Keen to get started? Then this section is just for you
- the basics on how to get FM3 into your application as quickly and simply
as possible.
Short Description:
Automatic Runtime File structure upgrading, and converting.
AutoUP Contents
Who should implement AutoUP?
- Anyone who understands the time and frustration of upgrading
client sites with the new file structures for every change.
- SQL Users, if you are using one of the currently supported drivers
/ databases, and you don't have a DBA.
- Those wanting to convert from 1 supported file driver to another.
Description
AutoUP allows your program to automatically upgrade it's own data files
when they need to be upgraded. This means that all you have to do is
change the dictionary, re-compile and distribute. AutoUP will do the
rest.
When you change your dictionary you can change anything. The file
driver, the password, add fields, remove fields, change keys, make
arrays bigger or smaller etc. You can also change field types, including
memos and strings etc.
AutoUP will also create the file if it does not exist. For this, please
ensure the CREATE file attribute is on (if you don't want to do this in
an SQL app, then checkout the
FAQ section).
Currently UnSupported Structures
- Dimensioned Groups(e.g.: MyDimGrp group,dim(5)).
- SQL Drivers do not support Memos (see the SQL
Tips and Tricks section for workarounds).
- SQL Drivers do not necessarily support the standard Date and Time
datatypes (see the SQL Tips and Tricks
section for details).
- SQL Drivers do not support Dynamic Indexes.
- SQL Relational Integrity on the backend.
- DAT file (Clarion 2.1) to TPS where the files are OEM collated.
The DAT file driver uses a different algorithm to the TPS file
driver to interpret OEM characters. So although byte-for-byte what's
in the file will be the same, the characters are interpreted
differently.
Note:
Ordinary Dimensions, and ordinary Groups are supported!
Implementation
Before applying AutoUP, make sure you have assessed your current
situation, and read the relevant documentation. AutoUP works differently
in different applications, and it is vital you have an understanding of
some of these things before attempting an upgrade. For example, AutoUP
is applied differently between ABC and Legacy application, Single exe
and Multi-DLL, and even between different file drivers. Please follow
the instructions for your specific scenario.
If you haven't already done so, run through the
Jump
Start section of this document.
Adding AutoUP to your Single exe ABC Application
On the Global Extension, AutoUP Tab, check on the file drivers used in
your application, including any you have used in the past. Goto
Template
Reference:
FM3 global extension template for more details.
Adding AutoUP to your Multi-DLL ABC Application
- For Multi-DLL ABC, the Global Extension should be added to the
DATA DLL only.
- On the Global Extension, AutoUP Tab, check on the file drivers
used in your application, including any you have used in the past.
- If you are using a Runtime File Manager and / or Connect Template
(SQL), then these procedures should also be
added to the DATA DLL. You can use the Template
Utility to do this.
You may Export the Runtime File Manager.
Note: SQL users in Clarion 6 Gold:
Due to a bug in Clarion 6, it is recommended you add the FM3 Global
Extension to the main exe app as well as the DATA dll. Make sure you
check on the necessary driver support, but leave the Connect Procedure
Blank! This will allow your program to be properly terminated, instead
of the process hanging at 90% CPU.
Adding AutoUP to your Single exe Legacy Application
- On the Global Extension, AutoUP Tab, check on the file drivers
used in your application, including any you have used in the past.
Adding AutoUP to your Multi-DLL Legacy Application
- For Multi-DLL Legacy, the Global Extension should be added to ALL
DLLs and the exe.
- On the Global Extension, AutoUP Tab, check on the file drivers
used in your application, including any you have used in the past.
- For each DLL app, add a source procedure named:
<appname>:FM3Init, where <appname> is the name of the
app.
- Open the Embed Editor for this procedure, and double click on
"Processed Code".
- Select VLDS_DLL - FM3 DLL Init Function from the list:

- Now, in the EXE app, Global Extension, Options Tab, click on the
Root DLL Init Names button.
- Fill in each of the names created above.
- If you are using a Runtime File Manager and / or Connect Template
(SQL), then these procedures should also be
added to the DATA DLL. You can use the Template
Utility to do this.
You may Export the Runtime File Manager.
Adding AutoUP
to your IP Driven Application
- Add FM3 to the Data Management DLL (That's in the IP Server app.)
- Remove FM3 from your Client app if it exists, whether it's a
multi-dll or single exe.
- If you are using a Runtime File Manager, then leave FM3 in your
Client app data dll, and add the RuntimeFileManager there.
- If FM3 remains in your client app, ensure that the IPDriver check
box is checked on in the Global Extension.
NOTE: It's a good idea to use a variable
for the connection string for the IPServer (i.e. in the owner field).
Otherwise, if you need to change it, FM3 will think you're making a file
change and request a version number increment.
NOTE: You must copy the FM3 dll
(c6fm3x.dll for Clarion6 applications located in the
Clarion\3rdparty\bin directory) to the ClarionDataServer directory
(where the Clarion IPDriver Server resides). If your data server dll
resides in a route directory, then the fm3 DLL must be in that directory
as well.
Some additional cases:
Case 1:
Note: If you would like FM3 to manage
local client-side files, then leave FM3 in your data dll or exe, and
check the IPDriver check box on the Global extension.
Case 2:
If you have applications that use the TPS files on the IPserver as local
TPS files, then these applications will need to use the upg.tps file
that exists in the IPServer database. These applications can be treated
as normal TPS applications (where adding FM3 is concerned). If you have
Multi-Proj, then you can use the Driver Substitution feature to make 2
exes from the same application - one that is IPDriver enabled and one
that is TPS enabled. Otherwise you will need 2 apps - one for IPDriver
and one for TPS.
Case 3:
Your data does not exist in the directory in the IPServer where your
data Server DLL resides. Insert the following code into your IPServer
DLL (in the 'FM3 Global Embeds | Start of Initialization section' global
embed point):
ds_SetUPGPath(<subdirname>)
!<SubdirName> would be set to 'Data' to exist in the (for example)
c:\ClarionDataServer\Data
directory).
Case 4:
You have data both locally and at the IP Server. You would like to
access the IP Server only if there is a connection available.
At this stage, the table management is not optional at application
level. In order to cater for this situation, you need to pull FM3 out of
your application and make 2 separate
applications
for upgrading - one for the IPServer files, and one for the local
files. In each app, you need to turn the
Generate
all Files checkbox off (This is on the Global Properties), and
manually force the compiler to generate each IPDriver file (for the IP
Driver management app) and then for each TPS file (for the local upgrade
app) - also on the Global Properties - Individual File Overrides tab. On
the Runtime File Manager of each new application you have just created,
you'll find the
RuntimeFileManager
Control Template. Set the Use Files option to
Files
Used in this APP.
Known issue: Once adding FM3 to the
IP_Server Dll, a
Memory Block free'd twice error
occurs on unloading of the dll. We are not certain of the cause, but
this will only occur when you close the IP_Server Dll. The message will
remain for about 20 seconds, and then disappear harmlessly.
Not
recommended: Further to this, you can set your IPREQ service to
not allow interaction with the desktop. This
will ensure the error is not visible - although be careful, because if
you have any errors, they will not be displayed, so Possible file
upgrading without changing the version number errors will cause your DLL
to freeze on the IP Server.
AutoUP and the Dynamic File Driver (DFD)
Because the majority of DFD usage is using handcoded data structures,
you will need to handcode the FM3 functionality
- You will need to make a call to the
ds_AddDriver function - if you have no other files using that
file driver in your dictionary (IOW this function should be called
once for each driver that your application's files use, and that FM3
is required to upgrade).
- After creating the DFD data structure, make a call to the ds_UsingFile
function. You will need to manually increment the version number in
this call each time you make a file structure change.
The alternative -
Creating a Separate Upgrading Application
Many times it's a good idea to have a separate application to upgrade
your datatables. This means that the upgrading of the tables is done
once at a scheduled time. Normally you would run this application from
your program install, as one of the last thing the installer does. You
can do this very easily as follows:
- Create a blank application based on your dictionary.
- From the Application | Template Utility menu, select the
CreateFM3ConvertorApplicationxxx utility.
- If you're wanting to include a SQL_Connect procedure in this
application, then check the Include a Connect
Procedure checkbox, otherwise leave it blank.
- You will see the RuntimeFileManager and SQL_Connect (if selected)
procedure(s) added to this application.
- You will need to setup the FM3
global extension template as you have in your application (for
settings pertaining to AutoUP).
- You will also need to create the necessary project defines in your
project to include the supported drivers.
- You will also need to modify the ConnectToSQLBackendControls
control template prompts (on the SQL_Connect window) to match those
in your application.
NOTE: If you don't want the create attribute on in your dct for your
tables that must be upgraded, then you can remove FM3 from your main
application (you will need to build your owner string if you're using
SQL manually), and Set the Applications Global Properties | File Control
| Create to "Create:None". In your FM3 upgrader application, you can set
this to "Create:All"
Where to from here...Assess your scenario:
You are adding AutoUP to a new
Application.
You are ready to run your application, make file changes, etc. Now read
about
How to make file structure changes.
You are adding
AutoUP to an existing Application.
The key here is that you do not already have an Error 47 or D00001
Invalid File Declaration present. This is especially important for
TopSpeed and Btrieve files. AutoUP keeps a history of every file
structure, and uses this to upgrade from the old structure to the new
structure. It cannot do this if the file structure is already wrong.
These structures are stored in the
upg.tps file.
Here are a list of suggestions for getting around this:
- Change your dictionary back to a non Error 47 or D00001 state for
the file, and run your program to allow AutoUP to capture the file
structure.
- Build your own conversion program for this file.
- Use the Dictionary Conversion tool.
The key is that there should be no Error 47 or D00001s upon initial
running of your AutoUP enabled application.
You are ready to run your application, make file changes, etc. Now read
about
How to make file structure changes.
You are adding
AutoUP for a cross-driver conversion (e.g. TPS to SQL).
Please ensure you have first read the "You are adding AutoUP to an
existing Application" section.
If converting to a SQL backend, it is recommended you read the SQL Tips
and Tricks section, as well as
Converting
your application to SQL.
You are ready to run your application, make file changes, etc. Now read
about
How to make file structure changes.
You are adding
AutoUP to a DET or DEF Application.
DET Users should follow any Legacy specific code unless otherwise
stated.
DEF Users should follow any ABC specific code unless otherwise stated.
You are ready to run your application, make file changes, etc. Now read
about
How to make file structure changes.
How to make basic file structure
changes
As mentioned previously, you can change almost anything in your file
structure. You can change datatypes, increase and decrease data lengths,
add and delete fields and keys, memo to string and vice versa, etc.
Please take note of the
Limitations
you can make to changing file structures.
Changing a File Structure
How to add / change the file version
number
In some cases, there may be a little more to be done, but for the most
part, this is all you need to do:
- Make the necessary change in the dictionary.
- Then, for each file you have changed, go to the file Properties,
Options tab. Either add or increment the following:
- Clarion 5:
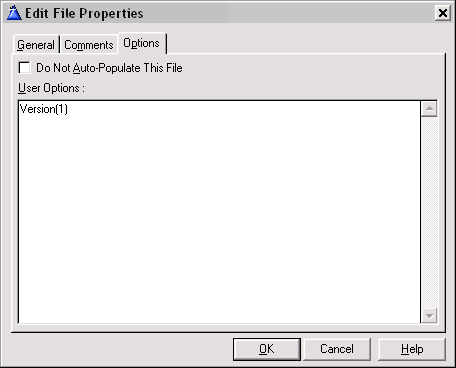
- Clarion 5.5 to Clarion 7:
Add a string type property, name it Version, and set the value
to 1 (or increment if already exists).
- Clarion 8:
Add a Predefined Option Property and select the File Version
Number (FM3) from the CapeSoft | FM3 group of file user options
and set the value to 1.

Important: Make sure you increase the
version number every time you change the dictionary. If you forget, a
warning messages will be displayed the next time you run the app. It is
strongly advised that at that point you end the program, and go back to
the dictionary, increase the version number without making any further
changes, and re-compile.
Notes:
- Never decrease the version number -
ever!
- You do not need to increase the version number of files you have
not changed.
- You do not need to change the dictionary version number.
- You do not need to make any changes to your app.
- You do not need to set and change the version number for an alias
file. It uses the parent file's version.
- You only need to add the version when you makes changes. FM3
defaults each file to Version 0 for files without a version.
- Do not use the Dictionary Browse and Convert functions!
- If using the Multi-Proj Driver Substitution feature, please
read the Hot
Topics section.
- FM3, and other 3rd Party tools use other user options. To add
multiple user options in the dialog, see below:
- Clarion 5:
- Clarion 5.5 and above:
How to change a file name
As mentioned above, in some cases of file structure changes, a little
more info is necessary to enable FM3 to perform it's duty. In cases
where you change the name of an object such as a file, you need to tell
FM3 what the OldName was, so that it can match it up during upgrade. To
do this, after changing the file name, add the following string user
option to the file properties options tab:
| Property |
Value |
| OldName |
MyOldFileName.tps |
or for Clarion 8 and up:
 Note:
Note: No quotes should be used!
You can make additional oldname attributes by adding a sequential (up to
14) number to the end of the attribute. This is useful if you find
you're having to rename a file again (which is especially useful when
upgrading to SQL):
| Property |
Value |
| OldName |
MyOldFileName.tps |
| OldName1 |
My2ndOldFileName.tps |
| OldName2 |
My3rdOldFileName.tps |
How to change a field name
As mentioned above, in some cases of file structure changes, a little
more info is necessary to enable FM3 to perform it's duty. In cases
where you change the name of an object such as a field, you need to tell
FM3 what the OldName was, so that it can match it up during upgrade. To
do this, after changing the field name, add the following string user
option to the field properties options tab:
| Property |
Value |
| OldName |
MyOldFieldName1 |
| OldName1 |
MyOldFieldName2 |
| OldName14 |
MyOldFieldName14 |
Note: No quotes should be used.
You can have up to 14 old field names listed.
How to change the file prefix
WARNING!! This
is NOT recommended for use, but is documented for use when absolutely
necessary. Please contact  before attempting this
change!
before attempting this
change!
Changing the file prefix was previously not allowed in FM3. FM3 uses the
file prefix as a unique identifier for the file in the upg.tps file. We
have now added the ability to change the file prefix. However,
this
is not advised! If you change the prefix, you should not use
the old prefix for any future file, as this could cause error 47's. FM3
will still associate this old prefix with the original file. Also, this
will only work if your new prefix is alphabetically directly after the
the old one! If you must change the file prefix, after changing the file
prefix, add the following string user option to the file properties
options tab:
| Property |
Clarion 8 Property Description |
Value |
| OldPrefix |
Old prefix for the table |
OldPRE |
Note: No quotes should be used!
Note: Do not make any other changes to
the file while performing this upgrade!
For more information, and syntax differences in Clarion versions, read
the
Dictionary User Options section.
How to prime new fields
When you add a new field, it is quite common to want that field to be
filled with data for all existing records in the file. AutoUP provides
an easy way to do this. Go to the Properties dialog of the field you've
added, and on the Options tab, add one of the following:
To prime a field with numeric data
| Property |
Clarion 8 Property Description |
Value |
| SetIfNew |
Default value of the field when added to the table |
44 |
To prime a field with character data
| Property |
Clarion 8 Property Description |
Value |
| SetIfNew |
Default value of the field when added to the table |
Hello World! |
To prime an autonumber field
AutoUP can automatically prime a new autonumber field for you. It will
start at 1 and increment by 1 for each record.
| Property |
Clarion 8 Property Description |
Value |
| SetIfNew |
Default value of the field when added to the table |
AutoNumber |
Note: SetIfNew AutoNumber is not
supported in SQL. Check out
AutoNumber in
the Dictionary User Options for more details.
To prime a field with an existing fields data
In some circumstances, you may want to prime your new field with data
from an existing field. A common example of this would be adding a new
Postal Address field, and priming it with the existing PhysicalAddress
field.
| Property |
Clarion 8 Property Description |
Value |
| OldName |
Default value of the field when added to the table |
PRE:FieldName (For SQL files, use
the SQl fieldname as it appears on the backend) |
Note: This variable will be set ONCE
before each file conversion, so the same value will be populated into
the new field for each record changed. If you are wanting to populate
each variable with a unique value, then you need to implement a callback
procedure. Follow the steps in
FAQ34 to change
values during the file upgrade.
Tip: To prime a field with an existing
field in the same table's data, use the oldname user option of that
existing field.
NOTE: For SQL files, using this will move the
data from the one SQL field to the other (in accordance with the
renaming field feature) - unless the oldfield still exists in the
dct. If the old field exists (in the dct) then the data will be copied
from the one filed to the new field, otherwise the oldfield will be
renamed to the newfield (and not exist on the backend).
To prime a GUID field
AutoUP will automatically prime each empty GUID field it finds during
upgrade. The field must be named GUID, or PRE:GUID and must be a
STRING(16). NOTE: Not available for SQL files at the time of writing
this doc.
To prime a field with a value from a function
AutoUP can automatically prime fields using a function (or variable).
Note that you need to prime variables for this function before FM3
initializes:
| Property |
Clarion 8 Property Description |
Value |
| SetIfNew |
Default value of the field when added to the table |
' & today() & ' |
Note: This function will only be called
ONCE before each file conversion, so the same value will be populated
into the new field for each record changed. If you are wanting to
populate each variable with a unique value, then you need to create a
process to run through the file and populate the new field with a
variable.
How to add / change a file password
(Owner)
For non-SQL drivers, the owner attribute serves as a way to password
protect your files. For SQL, the Owner attribute of a file serves as a
connection string. (For converting an encrypted TPS file to SQL, use the
OldOwner user option)
For security reasons, it's better to use a variable for this value, and
prime it inside your program. In order for FM3 to be able to manage the
file correctly, you'll need to prime this variable before FM3
Initialisation. The best place to place this code would be in the
Program
Setup Embed with the Priority set to
2000.
Please note, this priority
must be set less
than 3000 thousand to ensure it executes before FM3 Initialisation.
Alternatively, you can place it in the FM3:Start Of Initialisation
Embed.
NB: If you are adding
or changing the password for a file, it is absolutely necessary to
change the name of the file too, to allow FM3 to continue managing the
file. See Changing the name of a file above for more info.
To set the owner attribute as a variable, place an exclamation mark
("!") in front of the variable name. For example:
For more information on the SQL Connection String, see the
SQL
Reference.
AutoUpLimitations
See also the
SQL Reference for
SQL specific limitations.
General:
- You can't have dimensioned groups in an FM3 managed table.
- OLD Limitation: You used to not be able to change a DATE or TIME
to a LONG (or visa-versa) - as FM3 moved the data byte for byte
without interpreting the bytes.
BTrieve Specific:
- You cannot have the Memo=single attribute on BTrieve files.
Dictionary User Options
Introduction
Dictionary User options are a nifty feature in Clarion that allow you to
declare and prime custom variables for use in custom templates. These
user options are available at all levels, including dictionary options,
file options, field options, key options, and relation options. To add
user options to the dictionary, you go the Options tab of the desired
object's properties (so either in the file user options for the file
property and so on for the others). You can select what datatype the
option should be, and then give it a name, and a value. The datatypes
available are String, Boolean, Integer, and Ini. All FM3 User Options
use the String type. The most common FM3 user option is of a String
type. It belongs at File level, and is called Version. Here's a few
screen shots demonstrating this:
Right click on your file, and select properties.
Go to the options tab, right click on the list box, and select insert.

Ensure that the String radio is selected (Clarion 7 and below) or
Predefined (Clarion 8 and up), and then type the name of your user
option (Clarion 7 and below) or select from the list (Clarion 8 and up).
Finally, click in the right hand column of the list box, and set it's
value.
The following section is the FM3 User Option Reference. Level refers to
the object properties you need to use - ie, file, field, key etc. So, if
you need to add a Field Level User option, go to the field properties
dialog, and select the option tab there.
Dictionary User
Options Quick Reference
Here is a Quick Reference guide to all FM3 User Options.
Dictionary User Options In Detail
Version
This is the most important user option of the lot. In order for FM3 to
maintain a valid history of the data structures for a file, it must keep
track of the file version. This is a STRING user option added at FILE
level. You
must increment the value
of this user option after every change made to that particular file.
When you first declare a file in your dictionary, you do not have to add
this user option, as FM3 will assume the file is new, and therefore at
version 0. The next time you change that file structure, you must
increment the version number by at least 1.
Dictionary > Right Click on file > choose Properties > Select
Options tab > Right click on list box > Insert > Select String
type > Set the label to Version > Click OK > Click on the right
hand side of list box in line with the Version label > set value to 1
(or
n + 1).
For more information: See
How to make basic
file structure changes.
OldName(File Level)
When changing the physical name of a file, the OldName user option
should be added to the FILE level options. It should be of STRING type.
The label should be OldName, and the value should be the name of the
previous file.
If this is a constant, then your OldName user option should like this:

(Note the lack of quotation marks in the value)
If the name of the old file must be a variable, then you can enter this
in the value as follows:

(
Note: You must prime the variable before
FM3 initializes.
For more info, check the
How to change a file
name section of this doc.
OldName (Field Level)
When changing the name of a field, the OldName user option should be
added to the FIELD level options. It should be of STRING type. The label
should be OldName, and the value should be the old field name INCLUDING
the file prefix- e.g. :if changing the Product Name field from ProdName
to ProductName, then the OldName user option value would be PRO:ProdName
(where PRO is the Product file prefix). NO QUOTATION MARKS SHOULD BE
USED.
For more info, check the How
to change a field name section of this doc.
OldOwner
When changing the owner of a file (this is particularly useful when
upgrading an encrypted TPS file to SQL), the OldOwner user option should
be added to the FILE level options. It should be of STRING type. The
label should be OldOwner and the value should be the old encryption
password of the TPS file. You'll need to use quotes (for a constant) -
or a variable name (the variable must be set before FM3 Initializes).
Note: you cannot use this feature to upgrade encrypted clarion dat files
to tps.
Note: When using this feature to remove the encryption from a tps file,
you must change the name of the file (see
OldName
feature) simultaneously. You can only change the owner once for each
file (i.e. you can't have more than one oldowner user option for each
data file).
SetIfNew
This option is used when priming data into a newly added field. Check
the
How to prime new fields section for more
details.
UnRealField (SQL)
This is a SQL Specific User option, and is used specifically when
converting from TPS files to SQL files. This option should be added to
the String(8) field that is mapped to a SQL datetime. This string should
have a group following containing a Clarion Date and Time field. This
group should be declared OVER the string. This is a FIELD Level user
option, and does NOT require a value. Not being created correctly? Check
GQ1 in the FAQ section
RealField (SQL)
This is a SQL Specific User option, and is used specifically when
converting from TPS files to SQL files. This option should be added to
the Date AND the Time fields that are part of a group. This group should
be declared OVER a String(8) that is mapped to a SQL datetime. This is a
FIELD Level user option, and does NOT require a value. Not being created
correctly? Check
GQ1 in the FAQ section
AutoNumber (SQL)
This is a SQL specific user option. It tells FM3 to create the relevant
backend autonumber support on the SQL backend. For example, in MSSQL, it
creates an Identity field. Add this user option at FIELD level, and of
String type. Set the value to 1.
For MSSQL, you can choose to use the alternative syntax in order to
prime the seed and increment values. For example a value of 200,3 will
result in the autonumber field starting with a value of 203, and
incrementing by 3. Most common, and most recommended is to set the
increment to 1. e.g.: 1000,1 will start at 1001, then 1002, then 1003
etc. If you just leave the default syntax (1) then the seed and the
increment will be 1.
For other backends, only the increment portion is relevant, so you need
just enter (1) for an increment value.
Note: You can only create an Identity
field. You cannot convert an existing data field into an auto-numbered
field.
Not being created correctly? Check
GQ1 in the FAQ
section
Take a look at
Server
side Auto-incrementing for details on implementing the full
solution.
TableSpace (SQL)
This is an Oracle Specific User option, and it sets the TableSpace for
your oracle TABLES. This is a DICTIONARY or FILE Level user option of
String type.
For more information on the option: See
Oracle
TableSpaces in the SQL Section.
IndexSpace (SQL)
This is an Oracle Specific User option, and it sets the TableSpace for
your oracle INDEXES. This is a DICTIONARY, FILE, or KEY Level user
option of String type.
For more information on the option: See
Oracle
TableSpaces in the SQL Section.
ZeroNull(SQL)
This option is used when converting TPS to SQL. TPS does not support
NULL. SQL does. In SQL NULL is not the same as zero or blank. This
option tells FM3 to treat 0 and Blank data from TPS as NULL, and not
insert a 0 or blank in the backend. This option can be used a
DICTIONARY, FILE, and FIELD Level.
For more information: See the
Hot Tips
section in the SQL Section.
OldPrefix
WARNING! This action is not recommended unless absolutely
necessary. In order for this to work, you must follow the rules. This is
explained in detail in the AutoUP Section. For more information: See
How to change a file prefix.
IgnoreDriver
This option is used when converting Clarion DAT files to TPS.
For more information: See
Ignoring Pre-Existing
DAT files in the Overrides Section.
FM3IGNORE
This FILE Level user option surprisingly enough tells FM3 to
categorically ignore the file. FM3 will not manage this file at all. If
the structure changes, you will get an error 47 or D00001. It's a String
type, and takes no value. The existence of this user option means the
file is ignored, regardless of the value.
CreateConstraints (SQL)
This option (if set to 1) will force FM3 to create your unique keys as
constraints on the backend if you are using DCTMasterKeys = 1 (which
will default to creating unique keys as indexes).
AddDateTimeChangedTriggers
(SQL)
and
File:AddDateTimeChangedTrigger (SQL)
This option (if set to 1) will add a trigger to the file on the SQL
backend to stamp the changed date and time of the SQL file into the
gMSSQLFile (that matches that table). This is useful if you are
caching tables and need to know when to refresh the table. You can
store the date, and just check the stamped date when you need to
check whether to refresh the table or not. Your prop:sql to check
the file would look something like:
MySQLDummyFile{prop:sql} = 'select ds_field1, ds_field5 from
dbo.gMSSQLFile where ds_field1 = ''dbo.MyFile'''
ds_Field5 would then contain the datetime (in currenttimestamp
format).
DctMasterFields
(SQL)
This is a DICTIONARY and FILE Level user option. It takes a value of 1
or 0. Please see the SQL Field Management
Section before using this user option.
DctMasterKeys (SQL)
This is a DICTIONARY and FILE Level user option. It takes a value of 1
or 0. Please see the SQL Key Management
Section before using this user option.
DctMasterField
(SQL)
This is a FIELD Level user option. It takes a value of 1 or 0. Please
see the SQL Field Management Section
before using this user option.
DctMasterKey (SQL)
This is a KEY Level user option. It takes a value of 1 or 0. Please
see the SQL Key Management Section
before using this user option.
ForceSQLDataType
(SQL)
This is a very handy little user option. It's a FIELD Level User
option, and does exactly what it says. It will force a certain SQL
Datatype on the backend for the field. This comes in handy when
wanting use use the Binary Datatype, or the UniqueIdentifier, or force
another type for the field. Simply set the value to the desired SQL
datatype.
Please note: This leaves the ball in
your court to ensure the forced datatype matches, or is compatible
with the dictionary structure. In other words, if you try to force a
datetime datatype on a decimal field, you will get an error 47 or
D00001.
Not being created correctly? Check GQ1 in the FAQ
section
If you are supporting multiple backends then checkout the FAQs
section on how to Force a different datatype for each backend
you support.
DisableUniqueKeyNameCheck
This is a Dictionary User Option that is used to suppress the assert
warning that is generated by the template is a key has the same name
(external name) as another key.
Some Examples:
| ForceSQLDataType |
tinyint |
| ForceSQLDataType |
varchar(50) |
| ForceSQLDataType |
uniqueidentifier NULL ROWGUIDCOL
DEFAULT NewID() |
CaseSensitive
This is a field user option that is used to force case sensitive
collation for that field in MSSQL (at the time of writing (in Fm3
v4.91) only MSSQL is supported). In the Clarion dct, Case Sensitive
sorting is associated with a key, whereas in SQL, the case-sensitive
collation is on the field level. This option is particularly useful
for GUID fields (where it is automatically applied). This is to ensure
uniqueness of a key that is case-sensitive.
IgnoreDuplicates
This is a key user option (used when converting TPS to SQL) which,
when set to 1, suppresses the warning message when an attempted record
insertion is performed and a unique key is violated by the insertion.
The record is simply discarded. NOTE: You must use an external name
for the key.
Overrides
You may, for some reason wish to override FM3's default behaviour.
This section provides some of those options, and when and why you
would use them.
Ignoring Pre-existing DAT files
FM3 automatically searches for any pre-existing DAT files that you may
be converting to TPS. If your application does not have pre-existing
DAT files then you can disable the search that FM3 does for them. This
is necessary when you have DAT files of the
same name as your new TPS files, and they are in the same directory.
For example: App 1 uses file Customer.dat and App 2 uses file
Customer.Tps, but the two "Customer" files are unrelated.
- To set this option for all files:
- Go to the Global Extension Options Tab.
- Check on the "No pre-existing Clarion files" checkbox.
- To set this option for a specific file:
- Go to the Dictionary.
- Open the File Properties Dialog.
- On the Options tab, add the following String User Option:
| Property |
Value |
| IgnoreDriver |
1 |
Note: For more information, and syntax
differences in Clarion versions, read the Dictionary
User Options section.
Ignoring a particular file
If you wish to ignore a particular file, for whatever reason, then you
can do this by using the FM3IGNORE switch. If you ignore a file then
it is removed from FM3's sight, as if it didn't exist in the
dictionary. This includes the ability for C-Scan to scan the file, if
it is a TPS or Btrieve file. If all you want to do is make it be
ignored by the File Manager 3 template then use the "Exclude files"
button on the Runtime
File Manager Extension.
- To set this option for a specific file:
- Go to the Dictionary.
- Open the File Properties Dialog.
- On the Options tab, add the following String User Option:
| Property |
Value |
| FM3IGNORE |
1 |
Notes:
In this case, the value can be left blank.
For more information, and syntax differences in Clarion versions, read
the Dictionary User Options section.
Downgrading files
By default FM3 prevents your Topspeed, Btrieve, and SQL files from
being accidentally downgraded.
By default it allows downgrading of Clarion files, this is a side
effect of the support for pre-existing Clarion files. To disable the
automatic downgrading of DAT files, see the Ignoring
Pre-Existing DAT files section above.
If you want to force a downgrade of a file for any reason then you can
attempt it by placing /Downgrade on the command line when running the
program.
For example: c:\myexedir>myexe /downgrade
Here's an example circumstance when this may be required:
- Your clients have version 1 of your app (with FM3 enabled).
- You ship them version 2. They omit to take a backup of the data
before running the new version.
- The new program runs and updates one or more files. However
there is a major problem in your program necessitating a move back
to version 1 of the EXE.
- Usually FM3 would *not* downgrade the files from Version 2
status, but if you run the Version 1 exe with the /Downgrade
switch then FM3 will downgrade the files back to version 1 level.
The UPG file (Upg.tps)
The UPG file is what allows FM3 to work it's magic! But, how? you
ask...trust me, it's magic! <g>
The upg.tps and data strucutures MUST BE IN SYNC before making any
additonal changes to the tables are made.
When do I distribute the UPG file?
| Case 1: |
You've got a new app that you are distributing to new
clients. You are using any file driver. |
| What you do: |
You DO NOT distribute the UPG file. It is created, and
managed for you, at the client's site, automatically. |
| Case 2: |
You've got an existing app you want to upgrade. The app
currently uses Clarion DAT files (maybe it was written in CPD
or CDD). You may or may not be converting the data to the
Topspeed / Btrieve file formats. |
| What you do: |
You DO NOT distribute the UPG file. It is created, and
managed for you, at the client's site, automatically. |
| Case 3: |
You have an existing app using Topspeed or Btrieve files.
You are thinking of doing an upgrade, but you haven't changed
any file structures yet. |
| What you do: |
Before changing the file structures, add FM3 to your app,
re-compile and distribute. You DO NOT distribute the UPG file.
It is created, and managed for you, at the client's site,
automatically. |
| Case 4: |
You have an existing app using Topspeed or Btrieve files.
You have already changed some file structures in the
dictionary since you distributed the program to your clients. |
| What you do: |
If you can revert to Step 3 then do so. |
| Alternative 1: |
Add FM3 in the normal way. Upgrade the existing clients to
the new version using one of the older methods (i.e. using the
CW IDE or Conversion programs). From then on later versions
will upgrade automatically. If you were using the DC Data
Convertor templates, then this is probably the route you'd
take. Make your last data convertor conversion application.
You can either include this in the installer - and only run it
when the installer does not find the upg.tps file, or handle
the clients on a case -by-case basis (i.e. manually). You will
then need to ship the upg.tps file in your installer (with
version 1 records in it) - and only install it if the upg.tps
file does not exist already. |
| Alternative 2: |
Add FM3 in the normal way. Compile a version of your app
using the OLD dictionary structure. Compile and run the EXE.
Distribute the generate UPG.TPS file to the existing clients
with the next upgrade. You do not need to ship it to new
clients, or to clients who have already received it once. Make
sure that in your install, you set the installer to only
install the UPG.tps file if it is non-existent on the clients
machine. |
Forcing the position of the UPG file?
By default the UPG file is placed in the application directory, in the
same place as the calling program. In certain circumstances you may
need to override this. If for example you access the data from a
number of EXE's, stored in different locations, or if you don't have
write access to the application directory, then it makes sense to
store the UPG file in the data directory.
In fact, there is a strong case for getting the UPG file to appear in
the data directory.
Here are some of the advantages for this:
- When the user backs up the data the UPG file is also backed up.
- If you take a copy of the users data for support reasons then
the UPG file is included.
- On a network, the data directory is likely to be shared, but the
application directory would probably not be shared.
To set the position of the UPG file, use the ds_SetUPGPath()
function. This should be called in the FM3:Start Of
Initialisation Global Embed. Note: you must load the path (if
you're using a variable).
Note for SQL
users: If you are using SQL, then one cannot store the
upg.tps file with the data, so it needs to be stored somewhere else.
Here are some options:
- Option 1 is to have a common directory that all the users can
access (although this isn't always possible with an SQL backend).
- Option 2 (if your user's exes don't all have access to a common
directory) is to assign an "always install from this machine" that
keeps a local copy of the upg.tps file that it references - and
then run the conversion application from the installer.
- Option 3 (if you don't have the ability to restrict which pc the
user installs on) - if every installed copy of the app runs every
version - so even if each install maintains their own copy of the
application, it doesn't matter who installs from where, because
they all will have an up-to-date upg.tps file (albeit multiple
copies of the upg.tps file).
- Option 4 (if there's a possibility that they will run the update
from a machine that did not install the last update - and has not
run the exe since the last update) then you will need to ship a
default upg.tps file with all the possible versions in - although
this is definitely the worst possible option.
Some more details regarding the UPG.tps file For
those that care:
The versions contained at the client site are the ones that have been
entered into his UPG file. He doesn't need other structures (other
than that match his dataset) - but if his data structures are not in
the UPG file, he'll error 47 or D00001.
IOW if your UPG.tps file in your install does not contain version 3
(but does contain 1,2,4,5,6,7) - and his does (even if it only
contains version 3) and his file is version 3, then when you overwrite
the UPG.tps file at the client site, it won't be able to upgrade
because the UPG.tps file will not contain the matching version 3 file
structure.
Let FM3 maintain the UPG.tps file at the client's site.
Miscellaneous
Support for Multiple data sets
Non-SQL:FM3 does support multiple datasets
as is (for Non-SQL files). However, it may be a good idea to keep a
upg file for each dataset, thus ensuring backup and restore integrity.
Generally, changing the data path within the application is done by
calling SetPath() or FileDialog(). Simply ensure
that for each of these function calls within your program, you call
ds_SetUPGPath() directly
afterwards to ensure a upg file is created, and maintained in the
working directory. You'll need to call ds_CloseUPGFile()
before setting the path as well.
SQL: FM3 can only manage 1 SQL database at a
time. This is determined by the connection information given on the FM3:Connect
To SQL Backend Extension Template. Your program can still
access files contained within other databases, but FM3 is not able to
upgrade them. To upgrade files in a different database, restart the
program, connecting to the required database. Alternatively, you can create a separate conversion application
specifically for the other database, and run the conversion
application form your installation program to upgrade that database's
table structures.
Note: FM3 will still upgrade all
non-SQL files if necessary while running your program on an SQL
backend.
Very
Large Dictionary Support
If you have a very large dictionary, and possibly a lot of Aliased
files, together with FM3's initialisation code, this could extend the
allowed size of a Clarion module. In such cases, you may receive an
error such as: Link Error: Too many segdef in file Error(6):
cif$fileclose The handle is invalid.
First thing to try is to clear all your obj and obj32 directories,
restart your machine, ensure you are compiling in 32bit mode, and try
again. If the error persists, read on.
In such cases, you will need to separate FM3's init code into a few
blocks. The VLDS:FM3 Init Code Template does just this!
To add the VLDS:FM3 Init Code Template:
- Create a new soure procedure named FM3InitProc. (Don't
forget to check the 'Declare Globally' checkbox on the procedure's
properties).
- Open the embed editor, and add the code template VLDS:FM3
Init to the Procedure Code (or Process Code) in this
source procedure.
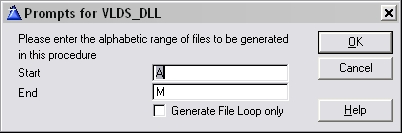
This prompts for 2 values: Start and End. It also contains a check
box called Generate File Loop Only? (You can ignore this unless
you're an avid handcoder that want's to do the coding yourself).
- Start is the alphabetic character of file names to start
generating from (typically "A"). and
- End is the Last alphabetic character of file names to generate
init code for.
It may well be that you'll need to split the init code into more
than one procedure (if after making one procedure you're still
getting the Too many Segdef error).
If this is the case, then you would break the init code by
specifying smaller alphabetic ranges for each init procedure.
E.g.: FM3InitProc might be "A" to "M", and FM3InitProc2 would
follow on from "N" to "Z".
- There is also a "File Loop Only" check box. This is to specify
whether to generate all init code, or just the file loop.
For the first init code template, you would leave this box
unchecked,
but for any further init code procedures you declare, you'll need
to check this box on,
to ensure you're not calling other FM3 init code more than once.
- When you're done adding your init procedures, you need to go the
Global Extension Options Tab, and specify the init procedures to
call (in the Very Large Dictionary Support group).
- On the Global Extension Advanced Tab, Add in each FM3 Init
code procedure in order in the Very Large Dictionary Support
section.
Screenshot:
How to handle a pre-existing
Error 47 or D00001
We STRONGLY recommend adding FM3 to your program while it "still
works". i.e., no existing error 47's. File Manager 3 keeps a history
of the file structures in it's upg file. This allows it to upgrade the
file later on. If your program is already in an error 47 or D00001
state before adding FM3, it will not be able to interpret the
structure. This is particularly important with TPS files. It is
recommended for all flat file systems though at least. In some cases
FM3 should be able to handle the pre-existing error 47 in SQL files.
If you do have pre-existing error 47, study the various options, and
follow these steps to solve the problem and allow FM3 to maintain your
database from here on out.
Option 1 - Undo the changes you made in the
dictionary.
- If you have a backup of the program in non-error 47 or D00001
state, restore that version, and add FM3 to the program there.
- Alternatively, if you are aware of the changes you have made to
the dictionary to cause the error 47, and it is easily undone,
then do so.
- If you are unsure of the structure of the current TPS file on
disk, use TopScan to view the file structure.
E.g.: TopScan File > File Layout.
Option 2 - Manually create a conversion program.
- Using the before and after file structures, you can manually
create a conversion program in Clarion.
SQL (for FM3 users)
SQL enabled apps with FM3 sometimes require a little more help from
you the developer to perform it's duties. Unfortunately, there may be
some mindset changes to make in terms of database design and best
practices, as Flat-file systems in Clarion are quite forgiving. Before
attempting a SQL enabled app, please read through our FM3
SQL Documentation.
If you are adding FM3 to a new SQL application, then you can pretty
much follow the AutoUP Implementation without a problem.
If you are converting to SQL, make sure you have familiarized yourself
with the Example apps shipped with FM3, and
read all the necessary documentation. If the
example apps don't work, it's pretty safe to assume that your app
wont, so get to grips with them first.
Adding the
Connect procedure
- Ensure you have added the FM3 Global
Extension.
- Run the 'Import the SQL Connect procedure' template utility.
You'll need to set the Global Owner variable in the SQL_Connect
window's "Connect To SQL Backend" Control Template prompts. To do
this, double click on the SQL_Connect window and click on the
"Connect To SQL Backend" control template to bring up the prompts
and enter the Global Owner variable in the field provided on the
General tab.
- In your FM3 global extension template, on the Auto Up tab, set
the "SQL Connect procedure" to 'SQL_Connect' (i.e. the new
procedure that the template utility just created).
AutoBUILD
Short Description:
Basic Database File Management built into your application.
Who should implement
AutoBUILD?
- Anyone wanting to implement AutoFIX.
- Those wanting to perform a check and upgrade of all files at
once, as oppose to each file converting when first accessed in a
browse for example.
- Those wanting to provide an effective, and easy way for their
users to do their own database management when required.
 Note: This is helpful in Support
scenarios.
Note: This is helpful in Support
scenarios.
Description
AutoBUILD adds basic Database File Management
routines to your application. It presents you with a list of your
data files and then allows you to do basic file maintenance on files
you select. To select specific files, click on the file label in the
list box.
DET Users Note: For maximum
compatibility with DET you will need to make a slight modification
to the FM3.TPL file. This change will be required if you are using
DET's variable file name feature. The FM3.TPL file is located in
your \clarion5\3rdparty\template directory and contains instructions
at the top of the file on the change required.
Runtime File Management
functions described
- Tag All: Mark ALL files to be
managed.
- Untag All: Clear ALL Marked files.
- Build: Rebuild KEY files (applies to
flat files only).
- Pack: Remove deleted records from
the files (applies to flat files only).
- Release: Unlock held records. This
is probably obsolete in most circumstances, as the technique of
locking/holding a particular record is no longer encouraged. You
would only use this function where you have used the hold
function to hold a record before performing an operation. If
your application GPFs before the record was released, then the
record would remain held. You can almost certainly hide this
button in your application (applies to flat files only).
- Fix: Call TPSFix to Fix corrupt TPS
files (This must be enabled on the Global Extension - Goto Template
Reference: FM3 global extension template for more details)
(applies to TPS files only).
- Freshen: Create a new file and copy
all the old records out the old file and put them in the new
file (applies to flat files only).
This effectively removes all duplicate entries (which might be
causing the Build to fail) and also can act as an effective
fixing of possibly corrupted files.
- Info:Examine number for records in
the file.
- Create: Create a non-existent file.
- Export: (Optional, requires xFiles
or jFiles.) Exports table(s) to XML or JSON format.
- Import: (Optional, requires xFiles
or jFiles.) Imports table(s) from XML or JSON format.
Some additional guidelines:
- Build is useful for updating key
files (particularly in Clarion dat files) - when keys need to be
rebuilt because the key file has got out of sync with the data
file.
- Freshen is the best for fixing
files, for getting rid of deleted records, and re-building keys
all in one.
- Fix must only be used if the file
doesn't come right with Freshen. Don't use Fix on working files,
as it can sometimes corrupt them. Fix is your last resort.
- Import and Export are optional and require xFiles (for XML)
and/or jFiles (for JSON) support. See below
for more information.
Implementation
Adding AutoBUILD to your application
- Add a menu item to your main menu. Call it File Manager, or
something similar. Set it to call a procedure called
RuntimeFileManager.
- Create a procedure in your app called RuntimeFileManager.
- Use the Window Template (NB: NOT the FM3 Runtime File Manager
Procedure).
- Populate the window with the Runtime File Manager Control
template.
- Make sure the Declare Globally option is checked in the
procedure properties.
- On the Global Extension, go to the AutoFIX tab, and select the
RuntimeFileManager procedure from the list.
Adding AutoBUILD to your
Multi-DLL application
- Create the RuntimeFileManager procedure in the Data Dll (ie
the DLL where all the files are declared).
- Go to the extensions for that procedure, and set the extension
to "Use all files in Dict".
- Export the procedure from the DLL in the normal way.
Note: The Runtime File Manager
Procedure template has been replaced by the Runtime File Manager
Control template. The procedure template is still included (so that
your program compiles) but it should be considered obsolete. At this
point you should delete your Runtime File Manager procedure and
re-add it again using the instructions above.
Distribution
You will need to ship the TPSFix.exe utility
with your application if you use Topspeed Driver data files. You do
not need to ship TPE files with your application. AutoBUILD will
create example files (TPE files) as and when required. TPSFix.exe
can be found in your \clarion\bin directory.
Disclaimer: As TPSFix is supplied by
SoftVelocity we recommend you read the instructions regarding it's
use. CapeSoft can not acceptresponsibility for the actions performed
by the TPSFix program.
Import and Export, XML and JSON
If you have either (or both) of
xFiles
or
jFiles
then you can easily add Export and Import buttons to your Runtime
File Manager window. Simply add the xFiles and/or jFiles global
extension to the app. Then you can add a button named
?Export
and/or a button named
?Import to the
window. The template will take care of the rest.
There are some options on the RuntimeFileManager control template
which allow you to have some control over how the import and export
are done. By default exports are allowed, but imports are not and
each table imports and exports from a single .xml or .json file.
For backward compatibility reasons the option to
Allow Multiple
Tables in the same File is OFF. If you are implementing this
for the first time in your application it is recommended to turn
this option on.
You can read more on the various template settings in the
template
documentation.
Note that xFiles and jFiles both have a 2 gigabyte file size limit
when exporting. This may may this feature unsuitable for tables with
very large numbers of records.
AutoFIX
Short Description:
Automatically trap possible TPS file corruptions.
Who should implement AutoFIX?
Those using TPS files, especially if you experience file corruptions.
Description
If you have a corrupt TPS file then this will most likely evidence
itself when the file is opened. By using FM3's AutoFIX feature you can
automatically trap when this occurs, and automatically invoke TPSFix
when your application is next run.
AutoFIX works by noting which file is being opened when a fatal crash
occurs. Unfortunately there is nothing we can do about the crash, but
the next time the program is run a message will appear noting that the
file caused an error, and offering to run TPSFix for you. If you
decide yes then a TPE file will be created and TPSFix will be invoked
in automatic mode. No other input from the user is required. After
TPSFix has finished the user can attempt to run the program again to
see if any progress has been made.
At this stage AutoFIX only supports the Topspeed File Driver.
Implementation
If you haven't already done so,
add the FM3 Global
Extension. Goto
Template
Reference: FM3 global extension template for more details.
Adding AutoFIX to your application
On the Global Extension, go to the AutoFIX tab, and check on the
AutoFIX checkbox.
Note: You must enable
AutoBUILD
in order for AutoFIX to work.
Recommendations
- CapeSoft recommends using the latest version of TPSFix
available, shipped with Clarion 6.
There have been huge improvements in this version over the C55
version.
- TPSFix isnota preventative tool. Do
not use TPSFix on non-corrupt files.
This means, especially in earlier versions of TPSFix, that if you
run TPSFix on a non-corrupt file, it may corrupt the original
file.
- It is important that you do not run TPSFix on a previous version
of the file.
This is because FM2 will build an example file based on the
current version specified in the exe, and not based on the
physical file which may be a previous version.
Distribution
You will need to ship the TPSFix.exe utility with your application if
you use Topspeed Driver data files. You do not need to ship TPE files
with your application. AutoBUILD will create example files (TPE files)
as and when required. TPSFix.exe can be found in your \clarion\bin
directory.
Disclaimer: As TPSFix is supplied by
SoftVelocity we recommend you read the instructions regarding it's
use. CapeSoft can not accept responsibility for the actions performed
by the TPSFix program.
Recommeded: CapeSoft recommends the use
of the 32bit version of TPSFix, currently shipped with Clarion 6 only.
AutoNET
Short Description: Automatic Program file
updating over a Network.
Having problems getting AutoNET to work? Check out the
AutoNET
TroubleShooting Section of these docs.
AutoNet and Vista:
Because AutoNet is copying program files (like EXEs and DLLs) from a
source directory to (generally) the Program Files directory, it
requires administrative privileges to perform this task. If your users
cannot run as administrators, then you will not be able to use AutoNet
as an automatic program updater.
CapeSoft no longer recommends the use of
AutoNET to update your applications because of compliancy with
Vista, Windows 7 and up. Instead, you should rather use a
client/server updater (like SafeUpdate 2) in conjunction with your
installer.
Who should implement
AutoNET?
Anyone with a multi-user environment!
Those running applications off a network location experiencing
slow load times.
Those finding it really hard to keep every client (workstation) on
a network up to date with the latest version of the application.
Description
AutoNET is a utility (compile exe) designed to allow you to easily
upgrade program files (exe's, dll's, and others) over a network. This
makes updating your application much easier on a network as only the
server has to be updated. All the workstations will automatically
update themselves from the server.
This means that the application files can be stored locally on each
workstation without the normal maintenance overhead this implies. This
is important as it reduces network traffic and speeds load times on
workstations.
AutoNET works by keeping the directory on the server and the directory
on the workstation in sync. Each time your application runs, it checks
the files in the local directory against the files in the server's
directory. If any of the files in the server's directory have been
updated, or if new ones have been added, then they are automatically
copied to the workstation directory, and the application will be
restarted.
Note: Not only newer files are copied -
which means that if you need to downgrade (your application), you can
do so with ease as well. Any file type will be copied across. This
means you should take care that your data is in a different directory
to your application - otherwise if data files end up in the netpath,
these will be copied across - even if they are older than the ones
locally.
Once AutoNET is enabled, all you need to do is update the network path
with your program update, and all workstations will be automatically
updated!
Implementation
AutoNET uses 2 ini file settings: LocalPath and NetPath. These are the
directory on the workstation (client) and the directory on the server
respectively. You must ensure that the client has access rights to the
server directory, otherwise AutoNET cannot perform it's magic! You
will need to set these settings during your application installation.
If you haven't already done so,
add the FM3 Global
Extension. Goto
Template
Reference: FM3 global extension template for more details.
- Go to the FM3 Global Extension
- Click on the AutoNET tab
- Check the Enable AutoNET switch on.
The following 2 entry fields can be left blank to use their default
settings, or you may fill in your own values.
- INI File Name: The name of the INI file where the LocalPath and
NetPath settings will be stored. Default setting: See below...
- NI File Section: The INI Section name in the above described INI
file. Default setting: Application name
Tip: Use a ! in front of variable
names.
The default value for the INI File Name varies slightly.
- If left blank, it will default to AutoNET.log in the logged in
user's temporary directory as described below*. This is where you
set the LocalPath and NetPath settings for your app. It is also
where AutoNET logs it's transactions to.
- If you supplied an ini file name, but excluded the path (e.g.:
MyIniFile.ini), then this will default to the local
windows directory. This is where you place your LocalPath
and NetPath settings. The AutoNET log file however will reside in
the logged in user's temp directory as described below*.
- If you specify a full path and ini file name (e.g.:
C:\MyDir\MyIniFile.ini), then that's where you set LocalPath and
NetPath. Again, the AutoNET.log file will reside in the logged in
user's temp directory as described below*.
- If you want your ini file to reside in the current directory
(the exe directory or the data directory if you have done a
setpath) - then you must use the .\ indicator before the file
name.
*Definition: "The logged in user's temporary
directory"
- Win98: C:\Windows\Temp
- Win2K/XP: C:\Documents and Settings\<THE LOGGED IN
USER>\Local Settings\Temp
To Sync more than 1 directory:
Occasionally a programmer will write a program which needs 2 (or more)
directories to be synchronized. The templates only support a single
directory being synchronized. While it would be possible to have the
templates support more than 1 directory, it seems that the method used
by each developer to identify the directories changes a lot.
Therefore, in order to give you maximum flexibility, an Embed point
has been created. It's a global point called FM2 - Manually Sync More
Directories. In this embed point you can identify directories that
need to be sync'ed using the ds_SyncDirEx function. For example;
If ds_SyncDirEx('q:\mydir1','c:\mydir1')
halt
End
If ds_SyncDirEx('q:\mydir2','c:\mydir2')
halt
End
Obviously you are then free to identify the directories in the way
that suits you best.
Note: You can use the additional
LogFile parameter: ds_SyncDirEx(NetPath, LocalPath, Logfile), where
LogFile is the AutoNET.log file, or whatever file you have specified
for AutoNET logging.
Note: Your application must have access
to the AutoNET.exe application to make use of the ds_SyncdirEx
function.
Notes
- ForMulti-dll applications, enable the
above described in your Data DLL application (although in some
situations, depending on 3rd party products, you may need to
activate this in your EXE as well). If you're using VLDS
- then you need to add this to your main exe as well as your data
DLL (note: For VLDS apps, don't enter the VLDS procedures in the
exe global extension - only in the data dll, otherwise your exe's
template prompts (in the FM3 extension) must be the same as the
data dll's settings).
- AutoNET is a Program Files
upgrade utility. You should not have any data files in your
program files directory.
- When you initially install your application, you will need to
set the LocalPath and NetPath ini file settings. This can be done
by your installation program.
- Example of ini file settings:
[YourProgram]
LocalPath=c:\YourProg
NetPath=x:\YourProgUpd
or
[YourProgram]
LocalPath=c:\YourProg
NetPath=\\YourServer\YourProgUpd
- Please note that all workstations
need the relevent access rights to the Network folder.
- The embed point to use immediately before the AutoNet
functionality is called, is the 'FM: Start of Initialization
section' embed point in your global embeds.
Note: When
converting
from a single-exe to a
multi-dll
application - you need to make sure that you've entered the correct
section name in the data dll (FM3 template).
Note: When using AutoNet in a
Terminal
Services environment, you need to use with caution. The
AutoNet.log file is created in a created user Windows directory. The
windows directory (used by Terminal Services) is a sub-directory
within the Terminal Server User's directory (C:\Documents and
Settings\<LoggedInUser>\Windows). You need to resolve the
AutoNet.log file that is located in that directory. Note: If the
autonet section in the original INI file gets changed, than you will
need to delete the ini file from the User's Terminal Services
directory so that a new one can be copied from the master directory.
Distribution
AutoNet makes use of the included AutoNET.exe program found in your
Clarion\3rdparty\bin directory.
This must be installed into your application directory when you
install your application.
Note: The source of AutoNet exe is shipped
as a project file with FM3. This means that you can edit the manifest
file to reflect your company in the trusted chain of applications
(rather than CapeSoft). To do this, you can edit the
autonet.exe.manifest file, and recompile the alu.prj project and
distribute the resultant autonet.exe file rather than the one included
in the FM3 install.
Troubleshooting
and Debugging
AutoNET also uses an INI file to log helpful info about the upgrade
process. We have chosen to place this file in a directory writable
across OS's. AutoNET writes to AutoNET.log in the logged in user's
temporary directory as described above*. The AutoNET.log file should
not be changed unless otherwise marked. AutoNET.log describes the
reason for performing an upgrade, and any errors that may have
occurred during the upgrade process.
If your application is not being updated, then check:
- That the AutoNET.exe utility is in the same directory as your
exe on that machine.
- That the machine has read/access rights to the directory that it
is trying to copy from. Open your AutoNET.log file, and a DOS
command prompt. Use the COPY command to attempt a DOS copy from
the NetPath to the LocalPath. If the files are not copied, then
you need to set the access rights of that machine.
- If you are running Vista or above, check that your user is able
to elevate to Administrative privileges (see AutoNet
and Vista for details).
If you are unable to solve the problem you're experiencing, send this
log file to
CapeSoft Support. Please
read the
Support and Debugging section for
details.
AutoNET.log
A useful addition to the AutoNET functionality is
the AutoNet.Log file. This is created in the Windows directory on the
workstation. This file is especially useful if you're not sure as to
why AutnNet is doing the things that it's doing. You should not change
the values in AutoNet.Log unless they are marked as changeable.
| [Version] |
AutoNet Version |
Version of the AutoNet.Exe on this workstation |
| [Request] |
NetPath |
The Request Section are parameters passed from the calling
program to the AutoNet Exe. |
|
LocalPath |
Location of program on the server |
|
Program |
Location of program on the workstation |
|
Parameters |
The name of the program calling AutoNet (so that Autonet can
call it back in turn). |
|
DelayTime |
Any parameters the calling program may have had when started
the first time. |
|
|
The length of delay (in hundredths of a second) that AutoNet
should allow for the calling program to complete shutdown.
This item is changeable. The default is 500. |
|
TargetOS |
The TargetOS of the calling program. i.e. 16 or 32.
Currently this parameter is not used. |
| [Program] |
|
The Program Section is updated whenever an AutoNET enabled
program is run. |
|
Name |
The command line which started the program |
|
Date |
The current date when the program was run (dd/mm/yyyy) |
|
Time |
The current time when the program was run |
|
Section |
The section name where AutoNet is getting its settings. |
|
IniFile |
The Ini file where AutoNet is getting its settings. |
|
NetPath |
The NetPath setting, as read from the above ini file. |
|
LocalPath |
The LocalPath setting as read from the above ini file. |
| Trigger |
nnn |
An explanation of what triggered the call to AutoNet. |
TIP: If you are using AutoNet then
there are 3 distinct directories that you need to keep in mind.
a) the shared data directory on the server. This should not be the
same as
(b)
b) the shared program directory on the server.
c) the local program directory.
AutoNet's job is to sync the server program directory with the local
program directory. Since you don't want data files flying around, you
should
definitely not have any data files in the server program directory.
Many people simply place the data files in a sub-directory on the
server.
Translation for AutoNet
Currently AutoNet uses the FM2.ini file inside the directory where the
AutoNet exe resides to translate the window text that it displays. The
following code is used to get the translation text:
mess1 = getini('AutoNet','M1','Upgrading
program files from the network...','.\fm2.ini')
mess2 = getini('AutoNet','M2','Please be patient....','.\fm2.ini')
mess3 = getini('AutoNet','M3','Initializing :','.\fm2.ini')
mess4 = getini('AutoNet','M4','Copying :','.\fm2.ini')
So adding translation simply means creating an ini file that will
contain the text above in the following INI file type format:
[AutoNet]
M1=Upgrading program files from the network...
M2=Please be patient....
M3=Initializing :
M4=Copying :
Hot Tips
Using
BLOB's in FM3 enabled applications in Clarion5
Use BDE to
help convert your dictionary to SQL
Use
Multi-Proj's Driver Substitution features to build multi-driver
support into your app.
Using BLOB's
in FM3 enabled applications in Clarion 5
Note: Clarion5.5 and up - BLOBs are
supported.
Tip: Our recommendation (and indeed a
good practice anyway) is to separate the BLOBS out from the data, and
put it in it's own table. With a single linking key field. This file
obviously never gets upgraded. The "parent" file is then free to
upgrade as often as it likes. There are a number of advantages to this
approach, quite apart from the upgrading. For example when doing
support you can leave the blob bit "behind".
| Code Example |
| MyParentFile |
file,driver('TopSpeed'),pre(MPF) |
| PK_MyParentFile |
key(IDCol),primary,nocase |
| FK_MyBlobFile |
key(MyBlobID),nocase |
| record |
record |
| IDCol |
long |
| EmailAddress |
string(30) |
| MyBlobID |
long |
|
end |
|
end |
| MyBlobFile |
file,driver('TopSpeed'),pre(MBF)! FM3IGNORE
User Option |
| PK_MyBlobFile |
key(IDCol),primary,nocase |
| BlobField |
blob |
| record |
record |
| IDCol |
long |
|
end |
|
end |
Click here to find out more about
FM3IGNORE.
I've got a BLOB in my table, but want to move over
to the correct method of handling BLOBs (only for Clarion 5 users)
You'll need to basically end up with 2 tables in your dictionary, you
can keep the main table (with the records) as the same label and
prefix, only the new BLOB field and file will have another name and
prefix. If you have an autonumbered field already in the file, then
you're in business. Use this field as the reference field in the BLOB
file. If not, then you'll need to use the fields in a unique key in
the original table as the reference in the BLOB file.
In your dictionary:
- You'll need to rename your file on disk (in the dictionary for
the BLOBless file) (Don't use the oldname useroption). Obviously
you'll need to create a new name for your BLOB file as well.
- Copy the table structure in the dct, and delete the BLOB in the
original table structure and increment the version number.
- Create the relationship between the two tables.
- Put the FM3Ignore useroption into the BLOB table. Note: You'll
have all the original fields in this table - but you can ignore
these.
In your program:
- Before FM3 kicks in (i.e. before the FM3 Initialization code),
check if you have the old file on your disk, and copy to the BLOB
file name, and rename the originalfile from disk.
- At runtime - FM3 will then remove the BLOB from the actual file,
but will leave the new file with the BLOB in it alone.
- You'll need to change your references to the BLOB field in your
application, as well as performing the lookup when dealing with
the BLOB.
Use
BDE to help convert your dictionary to SQL (Clarion 6 only)
Tip: BDE
is a Bulk Dictionary Editor shipped with FM3 to help you make the
changes to your dictionary, necessary for SQL and FM3 conversion, a
breeze! Read the
Full BDE Documentation
for details.
Use Multi-Proj's Driver Substitution features
to build multi-driver support into your app.
Tip: Multi-Proj comes with a Driver Substitution
feature. This means you can generate multiple exe's from 1 app (or
multi-dll apps), and 1 dct. For example, you maintain a TPS
dictionary, but generate AppTPS.exe, AppMSS.exe, AppODB.exe, etc. For
more information, see the
Multi-Proj docs.
From the FM3 side, you need to import the SQL_Connect window, but you
must leave all the SQL driver possibility switches turned off on the
AutoUp tab of the FM3 template. Otherwise, your SQL_Connect window
will open in your tps application as well. The SQL portion of the
application must be turned on in the MultiProj template, not the FM3
template. You can setup the SQL specific field user options in your
dct though (like ForceSQLDataType, AutoNumber, etc.) as these will be
ignored in the TPS version.
For more Hot Tips, see the
SQL
Documentation!
Helpful Utilities
CScan
Description
CScan is a program for scanning and editing data files. Similar to the
"Browse Database" feature in the CW IDE, and similar to the old
Clarion Professional Developer CSCN utility.
Screenshot:
 Note:
Note: If you're getting an Error 47 or
D00001 when attempting to browse a file, then it probably means that
your file declaration does not match that of the UPG.tps file. This is
normally due to either a restored backup (without the UPG.tps file
being restored as well) - or a data file that has been converted by
the dictionary convertor instead of ensuring that conversion is only
handled by FM3.
Formatting
To change the formatting of a column, after opening a file, point to
that column and press Ctrl-F, or Ctrl-P. You can enter any standard
Clarion picture.
To change the contents of a field simply type the new contents over
the existing contents.
Note: Because CScan saves the format of
your layout as you set it up, this can cause problems in the future -
particularly if you hide columns or alter column orders. If the file
browse gets completely out of hand, you can modify the c-scan.ini file
in the windows directory manually to tweak the fields displayed, and
the order in which they are displayed.
Security
To prevent unwanted scanning by your end user, C-Scan is protected
using a simple password. The password is "SCAN". This is not meant as
a security device, but to stop users accidentally scanning, and
possibly editing files. To turn off this feature go to Preferences in
the Help menu.
If you want to give your users access to C-Scan, but you don't want to
give them the SCAN password, then there is a dynamic alternative.
C-Scan has a "password of the day" feature. This password is
calculated as follows;
- Take Today's date, and write it in D11 format (i.e. YYMMDD) e.g.
990731 (for 31 July 99)
- Change each 0 into an A, 1 into B, 2 into C and so on. e.g. the
above becomes JJAHDB
C-Scan asks for the file's "Owner" name, if one exists, every time
that file is scanned. If you want to protect your files from scanning
by a sophisticated user, or another Clarion user, then use the Owner
feature to encrypt your data files.
Searching (and Replacing)
C-Scan includes the ability to search a column for a matching entry.
In addition to this you can also do Partial and Anywhere searches. A
Partial search will find a match, even if the search string is only
part of an actual field. In other words a partial search of the word
Cape will return a match in the string CapeSoft. An Anywhere search
allows you to search all the fields for the required value. If this is
switched off then only the highlighted column will be searched. Choose
the Search menu option after opening a file to search the file. Search
and Replace is also supported.
Distribution
You are free to install CS.Exe on any computer, provided that an FM3
enabled application is running on that computer. This means that you
can install C-Scan on your clients computer which can assist you with
debugging, and supporting your program. C-Scan is compiled in local
mode, and doesn't require any DLL's.
Btrieve
The current release of C-Scan does not support Btrieve. However an old
version of C-Scan is available from our web site (
https://www.capesoft.com/ftp/public/cs.zip).
The older C-Scan requires also that you install some btrieve DLL's.
These DLL's are included in the cs.zip file.
UPGView
Description
UpgView is a utility for viewing the Upg.Tps file. This is a useful
debugging tool to see why a particular file won't upgrade. It is not
intended as an End-User tool, but rather as a tool to assist
developers.
ScreenShot:
 Import from another UPG file
You can use this option to merge 2 upg.tps files together. This is
typically useful where some versions of tables exist in a UPG.tps file
and not in another - or where you would like to merge the dataset of 2
different applications into one folder (each having an individual
UPG.tps file).
Print File Layout
To print a copy of the file layout, for any particular version of the
file, simply highlight the file and choose "File Layout" from the
Reports menu.
Analyse File Changes
To view an analysis of the changes to a file structure, highlight the
file label and choose "Analyse File Changes" from the Reports menu.
This lists all the versions of the file, and the differences between
the versions.
ScreenShot:
 Distribution
You are free to install UpgView.Exe on any computer, provided that an
FM3 enabled application is running on that computer. This means that
you can install UpgView on your clients computer which can assist you
with debugging, and supporting your program. UpgView is compiled in 32
bit, Local mode, and does not require any DLL's.
Bulk Dictionary Editor (BDE)
Read the
Full BDE Docs here.
Errors - Runtime, Compiler, Program GPFs or
Hangs
All FM3 errors are now prepended with the "FM3"
identifier in some way, i.e.: "FM3: bla bla", or "FM3 Error: bla bla".
If you are getting errors without a reference to FM3 in them, then
they are not FM3 errors. If you are not convinced of this, use the FM3
Debugging functionality to see if the error
appears there. If it does, send the Debuglog, together with the error
screenshot, and detailed description of how to repeat the error to
Support.
C7 specific compile errors
Program GPFs or Hangs
Runtime Errors Related to FM3
| Compiler Errors |
| Error: |
Assertion failed on line: 303 in file
abfile.clw. Message: You are calling CLOSE(thefile) instead
of FileManager.close(). Shall I GPF? |
| Cause: |
ABC is doing a rather over-enthusiastic check of the CLOSE()
statement, initially useful when converting your Clarion /
Legacy code to ABC. |
| Reason: |
FM3 does not use ABC code, so the ABC File Manager is
complaining. |
| Solution: |
You can safely click on No, then there are 2 ways to
eliminate these errors:
- Go to your Project Properties and turn off debugging by
"Building Release System", or setting Debug mode to "Off".
- Edit the ABFILE.clw. (Comment out the assert on that
particular line in the abfile.clw - which is found in your
Clarionx\libsrc directory). If you want GPFReporter and
FM3 to co-exist, then you need to do this.
|
| Error: |
Compile Error: Link Error: Too many
segdef in file Error(6): cif$fileclose The handle is
invalid. |
| Cause: |
The main program module is too big for the compiler. |
| Reason: |
You're possibly using FM3 on a very large dictionary with
lots of aliases and FM3 user options. This causes FM3 to
generate a lot of initialization code. |
| Solution: |
Use the Very Large Dictionary Support Code template to split
the FM3 initialisation code between multiple modules. See the
VLDS section of
the docs for details on how to do this. |
| Error: |
Error Occurred: 37000 [Microsoft][ODBC
SQL Server Driver][SQL Server]Zeile 1: Failed Syntax in the
File |
| Cause: |
The Compiler is trying to use a file driver that is not
compiled in. |
| Reason: |
There is no project define including the file driver into
your application. |
| Solution: |
Add the MSSDRV (or other depending on which compile flag
you're using) to the Project defines. |
| Error: |
FM3 warning: '<FieldName>' has a
non-unique external name. Invalid in '<FileName>' of
driver: <FileDriver>. |
| Cause: |
You have more than 1 field in a file with the same External
Name. |
| Reason: |
SQL requires a unique field name for each field in a table.
If you have not uniquely assigned an external label for each
field, this will cause a GPF in the conversion of the table. |
| Solution: |
Go to the dictionary, and ensure all fields have unique
External Names across the file. |
| Error: |
FM3 warning: '<FieldName>' of type
'<FieldType>' is invalid in '<FileName>' of
driver: <FileDriver>. |
| Cause: |
You file declaration is using a datatype that is not allowed
with the specified driver. |
| Reason: |
Usually when changing the file driver in the dictionary, the
IDE will warn you to change any invalid datatypes, but if you
used BDE, there may be a MEMO left behind which is not SQL
compatible. |
| Solution: |
If you are manually editing your dictionary then you should
never see this message, however if you have used a 3rdparty
tool to convert your dictionary to a different driver, then
you may have some field types that are invalid for the new
file driver. The compiler simply warns you of an invalid data
type for the new file driver. If you continue compiling you
will probably get an Error 47 or D00001 when FM3 tries to
convert the file.
If the type is blank, then you probably had MEMOs which BDE
was unable to convert to CSTRINGs (for SQL) and are now of
type blank in the dictionary. You need to set each MEMO to a
CSTRING in the dictionary. |
| Error: |
FM3 warning: Group 'PRE:MyGroup' has an
external name. Invalid in 'MyFile' of driver: MyFileDriver |
|
External group names were always overlooked by the compiler
until recently. If you have a external group name, this will
now cause a GPF in the file conversion process (in FM3). If
you have a really good reason for an external group name, then
ignore this assert - however you will probably experience a
GPF in the file-conversion process. |
| Error: |
Link Error: DS_FILEOPEN is unresolved in
file c:\Clarion5\xxxxxxxxx.OBJ (Repeated for a number of
functions) |
| Cause: |
The FM3 lib is not being linked into the project |
| Reason: |
You're probably compiling in 16 bit mode - or else you have
removed the FM3 template from the application. |
| Solution: |
- Change your project to 32 bit mode. FM3 only supports 32
bit applications.
- OR (if you have removed FM3 from the application) remove
the FM2=>1 from the project defines in the project.
|
| Error: |
Link Error: Duplicate symbol:
SQLxxxxxxxxxx, file FM2.OBJ (Repeated for a number of
functions) |
| Cause: |
Two products are declaring the same procedure |
| Reason: |
You're using an old version of Fomin Report Builder. |
| Solution: |
Download the latest version of Fomin Report Builder from
their website - and include the 'Compatibility with MAV and
other ODBC templates' global template in your application. |
| Error: |
Syntax error: Unknown identifier:
GLO:<FileName>_NAME |
| Cause: |
FM3 uses a variable name for each filename. This filename is
set for each table when you upgrade your dictionary using BDE.
Either you have not used BDE to do the conversion to SQL (in
which case the filename is not set to use the variable) - or
else you have the 'Generate File Declarations in Modules'
checkbox (in the Global Properties - file tab) checked |
| Solution: |
- Make sure that the 'Generate File Declarations in
Modules' checkbox (in the Global Properties - file tab) is
unchecked.
- You need to check the 'Generate all file declarations'
checkbox on the FileControl tab of your application's
Global Properties.
- If you're using Multi-Proj's Driver Substitution
feature?
If so, you need to make sure that the Conditional Compile
Switch in the SQL_Connect procedure matches what you've set it
in the Multi-Proj driver substitution settings.
For example (using ODBC driver):
- In the Connect to SQL Backend Controls control template
in the SQL_Connect window, set the ODBC Driver Conditional
Compile Switch to UseMySQL.
- In your MultiProj extension (the one with Enable Driver
Substitution checked) - in your Override Driver
Possibilities button list (immediately below the Enable
Driver Substitution checkbox on the Resources tab), make
sure that your Conditional Define of the Topspeed to ODBC
is set to UseMySQL.
- On your Versions tab of the same Multi-Proj Extension
instance, you should have a version to create a project
for the ODBC version of your program, lets call it
ODBCPrj. In there (on the defines tab) you should have an
entry: UseMySQL=>1, and on the FileDrivers tab you
should have at least the ODBC and the ASCII file drivers
listed (you'll need any others as well if you've used the
file drivers that won't be substituted in the other
project.
|
| Error: |
Unresolved External ds_FILEOPEN in
xxxxxx.obj |
| Cause: |
FM3 has been removed from the application, but the project
define is still set to 1. |
| Solution: |
Remove the FM2=>1 from the project defines in your
application's project. |
| Error: |
Unresolved External, ds_SomeFunction |
| Cause: |
You have an old copy of the lib file on your hard drive. |
| Solution: |
Check the project to see which FM3 lib is being linked into
your program, and then search your drive for that lib. |
|
Error: |
Parameter type label ambiguous |
|
In Clarion 4 and above, the old File Manager procedure has
to be renamed to RuntimeFileManager. |
| Error: |
No matching prototype available for
ds_UsingFileEx |
|
Make sure you have checked the "Generate All File
Declarations" in your global properties. |
| Error: |
Syntax Error: Unknown Procedure Label
error on the line that calls the RuntimeFileManager |
|
Go to the Properties for the RuntimeFileManager Procedure,
and make sure the Declare Globally option is on. |
| Error: |
Duplicate Identifier: &Workfile |
|
Go to the Global Data Button, and delete the variable &
WorkFile from there. |
| Error: |
Unknown variable '%NoFm2' |
|
If you have converted your application from FM2 to FM3, you
may not have changed the Runtime File Manager control template
from FM2 to FM3. Open the Runtime File Manager window, delete
one of the controls to delete the control template, and then
add the FM3 File Manager Controls. |
| Error: |
Unknown variable errors in the
RuntimeFileManager window |
|
If you have set your RuntimeFileManager to use all files in
your dictionary, but you have not checked the 'Generate All
Files' checkbox in the Global Properties (File tab). |
| Error: |
Unknown Identifier: WorkFile and\or
WorkFileName in my SQLConnect or RuntimeFileManager windows. |
|
You've handcoded code using these two variables which
changed in 3.78. Change the code to use the LocFMx:WorkFile
and LocFMx:WorkFileName. |
| Error: |
'FM3 warning: You have more than one key
in your dictionary with the same external name:
<KeyName>. Files: <File1>, <File2> Driver:
<FileDriver> |
|
Some SQL backends require that unique constraints have
database-wide unique external names. FM3 will be therefore
unable to add non-unique constraints to the SQL backend if
there are duplicates in the dictionary, thus FM3 checks the
dictionary for you to find non-unique external names.
If you don't want FM3 to check the unique external key names,
then you can add the following Dictionary user option:
DisableUniqueKeyNameCheck
(1) |
| Error: |
Duplicate symbol: CloseODBCPerfData and
others. |
|
You have at least one other template that is trying to
include the ODBC function library into your application. To
prevent FM3 from linking this LIB file in, go to the SQL tab
of your FM3 Global Extension template, and uncheck the 'Link
in ODBC.LIB' checkbox. This will ensure that the ODBC LIB only
gets included once into the template. |
| Error: |
Duplicate
symbol:$GLO:<FileName>_Name for all my files. |
|
You need to uncheck the 'This is the Data-DLL' switch in the
DLLs that are not the data-DLL (for DLL applications). If this
is the EXE application of a Multi-DLL application, then you
need to check the 'This is part of a Multi-DLL project'. This
is only applicable to legacy applications - for Multi-DLL ABC
applications, you only need to add the extension to the data
DLL. |
| Error: |
Duplicate symbol: SQLAllocConnect (and
others) |
|
This is most likely caused by a clash with Fomin Report
Builder and FM3. There is a template available from Fomin to
suppress their use of the ODBC library. This will only apply
to local mode applications. |
| Error: |
You have 2 files which will be named the
same (<filename>.tps): <table1> and
<table2> |
| Cause: |
If you don't specify a filename for your tables, clarion
will use (up to)the first 8 letters to name the file on disk
(for TPS/flat files). If you have 2 files in your dct with the
same first 8 letters - you'll get both tables using the same
file. The second table to open the file will get an error 47
or D00001 - because the structure is different. FM3 is warning
you about this so you don't get to this place - and wonder why
you're getting error 47 or D00001. |
| Solution: |
Either specify a filename in the dct or you can add the NoAutoNameCheck file user option
to one (or both) of the tables. |
C7 specific compile errors
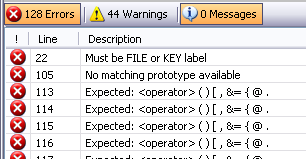
Clarion 7 has converted your c6 application erroneously. This is
normally fairly easy to solve.
- Close your application and the C7 IDE.
- Open the folder wherein your application resides (using Windows
Explorer).
- Make a backup of the files in the folder.
- Remove the <applicationname>.app, the
<applicationname>.sln and the
<applicationname>.cwproj.
- Rename the <applicationname>.6app to
<applicationname>.app.
- Re-run the conversion.
Program GPFs or Hangs
| I've
added FM3 to my program, and now it GPF's on close of the
program? |
| You are upgrading / converting files on the main thread.
This is causes a problem with the Clarion Threading issues.
Ensure you are only opening FM3 managed files on new threads. |
| I've
added FM3 to my program, and now I get a GPF on program
startup, or when I access a file? |
| You have probably used a CString for the Owner or Full Path
Name attributes in your Dictionary. Change these to Strings. |
| FM3
connects to the SQL backend, but when it tries to upgrade
datatables, it hangs - or it hangs while trying to connect
to the backend |
Check that you have correctly named your server (that FM3 is
connecting to the correct server). Sometimes the connection is
a bit more forgiving than the upgrading, so if your server is
MyServer\MyDB, and you enter it as \MyServer\MyDB it will
connect, but will have problems upgrading the tables.
Check that your dct owner variable matches the owner variable
used in the SQL_Connect window. Make sure you've put a ! in
front of the dct variable in the owner field in the dct:

If you're not sure, then run the application with the command
parameter: /ShowConnectErrors and the error will be displayed.
A logon window will also be displayed.
(Win7 64 bit MSSQL users especially): Sometimes a PC will not
reconcile the machine name, so try using the IP Address in the
Server name instead of the PC name. If you do do this, then
you need to re-import the Connect window into your
application, and set the Server Name (in the connect window
options at runtime) to the named instance of the server. For
example:
Server Name = MyServer\MyDB
Server = 192.168.50.50\MyDB !It is important that when
using the IPAddress in the Server, that the Server is entered
correctly with the named instance.
Note: For MSSQL:
If you are using SQL Authentication - then make sure that your
server is setup for mixed-mode Authentication.
If you are connecting from a remote machine, you may need to
enable the Guest account. Also, make sure that your
firewall/router is allowing/forwarding requests from the port
that the connection is using.
If you are using the default port, then make sure the port is
set to 0 on the connect window settings.
If you have just upgraded to Clarion 11 13505 or later, then
the loading of 3rdparty DLLs has moved, and so we've had to
change when the Connect window is called. You need to check
the "Init FM3 in the 'Initializing other ABC Clarion DLL'
embed (recommended for Clarion 13505 an up)" setting in the
FM3 global template. Caveat: If you have any code in the
Program Setup section of the data dll, then you need to move
that code to the 'Initializing other ABC Clarion DLL' embed
point (after the FM3 connect window is called).
Note: For MSSQL on Vista (where
the client is running on Vista):
You need to tweak some of the connection settings from the
command line prompt (at the client PC):
netsh interface tcp set global rss=disabled
netsh interface tcp set global autotuninglevel=disabled |
| My
program hangs as it upgrades a table. |
There's a couple of reasons that this could be occurring:
- You are using Superfiles, and you are attempting a table
upgrade (that's in the superfile) while another table in
the same superfile is already open. FM3 requires exclusive
(locked) read/write access to the file during conversion.
The most simple work around is to convert
all the tables on application startup - otherwise,
you need to open and close each file (in case of upgrade)
- before starting your procedures.
- Due to an apparent known issue with the MDI Sync
Templates, FM3 hangs during upgrade. To workaround this,
you can switch off this template on the local procedure
you're using to upgrade the file. ie, go to the procedure
extensions, and check the Disable MDI Synchronisation.
Alternatively, add AutoBUILD -
FM3's RuntimeFileManager Control Template, and this should
convert your files without a problem.
|
| I
am installing my FM3 enabled app on a Tablet 2005, and my
app is hanging, or getting an error: unable to open upg.tps. |
| Some people have reported problems running new FM3 enabled
apps on Tablet 2005 PC's. The workaround is to ship your
development upg.tps. |
| I'm using Clarion 6, ABC multi-dll, and my
application hangs on exit with the CPU running at 90%. |
| Due to a possible bug in Clarion 6, you need to add the FM3
Global Extension to your exe app as well as your data dll app.
Make you sure you check on all the necessary driver support,
but leave the Connect Procedure blank in the exe extension. |
| My program GPFed - and now it GPFs on startup.
If I rename the exe, it works for sometime but then starts
GPFing like the first one. |
| You are probably using TPS files - and one of the files has
reached the 2Gigabyte limit. AutoFix is registering it as a
corrupt file - and when the application runs, it goes to the
RuntimeFileManager for you to "fix" the file, and GPFs on file
open. You need to restore a backup of the file (from before it
reached the 2G limit), and truncate the file - either by
reducing the number and/or size of fields, or splitting the
table into 2 - the new table being a child of the existing
one. |
| Index out of range |
| If you're using SQL files, one of your files' version
number, may have gone backwards. Drop the gMSSQLFile (or
gODBCFile). |
| General FM3 Errors |
| Error: |
Unable to identify driver - use
ds_AddDriver driver to register drivers. |
| Cause: |
FM3 cannot identify the driver specified for the file it's
attempting to manage. |
| Reason: |
The driver has not been registered in FM3 by a call to
ds_AddDriver(). |
| Solution: |
2 options:
- Go the Global Extension and ensure that all file drivers
in your dictionary(past and present) are checked on.
- If handcoding, use the ds_AddDriver() function to
register the driver in FM3. See the Technical Reference
for details.
|
| Error: |
Unable to Upgrade - Not "Using" File
<file prefix> |
| Cause: |
The file has not been registered with FM3. |
| Reason: |
Possibly a wrong implementation of FM3 for your application
(Multi-DLL). |
| Solution: |
Check the implementation for your setup in the AutoUP
section. |
| Error: |
Possible file change without changing
File Version number. File involved : <filename> |
| Cause: |
FM3 has detected a difference between the file structure
being used, and the file structure stored by FM3 for that
version number. |
| Reason: |
You've made changes in the dictionary, and forgotten to
increment the version number for the file, or the default clw
of the data dll (or exe for single exe applications) was not
re-generated. |
| Solution: |
FM3 can upgrade the file if necessary, but you will not be
able to upgrade again unless you fix the error by performing
the following step without changing
the structure.
Go the dictionary, and increment the version number for this
file. Then recompile.
If you still get this error, then delete the default clw
module of you data dll (or exe for single exe applications).
Sometimes clarion does not regenerate the clw if you just
changed the version number.
If you still get this error, then probably the best thing is
to use UPGViewer to check the version
numbers for that table inside the UPG.tps file. That will show
you what the last version number for that (those) files is
inside the UPG.tps file. You need to set the version number to
the last version number +1 (in the dct).
For more info, see How to make basic file
structure changes. |
| Error: |
Unable to Open UPG file : cause
<error> |
| Cause: |
FM3 is unable to open it's own data file (upg.tps). |
|
If the errorcode is 3, then the
most likely reason is that the path specified for the upg.tps
file does not exist.
If you specified the upg.tps path using ds_SetUPGPath(),
then check that the path is valid and accessible. |
If the errorcode is 5 (Access
denied) then there's 2 things I'd check _very_ carefully.
a) open a dos prompt.
c:
cd "\Program Files\iCollecttrains"
be _very_ careful that you spell it _exactly_ as the error
describes it. I know, I know. the folder is there. I've lost
count of the folks who've assured me the folder is there, but
the above test fails. hmm dang client has decided to move
something - or something is misspelled or whatever.
b) assuming that test is ok, and the folder does exist. now
type
notepad test.txt
notepad (should) open - in the file write hello, and save and
exit notepad.
type
notepad test.txt
file still there? contains the word hello?
This is the second most common reason for access denied. Some
sort of access restriction by the server that prevents files
being opened in create / write mode.
Oh, and remember to do this test _on the machine that triggers
the error_... |
If the errorcode is 90, then it probably means that the file
is corrupt.
Your options are (in recommended order)
a) restore a file from backup
b) copy a upg.tps from your machine, or the machine of another
client.
c) rename upg.tps to upg.old (on their machine).
If one TPS file is corrupt then chances are other may be too,
so inspect your data carefully after the program starts
running. At the very least go to your Runtime File Manager
window, do a Tag-All, then "Info".
|
| Error: |
Unable to upgrade file which doesn't have
a prefix : <filename> |
| Cause: |
No File Prefix specified. |
| Reason: |
You have not specified a file prefix for this file in the
dictionary. FM3 needs a file prefix for each file.
Alternatively you may have handcoded a file into your
application. FM3 replaces the Clarion open function with the
FM3 - so all file opens proceed through it. If you have a
table without a prefix, then FM3 is unable to determine
whether the file is in the "Used File" list or not. |
| Solution: |
Go to the Dictionary and add a file prefix for the file (or
add a pre(<Prefix>) if you're handcoding the file
definition in your application/project). |
| Error: |
Unable to upgrade file - no file name
available |
| Cause: |
FM3 cannot copy your data to a temporary file. |
| Reason1: |
FM3 renames your data file to another name before upgrading.
This name is DSTMPxxx where xxx is a number from 000 to 999.
If none of these filenames are available (i.e.. they already
exist) you will get this error. |
| Reason2: |
Your data is on a different network machine, but the machine
that you are running your application from does not have
sufficient create/delete/read/write access rights/permissions. |
| Solution1: |
You probably have the "Don't remove old versions" check box
checked on in the Global Extension.
2 steps:
- Uncheck the "Don't Remove old versions" checkbox on the
Global Extension.
- Go to your data directory and delete, or move all the
DSTMPxxx files.
|
| Solution2: |
Check the permissions settings on the machine that houses
the data for the user that accesses the data. Make sure that
that user has file create, remove, read and write access all
allowed. |
| Error: |
Unable to upgrade file - Error creating
destination file <error> |
| Cause: |
The <error> above describes the cause. |
| Reason: |
FM3 could not create and open the destination data file. |
| Solution: |
The solution would depend on the <error>. |
| Error: |
Unable to upgrade file - Error opening
destination file <error> |
| Cause: |
The <error> above describes the cause. |
| Reason: |
FM3 could not open the destination data file. |
| Solution: |
The solution would depend on the <error>. |
| Error: |
Unable to upgrade file - Error reading
source file <error> |
| Cause: |
The <error> above describes the cause. |
| Reason: |
FM3 could not read the source data file. |
| Solution: |
The solution would depend on the <error>. |
| Error: |
Error Writing destination file
<error> |
| Cause: |
The <error> above describes the cause. |
| Reason: |
FM3 experienced an error while writing the data out to the
destination file. |
| Solution: |
The solution would depend on the <error>. |
| Error: |
Warning - Driver not located - GPF likely |
| Cause: |
FM3 is attempting to use a driver that has not been
registered in FM3. |
| Reason: |
A structure exists in the upg.tps file which uses a driver
that is not switched on in your app. |
| Solution: |
- Go to the AutoUP tab on the Global Extension.
- Check on all drivers used in the app, both in the past
and present.
If you are using the Dynamic File Driver, then you will
need to add the replacement driver as well (like 'MEMORY')
|
| Error: |
WARNING:
Possible downgrade... |
| Cause: |
FM3 has detected a possible Downgrade about to take place. |
| Reason: |
Either, you've used the /downgrade command line switch, or
an AutoDowngrade on Clarion DAT files. See Downgrading Files
for info. ...to be continued... |
| Solution: |
- Click Ignore to continue with downgrade.
- Click Abort to abort the program immediately without
downgrading.
|
| Error: "File has no
Prefix" |
| Are you using encryption for these files? If so read up on
using AutoUp with encrypted files here, as you probably aren't
setting the variable passwords soon enough. These variables
must be primed before the file is opened. To be completely
safe, prime them in the Program Setup embed priority <
3000. |
| Error: "The data file
is Invalid" |
| Are you using encryption for these files? If so read up on
using AutoUp with encrypted files here, as you probably aren't
setting the variable passwords soon enough. These variables
must be primed before the file is opened. To be completely
safe, prime them in the Program Setup embed priority <
3000. |
| Error: |
File Corrupt. Restart program to invoke
AutoFIX. Name : <FileName> |
| Cause: |
FM3 has detected a possible TPS File corruption. |
| Reason: |
<FileName> is corrupt. FM3 will call TPSFix when the
program is restarted and attempt to fix the file. |
| Solution: |
Restart the program. |
| Error: |
Errorcode received on open: <error> |
| Cause: |
FM3 cannot open the file. |
| Reason: |
FM3 does not know how to automatically handle this error
<error>. |
| Solution: |
You are highly unlikely to receive this error, as FM3
automatically handles most of the common File Open errorcodes.
If you cannot fix the problem based on <error>:
Send the details together with a debuglog to CapeSoft
Support. |
| Error: |
Unable to Open MDI window. |
| Cause: |
The program is trying to open an MDI window before the frame
exists, or when no frame exists. |
| Reason: |
FM3 initialises the RuntimeFileManager window before the
frame opens when it has detected a possible file corruption. |
| Solution: |
Remove the MDI attribute from the RuntimeFileManager window. |
| Error: |
M13: Memo file missing |
| Reason: |
Some flatfile systems have a separate physical file for the
memo contents. If this memofile is missing, then you will get
this message. |
| Solution: |
Locate the missing memo file (restore from backup) |
| Error: |
M14: Internal File Format Too Large. File
: <FileName> |
| Reason: |
FM3 interprets the file header memory space in order to
glean information about file structures (that Clarion uses or
requires). The memory required is larger than the maximum
specification - this normally means that the file is corrupt. |
| Solution: |
Restore the file from backup. |
| Error: |
FM3: Unable to upgrade. Access to the
existing file has been denied |
| Cause: |
FM3 requires exclusive access to data files in order to
upgrade them. |
| Reason: |
Another program has access to the data files (either another
instance of your application) |
| Solution: |
Ensure that all users have quit the program before
upgrading. You could make use of NetTalk's AutoCloseApps
control template to do this. |
| Error: |
This record was changed by another
station. Those changes will now be displayed. Use the Ditto
Button or Ctrl+H to recall your changes |
| Cause: |
- You're using MSSQL and are accessing the database from
multiple instances of the application (or threads in the
same application)
- You are using PostgreSQL and upgraded from TPS.
|
| Solution: |
- Use the /MultipleActiveResultSets=true driver switch
that you can add to the FM3 connect table (you need to do
this in your FM3 global extension template).
- See the Turning_off_the_CR/LF_conversion_(to_LF_only)
section of the FM3SQL documentation.
|
| Can't
fix Encrypted files |
| Fixing encrypted files means that your encryption code is
passed to TPSFix via a command line parameter. This means that
your encryption code can be detected (and is therefore not
secure). You can allow fixing of encrypted files (check the
"Allow fixing of encrypted files" checkbox in the
RunTimeFileManager control template) - but be aware that this
will be exposing your encryption code. |
Back to the top of the errors section
SQL Specific FM3 Errors
M11: Unable to open file.
Errorcode 90 received. Are you sure your Connection details are
correct?
If you're getting a Errorcode 90 on a SQL file, then checkout the
Connection Issues section of
the SQL documentation.
If you get Errorcode 90 on a TPS file, then it means that either the
file is encrypted (and the encryption code has changed - so FM3 can't
read the file) - or the file is corrupted. In order to get the file
error, run your application to output debug information and the
fileerror and fileerrorcode will be output to a DebugViewer (see the
Debugging & Support section for more
information).
If you're getting a Errorcode 90 on an IP driver enabled file, make
sure that you have recompiled the “Data Manager” application after a
dictionary change and registered it in the IP Server Administrative
Console. If it is already registered refresh the registration. For
farther details see the documentation for the IP driver.
M21: Error: File not in
Manageable Zone!
FM3 can only manage one database at a time. If the database name for a
specific file does not match the current database, then FM3 will not
be able to convert that database. You need to either:
- Move the offending table to the database that will be managed.
- Use the FM3IGNORE function to tell
FM3 not to manage that file.
M22: Error Creating / Opening FM3
System File: <FileName>
FM3 could not create or open the FM3 system file that it requires in
the database. Checkout the
Connection
Issues section of the SQL documentation.
M23: Error getting
IncomingVersionQ:
FM3 is attempting to upgrade a file that has not been registered
(using the ds_UsingFileEx function). This normally occurs if you've
handcoded calls to the FM3 functions, but have omitted the call to the
ds_UsingFileEx for one specific table.
M24: Error occurred
inserting/updating FM3 System file:
FM3 uses a file it creates on the backend to keep track of changes
that it has made to the database. This error will occur if FM3
attempts to insert (or modify) a record into the table. Depending on
what the file error is, will depend on why the insert failed.
M26: Error occurred executing SQL
Statement: <SQLStatement>
FM3 uses SQL syntax to modify data structures on the backend. This
syntax is compiled at runtime in order to re-structure the backend. We
have endeavored to cater for as many exceptions as possible, but all
the supported backends have different limitations and unique quirks.
Occasionally, FM3 will therefore compile a statement based on changes
to the dictionary, which cannot be performed on the backend (and which
it does not detect as illegal). Let us know about these exceptions and
we will build in a check for that specific condition before the SQL
statement is compiled.
M27: Unrecognised Datatype:
<DatatType>
FM3's query to the SQL backend has returned a datatype for a field
that it does not know about. Please inform: support at capesoft dot
com , and we will endeavor to support that field type (so long as it
can be matched to a Clarion datatype).
M32: SQL WARNING ABOVE - take
note!
A non-fatal error occurred when FM3 performed some file structure
changes on the backend. This will be displayed in the logfile.
M38: Could not locate key field:
<FieldName>
A component of the index\constraint could not be located in the list
of fields from the database. The database is corrupt and needs to be
repaired.
M39: Could not reconnect ASA:
<Reason>
Clarion sometimes loses the connection to the Sybase database, and
needs to be re-established (when maintaining files). Sometimes this
connection cannot be re-established again.
M43: Attempted using an Invalid
field type for creating a unique index/constraint.
A field in the key is being converted to a datatype on the backend
that cannot be used in an index\constraint. You need to either:
- Force the datatype to a datatype that the backend will support
as a component of keys (use ForceSQLDataType
for this).
- Remove that particular field from the key's components.
- Shorten the field (in some cases (like MySQL) - a maximum
CSTRING size is 256, so anything greater than this will be
converted to a text datatype, which is not legal in a constraint)
M44: Attempted creating an
index/constraint greater than the permitted size <IndexName>
Some backends do not permit the fields used in an index to have more
than a certain amount of characters (particularly large strings). If
you get this message, then you need to either:
- remove the key from the dictionary,
- remove certain fields from the key's components,
- remove the attribute that is forcing the key to be populated on
the backend (either the DCTMasterOfKeys or Unique key).
- Use a different backend (MySQL < 5 is particularly prone to
large keys).
M48: Attempting to create a key
with a reserved keyname: <KeyName>
You have used a label for your key that is not permitted on the SQL
backend that you are using. The best is to change the External name of
the key in the dictionary. Generally a good idea is to use:
file-prefix underscore and keyname in the external key name.
M49:
Attempting an illegal field type conversion. Field:
<FieldName> <FromType> - <ToType>
FM3 is trying to convert a datatype on the backend, and this field
cannot be converted to the type that it needs to convert it to. This
normally occurs when there is a pre-existing database - and now you've
added FM3 to your application to manage the database. If the field is
correctly typed in the database, then you need to use the
ForceSQLDataType
feature to force the field to the unconventional datatype. Otherwise,
you need to delete the field from the database.
An Example:
You have imported your tables into your dictionary from an SQL Server.
You have a variable type of text in the SQL Server. After importing,
the variable type used is a BLOB. FM3 will try and convert this field
to an image (which is the variable type normally used for a BLOB)
which is an illegal type conversion in SQL Server. To prevent FM3 from
attempting to convert this field you can either:
- Use the ForceSQLDataType
feature to force FM3 to use a text type character
- Redefine the variable type in the dictionary as a string or
cstring of > 8000 (which will make FM3 use a text type variable
on the backend). You will need to ensure that the string/cstring
has sufficient characters to handle the data handling in Clarion,
as this will be the size of the buffer allocated to the variable
in Clarion (even although there SQL data is virtually unlimited on
the Server side).
M70: Cannot load the MySQL
driver dll. Is it installed?|Contact your application supplier for
details.
Make sure that the MySQL client ODBC driver is installed on the PC
that is running the EXE requiring the connection. In your connection
window, you must use the correct MyODBC version to match what you
have installed on your PC.
| SQL
Related FM3 Errors |
| Error: |
(M20) FM3 cannot detect any connection
properties for this file: <FileName> |
| Cause: |
FM3 cannot connect to the database for <FileName>.
Checkout the Connection
Issues section of the SQL documentation. |
| Error: |
WARNING:
FM3 detects this application contains older file structures
than the current backend version. Please upgrade your
Program. FM3 suggests implementing SafeUpdate for automatic
program file upgrades across networks! Ending Program! |
| Cause: |
The application's file definitions are out of date or old,
you've imported the structures from your db to your dct,
you've restored a copy of your dct (with an old version), or
you've decremented the Version number of a particular file
(never, ever do this). |
| Reason: |
Possibly another site has a newer version of the exe which
has already updated the SQL Backend, but this exe has older
file definition versions. |
| Solution: |
- Use SafeUpdate to implement automatic program file
updates across networks.
- Alternatively, manually ensure your exe is up to date.
- If you're still not coming right, delete the gMSSQLFile
(or gODBCFile if using ODBC) from the backend. This will
be re-created by FM3 again.
|
| Error: |
Error locating the Database name for this
file: <FileName>
Owner string searched: <FileOwner> |
| Cause: |
FM3 cannot locate a Database to connect to for
<FileName>. Checkout the Connection
Issues section of the SQL documentation. |
| Error: |
File Manager 3 does not currently support
this Database through ODBC: <DataBase> Alternatively,
please check that you entered the database backend correctly
on the ConnectToSQLBackend Extension Template. Ending
Program! |
| Cause: |
FM3 does not recognise this backend <DataBase>. |
| Reason: |
Either you have misspelled <DataBase> or it is
currently not supported by FM3. |
| Solution: |
- Ensure you have typed it correctly as shown in the
ConnectToSQLBackend Extension Template Notes.
- Alternatively, if this database is indeed not supported,
disable FM3.
|
| Error: |
FM3 could not find the specified database
(<DataBaseName>) in the backend! |
| Cause: |
FM3 cannot connect to the Database specified in
<DataBaseName>. Checkout the Connection
Issues section of the SQL documentation. |
| Error: |
Unable to open FM3 System table:
<gSQLFileName> Error posted: <Error>. |
| Cause: |
FM3 cannot open the required FM3 system table:
<gSQLFileName>. |
| Reason: |
An error occurred: <Error>. |
| Solution: |
If you cannot solve the problem based on the error, send a
Debuglog to CapeSoft Support. See the Debugging
section. |
| Error: |
Unable to interpret SQL structure:
[columns] Error: <FileError> |
| Cause: |
An error occurred when FM3 attempted to retrieve the current
SQL file structure. |
| Reason: |
<FileError> should give you the reason. |
| Solution: |
- Check User Access Rights.
- Check that the SQL Server is online.
- If you are unable to determine the problem, send a
Debuglog to CapeSoft Support. See the Debugging
section.
|
| Error: |
Could not create Oracle TableSpace!
<FileError>
Press Ignore to create the table in the default tablespace.
|
| Cause: |
An error occurred during creation of a the specified Oracle
TableSpace. |
| Reason: |
<FileError> should give you the reason. |
| Solution: |
If you would like FM3 to continue and create the table in
the default TableSpace:
If you would like to fix the error, and not continue to create
the table at this point:
- Click Abort.
- Make the relevant changes to eliminate the error.
- If you are unable to determine the problem, send a
Debuglog to CapeSoft Support. See the Debugging
section.
|
| Error: |
WARNING: This table already contains
an IDENTITY FIELD : <TableName>
Ensure there is a maximum of 1 per file. |
| Cause: |
FM3 cannot create the identity field. |
| Reason: |
FM3 detects more than 1 identity field specified for this
table: <TableName>. |
| Solution: |
Go to the dictionary and ensure that you have only specified
1 field in the file as an Identity Column. |
| Error: |
FM3 has detected a SREAL datatype in your
Clarion Dictionary. Oracle does NOT support this datatype.
Please update your dictionary definition to datatype REAL.
FM3 cannot manage this file! |
| Cause: |
FM3 warns you of un-manageable datatype. |
| Reason: |
You have declared a field of SREAL datatype in an Oracle
driven table. |
| Solution: |
Go to the dictionary and change it to a REAL, or some other
supported datatype for this driver. |
| Error: |
FM3 has detected an INVALID datatype in
your Clarion Dictionary.
FM3 does not support this datatype: <DataType>
Please update your dictionary definition. FM3 cannot manage
this file! |
| Cause: |
FM3 warns you of un-manageable datatype. |
| Reason: |
Not all Clarion datatypes are supported by the various SQL
drivers. FM3 supports what the driver can handle, and in some
cases more! |
| Solution: |
Go to the dictionary and change <DataType> to a
supported datatype for this driver. |
| Error: |
FM3 encountered errors during file
structure upgrade.
Please review the "Debugging" and "Support" sections in the
FM3 Documentation,
or contact your application vendor for technical support! |
| Cause: |
1 or more errors occurred during FM3's upgrade process. |
| Reason: |
The reason would depend on the errors. |
| Solution: |
- Run a Debuglog of the behaviour. See the Debugging
section.
- Analyse the errors yourself, and fix the problem if
possible.
- If you are unable to determine the problem, send the
Debuglog to CapeSoft Support.
|
| Error: |
Could not configure your SQL Server as a
Linked Server! FM3 cannot manage this file! Error: <error> |
| Cause: |
Executing Microsoft Stored Procedure (sp_addlinkedserver)
returned an error. |
| Reason: |
Most likely related to user permissions. <error>
should give you more details. This is because in order for FM3
to automatically created a linkedserver, it needs to login to
the server with a login with sysadmin rights. If you don't
want to do this, you will need to create the LinkedServer
manually, and then use a login with dbOwner rights (see the FM3 SQL docs for this) |
| Solution: |
- Ensure the user has the required permissions and roles
for FM3 to function properly (Check the FM3SQL
docs - The SQL Database for details)
- Read the Microsft SQL Server Books Online for
information on the stated <error>.
- Ask your Microsoft SQL Server DBA to configure your
server to be a linked server, and set DATA ACCESS to true.
- If you are running SQL Server Express, then your server
name needs to include the computer name that the Server is
running on: Computer_Name\Instance instead of just
Instance or localhost\Instance.
|
| Error: |
Could not configure SQL Server for DATA
ACCESS! FM3 cannot manage this file! Error: <error> |
| Cause: |
Executing Microsoft Stored Procedure (sp_serveroption)
returned an error. |
| Reason: |
Most likely related to user permissions. <error>
should give you more details. |
| Solution: |
- Ensure the user has the required permissions and roles
for FM3 to function properly (Check the FM3SQL
docs - The SQL Database for details)
- Read the Microsft SQL Server Books Online for
information on the stated <error>.
- Ask your Microsoft SQL Server DBA to configure your
server to be a linked server, and set DATA ACCESS to true.
|
| Error: |
FM3 File error on final
open:<filename> : <driver> <error>
Please ensure you have the FireBird Client DLL installed on
your workstation: gds32.dll. |
| Cause: |
Trying to open an FireBird table. |
| Reason: |
Most likely your workstation does not have the FireBird
Client DLL installed: gds32.dll
or
<error> describes the problem. |
| Solution: |
- Obtain the gds32.dll. (This is installed when you
installed IBExpert www.ibexpert.com
or copy from FireBird Server.
- Take action according to <error> described.
|
| Error: |
S1000: Connection is busy with results
for another hstmt, t: M26, l: 0 |
| Cause: |
Multiple connections to SQL Server on the same thread. |
| Solution: |
- Prop:BusyHandling = 2 Must be set on the file before any
SQL file is opened - indeed this should be done before the
connection to the backend is made. A good place to put
this would be in the Program Setup before FM3 initializes
(there's a place you can add this to the driver option
string of the FM3 table used to connect to the backend in
the fm3 template). You can also try using the
MultipleActiveResultSets=TRUE option in the same place.
- Older versions of Clarion appear to have been more prone
to this error, upgrade your Clarion (if you're not running
the latest version).
- Some erroneous string handling expressions (especially
in the filter) can cause this error. Typically if you have
variables with the same name as clarion functions.
|
| Error: |
Driver Error (1): (10) ODBC.DLL Could Not
Be Loaded |
| Cause: |
The ODBC driver is trying to load a specified database
client driver that is not installed on this client machine. |
| Solution: |
- Make sure that you've installed the correct ODBC driver
on the client that FM3 requires. If you're installing
PostgreSQL, check out the driver that you need in the Hot
Tips section of the FM3 SQL Document
- Older versions of Clarion appear to have been more prone
to this error, upgrade your Clarion (if you're not running
the latest version).
|
| Error: |
S0002: Cannot find the object "dbo.Ass_LevelUser" because it
does not exist or you do not have permissions. |
| Cause: |
There is no linked server created (or created incorrectly). |
| Solution: |
You are most likely connecting from a 64 bit PC, which
requires the server name and the server instance entered into
the connect window.
If you don't have the facility for this, re-import the connect
window, and enter the settings correctly:
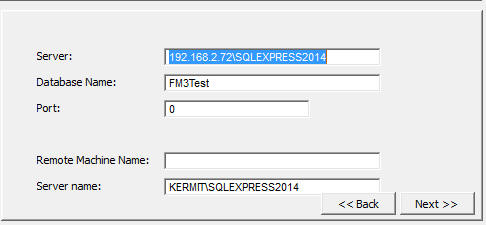 |
| Runtime
Errors Related to FM3... |
| Error: |
Untrappable runtime error - program
crashes at startup (during FM2/3 launching) |
| Cause: |
Possible corrupt UPG.TPS file |
| Reason: |
UPG.tps is a tps file - and is also vulnerable to the
weakness of the TPS driver. This means that very occasionally
the UPG.tps gets corrupted (which I think is what happened to
you). |
| Solution: |
You can minimise the damage by having a separate EXE to
upgrade your tables - and run this on upgrade, rather than
each instance of the application upgrading some tables as and
when it uses them (although you may still want to leave FM2
installed in those apps in case someone runs it before the
upgrade program kicks in - or without upgrading). The less
applications writing to the UPG file at any given point in
time the better. |
| Error: |
My program starts with the "Unable to
open MDI window (No application active) message" |
| Cause: |
You have a corrupt data file and the application is trying
to launch the RuntimFileManager window in MDI mode |
| Solution: |
You have 2 options (the first is preferable but may not be
possible for an immediate solution):
- Make the RuntimeFileManager window not an MDI child. If
you have a menu item for it then make sure the menu item
is set to NOT call it on it's own thread. (i.e. you do not
want to start a new thread when running the
RuntimeFileManager window.)
- A temporary fix, assuming for some reason you can't
recompile, is to edit the Win.Ini and remove the BadFile
setting. This is an entry in the win.ini file that tells
FM3 to run the RuntimeFilemanager and fix that file.
|
| Error: |
I've added FM3 to my IPDriven
application, and now I get a Memory Block free'd twice
error? |
|
This is a known issue. Once adding FM3 to the IP_Server Dll,
a Memory Block free'd twice error
occurs on unloading of the dll. We are not certain of the
cause, but this will only occur when you close the IP_Server
Dll. The message will remain for about 20 seconds, and then
disappear harmlessly. Further to this, you can set your IPREQ
service to not allow interaction
with the desktop. This will ensure the error is not visible. |
|
Error: |
File could not be opened. Error: Invalid
Filename (45). Press OK to end this application. |
|
Normally this occurs because you are relying on FM3 to set
the filename (in SQL applications) - but you've added the
FM3Ignore property to that file. The best option is to set
this in the dct, but you can also get FM3 to setup your
filenames (for the FM3Ignored files) in the Connect window, by
checking the 'Set filenames with the FM3Ignore user option'
checkbox on the control template prompts. |
Translating FM3 Error Messages
FM3 makes use of a translation file to translate error messages. The
name of this translation file can be set in the FM3 global extension
template (in the Translation tab). This can either be a variable or a
constant.
Checking the 'Make a blank translation file if non-existent' checkbox
will force a translation file (of the name specified) to be created
and populated with the default English text for each message. The
translation file is in an INI file type format as follows:
[Messages]
M1=Possible file change without changing File Version number. File
involved :
M2=Unable to Open UPG file : cause
M12=Please wait - Upgrading file
.
.
.
Thus to translate each message into another language, you replace the
English text with the text required. In Dutch this would be something
like:
[Messages]
M1=Possible file change without changing File Version number. File
involved :
M2=Unable to Open UPG file : cause
M12=Please wait - Upgrading file
.
.
.
Also implement translation into the AutoNet windows:
Translation
for AutoNet FAQ (Frequently Asked Questions)
If you're getting errors when converting to Clarion7, please check out
the C7FAQs
page on our website
Check out the Errors section for all queries on compile errors, runtime
errors, GPFs and program hangs.
NOTE: Please also check the FM3 forum for further FAQs:
http://clarion.capesoft.com/BrowseTopics?ThisForum=15
Please take note of the AutoUpLimitations
section of this doc.
- I'm using AutoUp and still getting Error 47 -
or "FIELDS D00001 - Component does not match physical file" (or my
SQL file is not being created correctly on the backend).
- When is it a good idea to delete the upg.tps file?
- When is it ok to decrease the file version numbers
in the dictionary?
- Does FM3 support programs that use Multiple Data
Sets?
- Does FM3 support programs using different
dictionaries, but sharing the same UPG file?
- I added FM3 to my application, but now it takes a
long time to load?
- I ran CScan, but it prompts for a password. I
tried the password you emailed me, but it does not work?
- I am having a problem with upgrading using an
Alias file?
- I changed a field from decimal(13,3) to
decimal(13,4). FM3 upgraded the file, but now the data values for
that field have been divided by 10?
- FM3 upgrades my files perfectly, but I cannot see
the name of the file displayed on the upgrade window?
- Is there any way to exclude a file from the
AutoUP?
- Is there a variable I can check inside the trigger
statements to make sure the triggers don't fire on an FM3 upgrade?
- How do I upgrade all my tables at startup?
- What do I do
when adding FM3 to an IPDriver application?
- FM3 upgrades my tables, but my data is getting
corrupted.
- How do I hide the upgrade window? Answer: Check the 'Hide the
yellow upgrade window' checkbox on the FM3 global extension
template.
- I was using Data Convertor templates, but want to move over to
FM3. How do I handle existing clients? See the upgfile
section of this document - particularly case 4.
- I'm changing a long to a decimal, but my data
is all wrong after conversion.
- I want to use my own routine to handle newer
file structures on the SQL database
- How do I change a field value during upgrade?
- How can I trap if a file is being (or has
finished being) upgraded?
- How do I create an upgrader
application?
- How do I set the location of the upg.tps file?
- I have incremented the version number in the
dct, but I still get the error message "Possible file change
without changing the version number error message.
- I'm getting FM3 SQL errors about a syntax error
near the Keyword ... ?
- Only my Primary Key is being created on the SQL
backend. Why aren't my other keys being created?
- I'm using DCTMasterKeys/DCTMasterFields but FM3 is
not creating / dropping Keys off the SQL Backend?
- I am converting TPS to SQL. No error messages pop
up, but my data is NOT converted to the new files?
- Does FM3 support the creation and maintenance of
File Relationships on a SQL backend?
- If FM3 supports ODBC, why can't I use FM3 against
any ODBC driven backend?
- Every time I run my app, FM3 "upgrades" my files
even though no changes have been made. (ie, I see the little
yellow progress bar window flashing up for 1 or more files.)
- The Connect window opens initially the app, if I
select an item from my menu, the Connect window re-opens.
- I have a Decimal(18,0) (in my dictionary) that FM3
converts to a Decimal(19,0). Why is this?
- Why is it necessary for FM3 to create a linked
Server on my SQL Server?
- Why can I not use the /TURBOSQL property for my
MSSQL tables in FM3?
- I cannot connect to my MSSQL database with the SQL
Server name, but I can via the IP Address.
- Where should the upg.tps be located in the case of
a SQL file server installation?
- FM3 does not create any of the tables on the
backend except the gMSSQLFile.
- I'm converting my TPS data to Oracle (or Oracle
Express) - but my unique indexes are not being added
- My application takes a long time to connect to the
SQL Server (or doesn't connect).
- How do I enable /MultipleActiveResultSets or
/BusyHandling (or other driver strings) when using FM3?
- Where should I put the upg.tps file
when I have multiple users using my SQL exe?
- My AutoNumbered key is not AutoNumbering
correctly.
- How do I use a different ForceSQLDataType for
different backends that I'm supporting
- I get "Invalid character value for cast
specification" when running my application.
- Do I have to change the
Exclude Empty Key attribute on all the unique keys even if they
are not the primary key?
- I have problems connecting to the database. What
should I look for?
- I am using FM3 and Multi-Proj driver substitution.
The SQL_Connect window pops up in my TPS app. Why?
- I'm using PostgreSQL, and when FM3 tries to
upgrade a large table I get and "Out of memory while reading
tuples.." message
- My data is converted - but there is additional
data (leftover from previous records) in my data field
- How do I use Firebird Embedded in my application?
- Since changing to Windows 7, my users can't
connect to the MSSQL database.
- I don't want to apply the create statement to my
tables in my dct, what must I do?
- I have a random constraint for each field
generated by FM3. How do I avoid that?
- I have a unique index added for each of my unique
keys. How do I force FM3 to create a constraint rather than an
index?
AutoNET Questions
| GQ5: |
AutoNET does not seem to work? |
|
NOTE: CapeSoft no longer recommends AutoNet for application
upgrading, as this is not a UAC compliant solution for Windows
Vista and up.
This is probably because you have the ini file, containing the
settings, in the wrong location. The default location is either
the Windows directory, or the current users temp directory. See
the AutoNET docs for details.
Particularly the TroubleShooting
and Debugging section. |
| GQ10: |
AutoNET give me an error saying the
AutoNET.exe and File Manager are out of Sync? |
|
Check and make sure the values in the designated INI file, for
NetPath and LocalPath, use the Short form of the name. In
earlier versions of Clarion Long File Names were not supported.
The AutoNet.Exe is compiled in Clarion 5 so it _does_ support
Long File Names, but if you use it with a Clarion 2 program, and
you use the longer version of the path name, then you might get
this error. |
| GQ27: |
AutoNET isn't working in my Multi-DLL
application - I have VLDS added as well. |
|
You need to setup AutoNet in your data DLL application as well
as your main EXE for AutoNet to work in conjunction with VLDS. |
Upgrading Questions
| GQ1: |
I still get Error 47!? (or "FIELDS
D00001 - Component does not match physical file") |
|
Check through the following list to determine the reason (If
you have recently upgraded Clarion, or even ClarioNET, you will
need to repeat step 2 of the following list.).
FM3 Error 47 Check list:
- You have definitely run the Support
ABC Template Utility (NOTE: This is no longer done
automatically for you in Clarion 8 and up. You need to do
this manually each time you upgrade your version of
Clarion).
- You have the CREATE
file attribute turned on (if you don't want to do this in
your dct, checkout SQ34).
- You have definitely added the FM2 define to my Project
Property Defines.
- You have not deleted or moved the upg.tps file.
- You added FM3, compiled and ran your program before making
file structure changes. If your are using SQL, then make
sure that your Owner string uses the dbOwner variable you
set in the SQL_Connect window.
- Check that you're not calling a procedure which accesses a
file before FM3 initializes. To do this, run FM3 in debugmode,
and see if your errorcode happens before any of the debug
appears in the DebugView.
- Check that your file structure is legal for the file
driver that you are using. (For Example: No Arrays in SQL)
- Check that the old structure is matched in the upg.tps
file. To do this:
- Open your existing data file in C-Scan. If it does not
open, then there is no matching file structure in the
UPG.tps file. This means that the upg.tps file was
either moved or deleted at some stage. You can open
UPGView to see the various historical structures of that
file contained in the UPG.tps file for that table.
Basically, FM3 needs to find one of those structures
that matches the one in the existing table in the
UPG.tps file - otherwise it will not be able to open the
file. Note: UPGViewer does not provide an exhaustive
display of all the properties of the file header, so it
appear to display exactly the same information as the
file structure expected, but there may be slight nuances
between the file header structure (as in the existing
file) and that saved in the UPG file, which are not
displayed in the UPGViewer.
- If it does open successfully in C-Scan, then wizard an
app with just that offending table, add FM3 to that
application and see if the table converts successfully.
- If that's successful, then there's something wrong in
your program - either the datapath is incorrect, or it's
using a different UPG.tps file (check for instances of
the ds_SetUPGPath
call in your program).
- If you have changed the FilePrefix - check the rules for changing a FilePrefix.
- If you have used an external field name, make sure that
there are no spaces in the external field name.
- Occasionally calling a procedure in the OpenWindow event
of a procedure may induce this behavior (the calling window
is in modal mode during this event). You'll find that moving
this code to the init method will resolve this.
- (MSSQL) If you are using a uniqueidentifier, then you need
to use an external name when using the '| READONLY'
attribute. Unfortunately, there's no way to rename the
column after it is already added - so you will need to use
the column name in the external name.
- (SQL) Check if your table has a group over string for a
datetime. If the datetime field is being created as a
char(8) then your field name is probably too long. Assign an
external name (for the group) that is shorter than 50 chars.
- If you are using hyperthreading and/or multi-cpus and you
get the Error47 or D00001 intermittently, then you should
try binding your exe to a single cpu (google for assistance)
- If you are changing a table name (for example storing to a
backup), then make sure that you set the variable
(containing the filename). It seems like in some cases
changing the table name using {prop:name} will cause a error
47 or D00001.
If you are certain you have obeyed "The
RULES", and the above check list, please send your
app, dct, upg.tps, builtins.clw, and a Debuglog to CapeSoft
Support detailing the steps taken.
|
| GQ2: |
When is it a good idea to delete the
upg.tps file? |
|
Never. To get some idea of this question, ask yourself, when
is it a good time to delete your customers / invoices / products
/ whatever file. The answer is never right? well that goes
double for the upg.tps. Never. Never. Never. Get it? |
| GQ3: |
When is it ok to decrease the file version
numbers in the dictionary? |
|
Never. Never. Never. Except if..... no, that's right,
never.... |
| GQ8: |
Does FM3 support programs that use Multiple
Data Sets? |
|
For flatfile, yes, but for SQL databases, it can only manage
one contiguous database connection. See Support
for Multiple Data Sets |
| GQ9: |
Does FM3 support programs using different
dictionaries, but sharing the same UPG file? |
|
Yes. Absolutely no problem here. One consideration though - If
you have files of the same name ( ie Customer File) in the
different directories, then the file structures, Including File
Version Number, must be the same in both Dictionaries. |
| GQ11: |
I added FM3 to my application, but now it
takes a long time to load? |
|
You may have made a call to ds_SetUPGPath
after FM3 has initialised itself - in which case FM3 is loading
twice. In order to eliminate the second load up make your call
to ds_SetUPGPathbefore FM3
initializes. There is a Global embed point, called "FM3 : start
of initialisation section", where you can do the call. |
| GQ12: |
I ran CScan, but it prompts for a password.
I tried the password you emailed me, but it does not work? |
|
The password to C-Scan is SCAN.
The password you were emailed is to extract the FM3 install file
from the saf file using SafeReader, downloaded from our website. |
| GQ13: |
I am having a problem with upgrading using
an Alias file? |
|
This can be a real funky problem, especially if the Alias was
introduced well into the development cycle. From FM3's point of
view an alias behaves very similarly to a file. However if the
file structure being converted pre-dates the introduction of the
Alias then you may get an effect where the file is converted,
but all the fields are cleared. In a situation like this try and
make sure that the genuine FILE is used in the app before the
ALIAS. |
| GQ15: |
I changed a field from decimal(13,3) to
decimal(13,4). FM3 upgraded the file, but now the data values
for that field have been divided by 10? |
|
The problem here is that you haven't fundamentally changed the
file, but rather you've changed the interpretation that the
program applies to the decimal field. It's natural to think of
the decimal declaration as (digits-left-of-decimal-point ,
digits-right-of-decimal-point). But this is not the way they are
actually defined. The clarion definition of a decimal is
(total-number-of-digits , number-right-of-decimal-place).
Thus when you changed 13,3 to 13,4 you effectively decreased the
size of the number that can be stored. In order to simply add an
extra decimal place you should have converted to 14,4 .
It is possible to correct the problem, but you must be careful
to do it right, or your data will remain in a "divided by 10"
state.
- Go back to the dictionary. Set the decimal back to 13,3
BUT INCREMENT the file version number.
- Compile and run the application.
- Back to the Dict again. Change the decimal correctly this
time. i.e. to 14,4. INCREMENT the file version number again.
- Compile and run the application.
|
| GQ23: |
FM3 upgrades my files perfectly, but I
cannot see the name of the file displayed on the upgrade
window? |
|
Are you using Prop:LazyDisplay? This is be known to cause a
problem with the name being displayed on the upgrade window. |
| GQ28: |
Is there a variable I can check inside the
trigger statements to make sure the triggers don't fire on an
FM3 upgrade? |
|
What you need to do is create a pointer to a byte (in your
global data) and then before FM3Initializes:
MyPointerToFM3Upgrading &= (ds_PassHandleForUpgrading())
Then you can use MyPointerToFM3Upgrading to detect whether FM3
is upgrading or not. In the trigger, it would be worth checking
whether the pointer is null or not before using it. |
| GQ29: |
FM3 hangs when it tries to convert a
superfile in my application. |
|
This is an oddity in the Clarion environment. You probably
have a file (that's in the file) that is open already in another
window. You can either:
- Upgrade all the files at the startup of the application.
- Run the application with the /silentupgrading command line
parameter when running your program. The FM3 progress
screens will not be displayed, but the conversion will occur
without hanging the application.
|
| GQ30: |
How do I upgrade all my tables at startup? |
|
On the Global Extension template, check the Force full upgrade
on Startup checkbox. (Note: You must have added
the RuntimeFileManager procedure to your application, and
checked the Enable Auto Fix on the AutoFix tab of the FM3 Global
Extension template in order to be able to do this).
If you would like to place a condition around the full upgrade,
then the place to do that is in the Global Embeds, using code
around the 'FM3 - Do Fullupgrade on Startup. Place condition
around this embed' embed point:

If you need to do additional functionality (other than just
upgrade the files - like build or pack) - then:
on the RuntimeFileManager window, Goto the Info button, and find
the End of Fullupgrade embed point. Make a source entry point
immediately above that and enter:
if ds_DoFullUpgrade()
post(event:accepted,?Build)
end
omit('****')
And after the End of FullUpgrade embed, enter the following:
!****
In your embed point of the build button (after the FM - Handle
Build button embed), enter:
if ds_DoFullUpgrade(0)
post(event:accepted,?Done)
end |
| Q31 |
FM3 upgrades my tables, but my data is
getting corrupted. |
|
Check the following:
- You don't have a dimensioned group in the file structure.
FM3 does not support dimensioned groups.
- That you're not changing a datatype which will invalidate
data (for example a string based data type to a value based
datatype). FM3 simply reads the data in binary and puts it
straight into the new variable space.
- If you have OEM collation checked, then FM3 does not
support changing file drivers with OEM
collation turned on. Clarion uses different OEM
algorithms to interpret the actual bytes returned from the
files, so the same byte returned from two files with
different drivers will be interpreted as 2 different
characters.
- Clarion5 users: You don't have a BLOB in your TPS file
structure. FM3 does not support BLOBs in flatfiles (in
Clarion 5).
- If you have triggers in your dictionary, these can affect
the data migration to the upgraded tables. You need to turn
the triggers off for the upgrade (you can use the
ds_FM3Upgrading flag to determine if an upgrade is in
process).
|
| Q32 |
I'm changing a long to a decimal, but my
data is all wrong after conversion. |
|
You must change the size of the variable storing the decimal -
so you cannot convert to a Decimal 7,x or 6,x. |
| Q33 |
I want to use my own routine to handle
newer file structures on the SQL database |
|
In your data-dll (or exe app for single-exe applications), run
the "Import a sample FM3Callback procedure" template utility.
This will create a source procedure that you can use to redirect
FM3 based on other factors (that you choose). So typically if
you wanted to run an install, and then abort the application,
you would code something like this in the source procedure:
if pFunction = 1 !This is the override
where newer files are found on an SQL backend
run(MyinstallFile)
halt
end
You can test your function by
running your application with the command line parameter:
/FM3TestCallback |
| Q34 |
How do I change a field value during
upgrade? |
|
In your single exe application (or data dll for multi-dll
applications):
- You need to create a callback procedure. You can do this
by using the ImportFM3CallbackProcedure template utility
that ships with FM3. You will find a newly created
MyFM3Callback source procedure added to your app.
- Go to the AutoUp tab of your FM3 global extension
template, and enter the 'MyFM3Callback' procedure name in
the "FM3Callback Procedure" template prompt.
- In the source of the 'MyFM3Callback' procedure, you can
code the changes you require as follows:
MyCallbackFunction procedure (long
pFunction,string pFileName,long pOptions)
UFDGroup group(FM3:UFDGroupType),pre(UFD) .
code
case pFunction
of FM3equ:UpgradingFile !About to upgrade a file
message('About to upgrade file: ' & pFunction
& ' File: ' & clip(pFileName))
of FM3equ:CopyingRecord !After copy record, before
save
if pOptions = address(Customer)
!We're upgrading the customer file, so in here
you can calculate new field values.
!CUS:Surname = ' New: ' & CUS:Surname
!message('copying Record: ' & pFunction &
' File: ' & clip(pFileName) & ' Add: ' &
pOptions & ' = ' & address(Customer) & '
Fields: ' & clip (CUS:FirstName) & ' ' &
clip(CUS:Surname))
else
!message('copying Record: ' & pFunction
& ' File: ' & clip(pFileName) & ' File? '
& pOptions)
end
of FM3equ:UpgradingFileDetailsString
UFDGroup = pFileName
message('File ' & UFD:FromLabel & '
upgrading from: ' & UFD:FromPrefix & ' To: ' &
UFD:ToPrefix & '|Version: ' &
UFD:FromVersionNumber & ' To: ' &
UFD:ToVersionNumber)
of FM3equ:EndUpgradeFile
message('Finished upgrading file: ' & pFileName)
end
return 1
|
| Q35 |
How can I trap if a file is being (or has
finished being) upgraded? |
|
Follow the steps in FAQ34 to trap a
file upgrade and when it is finished, and the details of the
file upgrading from and to. |
| Q36 |
How do I set the location of the upg.tps
file? |
|
Use the following commands to close the upg file, and then set
to a new path: ds_CloseUPGFile() and set ds_SetUPGPath() to the
path when you set the new data path. |
| Q37 |
I have incremented the version number in
the dct, but I still get the error message "Possible file
change without changing the version number error message. |
|
Clarion does not detect the version number change as a
material dct difference. It therefore does not force a default
clw re-generate. Delete the default clw in your data dll (or exe
for single exes) and re-generate and compile. |
SQL Specific FAQ
| SQ3: |
I'm getting FM3 SQL errors about a syntax
error near the Keyword ... ? |
|
You have named a file, field, or key with a SQL Reserved
Keyword. For more information, see your SQL documentation. BDE (Clarion 6 only) can bulk allocate all
external names to include the file prefix (e.g.: PRE_Keyword). |
| SQ4: |
Only my Primary Key is being created on the
SQL backend. Why aren't my other keys being created? |
|
Read the FM3 SQL Key Management
section. |
| SQ5: |
I'm using DCTMasterKeys/DCTMasterFields but
FM3 is not creating / dropping Keys off the SQL Backend? |
|
Read the FM3 SQL Key Management
section. |
| SQ6: |
I am converting TPS to SQL. No error
messages pop up, but my data is NOT converted to the new
files? |
|
Check:
- You have run the SupportABC template
utility. You must do this each time you upgrade Clarion.
- You have added the OldName property to your File User
Options in the dictionary. If only some files are converted
correctly, then this is most often the cause (that you may
have omitted this on some of the tables).
- FM3 is creating the tables in the SQL backend. FM3 must
create the tables in order to transfer the data. If the
tables exist already, then your data will not be
transferred.
- There is no error when upgrading (in this case check the
FAQs for the error that you are experiencing)
- You do not have the create attribute checked for
that/those table(s) in the dictionary property. You must
check the 'Enable Table Creation' checkbox checked. If you
do not want to do this, checkout SQ34 .
- Make sure that you've set the oldname to the correct
attribute. If your data is not being ported across, it means
that FM3 is not finding the old file - or else the table
already exists on the backend. Make sure that you're setting
your filenames immediately prior to FM3 init (and not after
FM3 has initialised). Also, you need to have added FM3 to
your application before doing the conversion. If not, you
need to go back to your previous app and dct (before doing
the conversion) - add FM3, compile and run your old
application.
For more info, see the Converting
your app to SQL section.
- Check that your SQL application is using the UPG.tps file
that your tps application was using. If FM3 cannot find the
file structure in the UPG.tps file that it needs to open the
TPS files, then it will not convert these. If only some
files are converted correctly, then this is most often the
cause.
|
| SQ7: |
Does FM3 support the creation and
maintenance of File Relationships on a SQL backend? |
|
No. Not at this stage. |
| SQ8: |
If FM3 supports ODBC, why can't I use FM3
against any ODBC driven backend? |
|
Unfortunately, there is no SQL language standard. Each SQL
Backend uses a slightly different dialect of SQL. Therefore, FM3
needs to be told exactly how to interpret structure of different
backends, and execute the upgrade scripts. We have chosen at
this stage not to rely on 3rdparty ODBC dlls, but we may well
implement a generic ODBC engine at a later stage.
Generally we implement support for new backends based on demand.
The higher the demand, the sooner it will be added. Feel free to
make your request - or use our prioritisation of features policy
(
www.capesoft.com\support.htm) to bump the implementation
of your priority up the list. |
| SQ13: |
Every time I run my app, FM3 "upgrades" my
files even though no changes have been made. (ie, I see the
little yellow progress bar window flashing up for 1 or more
files.) |
|
There could be a number of reasons for this:
- Are you running your program with the /goindeep
commandline switch? If so, remove it.
- Have you turned on the "Full FM3 comparison" switch on the
Connect Window? If so, uncheck it.
- It could be that for some reason, FM3 is unable to mark
this file as managed, or update it's version in the FM3 SQL
System table. Run a debuglog,
and see if you can solve the problem, or send it to CapeSoft
Support for analysis.
- If you have made a change in your dictionary that FM3 is
unable to perform (because the change is not permitted by
the SQL Server) - then FM3 will attempt to perform this
change every time the file opens. Common errors: changing an
image based data type to a text based data type (or
visa-versa) - changing a ROWGUID column's name.
|
| SQ15: |
The Connect window opens initially the app,
if I select an item from my menu, the Connect window re-opens. |
|
Checkout the Connection
Issues section of the SQL documentation. |
| SQ16: |
I have a Decimal(18,0) (in my dictionary)
that FM3 converts to a Decimal(19,0). Why is this? |
|
Clarion stores the Decimal size in odd number multiples. It
thus sees a Decimal(18,0) (on the backend and dictionary) as a
Decimal(19,0). FM3 will change a Decimal(18,0) to a
Decimal(19,0) - even though the dictionary says it's
Decimal(18,0). The runtime file properties that Clarion returns
show it as a Decimal(19,0), therefore FM3 will detect this as a
field type mismatch and perform the conversion. |
| SQ17: |
Why is it necessary for FM3 to create a
linked Server on my SQL Server? |
|
FM3 requires a linked server to extract information about the
existing table structures from the system tables of the
database. In order to created a linked server, the user must
have administration rights, otherwise FM3 will be unable to
create a linked server and therefore be unable to read the
system tables containing the table structure information. |
| SQ18: |
Why can I not use the /TURBOSQL property
for my MSSQL tables in FM3? |
|
Normally (without /TURBOSQL=TRUE set) when opening a table in
SQL, all the field properties of the table are returned. FM3
needs this information to verify that the file structure is
correct. |
| SQ19: |
I cannot connect to my MSSQL database with
the name, but I can via the IP Address. |
|
Checkout the Connection
Issues section of the SQL documentation. |
| SQ20: |
Where should the upg.tps be located in the
case of a SQL file server installation? |
|
Seeing that there is no common data directory - I'd go with
putting in the appdata directory (for Vista compliancy). What is
quite a common tack is to run a conversion application on
installing (which would probably be done on a central location -
fileserver or the like) - this upgrades all the datafiles on
installation, so that at runtime, each user is able to run their
application without any upgrades required. The UPG file then
becomes superfluous to each individual instance of the
application. |
| SQ21: |
FM3 does not create any of the tables on
the backend except the gMSSQLFile. |
|
This is indicative that your owner string for your dct tables
is set incorrectly. A couple of things that would cause this:
- Duplicate variable declaration of the owner string
(GLO:dbOwner defined in your application and your dct).
- A different variable used in the owner property in the dct
(or your Multi-Proj template if you're using Driver
Substitution) to that set in the SQL_Connect window.
- The SQL_Connect window called too late (this should not
happen if you're using the template to call the window - but
if you're calling it manually in code, then it needs to be
called before FM3 initializes).
|
| SQ22: |
I'm converting my TPS data to Oracle (or
Oracle Express) - but my unique indexes are not being added. |
|
The most likely reason for this is that your Oracle server has
been pre-configured to accept upper case names. If your external
names use mixed case, then Oracle will not match the mixed case
names to the upper case names in the database. If this is the
case, then change your external names to uppercase (or if this
is a Multi-Proj Driver Substitution application, then you can
check this option in the File Driver options). |
| SQ23: |
My application takes a long time to connect
to the SQL Server (or doesn't connect). |
|
There are a couple of possible for this:
- If you have a SQL View(MS-SQL) declared and that does not
have an Owner Name. Enter a owner.
- If using Windows server software without Active Directory
Services, you may need to add a static host record for your
server manually (Google this for help on your particular
server and environment).
- If you are connecting to a server that is not on the same
PC as you application: Check that the server is allowing
remote connections, also that the firewall is allowing
access through the port that the SQL server is listening on.
|
| SQ24: |
How do I enable /MultipleActiveResultSets
or /BusyHandling (or other driver strings) when using FM3? |
|
MARS (and BusyHandling and some other driver options) - must
be established at connect time. In other words, they must be set
on the table that is used to make the connection to the db. If
you are using FM3, then you can't set this in your dct (because
any table that you are opening will already have an established
connection to the db by that stage), you need to set it in the
FM3 Global Extension template (on the AutoUp tab, there's a
driver string entry field that you can enter what you want in
the driver string). The template prompt to use for this purpose
is the "Driver string (for connect)" template prompt. FM3 makes
it's own table that it uses to connect to the database, which is
why you need to add the driverstrings required for the
_connection_ to the FM3 table in the Global Extension template. |
| SQ25: |
My AutoNumbered key is not AutoNumbering
correctly (or my AutoNumbered field is not being created as an
identity field). |
|
In SQL, AutoNumber is created on the field level, not the key
level (like the Clarion dct). Take a look at Server
side Auto-incrementing for details.
If you're using Clarion 7 or up, then the most likely reason
that your Field is not created as an identity field, is that you
need to run the SupportABC template utility (because FM3 is not
creating your table, but rather Clarion is).
Check that you have added the AutoNumber FIELD user option
correctly (see AutoNumber in the
user options) |
| SQ26: |
How do I use a different ForceSQLDataType
for different backends that I'm supporting? |
|
- In your connect window extension template, equate the db
that you're connecting to to a global variable (create a
GLO:ThisODBCdb) in the 'GloVar For BackendType' prompt.
- In your global embeds find the following embeds (see
attached pic) for the field you need to change.
- In the ForceSQLDataType - Before embed:
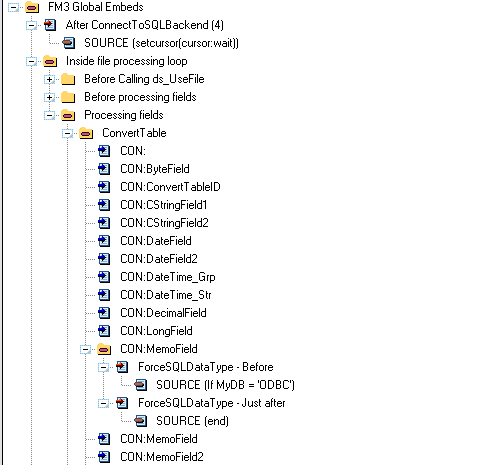
case GLO:ThisODBCdb
of 'MSSQL'
!One in the dct is set for MSSQL
- In the ForceSQLDataType - Just After embed:
of 'ORACLE'
orof 'ORACLE EXPRESS'
ds_ForceSQLDataType('CON:MemoField','imageblob')
of 'MYODBC 2'
orof 'MYODBC 3'
orof 'MYODBC 5'
orof 'FIREBIRD'
orof 'POSTGRES'
orof 'ASA'
ds_ForceSQLDataType('CON:MemoField','text')
else
!Unknown ODBC type - don't
force the datatype
end
|
| SQ27: |
I get "Invalid character value for cast
specification" when running my application. |
|
You are probably using the incorrect ODBC file driver for the
backend that you are connecting to. For instance, in SQL Server
2008, you must use the SQL Server 2008 driver (not the generic
SQL Server driver) if you are using dates and times. |
| SQ28: |
I have problems connecting to the database.
What should I look for? |
|
If you have errorcode 90, on a straight connection, but can
connect using dsn, then it could very well be that you an
instance of Zone Alarm has been installed, and is interfering
with the connection. |
| SQ29: |
I am using FM3 and Multi-Proj driver
substitution. The SQL_Connect window pops up in my TPS app.
Why? |
|
You need to uncheck all the SQL driver checkboxes in the
AutoUp tab of the FM3 global extension template. |
| SQ30: |
I'm using PostgreSQL, and when FM3 tries to
upgrade a large table I get and "Out of memory while reading
tuples.." message |
|
You need to add the following driver options to the table that
connects to the backend (in this case the FM3 connect table):
DeclareFetch=on
You can do this in the AutoUp tab of the FM3 global extension
template. |
| SQ31: |
My data is converted - but there is
additional data (leftover from previous records) in my data
field |
|
You have a string that is terminated with <0> char. IOW
it is behaving like a CString, and Clarion is displaying only up
to the <0> char (in your TPS app). SQL does not permit
binary chars in a text based field (like a char) - so FM3 will
convert <0> to <32> and keep going. In this case,
you need to make your strings (that behave in this manner)
CStrings (in the dct). |
| SQ32: |
How do I use Firebird Embedded in my
application? |
|
- Add the SQL_Connect window to your application in the
normal manner (see jumpstart for details).
- In your Data dll or exe (for single-exe applications) on
the FM3 global extension template (Auto Up tab) check the
ODBC Driver, and the 'Firebird: Enable embedded version'
check box.
- Create a blank firebird database. You'll need to add this
to your installer (install to the ProgramData directory of
another
- You will need to download the firebird embedded drivers
from SourceForge (or unzipped from
https://www.capesoft.com/ftp/public/resources/FireBirdEmbeddedFilesForAppDir.zip)
to your application directory. You will need to ship those
with your application. If you download the one from
sourceforge, you must copy the fbembed.dll to gds32.dll and
fbclient.dll.
- When you run your application for the first time, in the
SQL_Connect window, the server name must be blank and the
port 0. Make sure that the DatabaseName is the fdb filename
and path of the firebird database.
|
| SQ33: |
Since changing to Windows 7, my users can't
connect to the MSSQL database. |
|
- You must re-import the SQL Connect window
- At runtime, set the Server address and server name in the
connection options:
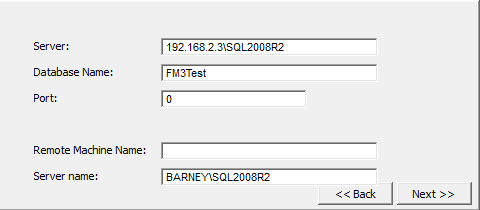
|
| SQ34: |
I don't want to apply the create statement
to my tables in my dct, what must I do? |
|
- You can override the create attribute of your tables in
the exe.
- In this case, the best is to
create an upgrader application, and in the global
properties, on the Individual File Overrides, override the
Create Attribute for each table:
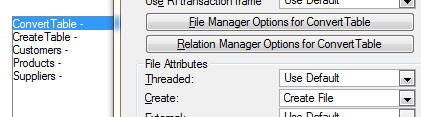
|
| SQ35: |
I have a random constraint for each field
generated by FM3. How do I avoid that? |
|
- If you have 'Prime new fields zero / blank' then the
Default '' attribute is added to the SQL alter statement
when creating the field. The effect of this is that MSSQL
will create a non-unique constraint for each field (to
generate the blank default).
|
| SQ36: |
I have a unique index added for each of my
unique keys. How do I force FM3 to create a constraint rather
than an index? |
|
- FM3 will by default create Indeces for your unique keys if
you use DCTMasterOfKeys. You can override this behaviour by
adding the DCT user option: CreateConstraint = 1.
|
Other FAQ Contents
| OQ1: |
Where can I buy FM3? |
|
Read the Purchasing section in this
documentation. |
| OQ2: |
I bought FM2/3 some time ago, but want to
upgrade. How much does it cost? |
|
Upgrades are currently FREE for FM3 users ...even across
Clarion versions. Read more info in the Purchasing
section. If you are still using FM2, you will need to purchase
an upgrade from FM2 to FM3 (see the Purchasing
section for details). |
| OQ4: |
What must I do to support Windows Vista? |
|
The best is to store your application data in the
CommonAppData directory. Ideally you need WinEvent to return
this so that you can set it correctly in your application on
startup, otherwise you can use the windows API calls to return
this location.
In the "FM3 start of initialization" embed, you need to set your
application data path:
GLO:CommonAppData = LONGPATH( CLIP( ds_GetFolderPath(
WE::CSIDL_COMMON_APPDATA ))) &
'\<Company>\<Product>' !You'll need WinEvent for
this functionality
ds_SetUPGPath( CLIP(
GLO:CommonAppData )) !Tell FM3 where to find our upgradable
files
SYSTEM{PROP:DataPath} = CLIP( GLO:CommonAppData ) !Set the
datapath for all our common files |
| OQ5: |
I don't use SQL - why should I upgrade from
FM2 to FM3? |
|
We are no longer implementing changes to FM2 - so any features
added to FM3 will not be included in FM2. For example, TPS BLOBs
are now supported in FM3, we've improved the renaming of temp
files (so you hardly ever get the 'data disappearing' that
occurred after a failed upgrade), FM3 does upgrading in multiple
transactions - reducing memory usage, and other changes. |
| OQ6: |
How do I remove FM3 from my application? |
|
If you have added FM3 to any other application in your
multi-dll than the data dll, start by removing the FM3 global
from that application and compile. If you get compile errors,
it's most likely that you have used an FM3 DLL function in your
application. Remove the call.
In your data dll:
1. Remove the SQL_Connect procedure.
2. Remove the RuntimeFileManager procedure.
3. Remove the FM3 global extension template.
4. Remove the FM2=>1 from your project.
5. Remove the claFM3.lib file from your project.
Compile.
Contact support if you get compile errors. |