Vote for this Product at ClarionShop  
Buy now at ClarionShop
Version Gold

www.capesoft.com
c3pa approved


Upgrading from a version prior to v1.09 or v1.10? Check out the FAQs for upgrading requirements. Getting Compile errors after upgrading?

Important: You need Office Inside 2.61 or newer for this version of SendTo!

 
Products Required for SendTo
  NetTalk  
Office Inside (at least version 1.67)
WinEvent (at least version 3.21)
Draw (at least version 2.20)
     

Contents
  Introduction  
Feature List
Adding SendTo to your Application [Important Reading]
The SendTo Templates
The SendTo Objects
Examples
FAQs
What the Users are saying
License & Copyright
Requirements
Installation & Support
Version History [Important for existing users]
     
 
Products Recommended to enhance SendTo
  xFiles  
HyperActive (used in conjunction with sending to PDF)
SoftVelocity's Clarion6 Report to PDF template
     

Introduction

Wouldn't it be nice to be able to export a list/browse straight to Printer, a file (like Excel or Word) or Email it? We as Clarion Programmers are renowned for spending piles of time getting our browses just right - and then quickly adding a few reports as an after-thought. And so instead of doing the work once, we're effectively doing it many times. 

Enter SendTo. SendTo will enable you to send your data exactly as it appears in the browse to Printer, or File (HTML, Excel, Word, CSV or PDF) or email it directly. Simply drop on the SendTo button on any browse/list in your application, and you have all these options available without having to design extra reports or export procedures - it literally takes a few seconds to add this amount of functionality to a browse.

No more designing reports to match the printout the user requires - simply display the data. What you see is what you will get in the SendTo output. So you can do what you do best - display the correct data and let SendTo do the hard work of getting it out of the List/Browse.

Features

* Clarion 6 ABC applications only or additional 3rdparty Tools required.
** XML export requires xFiles - a Capesoft 3rdparty accessory.
¶ At this stage the STYLE attribute is only supported. COLORs will not be displayed in the output.
¶¶ At this stage only certain icon formats are supported see FAQ 4.3

Adding SendTo to your Application

Before adding SendTo to your application, you need to import the SendToTempFile into your dictionary:

1. Open your dictionary in the Dictionary Editor.
2. Import the Send2Tmp.txd text file into your dictionary (the Import Text item in the File menu). This file is found in the Clarionx\3rdparty\Libsrc folder.

OK, now we're ready to add SendTo to your application. If this is a Multi-DLL application, then you need to do this in the Data DLL:

1. Insert the Global Extensions that you will require:
1.1. Click the Global button and click the Extensions button on the Global Properties window.
1.2. You need to add the ActivateSendTo Global extension template to the list.
1.3. You need to add the following Global Extension Templates: Activate NetTalk, Activate Office Inside, Enable WinEvent and Draw if they have not already been added. If you have HyperActive then add the Activate HyperActive to your application as well.
1.4. Click OK a couple of times to return to the Application tree window.
2. Open your application and run the ImportSendToWindows template utility:
2.1. Select the Template Utility option from the Application menu.
2.2. Select either the ImportSendToWindowsABC or ImportSendToWindowsLegacy (depending on whether your application is ABC or legacy based) from the Select Utility list box.

Note: For Multi-DLL applications you need to make sure the Export procedure in the SendTo_Window properties is checked.

3. Setup the SendToWindow pointer correctly:
3.1. Click the Global button and click the Extensions button on the Global Properties window.
3.2. Select the ActivateSendTo Global extension template in the list. On this template, make sure that the SendToWindow procedure is correct in the drop list provided.
4. If you require PDF file output, then you can either use Soft Velocity's Clarion6 ABC Report to PDF, Klarisoft's wPDFControls or PDFXChange (PDF-Tools). Perform the steps (dependant on the product) to adding the Report to PDF to your application. Note: If you own HyperActive, then you can add HyperActive to your application and preview the PDF.
5. For XML output support, check out FAQ 7.1

For Multi-DLL Applications

Now that you've added the SendTo functionality to the Data-Dll, you can use the functionality in all your applications that use this Data DLL.

1. Add the SendTo Global Extension template to your other app (e.g. your mainEXE application). 

1.1. In the SendTo Global Extension template, check the SendTo Window is in another app checkbox.
1.2. Enter the name of the SendTo Procedure (that is in your Data DLL) in the entry field provided.
1.3. If you check the Don't automatically map the procedure checkbox, then you'll need to manually map the procedure in your Global map, otherwise SendTo will do this automatically for you. If this is a Multi-Proj application, then you'll need to check this because Multi-Proj will do the mapping for you.

You must also add the WinEvent Global Extension to this application (if it is not already present)

2. If you have not done so already, then you need to add the Data-DLL as an external module to this application.

2.1. In your Application tree, select the Insert Module... item from the Application menu.
2.2. Select ExternalDLL from the list that appears.
2.3. Enter the name of the lib that is generated by your Data-DLL application.

Adding a SendTo Button to your Browse/List

1. Open the Window Formatter for the Browse procedure that you require the SendTo button on.
2. Select the Control Template... option from the Populate menu, and the select the BrowseSendTo or ListSendTo control template from the list that appears. Place the button on the window in an appropriate place.

Translation

There are two places you need to make alterations in order to cater for translation:
1. Open the SendTo_Window window formatter and translate all the prompt text.
2. Go to the SendTo Controls on the SendToWindow control template prompts on the SendTo_Window, tab across to the Translation tab, and fill in the respective text there:

In order to re-use this window in your other appications, you can do a selective export of the 5 SendTo windows (SendTo_Window, SendTo_Email, SendEmail, SendTo_Printer, SendTo_File) that you've translated to the SendToWindowsABCNoFTP.txa or SendToWindowsLegacyNoFTP.txa (depending on which template set your app is based on). Caution: Next time you upgrade your SendTo, these txas will be overwritten. Keep a backup of this file somewhere in case you do upgrade without thinking about the txas.

The SendToTemplates

The Global Extension Template
The Browse SendTo Control Template
The ListSendTo Control Template
The SendToWindowControls Control Template
The SendToFileProcess Extension Template
The SendToPrinterReport Extension Template

The Global Extension Template

1. The Disable all SendTo Features checkbox should remain clear (unchecked) - but is useful for debugging. If you have an untrackable bug, then you can disable all SendTo code generation in your entire application by checking this checkbox.
2.

The SendTo Procedure drop down list is used to specify the SendTo Window procedure - which is used for selecting the output of the data. If this is a Multi-DLL application and the SendTo Window is in another application, then you'll need to manually type the procedure name into the entry (after checking the SendTo Window is in another app checkbox).

3. If this is a Multi-DL application, and the SendTo window is in another application, then you can check the Don't automatically map the procedure checkbox if you would like to manually map the procedure definition in this application.
4.  SendTo turns on prop:buffer for the Browse boxes where the SendTo button is added. This makes the collating of data more efficient. You can check the Suppress Prop:Buffer use if you don't want to use the prop:buffer feature.
5. You can specify if you would like to force multi-lined rows (i.e. where LastOnLine is used in groups) into one row for some or all file outputs. This often makes for more logical sense, especially in CSV file outputs. Otherwise, the data will be exported as it appears (on separater rows) in the list/browse box.

The Browse SendTo Control Template


1. By default the heading text used for the data output will be the text on the titlebar of the window. You can change this in the Heading entry field in the template. Use quotes for constants or variable names. For example you could add the currently active tab's text to the TitleBar's text. 
2. You can force or warn a user on a record limit - if the user has selected to SendTo, but is unaware of the magnitude of the output that will be generated.
3. (For ABC) You can set the position of the SendTo popup menu - to one of first (i.e. at the top of the menu), Before Update items, After Update Items or Last.

4. The Column Customization list allows you to suppress columns from the SendTo output, or change individual column headers in the SendTo output.

The ListSendTo Control Template

1. By default the heading text used for the data output will be the text on the titlebar of the window. You can change this in the Heading entry field in the template. Use quotes for constants or variable names. For example you could add the currently active tab's text to the TitleBar's text. 
2. You need to select the List Control that contains queue to use for the SendTo data. If you only have one List control on your window, then SendTo will automatically select that one.
3. The Queue entry field is where you tell SendTo about the Queue that contains the data for the SendTo output.
4. The Columns to Suppress list allows you to specify which columns you would like to suppress from the SendTo output.

The SendToWindowControls Control Template

1. You need to enter 4 procedures - the SendTo Email Procedure, the SendTo Printer Procedure, the SendTo File Procedure and the SendTo FTP Procedure (optional - requires NetTalk 4) to handle the data output.
2. If you don't want any code to be generated locally, you can check the Don't generate SendTo code here checkbox. This is useful for debugging.
3. You can enter the names of the prompts you require for the Output prompts in the template. You can use variables for translation if you require.

On the Output Setup tab you can select the outputs that you want to support (FTP requires NetTalk 4). 

4. If you have a mechanism to convert your reports to PDF (a 3rdparty tool or the Clarion6 ABC templates) - then you can check the Use a Report to PDF Convertor to call the report.
5. You can also select which File formats you would like to display as options to your user. For each file format that you select you will need to enter a default extension as well. Note: There is a Clarion bug when displaying these entry fields (sometimes the entry fields are not displayed). You will also be able to select whether you would like the title to appear in the document that you are outputting to (check the Doc Title checkbox for this)
If you want to use an alternative delimiter (by default) for CSV output, then you can set the default delimiter either as a variable, or with quotes. The default is ',' a comma. The delimiter is a string(1). If you want to use a non-printable character, then you can enter the ASCII equivalent value in triangle brackets (so to use a tab, enter '<9>') using char equates (exactly as you would when entering the non-printable character into a normal string in your code).
Check the Add Extension to the filename (if none) if you'd like the SendToWindow to add the default extension if there is no extension in the filename
6. If you uncheck the Allow Email Configuration checkbox, then the user will not be able to configure their e-mail settings at runtime.
Checking the Don't remove TempFile after emailing checkbox will give you the option of deleting the file in your email routine or keeping it for further use.
7. If you would like to use a style file for your HTML generated output file, then you can check the use a Style file checkbox and enter the name of the style file into the Style File  entry field. The style file will get generated into the HTML document that is produced - so the HTML doc will be a stand-alone doc, although you'll still need to send the Style File with your application.
8.

On the Location tab, you can specify where the default location for the output files are to be stored. You can select between My Documents, Desktop and Temp Folder.
You can also specify the default basename of the output file. If no base name is specified and the header is blank, then the output file will be '.xls' for excel, '.doc' for word, etc. 
If you would like your SendTo output to always be named a particular output (without defaulting to the header name) then check the Only use output file basename when header is blank checkbox.

9.

The settings on the Save Settings tab can be used to specify if you want to save and restore options for repeated use. You can choose the Don't Store option (if you don't want to save your settings) or choose an INIFile to store the settings in.Settings that are saved are: The last output device (Printer,File or Email), File Format and the various options (Preview, Suppress Greenbar, etc). ABC applications can select the ABC only - use Application''s INIManager checkbox, which will use the INIManager class generated in your application by the ABC templates.

10. If you selected the INIFile option, then you will need to select which INI file the settings will be stored in. If you have many SendTo enabled applications, then you may like to store settings unique to this application, in which case you would select the Appname.ini option. Otherwise you could select the SendTo.INI or the Win.INI for across the board settings. 

The SendToFileProcess Extension Template

1. There are no prompts for you enter in this template. This template generates the necessary code in a process to export the data to a file.

The SendToPrinterReport Extension Template

This template generates the necessary code in a report to export the data to a printer.

1. ABC Only - If you would like to specifically open your Previewer in Maximised mode initially, then check the Start Report Previewer Maximised checkbox. Otherwise the Previewer will be opened to whatever it has been set to in the Report template.
2. ABC Only - If you would like to default the Previewer to open 100% zoom initially, then check the Start Report Previewer 100% zoom checkbox.
3.

You can specify a Left column indentation, which can either be a constant or a variable. This will indent the text of the left most column (header and text) - so if you require more space between left justified text and the left margin line, you can.

4. If you have more than one PDF template, then you can specify which one to use in the succeeding checkboxes.
5. If you are using a Report to PDF generator (a 3rdparty tool or the Clarion6 SVReportToPDF template), then you can add the HyperActive global Extension template to your application to preview the PDF instead of using the Report Previewer to view the PDF. Once you've added the HyperActive Global Extension template, then you can check the Use HyperActive to Preview the PDF File checkbox. 

The SendTo Objects

SendToBase
SendToPrinter
SendToCSV
SendToHTML
SendToExcel
SendToWord
SendToFile

SendToBase() class

The SendTo base class forms the foundation of all the SendTo classes. It handles all the nittigritty of extracting data, fontsetting, etc generic to all the other classes.

Properties

Property Name Type Description/Use
q &Queue A pointer to the Queue containing the data for the Report/File.
control long The ID of the List control containing the Queue.
Header string(255) The text to use for the header of the Report/File.
TotalWidth long The total width factor of the Listbox - to ensure all the columns fit into the Report/File.
LinesPerDetail long Lines required for each record entry for the Report/File
RecIndex long A counter containing the Index number of the record currently 'Got'
ProgressValue long The Progress Percent of the records processed.
Preview byte Set to Preview the Report/File.
PreviewProgram string(255) A name for the program to run to preview the data. If left blank, then use ShellExecute.
FileName string(255) The name of the File containing the exported data.
GreenBar byte If set to 2, then Greenbar is disabled, otherwise, it is used to switch between showing and hiding the background for the Greenbar effect.
Opened byte Indicates whether a file has been opened successfully.
fontName string(40) Contains the Fontname of the ListBox to use as the default (if the cell has no font)
fontSize long Contains the Fontsize of the ListBox to use as the default (if the cell has no font)
fontStyle long Contains the Fontstyle of the ListBox to use as the default (if the cell has no font)
fontColorFG long Contains the TextColor of the ListBox to use as the default (if the cell has no TextColor)
fontColorBG long Contains the BackColor of the ListBox to use as the default (if the cell has no BackTextColor)
fontCharset long Contains the Characterset of the ListBox to use as the default (if the cell has no CharacterSet)
Styles Group,pre(Styles),Dim(255) An array to store the ListBoxes style array during the Report/File formatting.
FontName string(40) Name of the Font for this stylegroup
FontSize long Size of the Font for this stylegroup
FontStyle long Style of the Font for this stylegroup
CharSet long CharacterSet of the Font for this stylegroup
ColorFG long Text color for this stylegroup
ColorBG long Background color for this stylegroup
Picture string(32) Picture used for this stylegroup
Exists byte(0) Set if this propstyle array row is used.
End
Icons Group,Dim(255) An array to store the Icon file names, and whether they exist or not.
IconName string(255) Name of the Font for this stylegroup
Exists byte(0) Set if this propstyle array row is used.
End
File string(255) Used to store the name of the file created (also contains the error code if the file was not created).
clm Group,dim(MAXCOLS1),pre(clm) An array containing formatting for each column.
Exists byte Set if this element of the queue is present in the List box.
width long Contains the width of the column
RightBorder byte Set if there is a border on the right of the column
LastOnLine byte Wraps the next field to the start of the next line
RunningWidth long Used to ensure the width of the column is not too small (for the data)
Header string(255) Contains the text for the heading of the column
HeaderAlign string(6) Contains 'left', 'center' or 'right' dependant on which alignment the header is.
HeaderLeft byte Set if the Header is left justified
HeaderRight byte Set if the Header is right justified
HeaderCenter byte Set if the Header is center justified
HeaderDecimal byte Set if the Header is decimal left justified
HeaderOffset long Offset of the Header text
HeaderControl long Used for the control of the header text in a report
Align string(6) contains 'left', 'center' or 'right' dependant on which alignment the column is
Underline byte True if the column text is underlined
Picture string(40) The picture of the column text
GroupNo long The number of the group that this field is part of.
FieldNo long Contains the field number of the queue that is the first in the list. If blank, than the field number is assumed to be incremented from the previous columns field.
Left byte Set if the column text is left justified.
Right byte Set if the column text is right justified.
Center byte Set if the column text is center justified.
Decimal byte Set if the column text is decimal justified.
Offset long Contains the offset of the text.
Color long Set if there are color settings for this column.
TextColor long Contains the color of the text.
BackColor long Contains the color of the background
Icon byte Set if there is an icon attribute for this column
IconTrn byte Set if the icon is transparent
CellStyle byte Set if the cell can be individually formatted with a style.
ColStyle byte Contains the default style for the column (if used).
DetailControl long The ID of the control containing the text for the cell.
IconControl ulong The ID of the IconControl to contain the icon for the cell.
DetailText string(255) The formatted text to be placed in the cell to be exported.
RunningColumn long The physical column that this column occurs in (numbered from left to right)
RunningRow long The physical row that this column occurs in (numbered from top to bottom)
End
grp group,dim(MaxCols),pre(grp) This Group contains the settings for Group headers.
Header string(255) Contains the heading text (for the group)
HeaderAlign String(6) Alignment
HeaderLeft byte Left justified (if set)
HeaderRight byte Right justified (if set)
HeaderCenter byte Center justified (if set)
HeaderDecimal byte Decimal justified (if set)
HeaderOffset long Offset for justification
HeaderControl long Control to contain the group header string
Columns long The number of columns in this group.
Exists byte whether the group exists (as a group) or not
Width long The total width of the group.
Rows long The rows that exist in this group (i.e. the amount of cells with the LastOnLine attribute in them).
End
ProgressText string(100) Contains the text for the Progress string on the Progress Window.
StyleFile string(255) The name of the style file (for HTML files)
NoOfColumns long The number of columns wide that the output will contain.
LastColumn long The number of the last column
RunningColumns long The number of physical columns that will be used in the output
RunningRows long The number of physical rows that will be used in the output.
HeaderRows long The number of physical rows that will be used in the output header
WriteToClipboard byte Set in order to write to clipboard (rather than file).
PreserveDateData long Set in order to present date date in true-date format (in Excel exports).
NoColumnHeadings long Set in order to prevent column headings from being generated (into Word, CSV and Xcel)

Methods

MethodName Parameters Description
DisplayProgress (*Byte ProgressValue,
Long ProgressControl'
long ProgressText=0)
Set and Display the value for the progress control on the progress window.
Parameters:
ProgressValue - a handle to the Progress thermometer
ProgressControl - the ID of the progressbar
ProgressText - the ID of the ProgressText string.
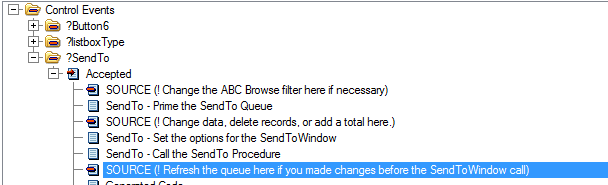
Init (Queue pQueue,
Long pListControl,
<SendToOptionsGroup pOptionsGroup>)
Initialize the object - set queue pointer, and gets the list properties and styles.
Parameters:
pQueue - the queue that contains the data
pListControl - the ID of the control containing the data
pOptionsGroup - a group containing the SendTo options
Next (),Long Populates the queue buffer with the next record in the queue. Returns a 0 if record is OK, otherwise the next failed.
LoadIcons () This procedure loads the list controls icon array into aSendTo icon array.
LoadListBoxProperties () Get the all the listbox's format properties.
LoadStyles () Get the list box's style arrays.
Run () Run the program associated with the file created.
ErrorTrap (Long p_Code, String p_Text) Display an error that occurs.
Parameters:
p_Code - the errorcode that occurred.
p_Text - the message text that must be displayed.
_FontColor (long p_Col),Long Returns the FontColor for this specific cell.
Parameters:
p_Col - the column number of the cell
_FontBackGroundColor (long p_Col),Long Returns the BackGroundColor for this specific cell.
Parameters:
p_Col - the column number of the cell
_FontName (long p_Col),String Returns the FontName for this specific cell.
Parameters:
p_Col - the column number of the cell
_FontStyle (long p_Col),Long Returns the FontStyle for this specific cell.
Parameters:
p_Col - the column number of the cell
_FontSize (long p_Col),Long Returns the FontSize for this specific cell.
Parameters:
p_Col - the column number of the cell
_FontCharset (long p_Col),Long Returns the CharacterSet for this specific cell.
Parameters:
p_Col - the column number of the cell
Kill () Dummy method for classes derived from the base class.
Open () Dummy method for classes derived from the base class.
CreateHeader () Dummy method for classes derived from the base class.
WriteColumn (<string pDetails>,
<long pColumn>,
byte pHeader=0,
<string pAlign>,
long pSpan=0)
Writes the Details into the cell/block specified (and sets up styling and alignment as necessary. If Details is blank, a blank detail is written.
Parameters:
pDetails - the content of the string to place in the control
pColumn - the column number 
pHeader - set if this is the header, otherwise cell is in the body.
pAlign - an optional alignment string 
EndHeaderRow () Code to run at the end of a Header row (like adding into the file and incrementing the column)
EndDetailRow () Calls the parent EndHeaderRow - but allows for overwriting if other code is required.
SetDetail () Dummy method for classes derived from the base class.
GetFontStyleName (long pFontType),string Return's the name(i.e. string description) of the FontType.
Parameter:
pFontType - contains the FontType equate
Debug (string pDebugStr) Output debug information for debugging.
Parameters:
pDebugStr - the debug string to output.
_CellStyle (long p_Col),long Returns the style number for the cell of the column.
Parameters:
p_Col - the column number.
_ColorEquate (long pColor),long Returns the closest Clarion color equate (for Word and Excel)
Parameters:
pColor - the color used.
OldNoOfColumns (),long Returns the number of columns that appear in the output (taking into account the LastOnLine columns)
NoOfRows (),long Returns the number of rows that appear in the output (taking into account the LastOnLine columns)
GetProgress (),long Returns the value to display on the progress bar/counter

SendToPrinter(SendToBase) class

The SendToPrinter class is based on the SendToBase class and handles sending the data to a printer in a report format.

Properties

Property Type Description/Use
Report &Report A pointer to the pre-defined report (in the report procedure)
ReportHeader long The control on the report that contains the Header of the report
ReportDetail long The control on the report that contains the detail
ReportFooter long The control for the report footer
ReportTitle long The control for the title of the report
HeaderBox long The box control around the header
DetailBox long The box around the detail of the report
FooterBox long The box around the footer of the report
WidthFactor Real A property used to factor out the size of the paper with the widths of columns in the list box.
LineHeight long A property used to work out the height of the detail line.
LineSpacing long If required - used to create uniform spaces between the lines
CellSpacing long Ensure uniform spaces between cells of data.
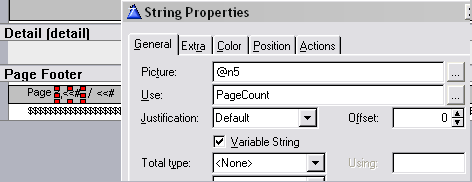
TotalPages long A property containing the amount of pages required for a report.
LinesPerPage long Contains the maximum amount of lines used in a page
HeaderYPos long Contains the position of the header of the list in the report.
FirstControl long Contains the x position of the first cell in the report.
DetailYPos long Contains the starting point of the row of detail cells to print
PagesWide long(1) The amount of pages (across) to use. Set to 0 for automatic.
PagesWideCount long Contains the running count of the amount of pages (across) used.
LastControl long Keeps a track of the last control number used (for the creating of the report controls)
FirstColumn long Contains the FirstColumn that was used for the current page (or last page) printed.
FirstRunningColumn long Contains the First physical Column (from left to right) that was used for the current page (or last page) printed.
LastRunningColumn long Contains the Last physical Column (from left to right) that was used for the current page (or last page) printed.
StartWidth long The first column's width in this page (across).
PageWidth long Total width for this page (across)
PageCount &long Contains a pointer to the variable used to track the pagecount on the report.
LinesOnThisPages long Tracks the lines used on the page (vertically).
PaperWidth long Contains the width of the paper to use
PaperHeight long Contains the height of the paper to use
TotalLinesPrinted long Contains a running tally of the detail bands printed

Methods

Method name Parameters Description
CreateHeader (byte pFirstTime=0) It creates the columns with their respective headers.
CreateDetail ( ) This method creates each detail band and the controls in the detail band.
SetDetail ( ) Sets the properties for the cells of the detail band.
Init (Queue p_Queue,
Long p_ListControl)
Initializes the object.
Greenbar ( ) Sets the greendbar effect on the report.
Next (),long When all the records are retrieved, redo from start if the PagesWide > 1.
ArrangePages (*Queue pQueue) Once all the pages are printed, arrange into the correct order.
GetProgress (),long Returns the correct progress value (when multiple pages wide is used)
Kill () Used to dispose the Draw object.
SetPageWidth (long pPaper) This method sets the PaperWidth and PaperHeight properties for the paper used in the report. pPaper is an equate containing the Clarion paper ID.
EndPage ( ) This method checks whether an EndPage is required and enforces one if the LinesOnThisPage = LinesperPage. Calculation using the height of the detail bands and the Report height does not match the printed output.
OpenReport (long pPaper=0 ) This method creates the report outline and sets the various report properties. 

SendToCSV(SendToBase) class

The SendToCSV class is based on the SendToBase class and handles the exporting of data to a CSV file.

Properties

Property Type Description/Use
detail string(65535) The complete datastring of all the columns to be added to the file.
clipboardstring any Contains a string that will be sent to the clipboard.
clipboardstringlen long Contains the length of the string that will be sent to the clipboard.
delimiter string(',') Contains the delimiter that will be used in a CSV export.

Methods

Method name Parameters Description
Kill ( ) Close the file and kill the object
CreateHeader ( ) Creates the header of the file (column headers to match the columns)
WriteColumn (<string pDetails>,
<long pColumn>,
byte pHeader=0,
<string pAlign>,
long pSpan=0)
Writes the Details into the block specified. If Details is blank, a blank detail is written.
Parameters:
pDetails - the content of the string to place in the control
pColumn - the column number 
pHeader - set if this is the header, otherwise cell is in the body.
pAlign - an optional alignment string 
EndHeaderRow () Writes the record to the file and clears the detail string.
Open ( ) Opens the file to store the export.
SetDetail ( ) Creates the text to be entered into the file.
Init (Queue pQueue,
Long pListControl,
<SendToOptionsGroup pOptionsGroup>)
Calls the parent Init method and sets the name of the PreviewProgram to run.
WriteToFile (*string pStringToWrite,
ulong pBytesToWrite) 
A method that writes the string passed to the file (or the clipboard if the output is the clipboard).

SendToHTML(SendToCSV) class

The SendToHTML class is based on the SendToCSV class and handles the exporting of data to a HTML file.

Properties

Property Type Description/Use
meta string(1024) A property which allows you to write stuff into the meta tag section at the beginning of the HTML doc.

Methods

Method name Parameters Description
CreateFooter ( ) Ends off the doc.
CreateHeader ( ) Creates the doc, sets the styles and creates the columns' heading text and the title text. 
WriteColumn (<string pDetails>,
<long pColumn>,
byte pHeader=0,
<string pAlign>,
long pSpan=0)
Writes the Details into the cell specified (and sets up styling and alignment as necessary). If Details is blank, a blank detail is written.
Parameters:
pDetails - the content of the string to place in the control
pColumn - the column number 
pHeader - set if this is the header, otherwise cell is in the body.
pAlign - an optional alignment string 
EndHeaderRow () Code to run at the end of a Header row (like adding into the file and incrementing the column)
EndDetailRow () Code to run at the end of a Detail row (like adding into the file and incrementing the column)
Init (Queue pQueue,
Long pListControl,
<SendToOptionsGroup pOptionsGroup>)
Calls the parent.init method and suppresses the Greenbar property (if not required).
SetDetail ( ) Sets the greenbar effect and the styles of the cell text.
_Color (long p_Color) This method returns the hex RGB value of a Clarion RGB color long format.
Parameters:
p_Color - a long containing the RGB Clarion color.
_DecToHex (Byte p_Decimal) Converts a byte to a Hex string.
Parameters:
p_Decimal - a byte containing the number to convert to hex.
Kill ( ) Creates the footer and then kills the object.
_ReadCSSFile (byte pAddInFont=1),string This method returns the contents of the Style file, optionally modified to contain the FontName of the browse.
Parameters:
pAddInFont - If set, adds the Font name in, where required.

SendToExcel(SendTOBase) class

The SendToExcel class is based on the SendToExcel class and handles the exporting of data to an Excel spreadsheet.

Properties

Property Type Description/Use
Excel &oiExcel A pointer to the OfficeInside Excel object.
StartColumn string(2) The column to start the first cell to export
StartRow long The Row to start the first cell to export
RowNumber long Used for storing the row where the object is writing to. 
ColumnNumber string(2) Used for storing the column where the object is writing to.
ColumnNumberB byte,dim(2),over(ColumnNumber) Used for incrementing the column where the object is writing to.
TemplateFile string(255) Contains the name of the template file to use.
WidthFactor Real A property used to factor out the size of the spreadhsheet with the widths of columns in the list box.
NumColors long Number of colors used in the custom excel palette
ColorPalette long, dim(40) Colors in the excel palette, allows existing colors to the fetched
CurColor long The current color in the excel palette
PalettePos long The position of the current color in the palette

Methods

Method name Parameters Description
Open ( ) Opens the excel spreadsheet.
Close ( ) Closes the spreadsheet.
CreateHeader ( ) Creates the header of the spreadsheet
WriteColumn (<string pDetails>,
<long pColumn>,
byte pHeader=0,
<string pAlign>,
long pSpan=0)
Writes the Details into the cell specified (and sets up styling and alignment as necessary).
Parameters:
pDetails - the content of the string to place in the control
pColumn - the column number 
pHeader - set if this is the header, otherwise cell is in the body.
pAlign - an optional alignment string 
EndHeaderRow () Code to run at the end of a Header row (like adding into the file and incrementing the column)
Init (Queue pQueue,
Long pListControl,
<SendToOptionsGroup pOptionsGroup>)
Calls the parent.init and sets up some of the initial settings.
SetDetail ( ) Formats the cells and writes the data to the cells.
_IncrementColumn ( ) An internal method used to increment the column letter.
Kill ( ) Closes the doc and kills the excel object.
_CheckForFormula (string pDataString),long Returns True if the string contains formula characters
Parameters:
pDataString - The string to pass to Excel.
_ColumnName (string pColumn), string
_HasFormulaChars (string pCheckString,
long startPos=1),long
GetPaletteColor (long pColor), long Returns zero if the color is not in the palette, or the position if it is
AddPaletteColor (long pColor)

SendToWord(SendToBase) class

The SendToWord class is based on the SendToBase class and handles the exporting of data to a Word document.

Properties

Property Type Description/Use
Word &oiWord A handle to the Office Inside Word object required.
RowNumber long Used for storing the row where the object is writing to. 
ColumnNumber long Used for storing the column where the object is writing to.
TemplateFile string(255) Contains the name of the template file to use.
TableNumber long The number of the table created.

Methods

Method name Parameters Description
Open ( ) Creates the word document
Close ( ) Saves and closes the word document
CreateHeader ( ) Creates the header of the document and the table for the text.
Init (Queue pQueue,
Long pListControl,
<SendToOptionsGroup pOptionsGroup>)
Inits the object and the Office Inside word object.
SetDetail ( ) Write the necessary to text to the cell and format the style of the cell.
WriteColumn (<string pDetails>,
<long pColumn>,
byte pHeader=0,
<string pAlign>,
long pSpan=0)
Writes the Details into the cell/block specified (and sets up styling and alignment as necessary. If Details is blank, a blank detail is written.
Parameters:
pDetails - the content of the string to place in the control
pColumn - the column number 
pHeader - set if this is the header, otherwise cell is in the body.
pAlign - an optional alignment string 
EndHeaderRow () Code to run at the end of a Header row (like adding into the file and incrementing the column)
Kill ( ) Close the document and kill the objects.

SendToFile() class

The SendToFile class controls the exporting of the data to a file. It is a generic class that has a handle that points to the class specific to the file type that is required in the output.

Properties

Property Type Description/Use
SendToFile &SendToBase The handle of the object to use to create the file.

Methods

Method name Parameters Description
Init (SendToBase pSendToClass,
queue pQueue,
long pListControl,
string pFilename,
byte pPreview=0,
SendToOptionsGroup pOptionsGroup),
long
Inits the SendToObject, sets up the required options and opens the document, as well as creating the header. Returns 0 if successful.
Parameters:
pSendToBase - a handle to the SendTo object.
pQueue - the queue containing the data for the output.
pListcontrol - the list control displaying the pQueue.
pFileName -  the file to export the data to.
pPreview - set if the file must be previewed.
pOptionsGroup - a group containing the various options (class type dependant).
Next (*long pRecordsProcessed,
*byte pThermometer,
long pThermometerCtrl,
long pProgressText=0),long
Calls the SendTo object's next method and handles the update of the Progress bar.
Parameters:
pRecordsProcessed - a  handle to the variable containing the records processed.
pThermometer - a percentile incrementor for the Progress bar.
pThermometerCtrl - the ID of the progress bar.
pProgressText - the ID of the progress text string on the Progress window.
Kill ( ) Kills the SendTo class and runs the file preview (if required)

Examples

The following examples are shipped with SendTo:

Demo\abcdemo.app This demonstrates the use of SendTo in a simple single-EXE stand-alone ABC application. It shows the use of all the SendTo templates. (Clarion6 demonstrates the use of PDF generation)
multi DLL\root.app and mainexe.app This demonstrates the use of SendTo in a multi-DLL application (ABC) where the SendTo procedures reside in the DataDLL (root.app), while the procedures from which SendTo is used resides in the mainexe.
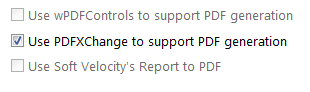
SendTo with wPDFControls\ abcdemo.app These two applications (one for legacy and one for ABC) demonstrate the use of SendTo using wPDFControls for PDF file export.
SendTo with PDFTools\
abcdemo.app
This ABC application demonstrates the use of SendTo using PDFXChange to generate PDF files.
SendTo with xFiles\
abcdemo.app
This ABC application demonstrates the use of SendTo with XML output.
SendTo with FTP\
abcdemo.app
This ABC application demonstrates the use of SendTo with export to FTP (requires NetTalk 4).
 

FAQs

I'm getting compile errors. What am I doing wrong?

1. Procedure importing and Template Issues:
1.1. I ran the ImportSendToWindows utility and no procedures were imported.
1.2. My SendTo window is in another app, but I have a SendTo_Window ToDo procedure.
1.3. The template utility fails to create the SendTo_Window and/or other SendTo procedures  
1.4. I have 2 (or more) browses on my window, I cannot select which browse to associate the SendTo control with - it always gets associated with the one browse.
1.5. The imported procedure 'SendTo_Window' has predetermined controls that are displayed based on the output. How can I permanently hide some of them?

2. General Formatting Issues:
2.1. SendTo is not formatting the output of my browse correctly.
2.2. Why do my style settings in my list not get depicted in the output properly?
2.3. My pages are appearing in strange orders and the rows aren't all appearing on the printed output.
2.4. Only the first 100 columns of my browse is being output. How do I change this limitation?
2.5. How do I suppress the column header row?
2.6. My text font color is white in the output - so it is not visible. How can this be rectified?
2.7. How do I get my date values into true Excel dates when exporting to Excel?

3. PDF Issues:
3.1. I'm using a Report to PDF template, but my reports are being printed, not PDFed.
3.2. How do I add PDF support to SendTo in my application?
3.3. How do I use HyperActive to view my PDF files?

4. Report (Printing) Issues:
4.1. My PageNumbers are not correct in my reports.
4.2. I want to be able to select the paper size for my printer. It's fixed to A4.
4.3. Not all my icons in my browse are being shown in the printout. How come?
4.4. I want to use a 3rdParty previewer. How do I do this?

5. Legacy Template Issues:
5.1. Not all my records are appearing in the SendTo output.
5.2. When I return from my SendTo output, the record I selected is different from when I called the SendTo routine.

6. Email Issues:
6.1. My SMTP server requires a Authorized user and password. How do I do this in SendTo?
6.2. When using SendTo, how can I change the default email Text from 'Please find the attached file.'?

7. Other export formats (FTP, XML, etc)
7.1. How do I export to XML using xFiles?
7.2. How can I enable my user to select a Tab delimiter character for the CSV file at runtime?

8. Miscellaneous Questions
8.1. Do I really need to purchase all those other products in order to get SendTo to work?
8.2. Not all my data is being output to the SendTo output.
8.3. How do I use a different text editor (other than notepad) to view the CSV file output?
8.4. How can I get SendTo to work with a Dynamic Queue?

If your question is not answered in the docs, contact support


1.1. I ran the ImportSendToWindows utility and no procedures were imported.

Answer:

Are you sure you completed all the steps to add SendTo to your application? (Check the Adding SendTo to your Application for more details).

You've probably missed one of the following:
1. The SendToTemp file has not been imported to your dictionary.
2. The Global Extensions of all the products have not been added before running the import utility.
3. The incorrect template utility is being used (you must use the ImportSendToWindowsABC must be used for ABC applications, not legacy applications and visa-versa)


1.2. My SendTo window is in another app, but I have a SendTo_Window ToDo procedure.

Answer: You need to:
1. Go into your SendTo global extension template (on the same app) and uncheck the SendTo Window is in another app.
2. Delete the entry in the SendTo Procedure so that it is blank.
3. Check the SendTo Window is another app checkbox.
4. Type in the name of your SendTo_Window (that is in the other application) into the SendTo Procedure entry field.


1.3.The template utility fails to create the SendTo_Window and/or other SendTo procedures.

Answer: Make sure you:

1. Add the SendTo file to your dictionary.
2. Add the necessary 3rdparty templates (NetTalk, Draw, WinEvent & OfficeInside)
3. Select the correct utility for the template type (ABC or legacy)
4. If all the above are correct and the SendTo procedures are still not being added to your application, then manually import the txa file from the claironx\3rdparty\libsrc directory (either SendToWindowsabc.txa or SendToWindowsLegacy.txa depending on whether your application is legacy or ABC).

For more details see the Adding SendTo to your Application section of this doc.


1.4. I have 2 (or more) browses on my window, I cannot select which browse to associate the SendTo control with - it always gets associated with the one browse.

Answer: This is a Clarion IDE oddity. Unfortunately there is nothing we can do about it. The only way to solve this is by deleting and re-adding the browses.


1.5. The imported procedure 'SendTo_Window' has predetermined controls that are displayed based on the output. How can I permanently hide some of them?

Answer: You can delete the following optional controls from the SendTo window if you don't require them:
1. Configure Email Settings.
2. Preview after Save.
3. Suppress Greenbar.
4. ExcelSettings group.
5. Pageswide selection group.


2.1. SendTo is not formatting the output of my browse correctly.

Answer: Sometimes Clarion does not return the correct Browse format:

1. If you have a group with a header, and the first column is blank, then, you will have 2 headers in your SendTo output. Unfortunately there's nothing I can do about this, but what you can do is move the header from the group to the column header. This will ensure that SendTo will obtain the correct information.


2.2. Why do my style settings in my list not get depicted in the output properly?

Answer:

Unfortunately some of the style properties in a list box are not readable. This means that (besides the text and background color settings) SendTo cannot determine the settings of your browse. As a result only the 2 color properties of the font will be depicted in the output.


2.3. My pages are appearing in strange orders and the rows aren't all appearing on the printed output.

Answer: You're probably not using the correct printer driver for the printer. This is the most likely cause. The best way to verify this, is to check the PDF output and see if it is correct. If it is correct, then this is the problem - otherwise mail us at support.


2.4. Only the first 100 columns of my browse is being output. How do I change this limitation?

Answer: This is easily changeable. We needed to pick a maximum and to optimize the amount of calls done in loops and size of memory used - while not over optimizing in that this becomes an inconvenience we picked 100 columns as the maximum. You can easily increase this, by changing the SendTo.inc file equates. So if you wanted to increase this limit to 200:

MaxCols        equate(200)
MaxCols1      equate(201)


2.5. How do I suppress the column header row?

Answer: You need to re-create the SendTo window (which will have the 'Suppress Column Headers' checkbox that you can use to suppress column headers at runtime).


2.7. How do I get my date values into true Excel dates when exporting to Excel?

Answer: You might need to re-import the SendTo window (as this is a control introduced in version 1.45). In the SendTo window, you'll find a check 'Date using True-date format' that you can use to use the excel date format when selecting Excel as the output format.


2.6. My text font color is white in the output - so it is not visible. How can this be rectified?

Answer: You cannot use propstyle:FontColor in your style's fonts. You must use propstyle:TextColor (which is an exact replacement). This is a known bug in Clarion, as propstyle:FontColor is write-only (and not read/write as the help indicates).


3.1. I'm using a Report to PDF template, but my reports are being printed, not PDFed.

Answer 1: Check (we'll use the wPDFControls template in this example):
1. That you've added the wPDFControls Global template.
2. The 'Save Report to PDF' extension template to the SendTo_Printer procedure (leave as is).
3. That you've checked the 'Use wPDFControl to support PDF generation' checkbox on you SendTo template on the SendTo_Printer procedure.
4. That you've checked the 'Use a Report to PDF Convertor' checkbox on the SendTo control template in the SendTo_Window procedure.

Answer 2: There is an oddity in the Clarion6 IDE/Compiler. You need to:
1. Remove the SendTo windows and the SVReportToPDF global Extension template
2. Re-import the SendTo windows and add the SVReportToPDF global Extension template
3. Setup the SendTo_Printer procedure and the SendTo_Window procedure templates to cater for PDF.


3.2. How do I add PDF support to SendTo in my application?

Answer:

For Clarion6 ABC applications:

1. Your application must be an ABC based application compiled in Clarion6
2. You need to add the Report to PDF - Global extension template to your global templates.
3. In your SendTo local extension on your SendTo_Window - you need to check the Use a Report to PDF Convertor checkbox on the General tab. You also need to check the PDF checkbox on the File Formats tab.

Either

4. Re-run the ImportSendToWindowsABC Template Utility (Note: this will overwrite your existing SendTo windows).

OR

5. In your SendTo_Printer Report Properties, who must have the Report Target set to Printer. 
6. Your SendTo_Printer procedure prototype should be as follows:

(queue pQueue, long pListControl, string pHeader, byte pPreview=1,byte pSuppressGreenBar=0,<string pPdfFile>)

Lastly: In your SendTo Extension template on your SendTo_Printer procedure, check the available PDF support checkbox on the options tab

For other applications:

1. You need to purchase a 3rdparty Report to PDF tool (like wPDFControls).
2. Follow the tool's instructions to add the template to your application (particularly your SendTo_Printer procedure).
3. The SendTo control template will detect the presence of the 3rdparty tool and add support to the procedure for that tool. Currently supported 3rdparty tools are: wPDFControls and PDFXChange. For support on other tools, please contact support<at>capesoft.com for more information.
4. In your SendTo local extension on your SendTo_Window - you need to check the Use a Report to PDF Convertor checkbox on the General tab. You also need to check the PDF checkbox on the File Formats tab.


3.3. How do I use HyperActive to view my PDF files?

Answer:

This is Available for PDF users (in conjunction with the ABC Clarion6 SVReportToPDF extension template)
1. Add the HyperActive Global Extension to your application.
2. In the Local Extensions of your SendTo_Printer extension template, highlight the SendTo Local Extension template, and check the Use HyperActive to Preview the PDF File checkbox.