


www.capesoft.com

| NetAuto Objects and the NetAuto Protocol | |||
|
|
|
||
|
|
|||
| Version
www.capesoft.com |
|
||
 |
 |
 |
 |
|
 |
 |
 |
|
Learn
NetTalk
|
Examples
|
Common
Features |
NetAuto
Objects |
NetSimple
Objects |
Dial-Up
|
Support
|
Version
History
|
There are a number of ways of adding the NetTalk objects to your program. In this first section we will deal with the easiest way to add them to your applications. In the following sections we cover the rest of the NetAuto objects in more detail. The NetSimple objects are dealt with in the separate NetSimple documentation.
NetTalk provides you with a number of control templates which allow you to quickly use some of the NetTalk functionality. These controls are demonstrated in the example program.

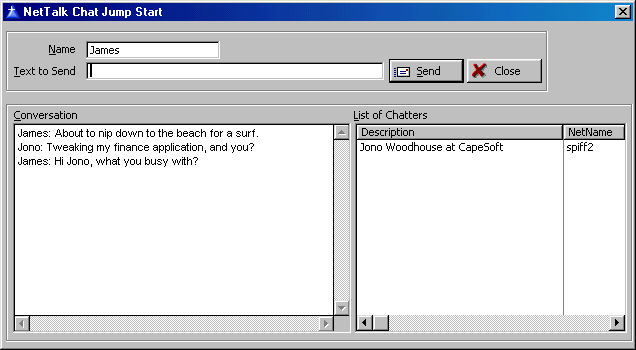
JUMP START for ChatControls
This has been modeled in the NetDemo example application.
Example Screenshot
This control template allows you to add a Chat window to your application:
1) Open or create a new application.
2) Clarion 5 Users (only):2a) Go to the "Project" Menu click "Properties" this will load the Project Editor.
2b) Click on "Project:Generator" in the very top of the left-hand pane, then press the "Properties" button and make sure your application's "Target OS" is set to " Windows 32-bit". If it's not, change it to 32-bit. (NetTalk only works for 32-bit applications).
2c) (Optional but recommended - turn on logging options - only needed in Clarion 5, as the NetTalk template in more recent versions does this for you):
Go to the defines Tab and add
NETTALKLOG=>1
This will turn on the NetTalk logging option (for debugging).
Then press OK a number of times to return to the Application Tree3) Add the NetTalk Global Extension by going to the "Global" button, pressing "Extensions", then "Insert" and choose "Activate_NetTalk" from the list of extensions. Press OK a number of times to return to the Application Tree.
4) Go to the Window formatter of the window procedure that you want as the chat controls placed in.
5) Go to the "Populate" Menu and choose "Control Template...". Choose "ChatControls" in the Select Control Template Window under "Class NetTalk" and press Select
6) When the list box formatter appears press OK.
7) Resize your window so that you can see all the controls. Return to the Application Tree.
8) Right click on the procedure with the Chat control and click and choose extensions.
9) In the NetTalk extensions setting you will see three tabs. Click on the "Settings" tab and you will see the name of your application in the Unique Application Name field. You may need to change this to be the same as the Unique Application Name of any other applications that you want your chat window to be able to chat with. The chat window can only chat with other NetAuto chat applications that have the same Unique Application Name.
10) Save your work and Compile and Run your application. (If you get any Compiler Errors then you can diagnose what went wrong in the compiler errors section).
You can either run two copies of the program or run it on two different machines to try it out.
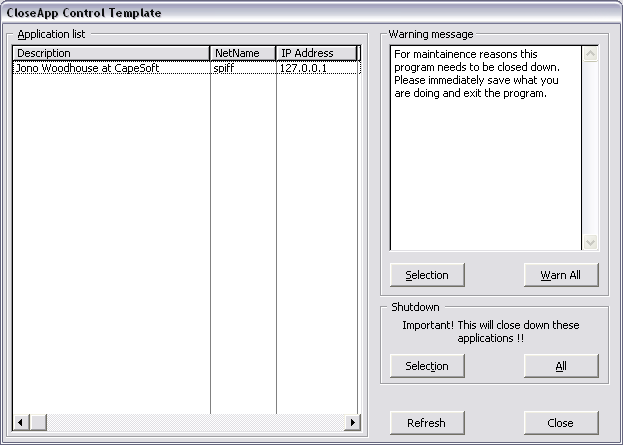
The CloseAppControls give you the controls for remotely closing down your application from anywhere on your LAN.
This has been modeled in the NetDemo example application.
The Close Remote Applications is a client/server feature. Your need to add both the server (NetAutoCloseServer) and the client (NetCloseApps) functionality to your application. This is very easy to do.
This Client part is added via a Control template in a similar fashion to the ChatControls.
The Server part is added by using a new NetTalk object instance in the main frame of your application based on the NetAutoCloseServer object. This Auto Close Server runs when your application is loaded. The client is only run when the network administrator wants to close down the applications. (Remember a client is the process that initiates the communication or task). So the server just sits and waits until the client sends the request to close down.
1) Open or create a new application.
2) Clarion 5 Users (only):2a) Go to the "Project" Menu click "Properties" this will load the Project Editor.
2b) Click on "Project:Generator" in the very top of the left-hand pane, then press the "Properties" button and make sure your application's "Target OS" is set to " Windows 32-bit". If it's not, change it to 32-bit. (NetTalk only works for 32-bit applications).
2c) (Optional but recommended - turn on logging options - only needed in Clarion 5, as the NetTalk template in more recent versions does this for you):
Go to the defines Tab and add
NETTALKLOG=>1
This will turn on the NetTalk logging option (for debugging).
Then press OK a number of times to return to the Application Tree3) Add the NetTalk Global Extension by going to the "Global" button, pressing "Extensions", then "Insert" and choose "Activate_NetTalk" from the list of extensions. Press OK a number of times to return to the Application Tree.
4) Go to the Window formatter of the window procedure that you want as the close applications controls placed in.
5) Go to the "Populate" Menu and choose "Control Template...". Choose "CloseAppControls" in the Select Control Template Window under "Class NetTalk" and press Select.
6) When the list box formatter appears press OK.
7) Resize your window so that you can see all the controls.
8) Go back to the Application Tree. Right-click on the procedure that you just added the CloseApp Controls to and choose Extensions.
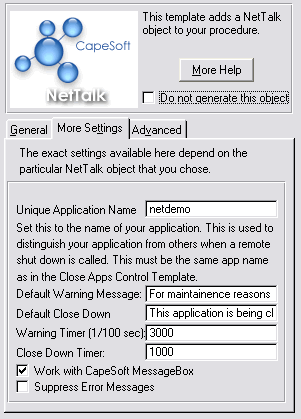
9) Go to the "Settings" tab on the Add CapeSoft NetTalk Close Controls and type in a unique application name. This needs to be the same name as the one you will use on the Auto Close Server.
10) You can also go to the "Extra" tab and set the default warning message. (The AutoClose Server can override these this message, with it's default message).
We have now added the CloseAppClient (CloseAppControls) we now need to add a AutoCloseAppServer.
11) Go to main frame of the project and right-click and choose extensions. (Note: This frame (or window) needs to be open the whole time your application is open, otherwise you will not be able to shut it down, that's why it's best that the AutoClose Server is added to a Frame). When the Extension and Control Templates window opens, click on the Insert button. Choose "IncludeNetTalkObject" under Class NetTalk. Press Select.
12) In the "This Object Name" field type in "OurCloseServer".
13) Set the "Base Class" Combo box to "NetAutoCloseServer". Press OK.
What we have done here is chosen to create our own instance of a NetTalk object based on the predefined NetAutoCloseServer object.
14) You now need to set the "Unique Application Name" in the template extensions to the same name that you used in the Client extension template. These settings are found in the "Settings" tab in extensions for both the Client and the Server procedures.
15) You can set the default messages and length of times that the messages are displayed for on this tab as well.
16) Save your work and Compile and Run your application. (If you get any Compiler Errors then you can diagnose what went wrong in the compiler errors section).
You can either run two copies of the program or run it on two different machines to try it out.
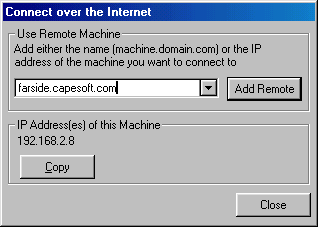
This Control is added in a similar fashion to the ChatControls. (If you don't want to use a Control Template to connect to remote machine, then you can also use the NetAutoRemote DLL function)
Important: NetTalk also has a DIP (Dynamic IP) manager. This technology provides you the ability to get all your applications talking to each other over a WAN or the Internet without having to know the individual IP address. 9 times out of 10 if you use the DIP object and the DIP server you will not need to use the UseRemoteMachine control template or the NetAutoRemote function.
This has been modeled in the NetDemo example application.
1.)Open or create a new application.
2) Clarion 5 Users (only):2a) Go to the "Project" Menu click "Properties" this will load the Project Editor.
2b) Click on "Project:Generator" in the very top of the left-hand pane, then press the "Properties" button and make sure your application's "Target OS" is set to " Windows 32-bit". If it's not, change it to 32-bit. (NetTalk only works for 32-bit applications).
2c) (Optional but recommended - turn on logging options - only needed in Clarion 5, as the NetTalk template in more recent versions does this for you):
Go to the defines Tab and add
NETTALKLOG=>1
This will turn on the NetTalk logging option (for debugging).
Then press OK a number of times to return to the Application Tree3) Add the NetTalk Global Extension by going to the "Global" button, pressing "Extensions", then "Insert" and choose "Activate_NetTalk" from the list of extensions. Press OK a number of times to return to the Application Tree.
4) Go to the Window formatter of the window procedure that you want as the chat controls placed in.
5) Go to the "Populate" Menu and choose "Control Template...".
6) Choose "UseRemoteMachineControls" in the Select Control Template Window under "Class NetTalk" and press Select
7) When the list box formatter appears press OK.
8) Resize your window so that you can see all the controls.
9) Save your work and Compile and Run your application. (If you get any Compiler Errors then you can diagnose what went wrong in the compiler errors section).
The NetDIP object(suggested reading)
This object is demonstrated in the NetDemo example.
DIP stands for Dynamic Internet Protocol address, and enables you to detect other instances of your program (or those in the same "room" as yours) by connecting to a common application server. The server then groups the clients into "rooms", by the room-name specified in your program, informs you who's in the room and then the necessary connection can be made.
NetDIP will be extremely useful to you if you receive a Dynamic IP address from your ISP, or you want to co-ordinate a central server to tie all sorts of users together around a LAN or WAN or the Internet. NetDIP is demonstrated in the NetDemo example and we suggest having a look at the Internet Chat example of how you can connect through a single DIP server in the CapeSoft office to other people using the chat program.
NetDIP is actually a NetSimple object, but it's main use is the co-ordination of the IP addresses of machines using the NetAuto objects. That's why we've put it in the NetAuto object document (Document 2).
TIP - There's an excellent snippet of information you need to read in the FAQ on using WAN & Internet.
Note: In order to use the NetDIP object, which is a DIP client, your application will need to be able to communicate with a DIPServer. There is one permanently running at dip.capesoft.co.za or you can compile your own DIPServer (see the example code in clarion/3rdPart/Examples/NetTalk) or you can download the DIPServer.exe from the NetTalk download page on www.capesoft.com .
Important: To test this application you will need to create this application and then test it over the Internet or a WAN. To effectively test it you will need to run two copies of the application you create, but they should not share the same LAN if you want to test the DIP functionality. (If both applications are on the same LAN they will still work, but are able to communicate with each other by virtue of being on the same LAN and not because they identified each other through the DIP server).
To use the NetDIP objects you need to do the following: (You will find this section easier to understand if you have already worked through scenario one).
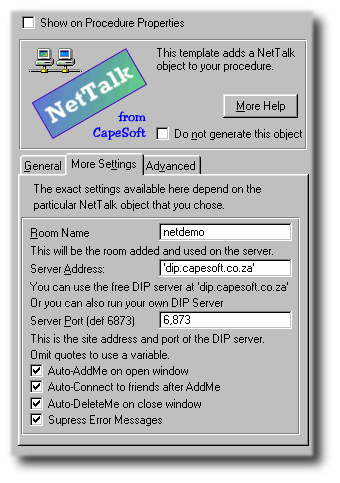
Example Screenshot
1. Add the NetTalk Global Template and all the usual basics (see steps 1 to 4 of Chat Control JUMP START).
2. Use the NetTalk extension template to create your own object based on the NetDIP class. You could call your object anything you like (e.g. ThisDIP).
3. In the 'Settings' tab you find some prompts which will enable you to customize your program.
3.1. The 'Room Name' is the name of the unique "room" that users of your program will be added to. You want your room name to be unique. You could set this to something like MyTest123
3.2. The 'Server Address' is the address of the registration program that your program will connect to. There is a permanent DIP server running in the CapeSoft office ('dip.capesoft.co.za'), to use this you need to be connected on the Internet. If you want to run your own DIP Server it's in the examples folder. (You need to use single quotes if you are telling it to use a string otherwise you can specify a variable (without quotes)).
3.3. If the 'Auto-AddMe on open window' is checked, the user will be added when the window (with the NetDIP object on) is opened.
3.4. If the 'Auto-connect to friends on AddMe' check box is checked, your program will automatically open a communications port to other instances of the program in the "room" when your program adds itself to the "room".
3.5. If the 'Auto-DeleteMe on close window' is checked, then the user will be deleted from the room in the registration server when the window (with the NetDIP object on) is closed.
3.6. If the 'Suppress Error Messages' is checked, no NetTalk errors will be displayed if things go wrong. We suggest leaving this checked, as if the person if unable to connect, it's as simple as that, they can't connect and displaying an error message will not make then connect. (Errors can be seem via the debug logs).
4. If you want to programmatically extend this object you may need to override whichever methods you need to use. But for most applications you won't.
5. To test this, also add the Chat Controls to this window and then try out two copies of the application over the Internet. Make sure that both applications are not on the same LAN, so that they are being forced to use the DIP server to connection to each other.
Some of these examples are demonstrated in the NetDemo.app example application.
For the most part NetDIP is merely a template driven object. For those who wish to do some hand coding we have supplied the following example code.
Example Code for communicating with the NetDIP Server using the NetDIP object:
! Call the AddMe() method after the object has been initialized and the
! connection to the server has been established .
ThisDIP.AddMe()
! At the next ThisDIP.Process, a <Ok> OK </Ok> will be returned to confirm
! that the user has been added to the "room" on the server.
! You can then find out who else is in the room.
! You don't need to call the AddMe method before the GetFriends() method.
ThisDIP.GetFriends()
! At the next ThisDIP.Process, a String in the following format will be
! returned:
! <Room> roomname
! <Guid> GUID1.GUID2 </Guid> <IP> IPNo </IP> <Date> ConnectedDate
! </Date> <Time> ConnectedTime </Time>
! .
! .
! .
! more users
! </Room>
! roomname is the name of the room (set in the NetTalk template).
! The users' details are then listed after the roomname (a line for each user)
! GUID1 and GUID2 is the DIP of the user connected.
! IPNo is the user's IP address.
! ConnectedDate and ConnectedTime indicate when the user connected to the server.
Once you have done both of the above 2 methods, you can make the connection to your "friends" like this (You will not need to call this method if you have the "Auto-connect to friends on AddMe" check box in the NetTalk Local Extension Template checked):
ThisDIP.ConnectToFriends()
Before closing the object you will need to delete the user from the room.
ThisDIP.DeleteMe()
You can also use NetDIP to determine what your IP address is. To do this call:
ThisDIP.WhoAmI()
then put the following code into your ThisDIP.GotWhoAmI() method:
Message ('My IP is ' & self.MyIPAddress)
Adding email sending functionality to you applications is easier than ever. See the Send Email Control Template section for all the details.
This has been modeled in the NetDemo example application.
Adding FTP upload and download functionality to your applications is easier than ever. See the FTP Control Template section for all the details.
This has been modeled in the FTPDemo example application.
Activate_NetTalk
This Global Template must be added to your application to use any of the following features. Later on we'll explain how to do this.
Suppress_NetTalk - (only for DLL applications)
By Default NetTalk is part of ABC. If you are making a Multi-DLL app then NetTalk is automatically included in the "Root" DLL. This may not be desirable because NetTalk requires both the DOS and the NetTalk DLLs. This extension is designed to be added to your Root DLL. It removes NetTalk from the Root DLL. Use this ONLY if the application will NOT be using NetTalk in ANY of it's DLLs or EXEs.
Use_NetRefresh
Add this Global Template to use NetRefresh in your application. Again this is explained later on the Use_NetRefresh section.
You can use this template to automatically refresh data on open windows (browses and forms) when data is changed in other instances of your program or in windows on other threads. This is really useful when multiple users use the same data set. On your forms and processes you can issue a refresh command when the records are saved and any window that is active (in it's thread) will immediately be refreshed with the correct data. A window that was not active (in it's thread) at the time when the refresh was issued, will be refreshed as soon as it becomes active on that thread. There is an example of the NetRefresh in the NetRefresh example application.
Important Note: The NetRefresh function will only work in Frame based applications. You must have a frame in your application, and you must not run windows on the same thread as the Frame's thread. Rather use the Start function to start windows on their own threads.
1. Add the "Refresh All Windows on Update" global extension template to your application (for a Multi-DLL project you must do this for all the apps). To do this:
1.1. Open your application and click on the "Global" button.
1.2. Click on the "Extensions" button on the "Global Properties" window.
1.3. If you have not added the "Activate_NetTalk" extension, then you will need to do that now. Click "Insert" and select that "Activate_NetTalk" extension from the list of templates and click on the "Select" button.
1.4. Make sure that the "Activate_NetTalk" extension is highlighted and click the "Insert" button. Select the "Use_NetRefresh" extension template from the list box and click the "Select" button.
2. Customize the Global Extension to suite your needs:
General Tab3. Click "OK" a couple of times to return to the application tree.
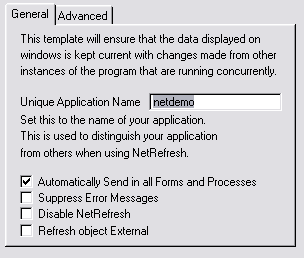
2.1 Enter a Unique Application Name. This should be a name that uniquely differentiates your application from all the other NetRefresh enabled programs that may be running on your Network (for a Multi-DLL project this must be the same in all the apps).
2.2. Leave the "Auto send in forms and processes" set on (default) if you want to automatically send the refresh command on the "OK" button (forms) or when processes are completed. This option can be overridden on each form if you require.
2.3. You can choose to Suppress Error Messages if these get in your way. The default is to have Error Messages displayed. But on some applications you may choose to turn this off.
2.4. If you don't want to use the Auto-Refresh function, then check the "Disable NetRefresh" check-box.
2.5. If this app is part of a multi-DLL application and it is not the data DLL, then you need to check the 'Refresh object External'.
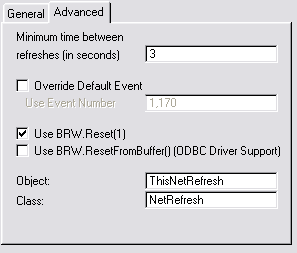
Advanced Tab
2.6. Minimum time between refreshes is useful for programs with heavy traffic, i.e. in a database where there are many changes being made, the screen can be constantly refreshing, causing confusion to the user. It may be helpful to perform multiple changes in one refresh every minute, rather than refreshing multiple times every minute.
2.7 Use Window.Reset(1) - should be on (default)
2.8 Use BRW.ResetFromBuffer() - should be turned on if you are using the ODBC Driver.
4. Add the Refresh command to the required places. This is automatically done on all forms and processes, if you checked the "Auto send in forms and processes" on.
4.1. This is not normally needed, except if you want to manually issue a SendRefresh command. Simply add the following line of code to wherever you need to issue a refresh (e.g.. after records have been changed/added or deleted):5. If you don't want a window to be refreshed when a refresh command is received, then you can disable the Refresh on that specific window.
ThisNetRefresh.send() ! refresh all the other windows with our data change.where ThisNetRefresh is the name of the object entered in the Global Extension template.
4.2. You can turn the Refresh command to forms and processes manually on in the local procedure extension template that is automatically populated by the "Use_NetRefresh" template. (Note this only applies to Forms and Processes not Browsers nor Windows)
4.2.1. Right-click on the form/process from, in the application tree, where you would like to issue the Refresh command.
4.2.2. Select "Extensions" from the popup menu that appears.
4.2.3. Highlight the "Refresh this Window on Update" template in the template list that appears.
4.2.4. In the Template's properties that appear on the right, you can change the status of the "Send Refresh Command" to "Use Global Default" (the setting in the Global Extension template), "Yes" or "No".
5.1. Do 4.2.1. to 4.2.3. to get to the local extension template for the window where the Refresh must be disabled.
5.2. Check the "Disable Net Refresh on this window" will ensure that this window is not updated when a Refresh command is posted to this application.
To harness all the power of NetTalk you need to use the NetAuto or NetSimple objects directly. This section looks at using the NetAuto objects. (For info on using the NetSimple objects please look at Document 3).
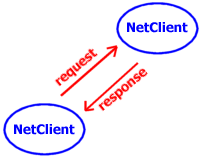
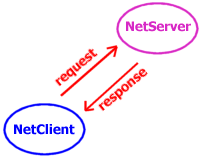
When you want to build your own application that can communicate over the network, you can use the two main NetAuto objects, NetServer and NetClient. NetTalk templates allows you to easily build your own instances of these objects. These objects provide you with the network communication. You can then tailor these objects to your needs. The details of how to do this are described in the three scenarios.
The rest of this section describes the NetAuto objects in more detail. If this is the first time you are reading this manual you may want to skip this section for now, but make sure you come back here later and read the rest of this section later, as it lays a foundation for NetTalk and object programming. If you choose to skip this section you can go to the next section (Programming Scenarios) which give you practical examples of how to use NetTalk.
NetAuto allows you to set up client and server services. To create your own NetAuto Service you will use either the NetServer or NetClient object. (The NetTalk template extensions help you do this). You will create your own instance based on one of the NetAuto objects and can override methods or derive your own methods and properties.
When you add a NetAuto object to your procedure using the extension template, you choose whether the object is private or public. See Scenario One for an example. Normally servers are public, because a public service is announced to other NetAuto services so that they can use the service. Most clients are private, as no other NetAuto services need to be seen. If your clients need to see other clients then you would create a public client. (Technically a client is also a server, in that it can respond to communication from another client).
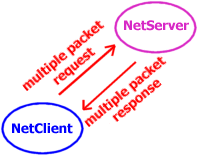
When you want your client service to send a packet, you will override the Send() method or derive an Ask() method. See Scenario One for an example. NetAuto communication is done via packets. The NetAuto packet has various properties that should be set (more details in the What data must I set before sending a packet section) before it is sent. These include specifying the data you want to send, and who (which machine(s)) you want to send it to. You can choose to send it to any server, a particular server or all servers. When the packet properties are set you will call the parent.send() method, which will send the packet. If your data is too big to be sent in one packet, you can specify that you want to send a set of packets.
The packet has two data properties which you can set. The first is a long (32-bit) number called self.packet.command. This is a useful property to send command numbers to other processes. For example you could send command=1 when you want to request the time, or command=2 when you want to set the time. You can tailor this command for your own use. By convention a command of 0 means you are not using the command. The second is a string called BinData (binary data). The maximum amount of data you can place in the BinData string is a constant value of Net:MaxBinData (currently 16K). Scenario One demonstrates how to pack all sorts of data into BinData using groups defined over the string. (If you want to send more than 16K of data then you will need to send a set of packets, see Scenario Three).
Each process (or instance of your application) that uses NetAuto gets assigned it's own Name. This name is referred as the NetName. In the TCP/IP protocol each machine has it's own hostname and in NetTalk each application that uses at least one NetAuto object gets assigned it's own NetName based on the hostname. Your hostname is the name set in the Windows Networking Properties, from your control panel. Example: If I load up an application that uses NetAuto on my machine. It's hostname is 'spiff' and it's NetName is also 'spiff'. If I load a second copy of this application into memory (i.e. 2 copies running) the hostname for is still 'spiff', but it's NetName is 'spiff2'. The NetName is used to differentiate multiple NetAuto enabled applications running on the same machine. For an example see Scenario Two.
When you want to write the code that will receive a packet you will override the Process() method. See example Scenario One. This virtual method gets called for you when your NetAuto instance receives a packet. It allows you to read the data sent to you from other NetAuto applications. You can also use this method to send data back or to communicate with other instances. In fact there is no limitation in how you want to build your applications. NetAuto is very flexible. Should you wish to send off a set of packets then you will override the MultiPacketReply() method, which will allow you to prime one packet at a time, before they are sent. (The MultiPacketReply() method is only used when you are sending a set of packets, and not for single-packet transfer. You can send multiple single-packets which is different from sending a multi-packet set. Single-packets only need to use the Process() method. You only need to send a set of packets when the data you want to send is larger than one packet.)
You can look at the section that describes the methods and properties of the NetServer and NetClient objects. You should also look at the Handy Guide for what you need to set before sending a packet.
The following programming scenarios have been created as examples which will help you to create your own NetAuto applications.
Most network applications fall into one of three categories and we have modeled these three categories as three scenarios for you. To incorporate the NetAuto objects into your application, look at the following scenarios and find the one that closest matches what you are trying to do. You will then find it relatively easy to add NetAuto communication to your applications by following the example. To understand these scenarios you need to know that our definition of a client is, the process that initiates communication, whereas it is the server that responds to communication. See the Client / Server section for more detail.
Note: The source code (in an app file) for this scenario can be found in your Clarion\3rdParty\Example\NetTalk folder.
In this example we build a Time Client and a Time Server. The Time Client will request the time from the Time Server, by sending a packet command of 1. The Server will return the time in the binary data portion of the packet.
1) Open or create a new application in Clarion. (You can turn off Quick Start and the Application Wizard for this example).
2) Clarion 5 Users (only):2a) Go to the "Project" Menu click "Properties" this will load the Project Editor.
2b) Click on "Project:Generator" in the very top of the left-hand pane, then press the "Properties" button and make sure your application's "Target OS" is set to " Windows 32-bit". If it's not, change it to 32-bit. (NetTalk only works for 32-bit applications).
2c) (Optional but recommended - turn on logging options - only needed in Clarion 5, as the NetTalk template in more recent versions does this for you):
Go to the defines Tab and add
NETTALKLOG=>1
This will turn on the NetTalk logging option (for debugging).
Then press OK a number of times to return to the Application Tree3) Add the NetTalk Global Extension by going to the "Global" Button, pressing "Extensions", then "Insert" and choose "Activate_NetTalk" from the list of extensions. Press OK a number of times to return to the Application Tree.
4) Open the window formatter for the window that will request the time. (You may need to create a new procedure to do this).
5) Insert a button onto the window. Change the "Text" property of the button to "Get Time" and change the "Use" property of the button to "?GetTime"
6) Insert a string field onto the window. This will be the string field that will contain the time, when we get it from a server. Set the "Use" property to "?TimeStr"
7) Return to the Application Tree and rename your procedure to 'TimeClient'
8) Go to the procedure extensions for your (TimeClient) window. i.e. Right click on the procedure and choose extensions. Press the "Insert" button and choose the "IncludeNetTalkObject", press the "Select" button.
9) In the NetTalk template properties set the "This Object Name" to "ourTimeClient" and the "Base Class" field to "NetClient" (note we aren't going to use the NetGetTime object this example.). In the Settings tab, set the Service Name to "MyScenario1". Make sure that the Private Service checkbox is checked (ticked)
Explanation:
What we've done is created an instance of the NetClient object. This is our client object (called ourTimeClient) and it will be responsible for initiating the communication by requesting the time from the Server (which we will create later). The Service name is the name of all services that this client can communicate with. A NetAuto server and client can only communicate with each other if the service name is the same. The reason why we choose to define this service as a private service is that this service does not need to announce itself to other NetAuto programs. It's a client and no-one needs to know that it is running. It will find a server (which will be a publicly announced service) and it will communicate directly with the server.
10) Click on the "Advanced" tab and press the "Data Embed" button in the Override Existing Class Methods group. We are going to insert some code into the data section of one of the existing methods of the object.
11) The "Embedded Source" window appears. If the content of the main text box is empty go to the "view" menu and turn off "Show Filled Only"
12) Find the "Process Procedure" node under Local Objects - ourTimeClient and open the node. Click on the "Data" node and press the "Insert" button.
13) In the Select Embed Type Window choose Source. Paste the following code into the embed editor:
ourData group ! We make a group to store
time long ! the data we want to send
date long
end
ourString string(size(ourData)),over(ourData)
! then we create a string
! over it.
Press the "Exit!" button to return to the Embedded Source Window. Press the Close button to return to the Extensions Window.
14) Click on the "Advanced" tab and press the "Code Embed" button in the Override Existing Class Methods group. We are going to insert some code into the methods of the object we have just created. Find the "Send Procedure" node under Local Objects - ourTimeClient and open the node. Click on the "Parent Call" node and press Insert. In the Select Embed Type Window choose Source. Paste the following code into the embed editor:
self.getservers() ! check for a list of servers
if self.error <> 0
if self.error = -15 or self.error = -16
message ('No Time Servers could be found on your LAN.', |
'NetTime Demo',ICON:ASTERISK)
else
self.ErrorTrap ('An error occurred while attempting to get ' & |
'a list of time servers.', 'TimeClient.Send')
end
return ! Do not send a packet
! Do not let parent.send() get called
else ! if a server exists. (self.error = 0)
self.packet.ToNetName = '' ! We don't mind who serves us
self.packet.Command = 1 ! Send the server command 1
! (we use command 1 as Get the Time)
self.packet.BinDataLen = 0 ! the server doesn't take any data...
self.packet.Options = NET:SinglePacket ! Single packet
! Okay to send the message to a server
! The packet will be sent by the parent
! call that follows this code
end
Click on the Exit! button and you will be returned to the Embedded Source window.
Press the Close button to return to the Extensions Window.
Important! Make sure that the code you inserted has been placed before the parent call in the Send PROCEDURE node. If not click on the Source node that you just inserted and press the up arrow in the priority group box on the right of the window. This will move the source above the parent call.
Explanation:
Okay, we've overridden the Send() method. This is the method that gets called when we want to get the time from a server. This is achieved by sending the server a packet requesting the time and then waiting for a return packet.
The GetServers() command makes sure that we have a server to request the time from. If there aren't any servers it returns -15 or -16 and we raise an error.
The reason we call the return statement when the error occurs is to stop the parent.send() method being called. (If you click on the Source button in the Embedded Source Window, you can see how the code that we added and the parent call interact in the ourTimeClient.Send() method) The parent call is the call to send the packet, and if we don't want to send the packet, we must make sure it is not called, by returning from outTimeClient.Send() before parent.send() is called.)
15) Now repeat this process of inserting source code into the Code Embed of the "Process Procedure" node (can be either before or after the parent call - as parent.process() does not do anything):
if self.packet.command = 2 ! Server has sent us the time
ourString = self.packet.bindata[1:8] ! Store the data that
! the Server sent us
?TimeStr{Prop:Text} = format (ourData.date,@d17) & |
' ' & format (ourData.time, @t4)
! Display it
end
16) Return to the Application Tree
17) We just need to tell your application what to do when the user clicks on the "Get Time" button. Go to the window-formatter of the Get Time Window. Right-click on the "Get Time" button, choose embeds. Select the "Generated Code" under "Accepted", double-click this. Choose "Source" and then insert the following
ourTimeClient.Send() ! Send a packet requesting the time
18) Save your client application and create a new application (which will be your server application) and repeat points 1 to 5 for this new application.
19) In the main window (which you could call something like TimeServer) add the "IncludeNetTalkObject" NetTalk extension.
20) Set the object name to "ourTimeServer" and the Base Class to "NetServer". In the Settings tab, set the Service Name to "MyScenario1". (Note this must be the same name that was used in the Client). Make sure the Private Service checkbox is unchecked. We want a public service. It must let other NetAuto applications know that it is available as a Time Server.
21) Click on the "Advanced" tab and press the "Data Embed" button in the Override Existing Class Methods group. We are going to insert some code into the data section of one of the existing methods of the object. Find the "Process Procedure" node under Local Objects - ourTimeClient and open the node. Click on the "Data" node and press Insert. In the Select Embed Type Window choose Source. Paste the following code into the embed editor:
ourData group ! We make a group to store
time long ! the data we want to send
date long
end
ourString string(size(ourData)),over(ourData)
! then we create a string
! over it.
22) Return to the Extensions Window and use the "Code Embed" button to insert the following in the Process() method: (can be either before or after the parent call - as parent.process() does not do anything).
! This method is triggered when a request is received
! from a client. All we have to do is prime the packet
! information with the correct data, the server object
! will do the rest.
if self.packet.command = 1 ! Client has requested the time
ourData.time = clock() ! prime our data in the ourString
ourData.date = today() ! which is "over" ourData
self.packet.bindata = ourString [1 : size(ourString)]
! set the data we want to send
self.packet.BinDataLen = 8 ! set the length of the data
self.packet.command = 2 ! 2 = I'm sending the time
self.packet.options = Net:SinglePacket ! Single packet
self.SendReply = 1 ! and tell the server object
! to send this packet
end
23) You can now compile and run these two applications. Should you need to debug your code, you can compare your code with the example in the Clarion/3rdParty/Examples/NetTalk directory. You can also consult the Error Codes sections and also the Logging section.
Note: The source code (in an app file) for this scenario can be found in your Clarion\3rdParty\Example\NetTalk folder.
In this example we build an Chat application which will only have a client object, but we will get the client object to operate as both a server and a client. (Remember a client is actually an advanced server). This example will also demonstrate broadcast communication, whereby a packet is sent to all listening servers.
1) Open or create a new application.
2) Clarion 5 Users (only):2a) Go to the "Project" Menu click "Properties" this will load the Project Editor.
2b) Click on "Project:Generator" in the very top of the left-hand pane, then press the "Properties" button and make sure your application's "Target OS" is set to " Windows 32-bit". If it's not, change it to 32-bit. (NetTalk only works for 32-bit applications).
2c) (Optional but recommended - turn on logging options - only needed in Clarion 5, as the NetTalk template in more recent versions does this for you):
Go to the defines Tab and add
NETTALKLOG=>1
This will turn on the NetTalk logging option (for debugging).
Then press OK a number of times to return to the Application Tree3) Add the NetTalk Global Extension by going to the "Global" Button, pressing "Extensions", then "Insert" and choose "Activate_NetTalk" from the list of extensions. Press OK a number of times to return to the Application Tree.
4) Create a window (you can call it something like "Chat") that we can use as the Chat Window. (You may need to create a new procedure to do this).
5) Go to the Properties of this Chat Window (you may need to define it as a 'Window' procedure type). Press the Data button. Insert the following data types:
Name
Type
Base Type
Size
ConversationText
String
32000
OurText
String
100
ListOfServers
Queue
Net:AutoPublicServicesQType
6) Return to the procedure properties window. There is a little button marked '...' to the right of the window button. Click on this button and overwrite the following to define the window (normally you would use the window formatter to define your own window, but this speeds up the example):
Window WINDOW('Chat Example (Scenario 2)'),AT(,,399,185),|
FONT('MS Sans Serif',8,,FONT:regular),SYSTEM, |
GRAY,DOUBLE
PROMPT('Your &text'),AT(3,1,101,11),USE(?Prompt1)
ENTRY(@s100),AT(3,12,242,10),USE(ourText)
BUTTON('Send'),AT(254,10,50,15),USE(?Send),DEFAULT
TEXT,AT(3,33,243,148),USE(ConversationText),HVSCROLL,READONLY
LIST,AT(254,33,144,134),USE(?OtherChatters),HVSCROLL,|
FORMAT('80L(2)|M~Description~@s80@37L(2)|' & |
'M~NetName~@s80@4L(2)|M~IP Address~@s80@'), |
FROM(ListOfServers)
BUTTON('Close'),AT(348,169,50,15),USE(?Close),#SEQ(1)
End
Press the Exit! button to return to the Procedure Properties window. Return to the application Tree
7) Go to the procedure extensions for your (Chat) window. i.e. Right click on the procedure and choose extensions. Press the "Insert" button and choose the "IncludeNetTalkObject", press the "Select" button.
8) In the NetTalk template properties set the Object Name to "ourChat" and the Base Class field to "NetClient". In the Settings tab, set the Service Name to "MyScenario2Chat". Important: Make sure that you uncheck (no tick) the Private Service checkbox. We do not want this client to be a private client, it must be public.
Explanation:
What we've done is created an instance of the NetClient object. This is our server & client object all-in-one (called ourChat) and it will be responsible for sending Chat strings to other Chat processes as well as receiving Chat strings from other processes. It plays the role of both the client (initiator) and the server (the process that responds to the initiator). It must be defined as a public service as it needs to announce itself to the other applications that will use it. That way the Chatters list is updated and when you press the Send button it knows who to send the data packets to.
9) Click on the "Advanced" tab in the NetTalk extension and tick the "Derive?" check-box. We are going to add a new property to the object we have made. Click on the "New Class Properties" button. Click on the "Insert button" in the "New Class Properties" window that opens.
10) Set the property name to "myName" Set the property type to "String" and the size to 80. We will use this property to store the name our NetAuto NetName. (The NetName is usually the name of your machine. But a second instance of NetAuto on the same machine will have a NetName with a "2" appended to the end. A third instance will have a "3" etc.) Press OK twice to return to the Extension and Control Templates Window.
11) Click on the "Advanced" tab and press the "Code Embed" button in the Override Existing Class Methods group. We are going to insert some code into the data section of one of the existing methods of the object. The "Embedded Source" window appears. If the content of the main text box is empty go to the "view" menu and turn off "Show Filled Only". Find the "Init Procedure" node under Local Objects - ourChat and open the node. Click on the "Parent Call" node and press the "Insert" button. In the Select Embed Type Window choose Source. Paste the following code into the embed editor:
self.broadcast = 1 ! sets us up for sending
! each packet to everyone
self.myName = NetAutoGetNetName() ! Get the name of our process
Window{Prop:Text} = 'NetAuto Chat Example (' & |
clip (self.myName) & ')'
! Set the window title bar
self.servers &= ListOfServers ! set the object to use our
! queue, not it's own queue
Click on the Exit! button and you will be returned to the Embedded Source window.
Press the Close button to return to the Extensions Window.Important! Make sure that the code you inserted has been placed after the parent call in the Send PROCEDURE node. If not click on the Source node that you just inserted and press the down arrow in the priority group box on the right of the window. This will move the source below the parent call.
Explanation:
Okay, we've overridden the Init() method. This is the method that gets called when the object loads up. We are setting the window title property as well as telling NetAuto to use our Queue of available servers so that we can display a list of servers to the user. We get the NetName by calling the NetAutoGetNetName() DLL function. We store this NetName in the new myName property that we added to our object.
12) Now repeat this process of inserting source code into the Code Embed of the "Process Procedure" node (can be either before or after the parent call - as parent.process() does not do anything):
! This method receives packets from other Chat controls.
ConversationText = clip (|
self.packet.bindata[1 : self.packet.BinDataLen]) & |
clip(ConversationText)
! Add the text people send us to our
! Text Box on the Screen
display(?ConversationText) ! Refresh the Conversation Box
Explanation: This is the code for handling Chat strings that arrive from other processes.
13) Insert the following into the Code Embed in the Send() method (in the "Send Procedure" node) before the parent call.
self.getservers()
self.packet.ToNetName = '' ! Everyone (we are using broadcast)
self.packet.command = 0 ! We aren't using command
self.packet.BinData = clip(self.myName) & ': ' & |
ourText & '<13,10>'
! Send our name followed by the
! Text the user has typed in
self.packet.BinDataLen = len(clip(self.packet.BinData))
! Set BinDataLen to the
! length of BinData
self.packet.options = Net:SinglePacket ! Single packet
! packet will now be sent by parent call
14) Insert the following code after the parent call (in the Send() method)
self.process() ! This is a bit sneaky, all we do
! here is call our own process() and
! pretend that we received the data
! in our own packet, even though
! it wasn't sent to us. This
! updates the conversation text
! box on the screen for us.
Explanation: This is the code for sending Chat strings to all other processes. We are sending in broadcast mode and so we set the ToNetName to '' (all in broadcast mode).
15) Return to the application tree. We now need to tell the send button what to do when someone clicks on it. Open the window formatter for the Chat window. Double click on the Send button to open the "Embedded Source" window. Under "?Send" -> "accepted" double click on the "Generated Code" node. Choose "Source". Insert the following:
ourChat.Send() ! Call the send method of ourChat object
!Begin Optional
clear(OurText)
select(?OurText)
!End Optional
16) Return to the window formatter. Double click on the close button and insert the following source into the "?close" accepted embed point:
post (event:closewindow) ! Close down this window
17) Return to the application tree. Save and Compile and Run your application.
(If you application compiles but does not work (can't send messages to other chatters) please check step (8) to see if you did uncheck (no tick) the private service checkbox).
Note: If you want this application to be able to communicate with the Chat window in the NetDemo.exe you need to change the ServiceName from MyScenario2Chat to NetChatnetdemo in the extension template Settings tab. This is because the service names are different. But if you make them the same the two different chat programs can communicate with each other.
Note: The source code (in an app file) for this scenario can be found in your Clarion\3rdParty\Example\NetTalk folder.
In this example we build a Server and Client that will transfer a large string (in this case 128K, but it could be anything) via a set of packets. The point of this exercise is to demonstrate sending multi-packet sets. Sending sets of packets is very useful when transferring large amounts of data or when transferring files. (If you are interested in transferring files then you can look at the NetGetFile (Client) and NetFileServer (Server) objects that come with NetAuto. You can find their source code in the Clarion\LibSrc folder in the net*.clw and net*.inc files.)
This is the most complicated of the three scenarios and so it is recommended that you work through the first scenario before this one.
1. Open or create a new application. (You can turn off Quick Start and the Application Wizard for this example).
2) Clarion 5 Users (only):2a) Go to the "Project" Menu click "Properties" this will load the Project Editor.
2b) Click on "Project:Generator" in the very top of the left-hand pane, then press the "Properties" button and make sure your application's "Target OS" is set to " Windows 32-bit". If it's not, change it to 32-bit. (NetTalk only works for 32-bit applications).
2c) (Optional but recommended - turn on logging options - only needed in Clarion 5, as the NetTalk template in more recent versions does this for you):
Go to the defines Tab and add
NETTALKLOG=>1
This will turn on the NetTalk logging option (for debugging).
Then press OK a number of times to return to the Application Tree3) Add the NetTalk Global Extension by going to the "Global" Button, pressing "Extensions", then "Insert" and choose "Activate_NetTalk" from the list of extensions. Press OK a number of times to return to the Application Tree.
4) Rename the Main procedure window that to "LargeStringServer". We will use this window as the Server window.
5) Go to the procedure extensions for your (LargeStringServer) window. i.e. Right click on the procedure and choose extensions. Press the "Insert" button and choose the "IncludeNetTalkObject", press the "Select" button.6) In the NetTalk template properties set the This Object Name to "ourStringServer" and the Base Class field to "NetServer". In the Settings tab, set the Service Name to "MyScenario3". Uncheck (no tick) the Private Service checkbox.
Explanation:
What we've done is created an instance of the NetServer object. This is our server object (called ourStringServer) and it will be responsible for providing the large String to any clients that request it. It is a public service as the clients will need to know about it.
7) Click on the "Advanced" tab in the NetTalk extension and then tick the "Derive?" check-box. We are going to add a new property to the object we have made. Click on the "New Class Properties" button. Click on the "Insert button" in the "New Class Properties" window that opens. Set the property name to "LargeStr". Set the property type to "Other" and the other data type to "string(128000)". This will be the string we return to the client when they request it.
8) Also add a property called "progress" of type long. This will be used to keep a record of how much of the string we have sent, when we send the string. The string will need to be sent over a number of packets. Press OK twice to return to the Extension and Window.
9) Click on the "Advanced" tab and press the "Data Embed" button in the Override Existing Class Methods group. We are going to insert some code into the data section of one of the existing methods of the object. The "Embedded Source" window appears. If the content of the main text box is empty go to the "view" menu and turn off "Show Filled Only". Find the "Process Procedure" node under Local Objects - ourStringServer and open the node. Click on the "Data" node and press the "Insert" button. In the Select Embed Type Window choose Source. Paste the following code into the embed editor:
x long
10) Press the "Exit!" button to return to the Embedded Source Window. Press the Close button to return to the Extensions Window. Click on the "Advanced" tab and press the "Code Embed" button in the Override Existing Class Methods group. We are going to insert some code into the methods of the object we have just created. Find the "Process Procedure" node under Local Objects - ourStringServer and open the node. Click on the "Parent Call" node and press Insert. (Can be either before or after the parent call - as parent.process() does not do anything). In the Select Embed Type Window choose Source. Paste the following code into the embed editor:
! Okay we got a packet from a client
if self.packet.command = 1 ! A client requested the large String
! Create the large string.
! This could be your own data
! Or the contents of a file.
! This slows things down a bit
! but it's just an example.
loop x = 1 to size (self.largeStr)
self.largeStr [x] = x % 10 ! Fill it with sequential numbers
end
self.progress = 0 ! This is our own property - tells us how much
! of the large string we have sent
self.sendreply = 1 ! Tells NetAuto we want to reply to the
! process that sent us this packet.
! If we were sending a single packet, we would
! set up out packet data here, but in multi-
! packet transfer this all gets done in the
! MultiPacketReply() method.
end
Explanation:
If we receive a request (self.packet.command = 1) then we prepare our data that we want to send and we set self.sendreply = 1. This causes the MultiPacketReply() method to be called. In normal single packet transfer we would set the packet properties and then the packet would be sent. Now, because we are doing multi-packet transfer the individual packets are set up in the MultiPacketReply() method. (In fact, in scenario one when you do single packet transfer MultiPacketReply() is still called, but because you won't have put any code in the MultiPacketReply() method it has no effect, and the packet is sent as a single packet.)
11) Return to the extensions window. Insert the following code Data Embed of the existing MultiPacketReply() method.
endPosition long
12) Insert the following into the Code Embed of the existing MultiPacketReply() method. (Can be either before or after the parent call - as parent.MultiPacketReply() does not do anything)
! Work out how much of the string we can send in this packet.
if (len (clip(self.LargeStr)) - self.progress) > NET:MaxBinData
endPosition = self.progress + NET:MaxBinData
else
endPosition = len (clip(self.LargeStr))
end
if self.progress = 0 ! We set this to 0 in Process()
self.packet.command = 2 ! First Packet
else
self.packet.command = 3 ! Another Packet
end
! Fill in the packet data
self.packet.BinData =self.LargeStr[(self.progress+1) : endPosition]
self.packet.BinDataLen = endPosition - (self.progress+1) + 1
if endPosition < len (clip(self.LargeStr))
self.packet.options = NET:PartOfSet
! this calls MultiPacketReply() again.
else
! Last packet of Set
self.packet.options = NET:PartOfSet + NET:LastOfSet
! MultiPacketReply() wont be called again
end
self.progress = endPosition ! Update progress
Explanation:
When we send single packets we set all the packet data in the Process() method. Now, because we are sending a multi-packet set we use the MultiPacketReply() method. When we set self.sendreply = 1 in Process() the MultiPacketReply() method is called. This gives us a chance to set the packets data, if we do not specify that the packet is the last in its set, then the MultiPacketReply() method will be called again (and again etc.), giving us a chance to set the data for the next packet. This continues until we set the packet options to (NET:PartOfSet + NET:LastOfSet)
13) Return to the Application Tree and Save and Compile your application.
14) Create a new application and repeat points 1 to 3 for this application.
15) In the main window which you can rename to "LargeStringClient" add the 'IncludeNetTalkObject' extension.
16) Set the object name to "ourStringClient" and the Base Class to "NetClient". In the Settings tab, set the Service Name to "MyScenario3". Remember the Service name must be the same in both the client and server objects. Check (tick) the Private Service checkbox.
17) Click on the "Advanced" tab in the NetTalk extension and then tick the "Derive?" check-box. We are going to add a new property to the object we have made. Click on the "New Class Properties" button. Click on the "Insert button" in the "New Class Properties" window that opens. Set the property name to "LargeStr". Set the property type to "Other" and the other data type to "string(128000)". This will be the string we get from the Server when we request it.
18) Also add another property called "LargeStrSize" of type long.
19) Insert the following into the Code Embed of the existing Process() method. (Can be either before or after the parent call - as parent.Process() does not do anything)
! Process the packets we receive, they contain the large string
! but it is broken up into set of packets.
if self.packet.command = 2 or self.packet.command = 3
if self.packet.command = 2 ! It's the first packet (the server
! sets command = 2 on the first
! packet and command = 3 on
! subsequent packets.
self.LargeStrSize = 0
end
! Add the data to our larger string
if (self.LargeStrSize > 0) and (self.packet.BinDataLen > 0)
self.LargeStr = self.LargeStr[1:self.LargeStrSize] & |
self.packet.BinData[1:self.packet.BinDataLen]
else
self.LargeStr = self.packet.BinData [1:self.packet.BinDataLen]
end
self.LargeStrSize += self.packet.BinDataLen
if band (self.packet.options,NET:LastOfSet) ! Last packet in set
message ('We received the whole string (length = ' & |
self.LargeStrSize & ' bytes). ' & |
'Here are the first 50 bytes:|' & |
clip (self.LargeStr[1:50]),|
'String Client',ICON:ASTERISK)
setcursor ! Set the cursor back to normal
end
end
Explanation:
What happens here is that Process() is called multiple times. Once for each packet of the multi-packet set that we receive. Each time we add the contents of self.packet.binData to our self.LargeStr and we increment the length in self.LargeStrSize. The server sets self.command = 2 on the first packet in the set, so that we know to truncate our LargeStr.
20) Click on the Exit! button and you will be returned to the Embedded Source window. Insert the following code into Code Embed of the Send() method before the parent call.
self.getServers() ! Check if there are servers
if self.error <> 0
if self.error = -15 or self.error = -16
message ('No String Servers could be found on your LAN.' & |
'|Please load the String Server and try again.', |
'NetString Demo',ICON:ASTERISK)
else
! Raise Error
self.ErrorTrap ('An error occurred while attempting to get ' & |
'the large string from a String Server', |
'LargeStringClient.Ask')
end
return ! Don't send the packet
! return before the parent.send()
else ! if a server exists... (error = 0)
self.packet.command = 1 ! Request the string from the Server
! by setting command = 1
self.packet.BinDataLen = 0 ! We aren't using BinData
self.packet.ToNetName = '' ! Any server will do
self.packet.options = NET:SinglePacket ! The request is a single
! packet (what we get
! back may be a
! multi-packet though)
setcursor (Cursor:Wait) ! Set the mouse pointer to hourglass
! Send our packet via the parent.send()
end
21) Insert the following code into the Code Embed of the Send() method after the parent call.
if self.error <> 0
setcursor ! Set the cursor back to normal
end
Explanation:
We first check if there are available servers. We set self.packet.ToNetName = '' (which means we will are happy to send it to any server. The reason it is sent to any one server and not all servers is because we have not set self.broadcast to 1). This is in fact a single packet set as we simply need to send one packet requesting the large string.
22) You now need to add the following source to the accepted embed point of a "Get String" button:
ourStringClient.Send() ! Send a packet requesting
! the string from the server
23) You can then compile the application and run it. Should you need to debug your code, you can compare your code with the example in the Clarion/3rdParty/Examples/NetTalk directory. You can also consult the Error Codes sections and also the Logging section.
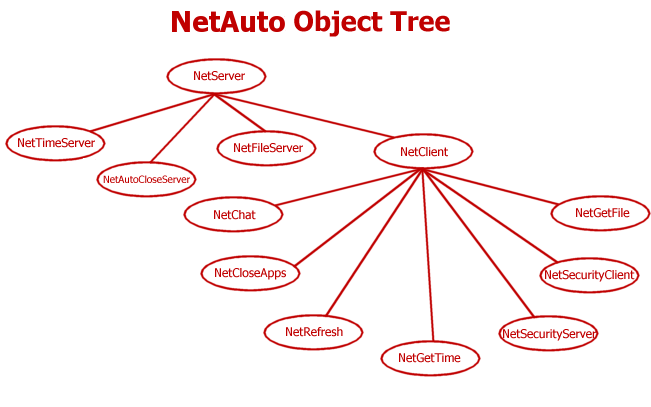
Apart from the two main NetAuto objects (namely NetServer and NetClient), NetAuto also provides you with a number of other ready build objects. We've included them in NetTalk because they may provide you with the functionality you are looking for, but they really serve as examples to teach you how to use NetAuto. These objects are:
You can find the source code for these in your Clarion/LibSrc folder in the net*.clw and net*.inc files.
NetChat and the NetCloseApps & NetAutoCloseServer can be implemented into your program through Control Templates, this is described in detail in the Control Templates section. The NetRefresh Global object can be implemented using the Auto-Refresh template set.
These objects are demonstrated in the NetDemo and SimpleFileTransfer Demo examples. The SimpleFileTransfer demo is more simpler. You need to do the following:
1. Add the NetTalk Global Template and all the usual basics (see steps 1 to 5 of Scenario One) for each application that will use NetTalk.
2. Use the NetTalk extension template to create your own object based on the NetFileServer class. You could call your object anything you like (e.g. "ourFileServer"). Make sure to use the same service name in you FileServer as in your FileClient (NetGetFile). Your Server must be a public (non-private) service. This is all you need to do for the FileServer.
3. Use the NetTalk extension template to create your own object based on the NetGetFile class. This should be a private service and must have the same service name as your File Server. You could call the object "ourGetFile".
4. In the embed point of a button insert:
ourGetFile.Ask('c:\testfile.txt','c:\testfile.txt')
! Ask the object to get this file for us
The first parameter is the file path of the file you want to get from the server, then second parameter is the file path that you want to save the file to.5. If you want to specify which server to get the file from then set
ourGetFile.UseThisServer = <NetName of the server you want to use>
If you leave this out, one of the servers will be randomly picked for you.
(You can look in the ourGetFile.Servers queue if you want to see which servers are available.
6. To see more look at the NetDemo example application.
These objects are demonstrated in the NetDemo example.
Template Options
Work with CapeSoft MessageBox - This option will ask MessageBox to press the Default button on any visible Messages. This is really useful when the user is on a form and the "do want to save changes to this record?" message appears when you are trying to remotely shutdown the application. (requires CapeSoft MessageBox v1.79 or greater)
Advanced Options
You can override the behavior of the NetAutoCloseServer object by putting your own code in the following methods:
ProcessWarningRequest() - This method is called when a Warning Request packet is received. By default it displays the Warning window ProcessShutdownRequest() - This method is called when a Shutdown Request packet is received. By default it displays the Shutdown window and then calls self.CloseApp() CloseApp() - This method is called when the application must close down all it's windows. It posts a number of events to each thread number. The MaxThread count is stored in self.MaxThreads which is 64 in Clarion 5 and 5.5, but defaults to 256 in Clarion 6 and above. Theoretically your application could used more than 256 threads so you may need to override this value to a higher value if this is the case.
Mini Contents
When you send a packet you have to specify:
1. Who the packet is for
2. What data we want to send.
3. Whether the packet is a single packet or part of a multiple set of packets.
It's a good idea to set all of the following variables even if you aren't using them all, otherwise they will contain the values of the last packet either sent to you or sent from you:
self.packet.ToNetName Set this to either '' (two single quotes which means use any server) or to the name of the process that you want to send the packet to. See the section on NetName.
(If self.broadcast = 1 then the packet will be sent to all servers).self.packet.Command Set this to the value of a 32-bit long command that you can use to send basic commands.
Set to 0 if you do not want to use command. (By convention a command of 0 means you are not using the command.)self.packet.BinData Use this to send data. The maximum length that it can be set to is found in the NET:MaxBinData equate (currently 16K).
If you do not want to send any data in BinData, you only need to set self.packet.BinDataLength = 0self.packet.BinDataLen This is the length of the BinData you are sending.
If you do not want to send any BinData, then set
self.packet.BinDataLength = 0
otherwise set it to the length of data you are sending.self.packet.Options Set this to one of the following: NET:SinglePacket (single-packet format) NET:PartOfSet (part of a multi-packet set) NET:PartOfSet+NET:LastOfSet (last of a multi-packet set. Note the use of both equates!)
Other considerations
self.Broadcast If you want to send a broadcast packet then use
self.broadcast = 1
You do not need to re-set self.broadcast before every send. It will remain at the value you set it.
For no broadcast use
self.broadcast = 0
If you use self.broadcast = 1 then you do not strictly need to set the self.packet.ToNetName, but for tidiness sake it's probably best to do the following:
self.broadcast = 1 ! broadcast to everyone
self.packet.ToNetName = ''
self.packet.compress Set this to 0 for no compression. Set it to 1 for compression. self.packet.encrypt Set this to 0 for no encryption. Set it to 1 for encryption.
After setting this data you will need to do one of the following:
1. If you are overriding your own object's send() method then you should set the contents of the packet before the parent call (parent.send()).
2. If you are in another method and want to send the packet you will need to either call your own self.send() method or the parent.send() method. The packet will only be sent when the parent.send() method is called. So either you must call this or your self.send() method must call it (which it does by default).
You can only auto reply to a packet in the Process() method in response to a packet you receive. Both clients and servers can auto-reply.
The following will only work for single-packet data (see Scenario Three if you need to send a multiple packet set data):
When you send an auto-reply packet:
1. You don't have to specify who the packet is for, that's the whole point of auto-reply. It knows who the packet came from and it will return it there.
2. You have to set self.reply=1
3. You have to specify what data we want to send.
4. You have to specify whether the packet is a single packet or part of a multiple set of packets.
It's a good idea to set the following variables even if you aren't using them all, otherwise they will contain the values of the last packet either sent to you or sent from you.):
self.reply This tells NetAuto you can going to auto-reply. Set this to
self.reply = 1self.packet.Command Set this to the value of a 32-bit long command that you may want to send.
Set to 0 if you do not want to use command.self.packet.BinData Set this to the data string you want to pass. The maximum length that it can be set to is found in the NET:MaxBinData equate (currently 16K).
If you do not want to send any data in BinData, you only need to set self.packet.BinDataLength = 0self.packet.BinDataLen Set this to the length of the BinData you are sending. Some times you can do this:
self.packet.BinDataLen = len(clip(self.packet.BinData))
If you do not want to send any BinData, then set
self.packet.BinDataLength = 0self.packet.Options This example is only valid for Single-Packet format and so self.packet.Options must be set to NET:SinglePacket
For multiple packet sets see Scenario Three
After setting this data you don't need to call anything else. The packet will be sent when you leave the process() method. Or you can call parent.send() if you want to at this point. There is no preferred method. Just use whichever is more convenient for you.
Method 1
You can now suppress error messages by using the settings on the local procedure extension templates.Method 2
You can also do this by hand coding the following:
Here are two examples of code. The first example only ignores error 10061, the second example ignores all errors.
Example 1:
Override the ErrorTrap() method and insert the following code:
if self.error = 10061 ! Forcefully rejected error
self.SuppressErrorMsg = true
else
self.SuppressErrorMsg = false
end
<parent call>
self.SuppressErrorMsg = false
Example 2:
Should you want to suppress all error messages simply use this code in the Init() method:
self.SuppressErrorMsg = true ! Ignore all messages
You can change the error messages that are displayed during the running of NetTalk by overriding the InterpretError() and ErrorTrap() method.
The InterpretError() method identifies the error in self.error and converts this into a string. By overriding the method you can change the error messages to suit your application or even to allow for foreign language support.
Here is an example of the embed code to inserted before the parent call in the InterpretError() method of a NetSimple object: (Would also work for NetAuto objects). See the NetDemo.app example.
! Example code of how to change an error message
if self.error = 10061
return ('The connection could not be established, ' & |
'the machine you are trying to connect to ' & |
'is not listening on that port')
end
For the full list of NetTalk error equates look in either the netall.inc file (search for "Error:") or look in the InterpretError() method in nettalk.clw. The WinSock Error equates are listed here: http://www.capesoft.com/Cached/Q199485 Winsock Error Codes.htm
The net*.clw and net*.inc files are found in you Clarion/LibSrc folder.
You can also override the ErrorTrap method if you really want the error messages to look or behave differently. The best way to do this is to look in the nettalk.clw file and the current contents of ErrorTrap() and then override your object's ErrorTrap method with your own style of error message.
This section describes the NetServer and NetClient methods and properties in more detail.
Error Long Contains the error value of the last transaction. 0 = no error. You can use the InterpretError() method for converting the error code into an error string. ErrorString String(256) Contains the last error string that was reported. It only changes the next time an error occurs. Packet Group(Net:AutoPacketType). This is the structure that holds the data of the packet that you are sending, or that was sent to you. For more information about what needs setting before you send a packet look in the Handy Programming Reference section. The contents of a packet are described in the NetAuto Data Structures section. SendReply Byte Used to send an auto reply packet back to the sender. For more details see the Handy Programming Reference section. Service Group(Net:AutoServiceType). This is the structure that holds the information about the service which will be started. The contents of a service are described in the Data Structures section. SuppressErrorMsg Byte If set to 1 it will suppress error messages being displayed on the screen (errors will be logged in the log file if the log file option is on). Normally set to 0. See example code in the Handy Programming Reference section. UseThisThread long (Advanced Optional Property). This property allows you to manually specify which thread must receive the messages that the NetTalk DLL posts to the NetAuto objects. Set this property before calling the Init() method. Defaults to 0 (no action).
ErrorTrap (string errorStr, string functionName)
Displays an error message and logs the error to the log file if the log file options have been turned on. Use the SuppressErrorMsg property to suppress error messages. See the Handy Reference section for some examples Do not prevent the parent call inside ErrorTrap from being called otherwise errors will not appear in the log file.
Init (string p_ServiceName, long p_Operation=Net:StartService)
If you are using the NetTalk extension template this is set up for you automatically.
This method is used to Initialise the service. You specify the name of the service you wish to start as well as some options.
Options allowed include:
NET:StartService - Start a service
NET:Private - It's a private (client) service.
NET:CanSeeMySelf - Allow service to be seen by own process
Example:
parent.init('NetFileSend', NET:STARTSERVICE + NET:PRIVATE)
InterpretError(), String
Converts the self.error property to a text string (returned).
Kill()
Used to kill (shutdown) your service. (Automatically set up by the extension template)
Log (string FunctionName, string LogString)
Used to write an entry in the Log File.
MultiPacketReply()
Used for sending multiple packet sets. See Scenario Three for an example.
Prime()
(Internal) Used to prime a service. Programmers never need to call this.
Process()
Called when a packet arrives. You can use this method to respond back to the service that sent the message.
ReSync (long p_PacketType=NET:PACKET:ICanDo,long p_Options=2)
Advanced Method
This method resends NetAutoRemotes to:
1) The localhost (127.0.0.1)
2) The LAN or local network
3) All machines that have been NetAutoRemoted before, or NetAutoRemoted us.
It basically refreshes the list of other servers or services. This function is used in the CloseAppControls to refresh the list of machines.
Parameters:
p_PacketType should be set to one of:
NET:PACKET:ICanDo - (default) forces the machine receiving the NetAutoRemote to respond by returning a reply packet, which informs us of the services they are running.
NET:PACKET:ICanDoBack - only send our list of services to the other machines, no list is returned.
NET:PACKET:ICanDoNRN - send our list and they may send us a reply if we haven't heard from them in a while.
p_Options should be set to one of:
0 - NetAutoRemote sent to all qNetIDs, but no services are marked inactive,
1 - then only qNetIDs with an long time since they last sent us data will be polled, and services we haven't heard from for ages are marked inactive and sent a full ICanDo Packet
2 - all services are marked inactive and sent a full ICanDO, which they all need to reply to
Examples:
self.ReSync() ! Mark all services as inactive and force them to refresh
self.ReSync(NETDLL:PACKET:ICanDoNRN, 1) ! Send only to those who are stale (a bit old).
TakeEvent()
This is the service TakeEvent method it sits in the accept loop and receives calls from other services. (Setup automatically by the extension template)
BroadCast Byte Set this to 1 if you wish to broadcast your packet to all servers or public clients that have the same ServiceName as your object. If it is set to 0 no broadcast will occur. DefaultServerNetName String(81) This is the name of the Default Server that the packet will be sent to if self.packet.ToNetName = '' and broadcast=0. To refresh DefaultServerNetName, call getServers() Servers &Net:AutoPublicServicesQType This is a queue of public services (i.e. Servers), that the client knows about. You can bind this variable to a screen listbox.
Example: (also see Scenario Two)
Define the following variable:
myServers Queue(Net:AutoPublicServicesQType).
After the parent call in the Init() method insert something like:
<myObject>.servers &= myServers
GetServers(), Virtual This refreshes our Servers list (i.e. the list of Servers that are able to serve us), it also refreshes our DefaultServerNetName property.
It also lets you know if there any servers available. Returns it's error status in self.error (see Scenario One).Send() This is good method to override in order to specify what data you want to send. See Scenario One for an example. ServersChanged(),Virtual This method is called when there is a change (or possible change) in the Servers list. This is useful for determining when a new server becomes available or when a currently available server ceases availability. (This method will sometimes get called even when there is no change to the Servers List, but will always be called when the list of servers change.)
You can put your own code in your ServersChanged() method.UseAnotherServer(), Virtual You can use this function to choose the next available server in the Servers list. You must have called GetServers() first. This can be useful when you want to get a resource from a server, but not every server may have the specific resource you want. You can call GetServers then request the resource, if that fails call UseAnotherServer and then request the resource from the new server. etc. It is demonstrated in the "Get File" example in the NetDemo.app program found in the examples folder. This function will return an error if no more servers are available.
This is the type in which stores who the packet is from. Most programmers won't need to use this.
NetID group(Net:AutoIDType) The NetID packet. This is the type in which the NetID data is stored in.
GUID1 long First 32 bits of the GUID (Global Unique Identifier) GUID2 long Last 32 bits of the GUID RUNID long 32 bit RUNID (Identification for each time the NetTalk DLL is run) SPort Net:PortType Streamed Socket Base Number DGPort Net:PortType Datagram Base Number Consists of the following: (for more details of how to prime packet before sending it see here)
Command long
A 32-bit long field you can populate.
BinData string(NET:MaxBinData)
Binary data that you can populate.
BinDataLen long
The length of the Binary Data (BinData) that you want to send.
ToNetName string(NET:StdStringSize)
The NetName of the process that this packet will be sent to.
FromNetName string(NET:StdStringSize)
The NetName of the process sending this packet.
ServiceName string(NET:StdStringSize)
The ServiceName of the sending and receiving service. Remember the service name of a sending and receiving service must be the same for communication to occur. This is all setup for you by the extension template.
Options long
This is where you specify the behaviour of the packet. Possible options at the moment include:
NET:SinglePacket - Used to indicate that this packet is a single packet. (Not part of a set)
NET:PartOfSet - Used to indicate that this packet is part of a set of packets that all belong to each other
NET:LastOfSet - Used to indicate that this packet is the last of a set of packets.
Note: NET:LastOfSet must be used in conjunction with NET:PartOfSet. e.g.
self.packet.options = NET:PartOfSet + NET:LastOfSet
SentDate long
The date that the packet was sent. This is automatically set, but can be read by the receiving service. (Internal Data - Do not change it).
SentTime long
The time that the packet was sent. This is automatically set, but can be read by the receiving service. (Internal Data - Do not change it).
PacketNumber long
This is the packet number. This is automatically set, but can be read by the receiving service. (Internal Data - Do not change it).
SetNumber long
This is the set number. This is automatically set, but can be read by the receiving service. (Internal Data - Do not change it).
ToThread long
The thread number of the NetAuto instance to whom the packet is being sent. This is automatically set. (Internal Data - Do not change it).
FromThread long
The thread number of the NetAuto instance that sent the packet. This is automatically set. (Internal Data - Do not change it).
DirectResponse group
Stores the data needed for replying to a packet. Most people won't ever use this. But you could store this information if you ever wanted to reply back to the sender at a later stage. e.g. If you received a request for data that needs to be computed (and may take some time).
1) You could store DirectResponse
2) when the data is available you prime a packet with your data,
3) restore self.packet.DirectResponse
4) set self.packet.options = NET:Response
5) call parent.send().
This would send the data back to the original caller.
FromIP string(15)
String representation of the IP address of the machine that sent the packet. For read-only (information) purposes only. e.g.
message ('from = ' & self.packet.FromIP)
Compress byte
Set this to 1 if you wish the packet to be compressed before it is sent down the network. It is automatically decompressed when it reaches the other side. (NOT FUNCTIONAL YET)
Encrypt byte
Set this to 1 if you wish the packet to be encrypted with 168-bit DES Encryption. It is automatically decrypted when it reaches the other side.
Reserved string(991)
Reserved data. Do not use or change.
This is the data queue type that is used for self.servers in a NetClient NetAuto object.
Description cstring (NET:StdStringSize) Description of the other service's NetAuto instance. NetName cstring (NET:StdStringSize) NetName of the other service's NetAuto instance. IPStr cstring (NET:StdStringSize) IP address of the other service's NetAuto instance. Speed long Will one day be used to indicate some measure of connection speed. ServiceName cstring (NET:StdStringSize) The Name of the service. NetID group(Net:AutoIDType) The NetID of the service. Reserved string(256) Reserved. Don't mess with this. This is the type in which you set up a remote machine before passing it onto the NetAutoRemote DLL function.
Name string(NET:StdStringSize) The hostname of the remote machine, or it's IP address. If you supply hostname a DNS lookup will occur. Options long Various options (unused in this version) Reserved string(64) Reserved. Do not use or change. This Queue is administered totally by NetAuto, and most programmers don't even need to know anything about it, but for the curious it contains:
ServiceName string(NET:StdStringSize) The Name of the Service Thread long The thread on which the service runs Event long The base event for receiving events (can receive events on the base event and the next four event numbers) Options long Various options Reserved string(1024) Reserved. Do not use or change.
These are all defined in your Clarion/LibSrc/net*.inc file.
NETTALK:Version The version of NetTalk NET:MaxBinData The maximum size of self.packet.BinData (currently 16K) NET:StdStringSize The Standard size of strings in NetTalk. (currently 81, but never use more than 80) NET:IPType IP Type equate for an IP Address (number format). NET:PacketIDType PacketID Type (long) NET:PortType Port Type equate for a Port Number. (ushort) NET:StartService StartService NET:StopService StopService NET:Private Used to specify that the service you are starting should be a private service. NET:SinglePacket for self.packet.options NET:PartOfSet for self.packet.options NET:LastOfSet for self.packet.options NET:Synchronous Used for some DLL functions. NET:Asynchronous Used for some DLL functions. NET:DontShowErrors Used for some DLL functions. NET:ShowErrors Used for some DLL functions. NET:NetAutoComplete Used for some length fields to get the object to work out the length for you. NET:ErrorTitle This is the default error title for error messages generated by the NetAuto and NetSimple objects.
You can override this yourself by setting this variable to something else.
At the start of your application do something like:
NET:ErrorTitle = 'My new error message title'
The NetOptions equates are described in the NetOptions section.
You may call the following NetTalk DLL functions directly from your code.
provides you with the NetName of your NetAuto process.
provides you with a means for getting and setting NetTalk options.
Set flag to any of the following:
Where:
After (You can only call this after the parent call in the Init() method)
Before (You can only call this before the parent call in the Init() method)
Either (You can call this anytime you like)
The results will be placed in the yourStr string.
Example 1:
This example uses the Stats functionality to tell you how many outgoing NetSimple and NetAuto packets are waiting in the DLL.
SimpleOutData_Size         long  ! How many outgoing NetSimple packets in DLL
OutgoingPacketsData_Size   long  ! How many outgoing NetAuto packets in DLL

ourNETStats                Group(NET:StatsType).
ourNETSTatsStr             String (size(NET:StatsType)),over(ourNETStats)


GetStats Routine
  NetOptions (NET:GETSTATS, ourNetStatsStr)  ! Call the DLL and ask for the stats
  SimpleOutData_Size = ourNetStats.qSimpleOutData_Size
  OutgoingPacketsData_Size   = ourNetStats.qOutgoingPacketsData_Size
For a complete description of the Net:StatsType group look in your net*.inc files in your Clarion/LibSrc folder.
Example 2:
ourSPort string (20)
ourDGPort string (20)
ourMaxInstances string (20)
ourNetName string (NET:StdStringSize)
ourIPs string (100)
ourHostName string (NET:StdStringSize)
ourTempString string (100)
ourInactiveTimerDelay string (20)
ourNetID group (Net:AutoIDType).
ourNetIDStr string (size(Net:AutoIDType)),over (ourNetID)
DisplaySettings Routine
NetOptions (NET:GETDGPORT, ourDGPort) ! Get Datagram Port Number
NetOptions (NET:GETSPORT, ourSPort) ! Get Stream Port Number
NetOptions (NET:GETMAXINSTANCES, ourMaxInstances) ! Get Stream Port Number
NetOptions (NET:GETNETNAME, ourNetName) ! Get our NetName
! Can also do this by calling NetAutoGetNetName()
NetOptions (NET:GETHOSTIPLIST, ourIPs) ! Get IP address(es)
NetOptions (NET:GETHOSTNAME, ourHostName) ! Get our Host Name
NetOptions (NET:GETINACTIVESERVICETIMER, ourInactiveTimerDelay) ! Get our Inactive Timer Delay
NetOptions (NET:GETNETID, ourNetIDStr)
Message ('This program is an example of setting ' & |
'NetAuto to use different Port Numbers|' & |
'|NetAuto is now running on ' & |
'|DataGram Port Number = ' & clip(ourDGPort) & |
'|Stream Port Number = ' & clip(ourSPort) & |
'|Max Instances = ' & clip(ourMaxInstances) & |
'|HostName = ' & clip (ourHostName) & |
'|NetName = ' & clip (ourNetName) & |
'|IPs = ' & clip (ourIPs) & |
'|Inactive Timer Delay (1/100s) = ' & clip (ourInactiveTimerDelay) & |
'|GUID = ' & ourNetID.GUID1 & ' ' & ourNetID.GUID2 & |
'|RUNID = ' & ourNetID.RUNID & |
'|SPort = ' & ourNetID.SPort & ' DGPort = ' & ourNetID.DGPort |
,'NetAuto Example', ICON:ASTERISK)
More Examples:
See the NetOptions example.
Returns an IP info queue.
If you set p_ShortList = 1 then it will only return IP, SubnetMast and BroadCast addresses, (although the BroadCast address always seems to be 1.0.0.0). Normally you will call this function as follows:
qIP QUEUE(Net:IpInfoQType),PRE()
END
NetGetIPInfo (qIP, 0) ! Get Full List
This function is demonstrated in the NetDemo example application.
Net:IpInfoQType Queue, Type
IPAddressCstr cstring (NET:IPStringSize+1)
SubnetMaskCstr cstring (NET:IPStringSize+1)
BroadCastCstr cstring (NET:IPStringSize+1)
Gateway1CStr cstring (NET:IPStringSize+1)
Gateway2CStr cstring (NET:IPStringSize+1)
Gateway3CStr cstring (NET:IPStringSize+1)
Gateway4CStr cstring (NET:IPStringSize+1)
Gateway5CStr cstring (NET:IPStringSize+1)
DHCPServerCStr cstring (NET:IPStringSize+1)
PrimaryWinsCstr cstring (NET:IPStringSize+1)
SecondaryWinsCStr cstring (NET:IPStringSize+1)
DCHPenabled long ! 26/8/2005 - was byte
WinsEnabled long ! 26/8/2005 - was byte
LeaseObtained long ! 20/7/2005 - was ulong
LeaseExpires long ! 20/7/2005 - was ulong
AdapterDescription cstring (128+4)
AdapterName cstring (256+4)
AdapterType long
AdapterIndex long
IPindex long
end
The NetAuto objects only automatically detect each other over a LAN, and so we added a function which would let you manually "add" machines so that they will polled to see which NetAuto services they provide. This function simply extends the range of machines that your NetAuto objects can see.
It has nothing to do with Remotely Controlling a remote box. i.e. It's not a VNC type object.
Provides you with a means for using Remote (WAN or Internet) machines that have NetAuto objects running on them. Basically you can call this function with either the IP address or the hostname of the machine that has NetAuto objects running on it, that you want to access, and it will allow your NetAuto objects to see the remote ones.
Important: NetTalk also has a DIP (Dynamic IP) manager. This technology provides you the ability to get all your applications talking to each other over a WAN or the Internet without having to know the individual IP address. 9 times out of 10 if you use the DIP object and the DIP server you will not need to use the UseRemoteMachine control template or the NetAutoRemote function.
Note: This function is also available as a control template (see the JUMP START UseRemoteMachineControls control template section).
HOT TIP - There's an excellent snippet of information you need to read in the FAQ on using WAN & Internet.
Note: Only the Net:Asynchronous mode and the Net:DontShowErrors mode are working in this version.
Important: NetAutoRemote is an Asynchronous function. This means that when it returns the job has not been completed, and is still in progress. Because of this you cannot do the following in say your window.init function
[Incorrect]
1) NetAutoObject.Init
2) NetAutoRemote (somesite)
3) Send a packet to somesite
This won't work, because the site you are trying to communicate will not have responded to the NetAutoRemote before you try to send it data. Rather you should use this approach:
[Correct]
In Window.Init
1) NetAutoObject.Init (done by the template for you)
2) NetAutoRemote (somesite)
In NetAutoObject.ServersChanged()
1) If records (self.servers) > 1
1a) or alternative look through self.servers to see if somesite is there.
2) Then send data to somesite.
3) You may want to add a timer to the window to allow your application to give up trying to see if somesite is up and running
It is a timing issue. The NetAutoRemote is an asynchronous function. It resolves hostname to IP (if you supplied hostname) and then it sends a DataGram packet to the IP address. If the remote machine is running NetAuto it sends back a list of NetAuto public services it provides (sometimes this list is blank - and that means it is running NetAuto but no public services). This whole process needs to happen before you can send a packet.
Important: Don't put NetTalk code in the Event:OpenWindow accept embed point. If you need to put code that needs to be run as the window opens put it in the window.init method.
Example 1:
ourRemote group(Net:AutoRemoteType).
! NetAuto Remote Group
returnCode long
remoteAddress string (252)
clear(ourRemote)
ourRemote.Name = remoteAddress
returnCode = NetAutoRemote(ourRemote, |
NET:ASYNCHRONOUS, |
NET:DONT_SHOW_ERRORS)
! Could use NET:SYNSCHRONOUS or
! NET:SHOW_ERRORS
if returnCode
if returnCode = -1
message ('Please open one of the NetAuto ' & |
'enabled Windows before calling ' & |
'this function.', |
'NetAuto Use Remote Error', ICON:Asterisk)
else
message ('An error occurred while adding' & |
'a remote address', |
'NetAuto Use Remote Error', ICON:Asterisk)
end
end
Example 2:
If I have 5 users using the Internet (Let's assume I know Their IPs) Where Should I insert The NetAutoRemote command so they can all see each other?
Open a window and add the Chat control to the window.
In the Data section of the ThisWindow. Init() method section or in the "Data for procedure" section add:
ourRemote group(Net:AutoRemoteType).
! NetAuto Remote Group
returnCode long
In or after priority 8040 in the code section of the ThisWindow. Init() method add: (If NetAutoRemote is called too early in the window startup cycle it will fail when hostnames are passed to it).
clear(ourRemote)
ourRemote.Name = '192.2.2.2' ! or 'fred.xyz.com'
returnCode = NetAutoRemote(ourRemote, NET:Asynchronous, |
NET:DontShowErrors)
! Could use NET:ShowErrors
if returnCode
if returnCode = -1
message ('Please open one of the NetAuto enabled ' & |
'Windows before calling this function.', |
'NetAuto Use Remote Error', ICON:Asterisk)
else
message ('An error occurred while adding a remote ' & |
'address', 'NetAuto Use Remote Error', |
ICON:Asterisk)
end
end
You will need to replace the IP number with your one and you would need to add this in a loop to add all the IP addresses.
Advanced DLL Function
This method resends NetAutoRemotes to:
1) The localhost (127.0.0.1)
2) The LAN or local network
3) All machines that have been NetAutoRemoted before, or NetAutoRemoted us.
It basically refreshes the list of other servers or services. This function is used in the CloseAppControls to refresh the list of machines.
Parameters:
p_PacketType should be set to one of:
NET:PACKET:ICanDo - (default) forces the machine receiving the NetAutoRemote to respond by returning a reply packet, which informs us of the services they are running.
NET:PACKET:ICanDoBack - only send our list of services to the other machines, no list is returned.
NET:PACKET:ICanDoNRN - send our list and they may send us a reply if we haven't heard from them in a while.
p_Options should be set to one of:
0 - NetAutoRemote sent to all qNetIDs, but no services are marked inactive,
1 - then only qNetIDs with an long time since they last sent us data will be polled, and services we haven't heard from for ages are marked inactive and sent a full ICanDo Packet
2 - (defualt) all services are marked inactive and sent a full ICanDO, which they all need to reply to
Examples:
NetAutoSendBroadCast(NET:Packet:ICanDo, 2) ! Mark all services as inactive and force them to refresh
NetAutoSendBroadCast(NETDLL:PACKET:ICanDoNRN, 1) ! Send only to those who are stale (a bit old).
Advanced DLL Function
This function encodes a string using the Base64 encoding scheme. This function accepts a string (Source) of length no more than NET:Base64MaxEncodedLength (16416 bytes) to be encoded.
Parameters
Source : A String containing the string to encode
Len : The length of the string to encode. Typically set this to be the clipped length of Source. If L=0 then the SIZE of Source is used.
Returns :
Len : Contains the exact number of characters in the encoded string.
Ans: The encoded string.
Example:
l long
a string(255)
b string(335)
code
l = len(clip(a))
b = NetBase64EncodeEx(a,l) ! the encoded contents of a is now in b
Advanced DLL Function
This function decodes a string which has been encoded using the Base64 encoding scheme. This function accepts a string (Source) of length no more than NET:Base64MaxEncodedLength (22464 bytes) to be decoded.
Parameters
Source : A String containing the string to decode
Len : The length of the string to decode. Typically set this to be the clipped length of Source.
Returns :
Len : Contains the exact number of characters in the decoded string.
Ans: The decoded string.
Example:
l long
a string(335)
b string(335)
code
l = len(clip(b))
a = NetBase64DecodeEx(b,l) ! the decoded contents of b is now in a
Advanced DLL Function
This function encodes a string using the Base64 encoding scheme. This function accepts a string (Source) of unlimited length to be encoded, as well as a string Ans which must be long enough to accept the result. A rough estimate is that the Ans string should be at least 1.3 times the length of Source.
Parameters
Source : A String containing the string to encode
Len : The length of the string to encode. Typically set this to be the clipped length of Source.
Ans : A string to contain the answer.
Returns :
Len : Contains the exact number of characters in the encoded string.
Ans: The encoded string.
Example:
l long
a string(255)
b string(335)
code
l = len(clip(a))
NetBase64EncodeEx(a,b,l) ! the encoded contents of a is now in b
Advanced DLL Function
This function decodes a string which has been encoded using the Base64 encoding scheme. This function accepts a string (Source) of unlimited length to be decoded, as well as a string Ans which must be long enough to accept the result. Since the decoded string is always shorter than the encoded string if Ans is as long as Source then it will be sufficient.
Parameters
Source : A String containing the string to decode
Len : The length of the string to decode. Typically set this to be the clipped length of Source.
Ans : A string to contain the answer.
Returns :
Len : Contains the exact number of characters in the decoded string.
Ans: The decoded string.
Example:
l long
a string(335)
b string(335)
code
l = len(clip(b))
NetBase64DecodeEx(b,a,l) ! the decoded contents of b is now in a
If you are using a Firewall or Proxy Server you may have found that that your applications that use the NetAuto protocol and the NetSimple protocol do not work. This is because a Firewall or Proxy Server limit who can connect to what over the network.
NetSimple ProtocolThis is the normal TCP/IP used by the NetSimple objects. You may need to configure your firewall or proxy to allow port access. Here are some typical settings:
Web Client - TCP Port 80 outgoing
Web Server - TCP Port 80 incoming
Email Send (client) - TCP Port 25 outgoing
Email Receive (client) - TCP Port 110 outgoing
FTP Client - TCP Port 21 outgoing, plus FTP proxy access
News Reader (client) - TCP Port 119
Plus any custom configurations you may have coded. For example:
NetSimple in client mode - TCP Port of your choice outgoing
NetSimple in server mode - TCP Port of your choice incoming
If you are looking for a thorough list of Ports that are used by all sorts of applications then look at rfc1700.NetAuto Protocol
At present the NetAuto protocol does not work through a proxy server. If you need access via a Proxy Server you'll need to use the NetSimple objects.
Important: Please read FAQ Article A4 - as it contains some important tips, and recommendations.
If you are only running a firewall (not a proxy) then depending on your firewall you may be able to configure it to allow NetAuto protocol traffic. Here is the list of Ports that NetAuto uses:
Instance 1 2 3 4 5 Default Datagram (UDP) Port Numbers 2326 2327 2328 2329 2330 Default Streamed (TCP) Port Numbers 2376 2377 2378 2379 2380 If you are using NetOptions to run NetAuto on a different set of ports other than the default ones, you will have to configure the Firewall accordingly. The same applies if you increase the default number of NetAuto instances allowed on one machine (default is 5).
This section deals with questions like:
How does the NetAuto protocol really work?
How does the NetAuto protocol know about the other machines on my LAN?
How does the NetAuto protocol communicate over the Internet or my WAN?
If I set self.broadcast=1 does it send data to every PC on my LAN?
What Ports does the NetAuto protocol use?
Lets look at the Chat object. (You can run this in the NetDemo.exe example). Each NetAuto instance maintains queue of public servers that are available from other machines or NetAuto instances. This is the list of chatters you see in the chat window. As far as NetAuto is concerned it does not differentiate between the chatters on your LAN and the chatters on a WAN (or the Internet). The only difference is that when you start a service (i.e. open the chat window) a quick message (known as an "I Can Do" packet) is sent to all the machines on your LAN telling them what public (non-private) services you offer (Chat is a public client service). This is why NetAuto seems to know about all the machines on your LAN and what they are doing. At this point NetAuto does not know about other Chatters that are running on the Internet as the "I Can Do" packet is only sent over your LAN. That's why you need to use the RemoteMachine function (In the NetDemo this is called "Connect over the Internet') to allow an Internet machine to know what public services you offer. Once that machine knows what you offer it will tell your machine what it offers and from then on that machine is treated just the same as every machine on your LAN.
The reason why WAN and LAN NetAuto processes behave the same once NetAutoRemote has been used is that when a service like chat broadcasts data it doesn't broadcast that data to every machine on your LAN, it only sends to those running Chat. So if you have 3 machines on your LAN, and 2 over the Internet and you send a chat string, it is individually sent to the 3 LAN machines and the 2 Internet machines.
So we really have two definitions of the word broadcast:
A data broadcast (i.e. sending data from a NetAuto service such as Chat) is sent individually to every machine in the service queue.
An "I Can Do" broadcast (used to tell the other machines what services your NetAuto program offers) is actually broadcast to all machines on your LAN. This means only one packet leaves your machine, but every machine on your LAN can read it in one go.
This way network traffic is kept to a minimum (I Can Do packets) but error-recovery is performed on an individual basis (data packets).
TCP/IP allows you to send data in two different ways:
1. TCP (Transmission Control Protocol). This is a connection orientated (Streamed Packet) communication method. It provides reliable communication of data as if it were fed through a pipe. What you put in one end comes out the other in the same order. Once you have set up the pipe (socket) you can send as many packets as you like. This is the protocol that NetAuto data packets are sent on. Packets can arrive in the wrong order but NetAuto sorts this out for you.
2. UDP (User Datagram Protocol). This is a very quick, but unguaranteed method of sending data. No connection needs to be set up. The packet is just sent. This is the protocol used for sending the NetAuto "I Can Do" packets. It is very fast, but not as reliable as Streamed Packets (TCP).
Each instance of NetAuto uses two ports to communicate on. The following table shows you the default ports numbers for each NetAuto instance running on a machine.
Instance 1 2 3 4 5 Default Datagram (UDP) Port Number 2326 2327 2328 2329 2330 Default Streamed (TCP) Port Number 2376 2377 2378 2379 2380
Return to Main
NetTalk Documentation
[End of this document]