Things
you absolutely have to know before you start
Take a couple of minutes to read this section. It may
cover some terms and ideas you already know, but it will save much
frustration and heartache later.
Secwin is a mature Feature-Rich package. This means that the most common
problem encountered by new users is Feature Overload. With so many
features, and possibilities, it's hard to understand how to accomplish the
simple tasks. Of course the features are there for a reason, and you'll
appreciate them later, but for now they get in the way.
One way to overcome this problem is to check out the JumpStart section for
task orientated documentation. For example you just want to add the Login
features? No problem, check out the section on
Adding
Logins
and Passwords. Just want to implement product Registration? Check
out the
Adding Licensing and
Registration Features.
(Not yet though read the
rest of this section first!)
Secwin is divided into 2 halves. You can use either half separately, or
the two together in an integrated system.
- The first half is known as Access Control
and governs who uses the program. An example of this is the Adding
Logins and Passwords, and the features go on from there. These
features allow your client to restrict access to his application. A
good place to start installing these features is using the JumpStart
section entitled Adding Logins
and Passwords. Screen and Control Access Control is the next
part of the equation, and the advanced features can be found in Access
Control. You can also use Secwin Access Control in your NetTalk
webserver application.
- The second half contain features collectively known as Licensing
and Registration. This covers what you might think of as Copy
Protection. These are features that make sure that you get paid for
your software. Start with Adding
the Licensing and Registration features, and then move on to Licensing and Registration.
Secwin also makes extensive use of Templates in order to implement the
features that you want. If you've been using Clarion for a while then
you're already familiar with the power that templates offer. But if you
haven't used a 3rd party template before then take a moment to read the
QuickStart section entitled Using templates in Clarion. Secwin uses a
mixture of Extension/Control and Code templates.
If you are supplying a program which needs translation then read the
section entitled
Translating Secwin
Windows.
Secwin stores the security settings in a file called dssw5.TPS. This
contains both the Access Control settings and the Licensing settings.
Please note that in the case of the 30 day demo licensing feature,
deleting the dssw5.TPS file does
not allow you
to get another 30 day license. For more information on this feature see
the 30 Day Demo section in the Secwin User Guide.
Although Secwin contains a feature called Super Users, this is not a
security back door. For a full explanation of the Super User features see
the section in the User Guide called
Super
Users.
Important Note: The security files are not
encrypted. The sensitive fields are encrypted, so that security is not an
issue, but illegal write activity is possible. Secwin will detect when an
illegal write activity has been made to the security files, and will not
allow the user to run the application. You need to keep regular backups so
that the user can immediately roll back to a previous version of the
security files and continue running your application.
[Each developer needs his own license to use Secwin. (Need to
buy more licenses?) ]
Features included in Secwin 6
- Complete NetTalk WebServer runtime
Access Control support with Email password retrieval (requires Using an encryption key).
- Windows User Authenticated login (see the Login
Options on the global extension template).
- Temporarily password assignment (for NetTalk WebServer
applications).
- Default License from Last License - when changing major versions of
your product, prime the default settings of the previous version (see
FAQ 1.15 for details).
- Demo licence extended to allow multiple copies, different company
name, counter defaults, optional modules on/off.
What must I change in my app when I upgrade from Secwin
3/4 to Secwin 6?
How do I upgrade from Secwin 3/4 to Secwin 6?
Why is CapeSoft charging for an upgrade from Secwin 3/4
to Secwin 6?
Features included in Secwin 4: (This is old
news now, but for reference for folk upgrading from Secwin 3)
Access Control:
Licencing and Registration Control:
Additional Features:
- All internal strings increased to 128 chars (SerialNumber, login,
password, etc.) - and some 252 chars.
Note: in Secwin 6, all the File driver DLLs
are included in the main install, so you will not require any additional
install files for other driver support.
What do we need to change in order to upgrade from
Secwin 3 to Secwin 4?
JumpStart:
Adding the Licensing and Registration Features
This is a quick way to get going implementing the Licensing and
Registration features. It's by no means all the power available to you,
but it's enough to get you up and running. we recommend reading the items
in the Secwin User Guide related to Licensing and Registration for more
information on what is available.
- Add Secwin's Activate Security
Global extension to your Application.
In the following template prompts of the Global
Extension Template:
a) Enter Unique Application Name.
b) On the Licensing tab, uncheck the Disable Licensing
support and enter the License Name and Seed Code.
These should be unique for your app, but remember them we'll use them
again later. You can ignore the other template prompts, these are
superfluous at this stage.
c) On the Files tab set the Allow Program to create
Security Files on, and set the Position
to Exe directory. If your application uses SQL, then see the
Secwin Global Extension
template for details on setting up an SQL connection for the Secwin
tables. You can ignore the other template prompts, these are
superfluous at this stage.
- In the Template utility item on the Application menu, Run the
Template utility: CreateMyRegisterProductWindow.
This will add a procedure to your application called
SecwinRegisterProduct. If you're wanting to use Access Control, then
run the template utility CreateAccessControlWindows
now as well. NOTE FOR CLARION 9 USERS: At the time of writing this,
there is a bug when importing a TXA into clarion 9 which requires you
to open each imported procedure that has a prototype. You need to do
this now.
- On the Frame procedure add the User
Screen Security extension template (if you have not already
added it)
In the following template prompts of the Global
Extension Template:
a) Click on the License Check and Restrictions button.
b) On Levels Tab : Set level to Demo
c) On Action Tab : Set action to Disable all controls
except.
d) Select controls which you want still to be available if the program
has expired. These typically include, ?Exit, ?HelpAbout and
?RegisterProduct (which you'll add just now). Note that you also need
to activate the menu name of these items if it exists (e.g.
?FileMenu). If your menu does not exist in the list, then you need to
add a Use Variable to that Menu in the Menu Editor (in the
Window Formatter)
- On the Frame procedure add the User
Login Here extension template (if it's not already there.)
For the Options on the Extension
a) On the Login Options tab set the Unique Area Name
to Main
b) On the Login Options tab set the Make login
optional to end user switch ON (if you are not wanting to use
Access Control)
c) Optionally set the Allow 30 day demo option On or Off...(
on is usually recommended).
- Go to the Frame procedure and add the Create
Secwin Menu. If you are not going to use Access Control in this
application, check the Disable Access Control Items
checkbox.
- Compile and run your application. Depending on your choice in 4c you
may or may not see a "Your product has expired" warning straight away.
i.e. If you set the Demo mode on then you're likely to get an instant
30 day demo license. If however you left the switch off then you will
need to register your program at this point.
TIP : At this point a lot of developers
get easily confused. You need to register your own program on your own
computer. Any registration type error messages you get do
not
apply to Secwin itself, but rather illustrate that the Secwin features in
your application are in fact working.
To register your product - which is what your client will need to do when,
or before, it expires, use the supplied Register Application or use
Secwin
Online Server to supply activation codes on line.
The manual registration application is shipped as one of the Secwin
examples, and can be modified to suit your needs. It can be found in the
\clarion\3rdparty\examples\secwin\register
directory.
In it's simplest form Register application allows you to capture:
- PRODUCT details ( the License name and Seed code used in step 1b )
- The CUSTOMER details ( Company Name )
- REGISTRATION details ( Serial Number, Expiry Date, number of copies,
Counters/Limits, Level, Optional Modules, etc.) which you set.
You can either generate an activation code immediately, issue an xml
file containing the registration details or print out a simple report
containing all the details and a code.
TIP : For a full description of the
Register example see the
Secwin Examples
Reference manual.
TIP : To the right of all alpha-numeric
fields on the window is a Check number. This number will be visible to the
client while typing the details in. If his number does not match the
supplied number then a spelling mistake has occurred.
TIP : Read the sections in the User Guide
which cover the
Licensing and
Registration features and options to learn more about what is, and
isn't possible using the Registration features.
JumpStart: Adding Logins and
Passwords
This is a quick way to get going implementing the Login and Password
features. It's by no means all the power available to you, but it's enough
to get you up and running. we recommend reading the items in the Secwin
User Guide related to Licensing and Registration for more information on
what is available.
- Run the Create
AccessControl windows template utility from the Application |
Template Utility menu item in the Clarion IDE.
NOTE: If it's a legacy
app, use the CreateAccessControlWindowsLegacy, and if it's
an ABC app, use the CreateAccessControlWindowsABC.
This will add a number of Secwin windows to your application (you'll
probably want to do this in your data dll
in a Multi-DLL application or in a dll one up from the data dll -
we'll call that the security dll). If you
are wanting to use the Licencing and Registration part of Secwin, then
run the CreateMyRegisterProductWindow template utility now
as well.
If you don't get the windows, then you're using the wrong template
utility (i.e. the ABC one for legacy or visa-versa).
NOTE FOR CLARION 9 USERS: At the time of writing this, there is a bug
when importing a TXA into clarion 9 which requires you to open each
imported procedure that has a prototype. You need to do this now.
- Add Secwin's Activate Security
Global extension to your Application.
For the Options on the Extension
a) Enter the Unique Application Name. For Multi-DLL
applications, read up on the Using
Secwin In MultiDLL Apps section of the docs on what to enter
here.
b) On the Files tab set the Allow Program to create
Security Files on, and set the Position
to Exe directory.
Tip : This method of creating files
is not very secure if you aren't using the licensing features. If you
aren't using licensing then read about Creating
the Security File soon. For now though continue the QuickStart.
c) On the Options tab, set the Function Overrides
as follows (for Multi-DLL users, this will be in your data dll only):
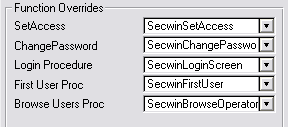
Note: SetAccess must be set to
SecwinSetAccess NOT SecwinSetAllAccess.
Note: For Multi-DLL users, you'll want
to compile the security dll (normally the
data dll) now, and then switch over to your main exe at this point.
Repeat steps 1 and 2 in the EXE application. In step 1, make sure you
check the 'Import the procedures as external' checkbox on the template
utility.
For Multi-DLL users, in other applications (not the
security dll) check the Functions are in another
application checkbox and type in the external procedure names
of the procedures that you will require in this application (typically
the SetAccess window only for most apps, except the one that
you log in with - then you'll need all the procedure names).
- Go to the Frame, or Main Menu, procedure. Add Secwin's User
Login Here Extension template (if it's not there already).
For the Options on the Extension
a) On the General tab, set the Unique Area Name as
Main.
b) If you don't want AccessControl to be optional for the end user,
then make sure that the Make Login Optional to End User is
unchecked.
- Continuing in the Frame procedure, add Secwin's Create
Secwin Menu extension template. If it was already there, then
make sure that the Disable Access Control Items checkbox is
unchecked, and that the following procedures are set correctly:
- Change Login Item Procedure: SecwinChangeLogin
- Browse User Groups item: SecwinBrowseUserGroups
- Set User Access item: SecwinSetAllAccess
- For Multi-DLL applications, you need to follow the Using
Secwin In MultiDLL Apps guide in this document.
The first time the program is run you will be asked to add the first
user. A User's information is made up of a First Name, Last Name and
Login code. When you add a user the password is automatically set to
be the same as the Login code. After you have finished entering the
first user, then you can use the Login code, and Password (which will
be the same at this point) to log in.
After you have logged in you can add more users using the Browse Users
item in the Security menu created by the Create
Secwin Menu extension template. You can also change your own
password using the Change Password item created by the Create
Secwin Menu extension template.
TIP : We get lots of questions about
passwords. For most of the answers see the section in the Secwin User
Guide entitled
Logins and Passwords.
JumpStart: Adding Screen, and
Control, Access Control
It's unlikely that you'll limit your access control features to just a
login. You'll also want your customers to be able to control who goes
where, and does what. this section is designed to follow on from the
Adding
Logins and Passwords section, so if you haven't done that, then do
that now. Which is why this section is also in the QuickStart.
The
User Screen Security
template allows you to protect any window in your application, and also to
protect individual controls on that window. Actually the template also
checks the licensing settings for that screen, but those features are
discussed in the section called
Adding
the Licensing and Registration features.
To Add the extension to your application simply go to the procedure you
want to protect, Click on Extensions, Insert and select User Screen
Security from the list. the procedure has 4 basic options;
a)
Screen Name : Leave this blank and the
procedure name will be used. If your procedure name is 'LEVEL' then you
must name this something here, as LEVEL is a reserved Secwin word.
b)
License Check and Restrictions Button : This
controls all the license requirements for this window.
c)
This procedure doesn't have a window : this
is used when you add this extension to a report (usually for Licensing
reasons).
d)
Disable Screen Security here : Allows you to
disable this template without losing all of the options you've set.
e)
Control Restrictions Button : This is the
place to set the screen security restrictions.
When you press the Control Restrictions Button you'll see a list of
protected controls (which is probably blank to begin with). Click on
Insert to protect a control. This is possible the most complicated bit,
it's where you set which controls you want to protect, and so on.
Unique Bit Position : This is simply a number
from 1 to 252. Start from 1 and avoid, if you can, missing any numbers
out. It's not too serious if you do. DON'T move items around once you've
started shipping your program.
Name : This is a name for the column on the Set
Access Screen. Use a simple name, like for the Delete button use Delete,
for the Print button use Print and so on. This name is limited to 7
characters long, so use something short.
Use Equate : This is the Equate for the control
you want to protect. Select it from the drop-down list.
List box Column : If the control is a list box,
then you can protect an individual column in the list box if you like. For
example you might just want to suppress the Salaries column. If so, enter
the Column Number here.
Action : This determines what should happen when
the user does not have access to a field. Button controls are typically
disabled (Menu Items MUST be Disabled, not hidden). Entry Fields are often
hidden. However the action is up to you.
Attach Other Controls : In some cases you want a
group of controls to be set, and unset, together. In this case click on
this button and you can add as many controls as you like. Ultimately if
the user has access to one of the controls then he'll have access to them
all. This appears as a single setting on the user's screen.
Repeat this procedure for all the windows that you want to protect. I know
this sounds like a lot of work, and it may be a couple of hours worth the
first time you do it, but it's much easier than writing the code, and
gives you full control over what's being set.
MULTI-DLL USERS need to check out the
JumpStart: Adding Runtime Access control
to a NetTalk Webserver application
This is split into 2 phases (
NOTE: READ EACH
STEP AND CAREFULLY IMPLEMENT BEFORE YOU DO ANY TESTING):
NOTE: DO NOT USE SECWIN LOGIN IN A MULTI-HOST
ENVIRONMENT AT THIS STAGE. Also, all forms and browses that require
runtime access control should be in the same app at present.
Phase 1 (gets you going with Access Control in your
application)
Note: Requires NetTalk
5.38 or higher, Clarion6
or higher. Recommended: In Memory Driver (from SoftVelocity).
- Open your dictionary and import the Secwin Memory tables from the
file SecwinNTWStables.txd - or if you don't own the Memory driver, you
can import the SecwinNTWStablesTopspeed.txd.
This file is located in your
\Clarion6\3rdparty\Libsrc folder or your
\Clarion8\accessory\libsrc\win folder.
CapeSoft recommends you use the In-Memory file driver option if you
own the In-Memory Database Driver. A stored file will expose your
operators to interrogation, so this is not recommended, unless you
have complete control over the machine that the NetTalk server resides
on. (If you need to know about what these are for, check out:
FAQ0.7
- Open your NetTalk WebServer application and add the Activate
CapeSoft's Secwin global extension to it.
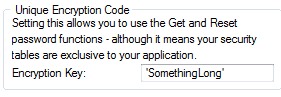
NOTE: You must set the encryption in the
Global Extension on the General tab. This will be primed to a random
value for you, however you may want to change it, especially if this
application will be sharing the DSSW file with another application.
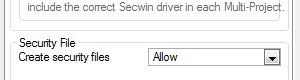
On the 'Files' tab, set the 'Create security files' to 'Allow'. (Note:
You will need to set this to 'No' later).
You must also set the Position of the Data files to where your data
store is (for testing, you can set it to the EXE directory, and set
this later).
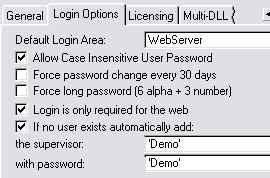
On the 'Login Options' tab, check the 'If no user exists automatically
add' checkbox. (Note: you'll probably want to uncheck this later
during the user Self-Insert section).
- In the application, go to the WebServer
procedure.
Add the User Login Here extension template
to the procedure.
You don't need to set any options - the default values will be
sufficient.
- Still in the WebServer procedure:
Go to the NetTalk or NetSimple Object(x) extension
template, on the settings tab, go to the Security
sub-tab and UNCHECK the Delete
Session on Logout
- Clarion 7 or Clarion 8:
Go to the Application menu, and select the
Template Utility option (or just press Ctrl-U).
Choose the utility called CreateNTWSAccessControlWindowsABC.
Clarion 6:
Clarion 6 struggles to import TXA's from a template utility, without
dropping some critical information. However you can import the TXA
yourself using the File menu, Import
Text option. The file you want to import is
c:\clarion6\3rdparty\libsrc\SecwinInNTWSABC.txa
NOTE: This will import the procedures you'll need in your
webserver application. Two of the procedures that you may already have
is the SendEmail and GetSetting procedures. If this is the case, click
the 'Rename' button when it appears during import. Both of these
procedures are called from the SecwinWebLoginForm.
NOTE FOR CLARION 9 USERS: At the time of writing
this, there is a bug when importing a TXA into clarion 9 which
requires you to open each imported procedure that has a prototype. You
need to do this now.
- Go to the WebServer procedure, NetTalk
extension, Settings / General
tab.
Set the Login page option is to 'SecwinWebLoginForm'
NOTE: If your application requires that people login (i.e. no access
to the site unless they're logged in), then you can set the Default
Page to the login page as well BUT YOU MUST set your URL On Click of
the Login_btn on the SecwinWebLoginForm to the page the user must go
to on successful login:
- Go to the Procedure that contains the menu. This is usually
PageHeaderTag.
Go to the Web Menu Extension.
Click on the Add Secwin Menus button. (If
this button is disabled, then save and close your application, and
re-open and come back here).
You'll see the 'Security' and 'User' menus appear in the Menus list
with the following items on each menu:
Security: 
User: 
Often times the Index page has it's own access rights apart from the
menu, so you need a mechanism to specifically set the menu item's
access (Checkout the NTWS FAQ in this doc for
details). You do not need this for each screen who's access you need
to manage because in browses and forms, you can use the key icon in
the tab heading to access the Set Access window.
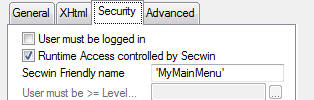
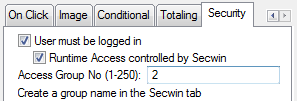
NOTE: For you Set Menu Access menu item, you need to set the Item's
options as follows:
The parameters options should read '_Screen_=MyMainMenu'. MyMainMenu
is the Secwin Friendly name of the procedure that contains the menu.
If it has not been set, then it's the name of the procedure. The
Secwin friendly name is located on the procedure's properties on the
Security tab:
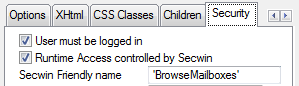
- Secwin allows you to protect access to Browses and Forms. Repeat
this step for each browse and form you wish to restrict.
Go to the Security tab, and check both the
User must be logged in and the Runtime
Access controlled by Secwin checkboxes.
This will provide access control for the procedure. The identifier for
the procedure defaults to the procedure name, however you can enter a
more friendly name if you want.
NOTE: See Combining
procedures' security access settings FAQ for neat ways of
setting 2 (or more) procedures' access control settings in one place.
- In addition to protecting the whole procedure, you can also protect
specific controls in the procedure. This step is optional and can be
applied on a procedure-by-procedure basis as needed.
Aside: Secwin uses the concept of "groups of controls", and allows you
to limit access to the "group of controls" on a user by user basis.
(Users can also be grouped together if you like, that's not what we're
talking about here - this is about control groups on a single
procedure.)
Now, of course, you can have just one control in a group, but it's
also possible to put multiple controls together. For example, on a
browse you might group the INSERT, CHANGE and DELETE buttons together
into one EDIT group. You might then group some sensitive browse
columns together into another group.
Browses:
On a browse you can assign the individual browse columns into
one or more control groups (groups), and you can also assign the
"browse buttons" into one or more of these control groups. Each
control group has a number (starting with 1, going up to 2, and so
on). Each control group must have a unique number, and it must be
sequential (i.e. don't miss out numbers)
Start on the Form Tab. Click on the Secwin Controlled Buttons button. Here you can
assign the INSERT, CHANGE, COPY and DELETE buttons into one or more
groups. (Just use a number for now, we'll assign a name to the group
in a moment.)

NOTE: The controls with controls with '-' in
front are not added to a group. The others show the group number in
brackets after the control.
NOTE: It is important that your control
group numbers are sequential starting at 1. Secwin will stop at the
first number it finds (up to 248) that is not assigned to a control
group.
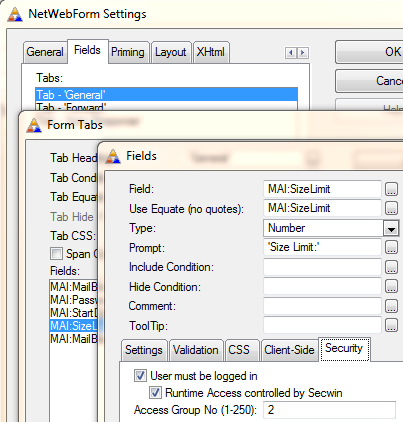
Next go to the General tab, to the Fields
list. For each field that you want to protect (fields can include
buttons, text, links, etc.), go to the Security
Tab (it's on the top row of tabs, on the far right). Again set this
column into a control group. This controls when the column will be displayed.
If the browse column can be Edited-In-Place then you will see a
security tab there where you can determine who has rights to edit
the field.
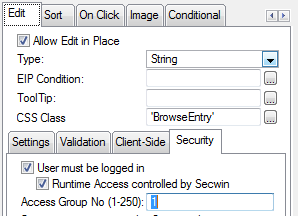
NOTE: You can set the edit group to the same number as the
one used for the edit buttons if you like.
When all the browse columns and buttons (that you want to protect) are
set, then go back to the Security tab for
the Browse itself. You should now see a list of groups is the Secwin
Access Groups list.
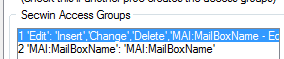
Going into each group you can change the "name" of the group. This
name will appear at runtime, on the Set Access screen, so use a nice
human-readable name. For example for the browse update buttons I call
the group 'Edit'.
Forms:
The same idea applies to forms. First go to the Fields
tab, to each field you want to protect, and to the Security
tab for that field.
Once you have done what you need to the fields, go to the overall
Security tab, and edit the names of the Security Access Groups, as you
did for the Browses.
Menus
By now the process should be familiar. For each menu and/or menu item
that you want to protect, assign it into a group. Then when you've
done that go to the Security tab and set the group names to something
friendly.
At Runtime...
At runtime, if you are logged in as a Supervisor (and hence have the
right to set the access rights for others) a small padlock icon will
appear on Browses, Forms and Menus. When you click on this padlock a
list of all the Operators will appear, and each column will be labeled
according to the name you set. You can then determine who has access
rights to which control groups.
Right now, you're good for a trial run, so go ahead, compile the app and
run it. You can log in as Demo/Demo (user/password). This is the default
user that is (by default) set to be created if no users exists.
NOTE:
DON'T BE TEMPTED TO ADD USERS AT THIS STAGE!! READ ON FOR MORE INFO.
Phase 2 (Handling user self-insertion and password
retrieval):
NOTE: it's a good idea to use the users email
address as their login (This is on by default).
You need to decide:
- How users will be added to the system. Self-Inserted users allow a
user to insert himself to the system. This is common for Forums, and
other web communities. In this scenario there is no restriction to a
user adding himself.
Alternatively, there may be an existing list of
customers/users/suppliers that can be "activated". In this case, they
would enter their email addresses to "create themselves as a user" and
this email address is tested for validity against an existing email
address in the database. ClarionShop does this for returning
customers. The self-inserted user has a basic access, and once he's
self-inserted, the supervisor can upgrade his access rights if
required. This approach is the default, (one of the menu items added
above was a Users browse that supervisors can add to.) See below for
more instructions on adding Self-Inserted user functionality.
The alternative to this approach is where users are added by an
existing supervisor. This is more common in applications with private
data, for example the supervisor of an accounting system would grant
access to new users on a case-by-case basis. This approach is the
default, (one of the menu items added above was a Users browse that
supervisors can add to.) See below for more instructions on adding
Self-Inserted user functionality.
- What level of access self-inserted users will be allocated.
Typically a self-inserted user is automatically placed in a user group
with fairly limited access rights. However they can also be assigned
no-rights until a supervisor approves them.
- Which method of password retrieval you are going to support.
- How the first supervisor gets created
1. For self-user insert:
- Test the users against a pre-determined list (like customers or
suppliers). NOTE: If this is a public site, you need to be aware that
email farmers can use the create users as a method to farm email
addresses. The method they'd use is to "enter" random email addresses,
and then test the response. If there's an "invalid email address"
note, then they keep going until they find an email that produces a
different response. See FAQ 0.1 for a complete
solution.
- Use a captcha to ensure that only humans can enter their data.
You'll need Draw for this, and there's a Captcha example that you can
use as a spring-board to add a captcha to the SecwinWebLoginForm.
- Use a combination of 1 and 2 for maximum security of self-user
addition.
2. What level of access self-inserted users will be
allocated. (if you're supporting self-user insertion).
- Create a Basic Access group, and assign the access for that
particular group. Assign each new user to that group. See FAQ0.1
NOTE: If you are using this approach, then you must either
programmatically create the user group (as in the NTWS example that
ships with NetTalk) or ship a pre-configured dssw5 file that has the
basic Access Group pre-added with the necessary access settings for
each screen. In the example, the user group has been programmatically
added.
- Similar to (1), but copy the access. The new users' access become
independent of the group (which can be a good or bad thing). see FAQ0.1
- The new user gets NoAccess, and must be assigned by the supervisor
to a group, or his own access settings. See FAQ0.1
3. Next you need to decide on the method of password
retrieval. Option 3.1 is the recommended approach.
- On forgot password screen, the user confirms with his email address
(or login if it's not the same as the email address). Password is then
reset, and a link to force the password change is mailed to the user.
A variation is to add a captcha to the Forgot Password screen. Which
just protects your system from being hit by a automated system farming
for email addresses. You would do this in the SecwinWebLoginForm
procedure. In the imported TXA there is a built in email farming
protection mechanism.
- Preset questions and answers are stored when the user creates
himself. These are presented upon a password reset request. Similar to
(1) in that a URL is sent to force a password reset. The major problem
with this method is that case-sensitive answers are an issue. Also
spelling, and change of opinions (for opinion type questions). It
seems that this solution type is less popular in automated systems
these days.
- A variation of (2), where the password is presented on screen (or
emailed to the user). This is the least secure, and not recommended.
4. How the first supervisor gets created
- By default, the Secwin global template is set to create a supervisor
if no users exist. If you like, you can keep going with this approach,
just change the default user and password to something unique to your
application.
- In secwin desktop applications, the first time you run the
application you're prompted to create the first user, which is a
supervisor. This is an approach you can take with the web server
application as well. In this case, on the Secwin global template,
uncheck the "If no user exists automatically add" checkbox.
When you first run your application:
- From a browser, Login with the default user (if you have setup a
default user) - or create your first supervisor and login with that
login.
- If you have enabled users to self-insert, and
you want your users to have a set of basic access settings, then you
need to create a Basic User Group for the default access settings
for self-inserted users, and set the access settings for that User
Group. Once completed, save this dssw5.tps file to your install, as
this will become the default dssw5.tps file that you ship with your
application.
- You need to go to your Secwin Global Extension template, and set
'Create security files' to 'No'.
- From there on, you can create users and user groups and assign
webpage and control access.
In your browses and forms, use the key icon in the title bar:  to get to the set access window to control the
access that each user has to the window and the control groups in that
window:
to get to the set access window to control the
access that each user has to the window and the control groups in that
window:

Use the check boxes to allow a user access or to hide/unhide certain
controls. In the above, both user groups have access to the
MailboxesBrowseControl procedure, but the Edit and Size Limit Edit
control groups are not displayed for users belonging to the Basic User
Group.
NOTE: When you add your first user, the system will attempt to email the
password reset to the new user. The Email details will not be set at this
point, so you'll need to go into the GetSetting procedure and edit it
based on where your settings are stored. You'll need an EmailServer,
EmailPort, FromAddress, HostAddress. The host address is the base address
that the user will click on to get to your website. By default, the
GetSetting procedure stores (and retrieves) it's settings from
Settings.ini in the application directory. This is not recommended for
your application (for a Windows compliant data location).
Changes you can make in the imported NTWS procedures:
- In the SecwinWebLoginForm procedure, you can force a long password,
or test for specific character patterns in the verifypasswordconfirmed
routine.
Check out the
FAQs if you are not getting the
results you're wanting.
What to Read Next
You've probably noticed a lot of possibly exciting template switches in
your Secwin use so far - if you want to know more about what each switch
does then check out the
Secwin
Template Reference.
If you really want to start exercising some power, then check out the
Secwin Technical Reference. This contains
descriptions of all the Secwin functions available to you.
Of course if these docs don't explain something clearly enough - or if you
need a question answered then don't hesitate to contact

- we're there to answer your
questions.
User Guide
Access Control
Overview of Access Control
Features
Access Control features allow the user to limit access to his application
based on who is using the program. This is necessary in many database
applications where you wish to expose some of the users to more data than
others.
The primary feature for all Access control is
Logins
and Passwords. This allows the computer to determine who is using
the program, and is essential for all the other features to work. For a
complete explanation and details on how to implement see the section
called
Login and Password Access Control.
The next most common features is being able to
limit
access to screens, and controls, within your application. This is
taken care of using the Screen Security template which is discussed in the
section called
Screen Security
Access Control.
The flip side of implementing all this access control, is
how
the end user goes about managing it. Read about this in the
sections called
Operator Browse and Form screen,
and the
Set Access Rights screen.
Ancillary User Functions, like
Change Password, Change Login and Lock Screen are also helpful at this
point.
User Groups are useful for grouping users
together. This can simplify the setting of user's access rights at
runtime.
Work Groups are useful for
programmatic
limiting of users. In other words by using the Workgroup field you can
group users together and limit their rights in your own way.
Advanced Programmer Functions
describes some of the functions available to the programmer for doing
their own advanced functionality.
If you're not wanting Access Control, but just wanting to use the
Licensing and Registration part of Secwin, then take a look at the
Bypassing
Access Control section.
Login and Password Access Control
The basis of Access Control is the concept of each user having their own
Login and Password. In it's most basic form Secwin allows you to protect a
program simply by requiring a valid Login and Password before it will run.
This is described in the QuickStart section
Adding
Logins and Passwords. Not surprisingly though even a function as
simple as this can have some quite complicated options.
Security will always be a balancing act. The opposite of security is
convenience, foolproof security is almost impossibly inconvenient, while
simplifying it almost always leads to lower levels of security. With
Secwin you can set very tight security, but unless it's absolutely
required, your users won't thank you for it. One of your first jobs is to
determine how tight the security needs to be, and implement it
appropriately.
Most of the options when it comes to the Login screen, apply to the
password. these options can all be set on the User Login here template and
include things like minimum strength passwords, case sensitivity, and
frequent password change enforcement.
Lost a password? The password itself is not
available to either the programmer, or any other user in the system.
Because Secwin has been designed to span across applications, and
networks, it would constitute a major security flaw for one user to be
able to find out the password for another user. This means effectively,
that if a password is forgotten, there is no way to retrieve it. If the
password can't be remembered, then the user will have to be deleted and
re-added. (
Tip : You can use User
Groups to handle folk who are continually forgetting passwords. See the
section in the User Guide entitled
User Groups.)
Alternatively, take a look at
Using an
encryption key for details on an alternative method of access
control, which enables you to retrieve the password.
You can choose to password protect an entire program with one login and
password (by far the most common approach), or divide the program into
multiple
areas, each area having its own login screen. In the
case of multiple logins the same user would use the same user code and
password for all the areas. however they may not be granted access to all
the areas, and their status from one area to another can change.
Multiple applications using Secwin, and sharing a common dssw5.TPS file,
will share a common list of users and passwords. Thus a user has the same
login code and password to all the EXEs that he has access to. If he
changes his password in one place, then it will change for all his logins.
TIP : If you have a Multiple-Exe product,
then you can consider each Application to be it's own area. However it is
possible for all the EXEs to have the same Area definition, and hence have
the same access rights apply to all the EXEs. This is done by setting the
Unique Application Name (on the Secwin Global Extension) and the Unique
Area Name (on the Secwin User Login Here Extension) to be the same across
all the Applications.
Advanced : Although it is most common to
have the first Login screen appear when the Application starts, it is
possible to leave the Frame procedure, and some of the sub-ordinate
procedures unprotected, and just require a login when a certain procedure
is run, for example a Report, or System Settings procedure. This is done
by removing the Login extension from the frame, and adding it to the
procedures where you do want the users to Login.
Definitions:
When a user logs in they can be classified into one of 3 possible
Levels.
Supervisor: This level has all
the power - the supervisor has access to the whole application (or area) -
and has the power to add users and user groups and limit those users and
groups.
No Access: This Level has no
power (in fact they will be denied access). These users will not appear in
the list of operators that the SuperVisor can assign access to (for
security areas in the application).
Operator: This level is in between - he
does not have the power to add or update users, or their access points,
but he is in the list of operators that the supervisor can grant or deny
access to (areas of) the application.
The difference between a Supervisor, and an Operator is obviously a
significant one. Simply put, a Supervisor is allowed to change the
security access rights of other Users. An Operator can not change either
their own, or anyone else's, Access rights.
Each
Operator can be assign an initial access of either
All
Access or
No Access. This is the default access for any
particular security access point in your application for that operator.
The
Supervisor can change that default access to any of the
security points. An
operator with an initial access of
No
Access will need to be assigned access by the supervisor before
they will have access to a security area.
Note: The difference between a user that is an
operator with an
initial access of
No Access and a user that has a level of
No
Access, is that the
supervisor will be able to grant
access to the
operator to particular areas of the program, but
the
No Access user will not appear on the list of users that the
supervisor can give access to. The
supervisor must
change a
No Access user to an
operator if they are to
be given access into your application.
Operator Browse and Form Screens
The Operator Browse and Form screens are used to manage the user list for
the program. They're also able to group users together (into User Groups)
but that is discussed in a section called
User
Groups.
The Operator Browse screen should be on your Application's main menu - as
described in Step (3) of the QuickStart section called
Adding
Logins
and Passwords.
Any
Supervisor can add new Users using these built-in Operator
Browse and Form Screens. On the Form are the following fields;
First name & Last name : These apply
obviously to the operator.
Login : This is the Login Code the user will use
to identify himself to the system. Note that the supervisor cannot set the
password for the user. The password will default to be the same as the
Login Code, after that only the user can change it. Note: The login cannot
be purely numeric. It must contain at least one alpha character (see the
ds_GetProperty function reference).
Level : Set the User to be either another
Supervisor,
and
Operator, or a User with
No
Access to this Area.
Default Access : If the User is an
Operator,
then you can set their Default Access. this is typically either All
Access, or No Access, but it can also be set to the Login code of another
Operator. In that case the new operator will assume all the current
Screen
Security settings of the selected Default Access operator. Note
that this will only be for this application name (set in the Secwin Global
Extension template) - not across every application that uses that
dssw5.tps file. (See
Definitions for more
details)
User Group : If the User is an
Operator,
then he can belong to any number of pre-defined User Groups. For complete
information on what User Groups are, read the section in this guide
entitled
User Groups.
Workgroup : You can assign a Workgroup number to
the user. For more information on Work Groups, see the section in this
guide entitled
Work Groups.
TIP :
For programmatic access to the Users list see the
ds_InsertUserEx
,
ds_ChangeUser,
ds_DeleteUser
and
ds_UsersEx functions in the
Secwin
Technical Reference.
Screen Security Access
Control
The Screen Security Access Control is handled by a template called User
Screen Security. This is added to each procedure where you want it. See
the QuickStart section called
Adding
Screen, and Control, Access Control.
Wherever this extension is added, the end user will be able to set his own
security using the
Set Access Rights
screen.
Set Access Rights Screen
While the
Operator Browse screen lets you
set access rights to the whole program, The Set Access screen allows the
end user to limit access to specific controls, and windows within the
application.
The main goal here is
simplicity. The idea is
that your customer must be able to work this screen, regardless of their
computer skills, and you must be able to teach it to them in a quick and
simple way. To this end we have avoided the use of complicated windows
which allow you to set multiple settings at the same time.
The screens, and controls, that support this feature are set by the
programmer at compile time, but the actual access rights are set by the
end-user when he runs the program. As the programmer you can find out how
to activate the security by reading the section called Screen Security
Access Control. In this section we'll concentrate on how the end-user uses
that security.
In order to set security rights the end-user must be logged in as a
supervisor.
By going to any window with the
User
Screen Security extension, and pressing Ctrl-F8, they will get the
Set Access window. This window will have a list of the Operators on one
side (Users with No Access, and Supervisors are not listed). User Groups
will also be listed, and users already assigned to groups are not listed.
The list takes the form of a spreadsheet, with the names on the left, and
the access rights on the right. By simply double-clicking on the displayed
rights, access can be changed from Yes to No. Closing the screen is done
by clicking on the Close button.
So if the user wishes to stop users Deleting his Customers, then simply by
going to the Customer Browse, and pressing Ctrl-F8, he can limit the
access to the Delete button.
Note: You can make use of the
Secwin
Global SetAccess window as well, which makes setting access points
much easier than using the SetAccess screen.
Note: You must add the check.ico and
uncheck.ico to your multiproject resources if you are building a multiproj
application.
Ancillary User Functions
These functions are designed to be added to your program as features for
your end-user to use. The first one Change Password is likely a necessity,
while the other 2 Change Login, and Lock Screen are optional.
Change Password : This allows your end user to
change his password. He will need to enter both the old password and the
new password. On your
login extension
template you are able to set minimum password requirements (Force
Password Change - Force Long Password). You can also make your own Change
Password screen, see the section entitled
Making
Your
Own Secwin Windows. To use the built-in Secwin Change Password
window see the
Change Password
Code template.
See
FAQ3.4 for details on how to retrieve lost
passwords.
Change Login : This function allows the users to
change from one user to another without exiting the program. You can make
your own Change Login screen, see the
Making
your Own Secwin Windows section for details. To change the Login
using the build-in Secwin Change Login screen see the
Change
Login Code template.
Lock Screen: This blanks out the screen so that
others can't see it. Only necessary in specific situations. Note that this
does not protect the whole machine, only the running application. The user
is required to re-enter their password before continuing. To call the Lock
Screen function use the
Lock Screen
Code template.
User Groups
If you have a large number of users then it may not be convenient to set
the access rights for all the users individually. In this case you can
create groups of users, cunningly called User Groups.
To create a User Group use the
Operator Browse
screen, and User Group Details button.
To put users into groups use the Operator's Form. A List of User Groups is
provided that the user may be allocated to. In Secwin 4 the User may be
allocated to multiple UserGroups. Note that this list box will only be
available if the User is set to be an
Operator.
Setting the rights for a Group is exactly the same as setting for an
individual. Simply use the
Set Access
screen while the program is running.
Note: an
Operator
can now be part of more than one User Group.
Tip : When you create a new user or user
group, you can set it to have an existing user or user group's access
rights (when it's created). You can diverge the two groups (i.e. if you
wanted more options for the one than the other).
Tip : If a user is always forgetting
their password, and you get tired of resetting their access rights every
time you have to delete, and re-add them, then make a user group for that
person. The access rights will be stored with the Group, not the User, so
it's easier to delete, and re-add the user.
What happens about access rights when a user gets added
to a usergroup:
When a user is assigned to a user group he loses his individual access
rights and only takes on those of the user group. If he joins multiple
user group, then his access is an "or" function of the user group's
rights. For example: one user group is denied access to a particular
screen and another is allowed access, and the user belongs to both user
group, he will be allowed access.
Work Groups
Work Groups are different to
User Groups, they
require more effort from the programmer (you need to handcode where access
is limited to a workgroup, or where a user is limited by belonging to a
workgroup) - and can be confusing to the end user. The difference between
User Groups and Work Groups is that user groups'
access are runtime assignable - whereas workgroups' access is programmed
into your application. A user is assigned to a workgroup at runtime (hence
the confusion on the supervisor's part of where the access points are),
even though the access points are set at compile time.
They are essentially a number (a long) which you can store with each user.
This number can be used to limit browse records which are available, or it
may be used to perform some specific access control feature of your own.
The Work Group number, for each user, is set on the normal Operator Form.
Each operator can only belong to one workgroup.
Example:
If ds_GetProperty(AppNum,,'WorkGroup') = 2
!Allow user into this routine
end
So to summarize: In order to use a WorkGroup for an operator, you need to
programmatically set the access rights in your application (for the area
that you want to limit access to), and then at runtime, assign that
operator to the WorkGroup Number you used in code.
Bypassing Access Control
There're a couple of reasons why you may like to bypass the Access control
part of Secwin (a bit like disabling Access Control - but technically it's
working around it). The primary reason for doing this, is for demo
purposes - i.e. you want your program to run without forcing the user to
login. Alternatively, you may not require Access control for your program
period, you might like to just use the Licencing and Registration
features.
There're 2 ways of Bypassing Access Control this:
- Check the Make Login Optional to End User (on the User_Login
template - Login Options tab). You won't need to ship a dssw5.tps file
(although you can if you want to use Access Control later). This means
that access control is bypassed. This is typically for people you
don't require Access Control or would like to make access control
optional.
- Check the Allow default login values (on the User_Login template -
Login Options tab) use a default Login code and password and ship a
dssw5.tps file that contains the default user (if you want access
control at a later stage, but not in the demo application). This is
typically for people who require access control (either now or at a
later stage), but not in the demo application.
Note: When shipping a dssw5.tps file, you
need to make sure that dssw5.tps file does not overwrite the one that
already exists there (for people downloading a program update who have
already set up all their user settings).
Multi-DLL Applications
When you add an operator and set his default access to 'All Access', this
will only be for the application that he is added to. For other
applications, his default access is set to 'No Access'. This is because it
would pose a major security flaw if you could create a user in a Secwin
enabled application and get all access rights to a completely unrelated
application. In order to allow cross-pollination of operators in a
Multi-DLL environment (IOW across multiple apps which are essentially the
same application) - you need to set the app name the same for each
application (you need to do this in the Secwin Global Extension template).
See the
Definitions section of this doc for
more details.
Licensing
and Registration
Overview of Licensing Features
The basic goal of the licensing features is allow you to sell your program
in different flavors, and yet have a single set of install files. In other
words by making use of an
Activation Code, you can limit, or
extend, your program based on the amount that the client pays. You can use
all the licensing features, or more likely, you'll just make use of a few
of them. In this User Guide each feature will be discussed in more detail,
so take a moment to read though them and decide which ones you want to
use. These features include;
Product Branding through the use of the user's
company name, and a serial number. this means you advertise on your
screens, and on your reports, the name of the licensed user. This makes it
difficult for illegal user to distribute reports etc. For more information
read
Branding on Reports, and
Branding
using Logo Screens.
Levels allow you to enable a piece of your
program, then a bit more, then a bit more, and so on. Each Level is a
superset of the previous levels - in other words each level includes all
of the previous level's features. By default these levels are named (in
order) Demo, Lite, Standard, Professional and Enterprise, however you can
name them anything you like. See
Using Levels
for more details on this feature.
Automatic Demo Licenses allow you to distribute
demo versions of your program that run only for 30 days. Please note that
this feature is very 'strong', so testing is difficult. Read
Automatic
Demo Licenses for more information.
Optional Modules allow you to activate up to 30
separate, unrelated, modules, in addition to your main program. For
example in accounting applications you often purchase a combination of
modules - General Ledger, Debtors Ledger and so on. See
Using
Optional Modules for details on this feature.
Concurrent Network Copies allows you to limit
the number of simultaneous, concurrent, users on a network. The user can
load your program on any number of computers, but only a limited number of
users will be able to access the data at any one time. See
Using
Network Copies.
Users currently logged in. This feature is
something of a bonus that you get when you implement licensing in your
program. Because of the concurrent network copies feature, Secwin is able
to track who is currently logged into your program. This can be very
useful for network updates, as you can ask users to quit the system while
you upgrade the program. See
Using Network
Copies.
Expiry Dates allows you to control when the
program will cease working. This can be used for distributing 30 day demo
versions of your software, or for licensing your software for limited
periods of time (for example yearly license renewals.) See
Using
Expiry Dates for the specifics.
Counters are somewhat less common. Essentially
they allow you to sell your program based on the number of times it will
be run, or the number of reports that will be printed, or something like
that. Alternatively you might use it just to store an extra number which
you want to use somewhere in your program. See
Using
Counters.
All of the features are activated and de-activated through an
Activation
Code. This code is generated by you, using either the Register
example application or using an online activation code generator (like
Secwin Online
Server).
If the user doesn't have sufficient access then the License will fail. The
exact action taken when this happens is determined by you - see the
section called
When the License Fails.
Some Activation Code secrets
Activation codes contain the date on which they were generated, and you
can specify the life length of the activation code. By limiting the period
that the activation code is valid, you can limit activation codes being
passed around and used by many users over an extended period of time.
Don't get confused between this date and the Licence Expiry
date though, these are 2 completely separate features.
This code should be written into your application that generates
registration codes. There is a default registry code generation app that
ships with SecWin as an example
(3rdparty\examples\secwin\register\register.app), which you can modify to
suit your needs.
Branding
Branding on Reports
An effective, and non-intrusive (to the registered user), form of copy
protection is Product Branding. One technique you use for Product Branding
is to put the name of the Company that registered the software on the
reports.
Unfortunately given the large number of report templates available, and
the fact that most reports are heavily customized, if not hand-written,
it's not possible to write an Extension Template that will work in all
situations. There is however a simple Code template, called
Code
: Call CurrentLicense, which will do most of the work for you. You
can find details about the template
here.
Branding using Logo Screens
One of the ways of Branding your product is to put the Licensed name of
the user on the screen as a background to your Frame.
As you may know, it's not possible to put any controls in the 'Window'
part of a Frame procedure. The best you can do is apply a bitmap graphic
as the wallpaper to the window. As we want the background to be dynamic
(to include the licensed user's name) a bitmap wallpaper isn't going to be
good enough.
Secwin overcomes this limitation by allowing you to create a separate
window procedure, put whatever you like in the window, and make this
window the 'background' to the window part of the frame.
You use the normal Clarion Window template to create the window. You can
put pretty much anything you like on the window - I often use the product
name, and maybe a product logo here. Of course the most important thing to
put here is the name of the current License holder. Note this is not the
name of the user (although you could put that here as well if you like),
but rather the name of the Company which has licensed the program.
There is one requirement for the window -it must have the MDI attribute
turned on. If you don't do this, instead of the window being at the back,
behind all your browses and forms, it will float to the front.
Some other suggestions which make the window work well are;
- Set the position to 'center'.
- Turn the Clarion feature to 'Save and Restore the Window position'
off.
- Remove the Caption, and the System Menu attribute.
- Set the 'border' of the Window to 'None'.
The second requirement is to add the Secwin Extension template, called
Extension : Make Logo Screen, to the
window. This adds the code necessary to make it a background window. You
can read more about the template, how to add it, and the options it has,
here.
The last step is to add code to your program that Starts the Logo screen.
Of course there is a Secwin template to do this as well, it's called the
Extension : Run Logo Screen template,
and you can read more about it
here.
This template is added to the Frame procedure itself.
See the
Examples section for an example of
this.
Hardware Copy Protection
In some cases you may want to 'lock' a particular activation code against
the actual machine. There are a number of different hardware IDs that you
might like to use - all of which have their weaknesses. You can use the
ds_GetDriveSerialNumber to return
the serial number of the hard disk (although some manufacturers are not
particular astute at generating unique serial numbers). Alternatively you
could obtain the MACAddress of the PC - although this could change as
additional MACAddresses are added (in the form of extra network cards or
virtual networks like Hamachi or Sonicwall). Although this number can be
changed by the end user, given the correct tools, it is a reasonably
effective way of ensuring that the data is not moved from one machine to
another.
Tip : Many users upgrade their computers
every 2 years or so. Network administrators change network drives more
often then that. Each time the hard disk is changed the user will have to
get a new activation code from you. If you're expecting a large number of
installations then DO NOT use this feature. Use only in very select
situations.
To implement a test based on this check, add the following code anywhere
in your program, After the user has logged in;
if ds_CurrentSerialNumber() <>
ds_GetDriveSerialNumber()
! oh dear - pirate code goes here....
end
Typically you would also display this number on your about screen. That
way, when issuing the code, you know what to set the Serial Number to. In
other words the user needs to report to you his serial number (he
shouldn't know it's the same as his hard disk) so you can generate a code
which matches that number.
When issuing the activation code (if you're not using Secwin Online
Server) - you will need to add this hardware ID to one of the additional
strings in the licence information:

In your SecwinRegisterProduct window, enter the following code in the Drop
event for the XML drop region:
SecLoc:xmlFile = DropID()
Do ImportXMLFile
if SecLoc:AdditionalString1 = FunctionToGetID() !This could be
ds_GetDriveSerialNumber
post(event:accepted,?Sec:RegisterButton)
else
disable(?Sec:RegisterButton)
!Warn on mismatched ID here
post(event:closewindow)
end
You also need to turn off the
Automatically register
when an XML file is dropped checkbox (on the RegisterProduct
control template on the SecwinRegisterProduct window).
When loading the application you need to test the hardware to a saved
licence:
LicenceDetails
group(ProductDetailsGroupType),pre(LD) .
code
LicenceDetails = ds_CurrentLicenceDetails()
if LD:AdditionalString1 = FunctionToGetID()
else
!Invalid hardware for registered licence code.
end
Using Levels
It's common these days to find different Levels available for the same
program. For example a program with Lite in the name normally means
there's a (more expensive) version, with more features, available. Another
common feature is to distribute a free demo version which is limited
either by time, or by feature set. ( The time option is discussed in the
section entitled
Using Expiry Dates).
Secwin supports up to 5 levels of the same program, although obviously you
may not have need for all 5. The levels are named (by default) Demo, Lite,
Standard, Professional and Enterprise. (You're free to rename the levels
to anything you like). The idea is that each level is a superset of the
previous one, with more features added. In other words the Lite level
includes all the Demo features, and the Standard level includes the Demo,
and Lite features and so on.
Using the
User Screen Security
Template you can set any of your procedures so that they require a
specific level before they'll operate. For example you might set a
procedure to require Level Lite - in which case it won't work in Demo
mode. Or another procedure might require Level Professional, in which case
it won't work in Demo, Lite or Standard Levels.
If you have a procedure where you want to use a Level restriction, then
add the Screen Security extension to the procedure, click on the License
Check and Restrictions button, and select the Level you require on the
Levels tab.
Automatic Temporary Licenses
When the user runs your program on his machine for the first time you can
set your application up that he can automatically get a temporary license
for running your program. You can switch on this feature by going to the
User Login Here template, on the
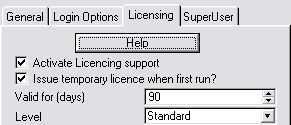
Licensing tab, and turning on the
Issue temporary licence when first
run? switch. The length of the demo is set in the next option
called
Valid for (days). You can set the automatic license level
in the
Level drop down list.
This feature also cause much grief to Secwin developers because they find
it difficult to test. Secwin will only issue ONE demo license for your
program on any one machine. If the user registers the program then they
will not get a 30 day temporary activation at any time after that. Also if
they install your program, and get their temporary license, they will
never get another for your program.
Automatic temporary licenses are issued with all modules enabled (see
Using Optional Modules for more details
on modules).
Tip 1 : Deleting the Security File
(dssw5.Tps) is not sufficient to overcome this feature, so please don't
complain when you can't make it work on your development machine a second
time.
Tip 2 : If during the 30 day period, the
PC date goes backwards, then the license will automatically, immediately,
expire.
Using Optional Modules
Optional Modules are a lot like Levels, but while Levels work by each
level including the previous level, Optional Modules work as completely
separate units. The most common example of this approach is the Accounting
Suite, where you can purchase any combination of General Ledger, Debtors
Leger, Creditors Ledger, Payroll, Stock Control and so on.
When you issue an activation code, you can enable, or disable, up to 30
optional modules. Within your program you can use the
User
Screen Security extension to set any of your procedures to require
one, or more, optional modules. You set the Modules require by going to
the License Check and restrictions bottom, to the Modules tab.
Using Network Copies
One of the settings you can set when setting an Activation Code is the
number of concurrent copies of your program that can be running at any one
time.
The idea is that, in a network situation, it's a good idea to activate the
program on as many machines as possible. By exposing more of the users to
your program, ultimately means more money for you. So you load your
program onto any number of workstations, but use Secwin to limit the
number of concurrent connections that can be made to the data.
Using Network copies is very easy. Go to the
User
Login
Here Extension, to the Licensing tab. Set the Licensing to be
active, and set the Unique 4 Character License code. If you wish to turn
off this feature then check the
Disable Network Licensing switch.
The number of copies that a user can have at one time is set as part of
the Activation Code.
Secwin will use these 4 characters, plus a 4 digit number, to create a
number of LIC files in your data directory. Each user as he logs in, will
open one of these files using a Read/Write Deny Write file setting. For
the duration, while he is logged in, this file will be locked. If your
program GPFs, or the workstation is rebooted then the server will
automatically unlock the file.
You can see a list of who's logged in by making a call to the
ds_CurrentlyLoggedInEx
function.
Note: This feature is only available
currently for ISAM file users (using TPS, BTrieve, Clarion, etc file
systems). SQL users will need to build in a TCP/IP client/server system to
verify with other applications whether the number of current instances
exceeds the permitted Network Copies. This is outside the scope of Secwin
and requires a template such as NetTalk to implement this functionality.
Using Expiry Dates
This is the only option which is not actually set by the user on the
Product Registration screen. This is because you may not actually want
your end user to know there is an expiry date. The date itself is set when
you generate the Activation Code. When the user's PC goes past this date,
then the license will fail.
If the user sets the date back to the last date of the license, runs you
program and then resets the date, then it is possible to bypass the Secwin
date checking. Probably the best solution in this case would be to put a
timer on the frame that checks the date is before the expiry date every
few seconds, and shuts the program down as soon as the date goes past the
expiry date. The function to call is
ds_CurrentExpiryDate
If the user is really desperate, and resets the date in order to keep your
program running (and keeps the PC date reset), then you could build a
system that checks an internet date (you could use NetTalk to do this) and
if the difference is > 1 day, then force the PC date to that date, and
redo the license check. They would need to be connected to the internet at
the time of the check though, so it might only take a short time for them
to figure out the check is in place. What you could do is do the check
once on startup - if there is no internet connection, then retrying every
30 seconds or so until one is established and you can then check the date.
Of course, the user could always disconnect from the internet while they
run your program - but eventually it gets so inconvenient for the user,
that they eventually purchase an extended license.
Using Counters
Counters are probably the most unusual of the Secwin features. Typically
they allow you to restrict the number of entries into a table, or to
restrict your program based on the number of times a procedure has run
(reports, or a procedure).
The counters for your client, are set when you issue the activation code.
You can use as many counters as you would like, each counter is identified
by a label. The means that the label of the counter in your Register app
(i.e. the program that issues activation codes) must match the label used
in the RegisterProduct window, which must match the label as it is used in
your application. This is simple for Table restrictions, but if you're
using it other than for table restrictions, you need to be careful of this
3 way name match that is necessary.
Table Restrictions:
For table restrictions, you need to:
- Add the table to be restricted in your Secwin Global Extension
templates (on the Licensing tab).
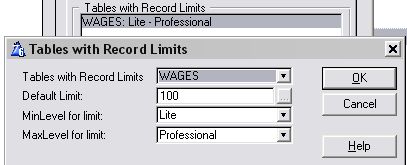
You can specify the table, the licence level range that the limit
applies to. Levels below the limit will not allow any records, and
licenses above the MaxLevel limit will not apply any limits to the
table. The Default limit is the limit that is applied for a Default
temporary initial activation licence - as well as what is initially
set in the manual registration screen (if you are not using Secwin
Online Server to automatically issue activation codes). The Counter
Label allows you to associate a user-friendly name with your counter
instead of the table name (leave blank to use the table name). Use
this name in your Licence code generation program (like
SecwinOnlineServer).
What this will do is add a callback when an insert to the table is
attempted and check the licensed limit for that table to verify that
table limit has not yet been achieved. If so, then the insert will
fail.
- In order to avoid the user from entering all the details on a form,
and the insert only failing when the hit the OK button at the end of
the form, you can add the User Screen Security template to your forms
(for that table) - and check the Warn before insert if records
are on the limit checkbox and specify the table to check in the
drop down below that.
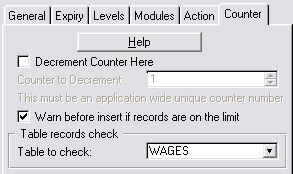
- In your register app, the counter used will be the name of the table
(in this case 'Wages'). This is crucial to get the counter to match
correctly.
Procedural
Restrictions:
In your program you can specify, using the Screen Security extension
template, that a procedure Decrements the counter. When the counter
reaches 0 then any procedure trying to decrement the counter will result
in a License fail.
This could be used when your program is being evaluated, for example when
you want to allow the user a fixed number of program runs before they have
to purchase.
Alternatively it's possible to sell your program based on the number of
times it is used. For example data applications can be sold by the number
of reports that can be generated. Your user can buy 10 reports, when they
run out you simply issue another activation code, and they get 10 more.
To set a procedure to decrement a counter:
- Go to the User Screen
Security extension for that procedure, click on the License
Check and Restrictions button, go to the Counter tab,
and select the option Decrement Counter here. You need to
specify which counter Secwin must decrement by a label (which must
match the label of the counter in the registration window as well as
that in the registration program issuing the activation code). This
means that there is technically no limit to the number of counters
your application can make use of.
For Hand-coding:
To check a counter or decrement a counter manually, use the
ds_CheckCounter
function to do this. The Counter label that you are checking/decrementing
must match the counter in the RegisterProduct window (as well as the
registration application that issues the licence).
For Secwin3 upgrade users:
If you made use of the counter in Secwin3, then the counter to resume
using is the 'Default Counter'. If you need additional counters, then you
can either make use of the Table Restrictions limit functionality, or else
you can use other labels and add additional procedural counters to your
registration window.
Using Serial Numbers
The Serial Number field is a string field which you are able to use for
Serial Number purposes. It is not required for licensing purposes - but is
provided for your convenience. You can use the Company name to make the
license unique.
When the License Fails
Whenever the user accesses a procedure, and the users' current license
doesn't meet the requirements for that procedure, then the license
fails.
You can decide on the action which must be taken at this point. The action
is set on the
User Screen Security
template. Go to the License Check and Restrictions button, and go to the
Actions tab.
The first option, and the most common action, is to display a warning
message, and to close the procedure. Typically the procedure will close
without any screen being opened, so the user will just see a warning
message.
Alternatively you can set it to close immediately without the warning
message.
You can also select for the procedure to carry on as normal, but for all
the controls on the window to be disabled. Actually you can also override
the disabling and allow some of the controls to be enables. This option is
most often used on the Frame procedure. If the program starts, and the
license fails (maybe it has expired) then you still want the user to
access menu items like, Help About, Register Product, and File Exit. By
using this option, and specifying these controls, the user will be able to
get your information (from the About screen) and use the Register Product
screen to enter a new Activation Code.
The final option is for it to call a procedure. This would most often be
used when you have created your own product registration screen, and if
the license on the FRAME procedure fails, you want it to automatically go
to your procedure.
Including
additional fields in the Licence
In Secwin4 you have the ability to use additional fields in the licence.
The licence details group contains Other2, Other3, OtherLong, ExtraLong
and ExtraString additional user-definable fields that you can make use of
for additional parameters.
In your RegisterProduct window (check the
Creating
the Register Product section of the docs, if you have not created
the SecwinRegisterProduct window in your application yet) you can add an
additional field (up to 5 - 2 longs and 3 strings) for the additional
items you would like to store.
These additional fields come already on the SecwinRegisterProduct window,
but by default are hidden. You can unhide the Additional fields group, and
then hide the controls that you don't require (unless you require all 5
additional fields). You can edit the field prompts to be something
descriptive, and make sure that the Additional fields are populated on
both the Register application (or Secwin Online Server) - as well as in
your application when registering the licence, otherwise the activation
code will not work.
Note: If you're using the built in xml file
mechanism to transfer the licence details in an xml file, then you will
not need to do anything extra to support this.
Using an XML file to transfer the licence
details
By far the easiest way to transfer a licence details manually is via an
XML file. This removes all possible user-entry error and makes it very
simple for the user to enter licence details. Simply send them an email,
include the XML file, and they can drag the xml file and drop it straight
onto the RegisterProduct window in order to register the product.
You will need to create the xml file in your registration application. For
an example of this, take a look at the RegisterABC application, in your
Secwin Examples folder. This does not include
a method of transporting the application, but using a product like
NetTalk, will make emailing the XML file as an attachment very straight
forward.
Some tips on creating a registration (using the registerabc application).
Run the registerabc application - and to create a registration:
- Create a product entry - making sure that your product name and
seedcode (you enter) matches the licence name in the Secwin Global
Extension of your application.
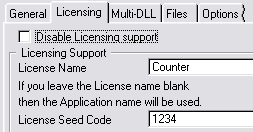

- If you have implemented table limits (or a
procedural or handcoded counter) you need to add the limit to
the product entry. When creating a registration, the registration will
contain a record for each limit that you added to the product (in the
products table). You can override the default limit (or count) that is
automatically primed in the new registration on the limits/counters
tab. The counter description used in the registerabc application must
match the 'Counter to decrement' field in the UserScreenSecurity
template prompt in your application. If you have stipulated table
limits in the global extension, then you need to use the exact table
name in the description in the registerabc application.
Showing Table Restrictions
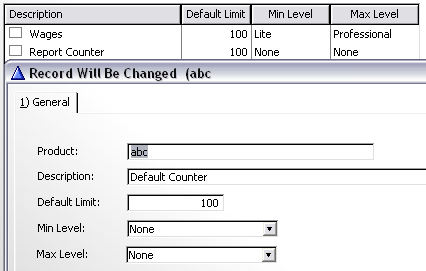
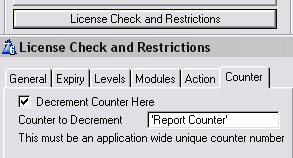
Showing a procedural counter
R# = ds_CheckCounter ('Default Counter',1)
Showing a hand-coded counter
What you need to change in your application:
Nothing - except
Creating the Register
Product window in your application. Once this is accomplished, you
will notice the following region on the SecwinRegisterProduct window:
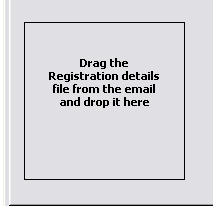
Dropping the xml license file onto this region will automatically populate
all the fields with the correct licence values. The user then simply has
to click the register button and he's done.
If you want to support manual entry into the Register Product window as
well as via the XML file (manual is by default disabled) - then you can do
this by enabling the ?Sheet1 control in the Window Formatter of the
Secwin_RegisterProduct window that you imported into your application.
Using Different Licence Types
Secwin supports different licence types (at this stage there are 2 types -
Permanent and Temporary). This feature enables your
existing
users to try out certain additional functionality for a demo period,
without losing their Permanent Licence. Once a Permanent licence is
issued, the Licence will always fall back to that permanent licence (after
an issued temporary licence expires).
You can issue as many temporary codes as you would like your customer to
have (each subsequent one will replace the previous temporary code). When
the temporary licence expires, the licence will always revert back to the
permanent licence that they had previously (unless the permanent licence
expires in the interim). Issuing another Permanent licence will replace
the existing Permanent licence (as will issuing another Temporary licence
will replace an existing temporary licence). The licence type is set on
the Registration window - and must match in both the Registration program
and on the RegisterProduct window in your application.
The temporary licence (by nature) - will contain more features than your
permanent licence. The reason for a temporary licence is to try out
temporary features. Once the temporary licence expires, the licence will
fall back to the permanent one - IOW the temporary licence is at a higher
level to the permanent one. Temporary Licences are Level 2 licences, while
Permanent Licences are Level 1 licences.
Because temporary licences should be temporary, the expiry period should
be a short period (say 30 days) in order to avoid the following issue:
Warning Note: The temporary licence will
always supersede the Permanent licence. This means that if you assign your
client a new Permanent licence, while the temporary licence has not yet
expired, it will not be used until the temporary licence expires. If you
don't want this feature, then hide the Type drop down in the registration
application, and always assign the licences to permanent. If you want to
assign more features in a permanent licence (than in a currently unexpired
temporary licence) - then you need to issue both the temporary and the
permanent licences (so that the current temporary licence will be replaced
by the new temporary licence with the new features)
Note: Don't confuse a temporary licence
with a demo licence. A demo licence is a permanent licence type - a
temporary licence is only issued to an existing permanent licensee to try
out new features (so the licensee is still registered).
Use the
ds_CurrentLicenceDetails
function to return the Licence type (as well as other licence details).
The mechanics of
Licensing
- Your program creates a .Lic file in a common directory (normally the
data directory) which it locks while it is open.
- The next instance of your application that runs, will find the
existing .lic file in the data directory and will attempt to open it.
If the first instance is still running (and will still have the file
locked) then this new instance of the application will fail to open
the .Lic file. It will then check how many licences are available for
use and create another .lic file (if the number of licences has not
yet been exceeded).
- Each instance of you application will continue with step 2 above
until the number of licences has been reached, at which point the next
instance of the application that is run, will fail.
In order for Licencing to work correctly, each instance of your program
must be set to create and/or use the Licence file in the same place as all
the other instances. This is set on the Files tab of the Secwin Global
Extension template of your application. If your application is opening
more times simultaneously than you have issued licenses for, then it
almost certainly means that each instance running is using a different
path for the license files. For more details on locating the Security
file, peruse the
Locating The Security
File section of this document.
For handcoders that care - take a look at the
Secwin
Data Types section of this doc for more details on the data
structures required for licensing and registration (in particular the
ProductDetailsGroupType and the LimitsQueueType data structures).
The Security File
Creating the Security File
Secwin makes use of a data file to store user names and access rights etc.
This file is called dssw5.TPS and is stored (by default) in the Windows
directory. (You can override the location - see
Locating
the Security File.) Also, by default, your program won't create the
security files. If it did then users could bypass the security by deleting
dssw5. (You can also make your program create the files by using the
ds_CreSec
function.)
Tip : If you used the QuickStart settings
to get going then you program is creating it's own security files. This is
not a problem if you are using Licensing, but if you aren't using
licensing the strongly consider changing to one of the options below.
Tip : Secwin ships with an example called
Cresec which creates the security file (
\clarion\3rdparty\examples\secwin\cresec.)
For your convenience this is also shipped as a pre-compiled Exe into your
\clarion\3rdparty\bin directory.
You have 4 options for creating the security file.
- Ship a dssw5.tps file with your application. If they delete the
dssw5 file then the program will have to be re-installed. This is the
simplest solution. (NB: Don't replace if there already)
- Ship a separate program, like Cresec.Exe to create the security
file. This program would need to be controlled by a system
administrator.
- You can add this functionality to your program by setting the switch
on the Secwin Global Extension.
Note this option is only recommended for very low risk sites, or for
programs where licensing is turned On. If the security file is
deleted, and licensing is turned on, then the program would have to be
re-activated anyway.
- You can add this functionality to your program by using the ds_CreSec
function in conjunction with some user input. This is for advanced
programmers only.
PIN numbers are used to add even greater security. They have to be
placed in the dssw5 file by the developer, and is known only to him. In
other words although CRESEC is freely available to anyone who knows
where to look, by using PIN numbers a developer can ensure that only a
dssw5 file stamped by him are valid. Pin Numbers are not not necessary
if you are using the Licensing features of Secwin. See Pin
Numbers for all the details.
Locating the Security File
For Flat file systems (like TPS): By default the
Security file will be placed in the Windows directory. This makes it
harder for people to simply copy your program from one machine to another.
However in network situations this approach doesn't work because typically
the users need to share the same security file. If the the file is shared
they can use the program, with their login, from any machine. Security
administration is also much easier if the file is shared.
There are ways to set the location of the security files.
- Use the settings on the Global
Extension to set the file to be in the EXE directory or the Data
Directory. This is the easiest method and is recommended. If you use
the Data Directory option, and you use a variable for the path, then
you need to prime the variable in the Program Setup Global
embed point in your program.
- Use settings in the Secwin.Ini file. (see below)
- Use Settings in the Win.Ini (If the Secwin.Ini doesn't exist). (see
below)
- Use the ds_SetPath command in your code.
For advanced programmers only.
Secwin.Ini
To set the location via the Secwin.Ini file, you must have a file called
Secwin.Ini in the Current Directory where the application starts. Inside
the file is a section entitled [Secwin] and a setting Path=xxx
where xxx is the path. If xxx is set to HERE then the current directory
will be used. If it's set to EXEDIR then the Application Exe directory
will be used.
Win.Ini
To set the location via the Win.Ini file, you must have a file called
Win.Ini in the Windows Directory. Inside the file is a section entitled
[Secwin] and a setting Path=xxx where xxx is the
path. If xxx is set to HERE then the current directory (not the windows
directory, but the 'Start-In' directory) will be used. If it's set to
EXEDIR then the Application Exe directory will be used.
For SQL files: The security files are located in
the database and/or schema specified in the connection string. See the
Security-File Driver section of this
document for more details on connecting to the server. Secwin will create
a handful of data files prefixed with Secwin_ which it will use to store
the necessary security data in.
Security-File Driver
Secwin supports storing the security file using a variety of different
drivers. These include support for Oracle (via ODBC), Microsoft SQL,
PervasiveSQL, IPDriver and ODBC drivers, which means you can use a variety
of different databases such as Interbase or MySql. These Security-file
drivers are included in the Secwin install.
To use one of these drivers:
- open your application, and go to the Secwin Global Extension's
template prompts. Go to the Files tab, and select the backend you want
to use from the drop down list.
- If you're using ODBC, then you need to pick the DataBase Type as
well from the list that appears.
- If you are using a file driver other than the Topspeed or Btrieve
drivers then you will need to enter the owner string in the Owner
field. This is the Owner attribute as it would normally appear in your
dictionary. The owner format for the different drivers is as follows:
Microsoft SQL
Host,db,user,pwd where
Host is the IP or Host name of
the Database server,
db is the Microsoft SQL database name,
user
is the username, and
pwd is the password.
PervasiveSQL
Host|db,user where
Host is the IP or Host name of the
Database server,
db is the database name, and
user is
the username.
Please note the
pipe
"|" character used between
Host and
db.
ODBC
Dsn,user,pwd where
Dsn is the Data Source Name,
user
is the username, and
pwd is the password. Alternatively, use
www.connectionstrings.com
to assemble a connection string that can be used to connect to the
database.
If you would like to use a different schema other than the default, you
can set this in the template entry prompt on the Files tab of the Secwin
Global Extension template.
Tip: The ODBC driver comes with special
support for
MySql,
Ingress
and Firebird. On the
Global
Extension Files tab, first select
ODBC file driver, and
then
MySql (or
Ingress) Database type. For all other
ODBC connections, use the
Other option.
Via ODBC, Secwin explicitly supports: MySQL, Ingress, Interbase and
PostgreSQL. You may have success with other databases, if so - please let
us know so that we can add these to the confirmed list.
IPDriver
Peruse the
IPDriver Compatibility section of this
document to include IPDriver support for Secwin.
Tip : See the various examples for these
drivers in your
clarion\3rdparty\examples\secwin
directory. Read more about these
Secwin
Examples.
If you are using the Topspeed or Btrieve driver, then you can leave the
Owner field blank, and the default one will be used. However you can enter
your own Owner field here if you want to.
Tip : If you set an owner here for
Topspeed or Btrieve then the security file you create will not be
compatible with other applications that use a different owner. Therefore
if you set the Owner field yourself then you
must
set the position of the file to be in the Application, or Data
directories. (See
Locating the
Security File.)
Of course if you set the owner, then you're able to import the security
files into your dictionary, and manipulate the files directly in the code.
We obviously can't stop you doing this, but we advise against it. By
altering the files directly you run the risk of bypassing the validity
checking that Secwin would normally do. For example Secwin doesn't allow
you to delete
Super Users, although in your own
code this would be a trivial thing to do.
Note: If you are using Multi-Proj's
Driver
Substitution, then peruse the
Using
Secwin in a Multi-Proj application section of this doc for details.
Creating a Callback Function
In your data-dll (or exe app for single-exe applications), run the "Import
a sample SecwinCallback procedure" template utility. This will create a
source procedure that you can use to redirect Secwin based on other
factors (that you choose). So typically if you wanted to import Secwin
tables when upgrading from TPS to SQL, you would code in something like
the following:
case pFunction
of ds_ErrorNoSecurityFiles
case message(pFunction & ' ' & clip(pMessage) & '|Would
you like to import the tables from another application?','Note'
,icon:question, button:yes+button:no, button:yes)
of button:yes
ds_Cresec()
ds_ImportTables(1)
message('Please restart the application')
end
end
return 1
Now in your Secwin global Extension template, on the Options tab, set the
Secwin Callback Procedure as follows:

Customizing the Look and Feel of
Secwin Windows
Changing the Logo on the Secwin Windows
On all of the Built-In Secwin windows is a little padlock logo. This logo
can be replaced by your own logo, or removed completely, using the
ds_SetLogo
function.
Making your own Secwin
Windows
As from version 3.1 all of the Secwin windows can be replaced with your
own Windows. This allows you more creative control over how the windows
look, and it's also an important part of making the program compatible
with Web Builder and
ClarioNet.
Creating the Product
Registration window
Open your application in the Clarion IDE and use the "Create
RegisterProduct window" (ABC or Legacy) to import a default
SecwinRegisterProduct window (in Multi-DLL apps, it's probably best to do
this in the DataDLL):
- Select the Template Utility item from the Application menu.
- In the Select Utility list, scroll down to the Class Secwin and find
the CreateMyRegisterProductWindowABC/Legacy and select it. You will
see a SecwinRegisterProduct procedure is now added to your
application.
- You need to call the SecwinRegisterProduct window from the control
that you previously added the Call RegisterProduct code template - or
where from where you called your MyRegisterProduct window.
Open the window formatter for the SecwinRegisterProduct procedure, you can
now hide controls that are not required (if you are not using all the
Licence features). If you don't use an entire tab, you can modify the
accepted code in the Back and Next buttons to skip that particular tab.
Don't delete controls in case you require those features at a later stage.
Have a look at the
Including
additional Fields in the Licence if you require the use of
additional fields in your licence.
Right-click on one of the controls, and you be able to set the following:
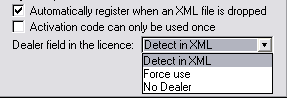
- Automatically register when an XML file is
dropped. Checking this will load the XML and attempt to
register when the XML file is dropped onto the XML region in the
Register Window. Otherwise, the settings will simply be loaded and the
user will need to manually click the register button.
- Activation code can only be used once. The
activation code is stored in history, and may not be used on the same
PC a second time.
- Warn for wrong product (for testing only):
This is useful if you're not sure whether you've set your product up
correctly. You can verify whether your product has been setup
correctly with the registration application.
- Dealer field in the licence. Detext in
XML: if the dealer field is included in the XML file, then the
activation code checker will assume that the Dealer field was included
when generating the activation code. Force use: will include the
dealer code in the activation code. No Dealer: will not include the
dealer in the activation code checker (whether the code is in the XML
or not).
On the Messages tab you will be able to set the text of Registration
success and failure:
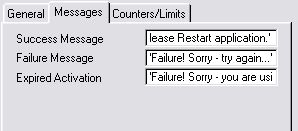
On the Counters/Limits tab you can enter any limits/counters that are used
in the activation code.
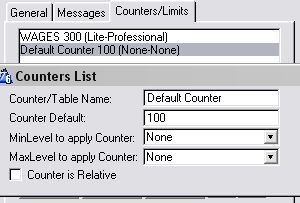
These must match those in the application issuing activation codes
(although these are case insensitive). If you are using table limits, then
these will be automatically added to the list from the Global Extension
template, and will only be displayed here. You will need to add the
procedure counters manually though. Peruse the
Using
Counters section of this doc for more details.
Note: If you're wanting to use Secwin
Online Server to manage your Product Registrations online, then you can
add the Secwin Online Server controls now.
Creating the
Global SetAccess window
Included in Secwin is the ability to create a Global SetAccess window. You
can create one window to SetAccess rights throughout the entire
application for each user. Here are the steps in order to do this:
- In the Secwin Global Extension template, on the Options tab
you will find a set of prompts to generate an include file (the
default extension is .SAC) for all the security points in the
application. This file is only used at compile time and does not need
to be deployed with your application. Check the Generate inc file
with Access points everytime checkbox, and enter a unique
include filename that will contain the additions to the Access Points
Queue (more about this queue later). For Multi-DLL
apps: You will need to come back here and add the name of
each SAC file generated by the other DLLs to this list AFTER you have
added AccessControl to those applications (and generated the entire
project). NOTE that each of your dll applications must have their own
unique name for their sac file, as these files are re-generated at
compile time.
- Run the Create
AccessControl windows template utility
- In the extension templates of the SecwinSetAllAccess
procedure, you will find a Secwin's set access globally
control template. In there is a list of the include files that need to
be used to create the AccessPoints Queue which is used in the
procedure to display all the access points of the application(s). The
one that is in the SecwinGlobalExtension template should be
automatically added.
Note for Multi-DLL users: You'll need
to add any other SAC files (to this list) that are created by other
applications related to this one. You'll probably want to delete the
root dll's sac file from the list, as it is normally superfluous (i.e.
it probably doesn't contain any access points).
- If you have not already added the Create
Secwin Menu extension template, then do that now.
The SetAccess window that is added to your application has two list boxes:
one for users and one for the AccessPoints.
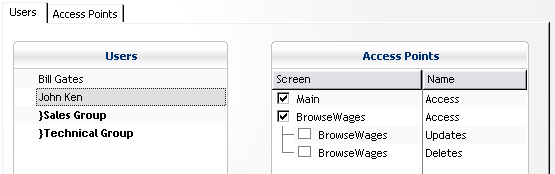
Selecting a User in the Users list, will show the AccessPoints that this
user has access to in the AccessPoints list (the ones that are checked, he
has access to and the ones that aren't he does not have access to). You
can edit a user's access rights by Double-Clicking the relevant
AccessPoint's checkbox in the Access Points list.
To view the users that have access to a specific Access Point, use the
Access Points tab:
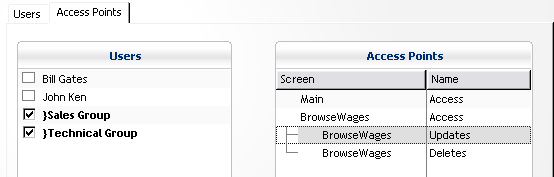
Selecting an Access Point from the AccessPoints list will show which users
have access to that point highlighted. You can edit a user's access rights
by Double-Clicking the relevant User's checkbox in the Users list.
You can add users and user groups using the respective buttons on the
window.
Note: Only supervisors have access to this
window.
Creating
the User Browse & Form windows
The way to do this is to use the
Create
AccessControl windows Template Utility to make a set of
AccessControl windows (including the User Browse and forms).
Creating the Login window
The way to do this is to use the
Create
AccessControl windows Template Utility to make a set of
AccessControl windows (including the Login Window)
Creating the Change
Password window
The way to do this is to use the
Create
AccessControl windows Template Utility to make a set of
AccessControl windows (including the ChangePassword window)
Creating the Change Login window
The easiest way to do this is to use the
Create
AccessControl windows Template Utility to make a set of
AccessControl windows (including the ChangeLogin window)
Creating the
SetAccess window
Use the
Create AccessControl
windows Template Utility to make a set of AccessControl
windows (including the SecwinSetAccess window). You are now free to
examine the
SecwinSetAccess procedure, and to
tweak the visual look & behaviour as you like.
Using SecWin in a
NetTalk WebServer
- You'll need to create an application that can create a supervisor
for the webserver.
- Import the SecwinOperators.txd into your dct.
Miscellaneous
Using Secwin in MultiDLL
applications
For and example of a MultiDLL application using Secwin, and the ABC
templates, see the
\clarion\3rdparty\examples\secwin\MultiABC
directory.
There are 2 kinds of Application in a Multi-DLL project. The first kind is
the Root, or Data application. This typically contains all your file
structures. The second kind is any of the other APP files, other DLLs and
EXEs that make use of this Data DLL.
Note: Follow the
Jumpstart
for adding support to your multi-dll application. In addition to that, you
need to do the following:
If this is the
Root Application then
- go to the Global Extension, to the Multi-DLL tab.
- Click on This is part of a Multi-DLL
Application.
- Click on Export Secwin data.
If this is
Not the Root Application then
- go to the Global Extension, to the Multi-DLL tab.
- Clickon This is part of a Multi-DLL
Application.
- Clickoff Export Secwin data.
In the global extension on each application:
- You need to set the "Unique application name" (in the Secwin global
extension template) the same in all the applications.
- The "Licencing" tab should be setup the same in the all your app
files (i.e. the data dll, the main exe and any additional dlls that
you want to add Secwin to).
For each application that is using Access Control, you will need to
record the name of the generated .SAC file and enter that into the list
of the "Files Containing Access Points" in the Secwin's set access
globally control template on the SecwinSetAllAccess window (Creating
the Global SetAccess window) to get all the access points into
that window:
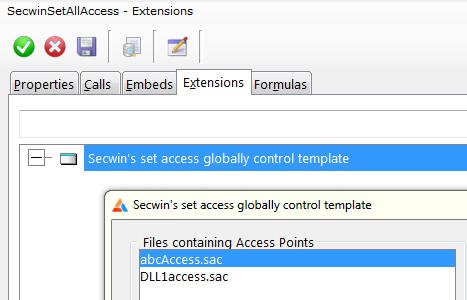
For some assistance with additional settings, check out the
Global
Extension
template
Converting from Secwin 2.x to
Secwin 3.x
One of the goals when creating Secwin 3.0 was to keep it as compatible as
possible with Secwin 2.x. There are very few issues to worry about when
converting, but known issues are described here.
Distribution
The Secwin DLL names
HAVE CHANGED! See the
Distribution section, in the
Other
Information section for specifics.
Multi-DLL Applications
Multi-DLL support has been simplified a lot, but this means that there
will be a few things for you to remove from your existing apps.
- In your Root DLL remove the QAdd, QGet and QDelete
functions.
- In your Root DLL go to the Global Data button and remove AppNameDesc
and AppNum
Btrieve Users
Support is being added for a number of different file drivers. The old Use
Btrieve switch has fallen away, and been replaced by a drop-down. This can
be found on the
Global Extension,
on the File Tab.
Secwin Examples
Secwin ships with quite a few examples, so sometimes it's difficult to
find the example you're looking for. Here is a list of all the examples,
and what they're trying to show you. Al the examples are found in the
\Clarion\3rdparty\Examples\Secwin directory.
| Demo_AccessControl |
Demonstrates the access control features in a simple
application. This uses an EncryptionKey. |
| Demo_Licence |
Demonstrates a program with the Licensing and AccessControl
features activated. This is the most complete functioning Secwin
Demo. |
| MultiABC |
Demonstrates a Multi-Dll program based on the ABC templates |
| MultiDLL |
Demonstrates a Multi-Dll program based on the Legacy templates |
| MultiEXE |
Demonstrates a Multi-Exe project which shares a Secwin Login. |
| Non_TPS_Examples\Interbase |
Demonstrates the use of the ODBC driver for Secwin with
Interbase. We have called this one Westwind. You will have to set
up a datasource name called Westwind_dsn. The
customizable procedure in the global embed will need to be edited
to suit your database setup. |
| Non_TPS_Examples\IPDriver |
Demonstrates the use of the IP driver for Secwin. Steps to get
going:
Compile the IP_abc.app and copy the compiled DLL (IP_abc.DLL)
to the C:\ClarionDataServer directory (or whatever directory you
installed the IP server into).
Copy the data in the example's Server sub-directory to the
IPServer's route directory.
Copy the IP Server driver DLL from your \clarion\3rdparty\bin
directory to your \ClarionDataServer directory. If you haven't
already done so also copy the Clarion Runtime DLL's to the
\ClarionDataServer directory - including C60RunX.DLL,
C60DosX.DLL and C60TpsX.DLL.
Run the RmAdmin program, and register the IP Server driver DLL
and IP_abc.DLL. (This is as you would do for your application's
IP driver DLL - which is laid out in the documentation provided
by SoftVelocity that comes with the IPDriver install)
Compile and run the abc.app.
|
Non_TPS_Examples\
IPDriverMultiDLL |
Demonstrates the use of the IP driver for Secwin in a MultiDLL
application. Follow the steps above, using the IP_Country.app for
the IPServer DLL.
Compile and run the DataDLL.app, the ProcsDLL.app, and the
Country.app (in that order).
|
| Non_TPS_Examples\MsSQL |
Demonstrates using the MsSQL driver. This example uses the
Northwind example database that ships with MsSQL. You will have to
make a small adjustment in the Global Embed to set the machine
name for your database. |
| Non_TPS_Examples\MySQL |
Demonstrates using the ODBC driver with a MySql database. We
decided to stick to the theme initiated by MsSQL and name our
example database Southwind. You will have to set up a datasource
name called Southwind_dsn, and fill in your datasource
name, username, and password in the global embed. |
| Register |
This is an example of a Activation Code database. It allows you
to create customers, products and registrations, and link them all
together. This program can be used as a start to developing your
own Activation Code database. |
NOTE: For a Secwin integrated webserver example application, check out the
NetTalk examples.
Super Users
Note : They are probably not what you
think. Read the next bit carefully to understand them.
The need for Super Users arises where you, as the developer, need to
maintain a permanent ability to access the program at your client's site.
While this may seem like a defacto requirement of all programs, it is
often not ideal. While it may be common for developers to have 'back
doors' into their own programs, these back doors provide a substantial
security risk (Anyone seen the movie War Games recently ?)
Of course on some sites you do need to make sure that your login rights
are preserved, because your users are likely to do things like lock
themselves out, or forget their own passwords. Secwin offers a SuperUser
feature for coping with these situations.
Firstly - what a Super User is NOT. It is not a Back Door which will
always let you in.
Essentially a Super User is simply a user who cannot be Deleted. The user
still needs to be added in the Normal Way. The Super User code is normally
set to be a Supervisor, although he can also be set to be an Operator, or
even set to No Access. The Super User can be seen by the customer, but
cannot be deleted by the customer.
The
User Login template has been
modified to support this feature. There is a special tab containing the
Login Code for the Super User. Remember the User must be created in the
normal way, setting the code here will not automatically add the user.
As with most features, this feature is optional and should not be used on
sites requiring a high level of security.
Translating Secwin Windows
In Secwin 4 and up, you'll hardly have any translating requirements within
the actual Secwin DLL - as the windows have all been transferred into your
application. This means that you can handle the translating of messages
and screen prompts from within your application.
For the odd internal DLL message you can still use the following to
translate the relevant messages (see the Secwin\Demo_Licence for an
example of using this functionality):
Secwin allows you to translate any of the windows into any language.
First one or two bits of terminology.
A
language file (note the small letters) is a text file
containing a list of translations, from the original English into whatever
language you like. The exact format of the file will be discussed later.
LanguageFile (note the big letters, and the lack of a space) is a
SecWin.INI file parameter, containing a DOS file name (including drive and
path) of a valid language file. This file normally uses the .IRF
extension.
LanguagePath is a SecWin.Ini parameter that is used with the
ds_SetLanguage function to change languages
on the fly. It contains a valid drive and path.
Choosing a language
Secwin allows you to choose your language using two methods, the first is
via the use of an INI file, and the second is via a function
(ds_SetLanguage) at runtime.
When your Secwin enable App is started Secwin looks for two parameters
namely LanguageFile and LanguagePath. Secwin looks first in the
Application directory, in the Secwin.Ini file, in the [Secwin] section. If
either, or both are not there then it looks in the Windows directory, in
the Win.Ini file, in the [Secwin] section. If LanguageFile is still not
present then it defaults to a file called Secwin.Irf, in the Windows
directory. If LanguagePath hasn't been found then it defaults to the
Windows directory. If LanguagePath is set to 'Here' (no quotes) then it
will be set to the application directory.
LanguageFile is a full path- and filename to a valid Secwin language file.
The exact format of a valid Secwin language file is discussed a little
later on. Secwin uses LanguageFile as the default language file containing
the required language phrases. If this file does not exist, then Secwin
uses the normal English phrases on the screen.
During the running of your application you can set, or change, the
language file being used by calling the ds_SetLanguage function. This
function takes one parameter, the name of a language file. This parameter
is added to the LanguagePath parameter (discussed above), and then used as
the current language file.
Example
Inside the Secwin.Ini file...
[Secwin]
LanguageFile=c:\Windows\Spanish.Irf
LanguagePath=c:\Lang
Using the above Secwin will default to using the Spanish.Irf language file
in the Windows directory, on the C Drive.
At runtime the application could call the ds_SetLanguage function, like
this...
ds_SetLanguage('Russian.Irf')
Which would change Secwin to use the Russian.Irf file, in the Lang
subdirectory on the C Drive.
The last point to discuss is the structure of the Language file itself.
Format of a Secwin language file
The format of a Secwin language file is very simple. It is made even
simpler by the fact that a sample language file (English.Irf) ships with
Secwin, and thus simply copying this sample file and translating the
English terms is all you really need to do. Note that Secwin (by default)
doesn't use the English.Irf file, it is only included as an example.
Inside the file there are a number of Sections, each one enclosed in a set
of square brackets, like this...
[spLevel Text]
Inside each section are a number of field equates that identify each
visible text field on the screen. On the right of the equals sign is the
actual text that would be displayed. For example the following.
[spLevel Text]
Level:Unknown=Desconocido
AccessLevel:2=Operador
AccessLevel:0=Sin acceso
AccessLevel:3=Supervisor
AccessLevel:-3=Todos Acceso
AccessLevel:-10=Acceso
By replacing the text to the right of the equals sign, you can get the
translated text to be displayed as anything you like.
At the top of the file is a section called [Intl], and this has a single
entry called sLanguage. eg
[Intl]
sLanguage=sp
This is used to find the correct section later on. You'll have noticed
above that the function name (e.g. ds_OperatorBrowse) is prefixed with
this. This is a requirement of the way the support works. If you change
the value in the Intl section, then you must change the prefix in all the
other sections as well.
At the bottom of the file is a section called [enuMessages]. This section
contains the messages that appear when SecWin needs to communicate with
the user. You will need to translate these messages as well.
Note: Because by default the Secwin windows
are included in your application, only the MessageText and level text will
require translation. The old DLL windows will still be supported for
Secwin3 applications using the Secwin 4 DLL.
Using a different date picture:
To set the different date picture, then you need to enter the following in
to the language file:
[engMessages]
datepic=@d6
Using alternative licence level notifications:
You can use alternatives to the default licence level indicators in Secwin
(i.e. Demo, Lite, Standard, Professional and Enterprise). Setup
translation in the normal manner (as indicated above) , and "translate"
the licence level text to display what you would rather display.
[engLevelText]
Level:0=None
Level:1=Demo
Level:2=Lite
Level:3=Standard
Level:4=Professional
Level:5=Enterprise
PIN numbers
Note : PIN numbers are only necessary if
the
Licencing and Registration
features have not been enabled. If you are using the
Licencing
and Registration features then you should set the PIN number to 0
and not worry about it
One of the only current methods of compromising SecWin Access Control
(where licencing and registration aren't used) is through the replacement
of the dssw5 security file by an empty dssw5 file. PIN numbers prevent
this from being effective by requiring that a dssw5 file be "stamped" with
a PIN number before the Application will accept the dssw5 file as valid.
The PIN number system introduces two new functions, and their associated
templates.
ds_SetPin is used to stamp a PIN
number into a DSSW file.
If you choose to make use of the PIN number system, then you will need
some way of stamping the dssw5 file with the pin number. This can be done
in a number of ways, some of which are laid out below!
- Use another EXE program, over which 100% physical control can be
maintained. It should not be accessible to un-authorized users, and
should be treated as a physical key. The PIN number itself is
hard-coded into the program, and can be run by anyone with access to
it. An example of such a program ships with SecWin and is called
HARDPIN. This can be found in the \Clarion\3rdparty\Examples\Secwin\UsingPin directory. The advantage of this method
is that a person doesn't need to remember the pin number - they simply
need to run the program.
- Use the enclosed SETPIN program which ships with SecWin. (This
program can be found in the \Clarion\3rdparty\Examples\Secwin\UsingPin directory.) This program requires that
the PIN number be entered by the user. The user will then need to know
the correct PIN number in order to properly stamp the dssw5 file.
You can use your own encryption key to essentially encode the
secwin_operators table so that it is unique to your application. This
means that no other application (that doesn't use the same unique
encryption key that your application uses) can access the
secwin_operator's table that your application uses.
For handcoders, you'll need to call the
ds_SetEncryptionKey function before initializing secwin (or template
users - there's a setting in the template that you can set to do this).
Note: Once the
ds_SetEncryptionKey function has been used by your application, and
your application has been run on the Secwin data tables, then only your
application will be able to read the secwin operators table. There's no
going back to default encryption again.
You can take a look at the example application in the Demo_AccessControl
folder that uses these functions.
Utilities Shipped With Secwin
The FileFixer Utility
This utility is provided in order to generate an Security code that will
enable Secwin to internally repair corrupted AccessControl tables. If your
user's tables have been altered by an application other than Secwin, then
the encrypted CRC will not match the CRC of the fields in the table. Your
user will be confronted with the following message:
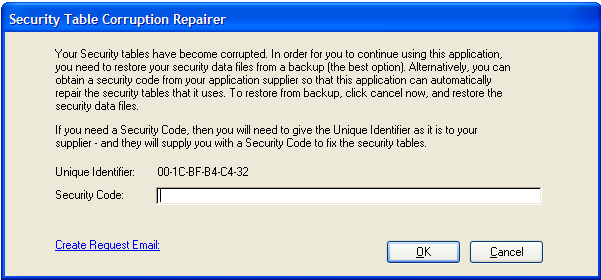
If you have entered an email address in the Secwin Global Extension
template (on the Options tab), then your user will be able to easily
generate an email requesting an activation code in order to easily acquire
a Security Code to copy and past into the entry field provided. The must
simply click the "Create Request Email" hyperlink. If you have not entered
a valid email address, they will need to enter the Unique Identifier into
an email (or over the phone) - which you can use to create a Security
code.
The file fixer utility is located in the Clarion\3rdparty\bin directory
(called SecwinFileFixer.exe) - and is used to generate the necessary
Security code to repair the AccessControl tables.
In order to generate a valid Security code that the user can enter to get
the program going again, you need to do the following:
- Enter your product (in the Browse Products procedure) - include a
description (in the Product Name field) - and the application name
(this is the Secwin Application name entered in the Secwin global
extension template).
- Enter the Customer details (in the Browse Customer procedure) -
include the customer name, Email address (this will be the from email
address of the Request Email) - and the UniqueIdentifier included in
the email.
- Next is to create a Request in the Browse Requests procedure (this
is an incident file). Here you can stipulate how long the Security
code issued is valid for, and how many times the Security Files can be
repaired during the course of the Security file's validity. Once
you've entered all the details, click the send email button - and use
your email client to send the email to the client.
ClarioNet / WebBuilder compatability
Secwin now supports full compatibility with both the standard Web Builder
templates included with Clarion, as well as the
ClarionNet
add on. For the sake of simplicity in this section I'll refer to WB
compatibility. This includes both the Web Builder and ClarioNet products.
The only thing you need to do to make your program WB compatible is to
create your own versions of the Secwin screens. (You may have already done
this anyway for design reasons.) For information on creating your own
Secwin windows see the section called
Making
your own Secwin Windows.
Using Secwin in
a Multi-Proj application
Secwin is completely compatible with a Multi-Proj application - however
you may need to tweak some settings in order to get the two templates to
operate correctly. Typically you'll need to do this if you are using the
Driver
Substitution feature in Multi-Proj. If you are creating an IPDriver
project (for example), then you'll need to make the following changes:
- In your Secwin Global Extension template, find the Files tab and
check the Manually include the correct Secwin
driver checkbox located in the Multi-Proj
support prompts groups.
- In your Multi-Proj template, on the Versions
tab, locate the project for the IPDriver substitution, and
double-click it.
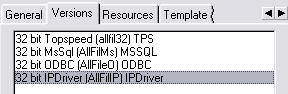
On the Resources tab for this Multi-Project
version, enter the Secwin IPDriver lib - s6ipdx.lib (if it's a
stand-alone project, and not a localmode project)

- In your application, you'll need to override the driver owner
setting generated by the Secwin template in your default module (your
main exe):
ds_InitFileCallback()
ds_SetAppName('SecwinDemo')
COMPILE('****',TOPSPEEDDRIVER)
ds_SetPath('HERE',,) ! secwin
****
COMPILE('****',IPDRIVER)
SWDRV::OWNER = 'IP_S6TPS6' &
sub(IPDRV::OWNER,instring('.',IPDRV::OWNER,1,1),255) !This is for
Clarion 6
SWDRV::OWNER = 'S70IPD6S' &
sub(IPDRV::OWNER,instring('.',IPDRV::OWNER,1,1),255) !This is for
Clarion 7
SWDRV::OWNER = 'SLAIPD6S' &
sub(IPDRV::OWNER,instring('.',IPDRV::OWNER,1,1),255) !This is for
Clarion 8
ds_SetOwner(SWDRV::OWNER,SWDRV::OWNER)
****
For a list of the matching drivers to their Secwin projects, see the
Distribution
section of this document.
IP Driver Compatibility
Installing
In Clarion 6, the IP Server driver DLL is called IP_S6TPS6.dll. In
Clarion7.1 and 7.2, the IP Server DLL is called S70IPD6S.DLL. In Clarion
8, it is called SLAIPD6S.DLL
- Copy the IP Server driver DLL from your \clarion\3rdparty\bin
directory to your \ClarionDataServer directory. If you haven't already
done so also copy the Clarion Runtime DLL's to the \ClarionDataServer
directory - including C60RunX.DLL, C60DosX.DLL and C60TpsX.DLL.
- Run the RmAdmin program, and register the IP Server driver DLL.
(This is as you would do for your application's IP driver DLL - which
is laid out in the documentation provided by SoftVelocity that comes
with the IPDriver install)
[
TIP : when deploying your application,
i.e. deploying the ClarionDataServer, then you will need to do steps (1)
and (2) as part of your deployment ]
Changes required to your application
The SV IPDriver Client Global Extension is active in your app then Secwin
will use the IP Driver connection (so you must have the SV IPDriver Client
Global Extension added to your application).
- Check that the the File driver (set in the Activate CapeSoft's
SecWin template) - Files tab, is set to Topspeed.
- Go to the Files tab of the Secwin Global Extension template, and in
the Security File - Position group, select the 'Data Directory' option
and enter 'HERE' (including the quotes).
Note: If you are adding Secwin to an
IPDriver application (Multi-DLL or single EXE), then you can follow the
steps in the
JumpStart as per a
normal application, with the above amendments to the JumpStart
instructions.
Using a sub-directory within the ClarionDataServer
The IPDriver supports multiple database driver DLLs, which means that you
can have a number of Secwin IPDriver DLLs running on the same server, each
with it's own set of security files that it is maintaining. This is what
you need to do in order to use a subdirectory within the
ClarionDataServer:
- Create the subdirectory within the ClarionDataServer directory
(let's call it MyDatabase)
- Copy the IP Server driver DLL to this directory (i.e.
c:\ClarionDataServer\MyDatabase)
- In your application, go to the Files tab of the Secwin Global
Extension template, and in the Security File - Position group, select
the 'Data Directory' option and enter 'MyDatabase\' (including the
quotes). You could use a variable here as well (without quotes) if you
wanted to load the directory at runtime. The important thing to
remember is that the path entered is with respect to the
ClarionDataServer directory (normally c:\ClarionDataServer\)
- If you are not allowing your program to create security files, then
you need to copy the dssw5.tps file to the
c:\ClarionDataServer\MyDatabase directory.
You can alternatively have the secwin data files residing in a different
sub-directory to where the IP Server driver DLL resides. By adding the
following to the Program Setup embed - immediately before the
Secwin
- After SetOwner and SetPath embed point. Note that the template
setting in the position group still indicates where the IP Server driver
DLL resides.
ds_SetPath(GLO:IPServerSubSir)
!GLO:IPServerSubSir must contain the sub dir containing the dssw5 file.
Some other Caveats:
- If you are using a global variable defined in your dictionary (i.e
located on the IPServer) - then you need to open a table before Secwin
initializes.
Limitations
- Only support for the TPS driver (i.e. dssw5.TPS) is currently
available. Support for other drivers will be made available on a
demand basis.
Note: An example ships with Secwin (see
Secwin Examples in this doc for details). If
you are having difficulties getting your IPDriver enabled application to
work, try this example t test where the problem lies.
Advanced Programmer
Functions
This section describes some of the advanced functions
available to you the programmer, and where you might use them.
ds_BuildKeys
This function can be used to rebuild the keys stored inside the security
file. The primary reason for using this function is when you want to
change the Locale settings for your program. In Clarion if the Locale
settings change then keys need to be rebuilt.
ds_Crypt
This is a simple function for doing simply text encryption. Pass the
string to the function to encrypt it, and pass the encrypted string to the
function to decrypt it.
ds_InsertUserEx,
ds_ChangeUser,
ds_DeleteUser
These functions allow you to add to and edit the list of users.
ds_UsersEx and
ds_UsersUserGroups
This function returns a Queue containing all the users currently in the
file. The Queue contains their First name, Surname, Login Code, and User
Group setting.
ds_SetPath
The most common way to set the location of the Security file (dssw5) is to
use the Secwin.Ini file. However you can also set the path in code using
this function.
Global Extension : Activate
Secwin features
Purpose
This is a Global Extension template which needs to be added to the Global
area in order for the Secwin features to work.
To Include in your App
- Open your App in the usual fashion
- Choose Global Properties from the Edit menu ( You can also
click on the Global button to get here )
- Click on Extensions
- Click onInsert
- Choose Activate Secwin Features
Options
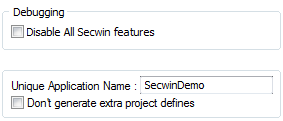
- Disable All Secwin Features - If this
option is on then all Secwin features in this application will be
disabled. This is very useful if you suspect Secwin is causing a
problem. By switching it off, you can confirm if Secwin is the source
of your problem.
- Unique Application Name - a unique name
for this application.
- Don't Generate extra project defines - in
old versions of Clarion (C6 and below) the compiler had a project
define limit.
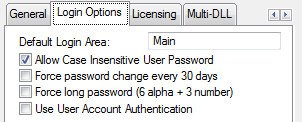
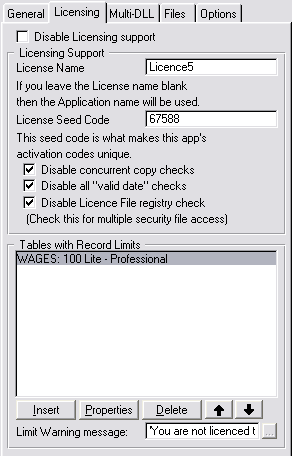
- Disable Licensing support - If you only
want to use the Access Control portion of Secwin, then you can use
this checkbox to disable Licensing throughout your entire application.
- License Name - This is the name of the
license for this application. When generating activation codes this
corresponds to the Application Name (or the name of the product).
- License Seed Code - This is the number
that makes the activation codes for your application different to
other Secwin users. Chose any random number here. Use this number when
generating Activation Codes.
- Disable concurrent copy checks - Secwin
will issue a licence file for each concurrent copy of the program that
is allowed to run (as issued in the licence). If you check this, then
you will effectively disable concurrent copy checking (i.e. allow
infinite amount of copies of the program to run on that licence).
- Disable all "valid date" checks - Prevents
the app from comparing the date of the dssw5 file to the computer's
date to check if the date is being reset to a previous date. Check
this if you have multiple different applications (i.e. different
Secwin applications) using the same dssw5 file.
- Disable Licence File registry check - If
you check this, then you disable extra registry checks that secwin
does to match the dssw5 file with a value in the registry (per
product). You would need this checked if you have more than one dssw5
file, or you have multiple applications accessing the same dssw5 file.
- Tables with Record Limits - enter the
tables that you would like to provide a limit on (depending on the
licence issued by the registration application). See Using
Counters for more details.
- Ill use my own code to find number of records
- is useful for SQL applications, or backends that don't support the
RECORDS() function call. You'll need to add your own code to verify
the number of records in a table does not exceed the licence
permitted. Take a look at FAQ1.17 for more
details.
- Limit Warning message - this is the text
of the message that appears when the above table limit is attempted to
be exceeded.
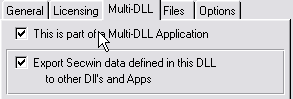
- This is Part of a Multi-DLL Application -
If this APP is part of a Multi-DLL application then click this on.
- Export Secwin data defined in this DLL -
If this is the Data DLL then tick this option on.
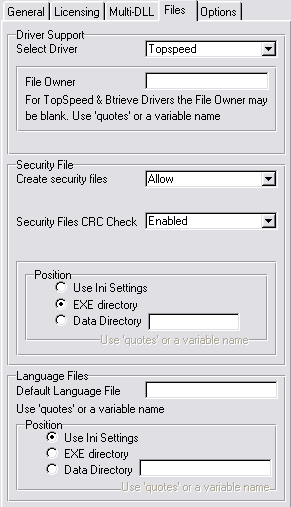
- Select Driver - Allows you to select the
file driver that will be used to store the security files. By default
the Topspeed driver is used. See Security-File
Driver for more information.
- Database Type - Only shown when ODBC
driver is selected, this takes care of those niggly differences
between sql databases.
- File Owner - If you use the Topspeed or
Btrieve drivers then this option is not used. With the other drivers
this option is required. Each driver will display the format for it's
owner string. Eg: The MSSQL owner label is host,db,user,pwd i.e. IP or
Hostname of MS SQL Server, databasename, username, password. See more
info at Security-File driver. Use
this to set the Owner property for your security files.
- Multi-Proj support - If you are using the
driver substitution feature of MultiProj, you can manually include the
driver for that specific driver. See Security-File
driver for more details.
- Allow program to create security files -
Allows your program to automatically create the dssw5 security file.
Only recommended for sites using licensing, or which have a low level
of security. See also Creating the
Security File.
- Security Files CRC Check - Enabled
(by default) - means that the Security files are constantly checked
for an illegal write (not made by the Secwin DLL).
Disabled (only recommended for sites using
licencing, where access control is a low priority or non-existent) -
means that the check is disabled. This means that anyone who is able
can alter the security files without Secwin detecting. Only affects
Access Control.
Command-line disable (only recommended for
sites using licencing, where access control is a low priority or
non-existent) - means that you can disable the Security file check
from a command line parameter of your choice. You would use this
typically if a user cannot restore their security file from backup.
Only affects Access Control.
- Security File Position - Set the default
position for the security file. See also Locating
the Security File.
- Default Language File - If you want to use
a language file other than English, then put the name in here. See
Also Translating Secwin windows.
- Language File Position - Set the default
position of the Language File.
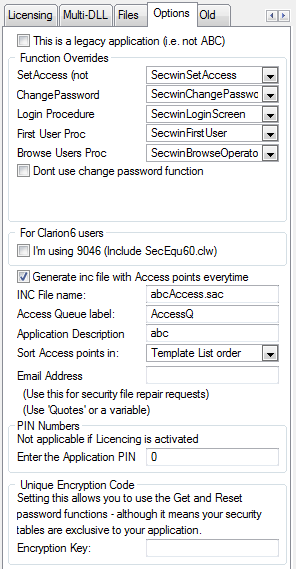
- Function Overrides - the names of the
procedures in your application used for the various Secwin
functionality:
- SetAccess: Typically this is the SecwinSetAccess procedure (not
the SecwinSetAllAccess window). This is called by Ctrl-F8.
- ChangePassword: Typically this is the SecwinChangePassword
procedure - called when a password change is required.
- Login Procedure: Typcially this is the SecwinLoginScreen
procedure - called when a login is required.
- First User Proc: Typically this is the SecwinFirstUser procedure
- called when no users exist and the first user must be entered.
- Browse Users Proc: Typcially this is the SecwinBrowseOperators
procedure - called to show operators for this application.
- Functions are in another application - For
Multi-DLL applications, check this checkbox if the functions are in
another DLL.
- Automatically map the Functions - this
will create a module map in your global map for this dll for the
procedures that you will require (like the SecwinSetAccess window and
the SecwinChangePassword function). Most times you can leave this
unchecked - as using the TXA will create the map for you.
- I'm
using 9046 - only for Secwin users using Clarion 6.2 9046.
- Generate inc file with Access points everytime
- this will generate an include file that Secwin makes use of to
create the Access points list in the SetGlobalAccess
window. Uncheck this if you don't need the AccessPoints generated.
- INC FileName - the name of the include
file to contain the Access points (on the Global SetAccess window).
- Access Queue label - the label of the
Access Q to contain the access points (see Creating
your own Global SetAccess window for more details).
- Application Description - Defaults to the
Unique Application Name. This will be the primary node of the access
points tree (on the Global SetAccess window).
- Sort Access points in - This will enable
you to set the order of the Access Points in the Access Points tree
(on the Global SetAccess window). Template List order (the order that
the access points are listed in the Control Restrictions list),
Restriction Name order (alphabetical by the name of the access points'
names), and Bit Position order (in order of the bit position of the
access points).
- Email Address - the address to use for CRC
check requests (see corrupt
Security files in the error messages section)
- Application Pin - See Application Pin
Numbers in the User Guide.
- Encryption Key - See Using
an encryption key in the user guide.
Extension : MakeLogoScreen
Visible Effect to your App
If you add this extension to a screen then the screen will be displayed,
but only in the background. this template is used in conjunction with the
RunLogoScreen Extension
Purpose
This is an Extension template which can be added to a screen to make it a
background screen. This background screen is ideal for displaying the
application's current user, current license etc. This effect only works on
MDI applications, and the screen must be an MDI child window screen. The
best way to run this procedure is by using the supplied
RunLogoScreen
extension in your Main procedure.
Tip : If you have the MDI attribute
clicked off by mistake then the window will float on top of all your other
windows instead of going to the back.
Tip : Setting the border of the screen to
None, and the Caption to blank and ensuring that the System attribute is
off, improve the screen's look. You can also use the Center attribute on
the Position tab when designing the screen to have the screen
automatically center itself.
To Include in your App
- Open your App in the usual fashion
- Click on the Window procedure that you want to make a "background"
window
- Click on Extensions
- Click on Add
- ChooseMakeLogoScreen
Options
| Do not Call ds_GetCurrent |
Click on this if you do not want the Logo Screen to
automatically load the current license details. |
| Level Names |
If you want to change the names of the different levels then
enter them here. |
Extension : RunLogoScreen
Visible Effect to your App
This template calls your logo window, which makes the logo window visible.
Purpose
This template starts a thread with your MDI logo window.
To Include in your App
- Open your App in the usual fashion
- Click on your Main function
- Click onExtensions
- Click on Add
- Choose RunLogoScreen Extension
Options
| Logo Procedure |
This is the name of the Logo Procedure to use. The Logo
procedure should use the MakeLogo Extension. |
Extension : User Login Here
Visible Effect to your App
The user must enter a valid user code and password here before the screen
will open. If you are not using AccessControl, you will still need...
Purpose
Use this extension wherever you want password protection. In the usual
case, where the user logs in before running the Application, use this
template extension on your 'main' function.
You can include any number of these extensions throughout your program.
Each time one is encountered the user will be required to enter a valid
user code and password in order to continue. In each section you can reset
which users are operators, and which are supervisors.
When the function, in which you use this extension, is completed then the
user is automatically logged out. The user then returns to the level, and
accesses, they had before entering the function.
You can tell the program to activate licensing support at this time, and
"get" a valid license.
You can include a "Super User" at this point. This user, although
deletable, will re-appear in the browse users list every time a user logs
in.
To Include in your App
- Open the App in the normal fashion
- Click on the procedure where you wish the login screen to appear
- Click on theProperties button.
- Click on Extensions
- Click onAdd
- Choose User Login Here from the list of available
extensions
Options
| Login Options Tab |
Override Global Options |
By default, these options are set in the global template (Global
Login Options tab). You can override this here for this instance
of the login. |
|
Unique Area Name |
This is the name for this login area. A program can have
multiple login areas (each one with a unique name). If you have
only one login area (as is probably the case) then you can just
use the word Main. |
|
Allow Case Insensitive Password |
If this is ticked then passwords will be case insensitive. If
this is off, then passwords will be case sensitive. |
|
Force Password change every 30 days |
If this is on the user will be asked to change their password
every 30 days. |
|
Force Long password |
If this is on then the user will be forced to have a password
containing at least 6 alpha characters and 3 numeric characters. |
|
Use User Account Authentication |
Use Windows authentication to log a user in. The user must still
be added as a Secwin user, but the login screen is not presented
to the user. For more details, check out:
FAQ3.21 |
|
Make Login Optional to End User |
If this option is ticked, and there are NO users defined then
the login screen will not be displayed. If this option is not
ticked, and no users exist, then the user will be prompted to add
the first user. |
|
Allow only 3 tries |
If this is ticked, and the login fails 3 times, then the program
will close. |
|
Allow Automatic Login from other EXEs |
If this option is ticked on then you'll be able to automatically
log into this program from other Secwin enabled programs, using
the ds_Run template, or
function. |
|
Allow Default Login values |
If this is on, then you can set default login and password
values. This allows you to 'auto-login' as well as supporting your
own Login window. |
|
Default Login Code |
Set this to a fixed value in 'quotes' - or a variable name. |
|
Default Password |
Set this to a fixed value in 'quotes' - or a variable name. |
|
Don't show screen if default fails |
If the default login fails, and this is ticked on, then the
Secwin Login window will not be displayed. Otherwise the Secwin
Login window will be displayed with the primed values. |
|
Display Login After Window Displays |
If this is on, then your Frame will display before the login
window. Normally the login window displays before the Frame
window. |
| Licensing Tab |
Activate Licensing Support |
Click this on to activate the licensing for this login.
Typically you'll click this on for a single login in your
application, usually the one on the frame. (Remember you app could
have multiple login screens.) |
|
Default to demo license |
If you ship a security file with No license, and this option is
on, then the user will automatically get a demo level license the
first time the program is run. Note they will ONLY get 1 demo
license. Deleting the dssw5 file will NOT result in another
license. |
|
Valid for (days) |
Active if the Default to Demo License is on. Default is 30 days.
Set the length of time (in days) that you want the demo to last
for. |
|
Level |
Allows you to set what Level will be set when the Demo License
is made. In the past this had to be Level Demo, now you can choose |
|
Disable Network Licensing |
If this option is ticked on then the Concurrent Network Copies
feature will not be enforced. |
|
Unique License Code |
Enter a 4 character (no spaces) code here. This, along with a 4
digit number, will be used to name the .LIC files used for network
copies. |
| Super User Tab |
Enable Super User |
Tick this option on to enable Super Users. |
|
Super User Login Code |
Enter the Super User's Login code here. Note Super Users are
probably not what you think they are See the section in the User
Guide for more information. |
|
Super User doesn't use a licence |
If you're using the number of copies licenced feature in secwin,
then you can check this so that the superuser does not use a copy
when accessing the application. |
Extension : User Screen
Security
Visible Effect to your App
At runtime a supervisor can press a hotkey ( Ctrl F8 by default ), on this
screen, and get a list of operators, along with the list of restrictions.
By using the mouse he can toggle access rights to individual operators.
Only users designated as Operators for this area of the App who are not in
groups, and user group names, will be displayed on the list.
Purpose
Include this extension in a function if you wish to restrict operators, on
an individual basis, from all, or part of, the function. This will
automatically check each operator as he enters the function to check if
access to the screen is permitted, and also to check if access to controls
on the screen are allowed. You can specify up to 30 other controls, apart
from the actual access to the screen, that the operator can be restricted
from. The controls that are not accessible can be either disabled, hidden
or set to read-only.
To Include in your App
- Open the App in the normal fashion.
- Point to the function you wish to protect.
- Click on theProperties button.
- Click on Extensions
- Click onAdd
- Choose User Screen Security from the list of available
extensions
- OR -
Add the
AutoPopulateUserScreenSecurity
Global Extension template to your application.
Options
| General Tab |
Disable Screen Security Here |
Click on this option to disable all the Secwin Screen Security
in this procedure. In other words this is like deleting the
extension, except that all your current settings are kept. This is
useful if you suspect that this extension is causing a problem in
your window. |
|
Screen Name |
Enter a user friendly screen name for the SetAccess window (at
runtime). You can also use this to make 2 procedures use the same
access points. |
|
Disable Access Control here |
Disables access control in this procedure (if you only want
licence checking done in this procedure). |
|
This Procedure Doesn't have a window |
This is used when you are adding licensing support to a
procedure which doesn't have a window - like a report. |
|
Always allow window access |
This will only affect users that are operators, with default
access of No_Access. It's useful if you want to add security to a
procedure to protect controls, while not restricting procedure
access. |
|
Don't check access in list box filters |
|
|
This is a CPCS report |
Check this if this is a CPCS report procedure |
|
Don't refresh access settings on GainFocus |
By default, Secwin will refresh the access control on Gain
Focus. This is in case another record got added to the table, or
changed, that will affect what controls and/or records the user
can view/use. |
|
Don't add this screen to the SetAllAccessList |
By default, all Secwin screens will be added to the SetAllAccess
window. You can check this if you don't want this procedure to be
added to the list. |
|
Control Restrictions Button |
Contains all the restrictions for the Access Control features.
See below for more information. |
|
License Check and Restrictions Button |
Contains all the restrictions for the Licensing features. See
below for more information. |
| Control Restrictions Button |
Setable |
You can select whether to control access to this control group
at runtime, or to User type. |
|
Unique Bit Position |
You are allowed up to 250 groups of controls per window. Each
group (a group may be just 1 control) needs a unique, unchanging
number, from 1 to 250 . Enter that number here. |
|
Restriction Name |
Enter the name of the group here. This name will be used on the
Set Access window. |
|
Action |
This determines what happens if the user does not have access to
the control. For buttons and menu items Disable is recommended,
for entry controls you probably want to Hide the controls.
Occasionally (mostly with text-boxes) it's useful to set the
control to Read-Only. This allows the user to cut & paste the
entry, but not change it. This is useful for address fields and
things like that. |
|
Use Equate (Controls to Protect) |
Enter the equate label for the first control in the group here.
(Most groups will probably have just this primary control). You
can select the control from the drop down list box. |
|
Column (Controls to Protect) |
If the control set in the previous setting is a list box, then
you can protect just a single column of the list box if you like.
(If you leave this as 0 then the whole list box will be
protected.). Enter a column number in here if you want to protect
just a single column. |
|
Action (Controls to Protect) |
You can use this list to override the Secwin restriction action
for a particular control in the group (see Action above for
details). By default, this is set to Default, i.e. the action of
the group. |
| License Restrictions Button |
Disable all License checking here |
Click this on if you want to bypass all the license checks here.
Typically you'd do this if the extension has been added for the
Access security above, but you want to prevent license checks. |
|
Disable Valid License File Check here |
This overrides the global extension option (see the global
extension template help for details). |
|
Disable Valid Date Check here |
This overrides the global extension option (see the global
extension template help for details). |
| Expiry Tab |
Warn of Impending Expiry |
Click this on if you want Secwin to automatically warn the user
when their program is nearing an expiry date. |
|
Warning Period |
This sets the length of the warning period in days. For example,
if set to 14, then the program will start warning the customer 14
days before it expires. |
|
Action : Display Message |
This allows you to specify the text of the message that will be
displayed. |
|
Action : Call Procedure |
This allows you to specify a procedure that must be called. You
can then create your own window procedure to display whatever you
like. |
| Levels Tab |
Level Required for this screen. |
If you set this to say Standard, and the user only has level
Demo, or Lite, then this will cause the License to fail. |
|
Control Restrictions |
This allows you to restrict access to individual controls based
on the Level. You can add as many controls as you like, and you
can set the option to either hide, or disable, the control if the
license fails, and for which licence level is required for that
control to be active. |
| Modules Tab |
Optional modules required for this screen. |
If you set any of the options on here, then the user will
require the same module to be set, or the license will fail. For
example if this procedure belongs to your General Ledger module
(module 1) then you would click on optional module 1 here. If the
user doesn't have the General Ledger then the license will fail. |
|
Control Restrictions |
This allows you to restrict access to individual controls based
on the Optional Modules that are activated. You can add as many
controls as you like, and you can set the option to either hide,
or disable, the control if the license fails. Set the column of a
list box if you need to hide a column (instead of the whole list
box). |
| Action Tab |
Action to take if License fails |
If the user doesn't have the correct level, or the correct
optional modules, or the license has expired, or the license is
invalid, or the user has run out of network copies, then the
license will fail. Exactly what happens when the license fails is
up to you. |
|
|
Show Warning and return to caller : This is the most
common action. The user will see an error message and the
procedure will close. |
|
|
Return to caller without showing warning : Use this if
you're going to show your own warning. |
|
|
Disable all controls except.... : This option allows
the window to continue opening, but all of the controls will be
disabled (except for the ones you specify). This is useful on a
frame so that the user can still run certain items (like Help |
About) but not get into the bulk of the program. |
|
|
Call Procedure : If you have your own Product
Registration window, then you might want to call it directly
(especially if the license on the Frame failed). |
| Counter Tab |
Decrement Counter Here |
If you click this option on then the counter will be decremented
when this procedure runs. If the counter is already at 0 then the
license will fail. Use this feature when you want to limit your
program by number of runs, or number of reports etc. You can
specify which counter you want to decrement (if you are using
multiple counters). |
Extension:
AutoPopulateUserScreenSecurity
This template will auto-populate the
UserScreenSecurity
template to all your procedures in your application (except source and
process procedures). Once added to your application, do not remove from
the application, otherwise all the UserScreenSecurity templates will be
removed (from their respective procedures).
This template is not recommended for small single-EXE applications - but
can be very useful in Multi-DLL applications.
Extension: CreateSecwinMenu
Note: This template can only be added to a frame
with the UserLoginHere template added there.
This template will create a Security menu with the necessary Secwin menu
items to enable the user to access Access Control and Registration
windows, where applicable. It can only be added to a Frame procedure.
This template will control what items are visible (depending on what
features you've selected). For example: If you have disabled licencing and
registration, then the RegisterProduct item will not be displayed in the
menu list. If you have selected to make Access Control optional, then only
the Create First User item will be displayed. If you are not wanting to
use Access Control at all, then you can disable the Create First User
item.
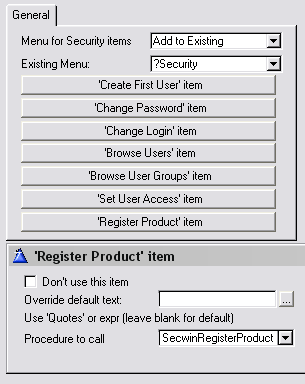
- Menu for Security items - you can either
add the items to an existing menu, or allow the template to create a
new menu on the menu bar (entitled 'Security' by default).
- Existing Menu - allows you to select the
menu that the Security items must be added to.
- Disable Access Control Items - If you're
only using the Licencing side of Secwin, you can disable the Access
control menu items from generating.
- Start all procedures - you can either set
all procedures to start on a new thread, on the same thread, or set
each procedure up individually.
- Each item button - you can disable the
item (using the Don't use this item
checkbox), and override the default text for each item. For those
items where the procedure to call is not stipulated on the Global
Extension template, you can specify the procedure to call:
- 'Change Login' item would typically be set to use the SecwinChangeLogin
procedure.
- 'Browse User Groups' item would typically be set to use the SecwinBrowseUserGroups procedure.
- 'Set User Access' item would typically be set to use the SecwinSetAllAccess procedure (not the
SecwinSetAccess procedure).
- 'Register Product' item would typically be set to use the SecwinRegisterProduct procedure.
Extension : User
Workgroup Filtering
Visible Effect to your App
Allows you to use the CWG variable in your browse filtering.
Purpose
This allows you to filter records from the browse based on the current
user's workgroup. You can set the User's workgroup on the User Details
Form, which is called from the Browse Users Screen. This template will
create a variable called CWG (a long) which stores the current users
workgroup. You can then use this variable in your browse filtering.
To Include in your App
- Open the App in the normal fashion.
- Point to the browse function you wish to filter.
- Click on the Properties button.
- Click on Extensions.
- Click on Add.
- Choose User Workgroup Filtering from the list of available
extensions.
- Click on the OK button.
- Add your desired filter in the normal fashion.
Note : No actual filtering is done by this
template. You are free to implement filtering in the normal fashion. This
template simply defines, binds, and primes the CWG variable for your use.
Control : Register Product
Controls
Purpose
This allows you to create a Register product window inside your
application (as apposed to using the deprecated RegisterProduct window
inside the Secwin DLL).
To Include in your App
Use the Template Utility provided to create a SecwinRegisterProduct window
in your application.
Options in the template
See the
Creating your own Product
Registration window section for more details.
Code : Call Current
Visible Effect to your App
Allows the user to call the
ds_CurrentName,
ds_CurrentLogin or
ds_CurrentLevel
function and place the result on the status bar.
Purpose
By using this template is is easy to see, on the status bar, the currently
logged in user. You can use any one of the user name, user login code or
user level. You can also prefix your own text or variable before the
result of the function call.
To Include in your App
- Go to the Properties screen of your Main Menu
procedure
- ChooseEmbeds
- Choose After Opening Window
- Choose the Call_Current code template
Options
| Position in Status Bar |
Enter the position in the status bar here. |
| Text |
Enter any text here you want to appear before the variable part.
For example if you're displaying the user's name then enter 'User
Name' here. Use quotes for literal text, or a variable (without
any !) |
| Call |
Select the variable you want to display. Use Name for the user's
name, Login for their Login code, or Level for their level |
Code : Calling Current Counter
Visible Effect to your App
Allows the developer to display the current value left in the counter.
Purpose
Allows the developer to display the current value left in the counter.
This is useful if you have a counter based license. the result is stored
in a field, and you can display the field on a Window or a report. It
makes use of the
ds_CurrentCounter
function.
To Include in your App
- Add the Code template to an embed in your program. You can call this
function from just about any local (not global) embed point.
Options
| Put the result in |
Enter a field which will contain the result. The field should be
a Long. |
Code : Calling Current Expiry
Date
Visible Effect to your App
Allows the developer to display the current value currently in the Expiry
Date in the License
Purpose
This is useful if you want to display to the user the date on which the
license will expire. It uses the
ds_CurrentExpiryDate
function.
To Include in your App
- Add the Code template to an embed in your program. You can call this
function from just about any local (not global) embed point.
Options
| Put the result in |
Enter a Long field to contain the date. |
Code : Calling CurrentLicense
Visible Effect to your App
Used to Brand Windows and Reports with the name of the user who is the
current owner of this copy of the program. You can also use the
Call
Get License Details template to get all the license details.
Purpose
This code template is designed to be attached to a report, or window. It
creates a variable called ds_RegisteredCompany. It puts the name of the
current License owner into the variable for you. You can then put the
string onto your window, or report, and format it any way you like. It
uses the function
ds_CurrentLicence.
To Include in your App
- Go to the Procedure you want to display the License name in
- Click onEmbeds for the procedure
- Choose an embed that is near the beginning of the procedure. The
exact spot will vary depending on your template, but any embed that
happens before the report starts printing is fine.
- Click on the Insert button
- Choose theCall_CurrentLicence code template.
- Close the windows in the normal fashion.
Then go to your Report or Window structure and populate the new Local Data
variable called ds_RegisteredCompany
Code : Calling
CurrentlyLoggedIn
Visible Effect to your App
Allows the user to see the list of all the users currently logged into the
system. Note that the network licensing features must be activated in
order for this to work.
Purpose
This code template is designed to be attached to a menu item or button. It
calls the
ds_CurrentlyLoggedInEx
function.
To Include in your App
- Add a control somewhere in your program. Usually this control would
take the form of a menu item in your main menu, but it could also be a
button, or a toolbar button.
- Click on Actions for the control.
- ChooseEmbeds
- Choose Control Event Handling , after generated code, Accepted.
- Choose theCall_CurrentlyLoggedIn code template.
- Close the windows in the normal fashion.
Code : Calling Change Login
Visible Effect to your App
Allows the user to call the Change Login Screen.
Purpose
This code template is designed to be attached to a menu item or button. It
calls the
ds_ChangeLoginEx function. If
you're going to use the built-in Secwin window then typically this would
be called from a menu item. If you are going to make your own Change Login
window then you would add this to the Ok button on your Change Login
window.
To Include in your App
- Add a control somewhere in your program. Usually this control would
take the form of a menu item in your main menu, but it could also be a
button, or a toolbar button.
- Click on Actions for the control.
- ChooseEmbeds
- Choose Control Event Handling , after generated code, Accepted.
- Choose theCall_ChangeLogin code template.
- Close the windows in the normal fashion.
Options
| 1. This is CALLING the Secwin Change Login window |
Click this option if you want the menu item to call Secwin's
built-in Change Login window. OR |
| 2. This is calling Your Own Change Login window. |
Click this if you want the menu item to call your own Change
Login window. OR |
| 3. This IS the Ok button on your Change Login window. |
Use this if this is the OK button attached to Your Change Login
window. |
| Login |
Enter a field name here which contains the Login code that the
user just entered. (Only used if Option 3 above is chosen) |
| Password |
Enter a field name here which contains the Password code that
the user just entered. (Only used if Option 3 above is chosen) |
| Your Procedure |
If you chose Option 2 above, then enter the name of your Change
Login procedure here. |
| Parameters |
If you chose option 2 above, then you can optionally enter your
parameters to your procedure here. This is included for your
convenience if you decide to make a procedure that accepts
parameters. |
Code : Calling Change Password
Visible Effect to your App
Allows the user to call the Change Password Screen.
Purpose
This code template is designed to be attached to a menu item or button. It
calls the
ds_ChangePasswordEx
function. If you're going to use the built-in Secwin window then typically
this would be called from a menu item. If you are going to make your own
Change Password window then you would add this to the Ok button on your
Change Password window.
To Include in your App
- Add a control somewhere in your program. Usually this control would
take the form of a menu item in your main menu, but it could also be a
button, or a toolbar button.
- Click on Actions for the control.
- ChooseEmbeds
- Choose Control Event Handling , after generated code, Accepted.
- Choose theCall_ChangePassword code template.
- Close the windows in the normal fashion.
Options
| This is your own Change Password Window |
If you've added this template to your own Change Password
window, to the Ok button, then click this option on here. |
| Old Password |
Enter a field name here which contains the Old Password that the
user just entered. |
| New Password |
Enter a field name here which contains the New Password that the
user just entered. |
| Verify Password |
Enter a field name here which contains the second copy of the
new password that the user just entered. |
| Suppress Warnings |
If this option is on then Secwin will not display any warnings
if the request failed. This is usually done when you want to
display your own warnings. See the ds_ChangePasswordEx
docs for information on the possible error codes. |
Code : Calling Get License
Details
Visible Effect to your App
Allows you to load all the current existing license details.
Purpose
This is typically used when you are creating your own Product Registration
screen. It allows you to prime all your variables with the current values.
It calls several of the functions including
ds_CurrentLicence,
ds_CurrentSerialNumber,
ds_CurrentCopies,
ds_CurrentCounter,
ds_CurrentAppLevel,
ds_CurrentExpiryDate and
ds_CurrentOptional
To Include in your App
- Add this to the Init method (in ABC templates) or to the After
Opening Window embed point if you are using the Legacy templates.
Options
| Company |
Enter the company field here. This should be a String(40). |
| Serial Number |
Enter the serial number field here. This should be a String(20). |
| Copies |
Enter the copies field here. This should be a Long. |
| Counter |
Enter the counter field here. This should be a Long. |
| Level |
Enter the level field here. This should be a Byte. |
| Expiry Date |
Enter the expiry date field here. This should be a Long. |
| Optional Modules |
Enter the optional modules field here. This should be an Array
of bytes. The array should have at least 30 items. If you select
the name from the lookup, then Clarion will automatically populate
the field with a subscript. e.g. Modules[1]. You should remove the
subscript part. e.g. Modules. |
Code : Calling Lock Screen
Visible Effect to your App
Allows the user to call the Lock Screen Screen.
Purpose
This code template is designed to be attached to a menu item or button. It
calls the
ds_LockScreen function
To Include in your App
- Add a control somewhere in your program. Usually this control would
take the form of a menu item in your main menu, but it could also be a
button, or a toolbar button.
- Click on Actions for the control.
- ChooseEmbeds
- Choose Control Event Handling , after generated code, Accepted.
- Choose theCall_LockScreen code template.
- Close the windows in the normal fashion.
Code : Calling Operator Browse
Visible Effect to your App
Allows the user to call the Operator Browse Screen.
Purpose
This code template is designed to be attached to a menu item or button. It
calls the
ds_OperatorBrowse function
with the appropriate parameters.
To Include in your App
- Add a control somewhere in your program. Usually this control would
take the form of a menu item in your main menu, but it could also be a
button, or a toolbar button. This control should be visible from all
the security areas within your App, so you may need to add more than
one control.
- Click onActions for the control.
- Choose Embeds
- Choose Control Event Handling , after generated code, Accepted.
- Choose theCall_OperatorBrowse code template.
- Close the windows in the normal fashion.
Code : Calling Register
Product
Visible Effect to your App
Allows the user to call the Register Product Screen.
Purpose
This code template is designed to be attached to a menu item or button. It
calls the
ds_RegisterProductEx
function with the appropriate parameters.
To Include in your App
- Add a control somewhere in your program. Usually this control would
take the form of a menu item in your main menu, but it could also be a
button, or a toolbar button.
- Click on Actions for the control.
- Choose Embeds
- Choose Control Event Handling , after generated code, Accepted.
- Choose the Call_RegisterProduct code template.
Options
| General Tab |
This is your own Register screen |
Click this option on if you're using this embed on the Ok button
of your own Product Registration screen. Click this option off if
you are calling the default Product Registration window. The rest
of the options you see will depend on this option. |
| Levels Tab |
Allow the following Levels |
Allows you to control what Levels appear on the default Secwin
window. Select the Levels you want Secwin to offer. |
| Optional Modules Tab |
Allow the following optional modules |
Allows you to control which Optional Modules appear on the
default Secwin Window. Select the modules you want Secwin to
offer. |
| Fields Tab |
Company |
This is set if this is your own Register Product screen. Set the
field to match the Company field that the user just typed in. |
|
Serial Number |
This is set if this is your own Register Product screen. Set the
field to match the Serial Number field that the user just typed
in, or that you've set in your code. |
|
Copies |
This is set if this is your own Register Product screen. Set the
field to match the Copies field that the user just typed in, or
that you've set in your code. |
|
Counter |
This is set if this is your own Register Product screen. Set the
field to match the Counter field that the user just typed in, or
that you've set in your code. |
|
Level |
This is set if this is your own Register Product screen. Set the
field to match the Level field that the user just typed in, or
that you've set in your code. |
|
Optional Modules |
This is set if this is your own Register Product screen. Set the
field to match the Optional Modules field that the user just typed
in, or that you've set in your code. |
|
Activation Code |
This is set if this is your own Register Product screen. Set the
field to match the Serial Number field that the user just typed
in. |
| Advanced |
Counter is Relative |
The counter setting will be added to the existing counter value. |
|
Activation code used once. |
Prevents the same activation code being entered multiple times.
Use when issuing relative counters to prevent multiple entry. |
Code : Calling RunAnotherExe
Visible Effect to your App
Allows the user to run another Secwin program, using the currently logged
in user. The program being run must have the Allow Automatic Logins from
other EXE's option clicked on.
Purpose
This code template is designed to allow you to run other programs, from
within the current program, at the same time automatically logging in to
the new program using the existing user's details. This template uses the
ds_Run function.
To Include in your App
- Add a control somewhere in your program. Usually this control would
take the form of a menu item in your main menu, but it could also be a
button, or a toolbar button.
- Click on Actions for the control.
- Choose Embeds
- Choose Control Event Handling , after generated code, Accepted.
- Choose the Call_RunAnotherExe code template.
- Set the name of the program to run as well as any other parameters
that the program may need.
Options
| Program Name |
Enter the program name to run here. This name can include the
path if necessary. |
| Parameters |
Enter any command line parameters, which will be sent to the new
program, here. |
Code : Calling Set Language
Visible Effect to your App
International language support.
Purpose
Allows you to change the language file which will be used when displaying
any of the default Secwin windows. Makes use of the
ds_SetLanguage
function.
To Include in your App
- Add a control somewhere in your program. Usually this control would
take the form of a menu item in your main menu, but it could also be a
button, or a toolbar button.
- Click on Actions for the control.
- Choose Embeds
- Choose Control Event Handling , after generated code, Accepted.
- Choose the Call_SetLanguage code template.
Options
| Language File Name |
Enter the name of the language file here. Use 'Quotes' if this
is a fixed name, or enter a variable if you want the name of the
file to be stored in a variable. |
Code : Calling SetPin
Visible Effect to your App
None
Purpose
This function is not designed to be added to your main application -
rather it is used on the developer machine to
stamp dssw5 files
with PIN numbers.
This code template stamps the dssw5 file with an Application PIN number.
Pin numbers enhance application security be ensuring that only correctly
"stamped" dssw5 files will be considered valid for the application. A full
description of the PIN number concept, and when you would use this
function, can be found in the User Guide in the section entitled
Application PIN numbers. It uses the
ds_SetPin
function.
To Include in your App
- Remember this function would not be used inside the Application you
are intending to protect. Rather you need to create a separate
utility. 2 examples of such utilities are shipped with Secwin. They
can be found in the \Clarion\3rdparty\Examples\Secwin\UsingPin directory.
- Add a control somewhere in your utility. This control could be a
menu item in your main menu, or a button, or a toolbar button.
- Click on Actions for the control.
- ChooseEmbeds
- Choose Control Event Handling , after generated code, Accepted.
- Choose theCall_SetPin code template.
Options
| Application Name |
Enter the name of the application here. You can use a variable,
or 'quotes' for a fixed value. |
| Application PIN number |
Enter the application Pin number in here. |
Code : Get Activation Code
Visible Effect to your App
None
Purpose
This function is not designed to be added to your main application -
rather it is used on the developer machine to generate Activation Codes.
This template makes use of the
ds_GetActivationCode
function.
Used in registration programs, like the included
Register
example application. You feed the template the variables it needs and it
returns a valid activation code. You can find the Register example in the
\clarion\3rdparty\secwin\register
directory
To Include in your App
- Add the code template to a button.
Secwin Technical Reference
See
Secwin Data Types
for the Secwin Specific data types required by some of these functions.
Please note: These function docs are as yet incomplete - where detail does
not exist, please contact CapeSoft Support.
ds_UserAllowed
ds_UserAllowed
(long app,string calledby,long override,long pUser,<string
pUserSite>)
Description
This function enables the application to get the access rights for a
specific user for a specific part of the program ( usually a screen.)
The function is called using the ApplicationNumber as well as the
FunctionName. The function returns a string, in which each character
signifies that access has been granted or denied to a particular
section. If the bit is set the access has been granted, if it is not set
then access has been denied.
These accesses only apply to users designated as 'Operators' on the
Operator Browse screen. You cannot limit the access of an user
designated as a 'Supervisor'.
Parameter
| Parameter |
Type |
Description |
| ApplicationNumber |
Long |
This is the Application number returned by ds_LoginUser. |
| Calledby |
String |
This is the name of the function to which the user is
requesting access. This parameter is not case sensitive. |
| Override |
Long |
This is an attribute that contains any overrides that the
program may use to override the users access levels. This is not
currently used and should be set to 0. |
| pUser |
Long |
The user number (if 0 then uses the current user). Required
for NetWebserver applications (with multiple users logged in
simultaneously). |
| pUserSite |
string(4) |
The user's site id (for Replicate enabled applications). |
Returns
A string which can be character tested to determine the access rights
that the user has been granted. These access rights are set by calling
ds_ModifyAccessEx
See Also
ds_LoginUser,
ds_ModifyAccessEx
Example
| Example |
ViewVideo Procedure
window WINDOW('Caption'),AT(-1,2,185,92),SYSTEM,RESIZE,MDI
BUTTON('Delete'),AT(68,28,,),USE(?DeleteButton)
BUTTON('Change'),AT(127,35,,),USE(?ChangeButton)
BUTTON('Cancel'),AT(74,53,,),USE(?CancelButton)
BUTTON('Ok'),AT(17,25,,),USE(?OkButton)
BUTTON('Print'),AT(19,51,,),USE(?PrintButton)
END
ThisAllowedString string(252)
CODE
ThisAllowedString = ds_UserAllowed (Application
Number,'ViewVideo',0,0)
if ThisAllowedString[1] <> '1' then return.
OPEN(window)
WindowOpened=True
if ThisAllowedString[2] <> '1' then hide(?OkButton).
if ThisAllowedString[3] <> '1' then
hide(?ChangeButton).
alert(DS_SECURITYKEY)
ACCEPT |
ds_BuildKeys
ds_BuildKeys (
[Locale] )
Description
Use this function to rebuild the keys in the Security file. Actually the
main reason for this function is to allow you to change the LOCALE
settings for the file. When you change your LOCALE settings then you
need to rebuild the keys in order for the new Locale to take effect.
Parameters
| Parameter |
Type |
Description |
| Locale |
String |
Optional. A string suitable for passing to the Clarion LOCALE
statement. |
Returns
Nothing
Example
| Example |
NewLogin String(12)
NewPassword String(12)
Code
ds_BuildKeys ()
ds_BuildKeys ('My.Env') |
ds_Allowed
ds_Allowed
(ApplicationNumber , FunctionName, Override)
Description
This function enables the application to get the access rights for a
specific user for a specific part of the program ( usually a screen.)
The function is called using the ApplicationNumber as well as the
FunctionName. The function returns a long ( although currently only the
low 8 bits are supported ), in which each bit signifies that access has
been granted or denied to a particular section. If the bit is set the
access has been granted, if it is not set then access has been denied.
These accesses only apply to users designated as 'Operators' on the
Operator Browse screen. You cannot limit the access of an user
designated as a 'Supervisor'.
Parameters
| Parameter |
Type |
Description |
| ApplicationNumber |
Long |
This is the Application number returned by ds_LoginText. |
| FunctionName |
String |
This is the name of the function to which the user is
requesting access. This parameter is not case sensitive. |
| Override |
Long |
This is an attribute that contains any overrides that the
program may use to override the users access levels. This is not
currently used and should be set to 0. |
Returns
A
Long which can be bitwise tested to determine the access
rights that the user has been granted. These access rights are set by
calling ds_SetAccess
See Also
ds_LoginText,
ds_SetAccess
Example
| Example |
ViewVideo Procedure
window WINDOW('Caption'),AT(-1,2,185,92),SYSTEM,RESIZE,MDI
BUTTON('Delete'),AT(68,28,,),USE(?DeleteButton)
BUTTON('Change'),AT(127,35,,),USE(?ChangeButton)
BUTTON('Cancel'),AT(74,53,,),USE(?CancelButton)
BUTTON('Ok'),AT(17,25,,),USE(?OkButton)
BUTTON('Print'),AT(19,51,,),USE(?PrintButton)
END
ThisAllowed long
CODE
ThisAllowed = ds_allowed (Application Number,'ViewVideo',0)
if ~band(ThisAllowed,1) then return.
OPEN(window)
WindowOpened=True
if ~band(ThisAllowed,2) then hide(?OkButton).
if ~band(ThisAllowed,4) then hide(?ChangeButton).
if ~band(ThisAllowed,8) then hide(?DeleteButton).
if ~band(ThisAllowed,16) then hide(?PrintButton).
alert(DS_SECURITYKEY)
ACCEPT |
ds_ChangeLoginEx
ds_ChangeLoginEx
(ApplicationNumber, [Login], [Password], [Options])
Description
This allows another user to Login without quitting the application. The
login screen will behave using the same options as was last passed to
ds_LoginUser. This function behaves the same as the ds_LoginUser
function and uses the Login and Password parameters in the same way.
If Options is set to 1 then the default Secwin screen will not be
displayed. This is used when you have your own ChangeLogin screen.
Note that you can create your own ChangeLogin window to collect the
Login and Password from the user, and pass them on to this function. In
this way you can bypass the built-in Secwin window.
Parameters
| Parameter |
Type |
Description |
| ApplicationNumber |
Long |
This is the Application number returned by ds_LoginUser. |
| Login |
String |
Optional. A default value for the Login. |
| Password |
String |
Optional. A default value for the Password. |
| Options |
Long |
Optional. Explained below |
Returns
A
Byte containing 0 if the operation was successful, or 1 if
the login was unsuccessful.
Example
| Example |
NewLogin String(12)
NewPassword String(12)
Code
ds_ChangeLoginEx (AppNum,NewLogin,NewPassword) |
See Also
ds_LoginUser,
Code
: Change Login,
Making your
own Secwin windows
ds_ChangeUserEmailAddress
ds_ChangeUserEmailAddress
(long app,long pUser,string pUserSite,string pPassword,string
pEmailAddress,long options)
Description
Allows a user to change their email address. Note: that only the person
currently logged in can change their EmailAddress. In other words the
Password field must match the password that the person currently logged
in.
If Option is set to 1 then the Secwin warning messages will be
suppressed.
Parameters
| Parameter |
Type |
Description |
| App |
Long |
This is the Application number returned by ds_LoginUser. |
| pUser |
long |
The user number (as set in the ds_LoginUser function) |
| pUserSite |
String(4) |
Optional - for Replicate purposes, contains the SiteID of the
user. |
| pPassword |
String(252) |
Contains the user's password. |
| pEmailAddress |
String(252) |
Contains the new Email Address. |
| Options |
Long |
A bit loaded flag:
DS_DONTWARN: if added will not display warning messages.
ds_CannotBeBlank: if added will not change an email address to
blank. |
Returns
A
long containing 0 if the operation was successful, or one of
the following error codes;
ds_InvalidUser - the user is not currently logged in.
ds_InvalidPassword - incorrect password supplied.
ds_CannotBeBlank - the EmailAddress supplied is blank (if the
ds_CannotBeBlank is set in the options flag).
Example
| Example |
case
ds_ChangeUserEmailAddress(AppNum,GLO:CurrentUser,,Loc:Password,Loc:EmailAddress,ds_CannotBeBlank)
of ds_InvalidUser
orof ds_CannotBeBlank
orof ds_InvalidPassword
!Error changing email address. The Email address was not
changed for this user.
else
message('EmailAddress changed successfully')
end |
Note: You must use the UserID (a number) not the login (see
ds_GetUserProperty).
See Also
ds_LoginUser,
ds_GetUserProperty
ds_ChangePassword
ds_ChangePassword
()
Description
Allows the user who is currently logged in to change his or her
password. The user will be required to enter his existing password, and
then his new password twice. There is only one password per user,
regardless of the number of applications or security areas.
To build your own password window, use the
ds_ChangePasswordEx
function.
Returns
Nothing
Example
| Example |
NewPassword String(20)
OldPassword String(20)
Code
ds_ChangePassword(OldPassword,NewPassword) |
See Also
ds_ChangePasswordEx,
Code
: Calling Change Password,
Making
your own Secwin windows
ds_ChangePasswordEx
ds_ChangePasswordEx
(AppNum, OldPassword, NewPassword, VerifyPassword, Options)
Description
Allows a programmer to use his
own
ChangePassword screen, and call this function to update the
password stored in the database. Note that only the person currently
logged in can change their password. In other words the OldPassword
field must match the password that the person currently logged in.
If Option is set to 1 then the Secwin warning messages will be
suppressed.
Parameters
| Parameter |
Type |
Description |
| ApplicationNumber |
Long |
This is the Application number returned by ds_LoginUser. |
| OldPassword |
String(12) |
The users old password |
| NewPassword |
String(12) |
Contains the new password |
| VerifyPassword |
String(12) |
Contains a copy of the new password. |
| Options |
Long |
DS_DONTWARN: If added, then a message is not displayed with
the error
DS_CASESENSITIVITYOFF: If added, does not save the new password
case sensitive |
Returns
A
Byte containing 0 if the operation was successful, or one of
the following error codes;
ds_InvalidPassword: Incorrect Old Password
ds_CannotBeSame: New password cannot be the same as old password
ds_PasswordsMustMatch: New Password and Verify Password don't match.
ds_CannotBeBlank: Password cannot be blank
ds_CannotBeSimple: Password must contain 6 Alpha and 3 Numeric
Characters
ds_InvalidUser (-100): The user is not yet logged in.
This last requirement is enforced if the
Force Long
Password option on the Login extension is set.
Example
| Example |
OldPassword STRING(12)
NewPassword STRING(12)
VerifyPassword STRING(12)
window WINDOW('Change
Password'),AT(,,209,75),SYSTEM,GRAY,AUTO
PROMPT('Old Password:'),AT(34,6),USE(?OldPassword:Prompt)
ENTRY(@s12),AT(103,6,60,10),USE(OldPassword)
PROMPT('New Password:'),AT(34,22),USE(?NewPassword:Prompt)
ENTRY(@s12),AT(103,22,60,10),USE(NewPassword),PASSWORD
PROMPT('Verify
Password:'),AT(34,38),USE(?VerifyPassword:Prompt)
ENTRY(@s12),AT(103,38,60,10),USE(VerifyPassword),PASSWORD
BUTTON('&Ok'),AT(56,55,45,14),USE(?Ok)
BUTTON('&Cancel'),AT(109,55,45,14),USE(?Cancel)
END
Code
open(window)
accept
if field() = ?Ok and Event() = Event:Accepted
if
ds_ChangePassword(AppNum,OldPassword,NewPassword,VerifyPassword,0)
= 0
post(event:closewindow)
end
end
end
close(window) |
See Also
ds_LoginUser
ds_CheckEncryptedActivation
ds_CheckEncryptedActivationCodeEx (string
pActivationCode,*ProductDetailsGroupType pProductDetails,string
pSeedCode,long pAppNumber,Queue pLimitsQueue,long pOptions=0),string
ds_CheckEncryptedActivationCode (string
pActivationCode,*ProductDetailsGroupType pProductDetails,string
pSeedCode,long pAppNumber,Queue pLimitsQueue),string
Description
This function allows you to verify an activation code (generated by the
ds_GetEncryptedActivationCode
function) - against a set of licence information. The set of licence
information must match that set used by the
ds_GetEncryptedActivationCode
function exactly.
Parameters
| Parameter |
Type |
Description |
| pActivationCode |
string |
The activation code to be verified |
| pProductDetails |
ProductDetailsGroupType |
A Secwin group (see Secwin Data
Types for details) containing all the licence information
used to verify the activation code add/change/delete the user. |
| pSeedCode |
string |
Contains the seedcode for the product
(entered on the Licence Tab of the Secwin Global Extension
template). |
| pAppNumber |
long |
Contains the AppNumber returned from the ds_LoginUser function. |
| pLimitsQueue |
Queue |
Contains the list of the counters and/or limits used in the
activation code (see Secwin Data Types
for details). |
| pOptions |
long |
A bit loaded flag: ds_OneTime - means that the activation code
can only be used once. |
Returns
The ExpiryDate of the licence (if the Activation Code check is
successful).
-1 = Activation code has expired.
-2 = Activation code failure (the Activation code does not match the
details in the ProductDetails and/or LimitsQueue)
-3 = Incorrect product (the Activation code is correct, but the product
does not match the one that the Activation code was issued for).
Example
See the
ds_GetEncryptedActivationCode
example to set the details of the licence. These must match those that are
used to generate the activation code.
| Example |
case
ds_CheckEncryptedActivationCodeEx(ActivationCode,MyDetailsGroup,'MySeedCode',MyLimitsQueue,ds_OneTime)
of 0 to ds_SecwinLastDate
!Success - restart your application for the licence to take
effect.
of -1
!The activation code is no longer valid.
of -2
!Activation code failure. The Activation code does not
match the details specified. Please ensure that the details
match exactly for the code to take effect.
of -3
!In correct product. The activation code used is not for
this product.
of -4
!Activation code already used.
else
!Unknown activation code error.
end |
See also
ds_GetEncryptedActivationCode
ds_CurrentAppLevel
ds_CurrentAppLevel (
)
Description
This is a Registration related function. It allows the programmer to get
the current Application Level ( e.g. Demo, Lite, Standard etc) set in the
current license. Don't confuse this function with ds_CurrentLevel which is
an Access Control related function, and returns the Users current level.
Returns
A long containing the current Application Level. Valid values are 1 to 5.
1 is the lowest level (Demo) while 5 is the highest (Enterprise).
Example
| Example |
Result Long
Code
Result = ds_CurrentAppLevel() |
See Also
Code : Get License Details,
Using Levels
ds_CurrentCopies ( )
ds_CurrentCopies ( )
Description
Allows the programmer to get the number of Copies set in the current
license.
Returns
A long containing the current number of copies.
Example
| Example |
Result Long
Code
Result = ds_CurrentCopies() |
See Also
Code : Get License Details,
Using Network Copies
ds_CurrentCounter
ds_CurrentCounter (
)
Description
Allows the programmer to get the Counter set in the current license. This
Counter is set when the activation code is generated, and used.
Returns
A long containing the current Counter value.
Example
| Example |
Result Long
Code
Result = ds_CurrentCounter() |
See Also
Code : Get License Details,
Using Counters
ds_GetEncryptedActivationCode
ds_GetEncryptedActivationCode
(long
pActivationExpires,long pLicenceExpires,*ProductDetailsGroupType
pProductDetails,string pSeedCode,Queue pLimitsQueue),string
Description
This function generates an activation code to be used to licence your
application at your user's site. This function would typically not be in
your application, but in a separate application that you keep locally to
generate activation codes. An example ships with Secwin that you can use
to generate activation codes, or as this basis for your own application.
Parameters
| Parameter |
Type |
Description |
| pActivationExpires |
Long |
The date the Activation Code expires (0 for unlimited - this
will give a date limit of 12/31/9999). The maximum date is
08/20/2084. After this date the activation code generated will be
out of date, and unusable. |
| pLicenceExpires |
Long |
The date the Licence expires (0 for unlimited - this will give a
date limit of 12/31/9999). The maximum date is 08/20/2084. This
date is when the licence will fail, and the application will no
longer be licenced. |
| pProductDetails |
ProductDetailsGroupType |
A handle to the ProduceDetailsGroup. (see Secwin
Data Types for details) This contains all the necessary
details to store in the activation code. |
| pSeedCode |
string |
A string containing a seedcode that your application uses. This
seedcode must match the one used in your application. |
| pLimitsQueue |
Queue |
For Users: pass the equate InsertRecord to add, ChangeRecord to
change and DeleteRecord to delete. You can add the ds_NoMessages
Secwin equate to the request to disable internal error messages
from being displayed. |
Returns
A string containing the activation code to register the application at the
clients site (using the
ds_CheckEncryptedActivationCode
function).
Example
| Example |
MyDetailsGroup group(ProductDetailsGroupType),pre()
.
MyLimitsQueue queue(LimitsQueueType),pre().
ActivationCode string(20)
code
MyDetailsGroup.SiteLimiter = '$$$$'
MyDetailsGroup.CompanyName = 'Paying Company'
MyDetailsGroup.Product = 'MyProduct'
MyDetailsGroup.LicenceType = 0 !Permanent
MyDetailsGroup.Copies = 5
MyDetailsGroup.Level = ds_ProfessionalLevel
MyDetailsGroup.SerialNumber = '12345'
MyDetailsGroup.OptionalModules = 0
MyLimitsQueue.Description = 'Default Counter' !The
old Secwin3 counter
MyLimitsQueue.Limit = 100
MyLimitsQueue.LimitIsRelative = 1
!Counter is relative - so add 100 to the existing number in the
licence.
add(MyLimitsQueue)
MyLimitsQueue.Description = 'Customers' !Limit
the customers entries to 100
MyLimitsQueue.Limit = 100
MyLimitsQueue.LimitIsRelative = 0
add(MyLimitsQueue)
ActivationCode =
ds_GetEncryptedActivationCode(today()+31,today()+365,MyDetailsGroup,'MySeedCode',MyLimitsQueue) |
See also
ds_CheckEncryptedActivationCode
ds_UpdateUser
ds_UpdateUser (long
App,ds_UserDetailsType pUserDetails,long pRequest)
Description
Lets you insert a user, change a user's (or user group's) details, or
delete a user in source code.
Note: This function has replaced the
superannuated functions: ds_ChangeUser, ds_InsertUser and ds_DeleteUser
Parameters
| Parameter |
Type |
Description |
| App |
Long |
The application number of the current application as returned by
the ds_LoginUser function. |
| pUserDetails |
ds_UserDetailsType |
A Secwin group (see Secwin Data
Types for details) containing all the information used to
add/change/delete the user. Not all the fields are required (when
changing a record) - although the user's login or number must be
set (in order to retrieve the correct record). Also - you cannot
use this function to change the password or email address of the
user. |
| pRequest |
long |
For Users: pass the equate InsertRecord to add, ChangeRecord to
change and DeleteRecord to delete. You can add the ds_NoMessages
Secwin equate to the request to disable internal error messages
from being displayed. |
Returns
| 0 |
Success |
| ds_ErrorInvalidUser |
Invalid User (change/delete: the user is not in the data file,
insert: required data is not complete) |
| ds_ErrorSuperUser |
You are trying to delete a superuser. |
| ds_ErrorUsedElsewhere |
The user you are trying to delete is used in another application |
| ds_ErrorLastSupervisor |
You are trying to delete the last supervisor. |
| -errorcode() |
An error occurred while trying to save the data changes. |
Example
| Example |
MyDetailsGroup group(ds_UserDetailsType),pre()
.
code
MyDetailsGroup.Number = UserNumber
MyDetailsGroup.SiteLow = NewSiteLow
!We'll leave the other fields blank, as they don't need
to be changed.
case ds_UpdateUser(App,MyDetailsGroup,ChangeRecord +
ds_NoMessages) !We'll display our own message for errors that
occur
of 0 !Success
of ds_ErrorInvalidUser
message('Operator Not Found')
of ds_ErrorUsedElsewhere orof ds_ErrorLastSupervisor orof
ds_ErrorSuperUser
!Not valid for ChangeRecord - only for deleterecord
else
!Negative value means a file error occured
message('Error('&errorcode()&') Writing Record: '
& Error())
end |
ds_Users
ds_Users (UserQueue)
Description
This function fills in a queue all the users currently in the database. In
other words by using this function you can get the logins and names of all
existing users.
This function is included in the docs for backward-compatibility
reasons. It should be considered as obsolete. The ds_UsersEx
function should be used.
Parameters
| Parameter |
Type |
Description |
| UserQueue |
ds_UserQueueType |
This is a queue defined in your application using the
ds_UserQueueType queue structure. the queue you pass must have
this structure. An example of such a queue is |
Structure
ds_UserQueue Queue,pre(_dsq)
Name string(20)
Surname string(20)
Login string(12)
UserGroup Long
end
Returns
Nothing. The queue you passed now contains all the user details.
Example
| Example |
ds_UserQueue Queue,pre(_dsq)
Name string(20)
Surname string(20)
Login string(12)
UserGroup Long
end
code
ds_Users (ds_UserQueue) |
See Also
ds_InsertUserEx,
ds_ChangeUser,
ds_DeleteUser,
ds_CurrentOperatorNumber
ds_CountUsers
ds_CountUsers(
SecurityAreaName)
Description
Counts the number of users that have access to this Area. If you create
your own login screen, then you will probably want to create your own
FirstUser screen as well. This procedure lets you determine if the
FirstUser function needs to be called.
Parameters
| Parameter |
Type |
Description |
| SecurityAreaName |
String |
This is the name of the area being protected. Each name must be
unique, even across applications, so by convention, this name is
normally made up of the application name and the area name,
separated by a pipe ( | ) symbol. The maximum length of this
parameter is 43 characters, and it is not case sensitive. This is
the same as the SecurityAreaName parameter from the ds_LoginUser
function. |
Returns
long containing the number of users with Supervisor or Operator access.
Example
| Example |
code
if ds_CountUsers(Clip(AppNameDesc) & ' | Main') = 0
myFirstUser(Clip(AppNameDesc) & ' | Main')
end |
See Also
ds_InsertFirstUser
ds_CreSec
ds_CreSec
Description
This function creates the security file. Typically it's called from inside
a separate utility, but it can be called from inside your program.
Care should be taken if you add this to your application as it can mean a
serious breech of the security is possible. For example a user might
overcome the security simply by deleting the security file and running the
program again. This is less of a problem if the Licensing features are
enabled as the program will have to be re-activated before it will run.
Tip : If you are using a file driver
other than Topspeed to store your security file, then you must call
ds_SetOwner before calling ds_Cresec.
The function won't empty, or overwrite, any security file which might
exist already.
Returns
Nothing
Example
| Example |
code
ds_SetOwner ('bobbybrown', 'washere')
ds_CreSec( ) |
See Also
Creating the Security File,
Activate
Security Extension,
ds_SetOwner
ds_Crypt
ds_Crypt
(TextString)
Description
Allows you to perform simple encryption on a string. To decrypt the string
you pass the encrypted string to ds_Crypt. This doesn't provide a very
high level of encryption as no key is used, but it does prevent
unsophisticated users from finding sensitive text on the disk.
Parameters
| Parameter |
Type |
Description |
| TextString |
String |
This is the string to encrypt or decrypt. |
Returns
A
String containing the encrypted or decrypted string.
Example
| Example |
Test String(12)
Code
test = ds_Crypt('hello') ! now test contains the encrypted
string
test = ds_Crypt(test) ! now test contains the decrypted string |
ds_ExportTables
ds_ExportTables(byte
pSelectDir=0)
Description
Exports the Secwin tables to a portable format. Useful when you need to
move the tables from one storage system to another (for example TPS to
MSSQL). The encrypted file is called dssw5.BIN and it will be created in
the "Current directory" (unless you using the pSelectDir parameter as
directed below). Use the
ds_ImportFiles
function to import the file.
Parameters
| Parameter |
Type |
Description |
| pSelectDir |
byte |
If this is 0 or omitted, then the select file dialog box is not
displayed and the exported table is merely created in the current
directory. If 1 is passed, then a select file dialog box is
displayed that allows you to select the file to export the data
to. |
Tip : It is recommended that this
function is only called After the call to
ds_LoginUser.
Tip : Use SETPATH to set the current
directory, however it is recommended that you restore the current
directory to the previous value after the export.
Returns
Nothing
Example
| Example |
Code
ds_ExportTables() |
See Also
ds_ImportTables
ds_ImportTables
ds_ImportTables
(byte pSelectDir=0)
Description
Imports the Secwin tables from a portable format (see
ds_ExportTables()).
Useful when you need to move the tables from one storage system to another
(for example TPS to MSSQL). The encrypted file is probably called
dssw5.BIN.
Parameters
| Parameter |
Type |
Description |
| pSelectDir |
byte |
If this is 0 or omitted, then the select file dialog box is not
displayed and the imported table is used in the current directory.
If 1 is passed, then a select file dialog box is displayed that
allows you to select the file to import the data from. |
Tip : It is recommended that this
function is only called before the call to
ds_LoginUser
(and indeed as soon after the connection to the backend is established as
is possible). You must have already called the ds_SetOwner in order to set
the internal owner string used by Secwin with the connection to your
backend (if required).
Tip : Use SETPATH to set the current
directory, however it is recommended that you restore the current
directory to the previous value after the export.
Tip : Data from the import is added to
the existing Secwin data. Duplicate records are automatically discarded.
However this function is designed primarily to move complete Secwin data,
and is not designed to merge Secwin data. While merges of multiple data
files may be successful, no guarantee is offered in this regard.
Returns
Nothing
Example
| Example |
Code
ds_ImportTables() |
See Also
ds_ExportTables
ds_CurrentLastPasswordChange
ds_CurrentLastPasswordChange
(ApplicationNumber)
Description
Allows the programmer to get the date on which the password, for the
logged in user, was last change. Useful for implementing your own "Force
Password Change" feature when the built-in version is not flexible enough.
Parameters
| Parameter |
Type |
Description |
| ApplicationNumber |
Long |
This is the Application number returned by ds_LoginText. |
Returns
A long containing the date of the last password change in a Clarion
standard date format.
Example
| Example |
Result Long
Code
Result = ds_CurrentLastPasswordChange(AppNum)
If Today()-Result > 7
ds_ChangePassword(AppNum)
End |
See Also
ds_ChangePassword
ds_CurrentLevel
ds_CurrentLevel
(ApplicationNumber)
Description
Allows the programmer to get the Level of the user who is currently logged
on. This can be useful for displaying the login of the current user on the
status bar etc.
Parameters
| Parameter |
Type |
Description |
| ApplicationNumber |
Long |
This is the Application number returned by ds_LoginText. |
Returns
A long containing the level of the user currently logged on. The returned
value will be either DS_SUPERVISOR or DS_OPERATOR.
Example
| Example |
CurrentLevel Long
CurrentLevelString string(20)
Code
CurrentLevel = ds_CurrentLevel(AppNum)
case CurrentLevel
of ds_Supervisor
CurrentLevelString = 'Supervisor'
of ds_Operator
CurrentLevelString = 'Operator'
of ds_NoAccess
CurrentLevelString = 'No Access'
end |
See Also
ds_CurrentLogin,
ds_CurrentName,
ds_CurrentOperatorNumber,
Code
: Calling Current
ds_GetProperty; ds_GetUserProperty
ds_GetProperty
(long ApplicationNumber,string pUserNumber,<string
pUserSite>,string pProperty)
ds_GetUserProperty (long
ApplicationNumber,string pUserLogin,<string pUserSite>,string
pProperty)
Description
These function returns information pertaining to a user (or the current
user). Depending on the property passed, will depend on the value returned
(see the pProperty parameter).
Parameters
| Parameter |
Type |
Description |
| ApplicationNumber |
Long |
The application number (as returned by ds_LoginUser) |
| pUserNumber or pUserLogin |
String |
Either the user number (with the ds_GetProperty) or the user's
login (with ds_GetUserProperty). If blank (for ds_GetUserProperty)
or 0 (for ds_GetProperty), then the requested detail pertaining to
the current user is returned). |
| pUserSite |
String |
The site ID of the User (for Replicate purposes) - may be
omitted for non-Replicate applications. |
| pProperty |
String |
The name of the property to return:
DefaultAccess - returns the Default access for the user.
Level - returns the user's operator level
Login - returns the user's login
Number - returns the user's number (or ID).
FirstName - returns the user's firstname
LastName or Surname - returns the user's lastname/surname
EmailAddress - returns the user's email address.
WorkGroup - returns the workgroup that the user belongs to.
LastPasswordChange - returns the date of the last password change.
ExtraString - returns the contents of the extra string field
(which you can use to store additional information in)
ExtraLong - returns the contents of the extra long field (which
you can use to store additional information in)
FingerPrint1 - a CString that you can use to store a fingerprint
or other data
FingerPrint2 - a CString that you can use to store an additional
fingerprint or other data |
Returns
ReturnValue string(252) !For Login,
FirstName, LastName, EmailAddress, ExtraString
ReturnValue long !For DefaultAccess, Level, Number,
WorkGroup, LastPasswordChange, ExtraLong
ReturnValue cstring(1024) !For FingerPrint1 and FingerPrint2
Note: If the user does not exist or there
is an file error in obtaining the user's details, then a blank string
(equates to 0 for a long) is returned.
Example
| Example |
ReturnValue =
ds_GetProperty(AppNum,0,,'FirstName') & ' ' &
ds_GetProperty(AppNum,0,,'LastName')
ReturnValue =
ds_GetUserProperty(AppNum,Login,,'FirstName') & ' ' &
ds_GetUserProperty(AppNum,Login,,'LastName'
case ds_GetUserProperty(AppNum,Login,,'Level')
of ds_Operator
!This is an operator
of ds_Supervisor
!This is a Supervisor
of ds_NoAcccess
!This user is disallowed from the application
end
case ds_GetUserProperty(AppNum,Login,,'DefaultAccess')
of ds_AllAccess
!This is user has all access to security areas by
default, unless restricted.
of ds_NoAcccess
!This user is disallowed from the security ares by
default, unless allowed.
end |
ds_SetProperty;ds_SetUserProperty
ds_SetProperty (long
ApplicationNumber,string pUserNumber,<string pUserSite>,string
pProperty,string pValue)
ds_SetUserProperty (long
ApplicationNumber,string pUserLogin,<string pUserSite>,string
pProperty,string pValue)
Description
These function sets information pertaining to a user (or the current
user). Depending on the property passed, will depend on the value set (see
the pProperty parameter).
Parameters
| Parameter |
Type |
Description |
| ApplicationNumber |
Long |
The application number (as returned by ds_LoginUser) |
| pUserNumber or pUserLogin |
String |
Either the user number (with the ds_GetProperty) or the user's
login (with ds_GetUserProperty). If blank (for ds_GetUserProperty)
or 0 (for ds_GetProperty), then the requested detail pertaining to
the current user is returned). |
| pUserSite |
String |
The site ID of the User (for Replicate purposes) - may be
omitted for non-Replicate applications. |
| pProperty |
String |
The name of the property to set:
DefaultAccess - returns the Default access for the user.
Level - returns the user's operator level
Login - returns the user's login
Number - returns the user's number (or ID).
FirstName - returns the user's firstname
LastName or Surname - returns the user's lastname/surname
EmailAddress - returns the user's email address.
WorkGroup - returns the workgroup that the user belongs to.
LastPasswordChange - returns the date of the last password change.
ExtraString - returns the contents of the extra string field
(which you can use to store additional information in)
ExtraLong - returns the contents of the extra long field (which
you can use to store additional information in)
FingerPrint1 - a CString that you can use to store a fingerprint
or other data
FingerPrint2 - a CString that you can use to store an additional
fingerprint or other data |
| pValue |
String |
The value to set the property to |
Returns
Example
| Example |
ds_SetUserProperty(AppNum,Login,,'FirstName','Geoff')
|
ds_UserInUserGroup
ds_UserInUserGroup
(long pUser, long pUserGroup)
Description
Allows the programmer to check if a user is part of a usergroup.
Returns
A long containing 1 (true) if the user is and 0 (false) if not.
ds_AddUserToUserGroup
ds_AddUserToUserGroup
(long appnum,long pUser,string pUserSite,long pUserGroup,string
pUserGroupSite)
Description
Allows the programmer to add a user to a usergroup.
Parameters
| Parameter |
Type |
Description |
| AppNum |
Long |
This is the Application number returned by ds_LoginText. |
| pUser |
long |
The user number. |
| pUserSite |
string(4) |
Reserved (leave blank) |
| pUserGroup |
long |
The user group number |
| pUserGroupSite |
string(4) |
Reserved (leave blank) |
Returns
A long containing 0 (no errorcode) if the user is successfully added to
the user group or errorcode() if adding the user to the user group failed.
Returns 1000 if the user or user group are not valid.
ds_RemoveUserFromUserGroup
ds_RemoveUserFromUserGroup
(long appnum,long pUser,string pUserSite,long pUserGroup,string
pUserGroupSite)
Description
Allows the programmer to remove a user from a usergroup.
Parameters
| Parameter |
Type |
Description |
| AppNum |
Long |
This is the Application number returned by ds_LoginText. |
| pUser |
long |
The user number. |
| pUserSite |
string(4) |
Reserved (leave blank) |
| pUserGroup |
long |
The user group number |
| pUserGroupSite |
string(4) |
Reserved (leave blank) |
Returns
A long containing 0 (no errorcode) if the user is successfully removed
from the user group or errorcode() if removing the user from the user
group failed. Returns 1000 if the user or user group are not valid.
ds_CurrentExpiryDate
ds_CurrentExpiryDate
( )
Description
Allows the programmer to get the current Expiry Date set in the current
license. This Date is set when the activation code is generated, and used.
Returns
A long containing the current date in a Clarion standard date format.
Example
| Example |
Result Long
Code
Result = ds_CurrentExpiryDate() |
See Also
Code : Get License Details,
Using Expiry Dates
ds_CurrentLicence
ds_CurrentLicence (
)
Description
Allows the programmer to get the name that this program has been licensed
to as set in the current license. This value can be used in the product as
a "Branding" technique. For example this value could appear on reports, on
the MDI screen etc.
Returns
A string containing the company, or person, name of the registered user.
This string can be a maximum of 40 characters long.
Example
| Example |
result string(40)
code
result = ds_CurrentLicence() |
See Also
Code : Get License Details,
Branding on Reports,
Branding
Using Logo screens
ds_CurrentLicenceDetailsEx and ds_CurrentLicenceDetails
ds_CurrentLicenceDetailsEx
(*LimitsQueueType pLimitsQueue),string
ds_CurrentLicenceDetails (),string
Description
This function returns all the licence details of the current licence used
by the application. The newer ds_CurrentLicenceDetailsEx function also
populates the passed pLimitsQueue with the current counter information.
Parameters (ds_CurrentLicenceDetailsEx
only)
| Parameter |
Type |
Description |
| pLimitsQueue |
LimitsQueueType |
A queue containing the description of the counter and it's
count:
LimitsQueueType queue,pre(_dsLQT),type
Description string(252)
Limit long
LimitIsRelative long
MinLevel long
MaxLevel long
ExtraString string(252)
end |
Returns
A group containing the current licence information as follows:
| ProductDetailsGroupType |
group,pre(_dsPDGT),type |
|
| SiteLimiter |
string(4) |
!For Replicate - reserved for later use. |
| CompanyName |
string(252) |
!The name of the Company that the licence is valid for |
| Product |
string(252) |
!The licence name for this application (see the Licensing Tab on
the Global Extension template) |
| Dealer |
string(252) |
!The label of the dealer selling the license (optional) |
| LicenceType |
long |
!The level of the licence type (see Using
Different Licence Types for details) |
| Copies |
long |
!The number of users in the current license that can run this
application concurrently (not valid for SQL applications) |
| Level |
long |
!The licence level of the current licence(equates: ds_DemoLevel,
ds_LiteLevel, ds_StandardLevel, ds_ProfessionalLevel and
ds_EnterpriseLevel) |
| SerialNumber |
string(252) |
!The serial number contained in the current licence |
| OptionalModules |
long |
!A bit loaded flag indicating the modules that the current
license contains. |
| AdditionalString1 |
string(252) |
!Additional information contained in the licence |
| AdditionalString2 |
string(252) |
|
| AdditionalLong1 |
long |
|
| AdditionalLong2 |
long |
|
| AdditionalString3 |
string(252) |
|
|
end |
|
Example
| Example |
LicenceDetails
group(ProductDetailsGroupType),pre(LD) .
LocLimitsQueue queue(LimitsQueueType) .
code
LicenceDetails = ds_CurrentLicenceDetailsEx()
message('Current licence details are:|' & |
' Company: ' & LD:CompanyName & '|' & |
' LicenceType: ' & LD:LicenceType & '|'
& |
' Copies: ' & LD:Copies & '|' & |
' Level: ' & LD:Level & '|' & |
' SerialNumber: ' & LD:SerialNumber & '|'
& |
' Dealer: ' & LD:Dealer) |
ds_CurrentlyLoggedIn
ds_CurrentlyLoggedIn
(Options)
Description
This function requires the registration features to be active. Allows the
user to see who else is logged on to the system. This is useful when you
wish to ask people to quit the program because of insufficient licenses,
or if you need to update the program on the server.
If the DS_DONTSHOWSCREEN option is used then the function will not open a
screen showing the list of users.
Irrespective of the parameter, a comma delimited list of User Names is
passed back from the function.
Parameters
| Parameter |
Type |
Description |
| Options |
Long |
Valid options are DS_DONTSHOWSCREEN. |
Returns
A comma delimited string containing the list of User Names currently on
the system.
Example
| Example |
List string(255)
Code
ds_CurrentlyLoggedIn()
list = ds_CurrentlyLoggedIn (DS_DONTSHOWSCREEN) |
See Also
Code : Calling Currently Logged In,
Using Network Copies,
ds_CurrentlyLoggedInEx
ds_CurrentlyLoggedInEx
ds_CurrentlyLoggedInEx
(LoggedInQueue,long pOptions=0)
Description
This function requires the registration features to be active. It fills
the supplied Queue with the names of all the other users who are logged
onto the system. This is useful when you wish to ask people to quit the
program because of insufficient licenses, or if you need to update the
program on the server.
In addition to the Queue being populated, a comma delimited list of User
Names is passed back from the function.
This function is not designed to replace
ds_CurrentlyLoggedIn,
but rather to provide a method for getting the list of names in a Queue
format. This is particularly useful if large numbers of users will be
connected, and the string is not large enough for the whole list.
Parameters
| Parameter |
Type |
Description |
| LoggedInQueue |
ds_LoggedInQueue |
This is a queue defined in your application using the
ds_LoggedInQueue queue structure. the queue you pass must have
this structure. An example of such a queue is... |
| pOptions |
long |
This is a bit loaded option:
Bit0 - if set, includes duplicates in the list of users. |
Structure
| Structure |
LoggedInQueue QUEUE,PRE(_dsqex)
Name STRING(255)
Reserved STRING(255)
END |
Returns
A comma delimited string containing the list of User Names currently on
the system.
Note: The first item in the queue/string is
the current user. This will mean that the user is duplicated in the queue
of users. Don't forget to free the queue before calling the function, as
the function will simply add to the queue.
Example
| Example |
UserQueue QUEUE,PRE(_dsqex)
Name STRING(255)
Reserved STRING(255)
END
s STRING(255)
code
s = ds_CurrentlyLoggedInEx (UserQueue)
|
See Also
Code : Calling Currently Logged In,
Using Network Copies,
ds_CurrentlyLoggedIn
ds_CurrentOptional
ds_CurrentOptional (
)
Description
Allows the programmer to get the optional modules that this program has
been licensed to as set in the current license.
Returns
A long, where each bit represents an optional module. You can test for a
specific optional module by BANDing the result with one of the DS_OM1 to
DS_OM30 equates.
Example
| Example |
result long
Optionalmodule1 byte
OptionalModule2 byte
code
result = ds_CurrentOptional()
if band(result,DS_OM1) then OptionalModule1 =1.
if band(result,DS_OM2) then OptionalModule2 =1. |
See Also
Code : Get License Details,
Using Optional Modules
ds_CurrentSerialNumber
ds_CurrentSerialNumber
Description
Allows the programmer to get the Serial number as set in the current
license.
Returns
A String (20) containing the Serial Number.
Example
| Example |
SerialNumber String(20)
code
SerialNumber = ds_CurrentSerialNumber() |
See Also
Code : Get License Details
ds_DecrementCounterEx
ds_DecrementCounterEx(long
pDecrementBy)
Description
Removes pDecrementBy (normally 1) from the value stored in the License.
This is used when selling your program by number of runs, or number of
reports, or something like that.
Returns
0 if successful. 1 if failed. The function will fail if the counter is
already set to 0.
Example
| Example |
Result Long
Code
result = ds_DecrementCounterEx(1)
If result = 0 then return. |
See Also
Using Counters
ds_CheckCounter
ds_CurrentLogin
ds_CurrentLogin
(ApplicationNumber )
Description
Allows the programmer to get the Login Code of the user who is currently
logged on. This can be useful for displaying the login of the current user
on the status bar etc.
Parameters
| Parameter |
Type |
Description |
| ApplicationNumber |
Long |
This is the Application number returned by ds_LoginText. |
Returns
A string containing the login code of the user currently logged on. The
maximum length of the string is 12 characters.
Example
| Example |
CurrentLogin string(12)
Code
CurrentLogin = ds_CurrentLogin (AppNum) |
See Also
ds_CurrentLevel,
ds_CurrentName,
ds_CurrentOperatorNumber,
Code
: Calling Current
ds_CurrentName
ds_CurrentName
(ApplicationNumber )
Description
Allows the programmer to get the Name of the user who is currently logged
on. This can be useful for displaying the name of the current user on the
status bar etc.
Parameters
| Parameter |
Type |
Description |
| ApplicationNumber |
Long |
This is the Application number returned by ds_LoginUser. |
Returns
A string containing the name of the user currently logged on. The maximum
length of the string is 40 characters.
Example
| Example |
currentname string(40)
code
currentname = ds_CurrentName(AppNum) |
See Also
ds_CurrentLevel,
ds_CurrentOperatorNumber,
ds_CurrentLogin,
Code
: Calling Current
ds_CurrentOperatorNumber
ds_CurrentOperatorNumber
(ApplicationNumber)
Description
Allows the programmer to get the Operator Number of the user who is
currently logged on. This matches the number returned in the ds_UsersEx
function. You can use this number (which is unique for each operator) to
link your own user file to the Secwin user file.
Parameters
| Parameter |
Type |
Description |
| ApplicationNumber |
Long |
This is the Application number returned by ds_LoginText. |
Returns
A long containing the operator number of the user currently logged on.
Example
| Example |
CurrentOperator Long
Code
CurrentLevel = ds_CurrentOperatorNumber(AppNum) |
See Also
ds_UsersEx,
ds_CurrentLevel,
ds_CurrentLogin,
ds_CurrentName,
Code : Calling Current
ds_CurrentUserGroup
ds_CurrentUserGroup
(ApplicationNumber)
Description
This function has been deprecated in Secwin 4 for the following reason:
In Secwin 3 - you could only assign one user group to a user, but in
Secwin 4, you can assign a user to multiple usergroups, so in principle
(unless the user is only assigned to one user group) - there cannot be
such a thing as a CurrentUserGroup.
This function has been superceded with a function that returns a queue of
usergroups that the user is assigned to:
secwin.htm#ds_UsersUserGroups
You'll need to alter your code so that it loops through the UserGroups
queue and checks each value to see whether that user belongs to the user
group (rather than checking a single value).
Parameters
| Parameter |
Type |
Description |
| ApplicationNumber |
Long |
This is the Application number returned by ds_LoginText. |
ds_CurrentWorkGroupEx
ds_CurrentWorkGroupEx
(ApplicationNumber)
Description
Allows the programmer to get the Workgroup of the user who is currently
logged on. The users' Workgroup is set on the users form by a Supervisor.
Workgroups are a way of grouping users for browse filter purposes.
Parameters
| Parameter |
Type |
Description |
| ApplicationNumber |
Long |
This is the Application number returned by ds_LoginText. |
Returns
A long. The number returned is the number entered in on the User form.
Example
| Example |
CWG long
code
CWG = ds_CurrentWorkGroup (AppNum) |
See Also
Work Groups,
ds_GetWorkGroupEx
ds_GetAccessEx
ds_GetAccessEx
(ApplicationNumber, CalledBy, User) (or ds_GetAccess4)
Description
This function returns the access rights for a particular user, for a
particular procedure in the application. If the CalledBy parameter is set
to LEVEL then it returns the user's Level. This function is provided
primarily so you can build your own SetAccess window.
The ds_GetAccess4 is used in the GlobalSetAccess window, and will create
the access point to an area that the user has not yet accessed (assigning
the access point the default access).
Parameters
| Parameter |
Type |
Description |
| ApplicationNumber |
Long |
This is the Application number returned by ds_LoginText. |
| CalledBy |
String |
This is a unique string for this procedure. Usually the
procedure name. |
| OperatorNumber |
Long |
This is the number for the current Operator as returned by ds_CurrentOperatorNumber
or in the users Queue returned by ds_UsersEx. |
Returns
A Long, containing the access rights for that user, for that particular
screen. This is basically the number that has been set using the
ds_SetAccessEx function. If the CalledBy parameter is set to LEVEL then it
returns one of DS_NOACCESS, DS_OPERATOR or DS_SUPERVISOR.
Example
See the included Splash example for an example of a SetAccess window.
See Also
ds_Allowed,
ds_SetAccessEx
ds_CurrentName
ds_CurrentName
(ApplicationNumber )
Description
Allows the programmer to get the Name of the user who is currently logged
on. This can be useful for displaying the name of the current user on the
status bar etc.
Parameters
| Parameter |
Type |
Description |
| ApplicationNumber |
Long |
This is the Application number returned by ds_LoginText. |
Returns
A string containing the name of the user currently logged on. The maximum
length of the string is 40 characters.
Example
| Example |
currentname string(40)
code
currentname = ds_CurrentName(AppNum) |
See Also
ds_CurrentLevel,
ds_CurrentOperatorNumber,
ds_CurrentLogin,
Code
: Calling Current
ds_CheckCounter
ds_CheckCounter
(string pCounter,long pDecrementBy=0,long pOptions=0),long
Description
Removes
pDecrementBy from the
pCounter value stored in
the License. This is used when selling your program by number of runs, or
number of reports, or something like that. If the pCounter is blank, then
the Default Counter will be used.
This function replaces the old ds_DecrementCounterEx and
ds_DecrementCounter functions.
Parameters
| Parameter |
Type |
Description |
| pCounter |
String |
This is the Label of the Counter to Check or decrement. |
| pDecrementBy |
Long |
The number to decrement the existing value by. |
| pOptions |
long |
A bit loaded flag. DS_DONTWARN if added will not warn if the
counter has reached 0. |
Returns
The Counter value before decrementing if successful. 0 if the Counter is 0
and therefore no more records/reports/procedures are permitted on this
licence. If the function fails then nothing is removed from the counter.
If
pDecrementBy is 0, then the Counter is not altered, but
simply returned as is.
Example
| Example |
Result Long
Code
result = ds_CheckCounter ('WagesReports',1)
If result = 0 then return. |
See Also
Using Counters
ds_DeleteUser
ds_DeleteUser
(ApplicationNumber , Login)
Description
Allows the programmer to delete a user in Source code. Users that are used
in other applications which share this file cannot be deleted. (Rather set
their Level to NoAccess using the ds_ChangeUser function). If the user is
the last Supervisor for an application, and other Operators exist, then he
can't be deleted.
Parameters
| Parameter |
Type |
Description |
| ApplicationNumber |
Long |
This is the Application number returned by ds_LoginUser. |
| Login |
String |
The login code of the operator being deleted. |
Returns
0 if successful.
1 if the operator doesn't exist.
2 if he's the last Supervisor.
3 if the user is used in another application
4 if some file-access-error prevented the delete. Use ERRORCODE() to get
the actual error.
Example
| Example |
code
execute ds_DeleteUser(App,LoginCode)
message('Operator Not Found')
message('Can''t delete last supervisor')
message('Operator used by another program')
message('Unable to delete operator: ' & error())
end |
See Also
ds_InsertUserEx,
ds_ChangeUser
ds_GetAccess44
ds_GetAccess44 (long
App,string CalledBy,Long User,string pUserSite)
Description
This function returns the access rights for a particular user, for a
particular procedure in the application. If the CalledBy parameter is set
to LEVEL then it returns the user's Level.
Parameters
| Parameter |
Type |
Description |
| App |
Long |
This is the Application number returned by ds_LoginUser. |
| CalledBy |
String |
This is a unique string for this procedure. Usually the
procedure name. |
| User |
Long |
This is the number for the current Operator as returned by ds_CurrentOperatorNumber
or in the users Queue returned by ds_UsersEx. |
| UserSite |
string(4) |
This is the site id of the operatory (for Replicate
applications). |
Returns
A Long, containing the access rights for that user, for that particular
screen. This is basically the number that has been set using the
ds_ModifyAccessEx function. If the CalledBy parameter is set to LEVEL then
it returns one of DS_NOACCESS, DS_OPERATOR or DS_SUPERVISOR.
Example
| Example |
if
ds_GetAccess4(App,'Level',UserNumber,'$$$$') = DS_OPERATORString
then
!Do stuff for operators in here.
end
Access = ds_GetAccess4(App,CalledBy,UserNumber,'$$$$') |
See Also
ds_UserAllowed,
ds_ModifyAccessEx
ds_GenerateActivationCode
ds_GenerateActivationCode
( )
Description
Opens a screen that lets you generate an activation code. You wouldn't
normally include this function in an application. The Register.App example
calls this function so that you can generate unique activation codes based
on your clients name etc. The example can be found in the
\Clarion\3rdParty\Examples\Secwin\Register
directory.
Returns
Nothing
Example
| Example |
code
ds_GenerateActivationCode() |
See Also
ds_GetActivationCode,
Some
Activation Code Secrets
ds_GetActivationCode
ds_GetActivationCode
( Product, Company, SerialNumber, Copies, Level, Optional, ExpiryDate,
Counter, SeedCode )
Description
Takes all the required parameters and returns an activation code. This
function is provided so that you can design your own activation code
generation procedures. For an example of using this function see the
Register.App demo application This example is in the
\clarion\3rdparty\examples\secwin\register
directory.
This function is not typically called in the programs that you distribute.
Parameters
| Parameter |
Type |
Description |
| Product |
String |
The name of your product as specified in the Secwin Global
Extension. |
| Company |
String |
The name of the company which has bought the software. |
| SerialNumber |
String |
The serial number you have issued the company mentioned above. |
| Copies |
Long |
The number of concurrent network copies they are allowed to run. |
| Level |
Long |
The level they have purchased. 1 = Demo, 2 = Lite etc. ( Valid
1- 5 ) |
| Optional |
Long |
A bit mask of the optional modules they have purchased. 1 is
module 1, 2 is module 2, 4 is module 3, 8 is module 4 etc. So to
activate modules 2 and 4 this would be set to 10 ( 2+8 ). |
| ExpiryDate |
Long |
The date when the user's license will expire. This is a standard
clarion date. |
| Counter |
Long |
The counter field. |
| SeedCode |
Long |
The seed code of the application as specified on the Secwin
Global Extension. |
Returns
A
String of length 20 containing the Activation code.
Example
| Example |
AC String(20)
Code
AC = ds_GetActivationCode
('App','Comp','001',5,3,0,today()+30,0,1234) |
See Also
ds_GenerateActivationCode,
Some
Activation Code Secrets
ds_GetDriveSerialNumber
ds_GetDriveSerialNumber
( [Drive] )
Description
Used to get the Serial Number of the Hard Drive. This can then be used as
the program's serial number. By comparing the two numbers you can detect
when the data has been moved from one hard drive to another.
NOTE: You will only be able to get a local drive's serial number. If your
application uses data from a network drive, then you will not be able to
get that drive's serial number (across a LAN). In this case (if you still
require the drive serial number, in spite of not being able to use it for
the licence), you must specify the local drive in the Drive parameter,
otherwise the function will always return 0
Parameters
| Parameter |
Type |
Description |
| Drive |
String |
Optional. Contains the Root directory of the drive to check. If
omitted then the Current Path will be used. |
Returns
Ulong containing the Serial Number
Example
| Example |
Code
If ds_GetDriveSerialNumber() <> ds_CurrentSerialNumber()
message('I'm an unhappy program.')
return
End |
ds_GetWorkGroup
ds_GetWorkGroup
(ApplicationNumber, OperatorNumber)
Obsolete.
Use ds_GetWorkGroupEx instead. ds_GetWorkGroup returns a Short not a Long.
ds_GetWorkGroupEx
ds_GetWorkGroupEx
(ApplicationNumber, OperatorNumber)
Description
Allows the programmer to get the Workgroup of another user. The users'
Workgroup is set on the users form by a Supervisor. Workgroups are a way
of grouping users for browse filter purposes.
Parameters
| Parameter |
Type |
Description |
| ApplicationNumber |
Long |
This is the Application number returned by ds_LoginUser. |
| OperatorNumber |
Long |
This is the number for the current Operator as returned by ds_CurrentOperatorNumber
or in the users Queue returned by ds_UsersEx. |
Returns
A long. The number returned is the number entered in on the User form.
Example
| Example |
CWG short
code
CWG = ds_GetWorkGroup (AppNum,1) |
See Also
Work Groups
ds_InsertFirstUser
ds_InsertFirstUser(SecurityAreaName,Firstname,Lastname,LoginCode,Number)
Description
If the login to your program is not optional, then an issue arises if no
user has access to the program. At this point Secwin insists that either
an existing user (who currently has No Access) is granted access to the
system, or a new user is created. In either case the user will be granted
Supervisor status.
Parameters
| Parameter |
Type |
Description |
| SecurityAreaName |
String |
This is the name of the area being protected. Each name must be
unique, even across applications, so by convention, this name is
normally made up of the application name and the area name,
separated by a pipe ( | ) symbol. The maximum length of this
parameter is 43 characters, and it is not case sensitive. This is
the same as the SecurityAreaName parameter from the ds_LoginUser
function. |
| FirstName |
String |
Firstname of the user being added. Ignored if Number <> 0. |
| LastName |
String |
Lastname of the user being added. Ignored if Number <> 0 |
| LoginCode |
String |
The code the user will use when he logs in. His initial password
will also be set to this value. Ignored if Number <> 0. |
| Number |
Long |
The User Number of an existing User to be granted First User
rights to this area. If 0 then a new user (using the above
parameters) will be created. |
Returns
0 = Success. Otherwise Failure.
Example
| Example |
Code
If choice(?list1) < 0
get(q,choice(?list1))
ds_InsertFirstUser(AppName,FirstName,LastName,LoginCode,q.Number)
Else
ds_InsertFirstUser(AppName,FirstName,LastName,LoginCode,0)
End |
See Also
ds_CountUsers
ds_InsertUser
ds_InsertUser(
AppNum, FirstName, LastName, LoginCode, InitialAccess, Workgroup, Level)
Description
This function is obsolete. It's exactly the
same as calling
ds_InsertUserEx with the
UserGroup parameter set to 0. It is included here for backward
compatability reasons.
ds_InsertUserEx
ds_InsertUserEx(
AppNum, FirstName, LastName, LoginCode, InitialAccess, Workgroup, Level,
UserGroup)
Description
Lets you add a user (or user group) to the system in source code. As in
the screen version the user's initial password is set the same as his
login code. If the user exists, or if one of the parameters is blank, then
the function will fail.
If you are adding a User Group then the WorkGroup field is ignored, and
the FirstName field contains the User Group Name (eg Sales). The LastName
parameter should contain a space and the FirstName value. The Login code
should be blank.
Parameters
| Parameter |
Type |
Description |
| AppNum |
Long |
The application number of the current application as returned by
the ds_LoginUser function. |
| FirstName |
String |
Obvious (for Users). If the UserGroup parameter is set to -1
then this contains the UserGroup Name. |
| LastName |
String |
Obvious (for Users). If the UserGroup parameter is set to -1
then this contains a space followed by the UserGroup Name. |
| LoginCode |
String |
The code the user will use when he logs in. His initial password
will also be set to this value. |
| InitialAccess |
Long |
1 = All Access otherwise No Access. |
| WorkGroup |
Long |
The users Workgroup number. this is the same as the Workgroup
field on the usual operator form. |
| Level |
Long |
One of DS_SUPERVISOR, DS_OPERATOR or DS_NOACCESS |
| UserGroup |
Long |
User Group Number. If this is set to -1 then this is a UserGroup
(not a User) being added. |
Returns
0 = successful.
1 = Either No FirstName, no LastName, no LoginCode, or InitialAccess not
set to 0 or 1.
2 = An error adding the operator to the File (use Error() and ErrorCode()
for details)
Example
| Example |
Code
ds_InsertUserEx (AppNum, 'Bill', 'Gates',
'BG',1,0,DS_OPERATOR,0)
ds_InsertUserEx (AppNum, 'Sales', '
Sales','',1,0,DS_OPERATOR,-1) |
See Also
ds_UsersEx,
ds_ChangeUser,
ds_DeleteUser
ds_LicenceOk
ds_LicenceOk(
RqdLevel, RqdModules, Options)
Description
Checks the users current license and returns a value to tell you if it
passed or failed the check. Equates have been defined for the different
optional modules, namely DS_OM1 thru DS_OM30. You can modify the behaviour
by using the options parameter with one or more of the following values.
DS_NOWARN : By default Secwin displays a warning to the user when one of
these checks fails. By including this option no warning is displayed.
DS_NODATECHECK : This ignores the checks for errors 3 and 4.
DS_NONETWORKCHECK : This ignores the check which could return error 5.
DS_MULTIDATA : This ignores the check that could return error 7.
Parameters
| Parameter |
Type |
Description |
| RqdLevel |
Long |
The license level required at this point. Valid values are 1 to
5. Invalid values are automatically set to 3. |
| RqdModules |
Long |
The optional modules required at this point. Valid values are 0
or a combination of the DS_OM1 through DS_OM30 equates. |
| Options |
Long |
Various options that modify the behaviour of the function. |
Returns
0 if successful.
1 if the current license level is not sufficient.
2 if the current license has expired
3 if the current PC date is less than the date of a previous use of the
license.
4 if the current Pc date is more than 2 years later than the previous use
of the license.
5 if too many network users are logged in.
6 if the current licence's optional modules are not sufficient.
7 if the date and time of the dssw5 file goes backwards. (suppress this
check with DS_MULTIDATA)
Example
| Example |
Result long
Code
Result = ds_LicenceOk(1,0,0)
Result = ds_LicenceOk(3,DS_OM1,DS_NOWARN)
Result = ds_LicenceOk(5,DS_OM1 + DS_OM8,DS_NOWARN +
DS_NODATECHECK) |
ds_LockScreen
ds_LockScreen (
ApplicationNumber )
Description
Allows the user who is currently logged in to lock the application while
being away from the terminal temporarily. The screen is blacked out and
the user must enter their password before the application will continue.
Note that the machine is not locked as the Windows task manager is still
active. The application can also be terminated using the task manager.
Parameters
| Parameter |
Type |
Description |
| ApplicationNumber |
Long |
This is the Application number returned by ds_LoginUser. |
Returns
Nothing
Example
| Example |
Code
ds_LockScreen (AppNum) |
See Also
Ancillary User Functions,
Code
: Calling Lock Screen
ds_LoginUser
ds_LoginUser
(ds_UserLoginOptions pUserLoginOptions,*long pUser) (replaces the old
ds_LoginText function)
Possible Options
DS_DEFAULT (0) : Default behaviour. A login is definitely required, and
the password is case sensitive. Automatic logins are not allowed, and
unlimited login tries are accepted.
DS_CASESENSITIVITYOFF : If this flag is present then the User password is
not case sensitive.
DS_THREETRIES : Limits the number of login attempts to 3 before the
program automatically aborts the login attempt.
DS_USECURRENTLOGON : Allows this application to accept automatic login
attempts, using the ds_Run function.
Description
Allows a user to login to the program, or program area. A window will be
opened allowing the user to enter a user code and a password. If there are
no users defined for this application then one of the following two
actions will occur.
- If security is not optional then you will be asked to either assign
an existing user to this area as a Supervisor, or to add a new user as
a Supervisor. If you add a new user then the initial password is the
login code.
- If security is optional then no window will be opened and the user
will automatically be given the Supervisor level.
If the DS_USECURRENTLOGON flag is set then the function will attempt to
log the user in using the same login code and password of the calling
program. The calling program uses the ds_Run function (or template) to run
this program.
Parameters
| Parameter |
Type |
Description |
| pUserLoginOptions |
ds_UserLoginOptions |
This is a group containing:
AreaName: the name of the area being protected. Each name must be
unique, even across applications, so by convention, this name is
normally made up of the application name and the area name,
separated by a pipe ( | ) symbol. The maximum length of this
parameter is 252 characters, and it is not case sensitive.
Options: This parameter governs the behaviour of the Login
function. Multiple options can be added together. Possible values
are listed below.
Login: This is the Login code. If blank - returned with an invalid
login.
Password: This is the Password. If blank - returned with an
invalid login. |
| pUser |
long |
A handle to a long to return the user that is logged in (to
store locally - particularly for WebServer applications). If 0,
then the user is invalid. |
Returns
The Application Number (long).
This number is used by other functions so it must be stored, a global,
non-threaded long is the perfect storage vessel. If the number returned is
0 then the login was unsuccessful and appropriate action should be taken.
Advanced
If you have multiple login areas within one application then store the
application number (AppNum) in a queue, adding the new AppNum to the top
of the queue when successfully logging in, and removing it when logging
out. This ensures that AppNum always points to the current user area.
Calling ds_LoginUser automatically logs out the existing user for this
instance of the area, if one exists. In other words calling ds_LoginUser
(SecurityAreaName, x) causes an implicit ds_LogoutUser (ApplicationNumber)
- i.e. a logout of the same area - to be called before ds_LoginUser. If no
user is logged in then ds_LogoutUser ignores the request.
Example
| Example |
AppNum long
MyUserLoginOptions group
AreaName string(252)
User string(252)
Password string(252)
Options long
end
MyUser long
Code
MyUserLoginOptions.AreaName = 'MyApplication | Main'
MyUserLoginOptions.User = 'Geoff'
MyUserLoginOptions.Password = 'MyPassword'
!+ds_UseUserAuthentication to use user authentication to
login
!+DS_USECURRENTLOGON to use a login from another area/exe
!+DS_CASESENSITIVITYOFF to use a case insensitive password
when logging in
MyUserLoginOptions.Options = 0 !Use the equates listed
above.
AppNum = ds_LoginUser (MyUserLoginOptions , MyUser)
if AppNum = 0
! login was unsuccessful
return
End |
See Also
ds_Logout,
Extension
: User Login Here,
Login and
Password Access Control,
Making
your own Secwin windows
ds_LogoutUser
ds_LogoutUser (long
ApplicationNumber,long pUser)
Description
Allows a user to logout of an application, or application area. The user
will have to re-enter his login code and password before he can re-enter
the part of the application protected by the password.
It is not necessary to Logout if the program is being terminated.
Parameters
| Parameter |
Type |
Description |
| ApplicationNumber |
Long |
This is the Application number returned by ds_LoginUser. |
| pUser |
Long |
This is the user ID as set by ds_LoginUser. |
Returns
0 if successful. 1 if unsuccessful.
If the function returns 1, then the user was not logged in to the
application.
Example
| Example |
AppNum long
Result long
code
AppNum = ds_LoginUser ('Video.Exe', ds_DEFAULT,'','')
if AppNum = 1
! login was unsuccessful
return
End
< function code goes here >
result = ds_LogOut (AppNum)
return |
See Also
ds_LoginUser
ds_OperatorBrowse
ds_OperatorBrowse
(ApplicationNumber)
Description
Allows you to Browse the users for this Application or Security area. Only
Supervisors have access to this screen. A Supervisor must use this
function to add, edit or remove other Supervisors or Operators.
Parameters
| Parameter |
Type |
Description |
| ApplicationNumber |
Long |
This is the Application number returned by ds_LoginUser. |
Returns
Nothing
Example
| Example |
AppNum long
code
ds_OperatorBrowse (AppNum) |
See Also
Operator Browse and Form,
User
Groups,
Work Groups
ds_RegisterProductEx
ds_RegisterProductEx
( Product, Seed, Options, Company, SerialNumber, Copies, Level, Modules,
Activation code, Counter)
Description
This function is used to change the users current license levels.
NOTE: This function relies on the existance
of a licence already. It merely changes the existing licence. If you are
handcoding the call, then you need to first call
ds_UseLicence
in order to create an initial licence.
The product parameter is set with the name of the product. This is usually
hard coded into an application, and cannot be changed on this screen.
The seed code is used so that other developers cannot generate activation
codes for your applications. This is normally hard coded into the
application, and isn't seen by the end user.
The options parameter allows you to change the way the screen behaves.
If it contains any of the DS_LVL equates (DS_LVL1 to DS_LVL5) then that
level will not be displayed on the screen. So you can hide the
Professional and Enterprise options by including DS_LVL4 + DS_LVL5 in the
options parameter.
If it contains any of the DS_OM equates (DS_OM1 to DS_OM15) then those
optional modules will not appear. So to hide optional modules 13 thru 15
you would include DS_OM13 + DS_OM14 + DS_OM15 in the options parameter. If
this parameter includes DS_OM16 then all optional modules from 16 to 30
are hidden.
If it contains the DS_DONTSHOWSCREEN parameter then the screen will not be
opened. In this case you MUST pass all the correct values, including the
activation code, to the function. This is available so that you can draw
your own RegisterProduct screen. You should then check the value returned
to make sure the call was successful.
If it contains DS_RELATIVECOUNTER then any value in the Counter field will
be ADDED to the user's current Counter value. Use this in situations where
you are basically trying simply to increment the number stored in the
counter at the client.
If it contains DS_ONETIME then the activation code can only be entered
once. If it is entered a second time it will fail. This prevents a user
from entering a code, using up the Counter, and re-entering the same code
(within the 7 day window).
Using the company, serial number, copies, level, modules and activation
code parameters you can prime each of the values on the screen. If you
omit any of these parameters then they will default to their current
value.
Parameters
| Parameter |
Type |
Description |
| Product |
String |
The name of the product. |
| Seed |
Long |
The developer's seed code. |
| Options |
Long |
Various options, described below. |
| Company |
String |
The name of the company the product is licensed to. |
| SerialNumber |
String |
The serial number of the product. |
| Copies |
Long |
The number of copies that the user may simultaneously run on a
network. |
| Level |
Long |
The level that the user is licensed to. |
| Modules |
Long |
The optional modules that the user has access to. |
| Activation Code |
String |
The activation code as returned by ds_GenerateActivationCode. |
| Counter |
Long |
The number that the Counter must be set to. |
Returns
0 if successful, 1 if Invalid Activation code.
Example
code
ds_RegisterProduct('Wonderprog',12345678,0)
ds_RegisterProduct('Wonderprog',12345678,DS_LVL4+LVL5)
ds_RegisterProduct('Wonderprog',12345678,DS_LVL4+LVL5+DS_OM15)
See Also
Code : Calling Register Product,
Overview of Licensing,
Making
your own Secwin Windows
ds_UserRun
ds_UserRun (long
ApplicationNumber,long pUser)
Description
Allows you to launch another Secwin enabled EXE, performing an automatic
login using the currently logged in user.
In other words, App A can use this function to run App B, at the same time
passing App B the login code and password of the current user. App B will
automatically log the person in.
In order for this to occur App B MUST have the login option DS_AUTOLOGON
bit set. On the Login User Here template this option is referred to as
"Allow automatic login's from other EXEs".
Parameters
| Parameter |
Type |
Description |
| ApplicationNumber |
Long |
This is the Application number returned by ds_LoginUser. |
| pUser |
Long |
The user's login number. |
Returns
A string which needs to be included as a parameter in the Clarion "Run"
statement.
Example
| Example |
code
run ('ProgName ProgParam ' & ds_Run (AppNum)) |
See Also
Code : Run Another Exe,
Secwin
Examples
ds_LoadLicenceFromXML
ds_LoadLicenceFromXML(*ProductDetailsGroupType
pDetailsGroup,*queue
pLimitsQueue,string pXMLFile,<long pXMLStringLen>),long
Description
This procedure allows Secwin to import licence details from either an XML
file or a string in XML format (if the data is already loaded into a
string).
Parameters
| Parameter |
Type |
Description |
| pDetailsGroup |
ProductDetailsGroupType Handle |
A reference to a group containing all the Licence details. The
group must be declared as type: ProductDetailsGroupType |
| pLimitsQueue |
queue |
A queue containing the table limits and counters contained in
the licence. |
| pXMLFile |
string |
Contains the name of the XML file to save the licence details to
(if saving to file) - otherwise contains the actual XML string (if
pXMLStringLen is not omitted) |
| pXMLStringLen |
long |
A long containing the length of the xml string. If omitted, then
pXMLFile is the name of an XML file to load. |
Returns
long - 0 for success, otherwise an error occurred.
Example
| Example |
YourXMLString string(xxxx)
YourXMLStringLen long
code
!Here's an example of how you would create an XML licence
string:
!YourXMLString contains the
licence details in an XML formatted string.
if ds_LoadLicenceFromXML(REG:CodeGroup,Queue:Browse,YourXMLString,YourXMLStringLen)
.
!Here's an example of how you would create an XML licence
file:
if
ds_LoadLicenceFromXML(REG:CodeGroup,Queue:Browse,clip(REG:CompanyName)
& '_' & clip(REG:Product) &'.xml') . |
See
Secwin Data Types
ds_SaveLicenceToXML
ds_SaveLicenceToXML
(*ProductDetailsGroupType pDetailsGroup,*queue pLimitsQueue,<string
pXMLFile>,<ds_SecwinXMLString
pSecwinXMlString>,<SaveLicenceToXMLOptionsGroupType
pOptions>),long
Description
This procedure allows Secwin to export licence details to either an XML
file or a string in XML format (if not required to save directly to a
file).
Note: If you are saving to an XML string,
then you must dispose the string after using it (see the example code
below)
Parameters
| Parameter |
Type |
Description |
| pDetailsGroup |
ProductDetailsGroupType Handle |
A reference to a group containing all the Licence details. The
group must be declared as type: ProductDetailsGroupType |
| pLimitsQueue |
queue |
A queue containing the table limits and counters to be contained
in the licence. |
| pXMLFile |
string |
Contains the name of the XML file to save the licence details to
(if saving to file). This must not contain a path as well as the
name will be converted to a valid filename (i.e. invalid filename
chars will be converted to '_'). See ds_MakeValidFileName
for details. |
| pSecwinXMLString |
ds_SecwinXMLString |
A Secwin data type to contain the licence details in a string
(in XML format) - rather than saving to a file. |
| pOptions |
SaveLicenceToXMLOptionsGroupType |
A Secwin data type to contain the Options in a group passed to
the function:
EncodingType - should be either 'URLEncoded' (default if blank) or
the old 'ISO-8859-1'. |
Returns
long - 0 for success, otherwise an error occurred.
Example
| Example |
SecwinXMLString group(ds_SecwinXMLString)
.
code
!Here's an example of how you would create an XML licence
string:
if
ds_SaveLicenceToXML(REG:CodeGroup,Queue:Browse,,SecwinXMLString)
.
!Do code using XML string such as:
MyString = SecwinXMLString.bin !The bin item in the
group contains the contents of the string.
MyStringLen = SecwinXMLString.len !The len item in the
group contains the length of the string
dispose(SecwinXMLString.bin) !You must dispose the
string after using it.
!Here's an example of how you would create an XML licence
file:
if
ds_SaveLicenceToXML(REG:CodeGroup,Queue:Browse,clip(REG:CompanyName)
& '_' & clip(REG:Product) &'.xml') . |
See also
Secwin Data Types ;
ds_MakeValidFileName
ds_MakeValidFileName
ds_MakeValidFileName
(string pfileName)
Description
This procedure returns a valid filename that the
ds_SaveLicenceToXML
function will use to create the xml file for the licence details. You can
then use this filename to handle the file that the
ds_SaveLicenceToXML
function creates.
Parameters
| Parameter |
Type |
Description |
| pfileName |
string |
The name of the file that must be stripped of it's invalid
characters. |
Returns
string - contains the pFileName with invalid dos filename characters
replaced with '_'
Example
| Example |
| if
ds_SaveLicenceToXML(REG:CodeGroup,Queue:Browse,ds_MakeValidFileName(clip(REG:CompanyName)
& '_' & clip(REG:Product) &'.xml')) . |
See
Secwin Data Types ;
ds_SaveLicenceToXML
ds_SecwinMakeover
ds_SecwinMakeover
(MakeoverObject)
Description
This procedure allows the Secwin screens to support CapeSoft's
Makeover
accessory. The Makeover object is created by the Exe, and then this
function is used to pass a pointer to the object, to the Secwin DLL. Note
that Makeover is not required in order for Secwin to work properly.
Parameters
| Parameter |
Type |
Description |
| MakeoverObject |
Makeover |
A reference to a Makeover objected created in the Exe. This
would typically be ThisMakeover |
Returns
Nothing
Example
| Example |
code
ds_SecWinMakeover(ThisMakeover) |
ds_SecwinMessage
ds_SecwinMessage
(MessageName)
Description
This function gets, translates, and displays one of the common Secwin
error messages.
Valid message names are
| MessageName |
Default Message |
| activationfailed |
Incorrect Activation Code. Please consult your application
supplier. |
| activationsuccessful |
Activation Successful !! Please quit the application for new
settings to take effect. |
| accessrestricted |
Your access to this part of the program has been restricted. |
| cantdeletelast |
You cannot delete the last supervisor before deleting all the
other users, or setting their access to ''No Access''. |
| cantdeletesuperuser |
This is a super user created by the developer and cannot be
deleted. |
| featurenotavaliable |
This feature is not available in your Level of the program.
Consult your application supplier for more information |
| productexpired |
Your product has expired. Consult your application supplier. |
| toomanyusers |
Too many people are already running the system. People already
logged in include ... |
| notlicenced |
You are not licensed to use this module. |
| filecorrupted |
Your Security file has become corrupted. Consult your
application supplier for a new activation code. |
| badoldpassword |
Incorrect Old Password |
| cantbesame |
New password cannot be the same as old password |
| passwordsmustmatch |
New passwords must match. Please try again. |
| cantbeblank |
Password cannot be blank |
| cantbesimple |
Password must contain 6 Alpha and 3 Numeric characters |
| invalidpassword |
Invalid Password |
| invalidlogin |
Invalid Login |
| licensenotloaded |
Call to ds_LicenceOk, but License Not Loaded by ds_UseLicence |
Parameters
| Parameter |
Type |
Description |
| MessageName |
String |
This is one of the Standard Secwin Message Names. |
Returns
Nothing
Example
| Example |
code
ds_SecWinMessage('AccessRestricted') |
ds_ModifyAccessEx
ds_ModifyAccessEx
(ApplicationNumber ,ScreenName, Options)
Description
This screen is normally called from within a specific function in order to
change the access levels for the different operators, for that screen.
Only Supervisors have access to this function. The access levels are
retrieved using the ds_UserAllowed function. ds_ModifyAccessEx is normally
invoked by pressing a hotkey. This hotkey is normally stored in the
DS_SECURITYKEY equate. By default this key is Ctrl-F8. The function can
however be called in almost any manner, for example by using a button on
the window.
The Options parameter string contains all of the access options for the
calling function, as you want them to be displayed on the
ds_ModifyAccessEx browse box.
Parameters
| Parameter |
Type |
Description |
| ApplicationNumber |
Long |
This is the Application number returned by ds_LoginUser. |
| ScreenName |
String |
This is the name of the screen or function. This name must be
unique within an application. |
| Options |
String |
This string contains all the access options for this function.
Each item in the string is separated by a pipe (|) character.
There may be up to 8 items in the string. Each item must be 6, or
fewer, characters long. These items then appear on the Set Access
screen in different columns. |
Returns
Nothing
Example
| Example |
ViewVideo procedure
code
< normal opening window code etc goes here >
alert(DS_SECURITYKEY)
accept
if keycode() = DS_SECURITYKEY
ds_ModifyAccessEx
(AppNum,'ViewVideo','Access|Delete|Print')
End
< rest of accept handling goes here >
End |
See Also
Set Access Rights Screen
ds_SetAccess
ds_SetAccess
(ApplicationNumber ,ScreenName, Options)
Description
This screen is normally called from within a specific function in order to
change the access levels for the different operators, for that screen.
Only Supervisors have access to this function. The access levels are
retrieved using the ds_Allowed function. ds_SetAccess is normally invoked
by pressing a hotkey. This hotkey is normally stored in the DS_SECURITYKEY
equate. By default this key is Ctrl-F8. The function can however be called
in almost any manner, for example by using a button on the window.
The Options parameter string contains all of the access options for the
calling function, as you want them to be displayed on the ds_SetAccess
browse box.
Parameters
| Parameter |
Type |
Description |
| ApplicationNumber |
Long |
This is the Application number returned by ds_LoginText. |
| ScreenName |
String |
This is the name of the screen or function. This name must be
unique within an application. |
| Options |
String |
This string contains all the access options for this function.
Each item in the string is separated by a pipe (|) character.
There may be up to 8 items in the string. Each item must be 6, or
fewer, characters long. These items then appear on the Set Access
screen in different columns. |
Returns
Nothing
Example
| Example |
ViewVideo procedure
code
< normal opening window code etc goes here >
alert(DS_SECURITYKEY)
accept
if keycode() = DS_SECURITYKEY
ds_SetAccess (AppNum,'ViewVideo','Access|Delete|Print')
End
< rest of accept handling goes here >
End |
See Also
Set Access Rights Screen
ds_SetAccessEx
ds_SetAccessEx
(ApplicationNumber, CalledBy, User, Rights )
Description
This function sets the access rights for a particular user, for a
particular procedure in the application. This function is provided
primarily so you can build your own SetAccess window.
Parameters
| Parameter |
Type |
Description |
| ApplicationNumber |
Long |
This is the Application number returned by ds_LoginText. |
| CalledBy |
String |
This is a unique string for this procedure. Usually the
procedure name. |
| OperatorNumber |
Long |
This is the number for the current Operator as returned by ds_CurrentOperatorNumber
or in the users Queue returned by ds_UsersEx. |
| Rights |
Long |
These is the rights for this operator, for this window. Each bit
represents a different right. This is matched to the number |
Returns
Nothing
Example
See the included Splash example for an example of a SetAccess window.
See Also
ds_Allowed,
ds_GetAccessEx
ds_ModifyAccessEx
ds_ModifyAccessEx
(long App,string CalledBy,Long User,string UserSite,string Rights,long
pOperation=ds_ReplaceExistingAccess,long pAccessIsString=0)
Description
This function sets the access rights for a particular user, for a
particular procedure in the application.
Parameters
| Parameter |
Type |
Description |
| App |
Long |
This is the Application number returned by ds_LoginUser. |
| CalledBy |
String |
This is a unique string for this procedure. Usually the
procedure name. |
| User |
Long |
This is the number for the current Operator as returned by ds_CurrentOperatorNumber
or in the users Queue returned by ds_UsersEx. |
| UserSite |
string(4) |
This is the operator's site (for Replicate applications). |
| Rights |
string |
These is the rights for this operator, for this window
(dependent on the Operation). Each character represents a access
area right.
Obsolete: Each bit represents a different right. This is matched
to the number (Secwin 3 functionality). |
| Operation |
Long |
An equate, governing how the existing access rights are
modified:
ds_ReplaceExistingAccess - the Rights string replaces the existing
rights of the user.
ds_ClearAccessChars - Merges the Rights parameter with the
existing Access rights, by clearing the existing access chars, in
the positions that are set to 1 in the Rights parameter. Ignores
characters in the existing access where 0 exists in those
corresponding positions in the Rights parameter.
ds_SetAccessChars - Merges the Rights parameter with the existing
Access rights, by setting the existing access chars, in the
positions that are set to 1 in the Rights parameter. Ignores
characters in the existing access where 0 exists in those
corresponding positions in the Rights parameter. |
| AccessIsString |
Long |
Set if the Rights is a string, otherwise clear (if it represents
an old Secwin 3 bit flagged long). |
Returns
Nothing
Example
| Example |
ds_ModifyAccessEx(App,CalledBy,UserNumber,'$$$$',
NewAccessString,,1) !Replace the
existing access rights
ds_ModifyAccessEx(App,CalledBy,UserNumber,UserSite,4,1,-1)
!Force the user's access to be on for group 4 of the CalledBy
area.
ds_ModifyAccessEx(App,CalledBy,UserNumber,UserSite,all('1',252),0,1)
!Force
the user's access for all groups on this CalledBy area to NO
ACCESS. |
See Also
ds_UserAllowed,
ds_GetAccess4
ds_SetDefaultFontEx
ds_SetDefaultFontEx(Face,
Size, Color, Style, CharSet)
Description
This function allows you to set the font that Secwin will use on it's
screens. If you call the function with no parameters then the standard
Windows Font Dialog box will be called so that the user can select the
font.
Note: that only versions of Clarion 5.5
and later support CharSets. In the previous versions of Clarion, the
Charset will be ignored.
Parameters
| Parameter |
Type |
Description |
| Face |
String |
The name of the font to use. |
| Size |
Long |
The size of the font to use. |
| Color |
Long |
The color of the font to use. Valid colors, such as Color:Black,
are in the Equates.Clw file. |
| Style |
Long |
The style of the font to use. Valid styles, such as
Font:Regular, are in the Equates.Clw file. |
| Charset |
Long |
The Charset to use. |
Returns
Nothing
Example
| Example |
code
ds_SetDefaultFont('Arial',10,Color:Black,Font:Regular) |
See Also
Extension : User Login Here
ds_SetLanguage
ds_SetLanguage
(LanguageFileName)
Description
Allows you to adjust the text which appears on the Secwin screens. This is
used to translate the native English of the Secwin screens into other
languages. Note that this can be called from before or after the user logs
in. If this is called before the user logs in then the settings for the
language file in the various ini files will be ignored.
Parameters
| Parameter |
Type |
Description |
| LanguageFileName |
String |
This is the name of the language file to use. If this name is
invalid, or the file cannot be found, then Secwin will default to
English. |
Returns
Nothing
See Also
User Guide : Internationalization support
Example
| Example |
AppNum long
code
ds_SetLanguage ('Spanish.Irf') |
See Also
Code : Calling Set Language,
Translating
Secwin Windows
ds_SetLogo
ds_SetLogo
(LogoFileName, CallbackFunctionAddress)
Description
Allows you to change the logo that appears on all of the Secwin screens.
Parameters
| Parameter |
Type |
Description |
| LogoFileName |
String |
This is the name of the logo file to use. |
| CallbackFunctionAddress |
Long |
This parameter is reserved for future use. You should set this
to 0. If this is set to -1 then the Secwin about screen will not
appear if a user clicks on the Logo. |
Returns
Nothing
Example
| Example |
code
ds_SetLogo('c:\logo.ico',0) ! use logo in root directory
ds_SetLogo('logo.ico',0) ! use logo in current directory |
See Also
Changing The Logo
ds_SetOwner
ds_SetOwner (string
Owner1, string Owner2)
Description
This function allows you to set the Owner attributes for the Security, and
License Files. This function is required to support the alternative file
drivers. when you use the Topspeed driver (the default setting) then the
owner variables are set internally, and this function has no effect. If
you are using one of the other drivers, then set the owner using this
function.
Parameters
| Parameter |
Type |
Description |
| Owner1 |
String |
This is the Owner attribute of the Security files. (dssw5) |
| Owner2 |
String |
This is the Owner attribute of the License files. (.LIC) (for
flat files). If the backend selected is a SQL backend, then this
will be used for the DriverString. |
Returns
Nothing
Example
| Example |
code
ds_SetOwner ('bobbybrown','washere') !For flat files
ds_SetOwner
('SQLConnection,SQLDataBase,SQLUser,SQLPassword','/MultipleActiveResultSets=1')
!For
SQL files |
See Also
ds_CreSec,
Activate
Secwin Extension
ds_SetPath
ds_SetPath ([Path],
[LanguageFile], [LanguagePath])
Description
Allows you to programmatically set the location of the Secwin support
files, including the dssw5 file and the language file or language path.
They specifically override the PATH, LANGUAGEFILE and LANGUAGEPATH
settings as they appear in the Secwin.Ini file.
If any of the above parameters are omitted then the usual methods (i.e.
INI file & defaults) are used to determine the position of those
files.
For more information on the Language files and paths read the section in
the User Guide on
Translating Secwin
Windows.
Note : This function can only be called
once, and must be called Before any other Secwin functions. Therefore it
is recommended that you add this function, if required, to your Global
Program
Setup embed point.
Tip : Use the word HERE to indicate the
current directory, and the word EXEDIR to indicate the Application(Exe)
Directory
Parameters
| Parameter |
Type |
Description |
| Path |
String |
A specific path where the dssw5 file can be found. |
| LanguageFile |
String |
A specific name for the language file to use. |
| LanguagePath |
String |
A specific path for the language file. |
Returns
Nothing
Example
| Example |
code
ds_SetPath('c:\')
ds_SetPath('HERE')
ds_SetPath('HERE','Dutch.Irf','EXEDIR') |
See Also
Translating Secwin Windows
ds_SetPin
ds_SetPin
(SecurityAreaName, PinNumber)
Description
Used to stamp the dssw5 file with a valid pin number. You would not
normally do this from inside an application. The SetPin and HardPin
examples use this function. The examples can be found in the
\Clarion\3rdparty\Examples\Secwin\UsingPin directory.
Parameters
| Parameter |
Type |
Description |
| SecurityAreaName |
String |
This is the name of the security area, as used by the ds_UsePin
function. |
| PinNumber |
Long |
This is the Pin number to stamp into the file. |
Returns
Nothing
Example
| Example |
code
ds_SetPin('Bobs App',12345678) |
See Also
ds_UsePin,
Pin Numbers,
Extension : Activate Secwin Features
ds_SetSuperUser
ds_SetSuperUser
(LoginCode)
Description
Use this function to set a user as a Super User. Note that this does NOT
add a user, if the user doesn't exist then the function does nothing.
Parameters
| Parameter |
Type |
Description |
| LoginCode |
String |
This is the Login Code of the user to make a Super User |
Returns
Nothing
Example
| Example |
code
ds_SetSuperUser ('demo') |
See Also
ds_UsersEx,
ds_InsertUserEx,
ds_ChangeUser,
ds_DeleteUser,
Extension : User Login Here,
Super
Users
ds_UseLicence
ds_UseLicence
(ProductName, ApplicationNumber,LicenseName, Options)
Description
In order to enable the copy protection, and remote activation, features
which Secwin can add to your application, you use Licenses. Somewhere near
the beginning of your application (usually just after calling the
ds_LoginUser function) you make a call to ds_UseLicence. A license is then
sought, and held for the duration of the program. The license is
automatically released when the program terminates (in whatever manner) or
if the computer is switched off.
If no licenses exist then one will automatically be created. This created
license will have a level of 'Demo' (level 1) and an automatic expiry
period of 30 days. Your user can then change this license to their
requirements when you supply hem with the necessary activation code. If
you do not want the 30 day demo period then include the DS_NODEMO switch
in the options parameter.
Although you can call this function at any time it is best to do it just
after the call to ds_LoginUser as you will then be able to supply the
ApplicationNumber parameter. This allows Secwin to put the name of the
current user inside the license file so that others can see which users
are currently using the program.
You can override the default behavior of checking network licenses (i.e.
the user will have an effective "site license") by using the
DS_NONETWORKCHECK switch in the options parameter.
Note: that no checking of the license
occurs at this point. To check the license, especially the Expiry dates or
application level, use the ds_LicenceOk function.
Parameters
| Parameter |
Type |
Description |
| ProductName |
String |
This is the name of the product. This name is used when
generating activation codes. |
| ApplicationNumber |
Long |
This is the Application number returned by ds_LoginUser.
If you are not using a login then set this number to 0. |
| LicenseName |
String |
This is a unique, 4 character, string containing the unique
license name for this product. You may use alphanumeric characters
only. It is case insensitive. |
| Options |
Long |
A long number containing a number of different bit settings.
This variable can contain either (or both) of the following
options;
DS_NODEMO
DS_NONETWORKCHECK
The 3rd byte in the long (ie options/65536) contains the length of
the demo license. The default is 30 days.
ds_CaseInsensitiveProductName - use this flag if the product name
must be insensitive.
|
Returns
Nothing
Example
| Example |
AppNumQueue Queue
AppNum Long
End
Code
AppNum = ds_LoginUser('Video.Exe',DS_DEFAULT,'','')
if AppNum = 0
! login was unsuccessful
Return
End
Add(AppNumQueue,1)
ds_UseLicecnce('Amazing Wonderful
Program',AppNum,'AWP',DS_NODEMO) |
See Also
Overview of Licensing
ds_UsePin
ds_UsePin
(SecurityAreaName,AppPinNumber)
Description
This function allows you to "stamp" a dssw5 file as being valid. Without a
pin number the user can simply delete the dssw5 file, and re-create an
empty one using CRESEC25. This use of Pin numbers requires however that
the dssw5 file be stamped with the correct pin number before it will be
considered valid.
Parameters
| Parameter |
Type |
Description |
| SecurityAreaName |
String |
This is the name of the application. This is the same name as
you'd use with the ds_LoginUser
function. |
| AppPinNumber |
Long |
This is the unique pin number for this application. Only dssw5
files containing this pin number will be valid. |
Returns
Nothing
Example
| Example |
code
ds_UsePin (AppNameDesc,12345678)
ds_LoginUser( AppNameDesc, ds_Default,'','') |
See Also
ds_SetPin,
Pin Numbers,
Extension: Activate Secwin Features
ds_UsersEx
ds_UsersEx
(Appnum,UserQueueEx)
Description
This function fills into a queue, all the users and user groups currently
in the database. In other words by using this function you can get the
logins and other details of all existing users and user groups.
Parameters
| Parameter |
Type |
Description |
| AppNum |
Long |
This is the Application number returned by ds_LoginUser.
This setting is only needed if the Workgroup field needs to be
populated. Setting this to 0 does not fetch the Workgroup (or
UserGroup) fields from other tables and so imparts a small
performance benefit. |
| UserQueueEx |
ds_UserQueueEx |
This is a queue defined in your application using the
ds_UserQueueEx queue structure. the queue you pass must have this
structure. An example of such a queue is... |
Note: In Secwin4 this function has changed
somewhat, because a user can now belong to multiple user groups. In order
to get a list of the user groups that a user belongs to, you need to use
this function in conjunction with the
ds_UsersUserGroups
function. The UserGroup item in the queue will contain the first user
group that the user belongs to (making sure that your existing code will
not break when upgrading to Secwin 4) - but the user may belong to more
than one group, in which case it will be necessary to call the additional
function as well.
Structure
ds_UserQueueEx QUEUE,PRE(_dsqex)
Name STRING(40)
Surname STRING(40)
Login STRING(128)
UserGroup LONG ,
Number LONG
LastPasswordChangeDate LONG
Workgroup LONG
Reserved2 STRING(12)
Reserved3 STRING(20)
end
Returns
Nothing. The queue you passed now contains all the user details.
Example
| Example |
ds_UserQueueEx QUEUE,PRE(_dsqex)
Name STRING(40)
Surname STRING(40)
Login STRING(128)
UserGroup LONG
Number LONG
LastPasswordChangeDate LONG
Workgroup LONG
Reserved2 STRING(12)
Reserved3 STRING(20)
end
code
ds_Users (Appnum,ds_UserQueueEx) |
See Also
ds_UpdateUser, ds_UsersUserGroups
ds_UpdateUsersUserGroups
ds_UpdateUsersUserGroups
(long pAppNum,long pUser,string pUserSite,ds_UsersUserGroupsQType
pUserGroupsQu,long pForce=0),long
Description
This function updates all the usergroups that this user belongs to from a
previously populated UserGroup Queue (which you use
ds_UsersUserGroups
function to populate this queue with).
You can remove or add the user specified in the pUser field to any number
of usergroups in the user group, as follows:
UsersUserGroups.ActiveIcon = 2 !Adds the user to
the user group.
UsersUserGroups.ActiveIcon = 1 !Removes the user
from the user group.
Similarly, if you have other users that must be associated with the
usergroups of another user, you can retrieve the UserGroups using the
ds_UsersUserGroups function (using the
user id of the "from" user) and send the pUser to the user that you want
to associate the same usergroups to.
Note: When adding/removing a user from a
user group - leave the Active flag in the state it was in (when it was
returned from the
ds_UsersUserGroups
function) - and only change the ActiveIcon flag. Secwin will compare the
flags to see where the changes have occurred (rather than applying a
change to every record that is in the queue - which is really
inefficient).
Parameters
| Parameter |
Type |
Description |
| Appnum |
Long |
This is the Application number returned by ds_LoginUser.
|
| pUser |
Long |
This is the user's ID number. |
| pUserSite |
string |
This is the user's SiteID field. |
| pUserGroupsQueue |
ds_UsersUserGroupsQType |
This is a queue defined in your application using the
ds_UsersUserGroupsQType queue structure (see Secwin
Data Types). the queue you pass must have this structure. |
| pForce |
long |
If set, forces the UserGroup to be updated, otherwise only the
usergroups with the activeicon flag <> active+1 flag. |
Returns
Indicates whether a add to or remove from Usergroup failed:
0 - No error
1 - Removing the user from one or more usergroup(s) failed.
2 - Adding the user to one or more usergroup(s) failed.
3 - Adding to and removing from failed.
You can loop through the queue and see which records failed by testing
(see example code for details).
Example code
| Example |
UsersUserGroups
QUEUE(ds_UsersUserGroupsQType),PRE(SecLocUUGQ) !
END
UserNumber long !The ID of the user
code
UserNumber =
ds_GetUserProperty(AppNum,Login,,'UserNumber') !This gets
the usernumber for the user
if
ds_UsersUserGroups(AppNum,UserNumber,'',UsersUserGroups,0)
. !Load the Users usergroups list
!First retrieve the user group you are wanting to alter
Get(UsersUserGroups,<UserGroupToGet>)
!Code in here to toggle the group that the user belongs
to as follows:
if UsersUserGroups.ActiveIcon = 1
UsersUserGroups.ActiveIcon = 2 !The user is part of
the UserGroup
else
UsersUserGroups.ActiveIcon = 1 !The user is not part
of a UserGroup
end
put(UsersUserGroups)
if ds_UpdateUsersUserGroups(Appnum,UserNumber,'',UsersUserGroups)
loop Counter = 1 to records(UsersUserGroups)
get(UsersUserGroups,Counter)
if ~errorcode() and UsersUserGroups.ActiveIcon <>
UsersUserGroups.Active + 1
!What to do if the changed didn't take
end
end
end |
See also
ds_UsersUserGroups ,
ds_GetUserProperty
ds_UsersUserGroups
ds_UsersUserGroups
(long AppNum,long pUser,string pUserSite,ds_UsersUserGroupsQType
pUGQueue,long pOptions=1,<*string pChangeAccess>,long
pHash=0),long
Description
This function populates a queue with all the user groups that a user
belongs to. You can either use it to populate an exhaustive list of
UserGroups and highlight the user group using the active flag (like with a
style or Icon in a list) or only return a list of the user groups that the
user belongs to (depending on the pOptions flag passed to the function).
For example, if you have the following usergroups in this application:
StockControl
Accounts
Invoicing
OrderEntry
Receiving
And you would like to display all 5 with a checkbox next to the UserGroups
that a particular user belongs to, then you would set the pOptions to 0
(or omit the parameter). The Active element of the queue will be set for
those entries that the user belongs to. To just return the UserGroups that
a user belongs to (without returning all of the possible UserGroups) - set
the pOptions to 1.
Parameters
| Parameter |
Type |
Description |
| Appnum |
Long |
This is the Application number returned by ds_LoginUser.
|
| pUser |
Long |
This is the user's ID number returned by ds_LoginUser.
|
| pUserSite |
string |
This is the user's SiteID field (leave blank if not used). |
| pUGQueue |
ds_UsersUserGroupsQType |
This is a queue defined in your application using the
ds_UsersUserGroupsQType queue structure (see Secwin
Data Types). the queue you pass must have this structure. |
pOptions
(Optional) |
long |
A bit loaded flag:
Bit0: If set, then pUGQueue will be populated with a list of the
UserGroups that the user belongs to. Otherwise, all the UserGroups
will be added to the queue, with the Active flag set for those
UserGroups that the User belongs to. |
pChangeAccess
(Optional) |
*string |
A pointer to a string containing the access bits of a user
(mainly for internal use). Must be a string(252) |
pHash
(Optional) |
long |
A ID containing the area to assess the users' access rights (set
to 0 to check their level). (mainly for internal use) |
Structure
ds_UserSUserGroups QUEUE(ds_UsersUserGroupsQType
),pre(UUG) . !You must have a prefix - otherwise
you'll get compile warnings on this line
Returns
The number of usergroups that the user belongs to.
Example
| Example |
!This goes in your local data
section
ds_UsersUserGroupsQ
QUEUE(ds_UsersUserGroupsQType),pre(UUG) .
MyUser long
code
ds_UsersUserGroups(AppNum,MyUser,'',ds_UsersUserGroupsQ)
!The Queue will contain all UserGroups with the Active Flag set
for the ones that the User belongs to.
ds_UsersUserGroups(AppNum,MyUser,'',ds_UsersUserGroupsQ,1)
!Contains just the UserGroups that the user belongs to |
See
Secwin Data Types for more details on
the Queue structure.
See also
ds_LoginUser,
ds_GetProperty
. This function essentially replaces the obsolete
ds_CurrentUserGroup
function.
To change from using the
ds_CurrentUserGroup
function, you might have had something like:
if ds_CurrentUserGroup (Appnum)= 'MyUserGroup'
!Some functionality in here
end
Now, you need to declare the Queue as shown above (in your local data),
and replace the code with the following:
ds_UsersUserGroups(AppNum,MyUser,'',ds_UsersUserGroupsQ,1)
loop x# = 1 to records(ds_UsersUserGroupsQ)
get(ds_UsersUserGroupsQ,x#)
if UUG:GroupName = 'MyUserGroup'
!Somefunctionality in here
break
end
end
ds_ResetUserPassword
ds_ResetUserPassword(long
pUser,string pUserSite),long
Description
This function resets the user's password (specified by the pUser
parameter) to the default (i.e. their login). This must be used in
conjunction with the use of the
ds_SetEncryptionKey
(see
Using an encryption key for
details)
Parameters
| Parameter |
Type |
Description |
| pUser |
Long |
This is the user's ID number returned by ds_LoginUser.
|
| pUserSite |
string |
This is the user's SiteID field (leave blank if not used). |
Returns
A long indicating pass (0) or failure (non-zero).
Example
| Example |
ReturnValue long
code
ReturnValue = ds_ResetUserPassword(MyUser,'') |
See also
ds_SetEncryptionKey. To get the user
number, use the
ds_GetUserProperty
function.
ds_SetEncryptionKey
ds_SetEncryptionKey(string
pEncryptionKey)
Description
This function sets the encryption key used to encrypt the necessary fields
in the Secwin operators table (see
Using
an encryption key for details). Once this function has been used,
and your application has been run on the Secwin data tables, then only
your application will be able to read the secwin operators table.
Parameters
| Parameter |
Type |
Description |
| pEncryptionKey |
string |
This is the unique encryption key to use for your application to
access the operator's table. |
Returns
Nothing
Example
| Example |
ReturnValue long
code
ds_SetEncryptionKey('MyEncryptionKey') |
See also
ds_ResetUserPassword
Secwin Data Types
The following data types are used by some of the
functions and may be used in your application as well from time to time:
The complete data structures of these types may be found in the
secequ15.clw
file in your
clarionx\accessory\libsrc\win
directory.
| DataType |
Use |
| ds_SecwinXMLString group |
Used for saving licence in XML format to a string (rather than
an actual XML file). |
| LimitsQueueType queue |
A queue to contain the counters/table limits licensed for your
application. This will contain the description of the counter as
well as the value of each counter/limit. |
| ProductDetailsGroupType
group |
This group is used for saving and retrieving the licence details
of the licence for your application. |
| ds_UserDetailsType group |
Used to load and save a users details. |
| ds_UsersUserGroupsQType
Queue |
Used to load and save a user's user groups. |
|
LimitsQueueType |
queue,pre(_dsLQT) |
| Description |
string(252) |
| Limit |
long |
| LimitIsRelative |
long |
| MinLevel |
long |
| MaxLevel |
long |
| ExtraString |
string(252) |
| |
end |
| ProductDetailsGroupType |
group,pre(_dsPDGT) |
| SiteLimiter |
string(4) |
| CompanyName |
string(252) |
| Product |
string(252) |
| Dealer |
string(252) |
| LicenceType |
long |
| Copies |
long |
| Level |
long |
| SerialNumber |
string(252) |
| OptionalModules |
long |
| AdditionalString1 |
string(252) |
| AdditionalString2 |
string(252) |
| AdditionalLong1 |
long |
| AdditionalLong2 |
long |
| AdditionalString3 |
string(252) |
| |
end |
| ds_UserDetailsType |
GROUP |
| Login |
STRING(252) |
| FirstName |
STRING(252) |
| Surname |
STRING(252) |
| Password |
STRING(252) |
| Number |
LONG |
| LastPasswordChangeDate |
LONG |
| Hook1 |
LONG |
| Hook2 |
STRING(252) |
| EmailAddress |
STRING(252) |
| FingerPrint1 |
CSTRING(1024) |
| FingerPrint2 |
CSTRING(1024) |
| Site |
STRING(4) |
| SiteLow |
STRING(4) |
| SiteHi |
STRING(4) |
| ExtraLong |
LONG |
| ExtraString |
STRING(252) |
| Level |
LONG |
| InitialAccess |
LONG |
| CopyUserAccess |
LONG |
| WorkGroup |
LONG |
| UserGroup |
LONG |
| |
END |
| ds_UsersUserGroupsQType |
Queue,pre(_dsUUGQ) |
| GroupName |
string(252) |
| ActiveIcon |
long |
| Active |
long |
| Number |
long |
| Site |
string(4) |
| Login |
string(252) |
| Level |
string(252) |
Installation
Run the Supplied Installation file.
Distribution
You are free to distribute the Secwin DLLs with any of
your Applications without extra charge.
You are free to distribute the CRESEC.EXE or any of the Example programs
should you want to.
The DLLs your program require will depend on your version of Clarion and
the Secwin File Driver you are using. Note that programs compiled in
Local
Mode do not use DLLs and therefore there is nothing extra for you
to distribute.
|
Clarion 6 |
Clarion 5.5 |
Clarion 7 |
Clarion 7.3-8 |
| Topspeed Driver |
S6TPSX.DLL |
S55TPSX.DLL |
S70TPS.DLL |
SLATPS.DLL |
| Btrieve Driver |
S6BTRX.DLL |
S55BTRX.DLL |
S70BTR.DLL |
SLABTR.DLL |
| SQL Anywhere Driver |
S6SQAX.DLL |
S55SQAX.DLL |
S70SQA.DLL |
SLASQA.DLL |
| MsSQL Driver |
S6MSSX.DLL |
S55MSSX.DLL |
S70MSS.DLL |
SLAMSS.DLL |
| ODBC Driver |
S6ODBCX.DLL |
S55ODBCX.DLL |
S70ODB.DLL |
SLAODB.DLL |
| IPDriver |
s6IPDx.DLL |
|
|
|
| Pervasive SQL Driver |
s6SCAx.DLL |
s55SCAx.DLL |
s70SCA.DLL |
sLASCA.DLL |
License & Copyright
All the files distributed as part of the Secwin
package are copyrighted and remain the property of CapeSoft Software.
Secwin is licensed per developer. In other words each developer can use
Secwin on more than one machine (Work, Laptop, Home etc.) - however each
developer requires his own copy of Secwin.
Limitation of Liability
CapeSoft Software Ltd and its employees assume no
liability for the use of this package. Our sole liability rests with
fixing any software errors that may exist in the distributed Secwin files.
In certain cases, due to bugs in software supplied to us, it may be
impossible to correct errors in Secwin. Use of this product implies
acceptance of this limitation.
FAQs
I'm getting
Runtime and/or Compile Errors
NetTalk WebServer Questions
How do I add Secwin user access to my NetTalk
WebServer application?
I want to allow users to self-insert, but need to check
that they're already added to a customers table
After creating my supervisor and a user, none of my set
access windows show the user
I need to create a SetAccess menu item for a "window"
that does not have a security icon
I've followed the steps, but cannot add a user or reset
the password
I don't want to store the email server settings in the
INI file
I'm not able to add users as my Exchange server is not
allowing test emails through.
Where is the data stored (from the IMDD tables I
imported into my dct)?
I want to run some code after a successful login. Where
do I put this?
Combining procedures' security access settings into one
My SetAccess procedure comes up with No Records.
Everything else seems to work
I upgraded to NetTalk 7 and now I can no longer login
to my applications
Licensing Questions
1.1. I want to remove the license for a client on one
machine. How do I do this?
1.2. How I define the activation code's expiry date?
1.3. Can more than one person run my Secwin app with one
demo licence?
1.4. I want to ship a dssw5.tps file (with access
control setup) - but using that file gives me a license error when
installing it at the client side.
1.5. I have issued 5 licences, but more than 5 users can
run the application simultaneously.
1.6. I have issued a new code to my client, but the
features are not activated. They are still able to use the application
though.
1.7. My activation code that I'm generating in the
Register application is failing to activated my program.
1.8. I'm adding additional features and generating an
activation code - but when restarting the program, the features aren't
available.
1.9. I don't want Secwin to display an error message
when the Licence fails.
1.10. I want to encode some of the licence fields.
1.11. I drop my xml file into the register window, but
it always comes up with "Failure..."
1.12. I have issued 5 licences, but only 2 users can
run the application simultaneously.
1.13. I want to allow my users to enter their
registration details manually like in Secwin 3. How do I do this?
1.14. When I upgraded to the latest Secwin, the XML
License files generated now contain %20 for spaces?
1.15. I'm creating an upgrade for my product, so I want
my program to require a new licence, but it must be primed with the old
licence details.
1.16. After licencing a customer with x counter, I want
to issue a new licence and increment the counter. How do I do this?
1.17. I want to use the record counting feature to
limit uses, but I need to write my own code to check the number of
records. How do I do this?
User Security Questions
2.1. When I send the app to my clients the users have to
be re-entered for the security to work.
2.3. Will Secwin allow me to refuse access to a report?
2.4. Not all my Access Points are showing on the Global
Set Access window?
2.5. Is there any way to include an option in Secwin 6
to allow for the user to be forced to change their password at their
initial login?
Access Control Questions
3.1. Can I see who is logged into the program on all the clients? See the
ds_CurrentlyLoggedInEx function
3.2. I don't want to use the Access
Control features of Secwin, only the Licence and Registration.
3.3. I don't want the login screen
appearing in my demo application.
3.4. How do I reset a user's password?
3.5. I need to prevent the last SecWin User from
switching from supervisor to operator. How this can be done?
3.6. How do I force the user to change his password the
first time he logs on?
3.7. How can I set the default access to all access when
adding an operator (in a Multi-DLL/Multi-EXE scenario)?
3.8. How can I override AccessRights for
insert/change/deletion specific functionality?
3.9. How do I filter records in a browse based on the
user logged in?
3.10. I see duplicate entries in the Operator Browse
screen.
3.11. How do I print out a user's AccessRights?
3.12. I need to store extra information in the Secwin
operator table. How do I do this?
3.14. I want to hide and unhide controls based on my
own conditions - but Secwin is overriding my hide commands.
3.15. I only see 31 control groups on the access rights
screen when I press Ctrl-F8.
3.16. On the operator form, the Initial Access of each
operator always shows as 'No Access'.
3.17. Why can't I change the InitialAccess of an
operator?
3.18. Why can't I change a UserGroup's level from
NoAccess to Operator?
3.19. How do a select or de-select a user from all user
groups?
3.20. How do I copy a User's access settings to another
user?
3.21. I just want to use windows authentication, how do
I set this up for a new user?
3.22. What protocol does windows authentication use?
Registration Questions
4.1. My Text for Cut and Paste has an incorrect CRC
check in the Activation code. What must I do?
4.2. When I try to drag and drop a licence file into my
application in Windows 7 it does not do anything.
General Template Questions
5.2. What settings must I do in my various apps in a
Multi-DLL application?
5.3. How do I get my PowerToolbar application to work
with Secwin?
General Questions
6.1. How can I rename the dssw5.tps file?
6.2. My app was running fine in Windows XP - but in
Vista, it does not find the security file?
6.3. I'm using Secwin with MSSQL and I cannot get my
application to create the security tables.
6.4. I would like to make the SQL connection before
Secwin does. Where must I put my connection code?
6.5. I'm changing from TPS to SQL, and would like to
export the user's access control settings to SQL. How do I do this?
6.6. how do I remove Secwin from my application?
6.7. My app takes a long time to load after the login
screen
6.8. What DLLs and file do I need to ship with my
application?
6.9. I get a lot of flickering on my controls that are
Secwin controlled. How do eliminate this?
Upgrading Questions
7.1. Why should I upgrade from Secwin 3/4 to Secwin 6?
7.2. What must I change in my app when I upgrade from
Secwin 3/4 to Secwin 4/6?
7.3. How do I upgrade from Secwin 3/4 to Secwin 6?
7.4. How do I cater for existing clients using the old
application when issuing activation codes?
7.5. Why is CapeSoft charging for an upgrade from Secwin
4 to Secwin 6?
7.6. My saf password does not work on the latest Secwin
install. Where do I get a new password?
7.7. After upgrading from Secwin 3 to Secwin 4/6, none
of my users can log in.
7.8. Can I upgrade from Secwin 3 to Secwin 6?
7.9. What happened to Secwin 5?
0.1. Question: I want to
allow users to self-insert, but need to check that they're already added
to a customers table
Answer: In your SecwinWebLoginForm, use the
following embeds:

In the Secwin_ValidateEmailAddress routine, you can put code to check
after the user has entered their email address and verify the email. Here
is an example:
MAI:MailBoxAddress = loc:email <-----
the email address field in your customers table
if access:MailBoxes.fetch(MAI:EmailAddressKey) <----- fetch
from the customers table
loc:invalid = 'email2'
loc:alert = 'There is no email address in the database that matches.
Try again.'
p_web.ssv('Loc:ValidEmailAddress',Loc:ValidEmailAddress)
p_web.ssv('SecwinSetEmailEntryCount',p_web.gsv('SecwinSetEmailEntryCount')
+ 1)
exit
end
0.2. Question: After
creating my supervisor and a user, none of my set access windows show the
user.
Answer: By default, a new self-created user gets assigned to
usergroup 2. If you have not created the user group yet, then the created
user will be associated with a non-existant user group. You must first add
the user group (delete created users except the supervisor) and add the
user group. To do this, login as the supervisor, and via the web menu user
groups browse add the default user group.
If you want to programmatically add this usergroup, then you need to do
this in the WebServer procedure (where you added the User Login Here
extension template). After the ds_ChangeUserPassword function call, add
the following code (see the example for more detail):
if ds_InsertUserEx(AppNum,'Basic User Group','Basic User Group','Basic
User Group',ds_NoAccess,0,ds_Operator,-1)
!Now we create the user group for the users to belong to.
end
0.3. Question: I need to
create a SetAccess menu item for a "window" that does not have a security
icon
Answer: Go to the Procedure that contains the menu. This is
usually PageHeaderTag. Go to the Web Menu Extension. Select the 'Security'
Menu item and click Properties.
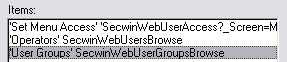
NOTE: The SetMenuAccess item has a Procedure name set to
'SecwinWebUserAccess' and the parameters '_Screen_=MainMenu' where
MainMenu is the name of the screen (or Secwin friendly screen name if
overridden).
For Menus on a NetWebSource page, you need to setup the access controls
and groups on the Web Menu Extension, and then the Security tab on the
procedure properties of the NetWebSource procedure:
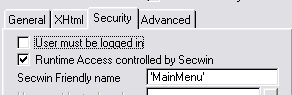
NOTE: For Frame web apps, you must add the target frame for the Secwin
procedures too (normally this would be 'right_fram').
0.4. Question: I've
followed the steps, but cannot add a user or reset the password
Answer: Make sure that you've entered all the necessary Email
info into your settings file. The GetSettings procedure is used to extract
the following settings:
[ApplicationSettings]
EmailServer=192.168.xx.xx
EmailPort=25
FromAddress=test@capesoft.com
HostAddress=
http://127.0.0.1:88
!This is the address the user would type in the browser to get to your
site.
EmailAuthUser=
EmailAuthPassword=
If you're using authenticated email, then you'll need a user and password
for that account.
If you're using Exchange server as your email server, you may have some
rules set about internal email addresses. Some users have struggled in
testing because of Exchange server blocking some emails addressed to test
users.
If you imported the SecwinWeb procedures prior to 6.06, then the user's
login must match the email address. If you want to support other login
names, then you need to re-import the secwin web procedures (or more
specifically the SecwinWebCreateUser procedure).
0.5. Question: I don't want to store the email server settings in
the INI file
Answer: This is recommended that you change the GetSetting
procedure to store the settings in a more suitable place. One of the
procedures imported into your application is the GetSetting procedure, and
coded as follows:
ReturnValue =
getini('web31Settings',Setting,'@@@NovalueYet@@@','.\Settings.ini')
if ReturnValue = '@@@NovalueYet@@@'
putini('web31Settings',Setting,pDefaultValue,'.\Settings.ini')
ReturnValue = pDefaultValue
end
return ReturnValue
Simply change the getini and putini with a file fetch and update
(or getreg and putreg) to change the storage method.
0.6. Question: I'm not able to add users as my Exchange server is
not allowing test emails through.
Answer: If you do not have access to a different Email Server that you can
control, you should setup a test domain with someone like gmail (where you
can setup email domains for free). This will enable you to setup mail
boxes without the rules of Email Server and your NTWS application does not
have to send mails via your exchange server. See
http://paulstamatiou.com/how-to-setup-gmail-for-hosted-domains for
details.
0.7. Question: Where is the data stored (from the IMDD tables I
imported into my dct)?
Answer: These are just temporary tables reflecting what’s in the
secwin files. The secwin files (for tps that would be the dssw5.tps file)
would be ultimately stored in the backend that you stipulate in the Secwin
global extension (files tab). The IMDD tables are merely there because
NetTalk webserver cannot support queues, otherwise we’d use queues like in
the desktop application (for browsing users, access settings, etc.). The
tables (whether tps or IMDD) that you imported into your dct are merely
temporary tables, and are discarded between sessions as they only reflect
the data in the actual secwin files.
0.8. Question: I want to run some code after a successful login.
Where do I put this?
Answer: In your SecwinWebLoginForm, you'll find a validateUpdate
routine. In that routine, there is an embed point:
! Secwin - After LoginUser Success
Place your code in there to run upon a successful login.
0.9. Question: Combining
procedures' security access settings into one procedure
Answer: Many times you may have a browse on a form (for example
if you have a number of buttons or filter options relating to the browse).
In this case, the browse would be the child procedure, and you'd probably
want only one place to set the security access settings for each user,
rather than having 2 places where the supervisor needs to set the same
access settings - both in the browse and in the form - for "one screen".
In this case, you need to set both the
Secwin Friendly
Name fields the same in both procedures:

and in the browse (which would normally be the child procedure), check the
Secwin Access Groups are not created here
checkbox on the Browse procedure:

You must then add each of the browse's access groups used to the Secwin
Access Groups list in the form procedure:
It's a good idea to add the groups first to the form procedure, so you can
get the Access Control group Number to use in the browse's controls you
want to protect. So in the above instance, we set the Insert control on
the browse to use Access Control Group 1, and Change control would use
Access Control Group 2:
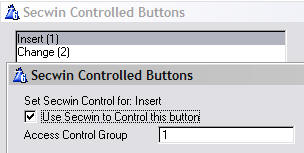
0.10. Question: My SetAccess procedure comes up with No Records.
Everything else seems to work.
Answer: In NetTalk 6.38, the sessionID changed from a long to a
string. This means that you need to change your sessionID (where used) in
your dictionary to a string(255) as well. For your Secwin table, this must
be changed as follows:
NOTE: If you are using a real disk file (as apposed to a memory file) for
the temporary secwin tables, then you'll need to either delete the table
or at least convert it (using FM3) in order to avoid errorcode 47.
Next thing you need to do, is open your NTWS application in the IDE, and
add quotes to the filter as follows:
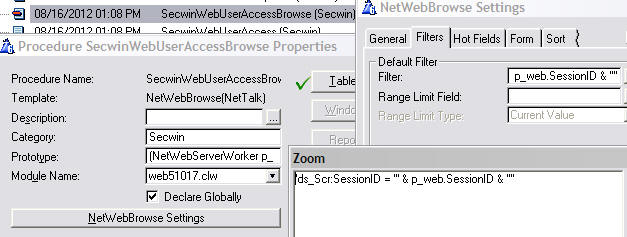
0.11 Question: I upgraded to NetTalk 7 and
now I can no longer login to my applications
Answer: In your WebServer procedure, go to the
Security tab on the Settings tab of the NetTalk or NetSimple
Object local extension template's prompts, and uncheck the "Delete Session
on Logout".
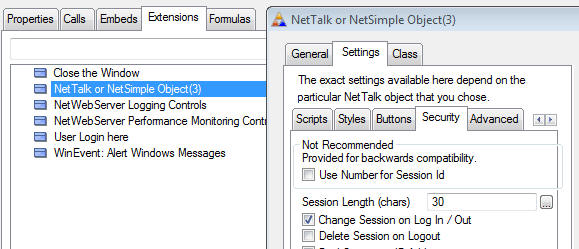
1.1. Question: I
want to remove the license for a client on one machine. How do I do this?
Answer: Call ds_RegisterProductEx with an already expired date.
1.2. Question: How
I define the activation code's expiry date?
Answer: In Secwin 4 - this expiry date goes in the activation
code itself. You can set the expiry date of the activation code when you
generate it.
1.3. Question:
Can more than one person run my Secwin app with one demo licence?
Answer: By default the demo licence will be a 30day, demo, 1 user
licence (if you've enabled that in the Secwin Templates). This means that
you can make any number of shortcuts to the application, but one person at
a time will be able to access the application. However you can send them a
(demo) code which allows multiple users at the same time. This code can be
entered on any workstation.
1.4. Question:
I want to ship a dssw5.tps file (with access control setup) - but
using that file gives me a license error when installing it at the client
side.
Answer: Basically what you're wanting to do is create a dssw5.tps
file without licensing included in the file. Normally you'd want to do
this to create a SuperUser and ship the SuperUser in the dssw5.tps file.
This is a bit tricky - but here's basically how you do it:
a) Go to your app and turn OFF licensing. You can do this on the Secwin
Global Extension Template.
b) Compile (don't run yet.)
c) Delete the dssw5.tps that your program will use. (so that a new one
will be created.)
d) Now run the program.
e) Doing as little in the program as possible, go to the Browse users
screen, and add the Super User. (if the system forces you to do this
before the Login, then add the user but DON'T login - just cancel when you
get there.)
f) Now save the dssw5 file in a safe place, so you have a copy for the
future. This "virgin" dssw5 file is the one you ship.
g) Back to the app, turn licensing back on. Compile. Ship (make sure you
include the dssw5.tps file that you created earlier in your install). In
your install, make sure that you don't overwrite the dssw5.tps file that
may already existing at the client site as they will lose their security
settings.
1.5. Question:
I have issued 5 licences, but more than 5 users can run the application
simultaneously.
Answer: Your application is not setup to use the same licence
file location. For more details, peruse
The
mechanics
of the Licencing section of this document.
1.6. Question: I
have issued a new code to my client, but the features are not activated.
They are still able to use the application though.
Answer: You're assigning a permanent licence to a client that
already has a temporary licence, that has not yet expired. For more
details on Licence Types check the
Using
Different Licence Types section of the docs.
1.7. Question:
My activation code that I'm generating in the Register
application is failing to activated my program.
Answer:
- Make sure that your seedcode and product is entered correctly in the
Register application (in
the product details) - exactly as it matches in the Secwin Global
Extension Licence settings of your application. you can check the
'Warn for wrong product (for testing only)' on the Register Product
Controls template - which will give you a warning if the product does
not match. You should not release your product with this checkbox
checked, as this weakens the security of your product's licence.
- Ensure that your are using the latest register application to
generate activation codes. If you are forcing the dealer string to be
(either included or excluded) in the activation code - then make sure
that you do this in both the register application and the template
setting in your application (see Creating
your own Product Registration window for more details). The best
is to leave the template setting to 'Detect in XML' - which means you
only need to set this once in the registration server (rather than
having to match the child to the server).
- If you have hidden fields (or deleted fields) - those fields may
contain different values to the ones used by the program generating
the registration codes. Unhide those fields (or re-import the
SecwinRegisterProduct window) and verify those fields are correct. You
can prime them with the default values that are used in the
registration program as well. Note: If you are allowing your users to
manually enter their details in the RegisterProduct window, then you
must make sure they enter all the fields that are used in the Register
application to generate the activation code. If you don't want them to
see some of the options, then you can hide these (for example the
Site, Copies or LicenceType fields), but you must equate them in the
PrimeFields embed routine.
SecLoc:SiteLimiter = '$$$$'
SecLoc:LicenceType = 1
SecLoc:Copies = 1
- If you are using a new version of the register application, with an
old version of your application, then check out: FAQ
1.14
1.8. Question: I'm adding additional features and
generating an activation code - but when restarting the program, the
features aren't available.
Answer: Almost certainly you have an unexpired temporary code
that is being used instead of the permanent code. Read up on
Using
Different Licence Types for more details.
1.9.Question: I don't want Secwin to display an error message
when the Licence fails.
Answer: You need to set the action when the licence fails to
"Return to caller without showing warning". This is set in the UserScreen
Security extension template on that particular window. Then you can handle
the return using the values returned by the
ds_LicenceOK
function.
1.10. Question: I want
to encode some of the licence fields stored in the Security tables.
Answer: The key is to get both the Registration application
encoding the fields before the XML generation.
A couple of changes you need to make to the registrabc.app:
1. Use a different field for the SerialNumber and AdditionalString1 (maybe
a local variable). Just before the generate activation code routine,
encode them to the variables that are currently used (when generating an
activation code).
2. You'll need to decode it on the way in to the form, so that the
original value is displayed in your custom fields.
What you need to do in your application:
1. When reading the licence details, you need to call your decode routine.
www.capesoft.com/docs/secwin/secwin.htm#ds_CurrentLicenceDetails is
the function to use for obtaining the licence details.
1.11. Question: I drop my
xml file into the register window, but it always comes up with
"Failure..."
Answer: This is normally one of the following:
- Your Licence Name (set in the Secwin global extension template must
match the name used in the Registerabc application exactly) doesn't
matche the one used in the register app. Case sensitive inclusive.
- Your License Seed Code does not match (between the registerabc
application and your own application).
- Your Dealer is not being set (in the register application) - and
your application is set to force the Dealer code to be set. (See
Dealer field in the licence template prompt on your
Control_RegisterProduct template on the Secwin Register Product
window).
- You have completed all the steps of the JumpStart,
particularly adding the User Login Here to the frame (or the main
window of your application).
1.12. Question: I have issued 5 licences, but only 2 users can
run the application simultaneously.
Answer: A couple of things to check:
- That the licence that they're using allows 5 concurrent users.
- It could be that your application is still running in memory
somewhere - so the .lic files are still opened by those instances. A
good way of testing
for this is to kick everyone out and then delete all the .lic files in
the directory where they're set to be (probably with the dssw5.tps
file). If some of the instances of the .lic file cannot be deleted
(because of in-use) then you've got an app open somewhere using those
files. You'll need to use a network tool to determine which PCs have
those
1.13. Question: I want to
allow my users to enter their registration details manually like in Secwin
3. How do I do this?
Answer: You can enable the sheet control on the
SecwinRegisterProduct window.
1.14. Question: When I
upgraded to the latest Secwin, the XML License files generated now contain
%20 for spaces?
Answer: in order to support HTML packets (for web activation
codes) - the XML packet generated needed to be HTML compliant.
Unfortunately this may mean that some of your old applications my be
expecting the old format of XML file. You can force a non-HTML compliant
XML registration packet, by using the following code in your registration
code application (see the registerabc.app that ships with Secwin):
if UseOldXMLEncodingType = 1 !You'll need to add a switch on
your screen to turn this on/off
SaveLicenceToXMLOptions.EncodingType = 'ISO-8859-1'
else
SaveLicenceToXMLOptions.EncodingType = ''
end
if
ds_SaveLicenceToXMLEx(REG:CodeGroup,Queue:Browse,ds_MakeValidFileName(clip(REG:CompanyName)
&
'_' & clip(REG:Product) &'.xml'),,SaveLicenceToXMLOptions)
<> 0
You'll need to create the options groups as well (in your procedure
data):
SaveLicenceToXMLOptions group(SaveLicenceToXMLOptionsGroupType) .
1.15. Question: I'm creating an upgrade for my product, so I want
my program to require a new licence, but it must be primed with the old
licence details.
Answer: In your SecwinRegisterProduct window, go to the Secwin's
Register Product Controls template prompts. On the Old Licences tab you
can enter the names of the previous product names to search for in the
licence file:

If you have upgraded from Secwin 3 on one of these releases, then you will
need to convert your counter to the new label. To do this, open your
SecwinRegisterProduct source in the embeditor, and find the
CopyOldCountersToNew routine, you need to move the old counter as follows:
case SecLocTemp:OldLicence
of 'TNA2000'
orof 'TNA4'
orof 'TNA5'
!This is just in here for old versions of TNA (prior to Secwin 5
implementation)
if records(LimitsQTemp)
get(LimitsQTemp,1)
if upper(LimitsQTemp.Description) = 'DEFAULT COUNTER'
LimitsQTemp.Description = 'Employees'
!NOTE: this is the name of the
counter you are changing to.
put(LimitsQTemp)
debugview('Changed limit to: ' & LimitsQTemp.Description)
end
end
SecLoc:AdditionalString1 = ''
end
1.16. Question: After
licencing a customer with x counter, I want to issue a new licence and
increment the counter. How do I do this?
Answer: When you create the product in the secwin register
program, you need to enter the counter name and the default counter limit
(which is auto-set when a new licence is created in the secwin register
program). This counter name must match the table name for the limit in
your application. In this case, don’t make the counter relative.
When you create the licence in the secwin register program for that
customer, it will default to the default counter limit (as above). You can
ship that licence to the client (using the XML file). When they want to up
the employee limit, then edit their licence in the register program, and
up the counter limit to the next limit. Then ship the licence (xml file)
with the updated details to the client for them to use re-register the
product.
1.17. Question: I want to use the record
counting feature to limit uses, but I need to write my own code to check
the number of records. How do I do this?
Answer: You can use the embed point Global Objects | CapeSoft
Objects | ThisSecwinThreadedClass | CheckRecords | CODE | Check Max
Records (database driver). Your code would typically look like this:
if CheckRecords(pFile) => ds_TableMaxRecords(TableName) !CheckRecords
would be your function that takes a file handle.
ReturnValue = 0
end
2.1. Question: When I send
the app to my clients the users have to be re-entered for the security to
work.
Answer: Maybe you're _shipping_ the dssw5 file. And the "install"
of the update is overwriting the existing dssw5 file?
If this is the case then set the file in the installer to be "preserve
existing".
Alternatively, you've changed the setting for where the dssw5.tps file is
stored? This is a setting on the
Activate
Security Global extension template.
2.3. Question:
Will Secwin allow me to refuse access to a report?
Answer: Typically you would restrict the control that is
actually calling the Report (like if it was on the frame, then you would
disable this report from there). Otherwise (if your report is being called
from a bunch of places and you want to cover your bases) look at the
examples\secwin\abc.app you will see a similar type of example (for
restricting a report). In your case, what you could do is disable the
Start/Pause button so the illegal entrant can only press the cancel
button.
2.4. Question: Not all my Access Points are showing on the Global
Set Access window?
Answer: If this is a multi-dll application, then you need to
compile your dll with the Secwin windows (normally the data dll) after
adding an access point to your procedures. You also need to ensure that
your .sac file is being re-generated after the compile of the dll with the
updated security settings (access points or a new User Screen Security
template addition).
2.5. Question: Is there any way to include an option in Secwin 6
to allow for the user to be forced to change their password at their
initial login?
Answer: There are 2 ways of doing it. You can either, immediately
after successful login, test if the login and password are the same (using
the variables in the login window), and then force a change password. Or
you can test the LastPasswordChangeDate (see
ds_GetProperty) after successful login. It will be set to 0 when the
user is created.
Answer: You can use the
ds_CurrentlyLoggedInEx()
function to return a queue of the users currently logged in.
3.4. Question: How
do I reset a user's password?
Answer: You will need to use your own encryption key - in order
to make the Secwin operator's table unique to your application. See
Using
an encryption key for details.
3.5. Question: I
need to prevent the last SecWin User from switching from supervisor to
operator. How this can be done?
Answer: You can use ds_UserEx to return the number of users
existing. You can use ds_CurrentLevel and then disable the Operator radio
button/level.
ds_UsersEx (Appnum,ds_UserQueueEx)
if records(ds_UserQueueEx) < 2
disable(?UserLevelGroup)
end
3.6. Question:
How do I force the user to change his password the first time he logs on?
Answer: You can do this by creating your own login window (check
out the
MakingYourOwnSecwinWindows
section of the docs) And then handcoding in the OK button's accept:
if
ds_LoginUser(Parameters required )
if GLO:Password = GLO:Login
ChangePasswordRtn() <---- your procedure to
change the password.
end
else
!Login failed
return
end
Check out the
ds_ChangePasswordExsection
of the docs for more details.
3.7.Question: How can I set
the default access to all access when adding an operator in a Multi-EXE
scenario?
Answer: The only way to do this is to make sure
that the Unique Application Name (in the Secwin Global Extension template)
and the Unique Area Name (in the Secwin User_Login_Here template) matches
in all the applications. It would constitute a major security breach to
assign a user access to all applications using the current Security Tables
(for applications that have a different Unique Application Name and/or
Unique Area Name).
3.8. Question: How can I
override AccessRights for insert/change/deletion specific functionality?
Answer: There are probably 3 categories of users: 1 - those who
have complete rights (i.e. able to change and insert), 2. those who have
insert rights (not able to change), 3. those that are not able to insert
or change.
Category 3: Place the restriction on the calling window (IOW they will not
be able to access the form to insert/change).
Category 2: Place the restriction on the form (either make all controls
readonly, or disable the OK button). These users that you are wanting to
restrict - the restriction will be overridden when inserting to allow
insertion.
Category 1: Remove all restrictions for these users.
Probably the best way to do this, is the following mod in the 'After Get
Allowed' embed point:
If self.Request = InsertRecord
ThisAllowed = DS_ACCESSALL
end
This will override the restriction for category 2 users to allow
them to insert the record.
3.9. Question: How do I filter records in a browse based on the
user logged in?
Answer: There's a couple of things you need to do:
- Decide how you will limit the records that the user sees (for
example: will he only see the records that he has created - will
supervisors see everything? etc)
- Create a variable to store the current user in and set the user in
the ThisWindow.init method:
Loc:UserNumber = ds_GetProperty(AppNum,,,'Number')
Loc:UserLevel = ds_GetProperty(AppNum,,,'Level')
- Use this in your filter to filter the records shown. Example:
PRE:UserNumber = Loc:UserNumber or Loc:UserLevel = ds_Supervisor
3.10. Question: I see
duplicate entries in the Operator Browse screen.
Answer: You need to
create
the AccessControl windows using the template utility provided,
rather than use the old Secwin 3 internal DLL windows. These are not
optimized for SQL - but are merely there for backward compatibility.
3.11. Question: How do I
print out a user's AccessRights?
Answer: The easiest way is to add a SendTo button (
www.capesoft.com\accessories\SendTosp.htm)
to the SecwinSetAllAccess window. Use the following setup:
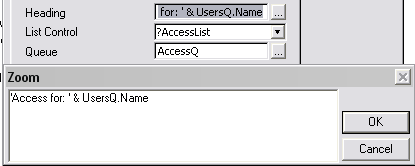
You will then be able to go to the Set All Access window in your
application, select the user and send the access to the output of your
choice.
3.12. Question: I need to store extra information in the Secwin
operator table. How do I do this?
Answer: There are additional fields available in the user table:
FingerPrint1 CSTRING(1025)
FingerPrint2 CSTRING(1025)
ExtraLong LONG
ExtraString STRING(252)
You can edit these properties using the
ds_UpdateUser
procedure, and retrieve these properties using the
ds_GetProperty
method.
3.14. Question: I want to
hide and unhide controls based on my own conditions - but Secwin is
overriding my hide commands.
Answer: You can override the Secwin control of a specific screen
control, in the RestrictAccess and GrantAccess routines generated by the
Secwin UserScreenSecurity template. You must place your code after the
Secwin generated code in order to have the desired effect.
3.15. Question: I only see 31 control groups on the access
rights screen when I press Ctrl-F8.
Answer: You must follow all the steps for
upgrading
to Secwin 4 (including
importing
the security windows into your application and setting these
procedures in the
Global Extension
template).
3.16 Question:
On the operator form, the Initial Access of each operator always shows as
'No Access'.
Answer: In your SecwinOperatorForm procedure, add the following
line of code at the end of the LoadRecord Routine (or re-import the Secwin
windows using the template utility):
SecLocLDG:InitialAccess =
ds_GetProperty(App,SecLocLDG:Number,,'DEFAULTACCESS')
3.17 Question: Why can't I
change the InitialAccess of an operator?
Answer: The initial access (or default access) only pertains to
screens not visited/accessed. Once an operator visits a screen for the
first time, their access to that screen is solidified. If the
InitialAccess for an operator is not correct (IOW it was not initially set
correctly) - then it's pointless changing the access after that particular
user has visited a number of screens (or the supervisor has set access for
those screens while that user has been present on the system) - as their
access would have been solidified for only those screens. The operator
must rather be deleted and re-added with the correct InitialAccess to
ensure that this is set correctly.
3.18. Question: Why can't I change a UserGroup's level from
NoAccess to Operator?
Answer: This would be an access security hole. If you have a user
group for the accounts dept - and you have a user group for the stock
control dept. Obviously both areas will have different supervisors. Indeed
the one supervisor may not have access to the other area. If the stock
control dept supervisor can turn the accounts dept user group to an
operator (in his area) - he can then assign people to that user group,
hence giving him control over the accounts dept. User groups can only be
operators to one security area - and the rest of the areas must be
NoAccess.
3.19. Question: How do a select or de-select a user from all user
groups?
Answer: In your SecwinOperatorForm (where you
update the user) - you can add a select and/or de-select button with the
following code:
!Select All
loop x = 1 to records(UsersUserGroups)
get(UsersUserGroups,x)
UsersUserGroups.ActiveIcon = 2
put(UsersUserGroups)
end
Like wise for de-select all:
!De-Select All
loop x = 1 to records(UsersUserGroups)
get(UsersUserGroups,x)
UsersUserGroups.ActiveIcon = 1
put(UsersUserGroups)
end
3.20. Question: How do I copy a User's access settings to another
user?
Answer: This option is only available when you insert a new user.
Besides the normal values that should be set in the
ds_UpdateUser
method call, you need to set the following:
SecLocLDG:InitialAccess = ds_CopyAccess
SecLocLDG:CopyUserAccess = LOC:UserNumberFrom
ds_updateuser(appnum,userdetailsgroup,InsertRecord)
Note: you must specify a valid secwin user id to copy from.
3.21. Question: I just want to use
windows authentication, how do I set this up for a new user and what
happens if the user does not have a password?
Answer: Each
Secwin user, including the first user to login, must be added to the
Secwin users in the normal way (by the first user creating himself, and
subsequently the first user, i.e. the supervisor, creating additional
users from the browse operators window). The first user would be your
supervisor (as per normal), and can be a windows account login. When
adding additional Secwin users that are windows authenticated, the login
must match the windows account name.
Secwin is relying on Windows Authentication to do the login
validation, so the login validation (strength of password, if there is
one) is completely in the Windows account setup. If your client wants
Windows Authenticated login, then it is up to them to ensure that
their users have strong passwords for their windows login (and to have
passwords at all).
3.22. Question: What
protocol does windows authentication use?
Answer: It basically uses the windows GetUserNameEx
name to fetch the currently logged in user, and then allows the user
in based on a successful windows login (and whether that user has been
added to secwin or not). This is not LDAP (i.e. controlled from a
central server - which will use PAP or CHAP1/2 to interact with the
LDAP server), but windows "user authentication" - IOW using a
pre-authenticated user account to login to the application (no server
interaction).
This security is very weak if users can create their own user accounts
on their PCs - since it means that they can create a user account of
the same name to someone who has a login to the program (Secwin), they
can essentially hijack the valid user's login.
4.1.
Question: My Text for
Cut and Paste has an incorrect CRC check in the Activation code. What must
I do?
Answer: There's a small change you need to make to your
Registration App:
Open the UpdateRegistrations window in the source editor and paste the
following line of code in the CopyIn routine:
do calccrc
immediately before the following code line:
TextField = 'Company : ' & clip(REG:Company) & ' (' & crc1
& ')<13,10>' & |
4.2.
Question: When I try to drag and drop a licence file into my
application in Windows 7 it does not do anything.
Answer: This is a manifest issue. Your application is running
without the correct manifest settings, and so it is required to run
elevated. Windows 7 seems to not allow dragging from a non-elevated
application (like Explorer) to an elevated application. This can be
temporarily repaired by unchecking the "include Default XP Manifest"
option on the App Settings of the Global Properties of your application.
5.2. Question: What
settings must I do in my various apps in a Multi-DLL application?
Answer: Check out the
Using Secwin in MultiDLL applications section of this document.
5.3. Question: How do I get my PowerToolbar application to work
with Secwin?
Answer: You to associate a normal clarion control with each
powertoolbar. You can then use the template to setup the access groups.
You'll need to mimic the hide/disable controls for the powertoolbar ones
in handcode in the RestrictAccess routine. There's a button on the User
Security Template that will get you straight there for each control. For
example:
RestrictAccess Routine
If ThisAllowedString[2] <> '1'
if ?Insert:2{prop:Disable} = 0 then
?Insert:2{prop:Disable} = 1
end
End
6.1. Question: How can I rename the dssw5.tps file?
Answer: We have not made this programmer/user configurable and do
not plan to do so in the future.
6.2. Question: My app was running fine in Windows XP - but in
Vista, it does not find the security file?
Answer: It's almost certainly got to do with the location of your
dssw5 file. See the Secwin Global Extension, Files tab.
Under XP it's ok to place the dssw5 file in the windows directory. In
Vista this isn't going to work. Recommended practice is setting the dssw5
file to be the same location as the rest of the data.
6.3. Question: I'm using Secwin with MSSQL and I cannot get my
application to create the security tables.
Answer: Are you using a trusted connection? Don't supply a user
name and password in the connect string.
6.4. Question: I would like to make the SQL connection before
Secwin does. Where must I put my connection code?
Answer: You need to make the connection in the MainEXE (If this
is a Multi-DLL application or a single-EXE application) in the Program
Setup embeds before the Secwin - Initialize template generated code. This
will be done by FM3 for you in the correct place, but if you are not using
FM3, then this is where you need to connect to the database.

6.5. Question: I'm changing from TPS to SQL, and would like to export
the user's access control settings to SQL. How do I do this?
Answer: There are 2 functions included in the Secwin libraries:
ds_ExportTables, and
ds_ImportTables.
You can call these in the respective applications (the export function to
export, and the import function to perform the import). The
ds_ImportTables
function must be called before the call for the user to login (i.e. the
ds_LoginUser or ds_LoginText function calls) if an import is required.
The best is to perform the import in the Program Setup – “Secwin – After
SetOwner and SetPath” in your data dll (ABC multi-dll apps) or EXE (single
exe or legacy apps). Create a test to see whether the import has occurred
or not.
Typically you'd call this in your callback function (when the Secwin
tables don't exist). The export file name is typically
SecwinSecurityFile.bin It gets created in your working directory. You have
the option to change the path. When testing, be sure to delete this file
before exporting a second time.
6.6. Question: How do I remove Secwin from my application?
Answer:
Note: Multi-DLL users must do this from the exe downwards -
finishing at the data dll.
- Remove the Create Secwin Menu template from your frame procedure (if
you added it).
- Remove the User Login Here (from the frame)
- Remove the User Screen Security templates from each of the
procedures where they've been added - or the Auto-populate UserScreen
Security global extension template.
- in the global extension template, on the Options tab, delete all the
procedure references in the Function Overrides group. Note: For
Mutli-DLL applications, after doing this, uncheck the Functions are in
another application and make sure the droplists are cleared as well).
- Remove the Secwin procedures from the application (that were added
when you ran the Secwin template utility). If you now end up with a
ToDo procedure, you'll need to export to TXA, delete the procedure and
re-import.
- Remove any other Secwin templates you may have in your application.
- Remove the Secwin global extension template.
6.7. Question: My app
takes a long time to load after the login screen
Suggestions:
- Make sure on the Global Properties, File control tab, 'DEFER OPENING
FILES UNTIL ACCESSED' is checked
6.9. Question: I get a lot
of flickering on my controls that are Secwin controlled. How do eliminate
this?
Answer: Go to the User Screen Security template on that window,
and check the
Don't refresh access settings on GainFocus
checkbox on that template prompt. You have something posting a refresh
event to the window (possibly IMM checked) which is causing a GainFocus
event. You must be aware that if this is a browse and you have record
based access control, and another station changes the state (which would
cause a user not to have access to specific features based on the record)
- that this will not be refreshed.
7.1. Question: Why should I upgrade from Secwin 3/4 to Secwin 6?
Answer: Besides Secwin 3/4 being "sooo last century" you'll miss
out on all the incredibly cool new features:
What's
new in Secwin 6? . We will continue building Secwin 4 for later new
releases of Clarion, but the door is officially closed on
fixes/tweaks/changes to older versions of Secwin. We have discontinued
Secwin 3. (Old Secwin 3 builds are available from our archive
https://www.capesoft.com/accessories/DownloadPatchesArchive.htm
)
7.2. Question: What must I
change in my app when I upgrade from Secwin 3/4 to Secwin 4/6?
Answer:
- Secwin 6 uses different table structures to previous versions of
Secwin. When your program upgrades, the secwin data tables will be
automatically upgraded to the Secwin 6 format, and the data file will
be called dssw5.tps (not dssw2.tps or dssw4.tps). You can then use
both Secwin3 and Secwin4 and Secwin 6 applications with the new data
structure. This will occur seamlessly and without any action from your
part. You need to be aware that any backup routines should now include
the dssw5.tps file and not the dssw2/4.tps file.
- If you want to add Secwin Access Control support for your NetTalk
Webserver application, take a look at the
JumpStart
- For Secwin3 users: If you are using the
Access Control side of Secwin, then you need to import the necessary
access control windows into your application. Run the Create
AccessControl windows template utility from the Application |
Template Utility menu item in the Clarion IDE. You must also set the
procedure names in the Secwin Global Extension template correctly.
- For Secwin3 users: You need to create a
new register application to manage your registrations. Your previous
application will not provide correct activation codes for your
applications.
- For Secwin3 users: You must create a new
SecwinRegisterProduct screen within your application - even if you
have already created a MyRegisterProduct window in Secwin 3. Checkout
the Creating a Register Product
window section of the docs for more details.
- For Secwin3 users: If you are
decrementing a counter, then you need to label
your counter (which by default will be labeled 'Default
Counter'). If you're doing table limits for your counter, then you'll
want to change the limit to using the new table
restrictions functionality.
- For Secwin3 users: Where you have used
the ds_CurrentUserGroup function - you will need to recode this to
using the replacement function: ds_UsersUserGroups.
Because a user can now belong to multiple UserGroups, the old function
cannot be made backward compatible to return a single UserGroup for a
user.
- For IPD Driver users: you need to register
the SLAIPD6S.DLL in your IP Server. If you are not using Secwin 4
applications in your Clarion DataServer, then you can de-register your
SLAIPDS.DLL (the Secwin 4 DLL). You will also need to run a Secwin
enabled TPS application on the TPS data at your IPServer in order to
convert existing Secwin 3/4 data to the new dssw5.tps file. Note: If
you run your Secwin 6 IPD server application and there are no users,
it almost certainly means that you failed to complete this step before
upgrading. In this case, delete your dssw5 file, and re-run the Secwin
tps application to convert the dssw4 file. Make sure that your
dssw5.tps file is created in the clariondataserver directory and that
the size of the file is in proportion to the previous dssw4 file.
- Make the most of the additional function found in Secwin 6: What's
new in Secwin 6?
- You will need to make some changes to your Register application if
you are not using the register application that ships with Secwin or
Secwin Online Server to issue activation codes (take note of the
registerABC application in the Secwin examples):
- Cater for Counter/Limit Queue functionality (CreateLimitsQueue)
- Cater for Secwin 3 codes and Secwin 4 codes
See also:
How do I cater for existing clients using the
old application when issuing activation codes?
7.3. Question: How do I upgrade from Secwin 3/4 to Secwin 6?
Answer:
- Purchase an upgrade to Secwin 6 from www.clarionshop.com.
FAQ 7.5: Why is CapeSoft charging for an upgrade?
- You will then receive the new unlock saf code for the Secwin 6
downloads.
- Download the full install for Secwin 6 (from
https://www.capesoft.com/accessories/downloads.htm)
- If you are not using the latest Clarion6 install, you need to
download the patch for the version you are using (as well as the main
install) from: www.capesoft.com\accessories\downloadpatches.htm
- Implment some of the features of Secwin 6 (see What's
new in Secwin 6?)
7.4. Question: How do I
cater for existing clients using the old application when issuing
activation codes?
Answer: You can still issue old Secwin 3 activation codes with
the new registration application. This means that you are not forced to
upgrade everyone to the new Secwin 4 or 6 activation code system. They can
each move over to the new application gradually if that is the method you
prefer. Secwin 6 uses the same licence activation code format as in Secwin
4.
For Secwin3 users: The new register.dct has been formulated in
such a way that if you were using the old register application exactly out
the box, then a simple matter of running the conversion application will
move the data from the old format to the new one. Your products (moved
over from the old database) will be considered Secwin3 applications - so
you can either create a new application (which will use the Secwin4
activation code system) and then move over clients as they upgrade to the
new system, or you can move the entire product over to use Secwin4 and
force an upgrade when the users next require an activation code.
7.5. Question: Why is CapeSoft charging for an upgrade from
Secwin 3/4 to Secwin 6?
Answer:
As much as we can we try to keep upgrades free. Charging an upgrade
gives us the resources to pack in a whole lot of extra functionality into
a product, that we would otherwise not be able to do. We are not forcing
you to upgrade - and we will continue supporting and building Secwin 4 in
future versions of Clarion. If you would rather not pay for the additional
functionality offered in Secwin 6, you're welcome to continue using Secwin
4.
7.6. Question: My SAF
password does not work on the latest Secwin install. Where do I get a new
password?
Answer: In Secwin version 6.00 CapeSoft introduced a paid-for
upgrade, which means that the unlock code changed. You can continue using
Secwin 4 and downloading the necessary install files with your existing
Secwin 4 saf code, or you can upgrade to Secwin 6 (and make the most of
all the functionality offered in the Secwin 6 package). To find out more
about:
7.7.Question: After
upgrading from Secwin 3 to Secwin 4 (or 6), none of my users can log in.
Answer: A Couple of things to try:
- You need to upgrade to the latest version of Secwin 6, delete the
converted dssw5.tps file (make sure that you've still got your old
dssw2/4.tps file hanging around) - and rerun your application. The new
dssw5.tps file will be recreated correctly, and your users will be
able to logon, etc.
- If you were using a Secwin 3 created window (i.e. not the DLL
windows) - then you need to re-create the SecwinLoginWindow, using the
template utility: Run the Create AccessControl windows
template utility from the Application | Template Utility menu item in
the Clarion IDE. You must also set the procedure names in the Secwin
Global Extension template correctly. You should complete all the steps
in FAQ 7.3 for a successful upgrade to Secwin
6.
- Make sure that you followed all the steps in FAQ
7.2.
7.8. Question: Can I
upgrade from Secwin 3 to Secwin 6?
Answer: Yes. Incidentally Secwin 3 is deprecated, although you
can still download the last build from our archives:
https://www.capesoft.com/accessories/DownloadPatchesArchive.htm
7.9. Question: What
happened to Secwin 5?
Answer: As you probably know we number each build that we
release. Secwin 4 is now up to build 4.99 (at the time of writing). If we
released the new Secwin as Secwin 5 then we'd have a problem updating
future versions of Secwin 4, should any be necessary. Rather than create a
problem, when none currently exists, we took the simplest solution and are
starting this version of Secwin at 6.00.
Click here for Secwin Runtime Error messages
Secwin Compiler Error Messages and Asserts
Incorrect
Prototype for own Login Procedure
You need to change your Login Procedure as laid out in the
Create
your own Login Window section of this doc.
You have a 3rdParty template that is incorrectly generating code into one
of the imported Secwin windows. Try disabling all added 3rdParty templates
(on those particular windows) until the compile error disappears.
You
must at least include one file of AccessPoints for the control template
to ....
The message is descriptive in it's solution (scrolling left will show the
full content of the message - as well as reading the combined asserts).
Essentially you have created (imported) a Global SetAccess window without
completing all the steps required to complete this addition. Work through
all the steps in the
Creating
your
own GlobalSetAccess window section of the docs in order to resolve
this assert.
Error(2):
cif$fileopen
<filename>.sac The system cannot find the file specified.
In your SecwinSetAllAccess window, in the Extension templates, you will
find a
Secwin's set access globally control template. On that
template, is a list of files to include to generate the access points list
tree for the SecwinSetAllAccess window (it's called "Files containing
Access points"). One of these files in the list is not being generated at
compile time. You need to delete this file from the list, so that the
compiler does not try and link an obsolete file when compiling.
If you are using this in a Multi-DLL application, then one of two things
is happening:
- You haven't compiled the dlls yet (that still need to create the sac
file).
- You've included a sac file from a dll that is not set to generate a
sac file (maybe doesn't have the Secwin template added, or has this
option disabled on the global extension template)
The sac file is only created (and maintained) at generate time, so if you
have included your GlobalSetAccess window in your Data DLL, you need to
compile it again - after compiling your other apps - to make sure it has
the most recent version of all the sac files from the other apps.
ds_UsersEx()
-
No matching prototype available.
You have a queue that is prototyped incorrectly. The ds_UsersEx function
is expecting a queue of the following structure:
ds_UserQueueEx Queue,pre(_dsuqex),type
Name string(40)
Surname string(40)
Login string(128)
UserGroup Long
Number LONG
LastPasswordChangeDate LONG
Reserved1 LONG
Reserved2 STRING(12)
Reserved3 STRING(20)
end
Probably the best would be to define your queue as follows:
MyUserQ queue(ds_UserQueueEx)
end
Unknown
Identifier:
PROP:IPRequestCount and AppsKey.
First search you drive for an old secequ15.clw file. Remove all copies
that are not in your clarion6\3rdparty\libsrc directory and recompile.
If you are still getting this error, then check the I'm using 9046
(include the secequ60.clw file) checkbox in the
global
extension template. (This should only be necessary for Clarion 6.2 users
on patch 9046).
Syntax
error: Field not found: CounterDescription
Change the variable used in your handcode to Description. If you get an
'Unknown' field in a list, you need to remove it and add the Description
field.
Unresolved
External DOS in Secwin6.OBJ
Typically you'd get this error in Clarion 7.3 and up where you're
compiling your application in Local mode. You need to add the DOS driver
to your project:
Secwin Runtime Error Messages
Access Denied
The user attempted to log in, but he does not have access to this
program, or program area. In other words he has a setting of 'No Access'
on the Operator Browse screen for this program. See
Operator
Browse and Form.
Error reading
License File : __________________
An unexpected disk error was encountered reading the security file.
Incorrect Activation Code. Please consult your
application supplier.
The activation code the user typed in was not valid. This is typically
caused by either
- The date on the PC is more than 7 days after the date when the
activation code was issued.
- The user didn't set all the settings the same as they were set when
the activation code was generated
- When generating the activation code the developer used the wrong
License Name and Seed Code. The correct values can be found on the
Global Extension, Licensing tab.
Incorrect Old Password
The user attempted to change the password, but they entered the wrong
password when asked to enter their old password.
Invalid Login
The user was logging in, but entered an invalid login code.
Invalid Password
The user was logging in, and entered an incorrect password.
Invalid Security
file : PIN missing.
The security file does not have the necessary PIN number stamped into it.
See
PIN Numbers.
New
password cannot be the same as old password
When entering a new password, the new password cannot be the same as the
old password.
New passwords
must match. Please try again.
The user was attempting to change their password. They were asked to enter
the new password twice. However the two copies of the new password do not
match.
No
users exist for this Application / Security Area. Do you want to add a
new user ?
This is the first time you have run the program, and there are no users in
the security file. Click on Yes to create the first user.
No
users exist for this Application / Security Area. Do you want to grant
access to an existing user ?
This is the first time the program has been run on this machine. There are
users in the security file, but none of the users has access to this
application. Select Yes to allocate access to one of the existing users.
Password cannot be blank
When entering a new password, then a blank password is not allowed.
Password cannot be the same
When entering a new password, the new password cannot be the same as the
old password.
Password
must contain 6 Alpha and 3 Numeric characters
If the Force Long Password on the Login template is on, then the user,
when they change their password, must have a password containing at least
6 alpha and 3 numeric characters.
The Security tables are non-existent.
Please contact your Application Supplier to obtain these files.
Possible causes and their fixes:
- You have most likely turned off the ability to create security files
(which often is the correct option) and your application can't find
the dssw5.tps file. You need to ensure that the application is looking
for the dssw5.tps file in the correct place.
- The dssw5 is on a different PC and PC where the application is
running does not have sufficient read/write access to the networked PC
where the data resides.
Run your application with the command-line switch /SecDbg, and immediately
after the message you'll get a stop with the actual disk error.
There
seems
to be an error with your PC date. The last time the program was run was
_________
This error occurs if the Expiry date in the license is less than 1/1/2095
and the date on the PC goes backwards. On a network this can imply that
another PC has a date set in the future.
There was an
error accessing a License File. The file was ________ and the error was
_______.
An unexpected error was encountered trying to enforce the Network Copies
feature. Typically this is caused by some kind of disk error.
This
feature is not available in your Level of the program. Consult your
application supplier for more information.
The user does not have a sufficient LEVEL to run this procedure.
This
is a super user created by the developer and cannot be deleted.
The developer has set a Super User setting on the Login extension template
identifying this user. You cannot delete the user, but you can set the
access rights to No Access.
Too
many people are already running the system. People already logged in
include _________.
The user has exceeded the number of concurrent network copies you have
allowed.
Unable
to
open Security Access file. Consult your application supplier.
The Security file is missing. See
Creating
the
Security file, and
Locating the
Security File.
Unable to write
modified access : __________
An unexpected disk error was encountered writing to the security file.
Unable to reload licence
You are calling ds_RegisterProductEx when there is no valid pre-existing
licence. Check the
ds_RegisterProductEx
function for more details.
Your
access to this part of the program has been restricted
The user is attempting to access a screen to which he doesn't have access.
This access has been set by a Supervisor using the Set Access (Ctrl F8)
screen. This error also appears when an Operator tries to access a
Security maintenance window, like the Operator Browse..
You are not
licensed to use this module.
The user has tried to access a procedure that belongs to an optional
module, where that optional module is not activated.
Your
product has expired. Consult your application supplier.
The date on the PC is greater than the expiry date set when the license
was issued.
Your
Security file has become corrupted. Consult your application supplier
for a new activation code.
Possibility 1: The date on the security file has
gone backwards. This may be because the user has restored a backup, or
because the user is attempting to use an old security file to gain access
to the program (i.e. the date of the Security file has gone backwards).
This check can be disabled by checking the "Disable Registry Check" in
your Secwin global extension template . Despite the dramatic warning the
file is not corrupted. To restore the program issue a new activation code.
If you have 2 applications using the same security file (or multiple
instances of the dssw5.tps file on the same machine - even if they are
used by different applications), you will need to check the Disable
Licence File registry check option in both applications.
Possibility 2: In Secwin 4 (and indeed for SQL
versions of Secwin 3) - the tables are now not encrypted (except for the
fields that are essential to Access and Security). This means that the
tables are open to use for reading from your applications. It also means
that tables can be manipulated from external sources. In order to protect
your access control - if the files are tampered with, Secwin will detect
this and disallow the running of your application. In order to allow the
user to continue using the application, they can either:
- Restore the dssw5.tps (or equivalent SQL tables) from backup. This
is a much better option, as it will restore the tables to a state
prior to tampering.
- 2.1. If the corruption error occurs in the access files your
users/clients can request a Security Code from you (preferably using
email) - that you will be able to generate with the SecwinFileFixer
utility in order for Secwin to repair the AccessControl tables. Your
users/clients will have to enter this code in the error Window that is
displayed when this error is detected. Please see SecwinFileFixer for
an example of this screen.
2.2 You can disable the security files CRC check in the Global
Extension template (in the Data-dll template if this is a Multi-DLL
application). This essentially weakens the AccessControl of your
application - as it means that the security files can be tampered
with, without your application being aware of it. Only the Secwin DLL
should be permitted to write to the Security files.
- 3.1 If the corruption error occurs in the license file you will have
to delete the license file and your users/clients will need to obtain
a new Activation Code in order for the application to be reactivated.
Your users/clients will have to enter this code in the Registration
Window in your application.
3.2 Disabling the CRC Check wil have no effect on the license table.
If a CRC error is detected in the licence table, the licence will be
reset, and a new activation code will be required to be issued in
order for the user to re-activated the licence.
You can disable the security files CRC check in the Global Extension
template (in the Data-dll template if this is a Multi-DLL application).
This essentially weakens the AccessControl of your application - as it
means that the security files can be tampered with, without your
application being aware of it. Only the Secwin DLL should be permitted to
write to the Security files.
Note: Disabling the CRC Check will only
disable the CRC check on the AccessControl tables. If this occurs in the
licence table, the licence will be reset, and a new activation code will
be required to be issued in order for the user to re-activated the
licence.
The
security
licence is used before it is loaded (i.e. ds_LicenceOk is called before
ds_UseLicence)
Basically you have a procedure that is trying to use the licence before
the licence is loaded. The Load licence method is called ds_UseLicence,
and thereafter ds_LicenceOK will use the licence that is loaded by
ds_UseLicence. Either you're calling a procedure before the procedure
where your Secwin Login Here template is added - or your procedure where
the Secwin Login Here template is not being called. If you have added the
global template 'Autopopulate User Screen Security', then you may have a
window called before the licence is loaded that is using the User Screen
Security template. In that window (could be a window like the
RuntimeFileManager window) you need to disable the auto-populated User
Screen Security template.
Error 2: Names (or Operators,etc)
There was an errorcode 2 in attempting to open one of the security files -
i.e. file does not exist when trying to open the names file. This probably
means one of the following:
1. that the exe is looking for the dssw5.tps file in the incorrect place
(i.e. it's installed in the incorrect place).
2. that the exe is not setup to create the dssw5.tps file.
3. that the user running the machine does not have sufficient access
rights for the program to create the dssw5.tps file (even although the exe
is setup to create the security file).
Technical Support
| CapeSoft Support |
| Email |
|
| Telephone |
+87 828 0123 |
Version
History
Download latest version
here
What's new in Secwin 6?
Getting compile errors after upgrading? Check the Compile Errors
Section.
NOTE: When you upgrade NetTalk to version 6.38 (for NTWS controlled access
control), in your Secwin_ScreenAccess table, you must change your
SessionID from a long to a string(30) (see
FAQ
0.10 for details).
NOTE: When you upgrade from NetTalk 6 to NetTalk 7, you must reset the
"Delete Session on logout" switch in the WebServer procedure's NetTalk or
NetSimple Object extension prompts:
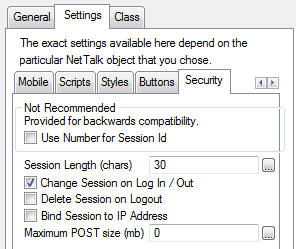 Version 6.54
 (30 November 2023)
GOLD
- Fix: Some screens could trigger a critical section wait without
release.
Version 6.53 (8 May 2023)
GOLD
- Fix: In some cases a VIEW error could cause the Secwin 7 conversion
to fail.
Version 6.52 (25
October 2021) GOLD
- Add: Support for Secwin 7 converter to get extended user attributes.
Required for Secwin 7 Conversion utility (DsswConverter*.DLL)
Version 6.51 (24 May 2021) GOLD
Version 6.50 (6 September 2020)
GOLD
- Add: ds_GetNames function. Required for Secwin 7 Conversion utility
(DsswConverter*.DLL)
- Fix: Remove calls to p_web._trace
- Add: Don''t show Warning messages template option
- Add: SecwinPrimeAdditionalOptionalFields
Version 6.49 (31 May 2019)
GOLD
- Secwin open files: Show error when an open fails.
- RunScreen support for when RunScreen is disabled.
- Correctly find the column (with runscreen enabled) when disabling a
column for a module.
- Add: Support for NetTalk 11. If you get a compile error, check the
Secwin extension and tick on "NetTalk 11".
Version 6.47 (17 September 2018)
GOLD
- Fix for %noAccessControlHere template variable error.
- Update clarion 11 build with IPDriver support.
Version 6.45 (12 June 2018)
GOLD
- Clarion 11 build
- Fix for Runscreen integration (use deny column rather than hide
column).
- You can now restrict column access on a browse based on the modules
of the licence.
- New AlwaysallowWindowAccess Access Control setting (in the User
Security template).
- New Disable Access Control here (in the User Security template).
- Dont generate the CallSetAccess routine (and call to it), the alert
(security key), the call to GetAllowed if Access Control is disabled
(in a procedure).
Version 6.44 (31 January 2018)
GOLD
- ds_swGetUserAccountName uses Format 12 and Format 2, not all
formats.
Version 6.43 (30 January 2018)
GOLD
- Refactor of ds_swGetUserAccountName, ds_LoginUser was failing to get
Windows login name in some cases. (Thanks to Mateusz Borowski)
Version 6.42 (5 December 2017)
GOLD
- Recompile to include BTrieve and IPDriver DLLs.
- Licence level check (to preform control level restriction) can be
based on a condition (other than just the licence level).
- Fix for ds_UsersEx returning workgroup for users ( when app not set
correctly).
- ds_ImportTables can import across data drivers (with the /ImportAsIs
command line switch).
Version 6.41 (21 April 2017)
GOLD
- Added support for RunScreen if browse columns are protected.
Version 6.40 (8 February 2017)
GOLD
- Upgrade User Groups from Secwin 3 fix - if a usergroup was not
created correctly (with "login" id) assigned one (to avoid failing
when being added) on import.
- Security Table Corruption Repairer - added GPF button to enable
tracking back (to function called).
Version 6.39 (9 January 2017)
GOLD
- ds_ResetUserPassword Fix - Set LastPasswordChangeDate to 0 when the
password is reset (to enable a force password change the first time
the user logs in after the password was reset).
Version 6.38 (4 July 2016)
GOLD
- Template Fix - %LevelModule template variable error.
- 'Show Warning but continue' added to possible Licence restriction
Actions.
- Optimize licence disable control code.
Version 6.37 (12 December 2015)
GOLD
- User Security Template tweak - move Disable All License Checking
here to the main prompt sheet, add 'Show Warning but continue' option
when license fails, clean up CheckLicense routine.
- DLL - exclude old C6 code.
- ds_GetUsers - fix for set occasional NoAccess for LimitedAccess
users (SQL version).
- Fix - CreateSecwinTable
- Can test an expired license with the command /TestExpiredLicence
- LoadUserByLogin - fix for not always finding a user (in change
login).
Version 6.36 (3 March 2015)
GOLD
- Fix - template regression in 6.35
Version 6.35 (2 March 2015)
GOLD
- Update: Support for Multi-Proj and setting of _NoSecwin_ define
added.
Support to custom link the secwin lib in to the project.
Clarion 10 binaries included.
Support for Global no warn option (user login here).
Only do Action if: option in user screen security (allows custom
disable, without being overridden by secwin).
Version 6.34 (31 July 2014)
GOLD
- Fix for ds_CurrentlyLoggedIn - displays a list of users including
duplicates.
Version 6.33 (1 July 2014)
GOLD
- Fix for ds_CurrentlyLoggedInEx - was not consistently returning a
complete list of the users logged in.
Use Variable rather than ds_CurrentAppLevel() - allows you to use a
global variable (and turn the licence down for testing). For example:
GLO:AppLevel long
code
- GLO:AppLevel = getini('Licence','Level',0,MyiniSettingsFile)
case GLO:AppLevel
of 0
GLO:AppLevel = ds_CurrentAppLevel()
of 1 to ds_CurrentAppLevel()
- !Keep the variable, because it's lower than the licenced
version.
else
- GLO:AppLevel = ds_CurrentAppLevel()
putini('Licence','Level',GLO:AppLevel,MyiniSettingsFile)
!Reset the ini file.
- end
Version 6.32 (2 June 2014)
GOLD
- Deleting an operator stores the operator number temporarily prior to
removing the access (was getting cleared sometimes). ds_CountUsers
does not remove spurious access rights (i.e. access rights that are
not associated with a user) - performs once in the ds_Register
procedure.
User Screen Security allows licence protection for a browse column at
the template level.
- Some extra embed points in the template generated code, embed code
prioritized to ensure generation occurs in the same order.
Version 6.31 (11 February 2014)
GOLD
- Includes C9 compatible txas for NetWebserver applications.
Version 6.30 (20 January 2014)
GOLD
- C9.1 (10638) compatible binaries
Version 6.29 (2 January 2014)
GOLD
- Template fix: In SetAccess window, Group preceded with space (also
template embed point to allow modification of the displayed group
description).
Version 6.28 (17 December 2013)
GOLD
- Fix regression in 6.26: Invalid %ImportSecwinGroup when running the
utility to import the secwin procedures.
- Fix for Oracle in Clarion 9: case-sensitive field names (when using
external names).
- Fix for regression in 6.26: TXA import not valid for Clarion 8 (and
below) when importing the AccessControl windows into an ABC
application.
Version 6.27 (13 November 2013)
GOLD
- Fix regression in 6.26 for IPDriver usage - was not allowing access.
- Fix: Control_RegisterProduct control template defined queue (for
licence limits) matches queue structure in the Secwin function (for
minlevel, maxlevel and relative).
- Change: Add ability to handcode the licence behaviour on
expiry/failure.
Version 6.26 (15 October 2013)
GOLD
- Global template buttons to import procedures.
- Support for MultiProj driver substitution (to control the path and
owner of the secwin files).
- Add the DOS file driver to MultiProj generated cwproj files.
- New function -
ds_CurrentLicenceDetailsEx. Populates the counter queue as well
as returning the licence details.
- SQLQueryFile changed to ODBC file for odbc projects.
- ds_Register function - internal view filter order matched the order
of the fields in the key (for flat file optimization)
- Includes Clarion9 dll for IPDriver support.
Version 6.25 (29 August 2013)
GOLD
- Fix for missing MSSQL driver error in ODBC projects (deprecation in
6.23). Also, Firebird and IPDriver (in Clarion 9) projects included
correctly.
Version 6.24 (28 August 2013)
GOLD
- New Clarion9 binaries supported.
Version 6.23 (5 August 2013)
GOLD
- Internal SQL query file (for mssql) uses MSSQL driver (rather than
ODBC).
- Fix for using 'EXEDIR' as the SQL path (for only the data path, and
not the language path) regression in 6.21
- Template change - move the Unique Encryption code prompt group to
the Settings tab.
- Template change - only apply %L% to cwproj if it's a local mode
compile.
- Template fix - was trying to copy slaodb.dll (instead of
slaodbc.dll).
- Clarion 7 and up MultiProj fix - compile the SecwinGlobalClass.clw
into the cwproj file.
- Remove the GrantAccess code from the GainFocus event (rather close
the window if the supervisor grants access and the user is already
logged in in another instance).
Version 6.22 (25 April 2013)
GOLD
Version 6.21 (16 April 2013)
GOLD
- DLL fix - retrieves ExtraLong operator option correctly.
- DLL fix - ds_UsersUserGroups, ds_UserInUserGroup uses a view (for
Oracle database was not always returning the correct usergroups the
user belonged to) and binds the fields (in the view - was not
previously filtering in some cases correctly). Also ds_CountUsers -
SQL failsafe check with views incase no users found (using prop:sql).
Also ds_GetUsers.
- DLL fix - prevent hang in ds_SetPath (avoid command(0) use unless
EXEDIR is used in the path explicitly).
- DLL fix - fix for importing operators into Oracle (ReservedLong not
available in Oracle).
- Template fix - Correctly added the dll to the shiplist
Version 6.20 (12 March 2013)
GOLD
- Template fix - In Clarion 7 and up, project the %DriverLib rather
than the name of the driver dll in to the cwproj file.
- Template fix - MultiProj support in Clarion 7 and up (for cwproj
files).
- Template fix - declare the secwin globals if secwin is disabled.
- Template fix - support for CPCS reports procedures
- Template fix - %SetFamily did not always return the correct family.
- DLL change - ds_UserQueueEx contains the user's workgroup (in the
Reserved1 long field) when returned from ds_UsersEx or ds_GetUsers.
- DLL internal change - store if a operator is a usergroup,
de-register callback to operators and access tables during
ds_UpdateUserEx (optimization that won't affect security). If querying
the email address of a user (and the user is a usergroup), then return
blank.
- DLL fix - SQL DLLs fix for not always storing the updated counter of
a licence code.
- DLL change - only call command(0) if the SetPath is called with
EXEDIR parameter (command(0) causes applications to hang
intermittently).
- DLL fix - ds_GetProperty(ExtraLong) was not returning the correct
value after a ChangeLogin.
- Internal DLL change - ds_UserInUserGroup and ds_UsersUserGroups
function uses a view for both TPS and SQL libs. ds_CountUsers uses a
view in SQL versions (if prop:SQL fails). ds_GetUsers - use view to
determine if a user belongs to a usergroup (rather than prop:sql).
Version 6.16 (8 January 2013)
- Template tweak - copy the Secwin dll to the app directory in
Multi-DLL applications (that aren't the EXE app).
- Template tweak - multiproj support for Clarion 7 and up. Inserts the
secwin dll into the cwproj and copies the secwin dll (if compiled in
dll mode).
Version 6.15 (21 November 2012)
- Template fix - Allow legacy EXEs (in a multi-dll application) to set
the encryption code from the template.
- Template tweak - cater for CPCS reports (legacy code) in an ABC
application.
- In GlobalSetAccess window, don't suffix 'Group' to groups.
- ds_UserQueueEx contains workgroup in the reserved field (returned by
ds_UsersEx).
- Counter Limits are loaded correctly when MaxLevel and MinLevel are
set (and stored correctly in MSSQL).
- Optimization for updating users (internally temporarily disable the
callback and set CRC manually).
- ds_GetProperty returns un-encrypted login for usergroups (if the
user is a usergroup).
- MSSQL - returns usergroups in ds_GetUsers
Version 6.14 (27 August 2012)
- Template fix - In the SecwinWebSetAccess window, set the filter to
include quotes for the ds_Scr:SessionID field.
Version 6.13 (16 August 2012)
- DLL Change - randomize the lic file to use (for each user that opens
a file).
- Template fix - If the licence fails, don't proceed with access
control checks for menu controls
- Template tweak - added an embed point to change the displayed
details in the web SetAccess browse.
- Change the txds to include the correct file structure for NTWS
applications in the Secwin temporary tables (the SessionID field in
the Secwin_ScreenAccess)
Version 6.12 (1 August 2012)
- DLL Fix - when owner reset (with second owner - i.e. driver
options), then reset the internal driver options variable.
- New function -
ds_UserInUserGroup() - checks if the user is in a usergroup
(number).
- ds_UpdateUserEx fix - when deleting a user, delete all the access
points (was just deleting positive access points in TPS)
- TPL change - define GLOSec:DefaultUsergroup whether Secwin for is
used or not (support for multi-dll where web is used in one of the
lower dlls), export from data dll, and define as external in lower
dlls.
- TPL change - if secwin is disabled locally, disable the template
prompts.
- TPL change - embed point in SecwinWebUserAccess extension template.
Version 6.11 (4 May 2012)
- NTWS support Template tweak - RememberCookie used rather than
remember to control the cookie value .
- NTWS support Template tweak - Password and Login session values
deleted when loading the login form (the saved fields are correctly
stored or not depending on whether the remember checkbox has been
selected).
- NTWS support Template tweak - Tabs are correctly assigned to Tab 0
when returning to the login window.
- NTWS support Template tweak - After setting a new password, this
password is saved where necessary (for remember function).
- NTWS support Template fix - Appnum correctly saved after login
(regression from 6.10).
Version 6.10 (1 May 2012)
- Template fix - fix for Demo Length period (was only allowing one day
for demo period).
- NTWS support - fix in TXA (regression in 6.08) allowing user to set
password from the URL link.
- NTWS support - template code to create the basic user group. (Must
assign the user group number to the user's usergroup).
Version 6.09 (5 March 2012)
- NTWS support - tweak to TXA to support login by login (not login by
email). If you require login by login (not email address), re-import
the secwin web windows.
- Template change - if datadir selected for the file directory, and
data dir is not specified, assume current path (i.e. default to
'HERE').
- Secwin User Login Here template for NTWS apps - remove ds_Logout
from win 32 code.
- Template change - if self-create first login, then ds_Logout after
login creation.
- Template change - better support for login and password different on
first login creation.
- Template change - does not abort webserver procedure if win32 login
fails.
Version 6.08 (22 February 2012)
- NTWS support - better support for login by login (not login by
email). ds_GetTempPassword can accept a login instead of an email
address. (If Login and Email are the same (as set in the template)
then attempts to locate user by email.
- Template fix - fix for default user to have a password that is not
the same as a login.
- Template change - if Data directory is selected (for datafiles) and
no path specified, default to 'HERE'.
- NTWS fix - don't logout (from desktop app) - not applicable. Also
don't return if Can't register for access control (access control will
fail).
Version 6.07 (20 February 2012)
- DLL work-around. Force firstname and lastname to login if neither
set (fix for failed insert user in NTWS).
Version 6.06 (17 February 2012)
- Tweaked TXA (NetTalk web server procedures) to allow a user to be
created with a login that does not match the email address.
- TPL change - Embed points around the SecwinLoginScreen call.
- TPL change - force http:// onto ServerAddress for SOS
GetWebActivation template.
Version 6.05 (2 February 2012)
- Fix GPF in ds_UpdateUserEx function
- Fix for SOS template problem where occasionally the request would
not be received.
Version 6.04 (17 January 2012)
- ds_ChangeUserEmailAddress - fix - ds_CannotBeBlank option when
testing EmailAddress by default.
- ds_LoginIsEmail option - allows a login that is not an email address
(for NTWS).
- ds_ChangeUserPassword - returns the errorcode of the put (was
returning 0 in some circumstances).
- ds_UpdateUserEx - added EmailAddress as parameter (future use)
- ds_SetProperty and ds_SetUserProperty - for setting a permitted
user's property.
- Fix for Btrieve: Various fields shortened to accommodate the 255
char limit in a unique key in Btrieve. Name attributes added to the
Keys.
- SecEqu60 file changed to accommodate for where other equates are
specified.
- Template change - only allow encryption set in Data DLL or single
exe) - accommodate for Legacy apps needing to set in the EXE.
- NTWS support - Option to change Local vars prefix (for storing
login, password, etc. cookies). This means you can make it unique for
your application.
- NTWS support - more embed points in the tpl code.
- Better refresh support for memory table.
Version 6.03 (21 October 2011)
- Callback function
introduced (at present for failure to open Secwin files). Useful when
using a different file driver to upgrade from the old TPS.
- Fix - legacy not always had the SecLOG group defined in the
registration window.
- SQL error reported with full fileerror and error when run in debug
mode.
- New procedure: ds_SetSecwinSetting - in future will handle all
global Secwin settings (at present just the callback function
address).
- Import filename set to SecwinSecurityFile.bin by default.
- NTWS application fix - returns the DefaultAccess correctly in the
Users and UserGroups browses and forms.
- Included updated TXA for NTWS procedures.
Version 6.02 (22 September 2011)
- Fix for ds_ChangeUserPassword (calling function as procedure
warning) in the template.
- Fix for duplicate export function in slatps.dll (for Clarion8 and
7.3 TPS DLL)
Version 6.01 (15 September 2011)
- Includes missing C8 dlls, and ip server dll.
- Fix for ds_LoginUser (calling function as procedure warning) in the
template.
Version 6.00 (9 September 2011)
Version 4.99 (20 July 2011) (No TXA import
required if upgrading from 4.58 or up)
- LoadUser was not always functioning correctly (occasionally affected
Change password, load user, etc.).
- ds_ChangeUserPassword applies case sensitive password correctly.
- IPDriver fix - was getting stuck in endless loop in some situations
(when adding an access record).
- Fix for changing path - was not allowing the path to be reset from
code to a different location.
Version 4.98 (15 April 2011) (No TXA import
required if upgrading from 4.58 or up)
- LoadUser was not always functioning correctly (occasionally affected
Change password, load user, etc.).
- Template fix for Clarion 7.3 IPD applications - includes the slaipds
dll for the connection.
Version 4.97 (23 February 2011) (No TXA import
required if upgrading from 4.58 or up)
- ds_ChangeUserPassword (and ds_ChangePasswordEx()) was not always
functioning correctly (internal var not bound in some cases)
Version 4.96 (9 February 2011) (No TXA import
required if upgrading from 4.58 or up)
- ds_Cresec() called from legacy EXE in multi-dll apps.
- %noscrsec variable was out of context sometimes - checks for
existence before using.
- ds_ChangeUserPassword returns the errorcode of the file put (MSSQL
fix for changing password, was not saving the pwd change on login).
- ds_LoginUser fix - was not logging in with case-sensitivity off
(when case did not match).
- Fix for when multiple counters are used, ensure that the counters
are CRCed in the same order internally (was generating failed licence
when multiple counters were used where the register app had the
counters in a different order to the program).
- ds_CloseTables forces the files closed (does not just decrement
internal file used vars and close if required). Fix for IPDriver where
connection was left open.
Version 4.95 (10 January 2011) (No TXA import
required if upgrading from 4.58 or up)
- Internal tweaks for more secure DLL.
- Fix for NoDemo (in some circumstances was allowing a one day demo).
Version 4.94 (7 December 2010) (No TXA import
required if upgrading from 4.58 or up)
- Template tweak for C7.3 support
Version 4.93 (19 November 2010) (No TXA import
required if upgrading from 4.58 or up)
- Optimize internal LoadUserByNumber method - which intern optimizes
ds_ChangeUserPassword, ds_ChangeUserEmailAddress, ds_GetProperty,
ds_UpdateUser, ds_LoginUser, ds_LoginText
- If EmailAddress is blank, don't returned encoded email address.
- ds_UpdateUser - when a usergroup gets deleted, remove the links in
the OperatorUserGroups table.
- ds_UsersUserGroupsQType - Return the site field of the UserGroup in
the queue.
- ds_GetUserPassword - deprecated. ds_GetUserPasswordEx requires the
supervisor to be logged in.
- ds_AddUserToUserGroup and ds_RemoveUserFromUserGroup functions added
to the map file.
- Fix - compile errors when Secwin for ODBC is compiled in localmode.
Version 4.92 (22 October 2010) (No TXA import
required if upgrading from 4.58 or up)
- ds_GetUsers - pass ds_GetUserGroupsToo in the options, and you get
the users and the usergroups.
- internal function Secwin_AddAccessRecord - opens and closes the file
(webserver support in some cases was denying access because of closed
files).
- Internal function OpeRecordToGroup - assigns the usergroup flag
(UserGroups in ds_GetUsers support).
- Template change - 'Don't generate extra project defines' - you can
check this if you're getting the 'Too many Pragmas' error when
compiling.
- Template change - for C7, only project the driver libraries in
Stand-alone mode.
- New extension template - Secwin_WebUserAccessSecurity - to place
code in the Secwin Access Assigning in a webserver application.
- New utility template to import the Secwin windows into a WebServer
application - requires NetTalk 5.02 or later - documentation to follow
once NetTalk 5.02 has been released.
- ds_UsersUserGroups fix - populates the site field correctly in the
queue returned.
- Procedures exported - ds_AddUserToUserGroup and
ds_RemoveUserFromUserGroup.
- ds_UpdateUser(DeleteReocrd) fix - when the user being deleted is a
usergroup, then all the relating records to the operators are dropped.
Version 4.91 (6 September 2010) (No TXA import
required if upgrading from 4.58 or up)
- IPDriver DLL - Support for Clarion 7. Includes the IPServer dll for
C7 versions (S70IPDS.dll).
Version 4.90 (23 August 2010) (No TXA import
required if upgrading from 4.58 or up)
- IPDriver DLL - allows customizable Secwin IPDLL server name.
Version 4.89 (14 July 2010) (No TXA import
required if upgrading from 4.58 or up)
- Template change - GetActivation template uses NetWebClient (rather
than NetSimple). This allows for improved handling of the send request
and receive request through proxy servers.
- Template change - GetActivation template: Added embed points at send
and receive procedures.
- Template change - GetActivation template sets SSL options,
Version 4.88 (4 June 2010) (No TXA import
required if upgrading from 4.58 or up)
- Clarion 7.2 compliant binaries included.
- CPCS reports support (for access control).
- IPDriver - workaround for failed rec0rds() in a file. New internal
function Secwin_AddAccessRecord
Version 4.87 (20 April 2010) (No TXA import
required if upgrading from 4.58 or up)
Summary: Fix GPF in ds_SaveLicenceToXMLEx, Fix IPDriver Access assigning
- Fix GPF in ds_SaveLicenceToXMLEx
- IPDriver - work around for Records() which does not work in the
IPDriver.
Version 4.86 (14 April 2010) (No TXA import
required if upgrading from 4.58 or up)
Summary: See below. Also see
Translating Secwin Windows on changed translation requirements for
Secwin4.
- Fix regression in 4.85 for C55 users (was not including the correct
dlls).
- Debug can log to a DOS file (so DOS driver is added to the libs).
- Translation fix - if lang file contained path, then was doubling up
on the path in the filename.
- SetPin fix - was not setting the application name soon enough.
- SOS - Fix client side to receive response through restrictive proxy
servers.
- Assert if ChangePasswordFunction is not set in the global extension
template (when required by the SecwinLoginScreen).
- Prompt to allow a window's prompts to not be added to the
AccessPointsQ.
Version 4.85 (8 February 2010) (No TXA import
required if upgrading from 4.58 or up) Summary: Clarion 7.1 duplicate
compile error fix, fix for long passwords required, fix for corrupt
licence (may require an initial re-activation).
- Template change - does not force password change (if optional login,
and no login is required, and long password is selected)
- Template change - control template (for Login Window). If long
password required, and user's password is not long, then forces
changepassword.
- Internal Encrypt class (DESObject) renamed - Clarion 7.1 work-around
(was giving duplicate compile errors where Secwin and NetTalk where in
the same local mode application).
- DLL - new function ds_CheckBigPassword() checks a string for a valid
alpha(6) numeric (3) password.
- DLL change - on insert user, clear superuser bit between additions
(possible carry-over from a previous add?)
- DLL change - internal function to setregistry was not opening the
file (casuing mis-matched registry date after registration in some
cases).
- DLL change - Set big password only overrides if BigPassword is
required (internal flag was being cleared in some cases).
Version 4.84 (25 January 2010) (No TXA import
required if upgrading from 4.58 or up)
- Removed 'Cehcking access for' stop in MSSQL apps.
- ds_CheckRegistry - was not checking access table early enough in
the app (in some cases).
- ds_CheckRegistry - check for old Secwin3 registry entry (if
registry entry is not there) - date checking support (licence).
Version 4.83 (22 January 2010) (No TXA import
required if upgrading from 4.58 or up)
- C6 and C55 install was not including the latest DLLs (due to changes
in the C7 build).
Version 4.82 (19 January 2010) (No TXA import
required if upgrading from 4.58 or up)
- C7.1 support - exclude Driver libs from the lib mode libs, set
ABCLinkMode to 0 in the lib mode libs - add name attribute to some
procedures that still required the name attribute.
- Use %WindowManager, and not the constant ThisWindow in calling
window class methods.
- Internal (for c7.1 support) Move the SQLQueryFile declaration into
the csSQL.clw file
Version 4.81 (13 January 2010) (No TXA import
required if upgrading from 4.58 or up)
Fix regression in 4.80 - was not displaying the UserGroups in SQL
versions.
- Template tweak - use %L% in projecting the dll. This means that for
C7 - the project can be change to lib/dll mode (not in the
application)
- DLL Change - fix for file declaration moved to inc file (regression
in 4.80 for C7.1 support) - caused UserGroups to not display.
- internal DLL Change - moved record declaration to an equ file to
cater for queue declaration and moving File decl into the clw file for
C71 compatibility.
Version 4.80 (31 December 2009) (No TXA import
required if upgrading from 4.58 or up)
Clarion 7.1 compatible build
- Internally renamed classes, and added name attributes to procedures
and global variables.
- Removed driver libs from the lib projects.
- Template change - add driver libs to the project (where necessary).
- Template change - additional embed points for Operator Form template
(code can be added before and after a user is deleted, changed or
inserted). Also embed points added to the SecwinSetAllAccess control
template (to put code in before modifying access).
Version 4.79 (8 December 2009) (No TXA import
required if upgrading from 4.58 or up)
Some optimization - especially for Oracle.
- Template tweak - In Create Secwin Menu template, store value of
ds_CountUsers for hide/unhiding controls.
- Template tweak - don't call ds_countUsers twice (in some cases).
- Template tweak (and new function call) - only call ds_UserAllowed
and not old Secwin 3 ds_Allowed as well. Call conversion function
rather (new function ds_GetOldAllowed)
- Oracle project - use prop sql for queries.
- SQL queries - don't use 'as' (not supported by all backends) - use
full table name.
Version 4.78 (24 November 2009) (No TXA import
required if upgrading from 4.58 or up)
- DLL fix - Optimization removed for SQL versions other than MSSQL.
(Prop SQL statements not compliant). Each version will require it's
own optimisation where necessary.
- DLL - new function ds_SaveLicenceToXMLEx. Includes an additional
options group parameter. In this case, specifically to force the URL
encoding of a XML packet to 'ISO-8859-1' where need be.
- DLL - Only call prop:SQL names check, if no name is found in the
initial Secwin names table search (regression in 4.66).
- Template change - add project define switch which is set according
to the global template switch to disable Secwin (_NoSecwin_).
- Template change - embed points added between ds_CountUsers and
SecwinFirstUser procedure; also in the GetAccess routine loop (for
overriding a displayed operator).
- RegisterABC application changed, to allow old registration codes
using 'ISO-8859-1' format to be issued.
- Template change - SecWin's Operator Form Control template requires
the Secwin global Template (disables code generation when Secwin is
disabled).
Version 4.77 (9 October 2009) (No TXA import
required if upgrading from 4.58 or up)
- Tpl fix - Regression in 4.73. File owner must be set in all dlls.
- Map fix - ds_SaveLicenceToXML was not including the proc attribute.
- Ds_GetProperty fix - was not returning the ExtraLong property for a
user.
- TPL feature - IPDriver apps can have security files local (rather
than on the IP server).
- TPL change - C7 seems to intermittently not have the %cwversion set
correctly - use %cwtemplateversion where this is the case.
- TPL change - when a control is deleted from the window, remove it
from the security level and module controls lists.
- TPL change - embed point added after failed registration attempt.
Version 4.76 (3 September 2009) (No TXA import
required if upgrading from 4.58 or up)
- Tpl fix - Don't assert on external ChangeLoginProc and SetUserAccess
(Secwin create MenuItems template).
- Tpl change (template utility) - allow external SecwinRegisterProduct
window import.
- DLL fix (regression in 4.xx) - allows for encrypted login to log in.
Version 4.75 (23 July 2009) (No TXA import
required if upgrading from 4.58 or up)
- DLL change - Fix for firebird 1.5 (was not creating the primary key
in the QueryTable because the field was > 245 chars.
- Template Change - shows the File options tab in legacy SQL Multi-DLL
exe apps. The Files and Options tabs must be setup as they are in the
data dll.
- Template change - embed point in the SecwinSetAccess control
template (allow handcode in the template routines).
- Template change - the SecwinSetAccess window includes the usergroup
flag - allowing sortability and formatting of the list for user
groups.
- Template fix - for SOS applications - was not getting the length of
the xml string correct (setting too early).
- Template fix - don't sort AccessPoints queue if "In template order"
is selected (for the sorting in the queue).
Version 4.74 (10 July 2009) (No TXA import
required if upgrading from 4.58 or up)
- DLL change - ds_SaveLicenceToXML does not alter the filename sent,
rather it returns an error if invalid filename is passed.
- Template change - IPDriver use is optional (for the dssw4 file). 'My
Security files are not on the IP server' switch on the Template can
allow the dssw4 to be located locally.
- DLL fix - when encryption used, was opening the security file in
access denied mode, which was pervading the security superfile
(despite that table being closed and re-opened in access all mode).
Note to self - don't open superfiles in access denied mode, unless all
the superfiles opened are closed, and then re-opened.
Version 4.73 (3 July 2009) (No TXA import
required if upgrading from 4.58 or up)
- DLL change - ds_SaveLicenceToXML makes a valid filename to store the
licence in (if an invalid filename is passed).
- DLL change - new exported function: ds_MakeValidFileName allows you
to create a valid filename before calling the ds_SaveLicenceToXML
function.
Version 4.72 (1 July 2009) (No TXA import
required if upgrading from 4.58 or up)
- Template change - hide template prompts for non-data dll apps in a
multi-dll application. Also only does the necessary in the data dll -
which means Pin, EmailAddress, etc are setup only in the data dll.
- Dll Change - registry changed to using URLEncoded values. This means
that reserved chars can be used in SOS and other http packets. XML
registration files will all be URLEncoded - but old XML files will
still be supported.
Version 4.71 (18 June 2009) (No TXA import
required if upgrading from 4.58 or up)
- Fix for Licence Failure - was not always halting.
- ds_UseLicenceEx - check whole file for licence (was case sensitive
in some cases).
- Template change - only allow encryption code to be set in the data
dll (or exe for single exe apps).
- Template change - fix priority for late login (was not always being
generated because of a clash in priority levels)
- Template change - new embed and embed button on the user screen
security template to add addition code when controls are restricted.
- Template fix - if items (in a menu) need to be disabled for licence
failure - all items in a enabled menu were being enabled.
- c7 Template fix - Call_GetLicenceDetails code template had a
unsupported template language use in c7.
Version 4.70 (5 May 2009) (No TXA import
required if upgrading from 4.58 or up)
- Fix for C7 - projects correct lib file when using secwin ODBC.
- Fix thread lock in ChangeUserPassword (causing app to hang when
changing a password).
- Fix for encryption - was not displaying users logged in correctly.
Also was not logging in some cases when security file is encrypted.
- Fix for ds_CurrentLyLoggedInEx - was including the name of the user
querying in the list twice.
Version 4.68 (16 April 2009) (No TXA import
required if upgrading from 4.58 or up)
- Fix GPF if ds_SetPath() called with a blank first parameter
Version 4.67 (25 February 2009) (No TXA import
required if upgrading from 4.58 or up)
Summary: A couple of minor tweaks. Affects programmers using AppPin, Super
Users, and/or UserGroups.
- Template Change - Clarion 7 workaround. Was not always getting the
Class declaration embed point correct.
- Template Change - allow disable of refresh on GainFocus (local
extension template). This means that the access is not checked on
every gainfocus event (for that particular procedure).
- Template Change - allow userID field to be stored in a global
variable.
- Template fix - Don't add user-level access points to the
SetAllAccess queue (was throwing up a compile error in some
circumstances - as well as being superfluous).
- DLL fix - MSSQL workaround: Don't create the file if there's a
NoFileError on open. Bug in MSSQL driver that creates a blank table.
Note: only for the MSSQLDriver, not when connecting to SQLServer via
ODBC. ds_LoginText uses Create procedure, rather than direct Create()
- DLL Fix - critical section error in change password caused a hang
when an invalid user was selected.
- DLL Fix - ChangePassword (when in case-insensitive mode) was
allowing users in when a force-change-password (without changing the
password).
- DLL Change - /SecwinNoAccessDelete command line means no access
entries are deleted (and logged instead). Useful for debugging
MSSQLDriver.
Version 4.67 (25 February 2009) (No TXA import
required if upgrading from 4.58 or up)
Summary: A couple of minor tweaks. Affects programmers using AppPin, Super
Users, and/or UserGroups.
- Template Change - only call setpin if AppPin is not 0.
- Template change - new feature: Super User doesn't use a licence.
- DLL Fix - If UserGroup is added as Operator, with default Access as
noaccess, then the usergroup really has default no access (previously
had default access to all either way)
Version 4.66 (22 January 2009) (No TXA import
required if upgrading from 4.58 or up)
Summary: Optimization for SQL (mostly - but also TPS), some template
tweaks. A TXA import is recommended for speed improvement.
- Template Change - only calls GetAccess once on open window (was
calling twice).
- Fix CriticalSection error - causing hangs in certain circumstances.
- Optimize non-SQL when deleting a user.
- Fix - not all users were associated with their usergroups in some
circumstances.
- Fix - when upgrading from dssw2 - old operators file was not being
closed in some circumstances.
Version 4.65 (24 December 2008) (No TXA import
required if upgrading from 4.58 or up)
Summary: Optimization for SQL (mostly - but also TPS), some template
tweaks. A TXA import is recommended for speed improvement.
- Template Fix (fix for incorrect C7 lib assignment if MultiProj
apps): Centralise secwin dll and lib name generation.
- Template Change: Call ds_UsersEx with 0 in the first parameter (so
that no user groups are fetched) - in Secwin windows. The first
parameter is only for Secwin 3 apps. Optimized for large numbers of
userGroups and Users (especially SQL).
- Template Fix: Clear login for usergroups (in the SetAllAccess
control template) - so that usergroups are displayed without a login.
- Template Change: in SetAccess and SetAllAccess templates, change to
using a combination of ds_GetUsers and ds_UsersEx (Optimization for
SQL) to get the users.
- TXA change: BrowseUsers and BrowseUserGroups call ds_UsersEx with 0
- optimization.
- ds_GetUsers - In SQL close files if they were opened in this
function. TPS mimics SQL functionality (supporting additional options
previously only supported in SQL)
Version 4.64 (26 November 2008) (No TXA import
required if upgrading from 4.58 or up)
- ds_LockScreen Fix: Was allowing a blank password to activate the
screen - and erroring on the correct password.
Version 4.63 (21 November 2008) (No TXA import
required if upgrading from 4.58 or up)
- ds_ResetUserPasswordDLL Fix: ds_GetUserPassword,
ds_ResetUserPassword - allows blank user site to be passed.
- Fix - in ds_SetPath for IPDriver apps. Provides support for
subfolder support (which was removed from 4.62 due to a regression
when ds_SetPath was not used). Now supports both sub-folder support
and default folder support.
- Template Change - split Secwin Initialize into 2 - to allow
additional code after init, but before creating the tables.
Version 4.62 (4 November 2008) (No TXA import
required if upgrading from 4.58 or up)
Summary: Optimization for SQL - particularly for UserGroups, Encryption
Code.
- Clarion 7 compatible install.
- New functions: ds_ResetUserPassword, ds_GetUserPassword,
ds_SetEncryptionKey. ds_ResetUserPassword, ds_GetUserPassword can only
be used if ds_SetEncryptionKey is first called with an encryption key.
These functions are not available when using the default secwin
encryption.
- Encrypting Tables with a unique key. This permits you to use the
ds_ResetUserPassword, ds_GetUserPassword - as the Operators table is
unique to your application.
- Conversion from default encrypted to encrypted, as well as import
from encrypted or default encrypted to encrypted. Export from
encrypted.
- Fix - change user password (not functioning correctly).
- Optimize for SQL - ds_UsersUserGroups, ds_NumberOfUsers , Delete
User, internal: UserInUserGroup
- Fix ds_CountUsers (for SQL) - Was only checking the noaccess users,
and not adding operators and supervisors to check if all existing
users had access record (noaccess, operator or supervisor).
- Fix - upgrading Secwin tables (from Secwin 3). Logout was not
functioning correctly in SQL, so only the first 2000 access records
were upgraded.
- TPL change: Windows Font settings moved to the 'Old' tab.
- Encryption key template entry prompt in the global extension
template.
- Tpl fix - incorrect spelling for importing the planejane template
windows.
- Template fix - legacy - was calling an abc method in the template
(INIMgr).
- Template fix - don't reject the UserSecurityTemplate on source and
report templates. Disable automatically for these if populated by the
AutoPopulateUserSecurityTemplate - but allow enabling.
- Template fix - disable UserScreenSecurity template in the FM3
connect window template (typo in previous attempt at this).
- IPDriver Fix - regression in 4.58 - when introducing sub-folder
support (sub-folder support is disabled at present).
Version 4.61 (23 October 2008) (Minor release)
Summary: Template change for Clarion7 support.
Version 4.60 (17 October 2008) (Minor release)
Summary: Release 4.59 did not include all the dlls for all the backends.
Version 4.59 (15 October 2008) (Minor release)
Summary: Fix for UserNumbers > 32767
- Secwin DLL - fix internal functions: ds_SetWorkGroup, ds_PutAccess
to take long parameters (rather than shorts).
- Secwin DLL - fix - only upgrades 399 licence structure for TPS
files. This will only effect those who implemented Secwin 4.00 licence
in a tps environment.
- Secwin DLL - fix for logout and re-login. Was not clearing internal
variables after logout.
Version 4.58 (16 September 2008) (TXA import
recommended)
Summary: Some startup optimization for SQL, IPDriver support for separate
datapath, better UserGroup support (editing) in the TXAs.
- Secwin DLL - optimize ds_UsersEx function. Does not check user
groups if no appnumber is passed to the function.
- Secwin DLL - optimize ds_CountUsers for SQL - use prop:sql rather
than a view to return the available users. Also deletes superfluous
Access records (of old deleted users)
- Secwin DLL - fix ds_getUsers was not returning the NoAccess users.
- Secwin DLL - if languagefile includes the path, then don't add the
path to the language file.
- Secwin DLL - use the IPDriver procedures to set the filenames
(allows the files to be in a different path to the Secwin dll on the
DataServer)
- Secwin TXAs - UserGroup editing improved - shows InitialAccess.
Disables initialAccess on changerecord, when UserGroup is switched
between Operator and NoAccess.
Version 4.57 (3 September 2008) (No TXA import
required if upgrading from a version greater than 4.55)
- Secwin DLL - Work-around for licences implemented with version 4.00
(was storing as case-insensitive product name).
- Secwin Template fix - If forcechange every 30 days, then don't allow
the user to cancel from the changepassword screen.
- Secwin Template Change - include the name of the screen from which
the SecwinSetAccess window is called (in the window text
- Secwin Template Change - Store the window size in the ABC resizer
for the SecwinSetAccess window for each different window from which it
is called.
Version 4.56 (22 August 2008) (AccessControl
windows TXA import recommended)
- Secwin DLL - Disable change in Level for UserGroups.
- Secwin DLL - Optimize User deletion: uses prop:sql to delete
operator usergroup associations.
- Secwin DLL - Don't get a user's level by the level of the highest
usergroup he belongs to.
- Secwin TXAs - disable the InitialAccess option controls when a user
is changed. See FAQ 3.17 for details
- Secwin DLL - can store activation codes to prevent re-use (new
function to replace superannuated one:
ds_CheckEncryptedActivationCodeEx)
- Secwin DLL - fix for relative counters (adds correctly - instead of
replacing existing ones)
- Secwin DLL - don't store licence when type < current licence
type.
- Secwin DLL - don't allow a activation code with a counter to be
reset with the same activation code.
- Secwin Template and DLL - make WrongProduct warning optional (for
debugging purposes only)
Version 4.55 (13 August 2008) (No TXA import
required if upgrading from a version greater than 4.54)
- DLL fix - only set the GUID (on adding) if the GUID is not set (fix
for the import/export routine).
- DLL change - ds_GetProperty
- allows IsSuperUser functionality to test if a particular user is a
superuser or not.
- DLL fix - import/export between different backends. TPS to SQL
export/import was not working correctly. Requires a new export if user
groups are used (were not correctly formatted in the export file).
- DLL change - Improved the 'Call to ds_LicenceOk, but License Not
Loaded by ds_UseLicence' message to 'Contact your Supplier: The
security licence is used before it is loaded (i.e ds_LicenceOk is
called before ds_UseLicence)'
- DLL Change - include the Dealer in the import/export of the licence
file.
- DLL Fix - UserGroup first user found (with no other operators
thereafter) - was causing an infinite loop.
- Template change - TXAs include a "Plain Jane" option for windows
import.
Version 4.54 (5 August 2008) (AccessControl
windows TXA import recommended)
- Secwin Equates - change CounterDescription to Description field (to
match the template queue). Handcoders using the LimitsQueueType will
need to change the reference to this variable to the correct one in
their source.
- DLL fix - don't show previously assigned user groups to a user that
is changed from an operator to a supervisor (in the BrowseOperators
UpdateOperators windows).
- DLL fix - was not assigning user groups correctly sometimes.
- Dll optimization - ds_GetUsers is 20% faster in SQL. Also the queue
is sorted correctly by FirstName/LastName.
- DLL fix - the Error storing licence message was not showing the file
error correctly.
- TXA change - disables the UserGroups queue in the
SecwinBrowseOperators and SecwinOperatorsForm windows for supervisors.
Version 4.53 (29 July 2008) (No TXA import
required if upgrading from a version greater than 4.43)
- New equate (ds_NoMessages) - which can be added to the Request
parameter of the ds_UpdateUser
function to suppress error messages.
- DLL Fix (ds_GetProperty) -
returns blank (or 0) property when a user does not exist. (was
returning incoherent values for non-existant users).
- DLL Change (ds_UpdateUsersUserGroups)
- the DLL changes the Active icon to correspond with a completed
change required (indicated by a user-changed ActiveIcon flag). This
means that if the ds_UpdateUsersUserGroups function fails with a
particular change, the failed change can be verified by the mismatched
Active flag in a particular row.
- Template Change - improved compile error messages for missing
procedure prompts in the global and/or Create Menu Extension
templates.
Version 4.52 (11 July 2008) (No TXA import
required if upgrading from a version greater than 4.43)
- Fix regression in Template (version 4.51). If SecwinSetAccess was
declared externally, then a blank procedure name was used.
Version 4.51 (10 July 2008) (No TXA import
required if upgrading from a version greater than 4.43)
Summary: Firebird support, support for a large number of Access Control
groups on one window (where the access control group string compiles to
> 1024)
- DLL Change - Implement Firebird support. This requires a different
DLL to the standard ODBC DLL. This is because a lot of the files
contain unique keys made of >250 bytes which Firebird does not
support. Important Note for Firebird users: Some of the string fields
(used in unique keys) have been shortened to accommodate for this
limitation in Firebird. Particularly: Firstname and Lastname (80
instead of 252), Product
- Template change - workaround for Clarion IDE limitation, which does
not permit more than 1024 chars in a parameter on one line. Split the
function call over to multiple lines if this is the case.
Version 4.50 (27 June 2008) (No TXA import
required if upgrading from a version greater than 4.43)
- DLL Change - Don't allow Hook1 to be set (in the ds_UpdateUser) -
this is used internally.
- DLL Change - ds_SetOwner,
allows the second parameter (Owner2) to be used for a DriverString set
(for SQL tables). This means that additional driver strings can be
used in Secwin tables. you may not use /CLIPSTRING though.
- Template Change - Support for additional driver strings (used in
ds_SetOwner).
- Template Change - Support for Multi-Proj - allows manual inclusion
of the Secwin Driver DLL - instead of using the Secwin Global
Extension setting (better support for Driver Substitution -
particularly the IPDriver).
Version 4.49 (11 June 2008) (No TXA import
required if upgrading from a version greater than 4.43)
- Template Change - improved Multi-DLL implementation. TXAs included
for external procedures.
- Improved Multi-DLL examples (includes an IPDriver Multi-DLL
application).
- Template Change - if 'Generate Access points everytime' is
unchecked, then don't force the addition of the sac points file into
the Secwin_SetGlobalAccessControls control template's include file
list.
Version 4.48 (5 June 2008) (No TXA import
required if upgrading from a version greater than 4.43)
- DLL fix - suppress CRC check during internal view transactions. In
SQL - this was doing an incorrect CRC check - resulting in a corrupt
security files warning.
- DLL fix - Change Login function was displaying the old Secwin DLL
window if no password was sent to the procedure
- DLL fix - ds_LockScreen - don't allow the window to close unless
legitimate closure issued.
- Template Change - display the login in the UsersList
(SecwinSetAllAccess window)
Version 4.47 (6 May 2008) (No TXA import
required if upgrading from a version greater than 4.43)
- DLL change - increase field length of the login names and passwords
in the deprecated dll window procedures (ds_LoginText, ds_ChangeUser,
ds_ChangePassword).
- DLL change - new procedure
ds_GetUserProperty. Users the Login name to get the property. If
the property was numeric, then ds_GetProperty was not returning the
correct user's details. Also, ds_GetProperty can accept a numeric
login preceded by '####'
- DLL change - IPDriver workaround - IPDriver was returning an
incorrect error code (errorcode 45).
- DLL Change - when upgrading from Secwin3 tables, store the original
login case-sensitively in the case sensitive field, and the login as
uppercase (for optimized login searching).
- Template Change - Secwin Menu extension template - allow all or some
of the procedures to be started in a new thread (requires some
procedures to change their parameter from a long to a string)
- TXAs change - calls the new ds_GetUserProperty where applicable.
Version 4.46 (21 April 2008) (No TXA import
required if upgrading from a version greater than 4.43)
- DLL change - Fix - returns the case-sensitive name in the functions
returning the current login (like ds_CurrentLogin and ds_GetProperty).
- Rebuilt installs (Corrupt installs for some of the patch installs).
Version 4.45 (9 April 2008) (No TXA import
required if upgrading from a version greater than 4.43)
- DLL change - Lock window password screen centered.
- DLL Change - allow translation of 'Access' and 'Group' used in the
SecwinSetAllAccess window.
- Template change - 'Disable Licence file registry check' is moved to
the global extension template (instead of the User Login Here
template). This was called 'Allow multiple security files'
- Template change - req() not always working when req is associated
with a local extension template - so changed to using restrict
instead.
- Template change - new prompt 'Dont check access in list box
filters'. To optimize list box filters if access control is not
applied to records in the browse.
- Template fix - ds_MultiData is included in the call to the
ds_LicenceOK function if the global extension template is checked.
- Template fix - Fixed where statement in UpdateWindow derived code
into ABC mbrowse class. A call to RestrictAccess was being called at
every method.
- Template fix - TearOff support implemented (regression in previous
TearOff support implementation).
- Template change - don't call RestrictAccess if the routine is empty.
Version 4.44 (21 February 2008) (Recommend
Access Control windows TXA import to optimize the BrowseUsers)
- Optimize DLL (ds_GetUsers) - makes OperatorBrowse faster.
- Template change - force '' into email address template field if
non-existent.
- Template change - a switch on the Create_Secwin_Menu template allows
quick disabling of AccessControl menu items.
- Template change - if a blank file exists in the Files to Include (on
the SecwinSetGlobalAccess window), ignore it.
- TXA change - remove the LoadQueue after Insert, Change and Delete
(already done in the ResetWindow method).
- TXA Change - don't disable the UserGroups list when inserting a user
(now updating a users user groups is supported during user insertion).
- TXA Change - remove example sac files from the Files To Include list
(on the SecwinSetGlobalAccess window).
Version 4.43 (6 February 2008)
- Template Change - allow access points (for the Set Global Access
window) to be sorted by Template list order, REstriction Name or Bit
ID.
- Template Change - don't use Default login , if it's not set.
- Template Change - an additional embed point prior to logintext if no
users found (allows custom code to provide additional options if no
users exist).
- Template Change - if Licence date 0 (not failed) - then licence is
non-expiring (set to 9999/12/31)
- DLL fix - Secwin3 operator browse was not sorting or scrolling
correctly.
- DLL change - optimize the deletion of an Operator for SQL. Deletes
access records with a prop:sql statement, instead of manually.
- DLL Fix - don't display encrypted blank email address (if email
address is blank). Affected ODBC applications.
- DLL change - returns FingerPrint1,2, ExtraLong, ExtraString, Site,
SiteLow, SiteHi from ds_GetProperty function.
- DLL Change - immediate return from the internal ds_About function.
- DLL Fix - allow VScrolling on the UserGroup list boxes.
Version 4.42 (30 January 2008)
- DLL Change - stores a case-sensitive login for reference purposes
(in insert user, and when upgrading from dssw2.tps files).
- DLL Change - when logging in, first tries a get for the operator
(before a set/next) - optimized for SQL. Also in the ds_ChangeLoginEx
function. ds_LoginUser and ds_ChangeLoginEx now internally use the
same function to load the user.
- DLL fix - ChangeLogin and ChangePassword was not case-insensitive
(if set to case-insensitive in the UserLoginHere template).
- DLL fix - was storing in the initial password in uppercase when
adding using the old ds_InsertUserEx function.
- DLL change - allows a ds_SecwinFirstDate to be set for the expiry
date for the licence (and the shelf life for the Activation Code) to
create non-expiring dates (expires 9999/12/31).
- DLL Change - OperatorForm DLL window entry string pictures changed
to @s252.
- DLL Change - WorkGroup fields on OperatorForm unhidden.
- DLL Change - VSCROLL added to the OperatorFrom and OperatorBrowse
UserGroups list box.
- DLL Change - ds_UpdateUser: Hook2 is reserved for casedlogin storage
of the login.
- Template Change - License name, Default login and password,
Restriction Name, RunAnotherEXE and Command line parameters,
Application Name and Application Pin (in the SetPin template)
increased to 252 chars.
- Template Change - BrowseUsers procedure template prompt moved to
global extension.
- Template Change - after changelogin, do GetAccess and set access
rights from the calling window.
- Template Change - Call_OperatorBrowse code template now dependant on
the Secwin Global Extension template (to cal lthe BrowseOperators
procedure set there).
- Template Change - C55 - Work around for doing a straight case on the
returned value of ds_CheckEncryptedActivationCode. Use a temporary
variable to store the value, and compare it.
- Template Change - verifies that 0 is a valid licence date (was
reporting this as an old expired licence)
- TXA change - when returning from the SecwinOperatorForm, the User's
UserGroups are immediately displayed.
- TXA change - Access increased to 247 allowable columns.
- TXA Change - ChangePassword Cancel button activated.
Version 4.41 (25 January 2008)
- Template fix - regression in 4.39 - when making login option (and no
users added) the program was immediately exiting.
- DLL Fix - regression in 4.39. When adding a superuser, sometimes all
users were seen as superusers (and deletion of users was essentially
disabled).
- TXAs - login, password, user name and user lastname fields pictures
changed to @s252. (Requires re-importing of the txas)
- TXA - AccessControl window columns reduced to 247 to cater for
limitation in the size of the format string.
- TXA - added a Select File button to the RegisterProduct window (ABC)
for XML file selection.
Version 4.40 (24 January 2008)
- Template fix - regression in 4.39 - new apps were not using the
imported login procedure.
Version 4.39 (22 January 2008)
- DLL fix - was able to delete superuser.
- DLL change - DatePicture defaults to @d17 (not @d6)
- DLL change - Default expired licence text changed to: 'The licence
for this product has expired.|Consult your application supplier for a
new activation code|to continue using this application.'
- Template change - Login and FirstUser procedure template prompts
moved to the Global Extension template.
- New Extension template - Create_Secwin_Menu.
For ease of adding the necessary security menu items to your
application.
- Template fix - if Secwin is disabled, don't generate Outlookpanel
code.
- Template fix - Procedures where User Screen Security was disabled
was still appearing on the Global Set AllAccess Control window.
- Template fix - Tearoff support was not being disabled if Secwin was
disabled (locally or globally).
- Template change - additional embed between the login user function
and the invalid user login message.
Version 4.38 (11 December 2007)
- DLL fix - login sometimes required case sensitivity (on the login
name) - now completely case-insensitive. Login converted to uppercase
(to optimize login - so that login does not have to be "searched" for)
- DLL fix - Browse User screen was not always displaying the Default
Access correctly.
- Template fix - Secwin:AfterLogin embed point ID duplicated.
- DLL change - Login uppercased on user insert (to optimize future
logins). initial password remains the case that the login was entered.
Version 4.37 (5 December 2007)
- DLL fix (regression introduced in 4.33 for SQL upgrade tables). Only
one record was upgraded in the names table.
- Fix GPF in RegisterABC app
Version 4.36 (3 December 2007)
- DLL fix - If ChangeLogin is selected (with an invalid user entered)
then a different user was "logged in" to the one that should be
currently logged in.
- DLL fix - version number equate used in the version number display
(rather than a constant)
Version 4.35 (29 November 2007)
- Template fix - %BitValue - invalid template variable (regression in
4.33)
Version 4.34 (26 November 2007)
- Dll fix - remove stop from the DLL (when going to the AccessControl
window)
Version 4.33 (22 November 2007)
- Template Change: User Screen Security group ID - verified with a
queue of existing IDs.
- Template change: User Screen Security: Allow 250 control groups
(template now uses ds_UserAllowed,
ds_ModifyAccessEx and ds_GetAccess4 functions).
- ds_UsersEx function now returns
the UserSite for each user in the queue (used to be reserved2 field).
- ds_DisplayUsersQueue type (used in the AccessControl windows) - name
changed to String(252), and a UserSite is added (to contain the user's
site id).
- Fix - ds_UserAllowed
function prototyped to return a string (replaces the ds_UserAllowed
function).
- New functions mapped:
ds_ModifyAccessEx (includes the site id of the user) and ds_GetAccess4
- Internal function: ds_PutAccessEx includes the user site id (instead
of using the glosite, searches for the user with the user's site id).
Also allows -1 to change a particular bit position access only.
- ds_UserAllowed - if pUser is
0, then loads the current user.
- Prettified Upgrading window.
- Optimized upgrade function - logout and commit for bulk file reads.
New security files opened in deny read/write mode.
- Obscure 'File Error 2 Names :' replaced with a translatable
intelligible message.
Version 4.31 (15 November 2007)
- Template fix: For Multi-DLL applications - allows Secwin windows to
be external (New checkbox - Functions In another app) - also provides
a mechanism to automatically map those windows (if MultiProj is not
used in this application set).
- Template fix: Also for the Login and FirstUser procedures (in the
User Login Here extension template).
- Template change: Change to the feature introduced in 4.29 - to
permit a control in a group to deviate from the default (for Control
Restrictions). The default is now re-introduced and may be overridden
for each control (otherwise assumed to be the default).
- Template fix: Displays the control group where the group is a "To
User Type" group. This was not displaying anything in the Control
Restrictions base list.
- TXAs - procedures requiring NAMEs, named (to enable exporting).
NOEXPORT added to those procedures which won't be exported.
Version 4.30 (14 November 2007)
- Template fix: If Default Login is selected - was not auto-logging in
without showing the window.
- Includes a exe to generate Security codes to allow authorization of
Security File repair (see
Your_Security_file_has_become_corrupted._Consult_your_application_supplier_for_a_new_activation_code
for more details).
- Removed omit statement from the GlobalClass.
- DLL fix - if the AutoLogin and Default login was selected, then was
not performing a Default login.
- Expanded the Security Files Corruption Fixer window to include a
Email request generator, as well as being translatable. Email is not
required, but strongly recommended. This property is set in the Secwin
Global Extension template (on the Options tab).
Version 4.29 (6 November 2007)
- Template change: ControlRestrictions - removed control equate, and
combined into one list (not one control and additional list of other
controls).
- Template addition: Control restrictions to a user type (i.e.
supervisor, operator or all).
- Template change: Each control in a control group can be assigned
individually to Disable|ReadOnly|Hide, etc.
- Template change: Action to take on failed licence: changed to drop
down, and controls that still work changed to an inline list. If "Call
a Procedure" is selected, then "return after" checkbox is default to
on.
- Template change: various cosmetic improvements.
Version 4.28 (5 November 2007)
- Fix Counter checking - was not cancelling the licence if Counter
tampering occurred.
- Additional text translation (for expiredcode, failedcode,
wrongproduct and usedbefore messages).
- Additional functions: ds_SetEmailAddress and ds_SetAppName used for
forthcoming functionality.
- Fix - when a user accesses a previously unaccessed screen, the
access record is cleared (was getting some ghost data from a previous
record in the access file). Similarly with the namecodes file.
- Template change - when using the IPDriver, force the SecFilePos to
the 'Data Directory' (only valid position).
- Template change - new EmailAddress (for support) defaults to the
GPFReporter setting.
- Template fix - Where a counter restriction only pertains to certain
levels, don't check the counter for levels outside that range.
- Template fix - use the correct template message prompt in the
correct place (was using ExpiredActivation message in place of Failure
message).
- Template change - if a valid expired licence code is issued, then
don't display 'licence successful' message. Display Expired LIcence
message.
Version 4.27 (26 October 2007)
- Fix for upgrading Operator's table - was deleting the file after
upgrading in some unusual circumstances. This fixes where folks cannot
login after upgrading. Internal - call ConvertSecwinTables direct for
no file error.
- Fix (regression in 4.23) - for generating licence activation codes.
Internal method change caused invalid codes to be issued.
Version 4.26 (24 October 2007)
- Fix for AutoLogin in a Multi-EXE setup (when using the new
AccessControl windows in your application - was not permitting
AutoLogin from another application, when activated). Template fix, and
GetCurrentUser function added internally in the DLL.
Version 4.25 (23 October 2007)
- Fix user upgrade for Secwin3 file. Secwin 3 allowed a blank user in
the file - whereas Secwin4 does not allow blank Logins. A blank login
will simply be omitted from the upgrade of the user file.
- Fix for Licence concurrent checking file. Was coming up with an
Error 47.
- Fix for Counters - was not always loading all the counters into the
internal CounterQ.
- Fix for Counters - was not always returning the Counter value
correctly from ds_CheckCounter
Version 4.24 (18 October 2007)
- ds_UseLicenceEx - fix concurrent copy checking.
- Template change - new embed point before ds_UseLicence call.
- Template change - organise Secwin embeds into a single Secwin Tree
(rather than each individual item in the embed tree)
Version 4.23 (17 October 2007)
- ds_CheckCounter function included in the map file - enabling the new
Counter features to be used.
- New function - ds_CheckHashCode - and EnterHashCode (for allowing
controlled repairing of corrupted SecurityFiles) - this feature is not
available yet, but coming soon.
- ds_CheckCounter function parameters corrected, and checks the
required counter correctly (saving a decremented counter where
required)
- ds_DecrementCounterEx calls ds_CheckCounter correctly.
Version 4.22 (12 October 2007)
- ds_GetUsers function optimized (was taking a long time to load the
operators due to a sub-optimal VIEW).
- Call_ChangePassword code template requires Secwin Global Extension
template, and detects the status of the 'Allow Case-Insensitive
password' set in the User Login Here template.
Version 4.21 (9 October 2007)
- Secwin ODBC now supports PostgreSQL.
- DLL fix - supervisor "switched" to user after editing that user's
details.
- Internal DLL Change - Operators file, Access file and NameCodes file
primary key changed to the GUID key - will only affect new databases.
- Internal DLL Change - External names of Operator file's LoginKey and
Key; Namecodes file's Key changed - allows Secwin3 tables and Secwin4
tables to co-exist in the same database (where databases require
database wide unique key names) - in order to allow upgrading from
Secwin 3 to Secwin 4.
- Internal DLL Change - Access table GUID key and the Counters table
LicenceGUIDKey made case-sensitive (Conversion routine created to
handle existing Secwin 4 tables).
- Internal DLL Change - CreateSecwinTables procedure to create tables
via SQL script for those not being created by the create() command.
Version 4.20 (1 October 2007)
- Include map to ds_SetSkipCRCCheck so that Security files CRC check
can be skipped if required.
- Include ip_s4tps6.dll (was not being included in the install).
Version 4.19 (21 September 2007)
- Corrupt Security file work around (allows Security file checking to
be bypassed - only recommended where access control is not used).
Version 4.18 (20 September 2007)
Note: Although support for the IPDriver is fixed, upgrading from
the Secwin 3 tables is still not possible yet.
- CLIPSTRING = FALSE driver string added to the SQL driver strings.
This is to ensure that the CRC is stamped correctly - in correlation
to the CRC returned from the database on a read.
- Regression fix - if CRC test fails, then recheck CRC (removing
spaces from the string) - if correct, then redo CRC in database.
Caters for strings being sent differently to what was returned in SQL
(because clipstring was true by default).
- Regression fix (introduced in 4.17) - if no Secwin 3 tables to
upgrade, the ds_cresec was not creating the names table.
Version 4.17 (18 September 2007)
Note: Although support for the IPDriver is fixed, upgrading from
the Secwin 3 tables is still not possible yet.
- Internal Change - createnames table superannuated (create attribute
added to the names table).
- IPDriver - owner set correctly in IPDriver tables.
- IP Driver DLL name changed to IP_S4tps6.dll - this means that the
Secwin 3 DLL can co-exist on the same server as the Secwin 4 DLL (if
required).
- DLL Fix - when a user is deleted, delete the association with any
usergroups that the user group is associated.
- Template Fix - If Secwin is disabled from the application, then the
secequ15.clw file is still included (for variable equates and types).
Version 4.16 (14 September 2007)
Note:
If you are not using SOS to issue registration codes (you are using the
register application) - then you will need to recompile your application
from the example shipped with Secwin. If you do not do this, then your
registration codes will fail if you are not currently including the Dealer
string in your registration codes.
- IPServer DLL compiled - note, the IPDriver files are not yet
upgraded from the S3 structure to the S4 structure, so only use the
IPDriver for new applications (not existing applications upgraded from
Secwin3).
- Optimize callback - use arrays to contain size variables, rather
than a queue.
- Uses thread locking in the FileCallback while priming CRC values.
- Implement CRC check in the FileCallBack for all tables (check for
corruptions/unauthorized alterations in all tables).
- Template Change - Dealer in XML file - an option to detect the
existence of the Dealer in the XML - so Dealer inclusion is dictated
by the registration server - rather than this setting being required
to match at the child and server.
- Template fix - clears the licence details from the licence group,
before loading from XML (incase fields are omitted in the XML file).
Version 4.15 (29 August 2007)
- Control template for the SetAccess windows. Handles toggling and
setting access rights for users.
- Legacy Access Control windows - Correctly named windows and built
missing windows (Login, FirstUser, ChangePassword, ChangeLogin, and
SetAccess) - uses SecwinAL.clw
- Default ABC SetAccess window uses the control template.
- Template fix - when checking parameters required for a procedure-
don't infinite loop if no parameters exist for the procedure.
- Template change - get procedure parameter names (rather than using
hardcoded ones).
- TXAs use short filenames (8.3) - very occasionally Clarion has
compile issues with modules using longfilenames.
Version 4.14 (23 August 2007)
- DLL Fix - Changed ds_LoginUser type if not required to return the
user number (User number handle is optional).
Version 4.13 (16 August 2007)
- Fix - ds_ChangeUserPassword parameters changed (in the include file,
not the DLL) to include user's site (for replicate compatibility). May
be omitted for non-replicate sites.
- Fix - ds_ChangeUserEmailAddress
had incorrect parameters (in the include file) - also changed the site
parameter to optional (for non-Replicate sites).
- Fix - SQL was not importing user's usergroups when converting tables
from Secwin 3 to Secwin 4 format.
Version 4.12 (10 August 2007)
- Fix - Export/Import of tables (was not using a large enough buffer
to export the necessary data that Secwin4 uses). Also exports and
imports all data used in the tables (invalid file message if attempted
to import a previous S4 exported file).
- Fix in deprecated ds_LoginText function - Created user's email
address was not being encoded correctly.
- Optimize BrowseUser screen (actually anything that used the
ds_GetProperty function) - was repeatedly reloading the user from disk
- especially slow in SQL.
- Renamed the AccessControlWindows template utilities.
Version 4.11 (8 August 2007)
Note: If you have an existing Login Window, then you will need to
change it (documented in the
Creating
Your Own Login Window section)
- Fix - Imported windows use 8.3 names (very occasionally Clarion gets
confused using longfilenames).
- Feature - changes GUID generation mechanism, to use printable
characters (so that char can be used for GUID field).
- Template - force generation of AccessPoints file from
SecwinSetAllAccess control template (prevents a compile error when
SecwinSetAllAccess window is added for the first time).
- Template - add Accesspoints include file to the list when
SecwinSetAllAccess window is added.
- Template assert - force set of backend used (if not set).
- Fix - prevent GPF in old ds_GetActivationCode (set level and copies
to 1 if non-existant - prevents divide by 0 from occuring).
Version 4.10 ( July 2007)
- Feature - new
AutoPopulateUserScreenSecurity template.
- Fix -Table Limits (now supported in C55 and legacy). Note: C55
requires a unthreaded class for the filecallback method. C6 uses a
threaded or unthreaded, depending on whether the table is loaded as
threaded or unthreaded.
- Deprecated the ds_SetMaxTableRecords function.
- Fix - Counter is not case dependent.
- Allows a translatable table limit warning message.
- Fix - when table limit is reached (warning is displayed).
- Fix (for legacy) - was not detecting the %ProcedureCategory (must
use %ProcedureTemplate) for display table limit warning template
option.
- Fix - added req attribute to Secwin extension templates (so that
only if the global extension is added, the local extensions will be
able to be added).
- Fix - RegisterProduct Control template, was not loading counters
correctly (if MaxLevel was set to None in the template)
- Fix - legacy support for the SecwinRegisterProduct template utility.
- Fix - warning: duplicate name variable - in the AccessControlWindows
imported by the template utility.
Version 4.09 (26 July 2007)
- Fix - When using Table limits, was not saving the limit record
(internally) correctly (GUID was not being populated).
Version 4.08 (26 July 2007)
- New Secwin datatype: ds_UserLoginOptions group (used for passing
parameters to the ds_LoginUser
function and the Login window (when using your own windows for access
control)).
- ds_LoginUser function's parameters changed.
- ds_UpdateUser changed - allows the last supervisor's details (except
level) to be changed.
- Allows case in-sensitive login (and password where specified).
- ds_LoginText Returns 0 when user not found (instead of the incorrect
ds_InvalidUser).
- Template - don't clear procs when de-selecting use own windows for
login.
- Secwin_LoginControls template - changed to show (translatable)
invalid login message - where user is invalid.
- SecwinAccessControlWindows changed (recommended re-import).
Version 4.07 (25 July 2007)
Note: If you are using your own windows (for AccessControl) -
then you need to re-import the windows using the template utility (because
the OwnLogin method has changed).
- Fix - user login error (AddUserToMemory function fixed).
- Change - ds_GetLicenceLevelText (replaces ds_GetLevelText) and
ds_GetAccessLevelText - 2 functions for translation purposes (to
translate the level text used throughout Secwin).
- Change - ds_GetUsers replaces ds_UsersEx with a comprehensive set of
user details.
- ds_LoginUser returns 0 when not successful and the appnumber when
login is successful (in keeping with ds_LoginText)
- Internal - OpeRecordToGroup decrypts the user info needing
decrypting (instead of returning encrypted).
- Improved AccessControl windows - SecwinSplashLogin,
SecwinChangePassword, SecwinBrowseOperators, SecwinOperatorForm.
- Template - Activate Licencing support only set on the Global
Extension template (setting superannuated in the UserLoginHere
template)
- Template - Default Licence issued is set correctly.
- New control Template - Secwin_LoginControls (required when using
your own login screen).
- Template - when using the GlobalSetAllAccess window, if the checkbox
is checked on the global extension template, then force the access
points file into the list on the GlobalSetAllAccess window.
- Template generated compile error - when a file is attempted to be
included (for access points) that is non-existent, then display a
comment to show where to delete the obsolete access points include
file.
Version 4.06 (23 July 2007)
Note: Because of a required file structure
change to the Licence security file, your licences issued after the
release of Secwin 4 will not work, your customers will need to re-activate
their licences.
- Fix - security leak allowed licence tampering without detecting. The
upgraded licence file requires abandonment (to a new structure).
- Fix - Licence table was not being created in SQL due to duplicate
primary key.
- Change - new ds_LoginUser function changed to exclude a window
(which allows better integration for using your own login window).
- Change - equates returned from ds_LoginUser changed to negative when
error occurs.
- GUID generation changed - use printable chars only in the GUID.
- OperatorForm - only show the UserGroups list if the user is an
operator.
- Fix - if Licence name mismatched, then was failing to add licence
(generating correctly), but generating a Success message.
- Fix - registry stamp (was not stamping registry on a StoreLicence,
so new licences could be corrupted).
Version 4.05 (19 July 2007)
- Fix for SQL (was not setting the owner string correctly)
- Fix - could not delete usergroups in the SecwinDLL windows.
Version 4.04 (18 July 2007)
- Examples in C55.
- Connects to SQL (MSSQL and MySQL tested) database and creates tables
correctly.
- Upgrades SQL tables correctly.
- Removed Makeover from Secwin - Secwin 4 now supports improved
AccessControl windows.
Version 4.03 (17 July 2007)
- Change functions - ds_GetProperty, ds_ChangeUserEmailAddress,
ds_UserAllowed, ds_UsersUserGroups (and other internal functions) -
now includes site field to correctly identify the user where
associated with a replicate site.
- Fix - SetAccessWindow now sets the access correctly.
- Fix - UserGroups can be deleted - was warning on last supervisor
before loading the record.
- Fix - version number from Lib file removed.
- Template fix - size of template prompt for control field (Control
Restrictions).
- New SetAccessWindow - new import of AccessControlWindows required
- Secwin GroupType change - ds_UsersUserGroupsQType and
ds_UserDetailsType includes the site field.
- New function -
ds_UpdateUsersUserGroups
- Fix - ability to change user details correctly.
- Fix - in UsersUserGroups, ability to assign and read a user that has
been added at a site, into a usergroup from a different site.
Version 4.02 (16 July 2007)
- Fix - template calls ds_SetPin function correctly.
- Include CreateSecurityTables example.
- Fix - warn on no Default Password and Login (if own login window is
used). Will resolve this in a later build to not force this.
- TXAs - include Access Control for windows in your application.
- Include CreateSecurityTables example (and application in bin
directory).
- Included Outlookbar support.
Version 4.01 (12 July 2007)
- Fix - When Converting tables check for existing UserGroup (if a user
was previously assigned to a UserGroup) - before assigning the user
group.
- Fix - in ds_UsersEx, was not populating the queue correctly (after
finding a usergroup).
Version 4.00 (12 July 2007)
- Show stopper (introduced in 3.99) - conversion was not setting the
LicenceType correctly (to permanent by default). If you upgraded from
Secwin3 during the alpha phase, you need to delete your upgraded
dssw4.tps file, to enforce a re-upgrade of the Secwin tables.
- Support for Secwin Online Server (for online registrations - the
Secwin 4 way).
Version 3.99e (10 July 2007)
- Expanded ds_SaveLicenceToXML and ds_LoadLicenceFromXML to load from
and save to an XML string.
- Auto-register XML details when XML file dropped (template option).
Version 3.99e (10 July 2007)
- Expanded ds_SaveLicenceToXML and ds_LoadLicenceFromXML to load from
and save to a XML string.
- Auto-register XML details when XML file dropped (template option).
Version 3.99d (6 July 2007)
- Compiled in versions c6.2 9049 to c6.3 9056.
- xFiles included in the DLL (rather than the application) - this
means that xml comes standard and no additional products are required.
TXA including xFiles support, now becomes deprecated.
- Template fix for including database support.
- Re-labeled additional licence fields (to AdditionalString1,
AdditionalString2, AdditionalString3, AdditionalLong1,
AdditionalLong2).
Version 3.99c (3 July 2007)
- Implemented other database support (untested as yet).
- Removed requirement for NetTalk when importing the RegisterProduct
window.
- 2 RegisterProduct txas - one for xFiles, and one without.
- Rehashed product registration window - for better future
compatibility.
- included CRCandLen function for RegisterProduct window (for
determining length and CRC of user-enterable fields - particularly
helpful for non-XML registration applications).
- Included drag-and-drop support for XML RegisterProduct window.
- Allow command-line security file creation (for install script
running).
- Dealer string allows a licence to be tied to a particular dealer.
Version 3.99b (29 June 2007)
- Removed stops :( from DLL
- Included RegisterABC.app with the correct dct structures required
for XML export.
Version 3.99a (28 June 2007)
- New Dealer field in the Licence file - will cause:
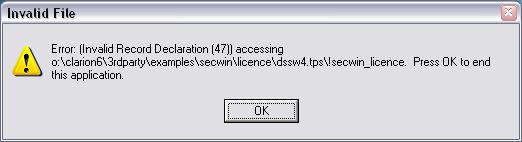
You need to delete your dssw4.tps file , and let Secwin re-upgrade
your Secwin3 file (for upgrading Secwin users).
- Limit Queues include the Relative switch (relative is not supported
at this stage, but will be supported later).
- Included XML file support for registration (requires xFiles version
1.23 or later).
Version 3.99 (26 June 2007)
New Features:
Fixes:
- Fix - CopyAccess was not operating correctly.
- Fix - When deleting a user, their access was not deleted.
- Fix - Users not limited to < 32000 (who's going to have more than
32000 users anyway?).
Version 3.47 (19 June 2007)
- Fix - different products using the same dssw2.tps file (and
different OS's accessing the same dssw2.tps file) - allows valid
checking of the Security file with the registry.
- Include latest Makeover in Secwin.
Version 3.46 (6 June 2007)
- Ability to disable Makeover in Secwin.
Version 3.45 (11 May 2007)
* Include latest Makeover classes into Secwin.
Version 3.44 (18 April 2007)
* Include latest Makeover classes into Secwin.
Version 3.43 (14 March 2006)
* Include latest Makeover classes into Secwin.
Version 3.42 (13 December 2006)
- New function - ds_ModifyAccess - allows modification of access
rights (without having to pass all the existing rights to the
function)
Version 3.41 (29 August 2006)
- Message indicates when import is complete.
Version 3.40 (27 July 2006)
- Fix - Exports and imports all tables (was not importing the names
table - so no access rights were being carried over).
Version 3.39 (29 June 2006)
- Fix - for Firebird database support (regression when Ingress support
was implemented). If using Ingress, then you must set the Database
Type to Ingress (Secwin Global Extension template setting).
Version 3.38 (15 June 2006)
- Supports alternative data subdirectory for the security files for
the IPDriver (for more infor see the IPDriver
Compatibility section of this document).
Version 3.37 (10 May 2006)
- Fix - exports the ds_ImportTables and ds_ExportTables functions.
These now take a parameter as to whether you want to select a path to
export to/import from or (by default) export to the current directory
without popping open a select file dialog.
- Template change - tweaks to support SecwinOnlineServer generated
code (now 100% control template generated code): Calls the
NetSimpleProcess, iunique changed to a string, implemented Serial
Number send and receive.
- Fix for MySQL operators create in C55 and c5 (regression in 3.36)
Version 3.36 (27 April 2006)
- Fix - workaround for MySQL5 support. MySQL 5 does not allow 0 DATEs
(NULLs are cool - but not zeros). When initializing the
LastPasswordChangeDate (LONG) - it's set to 0, which MySQL 5 was
complaining about. LastPasswordChangeDate is now created as an integer
rather than a DATE on the MySQL backend. In previous versions of MySQL
this will also be created as an integer, but existing DATE types (in
previous versions of MySQL) will still work.
Version 3.35 (27 April 2006)
- Template change - Updated Secwin Online Server control template to
support using the HTTP protocol.
- Fix - created a secequ60.clw file which is only included for
Clarion6.1 users and earlier (users on Clarion 6.2 9046 will need to
check the manual include checkbox on the global extension template as
the requirement for this include cannot be detected automatically
between in 9046)
Version 3.34 (21 April 2006)
- Change to Login window - buttons made transparent, which means that
manifest files will be applied to the login window.
Version 3.33 (21 April 2006)
- Fix - IPDriver - was not detecting the status of the enable checkbox
on the IPDriver client template.
Version 3.32 (18 April 2006)
- Fix - MySQL driver was not creating the licence table correctly.
Version 3.31 (24 Feb 2006)
- Added ds_CloseFiles() function for when a program exits. This was
affecting the IPDriver build of Secwin, because not all the files were
being closed (by the IPDriver DLL) on program exit
Version 3.30 (1June 2005)
- Added ds_ExportTables and ds_ImportTables functions.
- Added support for Clarion 6.2
- Added support for Ingress, using the ODBC driver
- Added "Secwin : After Login" embed point
- Cosmetic : Small tweak to AllOver utility template
- Fix : Clarion chain template code if no users exist
- Fix : Secwin items are not generated into Multi-Proj projects if
Secwin is disabled.
- Fix : Code added to GrantAccess routine to activate controls if
Modules exist.
Version 3.28 (22 December 2004)
- Added support for new IP Driver
from SoftVelocity. (Clarion
6.1 only)
- Minor fix to LoginText function
- Updated About screen
- Added new Control Template (GetWebActivation) for use with
Secwin-Online-Server
Version 3.27 (26 October 2004)
- Updated template to new CapeSoft look
- minor fixes for 5.5H, 6.1 support and so on.
Version 3.26 (22 January 2004)
- Fixed Sync bug in ds_CurrentLogin in C6
Version 3.25 (12 January 2004)
- Some changes for Clarion 6 compatibility
- Added support for Postgress in the ODBC version
- Added "Allover" template utility for generating all SetAccess names
Version 3.22 (14 July 2003)
- Added ds_DecrementCounterEx function.
- Documentation improved.
Version 3.21
- Changed all examples to compile in 32 bit
- Added ability to change date picture used on "Messages".
- Fixed problem on Operator Form when "Level" was translated.
Version 3.20
- Added support for Makeover 2.5. If you are using Makeover version
2.5 (or later) then you MUST use Secwin version 3.2 (or later). You
can download the latest Makeover from here.
- Dropped support for 16 bit. (If this is a problem for you let me
know, but as far as I know no-one is actually using 16 bit, so it
bloats the install for no good reason.)
- Clarion 4 Support Dropped : This version makes use of Clarion 5
language features. With the imminent release of Clarion 6, support of
Clarion 4 is being phased out.
Version 3.19
- Added ds_GetWorkGroupEx
function. (returns a long, not a short)
- Added ds_CurrentWorkGroupEx function. (returns a long, not a short)
- Corrected docs - 30 controls allowed, not 31
- Set MySQL to create UpperCase table names
Version 3.16d beta 6
- Added ds_CurrentlyLoggedInEx
function
- Fixed message where too many users logged in - now correctly
displays names of people already logged in.
Version 3.16c beta 5
- fixed problem with translations on the SetAccess window
- fixed problem with messages being suppressed immediately after
registering
- lengthened column headers from 9 to 20 characters
Version 3.16 beta 4
- Fixed problem with InterBase support
- Added support for Pervasive.SQL
driver
- Added ds_CurrentLastPasswordChange function
- Fixed problem with generating Login Screens to display after the
Frame
Version 3.15 beta 3
- Extended number of optional modules supported from 15 to 30.
- Support for MsSql, Oracle and ODBC (MySql / Interbase) drivers
completed. Examples included. See Security-File
Driver
Version 3.1 beta 1
Version 3.11 beta 2
- Fixed some bugs in Splash, and SplashABC examples. Specifically a
missing "do LoadQueue" from myBrowseOperators in SplashABC, and some
code to both myBrowseOperators and mySetAcess to limit access to these
screens to supervisors. Also ticked on the Password attribute for all
password fields.
- Extended the Change
Login Code template quite a bit. The menu item should now use
this template, and not call ChangeLogin directly. Even if you are
calling your own Change Login, you should still use this template from
the menu.
- Changed the Login
template (internally) to support "only 3 tries" even if a
myLogin screen is used.
- Changed the Login
template (internally) so that if a myLogin window is used, then
it allows repeat attempts. This makes it consistent with the built-in
Secwin login screen.
- Changed the Login
template (internally) to support Automatic Logins from other
EXE's, even if a myLogin window is used.
- Added a new option to the Login
template to allow you to specify the name of your MyFirstUser
procedure.
- ds_CountUsers function added.
ds_InsertFirstUser
function added. These are both necessary to take care of the case
where no users exist in the system.
- Fixed bug in ds_InsertUserEx
function.
- Added myFirstUser procedure to Splash and SplashABC examples.
Version 3.0 Beta 5 :
SPECIAL NOTE : If you used Beta 3, or Beta
4, with any of the SQL driver packs (MsSql, SQLAnywhere, Oracle, ODBC etc)
then you will most likely need to Drop all the DSSW
n Tables and
let Secwin re-create them. This is due to some changes which were required
by SQL in order for Secwin to work properly.
- New : Automatic Impending Expiry Date warning. See UserScreenSecurity
extension.
- New : Restrict Controls based on License Level. See UserScreenSecurity
extension.
- New : Restrict Controls based on Optional Modules in License. See UserScreenSecurity
extension.
- New : Stores MDI Logo thread number in MdiLogoThread# in case you
want to send it an event from the Frame.
- New : ds_SecwinMessage
function.
- New : The License file is now encrypted using triple DES. This
prevents the license being changed by data file browsers.
- Changed : AccessRestricted message moved from Template to DLL (to
allow translating) by using ds_SecwinMessage.
- Improved : translation support, especially on SetAccess screen.
- Fixed : SQL support - now appears to be all working except for
Concurrent copies checking
- Fixed : Disable Secwin now disables all CODE templates as required
- Fixed : User Group Form 'wot got broke in beta 4 like'.
- Fixed : Bug in Registration procedure which caused non-displayed
optional modules to be set ON. When generating codes, non-visible
optional modules are assumed to be OFF.
Version 3.0 Beta 4 :
- Fixed bug in registration Code activations
- Fixed SQL support. Tested with MsSql - other tests hopefully coming
soon
- Fixed bug in Btrieve, not allowing any operators.
- Fixed bug in Login window after frame opens.
- Fixed bug in Translate feature on Set Access screen.
- Fixed problem where the Change and Delete buttons are not properly
disabled in ABC.
- New : Multi-Set example - Demonstrates Secwin in a Multi-Dataset
application.
- New : Supports Template Driver setting of <nothing>
- New : Added option to set the Level of the Demo License. See Login
Extension, Licensing Tab.
- New : MsSQL example included in the MsSQL driver pack.