Introduction
What is SelfService?
CapeSoft SelfService allows your Clarion applications to be run as Windows
Services.
What do Services offer you?
One of the great features of Services is that they don't require a user to
be logged in, in order to run. Services can automatically start on boot
up.
Services also do not shut down when a user logs off or switches user, so
your application is always running.
What sort of applications are suitable for being run as
a Service?
Any of your applications that behave like a server are ideal candidates
for being run as a Service, for Example;
Web servers,
Web, FTP or Email polling applications,
Control applications like air conditioning servers,
Server components in client/server applications.
How easy is it to make my application run as a Service?
With SelfService you are able to convert your existing applications into
services in just a couple of minutes. No hand coding is necessary if you
simply want your application to run and install as a service. To maximize
the functionality that services offer you we have outlined a list of
considerations and tips. These serve as guidelines to help you design and
deploy effective and powerful services. To utilize more advanced service
functionality a small amount of hand coding may be necessary, which is all
clearly documented and demonstrated in the examples.
Installation
To download the latest installation please go
here
Ground Rules
(recommended reading)
This section explains some of the concepts that you'll
need to consider in order to effectively use Services.
- With SelfService added, your program can run either as a Service, or
as a normal EXE. When running as an EXE it behaves like any Windows
program. However when running as a Service it may behave slightly
differently. The items below only refer to the time while it is
running as a Service.
- Your service runs in a user account of your
choice. In the SelfService global extension you can specify
which user your service must run in. It's important to choose the
correct user as it will affect the behavior and functionality of your
service. SelfService offers you two options:
- Local System - This is the default
user, but it will not allow network access to other machines
shared folders (unless they are accessible to Guest via a null
session). This user also cannot open HKEY_CURRENT_USER
in the Windows registry.
NOTE: The GUI will not be visible while the program is
running as a Service.
- Custom - This allows you to specify a
user and password. Your service will then run with the privileges
of that user. If you give that user account access to shared
network folders, then your service can access these folders.
However the GUI of your program will not be visible to any user,
while running as a service (regardless of the Windows version.)
NOTE: The GUI will not be visible
while the program is running as a Service.
Note: the user account you choose must have a password
(it won't work without one).
Note: The user account may need to
be preceded by a .\ for example: .\administrator
Note: You'll need to give your
account "log in as service rights". Which can be done two ways:
- If you type the account details in to the Windows Service
Manager, the Service manager automatically adds "Log in as a
Service" rights.
- You can the Group Policy Editor (gpedit.msc).
Local Computer Policy | Computer Configuration | Windows
Settings | Security Settings | Local Policies | User Rights
Assignments | Log on as a service.
There are also two other built in account types that you can use (you
can enter them in the custom fields), but these do
not work with NetTalk, and are therefore not recommended:
- Network Service (enter NT
Authority\NetworkService as the username, no password) -
Shared Network folder access, not interactive and not compatible
with NetTalk.
- Local Service (enter NT
Authority\LocalService as the username, no password) -
Limited access user (no networking), not interactive and not
compatible with NetTalk
It's important to choose the correct account type, depending on
whether you want an interactive service, or a service that has access
to network files. Another thing to bear in mind is that if you are
using Proxy client software (e.g. Microsoft Proxy) to access the
Internet, this may not be available to the Local System account.
NOTE: Some external programs,
notably Excel, require a Desktop folder to work properly. If your
service interacts with other programs then it's probably advisable to
make sure the desktop folder exists. For 64 bit windows this is;
c:\Windows\SysWOW64\config\systemprofile\Desktop
for 32 bit windows this is
c:\Windows\System32\config\systemprofile\Desktop
- Windows Vista and later versions of
Windows, do not allow for the program's user interface to be visible,
while the program is running as a service. Thus an external method for
managing the service is recommended (this is discussed in more detail
in the JumpStart section of this document.)
Your program can still have windows, and indeed for most programs
these windows are necessary (because they process Events.) The windows
are still there, it's just that no one can see them.
- Your Service needs to be able to shutdown
smoothly without displaying the "Application still
active. Quit the application before quitting Windows" message.
So you're going to need WinEvent
to make sure your program automatically shuts down.
- A Service can only have one instance started by
the Service Manager. Although you can run multiple instances
of the same executable by double clicking it, the Service Manager will
only open one instance. i.e. If the Service Manager has already
started your Service, it won't and can't start another instance.
You can register the same exe multiple times, but each instance needs
a unique service name.
- Windows UAC, Services and Logins
In order to Register a service, the program needs to be run "As
Administrator".
There are possible options to solve this problem:
- Right click on the exe or shortcut and start it as
administrator.
- Add a Manifest to your program, and set the Manifest level to
"Require Administrator". This approach though means that the
program has Administrator access all the time, not just when
installing the service.
- Create a separate EXE that Starts, Install, Stops and Uninstalls
the service. When these functions are needed call this EXE using
ShellExecute and start it as an administrator. This approach has
the advantage that it works regardless of the UAC setting and does
not require the user to right click and start the management
program as an administrator. It also fits in with the manner in
which Microsoft specify that services should work.
- Adding to a Multi-DLL
solution.
If you are adding SelfService to a Multi-DLL then you add it to the
EXE app, not the Data DLL. There are no differences between adding
SelfService to a multi-app solution.
- Windows Server 2008 (and later)
If your program generates reports, then you will need to change
the account from Local System to User.
This is because the Clarion report engine requires a printer in order
to determine many of the report parameters.
In Windows 2003 and earlier you could install a printer for the Local
System account, but as far as we can tell (and we invite correction on
this point) there's no way to install a printer for the Local System
account in Windows 2008. So you will need to install a printer on
another account, and then set your service manually to use this
account.
- Windows Fast-Start
So you install as a service, and your service is running. Then you
shut-down the server, and after some time (quick or slow) you start it
up again. At this point surely your program just starts again right?
Well, maybe not. A feature in windows called Fast Start (if turned on)
just "hibernates" the machine on the shut-down (the service is not
ended) and unhibernates it on the next restart (so the service just
picks up where it left off.) Not only does it "seem" you you that the
program "remembered" all the variables, but it also does not re-do any
normal start up code.
A "Restart" is different. If you Restart, instead of Shut-Down, then
all the programs will terminate completely, and the machine will do a
from-scratch, cold start.
For more information see
https://www.howtogeek.com/243901/the-pros-and-cons-of-windows-10s-fast-startup-mode/.
thanks to Graham Dawson for discovering both this effect, and the
reason for it.
User Tips
(recommended reading)
This is a collection of tips from folk who have
implemented SelfService in applications. If you have a tip to add here,
please email it to us.
- David Jung reports: If your service is set to open files in
Exclusive Mode (i.e. not shared mode) and other program opens the
file, then the service will stop unexpectedly.
- Richard Rose says: Don't rely on some api's that return user
specific data like GetUserName() to return
the logged on users details, it returns the details of the system
account that the service logs on with.
- Larry Sand reminds: Create hook procedures for all the popup windows
- like AssertHook (for asserts if your program is compiled with
debugging turned on), HaltHook, StopHook and MessageHook for Clarion
HALT, STOP and MESSAGE commands. Failure to do this means if one of
these items "pops up" there's no -one there to see it, and the app
"stalls". (Cunningly CapeSoft has a product that let's you log,
and suppress these, called
MessageBox )
Jump Start
(recommended reading)
Services are really easy to create, and administer.
Using this Jump-Start we'll walk through all the steps you need to
consider to turn your application into a Service.
Your program not be visible while it is running as a Service. This adds a
layer of complexity, which will be addressed in the second part of this
Jump-Start.
Important: If you haven't already done so,
read the
Ground Rules section of this
document now.
1.
Add the SelfService Global extension to your
application
a) Open the application
b) Click on the
Global button (or select
Global Properties from the
Application
menu)
c) Click on the
Extensions button
d) Click on the
Insert button
e) Select
Activate_SelfService from the list of
available extensions.
f) Select the
Settings tab
g) Enter your
Service Name (this shouldn't
contain any spaces). Your name should be unique to this application.
h) Then enter the
Display Name and the
Service
Description.
The rest of the settings can be left at their default value for now.
That's all you have to do to make your application into a service. At this
point you can install your program as a service just by running it with
the command line switch (
/ISS
by default). After that you can manage it using the Windows Services
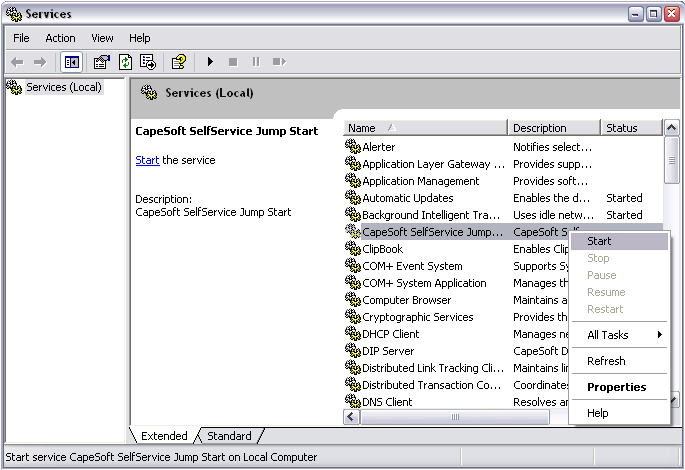
Manager (
Services.Msc).
You can run your program as a normal Exe (setting any settings you like)
or as a Service. When running as a service you may not be able to interact
with it. It still has Windows and timers, and so on, you just (possibly)
won't be able to see them.
There are a few possibilities for interacting with the service itself.
They are;
a) Include a Web Server inside the service. This allows you to interact
with the Service using a browser. This is the easiest approach, that works
on all versions of Windows, but does require that you have NetTalk Server.
b) Create a separate program that can Install, Start, Stop and Remove the
Service. This program may also allow your user to change service related
settings, and so on.
2. Creating a Separate Client Management application
The idea behind a separate manager is very simple. You add the SelfService
global extension, and the Management controls to a
different application, as per steps 1, and 2 above. The only
difference between the Manager app, and the actual Service app, is that
the Manager is set with the specific EXE name of the Service app.
Up to now the EXE name has been set (by default) to be the name of the
application that is running. However, if you set the EXE name to be that
of a different application, then all the commands to Start, Stop, Install
and Remove services apply to the Service EXE, not the Manager EXE.
a) Create, or open, the new application that will act as the service
manager.
b) Add the Global Extension as per step 1 above.
c) Add the Management controls as per step 2 above.
d) While still in the Window Formatter, Right-Click on one of the
management controls, and select Actions...
e) In the Service EXE Name setting enter the name of the Service Exe.
Include the .Exe in the name, and wrap the name in Quotes. For example
'JumpStartSelfService.Exe'
f) If the Service EXE is in a different folder to the
Management Exe, then enter the Service EXE's folder here. However usually
the Service EXE and Management EXE will be in the same folder, so usually
this field will be blank.
Destroy Controls
When running in service mode, a program can hang, or
GPF on closing. The exact circumstances of the issue are undetermined. If
this happens then destroying controls on windows as they are closed can
work-around the issue. SelfService includes a Global Extension template
called DestroyControls.
This template allows a conditional to be entered. This allows you to only
leverage this behavior when the program is being run as a service, not as
an Exe. There's no "always right" conditional here, but here are some
possibilities (in order of preference);
1. Using Clarion 10.11975 or later;
System{'ss:AmService'} = true
2. Single Exe system, using SelfService to make the program run as a
service;
gSelfService.AmService = true
3. Multi-App system, with ServiceService Global Extension added to each
app;
RunningAsAService = true
4. Otherwise;
4.1 Add a global variable to your dictionary. Called say glo:RunningAsAService
4.2 In the Exe app, Global Extensions, "Set Running As Service variables"
Embed Point, set your global variable;
glo:RunningAsAService = gSelfService.AmService
How to Know If the Exe is Running as a Service
The easiest way to know if your app is running as a
service is to test
System{'ss:AmService'}.
This is set to true when the program is in service mode. For example;
If System{'ss:AmService'} = true
! in service mode
End
This approach only works if you are using Clarion 10.11975 or later.
The advantage of this approach is that the code is system-global, meaning
it'll work in pre-compiled DLL's, classes with no access to global data
and so on.
If you are using an older build of Clarion then we recommend either (a)
upgrading, or following one of the steps described in
Destroy
Controls above.
Deriving from MyService Class and Using Derived
Classes
SelfService provides a number of embed points where
you can embed your own code into the generated gSelfService object. This
approach works well if you have a single EXE, and the code only needs to
go into one place. However if you are wanting to override the default
behaviour across multiple EXE's, then the best approach is to derive the
MyService class, adding your own code. Then that derived class can be
applied to the Exe. This section shows how to do both of those things.
Deriving the MyService Class
Deriving a class consists of creating two new text
files. An INC and a CLW file. You can call these anything you like
(typically they have the same name, just a different extension.) These
files should be in the same folder as the
SelfService.INC
and
SelfService.CLW files. Usually this
is in
\clarion\accessory\libsrc\win. In
the examples below these files are called
CustomSelfService.INC
and
CustomSelfService.CLW.
INC File
The INC file contains very little boilerplate
code. Just a simple INCLUDE statement, and the derived class
declaration.For example;
include('SelfService.Inc'),once
CustomServiceClass Class(MyService), Type,
MODULE('CustomSelfService.Clw'),
LINK('CustomSelfService.Clw',SelfServiceLinkMode),
DLL(SelfServiceDLLMode)
WarnAboutOtherInstance PROCEDURE (long p_ErrorNum=0) ,DERIVED
End
Note the MODULE and LINK point to your custom CLW file. You can use
the SelfServiceLinkMode and SelfServiceDLLMode
as is.
In this file, the INCLUDE at the top points to the parent class
include file, in this case SelfService.Inc.
CLW File
The CLWfile has a little more boilerplate, then
the custom methods are defined. You only need to derive the methods
you want to change, not the other methods.
member()
map
end
include('CustomSelfService.Inc'),once
CustomServiceClass.WarnAboutOtherInstance PROCEDURE (long
p_ErrorNum=0)
code
message('yo yo ... no')
parent.WarnAboutOtherInstance(p_ErrorNum)
Note that in this file, the INCLUDE points to your custom include
file.
Using the Derived Class in an App
Using the derived class in an application is a
simple 3 step process;
- Go to the SelfService Global Extension, to the Classes Tab. In the
Additional INC Files list add your custom INC file.
In this example CustomSelfService.INC.
- Click the Refresh Classes button. Then click the
Classes button. You should see your new derived
class listed there.
- In the Class Name field enter the name of your
derived class. In this case CustomServiceClass.
Examples
There are SelfService examples in your
\Examples\SelfService\
directory.
- JumpStart 1 - This example has implemented
Step 1, and Step 2 of the JumpStart documentation above
- JumpStart2 - This example includes an
external Manager program, as per Step 3 of the JumpStart documentation
above.
- Legacy - Simple example using the Legacy -
Clarion Template Chain.
- MultiDLLABC
- MultiDLLLegacy
Template Reference
SelfService Global Extension
General Tab
Disable All SelfService Features
If this option is on then no SelfService code will be generated into
the application.
Options Tab
Service Name (no spaces)
This is the service name (no spaces allowed). You can use this name in
a DOS prompt to call:
Net Start <ServiceName>
Net Stop <ServiceName>
Use quotes, or use a variable (which you can set in the 'SelfService -
Initialize variables' global embed point).
Service Display Name
This is the name displayed in the Windows Service Manager.
Use quotes, or use a variable (which you can set in the 'SelfService -
Initialize variables' global embed point).
Service Description
This is the description of your service and is displayed in the
Windows Service Manager.
Use quotes, or use a variable (which you can set in the 'SelfService
- Initialize variables' global embed point).
Allow Command Line usage
Allows you to run your app with
/iss
(Install and Start Service),
/is (Install
Service) or
/rs (Remove Service).
Additionally you can add
/silent if you do
not wish to see the status messages.
See the
Command Line Switch Options if you
want to customize the command line switches.
Always make path the same as the Exe Folder
This option will set the path of a service to the same as the exe
folder location. This is useful as when a service is started by the
Service manager, the path is
Windows\System32,
which is probably not where it was when you created and tested your
application. So it's best to have this option turned on.
Allow only one instance to run at a time
Will allow only one copy of the application to be run at a time
(either as a normal exe or a service)
Service Account
This is where you can choose which user the service should be run as.
This is described in the
Ground Rules
section. (Please note the user account you choose must have a password
(it won't work without one)).
Dependency
This allows you to add one dependency for your service. This must be
the ServiceName of the dependent service. (Should you wish to add
multiple dependencies then please see
DependenciesQueue)
Extra Tab
Turn on Logging
Send logging information to Debugview.
Side Note: When running Debugview++, to capture logging from services,
you need to run Debugview in Administrator mode, and set the option
Capture Global Win32 to on.
Work with WinEvent
This should be ticked on if you have WinEven in the application.
Don't check if running as an Exe
Check this checkbox to disable the check (i.e. it assumes that your
app is always a service).
Terminal Services uses Global Mutex
By default, a service will use a local mutex in Terminal Services,
thereby allowing one instance of your service per terminal service
instance. If you only want one instance of your service app over the
entire machine (even if in TS mode) then check this checkbox.
Multi-DLL Tab
This is part of a Multi-DLL Program
If you have added SelfService to the Data DLL, then tick this option
on. In most cases you do not need to add SelfService to the data DLL,
you can jsut add it to the Exe, in which case leave this option off.
Export SelfService class from this DLL
If you did add it to the Data DLL, and this is the Data DLL app, then
tick this option on. Otherwise leave it off.
Control Templates
SelfService ships with two Control Templates that
make it easy to add buttons to your window that allow you to install
(and start) your application as a Service.
Install and Start Button Control
This adds a single button to the window. It is a
minimalistic control that allows the user to install, and start, the
current exe as a service.
Service Buttons Controls
This adds a number of buttons, and a number of
instructions on a window for installing, starting and removing the
program as a service. It is a more functional alternative to the
single button above. It also contains far more template options so you
have more control over the program being installed.
Perform Operations Silently
If this is on then the registration will happen silently.
Service Exe Name
If left empty then the name of the current exe is used.
Service Exe Folder
If left empty then the location of the current exe is used.
Service Parameters
Add and optional, command line parameters here. These will be used
when the service is started and are accessible with the Clarion
COMMAND function.
Start Type
This determines how your service behaves when the machine is rebooted.
Choose one of
Automatic,
Automatic-Delayed,
Manual or
Disabled.
SelfService Object Properties
All the common and most useful SelfService settings
are configurable via the SelfService Template options. But we've also
listed the object properties here. It's more than likely that only
advanced programmers will want to access these properties.
| AllowCommandLine byte |
Set in global template - Allows the /is and /rs to install /
remove the services. |
| AllowOnlyOneInstance byte
|
Set in template. |
| AmService byte
|
Automatically set. Set to 1 if application is being run
(started) as a service, otherwise 0. |
| Automatic byte
|
Deprecated. Will cause a compile error. Use StartType
property instead. Defaults to
1 in Construct, this indicates the type of service (automatic or
manual). |
| DependenciesQueue
SSDependenciesQueueType |
Set by template for one single dependency. This must be the
ServiceName(s) of the Service(s) that your service is dependent
on. This could be your SQL Server service for example.
To add multiple dependencies you could use the following code:
free (gSelfService.DependenciesQueue)
gSelfService.DependenciesQueue.DependencyName = 'Themes'
! XP Themes
add (gSelfService.DependenciesQueue)
gSelfService.DependenciesQueue.DependencyName = 'W32Time'
! Windows Time Maintainer
add (gSelfService.DependenciesQueue)
The best place to add additional dependencies is in the Global
Objects|Capesoft Objects|gSelfService| Other Before Start Method
Call. |
| Description cstring(256)
|
Set by template. Used in Install/Remove - the description that
is displayed in the Windows Service Controller |
| DisplayName cstring(256)
|
Set by template. Used in Install/Remove - the name that is
displayed in the Windows Service Controller |
| ErrorString string(1024)
|
Stores the last error - only reported by .InstallService() and
.RemoveService() |
| Executable cstring(256)
|
Automatically generated. This is the full path to the
executable. Used in Install/Remove |
| FirstInstance byte
|
Automatically set. Set to 1 if this is the first instance
running on this machine. Will only work if self.NoMutex = 0 |
| InstallAsUserName cstring(80)
|
Set in template, but you can change before you call
InstallService. If blank it will use the Local Service account,
otherwise specify a user e.g. '.\Jono'. See Ground
Rules. |
| InstallAsPassword cstring(80)
|
See InstallAsUserName |
| InstallAndStartSwitch string(80)
|
Set in Template. Defaults to '/iss' - switch for Install And
Start Service. |
| InstallSwitch string(80)
|
Set in Template. Defaults to '/is' - switch for Install Service.
|
| InteractWithDesktop byte
|
Set in global template, but you can change this in your code.
See Ground Rules. |
| LoadGroupOrder CString
(256) |
LoadGroupOrder. Used for building Kernel Services to specify
when the service should be loaded. Normally this will be left
blank. |
| LoggingOn byte
|
Set in Template. 0 = no logging, 1 = logging to DebugView
(www.sysinternals.com) NOTE: Only for OS's up to XP. |
| NoMutex byte
|
Ability to turn off mutex (1). defaults to 0 (allow mutex) |
| Parameters
cstring(256) |
Allows you to add command line parameters to the service when it
is installed. |
| RemoveSwitch string(80)
|
Set in Template. Defaults to '/rs' - switch for Remove Service |
| ServiceName
cstring(256) |
Set by template. Used in Install/Remove, and call to
StartServiceCtrlDispatcher |
| SetPathToExeFolder byte
|
Set in template. |
| ShowErrors byte
|
0 = no message statements, 1 = show error statements |
| SilentSwitch string(80)
|
Set in Template. Defaults to '/silent' - switch for Silent Mode
- i.e. no messages |
| SleepMilliSeconds long
|
If > 0 it will cause the service to sleep this period of time
on starting as a service, before launching the global application
code - see in _ServiceMain(). You'll have to set this in your own
construct method. |
| StartType long
|
Determines when the Service will start. Defaults to
SS_SERVICE_AUTO_START which means the service will start
automatically after the machine is booted. Could also be set to
SS_SERVICE_AUTO_DELAYED_START, SS_SERVICE_DEMAND_START or
SS_SERVICE_DISABLED. Used by the InstallService method. Can be set
on the template prompts for the Install Service button. |
SelfService Object Methods
All the common and most useful SelfService settings
are configurable via the SelfService Template options. But we've also
listed some of the object methods here.
| GetServiceStatus
(string p_ServiceName, *SS_SERVICE_STATUS
p_ServiceStatus, long p_Silent=1),long |
This method will return the status of a particular service.
Returns 0 on success.
p_ServiceName - the name of the service to Get the status of
p_ServiceStatus - the handle to a SS_SERVICE_STATUS group (see the
SelfService.inc file for the Clarion equivalent group declaration)
that will contain the ServiceType, CurrentState, etc. For more
info on these values, check
http://msdn2.microsoft.com/en-us/library/ms685996.aspx. If
you're wanting to query the status of a service, then check the
SS_SERVICE_STATUS.CurrentState element of your ServiceStatus
group.
p_Silent - if set does not display a message when an error occurs. |
| InstallAndStartService (byte p_Silent=1),long,proc |
This method will install your application as a service with the
windows service manager and then it starts the application as a
service. Returns 0 on success.
This method can also be used to updated your Service settings with
the Windows Service Manager. |
| InstallService (byte
p_Silent=1),long,proc |
This method will install your application as a service with the
windows service manager. Returns 0 on success.
This method can also be used to updated your Service settings with
the Windows Service Manager. |
| LoadWindowsServiceManager
( ),long,proc |
This method loads the Windows Service Manager. |
| MapDrive (string
p_DriveName, string p_RemoteName, string p_UserName, string
p_Password),long,proc |
This method will map a network shared folder to a drive letter.
For example to map \\penguin\l-drive to Y: call:
gSelfService.MapDrive ('Y:', '\\penguin\y-drive', '', '')
which will map it using the current user.
Returns 0 on success.
If the return value is non zero you can use the ._WinError()
method in order to get the API error message associate with the
error code. Below are a list of possible return values if an error
occurs. |
| UnmapDrive (string
p_DriveName,Long pPersist=0, Long pForce=0),long,proc |
This method will unmap a mapped drive. For example;
gSelfService.UnMapDrive('y:') |
| RemoveService (byte p_Silent=1),long,proc |
This method will remove your application as a service from the
windows service manager. Returns 0 on success. After calling this
function you will need to close your application before you can
call InstallService(). |
| ReStartService (byte
p_Silent=1),long,proc |
This method will restart or start your application as a service.
Returns 0 on success. |
| StartService (string
p_ServiceName, long p_Silent=1),long,proc |
This method will start a service specified by the p_ServiceName
parameter. Returns 0 on success. Using this method enables you to
start other services. |
| StopService (string
p_ServiceName, long p_Silent=1),long,proc |
This method will stop a service specified by the p_ServiceName
parameter. Returns 0 on success. Using this method enables you to
stop other services. |
| Return code |
Description |
| ERROR_ACCESS_DENIED (5) |
The caller does not have access to the network resource. |
| ERROR_ALREADY_ASSIGNED (85) |
The local device specified by the p_DriveName
member is already connected to a network resource. |
| ERROR_BAD_DEV_TYPE (66) |
The type of local device and the type of network resource do not
match. |
| ERROR_BAD_DEVICE (1200) |
The value specified by p_DriveName is
invalid. |
| ERROR_BAD_NET_NAME (67) |
The value specified by the p_RemoteName
member is not acceptable to any network resource provider, either
because the resource name is invalid, or because the named
resource cannot be located. |
| ERROR_BAD_PROFILE (1206) |
The user profile is in an incorrect format. |
| ERROR_BAD_PROVIDER (1204) |
The value specified by the internal
lpProvider member does not match any provider. Please
contact CapeSoft Support if you get this error. |
| ERROR_BUSY (142) |
The router or provider is busy, possibly initializing. The
caller should retry. This is a not an error code that should
be returned by MapDrive. |
| ERROR_CANCELLED (1223) |
The attempt to make the connection was cancelled by the user
through a dialog box from one of the network resource providers,
or by a called resource. This is a not an error code that
should be returned by MapDrive. |
| ERROR_CANNOT_OPEN_PROFILE (1205) |
The system is unable to open the user profile to process
persistent connections. |
| ERROR_DEVICE_ALREADY_REMEMBERED (1202) |
An entry for the device specified by p_DriveName
is already in the user profile. |
| ERROR_EXTENDED_ERROR (1208) |
A network-specific error occurred. (The WNetGetLastError
API function can obtain a description of the error). |
| ERROR_INVALID_PASSWORD (1216) |
The specified password is invalid and the CONNECT_INTERACTIVE
flag is not set. |
| ERROR_NO_NET_OR_BAD_PATH (1203) |
The operation cannot be performed because a network component is
not started or because a specified name cannot be used. |
| ERROR_NO_NETWORK (1222) |
The network is unavailable. |
Advanced Methods:
It's more than likely that only advanced programmers will want to access
these methods.
| CheckCommandLine (
),long,proc |
Advanced programmers may want to override this method, which
looks for the /is etc. Command line switches. |
| HandleStopShutdown (long
p_ControlType),long |
Advanced programmers may want to override this method, which is
called when either a Service STOP or SHUTDOWN message are sent to
the service. If you return 0 then the normal Shutdown code will
report back to the SCM that a STOP_PENDING command, and then call
.CloseDown. If you return 1 then you must talk to the SCM in your
new code. |
| ManageInstances (
),long |
Advanced programmers may want to override this method, which
manages the instances of this application using a mutex. |
| SessionChanged
(ulong p_EventType, long p_TSID, long p_Context) |
Advanced programmers may want to override this virtual
notification method, which is called when SessionChange
information is available. |
| WarnAboutOtherInstance (long
p_ErrorNum) |
Advanced programmers may want to override this method which is
called when multiple instances occur and the settings have been
configured to warn the user. |
| CloseDown (
) |
Advanced programmers may want to override this method which at
the moment posts an event:closedown to the main thread. This
method is called if the Service Manager issues either a STOP
(Service must stop) or SHUTDOWN (machine is shutting down)
command. |
FAQ
I'm getting
Compile Errors
SelfService - Introductory Questions
Operating Services
Runtime Problems
- C1) I sometimes get a 15 second delay when starting
my application, even though I am just running the exe.
- C2) I can't get the Task Tray Icon to work and/or
my windows to display, when the application is loaded as a Service
on boot up.
- C3) After windows installs updates and re-boots, my
application is running, but no longer displays an icon in the tray.
- C4) My application runs as an application, but not
as a service.
- C5) I cannot connect to my SQL backend when my app
is compiled as a service.
- C6) I have a dependency service that is not
starting up in time before my service starts.
- C7) I'm using SQL Server - and when my application
runs as a service it locks up, but it runs fine as a normal EXE.
- C8) I can't install my service - it says access denied
(errorcode 5).
- C9) Error 1053 - The service did not respond to
the start or control request in a timely fashion.
- C10) I start my exe as a service, but the windows
service manager is not saying it has started successfully, although
the it is running.
- C11) I have a service running in a terminal
services environment, but each terminal service instance is creating
it's own instance of the service app
- C12) My app does not function the same as in
service mode as when run as an exe.
- C13) I'm using MSSQL but my service application
does not run (or does not connect to the backend)
- C14) I have a client/server setup, and when
attempting to install and start my server (service app) it installs
the client as the server
Miscellaneous
A1) What operating systems can I
run Services on?
Answer: All of them, except Windows ME and
earlier (Win 98, Win95) etc.
A2) What's the difference between
SelfService and running my application from the Scheduled Tasks?
Answer: There aren't any hard fast rules, but
here are some points that you may want to weigh up when comparing
Scheduled applications vs Services:
Scheduler:
1) You either need to add your application to the Scheduled Tasks list
manually or find the API calls to do it yourself.
2) The user that you use in the Scheduler should have a password. This now
means that user has to type in a password if they manually log in.
3) If you choose to start on "Log In", you're no better off than just
placing the application into the StartUp folder (which for some
applications works pretty well too).
4) If you choose to start your application "at System Startup", then you
can't see any windows, which is fine for some apps, but not for all.
5) You must make sure that the Task Scheduler has not been turned off,
otherwise your app won't load.
6) Explaining to clients that your app runs in the Task Scheduler doesn't
quite have the same prestige as saying it can run as a Service.
Services:
1) SelfService provides you with either a command line option to install
your application as a Service, or a your application can programmatically
install itself as a service via a method call.
2) You don't need a password to install an app as a service as it can use
the
Local System account.
3) SelfService does all the hard work for you and comes with full
documentation, examples, support and so on.
A3) What's the difference between
SelfService and Vince Sorensen's ABCFree NT_SVR template?
Answer: We've been working with Vince (ABCFree
Author) on this project. So there are a number of similarities.
ABCFree is a fantastic product, and there are a number of Clarion
programmers (ourselves included), who have benefited greatly from Vince's
product.
This is from Vince's documentation;
---------
Changes 11/9/2003
...
- Added AttachThreadToClarion calls to "NT Service"
template. This provides support for C5.5 and
Clarion 5 application migration, but it is
recommended that the new CapeSoft commercial
template be used instead. (www.capesoft.com)
--------
One of the main reasons for creating the SelfService product was so that
there was a commercially supported service product. While Vince's work is
free, the templates are also unsupported.
The SelfService product, comes bundled with full documentation, examples
and a jump start example. And there is information about service enabling
your application, as well as FAQs etc.
There are a couple of things that we have done differently. Some of the
changes include:
- We've moved 99% of the code into an object, which makes it easier to
use, if you want to hand code
- We've added logging
- Your application runs as both an executable(i.e. user double clicks)
and a Service.
- And we've added info about task tray icons, and auto shutdown
issues, which are all relevant issues when you consider creating a
Service.
B1) How can I install and/or remove
my application as a Service?
Answer: You can either call the
gSelfService.InstallService() or gSelfService.RemoveService() methods, or
you can run the application with the /is (install server) or /rs (remove
service). Additionally run the application with /silent if you do not want
to see the error messages displayed. (Make sure you've ticked on the
command line (/is and /rs) option in the
Global
SelfService Template).
Should you wish to you can change these command line parameters anything
you prefer (for example /install). This can be done in the Global
Extension.
B2) How can I Start
and Stop my Services?
Answer: You can use the features you've added
to your own program (see the
JumpStart section
of this document) or ...
Answer: You can start and stop your
applications from the Windows Service Manager.
To load the Windows Service Manager
Type
services.msc in the Start | Run
dialogue box.
Alternatively, you can also call
Net Start
<ServiceName> or
Net Stop
<Service Name> from a command prompt. For example;
Net Start CapeSoftJumpStart
If your Service is installed with the Service Manager and is set to start
automatically you can also reboot your computer and your service will
start.
B3) If I call
gSelfService.RemoveService() and then try and Install it again, I get
error 1072.
Answer: You need to close your application
after calling gSelfService.RemoveService(), before you can Install it
again. This is a Windows Service limitation. See also FAQ B4.
B4) In the Windows Service Manager,
I get a "The specified service has been marked for deletion".
Answer: You need to close your application
after calling gSelfService.RemoveService(), before you can Install it
again. This is a Windows Service limitation. See also FAQ B3.
B5) Is there a method where I can
control (or query the status of) the service
from another program?
Answer: Yes there is:
The following methods should help you in performing the various
operations:
StartService,
RestartService,
StopService,
GetServiceStatus
B6) How do I know if my application
is running as a service or a normal EXE?
Answer: See
How to Know
If the Exe is Running as a Service
B7) How do I set the failure
recovery options of my service?
Answer: You can run the sc.exe (located in the
system32 directory) as follows:
sc.exe failure yourservicename reset= 0 actions=
restart/60000/restart/120000/restart/180000
Here the service is set it to restart after 60 seconds, 120 seconds, and
180 seconds.
C1) I sometimes get a 15 second
delay when starting my application, even though I am just running the
exe.
Answer: One of the Windows functions sometimes
waits for 15 seconds before giving back control to your application. In
version 1.10 some code was added to detect if the service was started in
the same folder as the exe, if it was it was assumed to be a normal
executable (not a service) and the service code was not executed. If you
have to start your application in a folder other than the one that the exe
is in, then run your application with a command line switch,
/exe to tell SelfService not to call the
Service code, when it is started by the user.
C2) I can't get the Task Tray Icon
to work, when the application is loaded as a Service on boot up.
Answer: Services are not permitted to interact with the
desktop in Windows anymore, so you will need to create an application that
interacts with your service that can display windows, and the icon in the
task tray. You can add this app to the start up items so that the
interactive app starts when a user logs in.
C3) After windows installs updates
and re-boots, my application is running, but no longer displays an icon
in the tray.
Answer: If you are using WinEvent this is very
easy to fix.
1) Make sure you are using the latest builds of SelfService & WinEvent
2) In the WinEvent TaskBarIcon window extension (that adds the TaskBar
Icon to your window), make sure you've specified a Handle Variable (see
the bits in bold in the template). You can just add a local data item for
example:
MyHandle LONG
WinEvent will also add a timer to your window if you didn't have one. With
the Handle variable and the timer, WinEvent is then able to control and
update the icon for you.
If all else fails - you can look at the code in the SelfService JumpStart
example that ships in your
Clarion\3rdParty\Examples\SelfService\JumpStart1 folder - as this works
100%.
C4) My application runs as an
application, but not as a service.
Answer:
- If it's (especially) a Multi-DLL application, make sure that all
application DLLs are being shipped in the application folder. This is
most likely the cause of the problem. You should not rely on DLL's
being in the PATH, since the path belongs to a User, and there are no
users at this point. To find if any of the dlls are missing, run 'cmd'
(from the Start menu) - type 'path=:' and hit enter. Run your
service.exe (you'll need to navigate to your folder using the cd
command) - and if your dlls are missing, an abort will occur naming
the dll that is missing.
- Make sure that the service, and all the components in the service,
are installed on a local drive on the machine. shared drives belong to
users, and there isn't a user for services.
- If you are using FastUser switching (a Windows setting) - then this
can interfere with Service operation, particularly prior to logging in
(as a user). Try turning Fast-user switching off as very often this
will resolve this issue.
- If you are running your application in a mapped drive, then it will
not run as a service. You must run your application from a physical
drive in order to install it as a service.
- In some older versions of Windows - your service was allowed to
interact with the Desktop (hence the setting in the SelfService global
extension template). However, this can cause operational issues when
the service tries to interact with the desktop in some versions of
windows - so it is much better not to allow your application to
interact with the desktop, and create a separate application
containing user interaction with the service.
- In some versions of Clarion, menubars don't seem to work in service
applications. Remove the menubar (you can use a toolbar). There is
unfortunately no work around at this stage.
- If you are running a multi-core processor, you may need to lock the
process to one processor using imagecfg -a 0xn
<Drive:>\Path\yourprogram.exe. Imagecfg.exe is a
windows system utility. n is the value of the mask that you want to
set the affinity of your application to.
- Make sure that your access settings (in the manifest file) are
correct to what your application will require. This is normally
requireAdministrator.
- You cannot use a FRAME application. Your application must be based
on a window (not a frame).
C5) I cannot connect to my SQL
backend when my app is compiled as a service.
Answer:
there are a number of possible problems here;
1. If the Server is on the same machine as your application, you can make
the it dependent on the SQL Server service. (dependencies can be entered
in the
Global Extension template).
2. Are you connecting using a DSN? Make sure that it is a System DSN, not
a user DSN.
3. For Services, the service operates independently of the path() ( which
is not configured outside of the "logged in" mode), so make sure that your
INI settings file (e.g. that FM3 uses) is in your application directory
and that the it uses that INI file.
C6) I have a dependency service
that is not starting up in time before my service starts.
Answer:
Typically this would occur with a Database Server Service, like
MSSQLServer. What you need to do is only install your service initially
(without starting it at the same time). This will create the dependency to
the MSSQLServer (so long as you have set it as a dependency - see for more
details). You may need to start the MSSQLServer service as well. Use the
StartService method to start the MSSQLServer
service if this is required.
Then go into a timer loop that checks the status of the MSSQLServer
service (see
GetServiceStatus for more
details).
Once the MSSQLServer service has started, you can Start your service
(using the
StartService method)
C7) I'm using SQL Server - and when
my application runs as a service it locks up, but it runs fine as a
normal EXE.
Answer:
Services can behave differently to EXEs, and often this shows up in
internet connection, or database interaction. A good starting point is to
play with some of the combinations of SQL driver settings: IsolationLevel,
BusyHandling, MultipleActiveReulstSets, etc.
C8) I can't install my service - it
says access denied (errorcode 5).
Answer: You need to be logged in as an
administrator (or elevated with Administrator privileges). IOW - the user
that you're logged on to Windows with, must belong to the administrators
group.
C9) Error 1053 - The service did
not respond to the start or control request in a timely fashion
There are a number of reasons which can cause this issue to occur (which
we will add as cases arise).
- You're using the wrong account to run the service. Either the
account cannot run elevated - or you are interacting with a user's
desktop that is not logged in (or someother reason). If the latter,
then see the JumpStart section of the docs.
- You could be running a service manager that is interfering with the
operation of your service. Try disabling the "Service Health Manager"
application.
C10) I start my exe as a service,
but the windows service manager is not saying it has started
successfully, although the it is running.
Answer: The most likely cause of this is that
your application thinks it is running as an exe, and not as a service, and
so it is not responding to the queries of the service manager. If your
application is always a service, then you can force it to be a service
(and not perform the running as exe check) - either in code as follows:
gSelfService._DontCheckForNonService = 1
or use the template prompt "Don't check if running as an EXE".
C11) I have a service running in a
terminal services environment, but each terminal service instance is
creating it's own instance of the service app
Answer: This is the default behaviour for
services in a Terminal Services environment, although you can override
this by checking the 'Terminal Services uses Global Mutex' checkbox in the
global extension template. This will create one mutex across all instances
of Terminal Services.
C12) My app does not function the
same as in service mode as when run as an exe.
Answer: This especially manifests itself w.r.t.
printer drivers. Your service application operates outside the user
account (in ring0) so if you install a printer driver as a user, this will
not be available (or used necessarily) by the service. IIRC you can
install the service assigned to a particular user, IOW you can start a
service in the name of a user account in which to run the service. In this
case, the service will take on all the attributes (drivers, etc.) of the
user's account as if the user was logged in. You can do this in the
template by selecting the 'Custom - Network access, no interaction' option
in the ' Service Installation Options ' global template option, and then
specify a user name and password below that.
C13) I'm using MSSQL but my
service application does not run (or does not connect to the backend)
Answer: If you are using FM3, then you need to:
1) Ensure that your FM3 ini file (that contains the settings for the
connect window) is in a location that your service can reach. This should
be in the ProgramData folder, and you'll need your installer to allow your
exe access to that folder. In the interim though, you can turn UAC off (in
your development PC) and store the FM3.ini file in your application folder
to get things going, but this won't work when you ship your application.
2) Run your exe as a process (not a service) and setup your connection
settings, making sure that you check the Auto Login checkbox.
3) Install and start our service and test the MSSQL connection.
4) Move the ini file to the ProgramData folder, and use that folder to
contain your fm3.ini file (your application must point to that folder, and
when UAC is turned on, your service will need to be allowed access to that
folder).
C14) I have a client/server setup,
and when attempting to install and start my server (service app) it
installs the client as the server
Answer: You must ensure that:
1) your client application is set to call the name of the service app when
install and starting (the actual EXE name).
2) your server application must have the "Allow command line usage"
template option set.
D1) How do I manage the one
instance of the Service that is already running.
Answer: See the
Ground
Rules for more information and tips.
D2) Is it possible to add a command
line parameters when the application has been started as a service, so
that I can change some of the wording on the window?
Answer: Yes. See the setting on the Install
Controls template. Alternatively you can set the Parameters property
before the call to InstallService or InstallAndStart service.
D4) How can I install my
application as a Service upon installation?
Answer: The easiest way to do this, is to get
your installer to run your application with the command line parameter
/is. Note: you
must have allowed command line usage in the
SelfService
global extension template.
D6) Setting the datapath in
Multi-DLL Service applications.
Answer: Often you need to get the path that the
exe is running in in the data dll - which loads before the exe (where the
selfservice is activated). The best way to get the current path (and so
load settings needed in the dll) is to do the following:
GLO:ProgramPath=COMMAND('0')
POS#=INSTRING('\',GLO:ProgramPath,-1,LEN(CLIP(GLO:ProgramPath)))
GLO:ProgramPath=SUB(GLO:ProgramPath,1,POS#)
SETPATH(GLO:ProgramPath)
Compile Errors associated
with SelfService
Check out general product
CompilerErrors.
Occasionally the template registry gets confused, and does not declare the
SelfService classes, which will manifest itself with this error. You need
to:
- Open the Clarion IDE (close any apps that may be open if you the IDE
is already open).
- Go to Setup | Template Registry and select the SelfService template
in the list.
- Unregister it (using the Unregister button) and then re-register it
again (using the Register button - go to the Clarion\Accessory\Template\win
folder and double-click the SelfService.tpl
file).
If this does not resolve the problem, you will need to:
- Close the Clarion IDE.
- Delete the clarion\template\win\Registry.trf
file.
- Open the Clarion IDE, and register your templates:
- In the 'Setup' menu you will find a 'Template Registry' item -
selecting this will open up the template registry.
- Click 'Register' (which will take you to the Clarion template
directory by default) - you can register all the templates there in
one pass, by doing a multi-select.
- Click 'Register' again and locate the Clarion\accessory\template\win
directory (which should contain all your 3rdparty templates) - you can
register all the templates there in one pass, by doing a multi-select
- but make sure you do NOT register the
NoNetTalk.tpl (if you have NetTalk installed).
Support
Your questions, comments and suggestions are welcome.
Keep an eye on our web page (
www.capesoft.com)
for new versions.
You can also contact us in one of the following ways:
| CapeSoft Support |
| Support Page |
Find support page with various options here |
| Email |
 |
| Telephone |
+27 (0)87 828 0123 |
Distribution
CapeSoft SelfService ships as Clarion source code, so
you can simply compile and ship your application. No external resources
are necessary for SelfService.
However since your app may be using WinEvent and/or NetTalk you will need
to ship those DLLs (and others) as required.
License & Copyright
This product is copyright 2003-2025 by CapeSoft
Software.
You are
not allowed to copy any of the files,
including but not limited to, Template (TPL & TPW) files,
SelfService.clw, SelfService.inc and documentation files.
Each developer needs his own license to use SelfService.
This product is provided as-is. CapeSoft Software and CapeSoft Electronics
(collectively trading as CapeSoft), their employees and dealers explicitly
accept no liability for any loss or damages which may occur from using
this package. Use of this package constitutes agreement with this license.
This package is used entirely at your own risk.
Use of this product implies your acceptance of this, along with the
recognition of the copyright stated above. In no way will CapeSoft , their
employees or affiliates be liable in any way for any damages or business
losses you may incur as a direct or indirect result of using this product.
For the full EULA see
https://capesoft.com/eula.html
Acknowledgements
Many thanks to Vince Sorensen, firstly for his ABCFree
templates that he makes available to Clarion programmers for free, and
secondly for his help and support in this project.
Casey Rippon of Madrigal Soft Tools suggested the external Manager
application, and showed how easy it was to implement.
Version History
Download latest version
here
Version 3.63 (27 May 2025)
- Clarion 12 Install
- Add: WarnAboutMutexError method.
Version 3.62 (9 September 2024)
- Fix: Template did not apply StartType to InstallAndStartService
button.
Version 3.61 (27 June 2024)
- Change: Detecting if the program running as a service made more
sophisticated.
- Add: Support for /service command line option
- Improvement: CheckCommandLine method
- Internal: Update to Capexx.tpw version 4.32
Version 3.60 (22 January 2024)
- Internal: Update to Capexx.tpw version 4.31
Version 3.59 (10 January
2024)
Version 3.58 (20 July 2022)
- Add: System User Property, ss:amservice. Set to true when running in
Service mode. system{'ss:AmService'} = true
- Add: Global variable: Running As A Service, prefer to use system{'ss:AmService'}
if you can.
- Remove: Template option to "Interact with Desktop".
Version 3.57 (4 June 2021)
- Add: Support for pre-shutdown notifications (courtesy of Rick
Martin)
Version 3.56 (4 June 2021)
- Fix: Missing Trace declaration in INC file
Version 3.55 (3 June 2021)
Version 3.54 (25 May 2021)
Version 3.53 (1 May 2020)
- Extended: Space for username and password extended past 79 chars.
Limit is not more than Windows currently allows.
Version 3.52 (16 October 2018)
- Fix: Renamed sw_shownormal equate so as not to generate warning if
SVAPI.Inc is used.
Version 3.51 (13 September 2018)
- Add: Clarion 11 to install.
Version 3.50 (6 March 2018)
- Added Parameters property, and template option on the Install
Controls template.
- Updated Cape Templates to version 4.11
- Removed template option "Use Dictionary Construct Fix"
Version 3.49 (22 November 2017)
- Added missing event (3) to service handler log.
Version 3.47 (18 October 2016)
- Added support for WinEvent 5. (Still supports WinEvent 4 and
earlier.)
Version 3.46 (12 August 2016)
- Add: Global and Local extension for destroying
all controls on a window before it closes. (Workaround for
services bug in some cases.)
- Fix: A not incorrectly reporting " _LoadDLLProc for
ChangeServiceConfig2A failed " would appear in debugview.
Version 3.45 (1 September 2015)
- Add: Start Type option to Install Service Control template. Sets the
StartType property.
- Add: SS_SERVICE_AUTO_DELAYED_START as a
StartType possibility.
Version 3.44 (24 February 2015)
Version 3.43 (31 January 2014)
Version 3.42 (2 May 2013)
- Update to version 4.04 of Cape Object templates.
Version 3.41 (2 May 2013)
- Support for Clarion 9 added to build
Version 3.40 (14 March 2013)
- Changed to Ver4 object/template management system. IMPORTANT
READ
THIS.
- Add: support for Multi-Proj in C8
Version 3.39 (12 February 2013)
- Change: Automatic property removed. Now uses StartType property.
(Thanks to Chris Cordes for this suggestion.)
- Add: StartType property. Defaults to
SS_SERVICE_AUTO_START, but could be set to SS_SERVICE_DEMAND_START
or SS_SERVICE_DISABLED.
Version 3.38 (29 October 2012)
- Change: Suppressed the template if added to an app which is being
compiled as a DLL.
Version 3.36 (9 October 2012)
- Change: Implemented Cape.Tpw object generation template.
Version 3.35 (19 September 2012)
- Fix: Template was not being suppressed correctly when "Disable Self
Service" options was on.
Version 3.34 (20 July 2011)
- New property: TerminalServiceUsesGlobalMutex.
Services running in a terminal service environment can either use a
local mutex, or a global mutex, depending on whether the service must
be unique to the machine or the terminal service instance. There's an
option on the global template of your application that you can use to
set this property.
Version 3.33 (7 May 2010)
- Added better stop-service support for apps that don't have a single
procedure on the main thread.
Version 3.32 (29 April 2010)
- Template Fix for Clarion 7 (Sheet without tab removed).
Version 3.31 (7 January 2010)
- Service state set to SERVICE_START_PENDING
when object is constructed to avoid possibly returning 0 if a GetState
is done before the program has finished starting up.
Version 3.30 (5 January 2010)
- Executable property primed with double-quotes (for long path
support).
- New ErrorControl property - property
defaults to SS_SERVICE_ERROR_NORMAL (but
can be changed to an alternative value).
Version 3.29 (25 August 2009)
- Changed return type of GetState from SS_LONGX to LONG.
- Added test for gMyServicePointer being
null in _ServiceHandler method.
Version 3.27 Gold (10 November 2008)
- Clarion 7 compatible install.
- Template change
Version 3.26 Gold (28 October 2008)
- Better support for Legacy apps.
Version 3.25 Gold (30 September 2008)
- Fix template generation bug if last procedure in app is a Source
procedure.
Version 3.24 Gold (25 September 2008)
- Support for Multi-Proj corrected.
Version 3.23 Gold (24 September 2008)
- fixes template problem %dMethodsSSV has no instance
- General object handling template update
Version 3.21 Gold (16 September 2008)
- Fixed problem with methods getting lost.
- Documentation updates.
- NOTE: When opening an existing
app, which has an older version of SelfService in it, you may
encounter some errors. Press ESC to close the error window, and then
save the app. These should only appear the first time the app is
opened after the update.
Version 3.20 Gold (22 July 2008)
- Documentation overhauled.
- Examples overhauled.
- Management example for Vista included
- Template updated to allow for the Management Control template to
work in an app other than the actual service app. (Thanks to Casey
Rippon of Madrigal Soft Tools for suggesting this approach).
Version 3.19 Gold (19 February 2008)
- Updated FAQ question D2 to
explain how permanent command line parameters can be set.
- Tweaked template to avoid occasional "Procedure does not belong to
module" error.
Version 3.18 Gold (21 September 2007)
- Includes an example for Vista compliant service, as well as
documenting how to implement a vista compliant Client/Server
application pair (one to contain the user interface and the other to
contain the service).
Version 3.17 Gold (19 September 2007)
- Template fix - fix for legacy class generation regression introduced
in 3.16 (includes SelfService.tpw 1.55)
Version 3.16 Gold (31 August 2007)
- Template - fix for legacy class generation (includes SelfService.tpw
1.54)
- Template - check that Command Line pars (template prompt) are not
blank, before trying to use them.
Version 3.15 Gold (25 October 2006)
- Fix - tweak to allow variable ServiceName and description. These
should be set in the 'SelfService - Initialize variables' embed point
(if a variable is used).
Version 3.14 Gold (24 July 2006)
- Fix - tweak to template (another fix for the method headers not
being generated (as in 3.13)).
Version 3.13 Gold (12 July 2006)
- Fix - in some cases the method headers were not being generated
(caused by Read classes every generate being checked - this is an
obsolete function that is no longer required).
- Included the new SelfService.tpw (1.53) - contains a fix for case
sensitivity in derived methods from a base class.
Version 3.12 Gold (7 June 2006)
- Re-labeled the Global Extension template.
Version 3.11 Gold (5 June 2006)
- SelfService.tpw (version 1.51 - was 1.49) - fix for interference
with other templates (using the Object01.tpw template)
- Template fix: %SSClassName defined correctly (was coming up with
error when viewing embeds).
Version 3.10 Gold (18 May 2006)
- Template: Added new Control Template - "Service
Buttons Controls" - This adds an "Install and Start Service"
button to your window.
- Template: Updated Control Template - "Service
Buttons Controls" - so that the Close button works with
WinEvent.
- Documentation - added the Control
Templates section to this documentation.
Version 3.09 Gold (10 May 2006)
- Template: Changed %ClassName to %SSClassName - #prepare was getting
confused with multiple variable definitions of the same name (across
different templates). This could result in initially getting the wrong
class into the template (if you have xFiles or HotDates present in
your application). In this case, go to the class tab and set the Base
Class to MyService and the ClassHeader file to SelfService.inc.
- Requires GPFReporter 2.05 (if used in conjunction with GPFReporter).
Version 3.08 Gold (1 May 2006)
- Fixed missing SelfService:Version equate (regression in 3.07).
Version 3.07 Gold (24 April 2006)
- Changed 'Re-read class option' to default to 0.
- Template fix - changed control template to pick up the correct
buttons placed by the template.
Version 3.06 Gold (13 April 2006)
- Updated Jump Start Documentation.
- Corrected assert regression (introduced in 3.04)
Version 3.05 Gold (12 April 2006)
- Template Fix for Regression introduced in 3.04 (for fix with
GPFReporter).
Version 3.04 Gold (10 April 2006)
- Template Fix - when used with GPF Reporter, sometimes the class was
being switched to use the GPF Reporter class instead (and visa-versa)
- Template Fix - removed Tahoma font setting from all template prompts
(except the General tab) - means that entry prompts are legible in PCs
with Clear-Type fonts turned off.
Version 3.03 Gold (22 March 2006)
- Changed Thread32First and Thread32Next API calls
load dynamically, so that it works on NT 4.0 systems.
Version 3.02 Gold (16 March 2006)
- Tweaked Jump Start and included these changes in the Docs. This
makes it clearer on what to do so that the Taskbar Icon is displayed
as a service.
Version 3.01 Gold (1 March 2006)
- Slight tweak to the template, so that it works with NetTalk v3.xx.
(Was previously only working with NetTalk 4.xx).
Version 3.00 Gold (27 February 2006)
- New methods to setting and getting the thread and process priority
as well as window information.
- New Control Template and Template Utility for adding buttons that
will Install & Start, Install, Remove or open the Windows Service
Manager.
- New Example using Process and Threads methods.
- Added NetTalk support so that the NetTalk
DLL does not close itself down when you Log Off.
This will work best with NetTalk v4.00 and above
- New Fix in WinEvent v3.35 which ensures the Task Icon is displayed.
You'll need a timer on your window, and use a IconHandle (long) in the
Settings tab of the WinEvent: Add Icon to System Tray window
extension. See FAQ C2 for more details.
Version 2.05 Gold (10 May 2005)
- New method self.InstallAndStartService()
- New method self.RestartService()
- Silent options turned on by default (except from command line). So
if you want InstallService() and RemoveService() to be non-silent
please call then like this: InstallService(0) and RemoveService(0)
- Added functionality to work with GPF
Reporter v2.05 so that GPF Reporter can restart services.
- Updated examples accordingly.
Version 2.04 Gold (15 November 2004)
- Fixed Example Connection Checker, that had
a OS_ShellExecute clash with NetTalk.
Version 2.03 Gold (26 October 2004)
- New Property: DependenciesQueue
- new property added. You can specify one dependency on the template
now, or multiple dependencies using hand code. This is very useful if
you want to load say SQL Server before your service loads.
- New Property: LoadGroupOrder. New property
for building kernel services.
- Updated Example: Updates the TCP/IP
Connection Checker Example
- Update Template to the new CapeSoft look
and feel.
Version 2.02 Gold (13 September 2004)
- New Example: Connection
Checker - This example demonstrates using a Web Server in a
service to manage the configuration. The example will check a TCP/IP
connection. Which can be useful for checking (a) Network route
reachable, (b) if a machine is running, or (c) if a TCP/IP application
is running. This example will be show-cased at the Florida DevCon 2004
in the session that Jono Woodhouse will be presenting on Services.
Version 2.01 Gold (7 September 2004)
- Fixed: Dictionary
Class tweak so that your Service (which uses a Dictionary)
doesn't GPF when you run it with the /is or /rs option or after the
"cannot load as another instance is already running" warning.
Version 2.00 Gold (3 September 2004)
- InstallService: Now will update the
service details if it was already installed. (Previously it produced
an error).
- Minor Changes: To the log method and also
DWORD aligned the properties and method variables.
- Fixed: Dictionary
Class changes in Clarion 6.1 were causing a GPF (and Assert
error on line 227 of ABFile.clw if you had debugging on) when you had
a service application with a dictionary. This has now been fixed.
(Incidentally, if you are still using Clarion 6.0 you will need to
turn off the "Use Dictionary.Construct/Destruct Fix" checkbox in the
template).
- Legacy: Fixed the templates so they work
with Legacy apps again
Version 1.12 Beta (23 July 2004)
- Template:Minor tweak for use with
Multi-Prj
- Docs:Updated to use '~icon.ico' option
with WinEvent
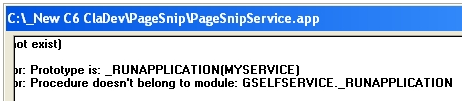
- Template: Fix to stop the following Syntax
errors:
Prototype is :_RUNAPPLICATION(MYSERVICE)
Procedure doesn't belong to module: GSELFSERVICE._RUNAPPLICATION
- Template: Changed from using Cape01.tpw to
using SelfService.tpw (so now there are two template files
SelfService.tpl and SelfService.tpw). Synchronized to the same code in
Object Writer's Object User v2.09
- Template: Changed the template variable
for the Base Class Name in the Advanced Tab in SelfService. This means
that the Base Class will revert back to MyService when you
upgrade to v1.12.. This will only affect really advanced users, and
you will understand what to do, if that's you.
Version 1.11 Beta (23 January 2004)
- Template:Added a bit of code the the
global application to check if you are using a compatible version of
WinEvent.
- Object: New advanced method
.HandleStopShutdown()
- New Example: New example
- Machine status reporter, that reports when a machine boots and shuts
down.
- Object Fix: Services now work in Windows
2000, previous version introduced some bugs that caused services not
to load correctly in Windows 2000
- Object Fix: Fixed the
.LoadWindowsServiceManager() method for Windows 2000.
- Template: Some tweaks and improvements.
Version 1.10 Beta (20 January 2004)
- Template:Added Only allow One
Instance to run at a time option.
- Template: Now includes a Service
Description, which is displayed in the Windows 2000, XP, 2003 and
Vista Service Manager.
- Example: Added the NetTalk DIP Server as
an example.
- Object: Added code to prevent the 15
second delay from happening, when you start your application in
non-service mode (i.e. From a shortcut). See FAQ
C1
- Documentation: The documentation has been
improved, and now includes an Object
Property and an Object
Method section
- Object: Added the .MapDrive() method for
creating maps like Y: to \\pengun\y-drive (see the Object
Methods).
Version 1.03 Beta (18 December 2003)
- Template: Added Work with WinEvent
option.
- WinEvent v3.04 fixes the problem with not
being able to see the tasktray icon when you login.
- Template: Improvements to the template
(thanks Geoff) regarding the way the object is generated into your
application.
- Documents: Updated
- Object: Using HandlerEx for Windows
XP/Vista
- Object: LoadWindowsServiceManager - now
works for Windows NT as well.
Version 1.02 Beta (21 November 2003)
- Template: Note:
Please remove the single quotes around your Service Name and Service
Description in your Global Extension to avoid a compile error.
- Template: Added an extra option to the
template so that the path is set to the EXE folder when the
application is started as a Service.
- Template: Added an option to the template
so that you can change the command line switches e.g. instead of using
/is you could use -install
Important Notice:
If you upgrading from from v1.01 or v1.00 ensure you read the Version History for v1.02
otherwise you will get compile errors.
|
Version 1.01 Beta (18 November 2003)
- Documentation: Improvements to the
Documentation & FAQ.
- JumpStart: Compacted the JumpStart.
Version 1.00 Beta (17 November 2003)
- First release of CapeSoft SelfService.