- CapeSoft Draw Basic Documentation and Template Reference
- Draw Method and Property Reference
- Draw Layers
- Draw Header - Easy dynamic window headings
- DrawImage
New image loading and handling, including
loading and saving a wide variety of formats such as JPEG, PNG,
TIFF and more. Features image rotation, high quality resizing,
automatic tiling, grayscale conversion and colour manipulation
and much more!
- Draw Paint
Create dynamic, user interactive
graphics, click and drag to select, move, resize and place object.
- Frequently Asked Questions (FAQ)
- Version History
Introduction
The CapeSoft Draw control allows you
to draw directly to an image control. Not only is this fast, but has the added
advantage that if the control is refreshed, it simply redraws the image, rather
than re-calling each of drawing commands. And it allows:
- Individual pixels to be modified, which is great for per pixel effects
- Faster special effects drawing.
- Images can be saved in either BMP or PNG formats, and with the new DrawImage
functionality (which utilizes the Clarion FreeImage library available from
www.Clarionfreeimage.com) images can be loaded and saved to and from JPEG, BMP, TIFF, PNG,
PCX and a large number of additional formats.
- Real-time animation in a standard Clarion image control.
- Very fast redraws.
- All commands are drawn directly to a buffer.
- Advanced drawing functions that easily allow you to achieve complex effects.
- Multiple layers, and transparency types.
Draw now supports multiple drawing surfaces, otherwise known as
layers.
Some of the features include:
- Layers can be any size (not necessarily the same as the image control).
- Layers can be hidden, which means you that can have hidden drawing surface that can be
used as off-screen buffers.
- Pixels can be copied in blocks of any size from any layer to any layer, with full control
over the exact size and location of the block.
- Any layer can be drawn directly to the image control.
- Drawing to a layer is as simple as selecting the layer using the
WithLayer() method and
then calling the Draw methods normally;
- Each layer supports index transparency (a single color can be selected as transparent).
- In addition each layer can have an associated alpha layer, which allows soft transparency
effects. Alpha layers can store three separate channels of alpha information,
which can be associated with any number of layers.
- See the section on layers for more information.
And best of all the upgrade to Draw 2 from previous versions is
free!
What's New
This section briefly describes what's new in the current release,
and important information when upgrading from older versions.
Draw 2.64
Updated DrawHeader template and added a new DrawHeader Class.
The DrawHeader no longer uses the local procedure, and the Utility templates
are no longer needed. The new options on the Global extension allow the old
template to be used (tick the Use Old Drawheader template
option), and also allows all settings for the DrawHeader object
to be overridden at the template level. The local extension
provides the same settings, and allows the global settings to be
overridden where needed.
DrawHeader control can use the new or old template code as
needed, simply tick the box for control that should use the old
DrawHeader template code, and use the Global extension to
specify whether the old of new template should be the default.
Draw 2.55
Updated DrawHeader template
For projects using the DrawHeader template run the DrawHeadingABC or DrawHeadingLegacy
utility template to import the update DrawMakeHeading function into your
application. This release adds resizing support and the ability to redraw the
control without recreating the icon.
Draw 2.30
Major new features include handling of Complex Script languages such as
Arabic and Hebrew (see the new
Show()
method documentation for more) as well as
Right-To-Left text ordering etc., support for
curve drawing. See the
History section for more.
Draw 2.13
Draw and Progress Compatibility
Draw 2.13 and Progress 1.14 both have template changes that make them incompatible
with the previous versions of the products, so please ensure that you
upgrade both products to Draw 2.13 and Progress 1.14 or later!
Draw 2.07
Important:
Because the equates that draw uses now all begin with 'Draw:', compiling
programs that use version prior to 2.07 may produce errors, in order to fix
these errors simply add the text 'Draw:' to each equate used in your source
code
. This mainly affects the internal drawing methods, as
a number of the API equates now have Draw: prepended to the label (e.g.
LOGPIXELSX
becomes Draw:LOGPIXELSX).
Most of the Draw equates already use the Draw: naming scheme. Only a very small
number of equates have been changed, so it is unlikely that you will comes across
this error.
See the
History
section for a full list and for features added in previous releases.
Support and Purchase
Your questions, comments and suggestions are welcome. See
our web page (
www.capesoft.com) for new
versions. You can also contact us in one of the following ways:
| CapeSoft Support |
| Email |
 |
| Telephone |
+27 87 828 0123 |
| Fax |
+27 21 715 2535 |
| Post |
PO Box 511, Plumstead, 7801, Cape Town, South Africa |
Draw may be purchased from:
| CapeSoft Sales |
| Web |
www.capesoft.com |
| Email |
 |
| Telephone |
+27 87 828 0123 |
| Fax |
+27 21 715 2535 |
| Post |
PO Box 511, Plumstead, 7801, Cape Town, South Africa |
Installation
Run the supplied installation file.
Distribution
If you need to save images as PNG files you need to
ship the
cs_libpng.DLL and the
zlib.DLL files. These will be in your
application folder, or if not, in the
\clarion\accessory\bin folder. Cs_libpng.dll and zlib.dll are
inked at runtime. If they are not present Draw will simply not allow
PNGs to be written.
If you are using the Draw.
Barcode function
to create PDF417 compatible 2D barcodes then you need to ship the
Barcode.DLL
file.
If you are using the FreeImage functionality then you will need to ship the
FreeImage.DLL as well. Please note that you will need to comply with the
FreeImage License if you ship this DLL.
Acknowlegements
This product includes the
FreeImage DLL
and is included here under the terms of the
FIPL.
A copy of the FIPL can be found in your
\clarion\accessory\licenses folder.
This product includes the
LibPng
DLL and is included here under the terms of the
Libpng License. A copy of this can be found in your
\clarion\accessory\licenses folder.
This product includes
ZLIB
and is included here under the terms of the
Zlib License
which can also be found in your
\clarion\accessory\licenses folder.
Jump Start
Keen to get started? Or just don't like wading through all the documentation?
This section is just for you - the basics on how to get Draw working
as quickly and simply as possible.
This jump start will show you how to place a Draw control on a window
and draw a red rectangle into the control. The completed app is in the
/3rdparty/examples/Draw/JumpStart/ directory in you Clarion directory
(QuickDraw.app is the ABC version and QuickLegacy is the Legacy version).
- Create a new application (or open an existing one).
- Select a procedure with a window that you would
like to place the Draw control on (create one if necessary), right click
the procedure name and choose "window" to open the window formatter.
- Go to the Control Template pad, and choose Draw from the section Draw.
Then click on the window to add the Draw control to the window.
Resize the Draw control - you can make it any size you like.
- Right click on the Draw control and choose "Actions".
Change the name of the object to "drawer". Click OK
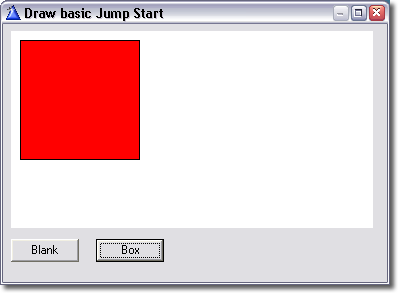
- Place a button on the window and change the text to read "Blank".
Right click on the button and choose "embeds" . In the "Control
Events" section, double click on "Accepted" and choose
"Source". Type the following code into the embed:
drawer.Blank
(color:white)
drawer.Display()
The first line of code clears the Draw layer to white, the second line
then write resultant pixels to the image control. Each time you call the
Draw methods you need to call Display() to update the image control. Click
"Exit" to leave the embeditor (click Yes when it prompts you
to save your work) and close the embeds window.
- Place a second button on the window with the text "Box". Follow
the same steps as above, except this time use place the following code
in the Accepted embed:
drawer.Box(10,
10, Random(80, 200),
Random(80,
200), color:red)
drawer.Display()
This will draw a red box with the top left hand corner at (10, 10) and a
width and height of between 80 and 200 pixels. Again exit the embeditor and
save you work. You can now exit the window editor, save the application,
compile and run it. You may notice that the box has a black border, you can
set the pen color that is used to draw line by calling the SetPenColor()
method.
- Try adding the following code before the call to drawer.Box():
drawer.SetPenColor
(Random(
color:black,
color:white))
You can also try out the setpenwidth() method
to set the line thickness.
For more advanced examples see the Examples section.
Useful Information:
Methods use in the quickstart
Blank() - clears the current
layer to the color specified
Display() - writes all visible layers to the
image control
Box() - Draws a rectangle
Setpencolor() - sets the current pen color
(used for drawing lines and borders)
Layers
In the above example we completely ignored the fact that Draw supports
multiple layers. When the Draw object is first created it creates
a layer and sets it as the active layer, so it is possible to
simply ignore the fact that a layer is being used. Layers allow
a huge amount of flexibility and power, see the section on
layers
for more information.
Lines and Fills
In addition to setting the pen and fill colors, Draw also supports
patterned fill and pens. See
SetFill() and
Setpenstyle()
Shading
As well as supporting simple shapes like
boxes,
lines and
ellipses Draw
has methods that create shapes with complex color shaded fills for
boxes,
cylinders,
ellipses and
even shaded lines.
Adding a Draw Control to your Window
Note: CapeSoft Draw only supports 32 bit applications
Adding a Draw Control to your window is easy:
- (Optional) Add the global extension template
for Draw. Go to the Global Properties Dialog box in you application, selection
extensions, then insert the GloDraw extension.
- Open the window editor for the window;
- Place an image control on the window;
- Select CapeSoft Draw Control from the template populate box;
- Right click on the control and choose 'actions', here you can customize the
Draw control's settings, such as giving the object a name - see
Options
for the Draw Control.
The Draw Global Extension Template
The global extension is used to enable Draw in your application and
also allows you to disable all Draw code, primarily
for debugging. From Beta 11, Draw uses runtime DLL linking for writing to PNGs,
see the section on
Distribution for the DLL required
for PNG writing.
Using Draw in Multi-DLL applications
Draw provide options on the global extension to make using it in multi DLL applications simple.
Draw is exported from the Data DLL, and then used in the other apps in your
system as required.
Data DLL App
- Add the Draw Global extension
- On the Multi-DLL tab tick on both options.
Other Apps (DLLs and EXEs)
- Add the Draw Global Extension
- On the Multi-DLL tab tick on ONLY the first option. (DLL's will
default to this being on, but EXE's need it explicitly set.)
Options for the Draw Control
Setting the Object Name
Under 'actions' in the control properties box you can set the object name.
This is the object whose methods you will call to do the actual drawing. All
examples in this document use the object name "Drawer".
Setting the Class Name
You can also set the class that Draw uses to create objects, this allows
you to modify or replace the Draw class with your own customized version with
a different name. If you do this please remember to add your own .clw to the
project (under "external source files").
Don't generate this Draw Object
This option works similarly to the option on the global template "Don't
generate Draw code", rather than disabling all draw code globally, this
option allows you to disable any generated code for this object only.
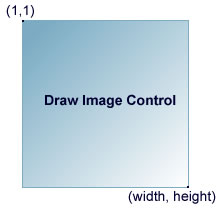
IMPORTANT: The origin of the Draw control
is the top left corner and is (1,1). See the image below.
Pixels and Dialog Units
Draw uses pixels throughout rather than dialog units. There are a number
of reason behind this, however the primary one is that for drawing pixels is
the natural unit of measurement, as whatever is drawn will eventually be rendered
in pixels. Changing the font or font size used for a window will not affect
Draw at all, unlike other controls which will be affected by the change in dialog
units. Using pixels also ensures that there are no rounding errors that result
in inaccurate drawing. In addition you can do calculations far more accurately
than the screen can render and simply pass the Rounded values to Draw.
You can convert from dialog units to pixels - to get the current
number of pixels per dialog units (this is likely to be a fraction, not a whole
integer):
pixPerUnit
real
curUnits
byte
code
curUnits = target{prop:pixels}
target{PROP:Pixels} = 0 ! Set to DLUs instead of pixels.
pixPerUnit = self.width/self.control{prop:width}
target{prop:pixels} = curUnits
Examples
Notes on getting started.
Unlike the Clarion drawing functions, the Draw control does not display
the result as each function is called, you need to call the
Draw.Display()
method to update the Draw control. Before drawing, you can call the
Blank
method to erase everything on the Draw control, or simply draw over the existing
image. This allows you to do real-time animation, simply by calling all the
drawing commands before calling
Display to update the
control, and
Blank between each frame of the animation.
Note that Blank does not take effect until Display is called.
A typical usage of the Draw methods would be:
Drawer.Blank()
Drawer.SetPenColor(COLOR:Red)
Drawer.Ellipse(1, 1, Drawer.width, Drawer.height,
COLOR:Green)
Drawer.Display()
This would display an ellipse with red line and a green fill that is the width
and height of the Draw control.
You can draw to any image control on a window or a report, however when drawing
to a report, you need to call the Clarion SetTarget(Report) function
before
calling any Draw methods. You can call SetTarget() with no parameters to make
the current topmost window the current target. See the section on
Using Draw on a Report
There are a number of examples in your
\Clarion\3rdParty\Examples\Draw directory.
The examples are a great way to get started and see a few of the ways you can
use CapeSoft Draw. Draw ships with the following examples:
| JumpStart | The result of following the JumpStart section. Th most basic example
of how to use Draw. The ABC version is called QuickDraw.app, the Legacy
version is QuickLegacy.app
See JumpStart for more details. |
| 3Dmap | The 3D map example uses Draw
to create really cool 3D maps, with a number of shading and display options.
The app file is clarion/3rdparty/examples/Draw/3DMap/map.app |
| pattern | Pattern.app is both an example and a useful
tool. It creates a patterned fill that is used to fill a rectangle. It also
displays the pattern string that can be used within your source code. See
the Pattern section for more information. |
| Demo | Draw 2.10 ships with a new Demo application that is
a great place to get a feel for some of the things that are possible to
do quite simply using Draw. This application demonstrates all the basic
functions in Draw as well as some neat effects like drop shadows, pie
slices, shaded bars etc. |
| Draw Layers
| The new Draw example
application that ships with Draw 2.00 and later. Allows you to Draw to an
image control and shows off a few of Draw's layer features. |
| DrawImage | This example utilizes the Clarion FreeImage template (available
from
www.clarionfreeimage.com) to save to different file formats
and to read images from different file formats. You must have
downloaded and installed the Clarion FreeImage template in order
to compile this application |
Debugging and Logging
Draw provides a Log() method to assist in debugging your Draw
applications. This method outputs a string to the windows debug output, all
output can be viewer using the free DebugView application from www.sysinternals.com.
DebugView can also be used to view any error message that Draw might encounter,
even is Draw.suppressErrors = 1. In order to use the build in logging in Draw
you should set the Draw.logging property to 1. Any error that a Draw method
encounters will then be sent to the debug output. This has the advantage of
allowing debug output to be viewed regardless of whether the app is compiled
in debug or release mode. It also allows debug output with affecting the program
execution, and allows debug logs to be saved. You can view both your own output
(using the Log() method) and Draw's output using Debugview, in addition DebugView
can be used for producing log files for other CapeSoft products, such as
File Manager 3 and
NetTalk.
Compiler Errors
Unknown template type. Activate
ClarionFreeImage - You are trying to compile/load a draw
application that uses the Clarion FreeImage template. This is an independent
template available for free download from
www.clarionfreeimage.com which
you can use to add additional functionality to Draw (like loading and saving
images from/to jpg, and other common graphic file formats).
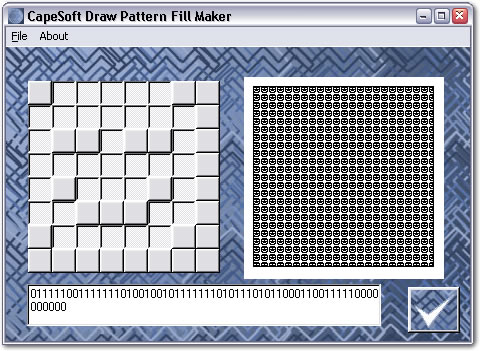
Using the Draw Pattern Fill Maker
Versions from Beta 7 and later include the Draw Pattern Fill Maker, an application
which allows you to easily design your own patterned fills with an easy to use
graphical interface. See the
Setfill() method for more
information on pattern fills. To use the Draw Pattern Fill Maker, simply compile
the pattern.app that ships with Draw. The files that you need are:
pattern.app - the app file
about.jpg, back.jpg and tick.jpg - image files used in the app
pattern.ico - the application icon
These files are installed in your Clarion directory under 3rdparty/examples/pattern
Simply open pattern.app in Clarion, compile it and run it.
To create a pattern click on the boxes on the left, you will see the resultant
pattern in real time on the right of the window. To use the pattern in your
clarion app, copy across the string displayed in the text box at the bottom
of the window. You can use a variable to store the string, or simply pass it
as a string, for example:
Drawer.SetFill('0000000010101010000100011010101000000000101010100001000110101010')
Each pattern is a 8x8 block of pixels that is tiled as necessary to cover the
entire fill area, hence the string is 64 characters long, a 1 (one) represents
a pixel to filled with the current color, while a 0 (zero) represents a pixel
that remains untouched.
See the
Setfill() method for more information on pattern fills.
Using Draw on Reports
Draw supports the same command on reports as it does on windows, however reports
do differ in some ways. When calling Clarion's drawing functions to draw to
a report it is necessary to call SetTarget(Report), similarly Draw requires
that you call SetTarget(Report) before calling any Draw methods that will draw
to the report. When you are finished you can call SetTarget() to set the current
target to the last window opened on the current thread. See the Clarion documentation
on SetTarget() for more information.
Populating the Draw control on a report is identical to populating it on a
window, simply place an image control on the Report and select the "DrawR
- CapeSoft Draw Control" template list under "Class Draw - CapeSoft
Draw Template" when populating it. The "R" on the end of "Draw"
in the template name signifies that it is the Report template control.
When drawing to a report, you will most likely want to increase the resolution
when you are drawing (unless you like big pixels and jagged edges of course),
as printing is generally done at a much higher resolution than your monitor
might display (most screens typically display 96 DPI or less, whereas most desktop
printers will print at at least 200DPI, and possibly considerably higher.) So
how do we increase the resolution of the Draw control so that our printed reports
look really good?
Firstly add the following data to the report procedure:
resized byte
Then, in the source code for the report procedure, directly after the call
to PARENT.Open() the Draw template would have populated the following code:
SetTarget(report)
drawer.Init(?Draw)
SetTarget()
When you would like to draw to the report:
SetTarget(report)
drawer.SetPenColor(color:green)
drawer.SetFontColor(color:red)
drawer.SetPenWidth(1)
drawer.Blank()
if resized = 0 !
checks if the image control should be resized
drawer.Resize(drawer.width*4,
drawer.height*4)
resized = 1
end
Once you have finished drawing to the report call SetTarget(), this will set
the target back to the last window.
That's it, you can now Draw to reports with high resolution Draw controls.
Bear in mind that you should multiply the size of anything that you draw by
the amount that you multiply the Draw buffer by (in this case four). If you
don't you will get a tiny version of whatever you are drawing in the bottom
left corner of the Draw control, this is simply because each pixel is taking
up 1/16 (in this case) of what it was taking up before we resized the buffer.
For example if we draw a box before the resize: Draw.Box(10, 10, 100, 122, color:red)
we should modify the call to Draw.Box(40, 40, 400, 488, color:red). If you are
going to be changing the resolution frequently, or allowing the user to specify
the resolution you should probably create a variable to store the multiplication
factor.
For example the above code to resize the control and draw a box would become:
resMult long
resMult
= 4
if resized = 0
drawer.Resize(drawer.width*resMult,
drawer.height*resMult)
resized = 1
end
drawer.Box(10*resMult,
10*resMult, 100*resMult, 122*resMult, color:red)
The call to Draw.Resize() sets the size of the Draw buffer to be 16 times larger
(four times as wide and four times as high). You can experiment with a multiplication
value that suits you, the higher the value, the higher the resolution, but obviously
the more memory you will use.
In order to reduce the amount of memory used by high resolution Draw controls
on reports, as well as provide a significant speed improvement, you can use
256 colour drawing. See the section on
Init256() for
how to draw in 256 colours on a report.
It is also useful to be able to change the font size on reports, especially
at higher resolution. To do this you can simply set the Draw.fontZoom class
property. The fontZoom property defaults to 1, to increase the size that the
fonts draw, increase fontZoom. In the example above we increased the resolution
by a factor of 4, so we can set the fontZoom property to 4. When you increase
the fontZoom factor, it allows you to use the same point size at higher resolutions.
See the
Show() method for more information.
A note on printer and monitor resolutions:
A fairly reasonable heuristic (rule of thumb) for estimating the needed resolution
of an image for printing is to simply divide the required printer resolution
by 4. So for a 360DPI inkjet, a 90 DPI image will print reasonably well, for
a 720 DPI inkjet you should use around 180 DPI. More resolution will generally
give you a crisper printout and fewer jagged edges (to a point, the resolution
is limited by the printer capabilities). The default resolution of the Draw
control is 72 DPI.
License & Copyright
This template is copyright © 2016 by CapeSoft Software. None of the included files may be distributed. Your programs
which use Draw can be distributed without any Draw royalties.
Each developer needs his own license to use Draw. (Need to
buy
more licenses?)
This product is provided as-is. Use it entirely at your own risk. Use of this
product implies your acceptance of this, along with the recognition of the copyright
stated above. In no way will CapeSoft Software, their employees
or affiliates be liable in any way for any damages or business losses you may
incur as a direct or indirect result of using this product
Version History
Download latest version
here
Version 3.58 (13 September 2018)
- Add: Clarion 11 to install.
Version 3.57 (15 September 2015)
- Fix to header if shading was not set to anything (global value
should be used.)
Version 3.56 (10 August 2015)
- Better support for Resizers with Auto-Headers.
Version 3.55 (25 February 2015)
- Installer supports Clarion 10.
Version 3.54 (16 January 2015)
- Better support for ResizeAndsplit in DrawHeader class.
Version 3.53 (22 December 2014)
- Do not add Auto DrawHeader extension to Widget procedures.
- Remove ObjectName and lhClassName parameters from LocalAutoHeader
extension.
- Added calls to %SetUseVersion to Resize #ATs.
Version 3.52 (16 December 2014)
- DrawHeader.Init method had a different property name to Draw.Ini,
which caused an embed point to be duplicated.
- Add Decide method to DrawHeader class. (return FALSE to suppress the
header.)
Version 3.51 (7 November 2014)
- More support for suppressing "empty" icons from project.
Version 3.50 (22 September 2014)
- Suppress "empty" icons from project.
Version 3.49 (11 July 2014)
- Draw Headings allow settings from AnyFont and Makeover to be used as
default values.
- Icons used by Headings are automatically added to the Project.
- Fix: Bug in DrawHeader where Icon would sometimes not display at
all.
Version 3.48 (19 June 2014)
- Automatically copy zlib.dll, freeimage.dll and cs_libpng.dll to
application folder when compiling.
- Work-Around: Apps being upgraded from earlier versions are changing
BarHeight from -1 to 0.
- Add: Auto-Draw-Header detects existence of manual header in a
procedure, and disables itself.
Version 3.47 (10 May 2014)
- Experiments with anti-aliased curve.
Version 3.46 (21 January 2014)
Version 3.45 (7 January 2014)
Version 3.44 (3 January 2014)
- Add: New Method: Flood (and
internal method _flood)
- Add: New Method: FindPixel
- Add: NewMethod: RoundRect
- Change: PutPixel Method
takes optional Layer parameter. (implemented as new method for
performance reasons.)
- Change: Show method multi-layer anti-aliased text optimization
removed.
- Change: HasAlpha method returns
the number of the Alpha layer. In the past it always returned 1 if the
alpha layer existed.
- Change: New parameter pQuad added to
Ellipse method.
- Internal: _NormCoords method name changed to NormalizeCoordinates
- Fix: ShowLayer took a parameter, but did not use it.
Version 3.43 (17 December 2013)
- Add: ResetDisplayArea called in INIT method.
- ASSERTS added to code to ensure DataStore is open before being used.
Version 3.42 (13 September 2013)
- Refactor: Options on Global extension and Local extension reorganized.
- Change: When DrawHeader control dropped on a window then it
automatically positions at 1,1 not where the mouse is.
- Add: Template option to set Icon Size for the Icon in the header.
- Add: Activate Auto Headers global extension.
- Add LocalAutoHeader local extension.
- Add: HeaderHeight property to DrawHeader class
- Add: SetWindow and SetTextY methods to DrawHeader class
Version 3.41 (18 July 2013)
- Add: Create:Arc added as a supported
drawing item to the DrawPaint class.
- Add: StartAngle and EndAngle added to the
ItemQueue properties - used by the
new Arc type.
- Add: Trace method to send debug information to debugview.
Version 3.40 (5 July 2013)
- Fix: Resize support in Header template could cause the program to
GPF.
Version 3.39 (7 June 2013)
- checked template support to make sure all generated code is excluded
if "Disable Draw" or "disable Draw Object" is on.
Version 3.38 (23 May 2013)
- Update: Implement 4.02 of cape templates.
- Fix: Set DrawLinkMode and DrawDllMode correctly in Multi-Proj
projects.
Version 3.37 (11 May 2013)
- Fix: GEN: Unknown Variable '%lhNoDraw'
Version 3.36 (30 April 2013)
- Updated Install to detect Clarion 9.
Version 3.35 (14 March 2013)
- Changed to Ver4 object/template management system.
IMPORTANT
READ THIS.
- Add: support for Multi-Proj in C8
Version 3.34 (11 February 2013)
- Fix: LoadIcon method copes better with 16 bit screen depth, and 32
bit icons with no alpha channel.
Version 3.33 (21 January 2013)
- Fix: DrawPaint class did not set the PenWidth before drawing
ellipses and circles.
Version 3.32 (6 November 2012)
- Implemented: Cape01 template format.
Version 3.31 (23 October 2012)
- Fix: LoadImage method could hang when loading an icon for a
DrawHeader.
Version 3.30 (12 July 2012)
- Template rework of Object and Export generation.
Version 3.26 (24 May 2012)
- Fix: (regression) Errors caused by DrawHeader fixed.
Version 3.25 (23 May 2012)
- Fix: All methods exported from Data DLL.
Version 3.23 (12 April 2012)
- Fix: Polygon, FillPolygon methods. Handle case where ymin = 0 and no
edges with y > 0.
Version 3.22 (14 December 2011)
- Required for Insight Graphing 2
- Added: Length3d method
returns the length of the vector in 3D space.
- Added: Normalize method
normalizes the passed Vector.
Version 3.21 (24 October 2011)
- Required for Insight Graphing 2
- Fixed: MouseX and
MouseY methods returning values offset up to the width
of the scroll bar when the Draw canvas was larger than the control and a
scroll bar was used in only one direction (either horizontal or
vertical, but not both) and the scroll bar was used to change the
position within the control (at full scroll the mouse coordinate would
be offset by the width of the scrollbar which was not present).
- Added: MultiMonitors
example application. Demonstrates listing all monitors, position a
window on the primary display, opening a window on a new thread on the
secondary display and setting it to full screen, and fullscreen
animation and color calculation using Draw.
- Added: Fullscreen
method which retrieves the monitor info for the screen that the window
is currently on and resizes the window to the full size of the screen.
See the "GoFullscreen" example application, which demonstrates creating
full screen Draw applications without title bars window borders etc.
- Added: GoFullscreen example application
(Clarion 6) which demonstrates creating fullscreen applications. Note
that the code used in the example is included in the
"HowTo" section of the
documentation.
- Added: Multiple Monitors section to the
"HowTo" section of the
documentation.
- Added: LoadUser32 method loads all
runtime loaded API functions required from User32.dll. This is called
automatically the first time a method which requires the functionality
is called.
- Added: ListMonitors
method lists all monitors on the system
- Renamed: EnumFonts to
EnumFontFamilies
- Fixed: Font enumeration was causing a
GPF
- Added: Font enumeration to the Demo
example
- Added: DRAW_DISPLAY_DEVICE type
- Added: DRAW_MONITORINFO type
- Added: DRAW_DEVMODE type
- Added: ListDisplayDevices
methods lists all display devices
Version 3.20 (16 September 2011)
- Required for Insight Graphing 2
- Fixed: Max method
returning the minimum value rather than maximum when three or more
parameters where passed.
- Updated: Validated the behavior of the
Min method.
- Fixed: RgbToHsv
treating certain colors as grey, resulting in incorrect conversion
- Fixed: LightenColor not
correctly lightening the color
- Fixed: Missing value clipping in
LightenColor and DarkenColor
- Added: DarkenColor now
supports both absolute and relative adjustments
- Added: LightenColor now
supports both absolute and relative adjustments
- Added: LightenColor now
does perceptual lightening rather than simply adjusting the HSV Value of
the color - the saturation is proportionally adjusted for colors with a
maximum lightness, resulting in the method behaving perceptually as
expected.
- Updated: Saturate
method calculation
- Updated: Desaturate
method calculation
- Fixed: aaArc
Anti-Aliased Arcs drawing with a "width" and "height" up to 1 pixels
less than the correct sizes.
- Added: aaArc
automatically falls back to the pen color if not explicit color is
specified, and draws nothing if no color is passed and the pen color is
COLOR:None.
- Added: aaArc returns
without drawing anything if the penWidth is zero.
- Added: PieSlice, aaPieSlice,
aaChord, aaBezier, and aaRoundRect now
do not draw anything if a line only pie slice is specified and the pen
width is set to zero (0).
- Added: _LineColor
internal method.
- Removed: Deprecated WuLine
method.
- Added: _PieLine method - draws a line only pie slice.
- Added: _ArcCheck
- Added: _ChordCalc
- Added: DrawChordCalc
type
- Updated: Refactored _mArc
- Updated: Refactored _mThickArc
- Updated: Refactored PieSlice
- Updated: Refactored ShadeArcBand
- Updated: Ellipse and Arc parameter handling and coordinate
normalization.
- Added: _PieCalcLines
for calculating arc radials
- Added: aaShadeLine
- Fixed: PieSlice not
supporting startRadius when the width and height of the base ellipse
were the same (slice out of a circle).
- Fixed: Arcs drawing based on an ellipse
that could be 1 pixels too wide and high (only affected non anti-aliased
arcs).
- Fixed: Ellipses and thick ellipses
drawing up to 1 pixel too wide or high (did not affect anti-aliased
ellipses)
- Removed: Deprecated OldGrabScreen method
- Added: Improve PieSlice
drawing
- Removed: endRadius from PieSlice
drawing
- Added: _LineColor
- Added: _PieBorder.
Draws the pie slice outline - can be used to draw line only pies, used
internally for pie slice anti-aliasing, and can draw line on pie slices
with shaded lines.
- Added: PieResetSlice
- Added: new aaPie method
that takes a PieSliceType parameter
- Added: aaArc method now
allows the start and end point values for the arc to the returned using
the pStart and pEnd parameters
- Updated: Refactored aaArc
to improve performance and reduce code and duplication (halved the
number of if statements per pixel executed)
- Updated: Improved aaArc
end point pixel accuracy
- Updated: Improved performances of
aaPie and aaShadeArcBand methods.
- Updated: Improved the drawing of pie
slices
- Added: LengthenLine
which takes a width and height for a line and increments them by the
passed amount while maintaining the line gradient and orientation (the
line is lengthened).
- Added: Inc method
increments the absolute value of the passed number by the passed amount
(increment if the number is positive, decrement if it is negative)
- Fixed: Cylinder method
drawing cylinder ends 1 pixels too large.
- Added: Partial support for cylinder
anti-aliasing (the bottom edge is not anti-aliased in this release.
- Added: _ArcFill method draws an arc and fills the
additional pixels (much like anti-aliasing but at full strength) to
create a 2 pixel wide arc.
- Added: ColorPos method
returns the color at a point in a given color range. The color range (or
gradient) is based on a start color, end color and the distance between
them.
- Updated: ColorRange
method refactored
- Added: "ColorHandling" example
application uses the new ColorPos method to create a "palette" of colors
using four base colors. Requires CapeSoft StringTheory.
Version 3.11 (28 July 2011)
- Fixed: Typo in the Draw.inc on the
_AddLayerOrder method (resulting in an unresolved for
export error in multi-DLL applications).
Version 3.10 (28 July 2011)
- Fixed:
Display method was
using the maxLayer property rather than numLayers when looping through
the layerOrder. This was causing a reduction in display performance.
Optimized multi layer display performance.
- Fixed/Changed: Rewrote the
InitLayer method to
improve performance and eliminate issues with duplicate entries in the
layerOrder array which would degrade display performance over time when
using multiple layer.
- Added: _AddLayerOrder
method which adds a new layer to the layerOrder array. This method is
internal and is not expected to be called directly.
- Deprecated: The maxLayer property has
been deprecated and removed.
- Added: Documented the
SetDisplayArea
method.
- Added: Document the
ResetDisplayArea
method.
Version 3.09 (21 July 2011)
- Fixed: Typo on the export name for the
Captcha method (was being exported as Capatcha). This
has no impact on application using Draw.
- Fixed: The ErrorTrap
method being called when diReadImageToBuffer was called
with a buffer that was intentionally too small (the method returns the
required size).
- Added: handling for invalid
layerOrder array values to prevent a potential GPF.
- Added: diWriteImage
method for saving the image in almost two different file formats
including JPEG, PNG, TIFF, BMP, ICO, PBM, Targa, JPEG2000 etc.
- Fixed: bug with the
layerOrder array that caused duplicate layer entries when
KillLayer and InitLayer were called
multiple times for the same layer. This could result in a GPF or reduced
display performance.
- Added: New menu system to the
documentation, cleaned up links and added missing items to the menu.
- Updated: The DrawImage documentation.
This is still a work in progress, see the DrawImage example application
for an example of using DrawImage.
- New: Added an example of the new diWriteImage to the DrawImage
example.
Version 3.08 (12 July 2011)
- Fixed: Typo in the template causing an
unresolved external in multi-dll applications on the LinearEllipse
method.
- Fixed: The MouseX and
MouseY methods not
correctly restoring the PROP:pixels setting for the window when
PROP:Thous was non zero (restoring PROP:Thous to a non zero value clears
PROP:Pixels).
Version 3.07 (11 July 2011)
- Updated: All examples applications have
been updated and tested, including migrating older examples from Clarion
5.0 to Clarion 5.5. Removed all old examples which were extraneous,
removed duplicate or deprecated files from examples, added manifests for
all examples, correct missing templates or compile errors etc.
- Fixed: Ellipse drawing off by one pixel
when the width or height were passed as negative values.
- Fixed: Shaded ellipses not drawing
correctly with vertical shading.
- Fixed: ShadeLine method not drawing
vertically shaded lines correctly.
- Added: _NormCoords method to provide
consistent coordinate normalization
- Added: _ClipCoords to provided
consistent coordinate clipping
- Fixed: Clipping of coordinates was
allowing (0, 0) rather than treating (1, 1) as the origin
- Fixed: Clipping or coordinates allowing
coordinates ending 1 pixel off the canvas
- Updated: Improved clipping and
normalization of coordinates for patterned lines.
- Fixed: Additional pixel drawing on
shaded vertical lines.
- Fixed: Shaded ellipses could draw the
left hand side of the ellipse with a radius 1 pixel greater than the
right hand side depending on the size and coordinates.
- Updated: Validated styled lines drawing
coordinates.
- Updated: Refactoring clipping and
normalization code for shaded and styled lines
- Fixed: Horizontal shaded lines filling 1
additional pixel.
- Fixed: Shaded vertical lines not shading
(drawing as a solid color).
- Updated: Optimized and refactored
_ErrLine
method, removed extraneous code
- Added: New AntiAlias example
demonstrates the new Anti Aliasing support in Draw.
- Updated: Removed additional extraneous
files from examples and reduced installer size.
- Updated: Modified the Chord method to
call Arc and removed duplicate extraneous code.
- Updated: Removed deprecated/unused
_NewThickLine
method
- Updated: Removed deprecated/unused
_Thickness method
- Updated: Internal LinearEllipse method
renamed to _LinearEllipse
- Fixed: MetallicCylinder not drawing the
cylinder body with certain coordinates as the result of overly
aggressive clipping.
- Updated: Removed the deprecated/unused
Thick_line method.
- Fixed: Anti-Aliased ellipses drawing
width incorrect coordinates (only affected the Ellipse method not direct
calls to aaEllipse).
- Added: Anti-Aliasing to the Demo example
application
- Updated: The code for the demo example
to better demonstrate basic drawing.
- Added: Examples of clipping coordinates
to the Demo example
- Added: A RandCoords routine to the Demo
example that demonstrates generating coordinates within an area and
clipping the result.
- Fixed: Removed extraneous debug logging.
- Added: New RandColor method that allows
the lightness and saturation of the color being generated to be
manipulated, as well as the amount of variance in the lightness of the
color to be influenced.
- Added: Example of using the new
RandColor method to the Demo example (see the Sphere drawing example).
- Updated: Removed the local RandColor
function from the example application and moved all calls to the
Draw.RandColor method.
- Added: Anti-Aliases edges to the Sphere
method. Now supports smooth edge drawing when Anti-Aliasing is enabled
(the Draw.antiAlias property is non zero)
- Fixed: Spheres potentially drawing 1
pixel too wide for some coordinates.
- Fixed: Icons drawing 1 pixels offset
from the correct location.
- Fixed: Icons clipping the icon width by
1 pixel too many when the entire icon was not on the canvas and hence
required clipping.
- Fixed: Icons drawing incorrectly when
clipped as a result of the source icon scanline not be adjusted for each
row of pixels in the icon, resulting in the next scanline beginning at
the clipping position rather than the start of the next scanline in the
icon (which resulted in a corrupted "skew" drawing of the icon).
- Updated: Verified icon clipped and
coordinate adjusted for all coordinate cases.
- Updated: Optimize icon drawing to not
process extraneous scanlines that would draw off the canvas.
- Added: New "Tests" tab to the main
example. This demonstrates some additional method calls and also tests
some of the Draw functionality.
Version 3.06 (28 June 2011)
- Fixed: A potential array index out of
bounds when using 256 color drawing in the Display method (the palette
could end up with 257 entries rather than 256).
- Fixed: Duplicate symbol compile errors
in Clarion 8 on the LibPNG functions.
Version 3.05 (6 June 2011)
- Fixed: Fix the template generating the Init call twice for reports.
- Fixed: The template not generating the call to InitDrawImage on
reports.
Version 3.03 (25 February 2011)
- DrawPaint - use only textvalue (for images as well). Deprecated
ItemQ.ImageName property. If you get compile errors, use the
ItemQ.textvalue property.
- Fix for RightReports - resizing fix. Don't resize < 0 (vertically or
horizontally)
Version 3.02 (16 August 2010)
- Fixed missing Thick_Line in the export list,
which would result in an Unresolved External error in multi-dll
applications.
Version 3.01 (10 August 2010)
- Fixed incorrect name() attribute for the
aaPolygon method.
- Removed the old
HLINE@F4DRAW from the template exports.
- Fixed release date for 3.00 in the History.
Version 3.00 (4 August 2010)
- Changed the open mode used by the Image() method
to open loaded images are read-only. This allows images to be read and
displayed from locations that do not have write access.
- Added code to load WMF and EMF files (in
progress)
- Fixed: GetDisplay() method was not always
calculating zero padding correctly.
- Improved performance of horizontal and vertical
lines that use line styles.
- Fixed lines drawing 1 pixel offset from the
correct location.
- The Arc method now allows
negative widths and heights
- Added anti-aliasing support (provides smooth
edges for objects being drawn).
- Added .antiAlias
property, when set to True, this will draw anti-aliased versions of
objects where available.
- Added aaPolyline
method
- Added aaRoundRect method
- Added aaBezier method
- Added the following internal methods
(typically the .antiAlias property would be set to True, and these
would be called automatically):
- Added aaLine method
- Added aaEllipse method
- Added aaPolygon method
- Added WuLine method
- Added aaArc method
- Added aaChord method
- Refactored code for clipping and coordinate
calculation across all line methods
- Fixed various offset isses, where shapes were
drawing offset by a single pixel.
- Fixed 45 degree lines drawing an extra pixel on
one end in some cases.
- Added Dist method for returning
the distance from one pixel coordinate to another.
- Added the Pos method to return
the pixel position when given a pixel coordinate and a distance.
- Added a ConstrainCoords method
that provides clipping and coordinate transformation.
- Corrected Polygon outlines, which could drawn 1
pixel short.
- Added anti-aliasing support to the standard
methods when the .antiAlias property is set to
True.
- Added a new AntiAlias example showing
anti-aliases object drawing.
- New thick line drawing algorithm provides improved
accuracy and initial anti-aliasing support (the algorithm for
anti-aliasing thick lines will be improved in future releases).
- Fixed lines potentially missing a pixel in their
center at specific angles and lengths.
Version 2.82 (30 December 2009)
- Fixed Unresolved External on _StringHeight when
compiling in multi DLL mode in Clarion 7.1.
Version 2.81 (21 December 2009)
- Corrected external name for _StringHeight method,
detected by linker in C71.
- Corrected indentation and quotes for Draw-Paint,
Multi-Proj, Embedded cursors support.
Version 2.80 (29 October 2009)
- Fixed: diReadImage was not displaying images that were loaded from
BLOBs as a result of a regression in 2.78 when image caching was added.
- DrawHeader:
- New: ChangeIcon() method allows the icon to be changed at
runtime.
- New: .resizePercentage property allows the resize width of the
bar to be adjusted. By default this is 100, which creates a bar
twice as wide as the current width of the window, allowing the
window size to be increased without having to redraw the bar
frequently. Setting this to 0 always draws the bar the same width as
the window, and values in between allow a balance between
performance and appearance. We don't recommend values above 100,
although there is no limit on the value.
- Improved: Support for 16x16 icons on smaller header bars.
- New: Support for Mike Hanson's resizing template.
Version 2.79 (16 September 2009)
- Fixed: DrawHeader: Template barheight now defaults to 5 in the
template settings
- Fixed: DrawHeader: If the barheight field is blank, then no code is
generated to override the barheight and the object's default height is
used.
- Updated: DrawPaint class to provide additional functionality for
RightReports
Version 2.78 (27 August 2009)
- Fixed: Exports for Multi-DLL applications. Fixes "unresolved
external" errors.
- Added: diImageFromCache method to load an image cached by the call
to diReadImage.
- Added: Enhanced functionality to diReadImage to support caching of
images. Images are cached by default, unless the cache parameter is
passed as 0.
- Added: draw:CacheBufferType data type to hold cached images.
- Improved: Clipping support for redrawing a specific area of the
canvas (dramatically improves performance with animation and other
frequent updates, where only a small area has changed):
- clipRectX long
- clipRectY long
- clipRectW long
- clipRectH long
- clipRect long
- Added: Cache group to store use to cached images for rapid redrawing
and reuse. Uses the draw:CacheBufferType group type to store each cached
image. The maximum number of cached images is determined by the
draw:MAXCACHE equate, which is 1000 by default.
Version 2.77 (14 July 2009)
- Fixed: The Polygon method was ignoring the numVertices parameter for
line only polygons.
- Fixed: The Polygon method not supporting thick line widths for
borders.
- Fixed: Thick line drawing was not always drawing the line widths
correctly.
Version 2.76 (15 May 2009)
- Added: diReadImage now supports loading images directly from BLOBs.
- Added: Updated documentation, dynamic syntax highlight for code
blocks, begun the documentation of the DrawImage methods.
Version 2.75 (6 May 2009)
- Fixed: DrawHeader template was not setting the bottom bar width.
- Fixed: DrawHeader template was ignoring the bottom bar shading if
set to color:none
- Added: a DrawHeader.blurBar property that when set allows the bottom
bar to be faded into the background along it's top edge. This was the
default behaviour with previous version, however the new default is to
draw the bar normally without any fading or shading into the background
along its top edge.
- Added embeds to the DrawHeader initialisation for the Legacy
template change, to allow the settings to be overridden (this
functionality already exists in the ABC template chain).
- Added: New Documentation for DrawImage
- Added: New "HowTo Guides" document (currently a place
holder for
- Added: New menu navigation system for the documentation
- Fixed numerous small errors in the documentation, expanded the
documentation throughout.
- Added: Support for EasyResizeAndSplit with the Draw Headings
template.
Version 2.74 (03 December 2008)
- Added Inited property. Is set in the init method, and kill is only
completed if the inited property is set (reset in kill method).
Version 2.73 (01 December 2008)
- Fixed: DrawPaint disposal and cleanup, fixes the RightReports editor
leaking memory when closed.
- Added: Small Clarion 7 template update.
Version 2.72 (10 November 2008)
- Clarion 7 compatible install.
Version 2.71 (13 October 2008)
- Fixed: Potential GPF in the Draw.Init() method because of invalid
handling of an API return value. This was causing SendTo to GPF when
using certain types of icons under Windows XP (Windows Vista was not
affected).
Version 2.70 (12 September 2008)
- Added: DrawPaint:The user can now
resize and object using any edge of the bounding box.
- Added: New resizing cursors for the above.
- Added: Additional bounds check in LoadIcon
for icons that had invalid header information, that could potentially
cause a GPF.
- Fixed: Error in LoadIcon where the allocated buffer was one byte
smaller than it should have been, causing a potential buffer overflow
with paletted (8 bit) icons where the AND mask of the icon had been
padded onto a DWORD boundary.
Version 2.69 (30 August 2008)
- Fixed: Draw of layers with alpha transparency, where the layer was smaller
than the canvas (baseLayer) and was position away from the origin. Layers
with alpha blending were drawing with the y-coordinate inverted. This same
issue also affected any layer copy done using CopyLayer() where the layer
being copied was using alpha blending.
Version 2.69 (28 August 2008)
- Fixed: Template error that was not exporting GetMonitorInfo and
GetWidowInfo in Multi DLL applications, resulting in an Unresolved External
compile error.
- Added: DrawHeader: Both normal a delayed (late) init splits the
Initialisation code into three sections, with an embed between each:
- Init Draw and DrawImage
- Add template settings code (if the defaults are overrriden)
- Call Display to render the control
- This allows the generated code to be easily overridden on a source
level, or for additional code to be called before or after each stage of
the initialisation
Version 2.68 (22 August 2008)
- Added: Draw.SetDisplayArea().
Limit the area redrawn when calling Display, and provides rapid refreshes
when just a small area has been modified.
- Added: Draw.ResetDisplayArea().
Reset the area being displayed to the default (display the entire image).
- Added: Draw.MonitorFromRect().
Returns a handle to a monitor (display) when passed a rectangular area (for
example if passed the coordinates of a window it would return which monitor
that window is on).
- Added: Draw.GetMonitorInfo().
Returns the information about a particular monitor, including the pixel
size, size of the work area (the area not obscured by the taskbar) etc. The
result is stored in the passed
draw_MONITORINFO group.
- Completed: Draw.GetWindowInfo().
The prototype has changed. This method now returns the information for the
current window. The information is stored in a
draw_WINDOWINFO group.
- Added: In the template. The ability to suppress the export of the draw
object from a data dll.
- Added: Picture display functionality to DrawPaint.
Version 2.67 (02 July 2008)
- Fixed: A GPF in the Draw icon loading where if the icon was loaded from a
resource using WinEvent to get the handle, and the size was specified, and
the icon contained only a 4 bit (16 colour) icon, and was completely
transparent (had no coloured pixels). This resolves an issue in SendTo.
Version 2.66 (03 June 2008)
- Changed: DrawHeader: The control is now populated with the width set to
Full rather than a specific value.
- Fixed: DrawHeader: For a number of the prompts color:black was being
ignored as if it was color:none
- Added: DrawHeader: The Local DrawHeader class override is blank by
default, and unless it it filled in the global setting is used. If the
global setting is blank then the default DrawHeader class is used. This
allows the local setting to be overridden but still use a base class that is
specified globally.
Version 2.65 (03 June 2008)
- Fixed: DrawHeader, the code was not being generated correctly if a
variable was used for the Heading Text and Icon fields in the template.
- Fixed: DrawHeader, if the DrawHeader base class was overridden in the
global settings then the custom based class setting would be ignored and the
default class would be used.
- Added: Draw.Captcha() method, creates a "CAPTHCA" from a string, and
optionally saves the PNG to disk with the file name specified. A CAPTCHA is
a challenge-response mechanism that is intended to differentiate between a
human and a computer. The current implementation is very simple, but will be
expanded.
- Added: Draw.EnumProcessModules() method, which populates and array with
the handles to all of the loaded modules for the current process.
- Added: DrawHeader can now use icons from any module, regardless of which
DLL the icon is actually in.
- Fixed: DrawHeader template not populating the code for the x and y
position of the text and icon.
- Changed: The EnumFont date types did not have the draw: namespace
prepended.
- Changed: Merged two LOGFONT data declarations.
- Added: Module enumeration with the first instance of Draw that
initialised. The handles to all loaded modules are retrieved and can then be
used to load resources from.
- Changed: External function and API prototypes have been moved to the
DrawAPI.clw file.
- Added: SetDisplayArea() method that allows a specific region to be
updated without the entire contents of each layer being composited together
for a display [BETA].
- Added: ResetDisplayArea() method. Clears the SetDisplayArea setting and
allows the entire image to be refreshed when calling Display()
- Fixed: Drawheader: Incorrectly named properties of the class in template
generated code (iconPostionX, iconPositionY and barColor).
- Added: DrawHeader: Bar shading support to the template so that the bar
drawn at the bottom of the header can be shaded between two colours.
Version 2.64 (23 May 2008)
- Fixed: Old Draw Window Headings not being displayed properly because the
old procedure is no longer used (the global option to use the old draw
header template should be enabled until migration to the new template is
complete. See the DrawHeader
documentation).
- Fixed: Function called as a Procedure warning on compile.
- Fixed: Template generating the call to Init() twice which could result
in the GDI device contexts not being created when procedures with Draw
objects where rapidly opened and closed.
- Added: Logging and error checking code to the GDI initialisation, as
well as font rendering.
- Fixed: Copylayer() inverted source and destination calculations. This
could result in the copied section y coordinate being inversed, or the
copied blocks being inverted.
- Added: Entirely new DrawHeader template
- Added: All DrawHeader settabtings exposed on the global template
- Added: DrawHeader template ability to use a different base class
- Added: DrawHeader local template to allow the global settings to be
overridden
- Added: DrawHeader backward compatibility, and an option to use the old
template by ticking the box on the global extension.
- Added: Documented all properties and methods in the DrawPaint Class, see
the DrawPaint documentation.
- New Methods:
- AddItem(),
AlignBottom(),
AlignLeft(),
AlignRight(),
AlignTop(),
CalcStringDims(),
Construct(),
CopyItems(),
DeleteItem(),
Destruct(),
DrawHighlightBox(),
DrawHighlights(),
DrawItems(),
FindParent(),
HideHighlight(),
Init(),
InResizeCorner(),
ItemClicked(),
Kill(),
MakeSameHeight(),
MakeSameSize(),
MakeSameWidth(),
MoveItems(),
PasteItems(),
RedrawHighlightBox(),
Reset(),
ResizeItem(),
SaveHighlightPos(),
SetCanvasSize(),
SetCursor(),
SetGrid(),
SortItems(),
SpreadHorizontally(),
SpreadVertically(),
TakeClickEvent(),
TakeDragEvent(),
TakeDropEvent(),
TakeEvent(),
TakeResizeEvent(),
WithItem().
-
New Properties:
- CanMoveNow, canvasColor, CopyItemQueue,
gridColor,
gridEnabled,
gridStyle,
gridWidth, hDrawFactor,
HighLight,
ItemQueue,
LockParents,
Moving, Resizing, vDrawFactor,
ZoomFactor,
_control,
_DeltaX,
_DeltaY, _highlighted,
_HighlightItems,
_HighlightQueue, _items, _MultiClickCount,
_nextId,
_StartMouseX, _StartMouseY.
- Added: Documented the new DrawHeader class
- Added: Drawheader backward compatibility, the template now allows either
the new or the old DrawHeader to use, and the setting can be set globally
and overridden locally. Migrating to the new template should be transparent
in most cases, except those where custom code has been added to the imported
DrawHeading procedure. This code can now be moved to a custom DrawHeader
class that inherits from the DrawHeader class, or the template can be used
to modify the settings globally, with local overrides available. Both the
old approach and new class based approach can be used in the same
application by selecting the desired option for the particular control, and
setting which should be the default on the global extension.
- Fixed: History documentation links were not working for entries that
were created before the History was split into a separate document
- Added: Documentation for the new DrawHeader class and templates,
migration information, descriptions of the template settings.
- New Methods:
- New Properties:
- displayText, textX,
textY, blurSize,
autoShadow, shadowOffsetX,
shadowOffsetY, shadowColor,
iconName, bgColor,
bgColorEnd, shadeType,
shadeDirection,
highlightPos,
highlightIntensity,
iconHandle, iconX,
iconY, iconSize,
barStartColor, barEndColor,
barHeight.
Version 2.63 (23 April 2008)
- Added: New DrawHeader class. This class completely replaces the old Draw
Header template/procedure:
- The local procedure is no longer required, and does not need to be
imported
- Does not create and destroy a Draw object each time the control needs to
be drawn
- Full control over the object setting using the DrawHeader object
- More properties exposed at the template level (global template settings
coming soon)
- Fast, intelligent built in resizing. Add the SV resizing extension and
the control will handle all resizing. No hand coded needed.
- Shade background support,
- No icon control is needed or created, loading icons from disk and
resource is handled internally and directly.
- DrawHeader is based on Draw and hence everything supported in Draw is
supported in DrawHeader - making it fully customisable.
- Automatic icon size selection based on the control size
- Full backward compatibility - existing controls continue to work and
provide upgraded functionality
- New shaded
- Automatic positioning if the height of the control changes (support for
vertical resizing)
- Automatically uses the correct icon if the height of the control
changes.
- Text is centred in the control based on the font sized used and the
height of the bottom bar (if any).
- Fixed: Multi-DLL compile error with new methods.
- Added: Lighten and Darken example code to the DrawImage example, as well
as a demonstration of the two supported modes for Greyscale conversion.
- Added: Built in icon loading from resource - WinEvent is no longer
needed for this functionality.
- Added: GetIconHandle
method to load an icon using the Windows API, which supports loading from
file or resource (this is done automatically, the correct source is
located), as well as loading any size icon and resizing icons to the
specified size if the specified size does not exist.
Version 2.62 (16 April 2008)
- Added some new fields to the ItemQueue in the DrawPaint class: Clipped, FitWidth and FitHeight.
Version 2.61 (13 February 2008)
- Added: Support for both FreeImage 3.10 and later and previous
releases. In FreeImage prior to 3.10 the topdown parameter in
FreeImage_ConvertFromRawBits and FreeImage_ConvertToRawBits was being
handled in reverse, and in 3.10 this was fixed - however this resulted
in all images loaded by the DrawImage functions being upside down when
the DLL from 3.10 or newer was used. This has now been handled
internally so that both old and new versions of the DLL are supported.
- Added: New DrawImage example that shows some of the basic DrawImage
functionality. This will be expanded, along with the DrawImage support
itself. Also a DrawPaint example will be available for future versions.
- Fixed: Unresolved Externals when compiling in Multi-DLL mode
- Major documentation cleanup and reorganisation. Documentation is now
split into logical sections, and the documents have been moved to XHTML
and all formatting is CSS based.
Version 2.60 (25 January 2008)
- Added: GreyScale() method to convert a section of the control, or any
layer, to Grayscale (256 shades of gray). Supports both linear conversion
and perceptual conversion (which used a good heuristic to preserve the
perceptual brightness that the human eye would see).
- Fixed: Image() method loading 256 colour (8bit) bitmaps incorrectly, the
wrong bytes were being assigned to the RGB components and the byte order was
shifted by one resulting in a "corrupted" image where the colours were
incorrect.
New Documentation for the DrawPaint Class (work in
progress, will be completely shortly)
New Document for DrawImage class (coming soon)- Improved integration for FreeImage
- Included FreeImage in the installer
- Complete revamp the documentation, added missing methods, split the
documentation into multiple documents and improved navigation and usability.
There is now a separate Class Reference, as well as a separate Layers
reference, FAQ, History etc.
- Added: PointInPieSlice() method - returns whether a point (x, y
coordinate) is within the specific Pie Slice shape (a segment of an
Ellipse). Typically used after drawing a pie chart using the PieSlice()
method to check whether a user clicked within one of the drawn slices, and
if so which slice was clicked in.
- Added: Additional BestFit() method that takes Longs instead of Ulong.
This polymorphic method is just a wrapper for BestFit() and included for
convenience.
Version 2.59 (06 December 2007)
- Added: New features to the DrawPaint class for RightReports.
Version 2.58 (30 October 2007)
- Fixed: 256 color bitmaps had an error in the bitmap header that set the
size to 1 bytes smaller than the actual file size, which could cause a very
small number of applications to not open the produced BMP. The only applies
to 256 color BMPs being written to disk by writing the BLOB for the image
control directly to disk.
Version 2.57 (25 October 2007)
- Added: Option in the global template to disable
resizing for the DrawHeading control template.
- Added: The docs and example for the Barcode support (PDF 417) now
reflect the fact that the barcode function returns a value that should be
checked.
Version 2.56 (25 October 2007)
- Fixed: GPF when starting threads very rapidly with
Draw controls (applies primarily to DrawHeadings). All static variables are
now threaded.
Version 2.55 (18 September 2007)
- Added: Support for resizing when using the DrawHeader
template. Please note that this has changed the DrawMakeHeadings procedure
prototype and if you are using this template you need to import the new
procedure into your application using the template utility (or by importing
the TXA file).
Important: When upgrading to this version of
Draw please ensure you update your DrawMakeHeadings procedure by running the
template utility.
Version 2.53 (23 July 2007)
- Fixed: Template issue causing a compile error in
Multi-DLL projects and projects not using DrawPaint or DrawImage.
Version 2.52 (16 July 2007)
- Added support for Clarion FreeImage (free)
- Integrated Clarion FreeImage functions
- New DrawPaint class for creating persistent objects,
allowing the user to select and manipulate the objects (picking) etc. This is an
entirely new class that provides a whole new set of functionality (Capesoft
WriteReports is an example of the type of functionality that this can provide).
Full documentation will be included in future releases of Draw, along with
example applications.
- Fixed a bug when using FreeImage support in the root DLL
and not enabling it in the application. This only applies to Multi-DLL projects
that use the FreeImage support in some apps and not others that import from an
app that has a different setting. This should not affect any current Draw users
as it only applies to a pre-release version of Draw.
Version 2.41 (29 March 2007)
- Update the Multi-DLL support in the template
- New Multi-DLL example
- Add a section to the document of using Draw (and Progress) in multi-DLL
applications.
Version 2.41 (29 March 2007)
- Update the Multi-DLL support in the template
- New Multi-DLL example
- Add a section to the document of using Draw (and Progress) in multi-DLL
applications.
Version 2.40 (14 November 2006)
- New property Draw.mirrorText allows the text to be flipped back
to the right direction when using RTL text rendering and the window order
is set to Right-To-Left.
- Fixed new font rendering:
- Coordinate system was off by 1 pixel
- ErrorTrap was being
called even though the SetTextAlign function was succeeding.
- New font rendering using the .wholeString property now supports 90 degree text
(rotation by an arbitrary angle to be added in a future release).
- Fixed problems with the new StrHeight method when used with the WholeString font
rendering.
- Automatic directional rendering of Hebrew and Arabic characters when used in
conjunction with the Window or Control RTL ordering.
- Fixed a bug when using the Draw header template with the Legacy (Clarion) template
chain and the Window Resize extension that produced compile errors
- Correct documentation regarding the 3D datatypes Point2D, Point3D, Vector3D.
Data type names had not been updated in the documentation.
- New support for MultiDLL applications, simplified to work simply by ticking the
checkbox on the global extension to support using Draw in a DLL.
- New MultiDLL support in the template to assist Draw and Progress use in Multi
DLL application
- Changed MouseX and MouseY to handle controls with scrollbars where the Draw image
is larger than the control. Returns theDraw. MouseX() and Draw.MouseY() in
pixels relative to the origin (top, left hand corner) of the Draw image,
regardless of where it is scrolled or not.
Version 2.30 (29 September 2006)
- Fixed the unhandled case of an equals sign in BufferFont, equals signs where
drawing as minus signs (a single bar instead of two). This resolved an
equals
sign being incorrectly displayed by the .Show() method.
- Template tweaks to support AnyFont for the WindowHeading control template.
- New string support for Complex Script Languages such as Arabic and Japanese,
new font rendering properties and options, Right To Left reading order.
- Automatic whole string rendering of Complex Script languages.
- Automatic setting of Right-To-Left reading order for Hebrew and Arabic.
- Support for additional character sets, see the new document for the .fontCharset
property and the new Show() docs.
- Updated Font related entries in the docs - see Show() method for more information.
- Add .useUnicode, .renderWholeStrings, .textAlignRTL and .ansiToUnicode properties
to the class (.useUnicode and .ansiToUnicode to be exposed in the next release).
- Added initial support for Unicode, ANSI to Unicode conversion (see above, to be
exposed in the next release).
- Additional documentation updated, more improved consistency, more links etc.
- New .Curve method supports smooth curve drawing between a set of points and uses the Draw
.curveSmoothness and Draw.curveTension properties to allow the drawing to
the modified. Uses Hermite curve interpolation.
- New ._ShowFull method
- New ._StringWidth and ._StringHeight methods
- Fixed a bug in the .WritePNG method that could result in the current layer being
written to a PNG rather than the entire image.
- Fixed incorrect drawing of double shaded boxes when the intensity parameter was
passed as zero.
Version 2.26 (10 July 2006)
- Changed the WriteBmp, WritePng,
WriteLayerBmp and WriteLayerPng methods
so that if the file exists it is deleted and a new file created for writing
the image to.
- Fixed the Barcode method
to handle barcodes where the number of columns in the barcode is a multiple
of 8 (this was producing barcodes where each line "wrapped" onto the following and the barcode looked skewed to the side).
- Fixed drawing of Pie Slices
where the chord of the arc that forms the outside of the slice had a width
or height of zero (these were drawing as triangles rather than with curved
arc edges).
- Uploaded missing images for the docs (HSV and RGB images).
Version 2.25 (24 November 2005)
- Fixes and improvements for all arc related methods (Arc, _ThickArc, Chord, Pieslice,
ShadeArcBand, HalfEllipse etc.)
- Template changes for using Draw in multi DLL projects (Added "Export Draw Class
from this DLL" option and "Use Draw that is exported in another DLL" option).
- Fixed StrLen method for vertical strings, fixed string first character positioning
- Fixed ShadeArcBand drawing one pixel out
- Fixed Pieslice drawing the "drop" section inverted for 3D pie slices.
- Documented PDF417 barcode functions and DLL.
- Grabscreen method now fully supports all options - it no longer grabs the entire
screen, instead it now gets the specified section of the screen and places
it at the passed coordinates.
Version 2.20 (17 November 2005)
- Added a Barcode
method which draws PDF417 compatible barcode when passed a string containing
the data for the barcode.
- Fixed drawing of
shaded boxes a single pixel wide or high, where the pen width is set to
greater than 1 (some types of boxes used the penwidth for drawing).
- Fixed StrLen
method (was returning the incorrect pixel length for strings).
- Fixed font underlining (also now
faster and uses no extra memory for underlined styles).
- Added support for loading
icons from resources as well as disk for the LoadIcon
method (Requires a handle to the icon resource, it is recommended that WinEvent be used to obtain the handle by calling the WinEvent function ds_GetHIcon()).
- Added support for all icon color
formats for loading icons from resource.
- LoadIcon
supports loading all icon formats from disk with the exception of 4 bit and
24 bit icons from disk (all icon formats for icon resource are supported.
NOTE: Loading icons from resource requires a handle to the icon resource.
Therefore WinEvent is recommended for loading icons from resources.).
- Fixed thick line clipping when the line ran along the
edge of the drawing area.
- Improved thick line clipping to work on a per pixel
basis.
- Fix problems on reports in Clarion 6.2, where setting prop:pixels and then
restoring the value changes the value of prop:thous.
- Fixed very small pie slices.
- Added automatic bit depth detection for loading icons
from resources.
- Corrected circles (Ellipse, _ThickEllipse, LinearEllipse, ShadeEllipse,
HalfEllipse and Sphere) drawing 1 pixels left and up (many thanks to Brian
Wigal for reporting this bug!).
- Corrected spelling and typographical errors in documentation.
- New HSV/RGB conversion methods - HsvToRgb, RgbToHsv,
LightenColor, DarkenColor,
Saturate and Desaturate.
- Add Min and Max methods -each take up to 10 parameters are return the minimum or
maximum values thereof.
Version 2.15 (08 September 2005)
- Changed the HalfEllipse
method to draw both half Ellipses and Circles (only circles were supported).
- Change the way the DrawStore.tmp
file is created. This is a dummy file used by Draw. Each instance of Draw
opens this file in Share mode, the file is never read or written to. The file
is now created in the system temp directory, and the full path is used for
the file name, this avoids problems when the system{prop:datapath} is set,
and the file cannot be located when the file name is relative.
- Added an optional parameter to
Polygon and ShadePolygon
to allow a number of vertices to be specified, as well as the default of using
all entries in the array for the vertices.
- Added support for shading to the
HalfEllipse method, currently it supports linear
shading, future versions will support other shading types.
- More updates to the docs, added
more detail for methods such as Polygon and ShadePolygon,
added new parameter lists and examples, as well as new style (parameters and
example in tables), generally improved consistency, detail and layout.
- Fixed bug in the GetImagePixel
method that returned the wrong color for the last row of pixels in the image.
- Added a PointInPolygon
method that returns whether a coordinate passed is inside a defined polygon
or not. This can be used to determine whether a user clicked in any area in
the image control that can be defined by a polygon, or whether a user clicked
on a particular polygon in the Draw control.
- Added SetFontMode
to allow the font rendering mode to be set (anti-aliased, cleartype, non anti-aliased
etc.).
- Added ImageFromBuffer
- writes from a buffer that contains RGB data to a layer, allows the position
of the image to be specified, along with the ability to clip the image and
tile it both horizontally and vertically. Tiling in either direction can be
specified independently.
- Added a BestFit
method that returns the best proportional scaling when passed an existing
width and height and the dimension that must be fit within.
- Added a ClarionToRGB
method that converts a standard Clarion BGR color to an RGB color.
- Added a GetLastError
function (not a member of the draw class, so it can be called anywhere in
an app without a Draw object). This returns the last Windows API error code.
This code can be passed to the Draw FormatMessage
method, which produces a Clarion string containing the error message.
- Added a ToClipboard function that copies the
Draw image to the clipboard. This function copies the visible contents of
the control to the clipboard (so hidden layers etc. are ignored). The image
is copied to the clipboard as a bitmap.
- When resizing and retaining the data, certain sizes could cause a GPF. This
GPF was in the ResizeLayer method when copying
the data from the old layer to the new layer, where the new layer was significantly
smaller than the old one and the zero padding changed.
- Added support 256 color icons to the LoadIcon()
method, fixed all issues with paletted icon transparency. The next release
will add support for all other icon formats (1,2 and 4 bit paletted icons,
as well as 16 and 24 bit icons). Currently both 8 bit (256 color) and 32 bit
icons are supported. Windows XP style 32 bit support the full 8 bit alpha
channel for transparency.
Version 2.14 (28 February 2005)
- Fixed
GPF in the Blank() method when blanking the canvas to a color (rather than
black or white) while the penWidth property of the class was greater than
1.
Version 2.13 (10 January 2005)
- Fixed
template error in 2.12
- Added template option to allow Draw to be easily included in a DLL in multi DLL
projects
- Added a DrawDLLMode define that the template automatically adds to the project
defines (Clarion 5 needs to have this done manually). This allows the Draw
to be compiled into a DLL and used from the DLL rather than compiling the
Draw.clw file into every app in a multi DLL project. This define supports
both Draw and Progress. See the What's New section for more information.
- Updated template to be consistent with new CapeSoft template style specification
- New AlphaCopy
method improves performance, fixes alpha errors and a possible GPF.
- Added code to automatically create alpha channels when drawing text to a layer
with an active alpha layer (still in testing)
- New DrawHeader
template which uses a single layer instead of multiple layers and supports
font anti aliasing
- Numerous updates to documentation
- Updated all example apps, totally
revamped the main example app with numerous useful features, such as drop
shadows and pie slices.
- Added HalfEllipse() method
- Fixed problems with Shaded object when a pen width and style had been specified.
Version 2.12 (05 January 2005)
- Internal release (not for public
consumption).
Version 2.11 (04 January 2005)
- Added
font anti-aliasing and rendering options (See SetFontMode).
- Added methods for enumerating all font on the system and populating a queue
(See EnumFonts)
- Added a number of new internal Draw properties and equates for fonts.
- Fixed rendering issues with some fonts that truncated some letters.
- New examples, with numerous feature additions and more useful code (such as demonstrating
drop shadows etc.).
- Added GetPixel method as an alternative name to GetImagePixel().
Version 2.10 (30 November 2004)
- Fixed
clipping issues with boxes.
- Fixed a small memory leak where a Draw could exit without releasing GDI handles.
- Documented the numerous new methods that have been added, such as shaded ellipses and spheres
- Updated Draw header template to allow all settings to be modified on the properties
page and to allow variables to be used as well as literal values
- New DrawHeader utility template for adding the DrawHeading procedure for both
ABC and legacy.
- New Demo and Example applications, example application have been cleaned up and
demonstrate the features
- DrawHeadings now allows icons in the current app to be specified, as well as icons
in the application directory. See the Dynamic Header Template section for more information.
- New functions:
Version 2.09 (21 April 2004)
- A number of internal fixes, an
improved template and a large number of new features, which will be fully
documented in the 2.10 update.
- New extension added to the template
that allows Draw to dynamically create header with drop shadowed text on windows,
simply drop the template on the window and enter text in the string (or even
leave it blank which will use the window title). See the Dynamic
Header Template section.
Version 2.08 (14 November 2003)
- Fixed GPF in Clarion 6 when writing to PNGs (threading bug).
Version 2.07 (04 November 2003)
- Interim release, fixes Duplicate label warnings with Clarion 6. Draw equates
now have the 'Draw:' namespace identifier prepended to them.
Version 2.06 (20 August 2003)
- New Cylinder() method, and an
additional cylinder method that allows new types of shading on cylinders.
- Fixed GPFs caused by accessing the 0th element of arrays.
Version 2.05 (31 July 2003)
- Only a single DrawStore.tmp file is created in the current
Windows temp directory regardless of the number of programs using Draw that
are run. (this file is always empty, and is never written to).
- Changed Windows Registry type equates to avoid duplicate
label warnings with C6 EA 5.1.
- This release is the basic version required for CapeSoft
Progress.
Version 2.04 (29 July 2003)
- Fonts: Fixed clipping, Font point sizes are now exact (previously
they were an estimate that occasionally was somewhat inaccurate), Fixed font
positioning, both vertical and horizontal. Note: You may notice that
your fonts now display smaller than they were previously, the display size
is now correct and uses the current screen resolution to calculate the exact
pixel height of fonts.
- ColorRange() Method - returns
a pair of colors on a range, given the start and end colors and the distance
between them
- Added new example app (simpler and cleaner)
- Fixed shaded boxes that were 1 pixel too small when draw
the same size as a layer.
- WriteBMP() and WritePNG()
now correctly write the display buffer to disk rather than the current layer
- Added WriteLayerPNG() and WriteLayerBMP()
to write just the current layer to disk.
- Fixed a bug in the WriteBMP() method
that produced unreadable BMP's with large images by truncating the last byte.
Version 2.03
- Another massive update of the documentation, added examples and screen shots
to all methods, added an info section with further useful information for
each method, and links to related methods. Examples are now actual useful
pieces of code that can simply be dropped in an app and compiled.
- Fixed penStyle applying to shaded objects.
- Fixed Highlight() method drawing off by a pixel
(vertical).
- Image() method documentation updated and expanded
- Image() method supports tiling an image across a layer
- Polygons draw correctly when the current pen color is color:none
- The Polygon() Method has been modified, all the workarounds
were removed and the original algorithm revised to work with all cases.
- Polygons are now faster as well as being consistent (no misdrawn pixels).
- Corrected misdrawn pixels at the end of very thin horizontal cylinders.
- ShadedLine() method shades a line between two colors
in any direction (not just vertical or horizontal).
- Added ShadeEllipse() method
- Added ColorRange() method which determines start
and end colors at two points within a color range
- Added versioning to the Draw template, templates which are dependant on
Draw (such as Progress) now check for a sufficiently new version of Draw.
- Fixed problem with True Type fonts not displaying when ClearType was enabled
under WindowsXP
- Changed layer display order, so that the first layer in the display order
list is the bottom layer, which means that each new layer created is created
on the top of the layer "stack".
- Fixed layers smaller than the the image control being draw from the bottom
left hand corner rather than the top left hand corner.
Version 2.02
- Fixed a bug with with layer copying, which incorrectly positioned layers
that were smaller than the baseLayer.
Version 2.01
- Added the call to UnLoadLib() for zlib in the Kill()
method.
- Corrected an error in CopyLayer() that resulted
in the last scanline being skipped.
- Corrected clipping for the HighLight() method (off
by 1 pixel)
- Corrected small bug in the BufferFont() internal method. The bug did not
affect any functionality.
Version 2.00 (Gold)
- Draw has gone gold!
- Added Layers, layer transparency, layer alpha channels,
Hidden layers and layer drawing methods. See the section on Layers
for more information.
- Added the GetWindowsColors() method to retrieve
the current colors for the Windows interface.
- Added a layer data type and a layer array to store
layers.
- Major revamp of the documentation, neatened and cleaned up existing sections,
added a large number of new sections and clarified some of the more obscure
sections.
- Added a layerOrder array to store the layer order independently of the layer
storage order.
- Added the following methods for manipulating layers:
| Draw.AddAlpha | Add an alpha channel to a layer |
| Draw.AlphaCopy | Copy a block of pixels from one layer to another using
alpha transparency. |
| Draw.CopyLayer | Copy a block of pixels from one layer to another. |
| Draw.HideLayer | Set a layer to hidden. |
| Draw.IndexTransparency | Set the index transparency of the layer. |
| Draw.InitLayer | Initialise a new layer |
| Draw.MoveLayer | Change a layer's display order. |
| Draw.ResizeLayer | Resize a specific layer. |
| Draw.SetMode | Set the display mode. |
| Draw.Showlayer | Set a layer to be shown when Display() is called. |
| Draw.SwapLayers | Swap two slayer's display order. |
| Draw.ToAlpha | Copy one RGB channel from one layer to another. |
| Draw.WithLayer | Activate a layer for drawing to. |
- A number of bug fixes and large number of improvements have gone into this
release.
- Cleanup up and corrected the template and template documentation.
- Added new examples, cleaned up old examples.
- Modified Init() and Kill() to allow the object to be dynamically created
and Init() and Kill() called multiple times to re-initialise the object.
- Added a destructor to the class.
- Added a large number of tweaks and improvements, including insuring that
old Draw programs continue to work flawlessly even though they now use layers.
- All example apps have been redone and a number of new examples added - see
the examples section.
- Both libpng.dll and zlib.dll are correctly loaded at runtime, if the files
are missing Draw handles the error.
Version 1.0 Beta 11a
- Added LoadIcon method to allow Windows icons (.ICO
files) to be loaded (currently only supports WindowsXP 32 icons)
- Changed the Show method, if the font color was less
than zero, the text would simply not be drawn, now the font color is set to
black if it is less than zero.
- Added a HighLight method that allows a color to
be XOR'd to turn a highlight effect on and off over an area.
Version 1.0 Beta 11
- Added Methods for 3D calculations (All method can be used for 2D calculations):
- PNGs produced by Draw are now compatible with all compliant PNG decoders.
- Draw now loads any DLLs at runtime (relevant for writing PNGs).
- Major revamp of documentation.
- The Image() method now supports a transparency color
for BMP's.
- New data types for 3D calculations:
Version 1.0 Beta 10
- A huge number of fixes and improvements since the last public release (Beta
7) too many to list individually.
- Fixed all polygon drawing issues, the polygon method is now robust and a
little faster too.
- A whole pile of changes to the font handling, mostly bug fixes but some
optimization issues too.
- Added Draw.fontZoom property to allow the fonts to be globally resized for
high resolution reports and such.
- The Arc() method has been tweaked and improved, and a few rounding issues
tidied up.
- 256 colour drawing has been implemented. This should be particularly useful
if the image needs to be sent across a network, or if the 24 bit version is
bloating a report excessively. See the Init256() method
for details on using 256 colour Draw images.
- Resizing supports 256 colour bitmaps, and zero padding is now correctly
calculated.
- Lots of code cleanup work has been done, so Draw should be cleaner and more
consistent internally.
- Added a SwapBuffers() method that allows any bitmap buffer to be written
to the image control.
Version 1.0 Beta 7
- Added global extension to allow PNG support to be disabled - with no PNG
support it is not necessary to ship the zlib.dll file.
- Documented all the features of the Blank() method.
- Added patterned fills and the Draw Pattern Maker - pattern.exe, which allows
you to create your own patterned fills with a graphical interface.
- Added the SetFill() method to allow patterned fills
to be used.
- Fixed rounding error with MouseY() method.
- The Image() method did not support all the documented
features. This has now been corrected.
- The Image() method now uses the top left hand corner
as the origin, the same as all the other Draw methods
- Fixed incorrect drawing of 45 degree lines that were more than 1 pixel thick
- Alphabetised class methods in documentation and added new table for easier
access.
- Fixed SetFontColor() method that was swapping
R and G color components (Clarion colors treated as RGB instead of BGR)
- Numerous fixes to the Arc() method, particularly with
thick arcs.
- Fixed vertical font clipping.
- Character font clipping implemented. Clips at the character level, so a
character drawing off the edge of the control will only draw the section within
the control and won't wrap. Previously the character was either clipped or
not.
- SetPenStyle() handles incorrect style options
by setting the style to the default.
- Blurry fonts when black font was drawn on white background fixed.
- Fixed vertical text not printing is the font color was < 0
- Added a fontStyle property to the class, see the Show()
method for more details.
- Text had a slight vertical alignment error, this has been corrected.
Version 1.0 Beta 6
- Beta 5 was an incremental release and the documentation was not changed.
- Fixed issues with 45 degree lines (pixel popping).
- Optimised 45 Degree lines.
- Fixed boundary and clipping issues.
- Fixed an error in the line algorithm that sometimes drew lines 1 pixel too
short.
- Fixed the Blank method, when clearing to colors other
than black or white it would not clear the bottom row of pixels.
- Fixed Polygon drawing and filling.
- Horizontal Doubled shaded cylinders erroneously treated Clarion colors as
RGB instead of BGR.
- Fixed the Show method, text now draws in the correct
position.
- Fixed the StrLen method, which returned the number
of bytes taken up by the individual color components rather than the pixel
length of the string.
- Changed the WriteBMP method so that it is not necessary
to have called Display at least once before writing
to a BMP file.
Version 1.0 beta 4
- Changed the coordinate system to be more consistent across all draw methods,
(1,1) is the top left corner (width, height) is the bottom right.
- Full thick line support for chords and arcs.
- Dramatically improved clipping.
- Full support for thick lines with pen styles (Clarion does not support this).
- Added Resize() method to allow the image buffer to
be resized dynamically.
- Added StrLen() method to return the number of pixels
any string will take up.
- Added GetDisplay() method to allow the data in
the control to be copied back to the Draw buffer.
- Added GetDevicePixel() method to get the color
of any pixel on the screen.
- Added GetImagePixel() method to get the color
of any pixel in the Draw control.
- Added ShadeLine() method which allows horizontal
and vertical lines to be shaded from one color to another.
- Added SetPenWidth() method to allow the penwidth
member data to be set.
- Changed Image() method to allow the Draw buffer to
be resized dynamically.
- Added ResizeControl() method to allow the control
to be resized dynamically.
Version 1.0 beta 3
Version 1.0 beta 2
- Full Support for thick lines
- Full support for pen styles (added SetPenstyle()
method)
- Supports thick lined circles and ellipses (Clarion doesn't)
- Does not support filled chords
- Fixed bug which drew vertical lines in the incorrect colour
- Fixed GPF (General Protection Fault) on close with ABC
- Blank() method now clears to any colour
- GrabScreen() Method added to get a screen capture
- Resolved numerous small bugs and increased some methods speed
- All shaded cylinders and boxes now draw correctly in all directions
- Corrected cylinder lengths (cylinders would draw slightly too long)
- Updated demo apps for ABC and legacy.
Version 1.0 beta 1: Released
- does not currently support thick lines (except vertical and horizontal)
- does not support filled chords
- does not support pen styles