This section of the Draw documentation covers the
examples that ship with Draw, along with tutorials and "JumpStart" guides, which
are aimed at getting you started as quickly and simply as possible.
Examples and Walkthroughs
| Demo |
Draw 2.10 ships with a new Demo application that is
a great place to get a feel for some of the things that are possible to
do quite simply using Draw. This application demonstrates all the basic
functions in Draw as well as some neat effects like drop shadows, pie
slices, shaded bars etc. |
| Draw Layers | The new Draw example
application that ships with Draw 2.00 and later. Allows you to Draw to an
image control and shows off a few of Draw's layer features. |
| DrawImage | Uses the DrawImage methods provided by Draw to demonstrate loading an saving
many different file formats (JPEG, PNG, BMP etc.) as well as various image
manipulating options provided. |
| DrawPaint | DrawPaint is a powerful additional class provide by Draw, which extends Draw and
provides the ability for the user to manipulate the objects on Draw control.
This provides persistent objects (boxes, text, pictures and so on) that can be
selected dragged, moved, modified, deleted and added to by the user. |
| DrawAlpha | This demonstrates using Alpha Layers in Draw to provide "soft" transparency
effects quickly and simply. If you are familiar with Layers Masks in Photoshop,
you will be right at home with Draw! |
| Pattern | A simple application that allows you to build patterns for use with Draw's built
in support for pattern based fills. |
| 3DMap | An application that demonstrates Draw creating a 3D map from polygons in
wireframe, or shaded, and allowing the map to be rotated and manipulated in
real-time. |
Unlike the Clarion drawing functions, the Draw control does not display
the result as each function is called, you need to call the
Draw.Display()
method to update the Draw control. Before drawing, you can call the
Blank
method to erase everything on the Draw control, or simply draw over the existing
image. This allows you to do real-time animation, simply by calling all the
drawing commands before calling
Display to update the
control, and
Blank between each frame of the animation.
Note that Blank does not take effect until Display is called
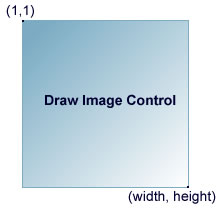
Like the Clarion image control, the origin of the Draw control
is the top left corner and is (1,1). See the image below.
A typical usage of the Draw methods would be:
Drawer.Blank()
Drawer.SetPenColor(COLOR:Red)
Drawer.Ellipse(1, 1, Drawer.width, Drawer.height,
COLOR:Green)
Drawer.Display()
This would display an ellipse with red line and a green fill that is the width
and height of the Draw control.
You can draw to any image control on a window or a report, however when drawing
to a report, you need to call the Clarion SetTarget(Report) function
before
calling any Draw methods. You can call SetTarget() with no parameters to make
the current topmost window the current target. See the section on
Using Draw on a Report
There are a number of examples in your
\Clarion\3rdParty\Examples\Draw directory.
The examples are a great way to get started and see a few of the ways you can
use CapeSoft Draw. Draw ships with the following examples:
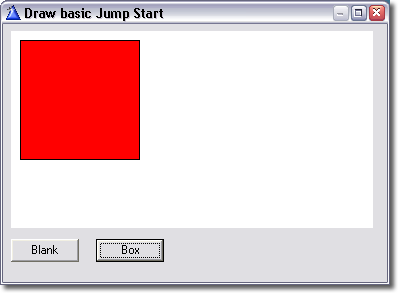
Keen to get started? Or just don't like wading through all the documentation?
This section is just for you - the basics on how to get Draw working
as quickly and simply as possible.
This jump start will show you how to place a Draw control on a window
and draw a red rectangle into the control. The completed app is in the
/3rdparty/examples/Draw/JumpStart/ directory in you Clarion directory
(QuickDraw.app is the ABC version and QuickLegacy is the Legacy version).
- Create a new application (or open an existing one). The app must be compiled
as 32-bit, as Draw does not support 16-bit programs.
- Select a procedure with a window that you would
like to place the Draw control on (create one if necessary), right click
the procedure name and choose "window" to open the window formatter.
- Place an image control on the window. You will be prompted to select
the control template to use, choose "Draw - CapeSoft Draw control".
Resize the Draw control - you can make it any size you like.
- Right click on the Draw control and choose "Actions".
Change the name of the object to "drawer". Click OK
- Place a button on the window and change the text to read "Blank".
Right click on the button and choose "embeds" . In the "Control
Events" section, double click on "Accepted" and choose
"Source". Type the following code into the embed:
drawer.Blank
(color:white)
drawer.Display()
The first line of code clears the Draw layer to white, the second line
then write resultant pixels to the image control. Each time you call the
Draw methods you need to call Display() to update the image control. Click
"Exit" to leave the embeditor (click Yes when it prompts you
to save your work) and close the embeds window.
- Place a second button on the window with the text "Box". Follow
the same steps as above, except this time use place the following code
in the Accepted embed:
drawer.Box(10,
10, Random(80, 200),
Random(80,
200), color:red)
drawer.Display()
This will draw a red box with the top left hand corner at (10, 10) and a
width and height of between 80 and 200 pixels. Again exit the embeditor and
save you work. You can now exit the window editor, save the application,
compile and run it. You may notice that the box has a black border, you can
set the pen color that is used to draw line by calling the SetPenColor()
method.
- Try adding the following code before the call to drawer.Box():
drawer.SetPenColor
(Random
(color:black
,color:white
))
You can also try out the SetPenWidth() method
to set the line thickness.
For more advanced examples see the Examples
section.
Useful Information
- Methods use in the quickstart
Blank() - clears the current
layer to the color specified
Display() - writes all visible layers to the
image control
Box() - Draws a rectangle
SetPenColor() - sets the current pen color
(used for drawing lines and borders)
- Layers
In the above example we completely ignored the fact that Draw supports
multiple layers. When the Draw object is first created it creates
a layer and sets it as the active layer, so it is possible to
simply ignore the fact that a layer is being used. Layers allow
a huge amount of flexibility and power, see the section on Layers
for more information.
- Lines and Fills
In addition to setting the pen and fill colors, Draw also supports
patterned fill and pens. See SetFill() and
SetPenStyle()
- Shading
As well as supporting simple shapes like
boxes,
lines and ellipses Draw
has methods that create shapes with complex color shaded fills for
boxes, cylinders,
ellipses and
even
shaded lines.