


www.capesoft.com

| Using the Proxy Example as a Debugging Tool | |||
|
|
|
||
|
|
|||
| Version
www.capesoft.com |
|
||
 |
 |
 |
 |
|
 |
 |
 |
|
Learn
NetTalk
|
Examples
|
Common
Features |
NetAuto
Objects |
NetSimple
Objects |
Dial-Up
|
Support
|
Version
History
|
The Debugging Proxy Tool is a useful tool for programmers who
are using NetSimple objects
to communicate with other network enabled applications.
This tool helps you monitor and see the actual communication between your application
and
other network applications. For example if you
are talking directly to a Web server, Web client,
Email
server and so on, you can use the Proxy Example
to view the actual commands sent
and received from your application.
The personal proxy requires the following templates to be installed if you want to compile it:
If you don't have these components you can download the compiled EXE from www.capesoft.comCapeSoft WinEvent version 2.71 or later
This is an example application demonstrating the use of NetTalk's packet handling capabilities. The example implements a simple proxy program that sits between your client (be it a browser, mail client, etc.) and the server. It gives one a good idea of what is happening behind the scenes, and illustrates some NetTalk concepts.
For those of us who are not so network-savvy: a proxy application is an application that functions between the rest of the network (such as the Internet) and your client application. Your client thinks it is talking directly to its server, while it is in fact talking to the proxy, who is then relaying your network commands to the intended destination. A proxy is often used as a security measure, as it can screen 'illegal' file requests from 'legal' ones (in the case of Internet browsing).
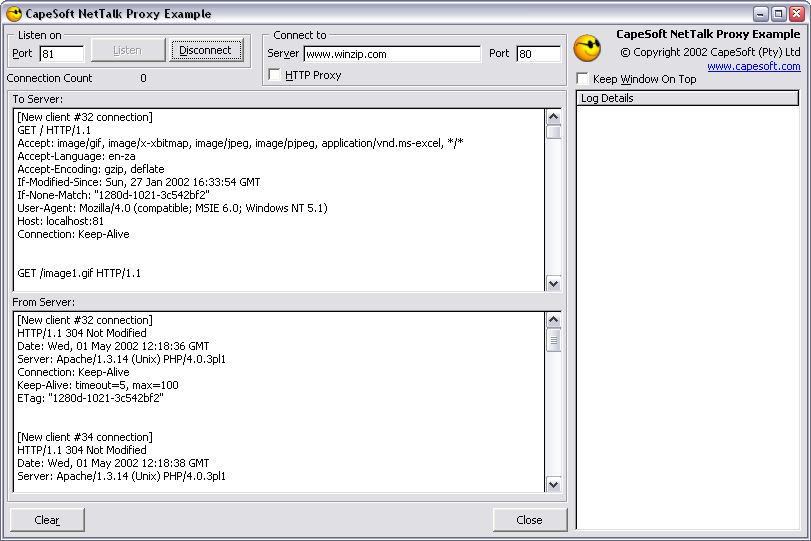
This is the main application screen. Below follows a description of each part:
The port the proxy should listen on. The client's port setting has to be the same as the proxy's one, otherwise a connection can not be established (this is the same when using a two-way radio: both handsets must be set to the same frequency, otherwise communication cannot happen).
This button starts the listening process on the specified port. Anything that is sent while the personal proxy is not listening is lost, and the client cannot connect to the network.
This stops the previously started listening process. This button is disabled when the proxy is not in a listening state.
This displays the number of connections to the listening port (the one that was set up using the Listen on Port setting, and the Listen button). See the description of the ServerConnectionsCount property of the NetSimple object for more information.
This lets you specify a server to connect to (such as a mail server, or proxy server etc.). This can take the form of an URL, such as HTTP://PROXY.CAPESOFT.COM, or an IP address, such as 195.214.143.67
Specifies the port that the Personal Proxy will connect to for network requests. See the Miscellaneous section for a list of common port numbers.
When ticked, the (real) proxy server is bypassed, and we connect directly to the server requested by the client (such as WWW.CAPESOFT.COM in the case of WWW.CAPESOFT.COM/INDEX.HTM When unchecked, we connect to the proxy server as specified in the above settings, and pass on the request made by the client.
Keeps the window on top of all other windows, even when a different window is active. When unchecked, the window behaves normally just like all other windows.
This list box shows various pieces of information, such as a list of servers (and their ports) the Personal Proxy has connected to during the current instance of the application, and error messages. What is shown here depends largely on the type of clients that are connected to the proxy (i.e. a web client will generate different messages in the log than, say, an email client).
All messages are also echoed to the log file.
It shows everything that was transmitted to us by the client (since the pane was last cleared by pressing the Clear button). Extra information is shown in square brackets.
When the data becomes too much to show in the pane, the text is clipped and replaced by the words "Clipped..."
Note that binary uploads can make the display difficult to read. These can take many forms, such as sending an email (in a client connected to our proxy) containing binary attachment (such as an image).
This list shows everything that the proxy transmitted to the client. This is mostly the data that is returned by the server in response to a request by the client.
Extra information is shown between square brackets.
When the data becomes too much to show in the pane, it is clipped and replaced by the text "Clipped..."
Note that all data is echoed to the log file as well.
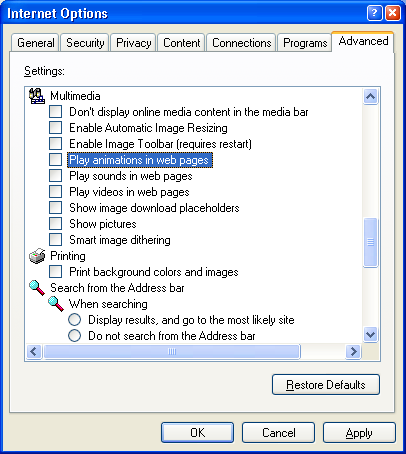
Also note that when transferring binary data, the display may look garbled. This is because all data (even binary data) is copied to the screen. It may be useful to limit binary data transfers to a minimum.
When using a web client (such as Microsoft Internet Explorer), this can be accomplished by opening up the Internet Options dialog box, going to the Advanced tab (as shown below), and scrolling down to the Multimedia section. Uncheck the Play Animations, Play Sounds, Play Videos, and Show Pictures options. Then click OK.
In the case of an email client, this means limiting the download of binary attachments, such as images.
Clears the two panes showing data transfers to and from the server. The log pane is unaffected.
This closes the Personal Proxy.
Here follows a list of the application's procedures and routines, with a description of what each one does. Please refer regularly to the source code. These explanations are intended as summaries, and are not complete and comprehensive.
Loads various pieces of data from the Personal Proxy's initialization file:
- The name of the proxy server that we redirect client requests to (when configured to do so; alternatively we could connect directly to the client's requested server).
- The port of the proxy server that we use.
- The port that the Personal Proxy listens on (This is the port that the clients connect to).
- The status of the WinOnTop flag - determines whether the application is always on top of all other windows.
Saves various pieces of information to the initialization file. See the LoadData description for a list of these variables.
Takes a string, such as HTTP://WWW.CAPESOFT.CO.ZA:80 and separates the server name part from the port number. HTTP_Port gets assigned the extracted port number (in this case 80), while HTTP_Host receives the rest of the string (HTTP://WWW.CAPESOFT.CO.ZA in this case).
This routine takes the string in MessageString, and saves it to the log file. This is used to write aditional information (such as when the proxy started) to the file.
Writes the string in MessageString to the pane containing text going TO the server. It will clip the pane's contents when it becomes too large.
Does almost the same as the WriteToServerPane routine, except that it writes to the pane containing text coming FROM the server.
Writes the message in MessageString to the status bar, and resets the timer. This ensures that the message is only on screen for about eight seconds.
Updates the Connection Count number on the window. It gets the number of connections from the ServerConnectionsCount variable (see the NetTalk documentation). This is a count of how many connections exist to the listening port the proxy set up.
In ThisWindow.Init
Sets the DataGram and Streamed Socket port number to use during the life of the program. Calls the LoadData routine to load the application settings from the INI file. The window heading is also set here. The log file is updated with a string indicating when the proxy was started.
In ThisWindow.Kill
The same variables that were loaded in the Init method are saved to the initialization file.
In ThisWindow.TakeAccepted there is a lot of embedded code for various controls. Below is a list of all controls and a short summary of what each one does:
In Thiswindow.TakeWindowevent there is a lot of embed code dealing with various window events that occur during the application's lifetime:
Clear button
The data displays (and their associated variables) are cleared. The log file will remain unaffected.
Listen button
Saves settings to the initialization file by calling the SaveData routine. Establishes the listening port by calling Open() with an empty string as the server name, and the port that was specified in the Port text entry is used as the port number. It also disables the Listen button and enables the Disconnect button. The log file is updated with an appropriate message.
Disconnect button
Closes all client connections. See the description of the CloseAll() procedure in the NetTalk documentation for more information. It also closes the server, re-enables the Listen button and disables the Disconnect button. Resets the timer by calling the ResetTimer routine (because we updated the status bar), and updates the data displays (Fromserver and ToServer) with the text "[User Disconnected]"
WinOnTopFlag check box
When checked it calls WinOnTop() to make the window stay on top of all other windows. When unchecked, it reverses the process by calling WinNotOnTop() to reset the behavior to normal.
OpenWindowThe MyClients.ConnectionClosed method is called whenever a connection was closed by the server. The closed connection's details will now be in the ourQueue buffer.
It checks whether the WinOnTopFlag is set (by the loading of the data in the INI file), and then calls WinOnTop() if necessary.
Timer
Clears the status display. This is useful to keep the status display relatively up to date, as old messages are cleared regularly (every eight seconds to be exact).
The status display is updated with this occurrence. Both the ToServer and the FromServer displays are updated with the text "[Server Closed Connection]" and with the details of the client that is being closed. The Timer is reset by a call to the ResetTimer routine. If the server is still listening to its port, CloseServerConnection is called to close the port the client is connected to.
MyClients.ErrorTrap is automatically called when an error occurs.
This function updates both the ToServer and FromServer panes with the error message "Error Communicating with Server", the error string and the function name it occurred in. The status display is updated as well with the text "Error communicating to Server", and the timer is reset. The log file is also updated with details of the error.
MyClients.Process is automatically called when data is received from the server.
The status display is updated with the text "<-- Received data from server. Sending it to the client ... ". The timer is reset by a call to routine ResetTimer. If the size of the existing FromServer buffer, added to the size of the data we just received, is too big for the buffer, the buffer is overwritten with "<clipped..>" The received data is then appended to the FromServer buffer (for display on screen). The Packet.* fields are initialized, and the packet is sent on to the client.
In MyServer.Close
Updates the connection count by calling the UpdateCount routine.
MyServer.ConnectionClosed
This is called when a client has terminated its connection to us. The details of the client that disconnected can be found self.packet.socket and self.packet.sockid.
The Connection count is updated by calling UpdateCount. The status display is set to "Client closed the connection". The FromServer and ToServer buffers are updated with "[Client Closed Connection]" and the timer is reset.
It then retrieves the connection details from MyClients.q and closes it (if the connection was found in the queue).
The MyServer.ErrorTrap notification method is called whenever an error occurs during communication between the server and the client.
The status display is updated with "Error communicating with client" and the timer is reset. The log file is updated with the name of the function that caused the error, and the reason an error was generated.
In MyServer.Open
The server has established a new connection. Calls the UpdateCount routine to show the correct number of connections on screen.
The MyServer.Process method is called whenever the server receives a packet. This does not necessarily indicate that data has been received, as a new connection is also established this way.
Calls the UpdateCount routine. If the HTTP Proxy box is checked, we check that no errors occurred. If that is OK, we continue.
If Process() was called because a new connection has been established, we return and do nothing, otherwise (we received a data packet) we do a check to see if the packet contains data (i.e. we check the length of the binary data). If there is no data in the packet we return.
We update the status display with a message that we received a packet, and reset the timer. The received data is appended to the ToServer buffer, and echoed to the log file.
We extract the "host:" part from the binary data using GetLineEntry(). The returned string is then split up into host and port parts using the SplitHostAndPort routine.
The connection details are retrieved from OurQueue. If there were no errors and HTTP_Host is not empty, and it is not equal to Connection.Server, OR HTTP_Port is not equal to Connection.Port, we close the connection, and change the error code to simulate an "Entry Not Found" error.
If the error code equals "Entry Not Found", the HTTP_Host variable is cleared, the log is updated with an error message, and we return.
After the error code check, the status display is updated to show that we are connecting to a server. The server name and port number is shown.
Add the text "[New client connection]" to the FromServer and ToServer panes. Then update the log with the Host and Port we are opening, and reset the timer in the process as well.
Opens the connection to the server, and check if an error occurred. If there was an error the status bar is updated with an error indication, the text "[Failed to connect to Server]" is added to the ToServer and FromServer panes, the socket connection to our listening port is closed, and we return after resetting the timer.
If no error occurred, the relationship (between client and server) is stored in the ourQueue queue. The packet is cleared, then its fields are reinitialized to the new values, and it is transmitted.
If the HTTP Proxy box is NOT ticked, and there was no error, we check whether this procedure was called because a connection was established.
If it was triggered because a connection was established, we update the status bar with this fact, and update the FromServer and ToServer panes with "[New client connection]", and reset the timer. Then the packet details are saved to temporary variables, and to the log file.
Open a connection to the server (using MyClients.Open). If there was an error the status bar is updated accordingly, and the Server buffers get the message "[Failed to connect to Server]" appended, where after the timer is reset. Then the socket connection to the port we were listening on is closed.
If there was no error, we store this relationship between client and server in the ourQueue queue.
If we received a packet from the client (instead of establishing a new connection), we check the OpenFlag property. See the NetTalk documentation for more (complete) information. In short, this flag indicates whether a connection is open.
if MyClients' OpenFlag is false, the timer is reset after displaying an error message on the status window.
If the flag is true, the status bar is updated with "--> Received data from client. Sending it to server ... ", and the timer is reset. The data from the packet is appended to the ToServer buffer (this is why it is advisable to disable graphics, so that binary data is not added here).
The connection details are retrieved from ourQueue. If we could not retrieve the connection details, update the status bar to say so, and reset the timer, else the packet is transmitted.
GetLineEntry
It receives a string to search for, a string to search in, a starting and ending position, an offset and a case-sensitivity flag. It then returns the string between your specified keyword and the next new line.
The proxy generates a log file (named LOG.TXT) of all data transfers that take place. This file can be found in the same directory as the executable file.
The proxy logs the content of the three data panes (the FromServer, ToServer, and Log panes) to the file (clearly marked which data originated from which pane).
This allows you to see a detailed view of the data transmissions between the client and the browser. As ALL data is written to the log file, this file can become quite large in a short time.
When using the proxy between a client and an Internet server, typical output would look like this:
What happens here is the following: first the user pressed the "Listen" button. This type of extra information is always indicated by the square brackets surrounding it. Following this action, a client connected (with a SockID of 4). This client then proceeded to send a packet to the server. This is indicated by the "Server <- Client ID:4:" part (the arrow indicates for whom the packet is meant). The data that is sent immediately follows this string, and is enclosed in "{" and "}" brackets.
[User Connected]
[-------------------- New client ID:4 connection --------------------]
Server <- Client ID:4: {GET http://www.theregister.co.uk/content/6/22714.html HTTP/1.0
Accept: application/vnd.ms-powerpoint, application/vnd.ms-excel, application/msword, image/gif, image/x-xbitmap, image/jpeg, image/pjpeg, */*
Accept-Language: en-us
User-Agent: Mozilla/4.0 (compatible; MSIE 5.5; Windows 98)
Host: www.theregister.co.uk
Proxy-Connection: Keep-Alive
}
Server -> Client ID:4: {HTTP/1.0 200 OK
Via: 1.0 EARTH
Proxy-Connection: Keep-Alive
.
.
.
<form method="POST" action="http://www.domainbuster.com/cgi-bin/domainbuster/dpro.pl?root_allowed=1">
<input type="hidden" name="lookup" value="OK">
<input type="}
The server then replied (as can be seen by looking at the direction of the arrow) with a packet of his own. Again the packet is enclosed in brackets (for space reasons the reply has been cut a bit).
When using the proxy as the go-between between a mail client (such as Microsoft Outlook Express) and a mail server, the output looks something like this:
This is what happened: the user pressed the "Listen" button (as indicated by the "[User Connected]" line. Some time after that the email client opened a connection to the server, to check for new messages. The server then replied (again, the data is enclosed in brackets) with a "ready-to-go" string.
[User Connected]
[-------------------- New client #2 connection --------------------]
Server -> Client ID:2: {+OK VPOP3 Server Ready <8e86.f0.29c27c7a>
}
Server <- Client ID:2: {USER Mike
}
Server -> Client ID:2: {+OK User Accepted, PASSword required
}
Server <- Client ID:2: {PASS MikeHasAGreatPassword
}
Server -> Client ID:2: {+OK Mike has 0 message(s) (0 octets)
}
Server <- Client ID:2: {STAT
}
Server -> Client ID:2: {+OK 0 0
}
Server <- Client ID:2: {QUIT
}
Server -> Client ID:2: {+OK VPOP3 Server Closing Connection
}
[Server Closed Connection]
[Closing connection from client ID = 2]
The mail client subsequently sent the current user's name, which the server accepted. The request for a password was then sent by the server (remember, the arrows indicate the direction of data transfer).
After the password was confirmed, the client requested a listing of new mail. In this case, there was none to be had. So the client sent a termination string, and the connection was ended.
This is a typical news transfer between a news server and a client such as Outlook Express.
The client connects. The server responds with a status message. The client then proceeds to request a specific news group, an then receives the data.
[-------------------- New client ID:2 connection --------------------]
Server -> Client ID:2: {200 news.softvelocity.com DNEWS Version 5.4g5, S0, posting OK
}
Server <- Client ID:2: {MODE READER
}
Server -> Client ID:2: {200 DNews is in reader mode - posting ok.
}
Server <- Client ID:2: {GROUP comp.lang.clarion
}
Server -> Client ID:2: {211 33467 19444 53047 comp.lang.clarion selected
}
Server <- Client ID:2: {XOVER 52750-53047
}
Server -> Client ID:2: {224 data follows
}
Server -> Client ID:2: {52750 Re: How to program Clarion "Kelvin Chua" <NOkelvinSPAM@accpro.com.sg> Tue, 6 Nov 2001 22:46:13 +0800 <3be7f87c@news.softvelocity.com> <3be5538c@news.softvelocity.com> <3be70ccd@news.softvelocity.com>
.
.
.
52763 Re: Clarion - Alternatives? arnor@icetips.com (Arnor Baldvinsson) Tue, 06 Nov 2001 16:01:23 GMT <3be808a3.8021036@news.softvelocity.com> <3be0e7cb.0@news1.mweb.co.za> <3be15be7@news.softvelocity.com> <3be3d3ac.88375426@192.168.15.1> <3be55ecc@news.softvelocity.com> <3be78e82.64784436@192.168.15.1> <3be7fe72@news.softvelocity.com> 1666 28 Xref: news.softvelocity.com comp.lang.clarion:52763
52764 }
This is a short example to demonstrate how to set up and use the CapeSoft Personal Proxy.
1. Start the proxy:
You can just double-click on the program file (which is named proxy.exe). There are no required command line switches.2. Configure the proxy:
The proxy must be set up to listen to a specific port, and the proxy server settings must be set up.3. Start up Internet Explorer as usual.
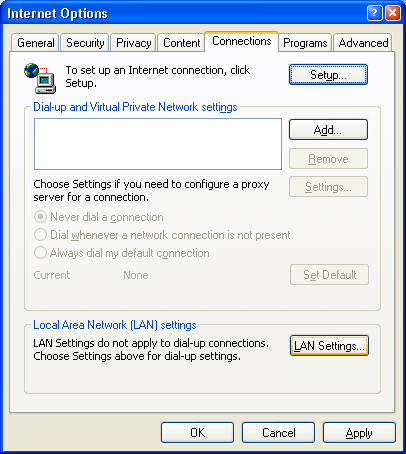
To set up the proxy settings: Type the proxy name into the Server text entry field provided for this purpose. Also specify a port on the server to use (A port number of 80 is usually used). A good place to get these details might be from Internet Explorer's Connections tab (as seen below)
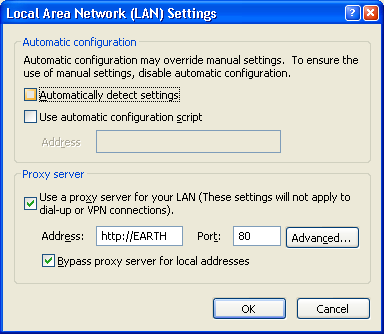
In my case I have to click on the LAN Settings button to reach the correct settings.
Then, just copy the proxy server address and port settings to the personal proxy (in this case EARTH and 80 respectively).
To set up the listening port: In the top left corner there is a space for the port number. Decide on a number and type it in here. See the Miscellaneous section for information about port number conventions. Then click the Listen button to start the listening process.
Minimize the proxy for now.
4. Configure Internet Explorer
We have to set up Internet Explorer to use our proxy program we just started. If Internet Explorer is not configured, it uses its default server, thereby completely bypassing our proxy.5. See the proxy in action
Open up the Connections tab on the Internet Options dialog box (accessible via the Tools menu). If you are on a local area network, you need to click the LAN Settings button. Make a note of these settings. When you are finished with the proxy, you need to restore them to their original values.
Replace the specified server address with the word localhost. Also replace the port number with the same number you configured the personal proxy to listen to. Make sure it is exactly the same, otherwise your browser will not be able to "see" the Internet, and your proxy will be sitting there idle as well.
Now click OK to close the dialog box.
Disable graphics: Before you use the proxy, you may want to disable graphics as this interferes with the data displays on the proxy.
Go to the Advanced Settings tab on the Internet Options dialog box.
Scroll down to the Multimedia heading. Make a note of the settings in this section (for when you need to restore these settings later when you have completed the exercises). Clear the tick marks next to the settings starting with "Play", and uncheck the "Show pictures" setting. Then click OK.
Remember to reset these to their original values when you have finished exploring the personal proxy.
Your browser has now been set up correctly.
Request a web site (anything, e.g. www.capesoft.com), and watch as the proxy springs into action, logging all activities.
1. Start the proxyDouble-click the proxy's program file (proxy.exe). Note that you should open two instances of the proxy, for reasons that will be made clear later.2. Configure the proxy
We need to set up the port the proxy should listen on, the server the proxy passes the mail commands on to, and the port on that server we are going to talk to.3. Start Outlook Express
Because a mail client usually uses two different ports (one for incoming mail [usually 110], and one for outgoing [usually 25]), we needed to start two instances (one for each port).
You can choose any two (different) port numbers to use, as long as Outlook Express is configured to use these same ports. Having said that, it usually makes more sense to stick to the defaults, to avoid clashes with other protocols, such as HTTP.
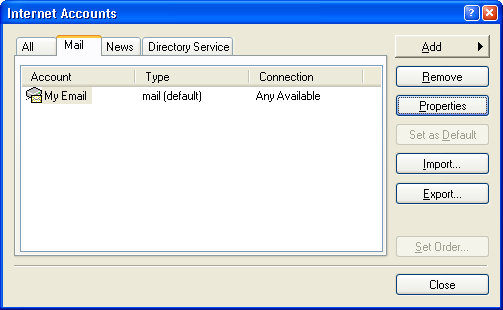
In Outlook Express's Internet Accounts dialog box (accessible via Tools->Accounts...), select the email profile that you usually use (probably the one marked "(default)"), and click on the Properties button.
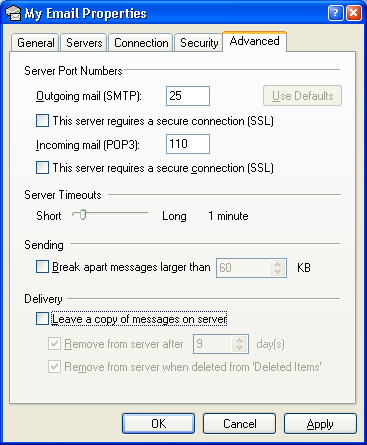
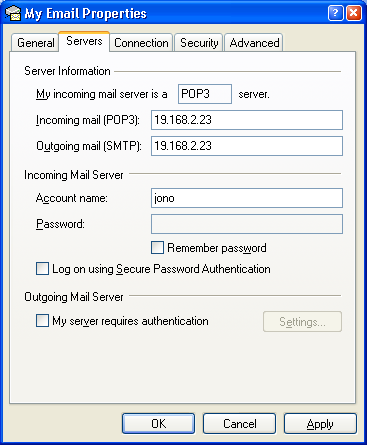
The Mail Properties dialog box will now pop up. Select the Advanced tab.
Note the two numbers (shown next to "Outgoing mail (SMTP)", and "Incoming mail (POP3)" respectively); configure each instance of the proxy to use one of these numbers. Do this by typing them into the Listen On Port boxes (in the top left corner) of the proxies.
Now for the server name: switch to the Servers tab in the Mail Properties dialog box. Copy the server name in the Incoming Mail text box into the proxy's Server text box (Important: this should be the same proxy that you set to listen on the incoming mail port). Do the same with the Outgoing Mail server name (type this one into the other proxy).
The last thing that needs to be set is the port on the mail server the proxy should connect to. This must be the same as the port numbers set in Outlook Express, so you can just copy the number in the Listen On Port text entry to the Port text entry next to the Server setting (this would be port 25 in the image below).
Do this for both proxies.
Now just press the Listen button, and minimize the proxies. They have now been set up correctly.
4. Configure Outlook ExpressGo to the Servers tab in the Mail Properties dialog box (accessible via Tools->Accounts...). Make a note of the server names (or IP addresses, whichever applies in your case). Now change both server names to the word localhost (e.g. in the image below, the IP addresses [192.168.2.23] should be changed to localhost). If you configured the proxies to listen on non-default port numbers, you need to set the port numbers on the Advanced tab to the numbers you have chosen. Close the dialog box.5. See the proxy in action
Go check for new emails, or send some of your own, to see the proxy in action. For an interpretation of the log files that are generated, see here.
Remember to restore your server names (in the Mail Properties dialog box), or you wil be unable to send and receive mail when the proxy is not running.
1. Start the proxy
Double-click the program file named proxy.exe. No command line switches are required.2. Configure the proxy
Set the proxy to listen on port 119 (this is usually the news port). Also set the server name to news.softvelocity.com. We are going to use the SoftVelocity news server for our example. The port setting next to the server name should be 119 as well.3. Start the NetTalk demo application
When all that has been set, you can press the Listen button to start the listening process.
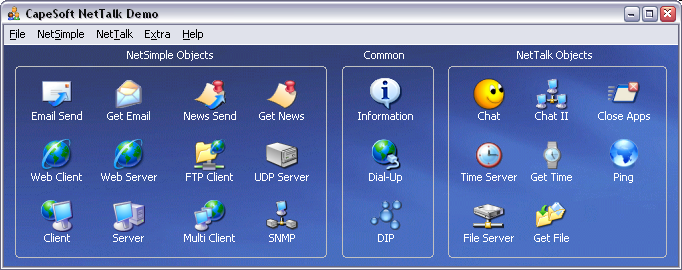
Double-click on the executable (named netdemo.exe). This can usually be found in your Clarion\3rdParty\examples\nettalk\Demo folder4. Start the demo's newsreader
If there is no executable file, you need to compile the NetTalk demo first. See the NetTalk documentation for instructions on how to do this.
Click on the Get News icon to start the reader.5. Configure the newsreader
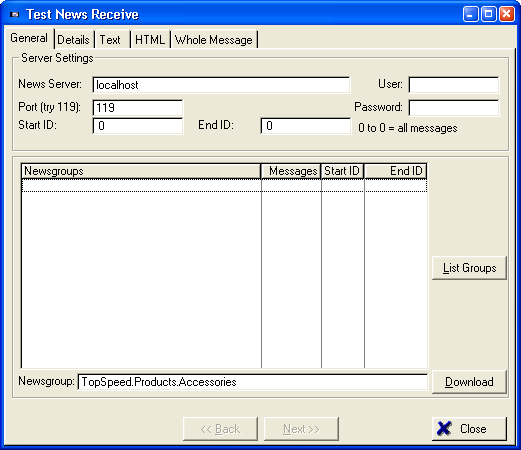
In the News Server text box type localhost. This will make the newsreader use the proxy instead of connecting directly to the news server.6. Start reading!
The rest of the settings should remain unchanged. Set the Port setting to 119.
To start with, press the List Groups button to get a listing of groups on the server. This may take a little while if you have a slow Internet connection.
You can then select a newsgroup to download. Do this by double-clicking the name of a group in the Newsgroups browse. This will fill in the Newsgroup field below the browse. Press the download button. This will retrieve all messages in your selected newsgroup.
When the download is complete, you can use the other tabs to see various aspects of the first message. Use the "<< Back" and "Next >>" buttons to navigate the messages.
Switch to the proxy from time to time, and observe the behind-the-scenes action. This can be quite fascinating.
This section contains some miscellaneous pieces of information that might be useful to you.
Some port conventions:
| Protocol | Port |
| Web access (i.e. Internet) | 80 |
| SMTP (email) | 25 |
| POP/POP3 (email) | 110 |
| News | 119 |
[End of document]