CapeSoft Email Server is a compact SMTP & POP3 Server
for small or medium businesses and home environments.
This Email Server is easy to use and provides you with full control
over email domains, mailboxes and aliases.
Upgrading the Email Server is free so you don't have to pay for future upgrades.
The number of mailboxes are unlimited so you don't have to spend more
as your company grows or your needs increase.
CapeSoft Email Server presents your with the following functionality:
- A fully working Email Server including SMTP server (email sending)
and POP3 server (email collecting).
- Free 60 day shareware trial
(Download Email Server)
- Direct MX SMTP and/or SMTP Relay Sending. Ideal
for permanent connections (Broadband / ADSL / DSL) and Dial-Up users. Email Server Home
edition only supports relay sending.
- Works with ADSL / Broadband
or via modem dial-up schedule.
- An easy to use
interface and a configuration wizard which makes
setting up this Email Server so easy.
- An incredible attractive
pricing scheme (one low price, no mailbox or
user limits for Business Edition).
- Free product upgrades(buy this Email Server once, and update as often as you like for free). (see
upgrade policy)
- Works with all email clients (e.g. Outlook, Outlook Express, Netscape email client, Eudora etc.).
- Runs on all 32-bit and 64-bit versions of Windows (Windows Server 2008, 2003 and
2000. Windows Vista, XP, 2000, NT4, ME, 98 and Windows 95).
- Business Edition provides a web based admin
interface (see the Version Comparison
below for which version is right for you)
Email Server Version Comparison
CapeSoft Email Server is available in two versions - Home Edition, and Business Edition.
| Home | Business |
| Mailbox limit | 25 | Unlimited |
| Direct (MX Sending) | No | Yes |
| Web (HTTP/s) Admin interface | No | Yes |
| 1 Hour setup support | No | Yes |
Software Developers please note
that the Source Code to this email server and a Developers Edition are
also available.
More details about Email Server Source Code and Developer Edition.
Screen shots
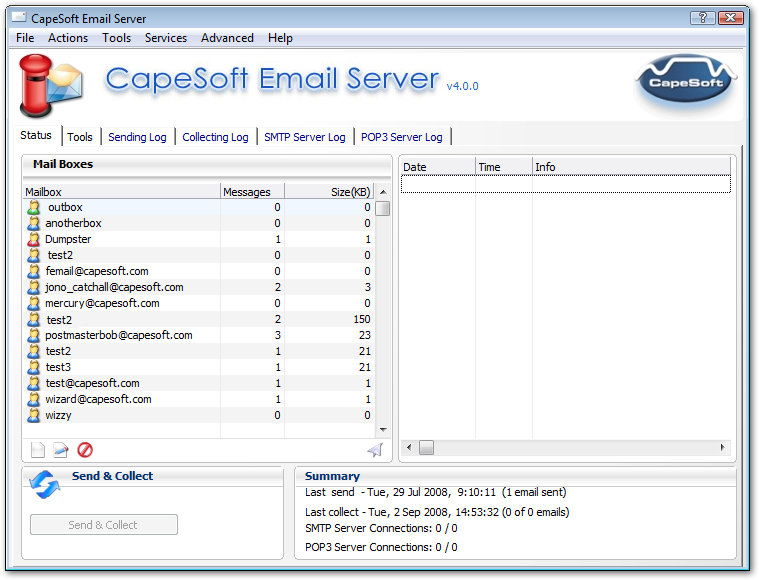
The main CapeSoft Email Server window (scroll down through this document to
see more screenshots)
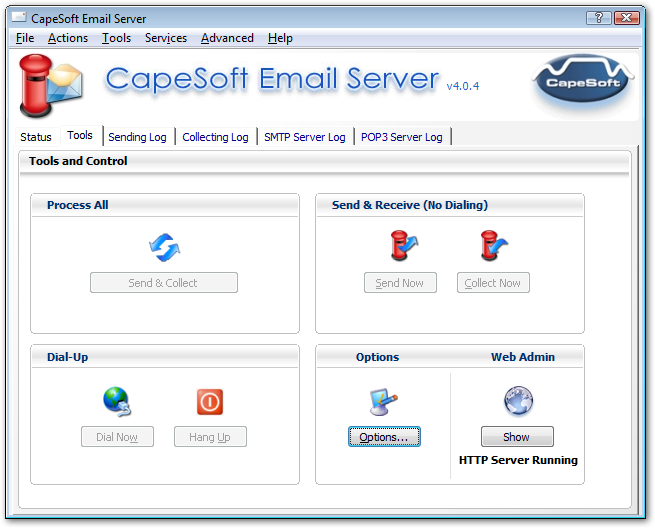
The Tools section of the Main Email Server window.
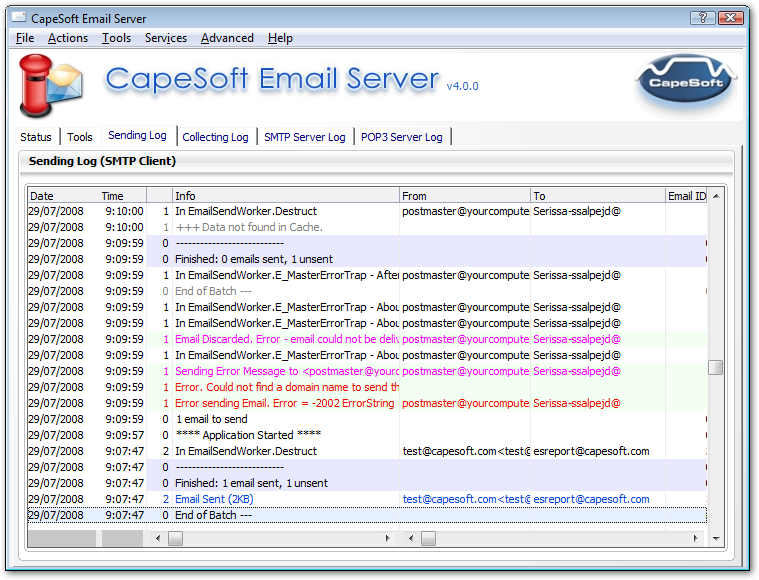
Email Server provides full logging for all functionality.
What People Are Saying...
- Congrats on the easiest e-mail server I have ever had to set up. - Jimmy Lishman
- I purchased the email server ... and I must say it looks great, you have
certainly done a lot of work and you obviously know your stuff. Well
done. - John Milson, Sydney
- This email server is the dogs bollocks. Absolutely superb. Well done. Fast,
stable, and easy to operate. Unlike me. - Keith Brook, England, UK.
- I purchased the Full Source Code
Version and it works 100% - Johan De Klerk, South Africa
- It's really great! Thanks, exactly what I need! - Menno de Ruiter, Spain
- I have just purchased your Capesoft Email Server software and installed it.
Let me mention that it is a great product and I am really very fond of
it. Very easy to install and implement and working flawlessly. I have
used various mail servers before, ... yours is really the best buy,
when one compares its features to its price. - Servet Cevik, Istanbul, Turkey
- I downloaded a copy of your Email Server software yesterday, and I must
say it was the easiest email server application that I have ever setup.
I tried about 6 or 7 apps before I found yours, and so far so good.
Easy to setup, easy to configure the domains and mailboxes, extremely
user friendly!!! - Max Paltsev, USA
- We have recently downloaded a Trial version of your Email Server, I would
like to take this opportunity to express how easy-to-use I have found
both the application itself and your website. Your piece of software is
ideal for our needs and we have almost certainly made the decision to
purchase your software later this week. - Matt Creak, England, UK
- I am very impressed with your software. I tried several server programs for
our small business. Most didn't do what we needed or were difficult to
configure. All were too expensive for our companies needs. Your
software is easy to use and does everything we want at a price that's
hard to believe. Our old server software used to crash on a daily basis
and took up my time to maintain. Your software is as stable as can be
and never needs my attention. - Ed Pitcher, USA
- Did I already mention what a great product
this is? :) I've been using email servers since 1994 and have
messed with IMail, NTMail, SendMail, PostOffice, Exchange since
V5, Merrick, and several others that I can't remember. Yours
is by far the easiest to setup that I've seen. I've only been
running it for three days, but it appears to be very fast and
reliable. Keep up the great work - Randy Martin
- I am the sysadmin for a small company in the
UK. We bought your email server about two years ago and I can
honestly say it's about the only bit of software that just worked
from day one. Well done. - Paul Scott
- Newbies, if you are hesitating, you can trust
Capesoft and their products. - Kelvin Chua
- If CapeSoft announces that they have a new
piece of software that will turn lead into gold - just sign me
up! Demo not required! - Charles Edmond
- This is the definition of responsiveness
to a client. Thank you! The Capesoft reputation as “best
in the business” is certainly deserved. - John Scott
Try CapeSoft Email Server
CapeSoft Email Server installs with a
free 60 day
fully-functional shareware trial license. Please
download a copy from
here.
Buy CapeSoft Email Server - Purchasing Instructions
Capesoft Email Server is available in two versions - the Home Edition, and Business Edition.
| CapeSoft Sales |
| Web |
www.capesoft.com |
| Email |
 |
| Telephone |
+27 21 715 4000 |
| Fax |
+27 21 715 2535 |
| Post |
PO Box 511, Plumstead, 7801, Cape Town, South Africa |
(Please note all prices are in US dollars, and are subject to change)
Software Developers
For Developers CapeSoft Email Server
is available in source code form to allow the application to be
customised and integrated. In addition Email Server is also
available is a royalty free redistributable Developer Edition.
See the
Developer Documentation
for more information
Source Code $499
Purchase the Clarion source code, you can then modify it and build
your own tailored applications that include a SMTP or POP3
server.
Royalty based fee
of $20 per application you sell
or run (the Source Code provides a license for one copy of Email Server, every
additional copy requires a royalty license if distributed with your
application, or a standard license if used as a seperate standalone
application).
More details.
Royalty Free Developer Edition $399
This royalty free
version is ideal for your applications which send emails.
You can run the Developer Edition on any of your clients systems
to receive email from your applications. This means your applications
don't have to be online to send emails.
More details.
Download CapeSoft Email Server
Download Email Server
Version

 | This download is for both
the registered version and
free 60-day trial version.
Buy with Confidence:
Free Upgrade Policy
Refund Policy |
Platforms:
All 32-bit & 64-bit Window OS
Windows Vista
Windows Server 2003
Windows XP
Windows 2000 Server
Windows 2000 Professional
Windows NT4 Server & WorkStation
Windows ME
Windows 98
Windows 95 |
Installing for the First Time?
Once you have downloaded the file, please run it
and the install program will guide you through the installation.
For further information please consult the
Installation or
Program Options sections in
this documentation.
Upgrading Your Current Installation?
Simply download the latest install file, shutdown
the Email Server (File Menu | Exit), then install the new install file,
your current configuration will be restored.
Pad File
Product Info for Software Sites (
Email Server Pad File)
Free Update Policy
CapeSoft products have always had a free update policy. You pay for
CapeSoft Email Server and updates and patches for the current version are free.
CapeSoft Refund Policy
CapeSoft believes that if you aren't satisfied with our products, we would
like them back - and we will refund you the money. This allows you to
purchase our products with confidence. This Email Server has a 60-day trial
license, which should give you some time to see how it works, and whether it
is the correct solution for you. Should you need an extended trial period or
if you are unhappy about any of our products, please contact
Copyright & License Agreement
This software is copyright. This means that after the 60 days evaluation
you should only use this software if you have paid for it. One license
is required for each copy that you run. i.e. If you are running this
program on three machines you need to purchase three licenses.
If you need more than 60 days to evaluate the product please contact

for an extended free trial period.
CapeSoft Software CC, employees of CapeSoft Software
CC, Dealers of CapeSoft Software CC products, Beach Palm Software
cc, and employees and associates of Beach Palm Software cc explicitly accept no
liability for any loss or damages which
may occur from using this package. This package is used entirely at
your own risk.
 All rights reserved.
Warning: This computer program is protected by copyright law and
international treaties. Unauthorized reproduction or distribution of this program, or
any portion of it, may result in severe civil and criminal penalties,
and will be prosecuted to the maximum extent possible under the law.
Use of this package constitutes agreement
with this license. Please contact CapeSoft Software should you
have any queries..
Installing CapeSoft Email Server is really
easy. Please follow the following
steps:
- Download the product install file. You can do this from the
download section.
- Run the downloaded file. The installation program will ask
you a series of question (for instance where you would like to install the
application).
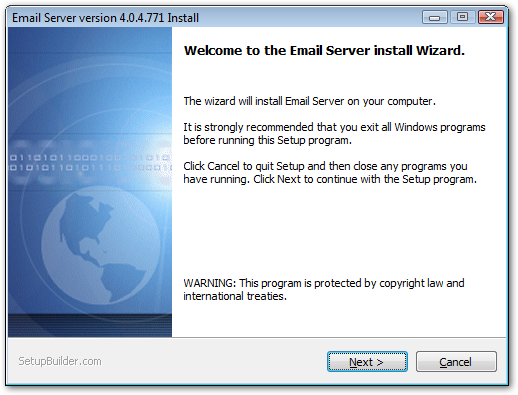
The installation program
- At the end of the installation you will be asked if you would like to
run the application now. Allow this to happen. The first time the
application is run a Configuration Wizard will be executed. This will help
you setup this product. (The configuration wizard can always be run at a
later stage). For more information see the Program
Options section.
- Please note that the Email Server requires that TCP/IP is installed on
the computer. TCP/IP is the Internet Networking protocol. Without it your
computer will be unable to access the Internet, read or send emails, browse
web sites etc. Most computers have this installed now-a-days. In fact
Windows XP, Windows Server 2003 and Windows Vista always have TCP/IP
installed (i.e. You can't uninstall it).
Email Server Configuration
In this section we discuss how to setup the Email
Server. This section is broken down into two parts:
- Five setup scenarios
- The Tools-Options Window
and Configuration Wizard
You may also want more information on choosing and configuring
Anti-Virus programs
Five Setup Scenarios
Most people will configure this email server in one of five
ways. For this reason we've included these five setup scenarios. Your configuration
will probably match one of these five scenarios.
All these options can be easily configured in the
Tools-Options or the Configuration Wizard windows.
Please choose a scenario (please read through each scenario
carefully - as there are some subtle differences):
(1) Office (or home) email via permanent Internet connection(e.g. ADSL / DSL / Broadband).
You administer a whole email
domain.
| Connection | use the Is Permanently Connected to the Internet Option |
| Connection | you don't need to setup a schedule. As your mail will be sent and received
every 10 minutes. (Or you could make it every 1 or 2 minutes). |
| Sending | You can use either Direct (MX) Sending or Relay Server (if you ISP allows this -
most do).
The most effective option is to turn on Direct MX Sending (you will need a
DNS server
IP address (or use the defaults) - can get this from your
ISP), and then turn on
both of the "If MX Fails pass on to Relay Server" options.
Here's
why. MX sending is not available in Home Edition, which only supports Relay
sending. |
| Sending | postmaster would
typically be postmaster@YourDomain.com (where
YourDomain.com is your full domain name). The postmaster description
would typically be something like Postmaster at YourDomain |
| Collecting | If your ISP stores the email
for your domain you'll need to collect emails from their server. Your
ISP
typically stores all the emails for your domain in
one email
account - the details of this account (or accounts) you can get from
your ISP (this
may be something like YourDomain@YourISP.com). If
want to collect emails from multiple accounts simply add more than one
set of account details.
Otherwise specify - Don't collect emails. - If this is the case, then
your the MX records for your domain would need to point to this email
server (and this email server only), and you need to keep your email
server running all the time. |
| Domains | add
your domain(s) to the domain list. Only add domain names for which you
administer the whole domain. (If in doubt, leave it out your mailboxes
and aliases settings alone will be sufficient). |
| Mailboxes | add every person who
will collect email from this email server here. Typically add people
as davesmith@example.com, bryanadams@example.com.
Tip: Enter the whole email address as the mailbox
name e.g. include the @example.com bit too. |
| Aliases | setup an alias of postmaster
to point to your mailbox - this means you'll get all the email for the
postmaster. |
| Aliases | setup aliases like info@example.com,
sales@example.com, support@example.com,
webmaster@example.com to point to the relevant
mailboxes. |
| Aliases | Alternatively you can
add an alias of sales which will receive all emails
that have sales on the left hand side of the @ sign
and any of your domains on the right. |
| Aliases | add aliases for any of
the mailboxes who may receive emails under different names. e.g. David@YourDomain.com,
DaveSmith@YourDomain.com, DavidSmith@YourDomain.com
would all point to the dave mailbox. (Alternatively
you can add an alias of dav#@YourDomain.com and
this will receive all the combinations of emails that start with dav
at your domain). |
| IP Filter | The default IP Filter settings are safe to use
- 10.0.0.0 to 10.255.255.255 - allowed (WAN settings)
- 127.0.0.1 to 127.0.0.1 - allowed(Localhost settings)
- 192.168.1.1 to 192.168.255.255 - allowed(LAN settings)
- 169.0.0.0 to 169.255.255.255 - allowed (DHCP server networks where no DHCP server running)
|
| IP Filter | add any other IP ranges that you may be using (e.g. Safe Remote Computers)
that are not on your network, that would need access to this email server. |
(2) Office (or home) email via permanent Internet connection (e.g. ADSL / DSL / Broadband).
You don't administer a whole
domain,
you just collect emails from one or more email accounts. In this
example we will just collect from 3 accounts.
| Connection | use the Is Permanently Connected to the Internet Option |
| Connection | your don't need to setup a schedule. As your mail will be sent and received
every 10 minutes. (Or you could make it every 1 or 2 minutes). |
| Sending | You can use either Direct (MX) Sending or Relay Server (if you ISP allows this -
most do).
The most effective option is to turn on Direct MX Sending (you will need a
DNS server
IP address (or use the defaults) - can get this from your
ISP), and then turn on
both of the "If MX Fails pass on to Relay Server" options.
Here's
why. MX Sending is not support in the Home Edition of Email Server. |
| Sending | postmaster would
typically be one of your email addresses like bob@someISP.com.
The postmaster description would typically be something like
Postmaster at YourCompany |
| Collecting | collect emails from another server. For example you may have three accounts
you would like to collect from - you'll need the details from your
ISP, but it's likely you'll be using a server like
mail.YourISP.com
with username bob (or possibly bob@yourisp.com) and some password.
Enter the details of all the accounts. (You may just be using one - that's fine,
if you use more just keep adding the details). |
| Domains | leave this domain list blank. |
| Mailboxes | add every person who
will collect email from this email server here. Typically add people
as davesmith@example.com, bryanadams@example.com.
Tip:
Enter the whole email address as the mailbox name e.g. include
the @example.com bit too. |
| Aliases | setup an alias of postmaster
to point to your mailbox - this means you'll get all the email for the postmaster. |
| Aliases | add aliases for any of
the mailboxes who may receive emails under different names. e.g. David@YourDomain.com,
DaveSmith@YourDomain.com, DavidSmith@YourDomain.com
would all point to the dave mailbox. (Alternatively
you can add an alias of dav#@YourDomain.com and
this will receive all the combinations of emails that start with dav
at your domain). (Because you aren't administering your own domain -
it's important that you supply the full email address in the alias e.g.
dave@example.com) |
| IP Filter | The default IP Filter settings are safe to use
- 10.0.0.0 to 10.255.255.255 - allowed (WAN settings)
- 127.0.0.1 to 127.0.0.1 - allowed (Localhost settings)
- 192.168.1.1 to 192.168.255.255 - allowed(LAN settings)
- 169.0.0.0 to 169.255.255.255 - allowed(DHCP server networks where no DHCP server running)
|
| IP Filter | add any other IP ranges that you may be using
(e.g. Safe Remote Computers) that are not on your network, that would
need access to this email server. |
(3) Office (or home) email setup, connecting to the Internet via Dial-Up.
You administer a whole email domain.
| Connection | use the Dial-Up configuration |
| Connection | schedule for automatically dialing up to the Internet (should you require this)
- you can still connect manually whenever you like. |
| Sending | try Relaying (faster) -
get the SMTP Server details from the
ISP you dial into.
Sometimes this will be mail.YourISP.com (where YourISP.com is the
domain name of your ISP)
Alternatively you could also use Direct (MX) sending (will need a DNS
server IP address (or use the defaults) - can get this from
your ISP). MX sending is not available in
Home Edition.
If you are using the Direct MX Sending option, then it's recommended to
enter the details of your ISP's Relay Server too, and turn on the two
"If MX fails pass onto Relay Server" options. |
| Sending | postmaster would
typically be postmaster@YourDomain.com (where
YourDomain.com is your full domain name). The postmaster description
would typically be something like Postmaster at YourDomain |
| Collecting | collect emails from another server. Your ISP would need to store all the emails
for your domain in one (or more) email account(s). The details of this
account (or accounts) you can get from your ISP (this may be
something like YourDomain@YourISP.com). If want to
collect emails from multiple accounts simply add more than one set of
account details. |
| Domains | add your domain(s) to the domain list |
| Mailboxes | add every person who
will collect email from this mail server here. Typically add people
as davesmith@example.com, bryanadams@example.com.
Tip:
Enter the whole email address as the mailbox name e.g. include
the @example.com bit too. |
| Aliases | setup an alias of postmaster
to point to your mailbox - this means you'll get all the email for the postmaster. |
| Aliases | setup aliases like info@example.com,
sales@example.com,support@example.com,
webmaster@example.com to point to the relevant
mailboxes |
| Aliases | Alternatively you can
add an alias of sales which will receive all emails
that have sales on the left hand side of the @ sign
and any of your domains on the right. |
| Aliases | add aliases for any of
the mailboxes who may receive emails under different names. e.g. David@YourDomain.com,
DaveSmith@YourDomain.com, DavidSmith@YourDomain.com
would all point to the dave mailbox. (Alternatively
you can add an alias of dav#@YourDomain.com and
this will receive all the combinations of emails that start with dav
at your domain). |
| IP Filter | The default IP Filter settings are safe to use
- 10.0.0.0 to 10.255.255.255 - allowed (WAN settings)
- 127.0.0.1 to 127.0.0.1 - allowed (Localhost settings)
- 192.168.1.1 to 192.168.255.255 - allowed(LAN settings)
- 169.0.0.0 to 169.255.255.255 - allowed(DHCP server networks where no DHCP server running)
|
| IP Filter | add any other IP ranges that you may be using
(e.g. Safe Remote Computers) that are not on your network, that would
need access to this email server. |
(4) Office (or home) email setup, connecting to the Internet via Dial-Up.
You don't administer a whole domain,
you just collect emails from one or more email accounts. In this example we will just
collect from 3 accounts. (
This is a common home dial-up setup).
| Connection | use the Dial-Up configuration |
| Connection | schedule for automatically dialing up to the Internet (should you require this)
- you can still connect manually whenever you like. |
| Sending | try Relaying (faster) - get the SMTP Server details from the
ISP you dial into.
Alternatively you could also use Direct (MX) sending (will need a DNS
server IP address (or use the defaults) - can get this from
your ISP). Direct (MX) sending is not
available in the Home Edition of Email Server. |
| Sending | postmaster would
typically be one of your email addresses like bob@someISP.com.
The postmaster description would typically be something like
Postmaster at YourDomain |
| Collecting | collect emails from
another server. You've got three accounts - you'll need the details
from your ISP,
but it's likely you'll be using a server like mail.YourISP.com with
username bob and some password. Enter the details of all three
accounts. (You may just be using one - that's fine, if you use more
just keep adding the details). |
| Domains | leave this domain list blank. |
| Mailboxes | add every person who
will collect email from this email server here. Typically add people
as davesmith@example.com, bryanadams@example.com.
Tip:
Enter the whole email address as the mailbox name e.g. include
the @example.com bit too. |
| Aliases | setup an alias of postmaster
to point to your mailbox - this means you'll get all the email for the
postmaster. |
| Aliases | add aliases for any of
the mailboxes who may receive emails under different names. e.g. David@YourDomain.com,
DaveSmith@YourDomain.com, DavidSmith@YourDomain.com
would all point to the dave mailbox. (Alternatively
you can add an alias of dav#@YourDomain.com and
this will receive all the combinations of emails that start with dav
at your domain). (Because you aren't administering your own domain -
it's important that you supply the full email address in the alias e.g.
dave@example.com) |
| IP Filter | The default IP Filter settings are safe to use
- 10.0.0.0 to 10.255.255.255 - allowed (WAN settings)
- 127.0.0.1 to 127.0.0.1 - allowed(Localhost settings)
- 192.168.1.1 to 192.168.255.255 - allowed(LAN settings)
- 169.0.0.0 to 169.255.255.255 - allowed(DHCP server networks where no DHCP server running)
|
| IP Filter | add any other IP ranges that you may be using
(e.g. Safe Remote Computers) that are not on your network, that would
need access to this email server. |
(5) You just want an Internal email system.
Users will be able to send email to
people in your office but not to anyone outside your
office (i.e. No Internet Email).
This setup requires neither Dial-Up or Permanent Connection.
Note: This is an
uncommon setup option.
| Connection | use
the Is Permanently Connected to the Internet Option (It doesn't sound
true - but it's how to achieve this scenario - in fact your could
equally correctly select Dial-Up - but then make sure no schedule is in
use) |
| Sending | select Don't Send Emails. |
| Sending | postmaster would
typically be postmaster@MyOffice. The postmaster
description would typically be something like Postmaster at
YourCompany. |
| Collecting | select Don't Collect Emails |
| Domains | add MyOffice
to the domain list (you could change this to something else, but make
sure it's changed in every section) |
| Mailboxes | add every person who
will collect email from this email server here. Typically add people
as johnwhite@MyOffice, or as davesmith@MyOffice.
Tip:
Enter the whole email address as the mailbox name e.g. include
the @MyOffice bit too. |
| Mailboxes | you may also want to reject emails for the
outbox, since no emails should ever get there, and by rejecting emails,
people will see warnings if they try to send emails, that would
normally be routed to the Email Server Outbox. To do this, open up the
properties for the outbox (Tools | Options | Mailboxes) and tick on the
Reject option. |
| Aliases | setup an alias of postmaster
to point to your mailbox - this means you'll get all the email for the postmaster. |
| Aliases | add aliases for any of
the mailboxes who may receive emails under different names. e.g. David@MyOffice,
DaveSmith@MyOffice, DavidSmith@MyOffice
would all point to the dave mailbox. |
| IP Filter | The default IP Filter settings are safe to use
- 10.0.0.0 to 10.255.255.255 - allowed (WAN settings)
- 127.0.0.1 to 127.0.0.1 - allowed(Localhost settings)
- 192.168.1.1 to 192.168.255.255 - allowed(LAN settings)
- 169.0.0.0 to 169.255.255.255 - allowed(DHCP server networks where no DHCP server running)
|
| IP Filter | add any other IP ranges that you may be using
(e.g. Safe Remote Computers) that are not on your network, that would
need access to this email server. |
Tools Options Window and the Configuration Wizard
The program options and configuration wizard are where you can
change the configuration and setup of this product.
You can access both of the Tools-Options window or the
Configuration Wizard from the Tools menu.
Both of these windows contain explanations of the options that
you can choose.
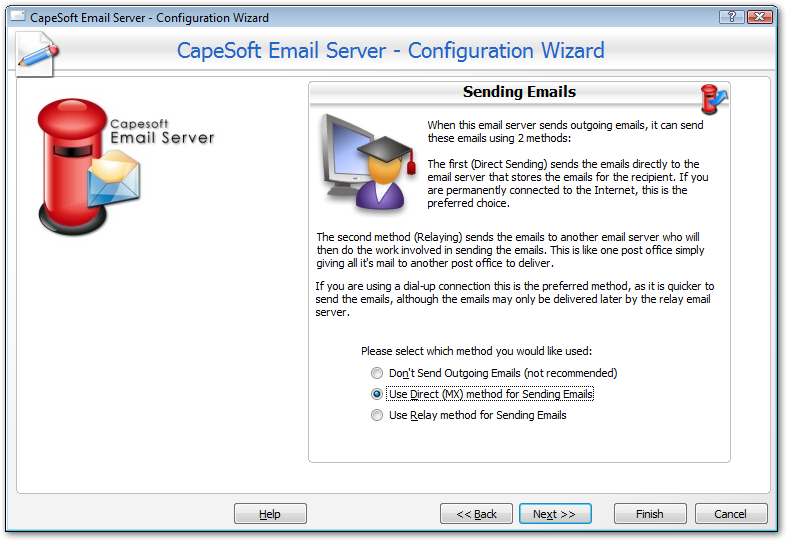
Configuration Wizard in action
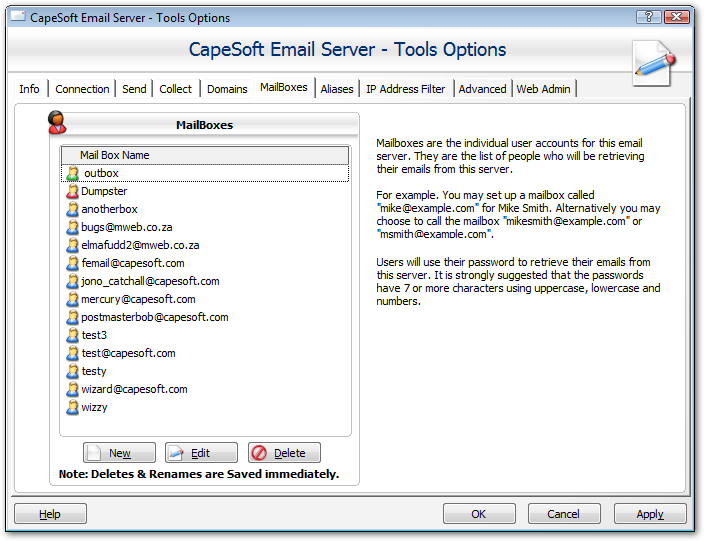
Tools Options window
Email Client Configuration
To configure the your email client (e.g. Outlook Express, Eudora, Outlook,
Netscape Mail etc.) to be able to send and receive emails from the
email server, please go to the Email Client Wizard (available in both the Help and
Tools menu). This wizard will provide you with the settings to configure your
email client. e.g. For user Jono Woodhouse with email address
woody@example.com select this email address from the drop down list.
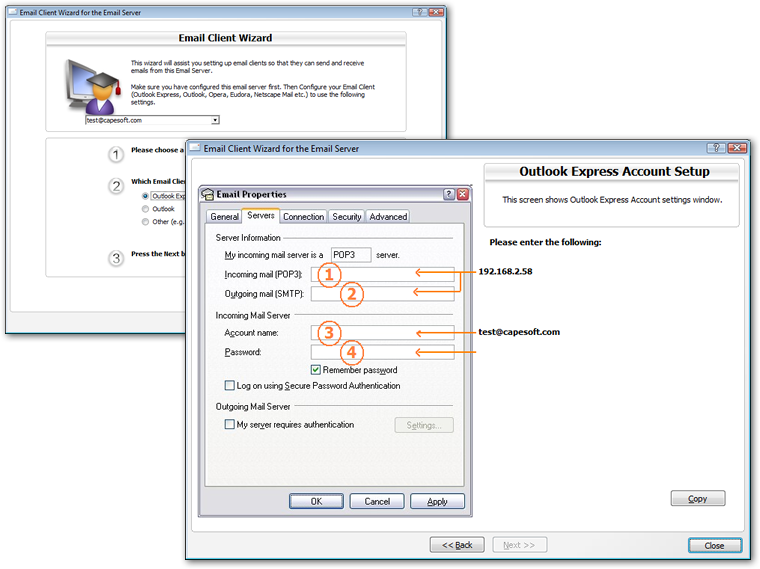
The email client wizard in action.
Web Admin Interface
Email Server Business edition support administration via a web
interface. The HTTP (web) server that provides this is built into Email
Server itself, and it does not require any additional software (such as a
web server). It can be accessed via a standard web browser, such as Firefox,
Google Chrome, Safari, Opera or Internet Explorer.
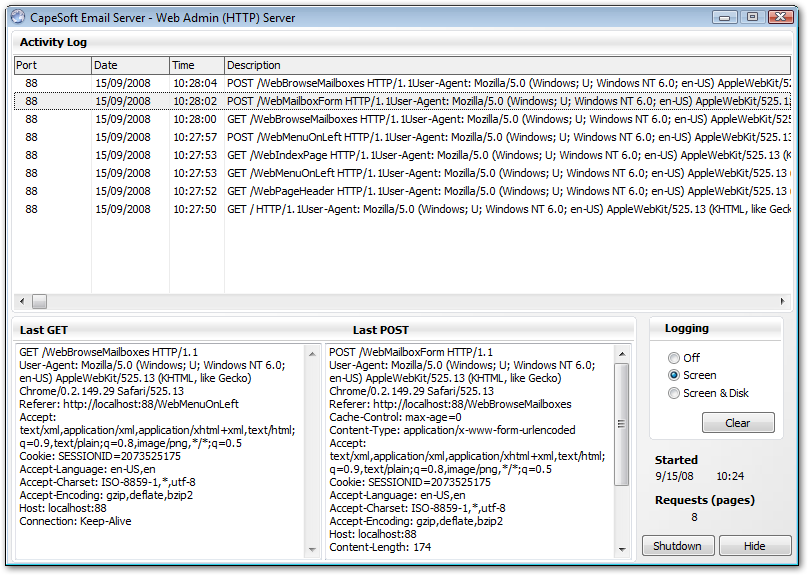
The Web Server window can be viewed by choose
Web Admin...
from the Tools menu. This window displays the web server access
logs.
Important: Closing this window will turn
off the web admin server, to hide the window press the Hide button. The
server can be started on the Tools tab of the main window, or from the Tools
Options window in the Web Admin section.
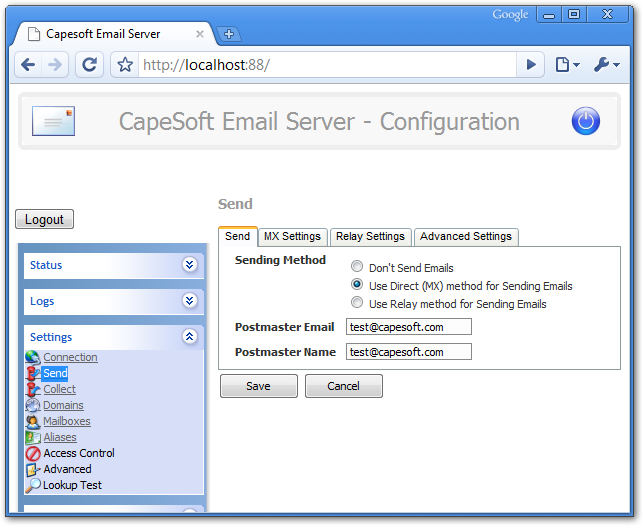
Setting up the Web Admin (HTTP) Server
To configure the built in web server open the Tools Options window
(either from the Tools menu or from the Tools tab on the main window). The
settings for the web admin are on the Web Admin tab.
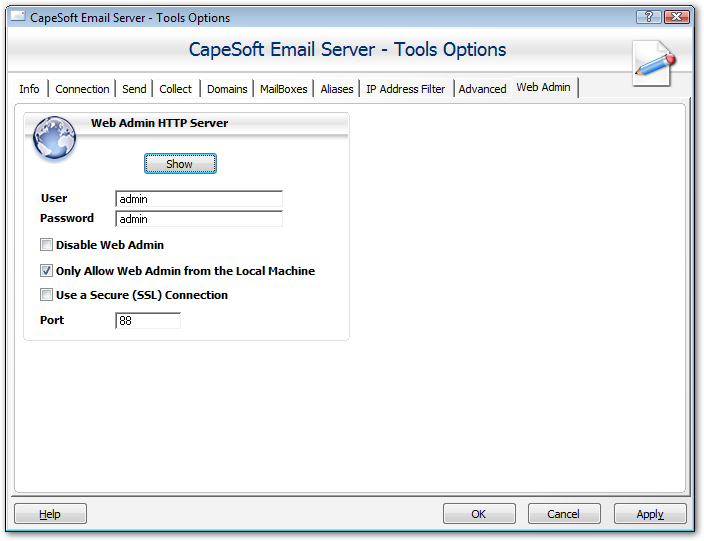 User
User
A user name for logging in to the Web Admin interface using a web
browser. This is required
Password
A password for logging into the Web Admin server. We recommend
using a strong password that contains letters, number and a mix of upper and
lower case.
Disable Web Admin
Disable Web based administration of the server (if we admin is
running click on the Show button and shut the web admin server down, it will
not be restarted again until this option is turned off).
Only Allow Web Admin from the Local Machine
If this is enabled the the web admin interface will only be accessible from
the local machine. If this is disabled then the web admin interface can be
accessed from any machine that can connect to the machine hosting the email
server (typically any machine on the same LAN).
Use a Secure (SSL) Connection
This secures the connection and connects using HTTPs rather than
standard HTTP. Note that your browser will display a certificate warning
when connecting to the server.
Port
The port for the web server to run on. The default port for HTTP is port 80,
and for HTTPs it is port 443, however we recommend using a custom port for
the Web Admin server.
Logging in to the Web Admin interface
Open a web browser and type HTTP followed by the address of the machine
that Email Server is running on, followed by a colon and the port number.
For example if you are on the same machine as the actual server is running
on use
http://localhost:80
or
http://127.0.0.1:88. To
connect to the web admin from a machine elsewhere on your LAN type the name
or IP address of the machine, for example:
http://192.168.0.10:88. If you have enabled SSL for a secure connection
then type https rather than http, for example:
https://127.0.0.1:443.
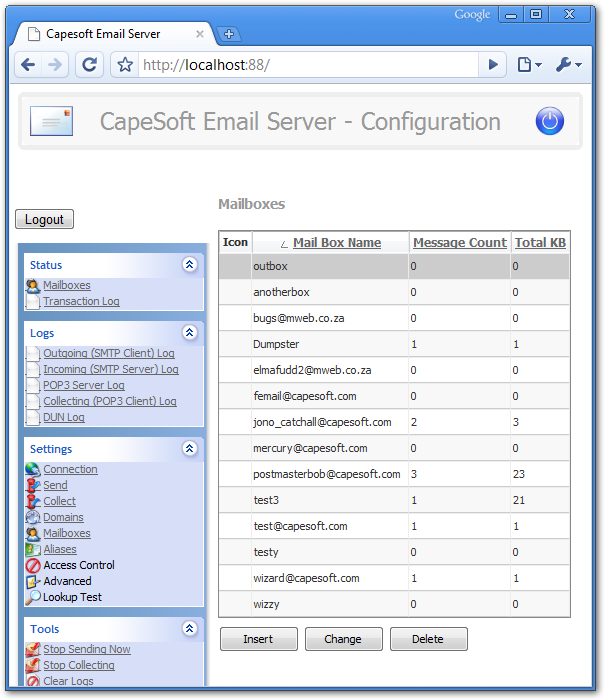
The Web Admin login will be display, at which point the user name and
password that was configured for web admin (see above) should be entered.
The web admin interface provides the same options as the standard Email
Server interface. Click on a category on the left hand menu to display that
option.
The Web Admin provides the ability to manage your mailboxes,
aliases and other settings
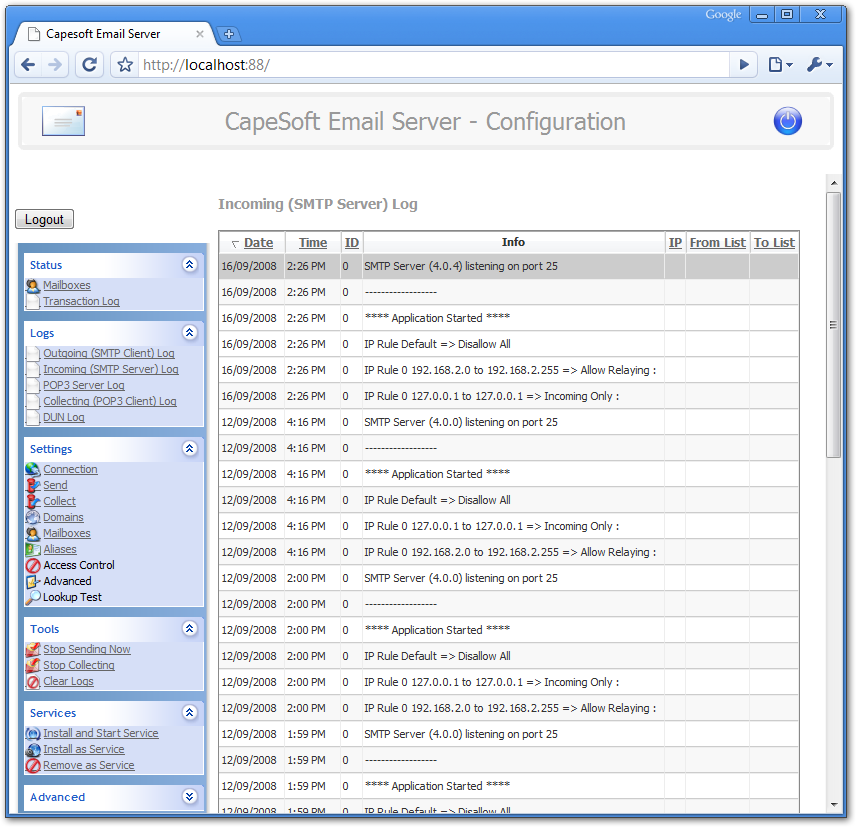
 The Logs section displays the Email Server transaction Logs.
Click on any of the headers to sort the list based on that field (for
example the SMTP Server log below is sorted by Date).
 The Settings section provides the same functionality as the Tools
Options window in Email Server itself
The Settings section provides the same functionality as the Tools
Options window in Email Server itself
When you press the Save button the settings take effect immediately.