Important Tips - Please read
| Are you a first time User? |
It is critical that you read the Suggested
Reading sections as adding Replicate to your application
incorrectly can cause significant damage to your data if set up
incorrectly! |
| Upgrading from 1.99beta or earlier? |
Check out the FAQs on Upgrading
from a previous version |
| What version of Clarion are you using? |
If you are upgrading your Clarion5.5 application to Clarion6,
then you must read the FAQ on upgrading
your LogManager from prior to beta 16
If you have C5.5F or earlier, you must read the FAQ:Compile
Errors section |
| Are you going to use Email or FTP to
transport your logfiles? |
The transportation layer does not form part of Replicate. You
will need a transportation engine to handle the transporting of
logfiles. In the examples that ship with Replicate we have used NetTalk.
|
Introduction
Replicate provides an automatic, driver independent,
file-version independent, mechanism for replicating the data in two or
more databases.
Basically, Replicate logs your changes, adds and deletes and then using a
transport manager of your choice, exports the changes to the other sites,
where the changes, adds and deletes are imported to that data set. This
all done completely automatically without your users having to do
anything!!
Replicate supports both offline and online environments.
Features
- Tracks all adds/edits and deletes-
Embedded into a level below the FileDriver, Replicate tracks all adds,
changes and deletes, whether hand-coded, called with the ABC methods,
or generated by templates. No extra calls are required to log
adds/edits and deletes.
- Field-level Replication- only logs fields that have changed (when
updating a record). (For MSSQL: only supported from 9057 and up -
because of a Clarion file-driver deficiency - see Useful
Tip 1.3 on how to implement this)
- Supports Logout/Rollback/Commit
- Subset propagation - Instead of
replicating all the data to all children, Replicate can be configured
to just send a subset of data pertaining to that child (or range of
children).
- Variable synchronization timing - You
can set-up the Replicate to synchronize as often as you would like,
and you can do manual synchronizing with the push of a button.
- Complete data export - A complete data
set can be exported and imported to a new site.
- Table & Field level Suppression -
Allows suppressing of specific tables and/or fields that are not
required (like calculated fields and temporary tables).
- Completely Bi-directional Replication -
Replicate will propagate all the file changes you make upwards and
downwards, i.e. to parent-sites and child-sites.
- Optional Internal LogFile compression - using Capesoft's zLib
compression classes.
- Supports Legacy, ABC and hand-coded procedures
and applications.
- Multiple Version support - only imports those fields that are valid
for the file version at the site. Not driver dependant, so you can
have a SQL file structure and a TPS file structure happily replicating
to each other.
Note: It's important to remember that
Replicate is much more than a synchronization tool. While it can be used
as a synchronizer on a LAN environment, you will find that the majority of
the time Replicate works asynchronously. You set it up to Process the
logfiles (i.e. import and export) as often as you want, and Replicate
happily works behind the scenes - without your users really noticing.
Two good reasons why
not to use Replicate!
You have a backend (like SQL) or
database that is accessed by programs other than your own, that will not
be Replicate enabled.
Unlike most SQL replication systems Replicate works on a 'Push' system -
i.e. the program must log the changes ('push' them out). This means that
if a program is making changes without logging them, Replicate will not
know about those changes. In this case you should use a SQL backend that
has the replication features, and use the SQL backend's replication.
Unfortunately this restricts you to use the same SQL backend (and in some
cases this is version dependent as well) for all your relating databases.
You have a database where running values must be kept
up to date live (like a bank or other such running totals).
Because Replicate consists of 2 or more different data sets, these data
sets will naturally only contain changes (made in between updates at the
other data sets) at the point of synchronization. While you can perform
updates as often as necessary, this still remains an aspect of
consideration. Live systems have their downsides - requiring a constant
link and continuous bandwidth usage are the main considerations.
Another Helpful
Hint:
If you have a single site that you're wanting to backup, then there are
better tools available to do this (although this can be done with
Replicate, the tool is not primarily focused on this feature). You could
look at Double-Take
http://www.nsisoftware.com
which some folks have had success with (I have not used this, so it's not
my recommendation) as an example.
Help
- I'm a new user, what must I read first?
Note: Replicate is unlike the
other CapeSoft products, in that it won't take a couple of minutes to
add into your application. You need to read the documentation thoroughly
and DO the tutorials in order to obtain a good understanding of the
structural concepts. DO NOT be tempted to skim read the docs and rush
into implementing it into your application!!!
- You need to understand some of the Replicate concepts, so it's
imperative that you read the Introduction
for Programmers first.
- You then need to make
the necessary changes to your dictionary, and have a reasonable
understanding of why you are making these changes (as these will
affect the way you design/change your application).
At this point you MUST compile the examples and setup the
tree structure that is provided. Without this grounding you will
waste a tremendous amount of time trying to get Replicate working
properly.
- You will now be ready to add
Replicate to your Application.
- You need to implement a mechanism for transporting
the Logfiles and do the JumpStart
tutorial to get 2 sites Replicating
- NB: Read The Rules
- RECOMMENDED - read through the Useful
tips section.
- For those who want to delve a bit deeper, you can get into the Replicate
classes to employ the full power of Replicate. If you are still
unsure of some of the Replicate concepts, it will be a good idea to
read the complete and (almost) unabridged Replicate
for Dummies by James Fortune.
- If you cannot get your LogManager to Replicate, then use the trouble-shooting
guide and the FAQs
to help find the problem.
Introduction for Programmers
What is a Site
A Site is simply a set of data that one or more applications may use. For
example:
We have 3 sites:
- A set of data at Head Office: You may have a sales database, with
orders, etc. There are 4 (in house) operators who operate the sales
via phone and all 4 operators have access to the same database on a
Fileserver. This is the first site.
- You have a roving salesman with a complete database on his laptop.
This is the second site.
- You have a remote branch with another 2 operators who use the same
database on a Fileserver. This is the third site.
Although there may be 7 operators running the program, there are only 3
sets of data - thus 3 sites.
The Site Tree Structure
Replicate requires a parent-child site structure.
In the tree below, we could visualize B000 as the Head Office, B100, B200
and B300 as regional offices, B110, B210, B220 and B310 as branches, while
the bottom layer are roving salesmen (for their allocated branches) with
laptops. Thus there are 14 Sites in the diagram below. Branch B110 has 3
roving salesmen - B111, B112 and B113. It is important to note that B113
cannot go and synchronize his data with B210, he must always relate to
B110. Similarly, 2 roving salesmen (B311 and B312) cannot synchronize to
each other while in the field - they must return to branch B310 to
synchronize their data.
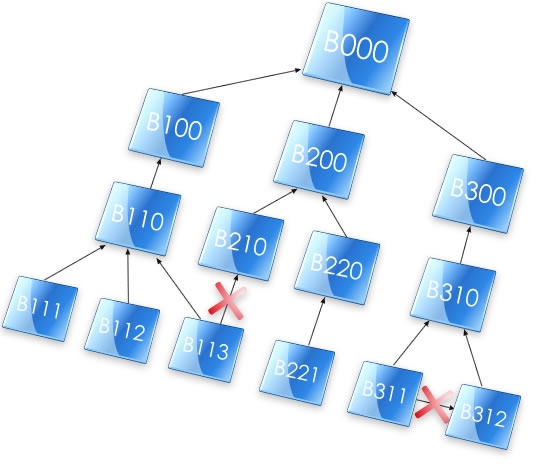 Note:
Note: the arrows reflect the child-parent
relationships, not the direction of replication. Replication is completely
bi-directional.
The crosses indicate illegal relationships. It is illegal for a site to
have more than one parent (as discussed above).
It
is important to remember that a Site is one data set, but could be made
up of many users/machines.
Selecting the site-tree structure best for you:
In a LAN setup you may choose to have a single database (i.e. one central
site) - or to have a site on each user's PC. The advantages of the second
option are:
- Faster data access - for reports and browses as the data is read
directly from the machine.
- If the "File Server" goes down, the operators can continue entering
data as they are not dependent on the FileServer to operate.
The advantage of the first option is:
- Totals (stock counts, etc.) are accurate at real time - as there is
only one dataset.
- Replication is quicker (if the Site-tree gets to more than 3 tiers,
you can have quite a lot of logfiles moving around up and down the
site-tree)
Depending on which is the most important priority for you will depend on
which is the best model in your situation.
The Primary Site
Only one site can have no parent (the apex of the tree). This is called
the
Primary Site. In the above instance, B000
is the Primary Site.
The Site
Identifier and Site Numbering Tips
Each site is identified by a Site identifier - a string(4). This site
field is used to associate site-related records with their relevant sites.
It is important to design a site map before implementing Replicate so as
to number your sites correctly. For example, if we number the descendants
of B100 in the range B100 to B1ZZ (i.e. there are 36*36=1296 possible
descendants of child B100), then it becomes easy to start thinking about
only
distributing
the file changes that pertain to the B100 family instead of the
entire log file. It's also a good idea to begin with a number that allows
upward expansion (i.e. it allows B000 to have a parent - A000, if so
desired).
Note: The Site identifier must be a unique
alphanumeric case-insensitive character of length 4 for each site.
The log files..
These are the files that Replicate logs the file updates to. The log files
are named as follows: xxxxnnnn.log (the file extension is .log by default,
but can be changed in the Global Extension Template). xxxx is the Site
identifier, and nnnn is a hex number (starting at 0001 and going through
to FFFF) and then a alphanumeric decoded string from the 65536th file. The
log file structure is defined in the Replicateobject (so you don't need to
add this to your dictionary). (
The
log file in more detail)
Logfile
Subsets
In most cases it will be a bit cumbersome to distribute all the changes to
all the children. A complete dataset will be at the Primary Site. From
there down, the datasets can be reduced, as only the data that pertains to
a site and its descendants needs to be kept.
Distributing logfile subsets drastically reduces the amount of traffic on
the network.
As a rule, all changes are distributed upwards (to the parent site) (this
is to ensure that a complete dataset is maintained at the Primary Site),
but subset distribution may occur downwards.
The LogManager
Program
The LogManager program is a separate program (from your application) which
runs in the background. This program handles the importing and exporting
of the log files from and to the relating sites' LogManagers.
There must be one and only one LogManager program
running per site.
What you need
to change in your Dictionary
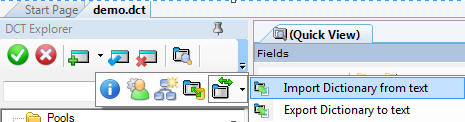
You can implement all the
following changes that you are required to by using the Bulk
Dictionary Editor, which ships with Replicate. The
Bulk Dictionary Editor is located in the
Accessories menu in the Clarion IDE. You need to export your
dictionary to a text file (force the extension of the output to a TXD
file), then run the utility on the TXD file (NOTE: Do not add the SiteFile
and LogHistory tables), and then re-import your TXD file to a new
dictionary.
- Open your dictionary and
import the clarion\accessory\libsrc\win\ReplicateTables.txd into your
dictionary.
You should have 3 tables imported into your dictionary: The SiteFile,
LogHistory and ReplicateSuppression tables.
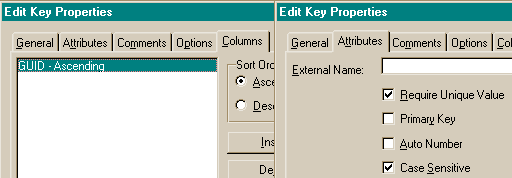
- You need to add a GUID field (and a corresponding GUID key) to each
of your replicated tables (You can use the Bulk
Dictionary Editor to do this).
- The GUID field must be a string(16) (NOT
a cstring) and must be labeled GUID. The GUID field is only for
Replicate's use and is meaningless to the programmer.
- The GUID key (label is irrelevant) must have the following
properties:
- You need to add a Site
Field to each of the tables whose records
are site dependent (You can use the Bulk
Dictionary Editor to do this). The
site field should be a string4 and should be labeled in
accordance with the Site
field descriptor in your Global Template (i.e. you must have a
common label for all your site fields - like Site - although it
doesn't strictly need to be called Site, you'll save yourself some
manual labour by sticking to the default). These tables now become
Site-related tables.
All site dependant file records will be distributed upwards (to the
parent), those that are distributed downwards will depend on the value
of the Site field in the file. If the value of the Site field is <
SiteHi and > SiteLow (or Site ID if there is no SiteLow setting)
then the record will be replicated to that relating site - otherwise
it will be omitted from the logfile for that site.
It is important to think carefully about which
tables require a Site field and which ones don't.
For Example: Suppose you have 3 tables - a products table, a customers
table and an invoices table. You have 3 sites: HO, Branch1 and
Branch2. Lets say that you don't need Branch1 to see Branch2's
customers (and visa versa). Each Invoice is related to a customer.
These two tables are Site related tables and require a Site field.
You want one product list which must be viewed at all Sites (which has
stock codes, pricing, etc.). This is a 'Global' table and all changes
to this table (prices, product descriptions, etc.) must be replicated
throughout all the sites. The Products table MUST NOT have a Site
field.
NB: Site-related tables will still require a
site field, even if you are not doing subset Replication.
Still not sure? Check out FAQ2.3
for more details.
- For each table that you added the Site Field to (Step 2 above), you
must add its Site field to any existing unique keys, although it must
not be added to the GUIDKey. (You can use the Bulk
Dictionary Editor to do this)
- You will need to set
the Initial Value of the Site field for Site-related tables with
auto-incrementing keys that you added the SiteField to (in step 3).
You can do this as follows (RepGLO:Site is a Global variable that the
Bulk Dictionary Editor adds to your
application):
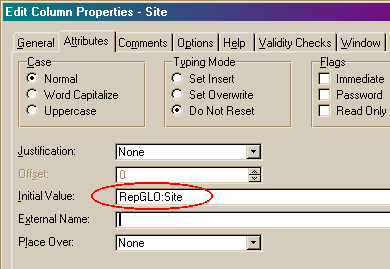
Note: For site-related tables that have
a Many-To-One relationship with another site-related table, then you
almost certainly want to use the parent table's site value, and not
the RepGLO:Site variable as the site field must inherit it's value
from the related table.
Adding Replicate to
your Application
If you are still unsure of some of the Replicate
concepts, it will be a good idea to read the complete and (almost)
unabridged
Replicate for
Dummies by James Fortune.
If this is the first time that you are using
Replicate, then you MUST first compile the examples
and setup the tree structure that is provided before adding Replicate to
your application. Without this grounding you will waste a tremendous
amount of time trying to get Replicate to work properly.
- You need to make the necessary changes
to your dictionary.
- Add the Global Extension Template to your application:
- Load your application in the Clarion IDE.
- Click the Global button
- Click the Extensions button
- Click the Insert button
- Select the Activate_Replicate
template from the Select Extension list
that appears.

- Click the Select button and the
Replicate Global Extension's prompts appear on the right-hand
portion of the Extension and Control
Templates window.
- On the Basic tab, make sure the
Disable All Replicate features and
the This is the LogManager
checkboxes are both clear.
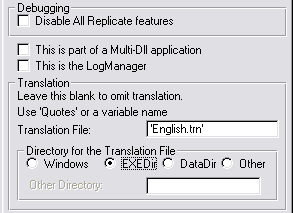
Leave the first 3 checkboxes unchecked if this is a StandAlone
EXE, otherwise checkout the What
to do in a Multi-DLL setup section in the Useful Tips in
this document. You can leave the Translation File entry blank if
you don't require translation (otherwise check the
Implement Translation section in the Useful Tips in this
doc).
In the Global Field label for SITE identified
records, enter a name which will be used to recognize the
Site field in each Site related file. This is not necessary if you
are not going to be doing subset
replication.
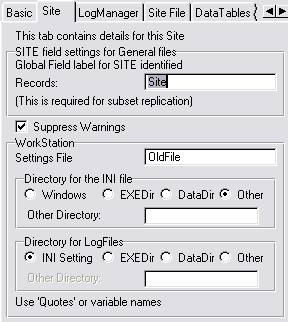
You can check the Suppress Warnings
checkbox if you don't want Replicate to warn the user when it
creates directories and has other minor errors.
Enter the Settings File name (an INI
file name) that will contain the Site settings. You can use quotes
for a fixed name or use a variable.
Select a Directory for the INI File
from the options provided.
The Directory for LogFiles option group
allows you to specify where the log files must be written. If the
same site data is used across a network (by multiple users), then
it is imperative that this path indicator is pointing to the same
place for all users of the site data.
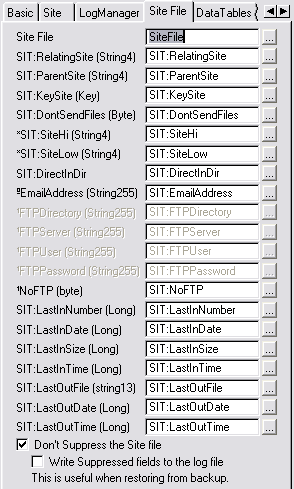
- On the Site Files tab, you need
to enter the details of your Site file.
- On the DataTables tab, you can enter the files
in your dictionary that you do not want to be replicated.
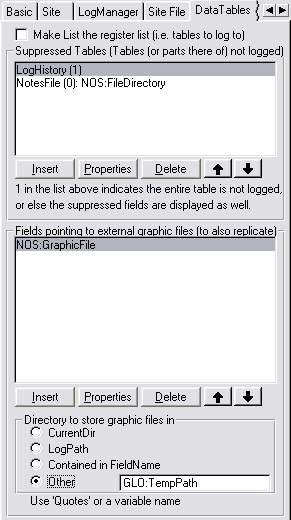
Click the Insert button. The Suppressed File window will appear.
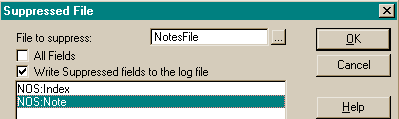
Enter the name of the File to suppress.
You can use the file select button (...) provided.
If you only want to suppress certain fields in this file (and not
the whole file), then clear the All Fields
check box.
You can add suppressed fields to the list by clicking the Insertbutton.
Alternatively you can add the RepSuppress option in the user
options of each file in your dictionary. This means that you only
have to do this once (if you have many applications).
If you have fields pointing to external files (like a graphics
file), then you can insert these fields into the second list - and
the external files will be exported with the logfiles (after this
field change). If you don't have a central location for the
external files, you can set the Directory to 'Other' and then put
a variable in the field provided. You will find an Embed point
(Global Embeds) in the PrimeLog method for each field (pointing to
an external file) where you can set the path where Replicate will
copy the external file from.
- On the Class tab, you can set
the Object Name ('ThisRep' by
default).
If you have derived your own Log class, then check the Derived checkbox and enter the required
details (the Include file and the Other Class name). Leave the I'll
do my own Init and Kill calls checkbox clear at this
point.
Creating the LogManager program
Introducing the LogManager
Now that your application is logging the file changes, you need to create
the LogManager to manage the importing and exporting of the log files and
transport these log files to the different sites. The type of
transportation manager will depend on the connection between the sites.
Please read this section carefully, as it will save a lot of heartache in
getting going with Replicate.
Generally there will be 3 different
types of connections:
- The direct transportation (where the logfiles are copied directly to
the relating LogManagers)
- The email transportation system (where the logfiles are emailed to
relating Sites)
- The FTP transportation system (where the logfiles are FTPed to a
common FTP site). Your own transport mechanism
You can program your LogManager to use all 3 transport mechanisms. In this
case, you can set the mechanism for each site (depending on their setup
and requirements) in the settings in the SiteFile. Also a site can receive
logfiles using all 3 transport mechanisms. In other words, if I have 4
sites - a head office, a branch, a roving salesman and a mirror-site (for
my backup); the head office can use FTP for the branch, email for the
roving salesman and direct copy for the mirror-site.
Let's look at each of these 3 in detail:
1. The direct transportation method
requires that the LogManagers can copy the logfiles directly to each
other's incoming directory. The incoming directory is a directory which is
treated as an Inbox. The LogManager will basically check it's InBox and
process any incoming logfiles that are found there and delete them once
they have been processed. The incoming directory is a sub-directory inside
the LogPath.
Important: You will need to ensure that each site
knows where the other site's incoming directory is (more about this
later).
A couple of things to watch out for when using this method are:
- Make sure your drive mapping is correct and that you are pointing to
the correct directory.
- Make sure that you have access rights to be able to copy the files
to the incoming directories.
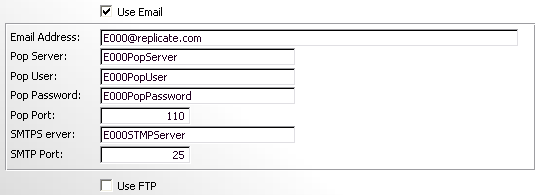
2. The Email Transportation method
requires that each site has a valid Email address. This Email address will
be the incoming mailbox and the LogManager will retrieve mail from that
inbox and extract the attached logfiles into the incoming directory
(checkout the Direct Transportation method for details) from where it will
process the logfiles. Relating LogManagers must send files to this
LogManager at this email address.
Important: You will need to ensure that each site
knows the relating sites' email address (more about this later).
A couple of things to watch out for when using this method:
- You must use a dedicated mailbox.
- You'll need a mail solution (like NetTalk - which uses SMTP) and
you'll need to ensure that your LogManager has the correct SMTP
settings at each site.
3. The FTP Transportation method
requires that each site has access to the FTP server. There are a number
of different ways of setting up the FTP transportation depending on your
setup. So it's important to work out which setup you will require at the
beginning:
FTP1. Will you have one FTP server that your sites will be using to store
the data?
FTP2. Will all your sites be using FTP for transport (i.e. will none use
Direct or Email)?
If you answered Yes for 1 then you have the simplest FTP setup. For
multiple FTP servers, this requires setting up (preferably) a default FTP
details for the site that you will use most and then overriding the
default for those sites that will use a different FTP server.
Important: You will need to ensure that each site
knows the relating sites' FTP directory (more about this later).
A couple of things to watch out for when using this method:
- The FTP server must be running all the time.
- You need to have the correct rights setup on the FTP server so that
the logfiles can be written, copied and deleted from the respective
folders. The Logmanager needs to be able to create it's incoming
directory (if it is non-existent) as well.
Creating the
LogManager
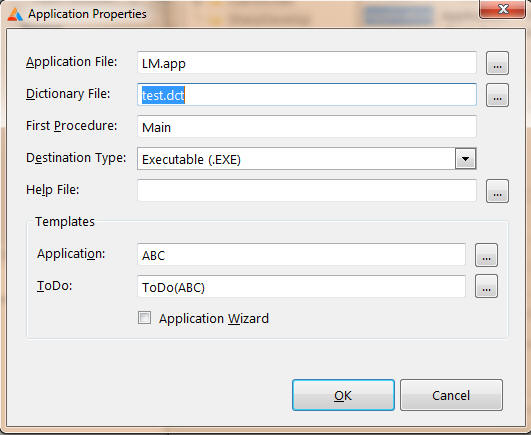
- Create a new completely blank application (using your dictionary)
based on the template set of your choice (ABC or legacy).
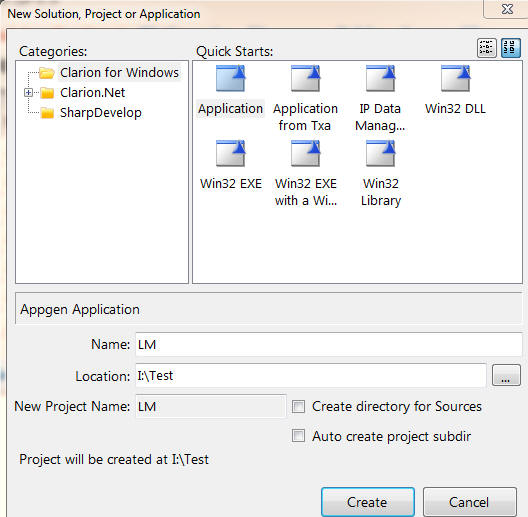
NB - uncheck the Application Wizard checkbox:
Don't be tempted to create a LogManager based application at this
point, as it won't work.
Note: If your application is written in
legacy, then it's a good idea to make a legacy application for the
LogManager - or do the conversion from legacy to ABC before
implementing Replicate - otherwise you my find that you are using
non-compliant ABC file names which will show up if you create an ABC
LogManager.
- Run one of the CreateReplicateLogManager
Template Utilities (legacy or ABC depending on which you choose)
- select whether you want all transport methods, or Direct Only. You
also need to decide whether you would like to implement the
ControlCenterClient technology into your LogManager at this stage
(check the Useful
tips: Controlling the LogManager Externally for more details).
- You need to change some things on your Replicate Global Extension
Template (Activate CapeSoft Replicate).
- Click the Global button.
- Click the Extensions button on the Global Propertieswindow.
- Highlight the Activate CapeSoft Replicate
template in the template list on the left.
- Change to the Site tab and enter the Records and the WorkStation
details to correlate to those
entered in your application.
- Change to the LogManager tab and enter
the LogManager Setup Options:
- If you would like to distribute subsets
of the logfiles, then you can check the Distribute
logfile subsets check box on the code template.
- Enter an Encryption Key, a nice long
for a strong encryption.
- If you are basing your LogManager on the csLogConnectionManager
class, then you will be able to select your transport method.
Check the relevant checkboxes (see the Global
Extension Template section for more details).
- Change to the Site File tab.
- Check that all the Site file's (file, fields and keys) details
are present and correct. If they are not there, then you don't
have a SiteFile in your dictionary (Check out
What you need to change in your Dictionary).
- Change to the DataTables tab and insert
the files as they were
entered in your application. Just do the suppressed files for
the moment, if you have external files to transport, do that later .
For more details on some of the other options, go to the
Global Extension Template section of this manual.
-
- At present the LogManager is setup to synchronize every 10
minutes, but you may require it to synchronize more or less
regularly.
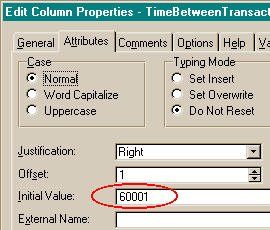
- Click the Global and then Data
buttons.
- Double-click the RepGlo:TimeBetweenTransactions
variable.
- In the Edit Column Attributes window
change to the Attributes tab.
- Change the Initial Value to the
amount of 100ths of a second that you require between logfile
processing.
- You'll probably want to prevent users from disabling the Logfile
processing. To do this, hide or disable the ?RepGLO:PauseTimer control
on the ReplicationControlWindow procedure.
You may also want to prevent your users from altering the process
interval at runtime. In this case, delete the
?RepGLO:TimeBetweenTransactions spin box (the Process Interval).
Note: You must delete these controls
without deleting the Control Template!!
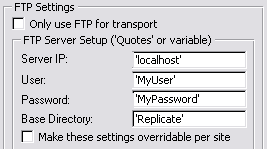
- You need to fill in the details for your FTP Server in the fields
provided in the FTP Server Setup group. I
would suggest using constants. If you need to use variables, then set
it up initially with constants and get a test setup working, and you
can then move on to using variables. Constants must be encased in
single quotes.
- If all your sites will be using FTP, then you need to check the Only use FTP for transport checkbox.
- Go to the LogManager tab on your LogManager's Replicate Global
Extension template and clear the Make settings
overridable per site checkbox if you will be using only one
FTP site. Otherwise you can check this checkbox and you will be able
to override the sites that don't use the default FTPServer.
- If you checked the Make settings overridable per
site checkbox (i.e. you will be using more than one FTP
server) then you need to enter the SiteFile's field names that contain
the FTP override details in the SiteFile tab on your Replicate Global
Extension template.
BTW - because (when using FTP) there is a default setup, the LogManager
will assume that all your sites will use FTP. If they don't use FTP, then
check the NoFTP checkbox in the SiteFile to ensure that that particular
site doesn't attempt to connect to the FTP server.
For more detail, check out the section on
Some
more
explanation on the built-in functionality of the default LogManager
JumpStart
tutorial to get 2 sites Replicating
First a simple
explanation of the Site File
The Site file basically contains all the information on how the sites
relate to each other - or more accurately how a site relates to it's
relating sites. Each record in the site file represents a relationship
with another site (there's an exception - but we'll get to that just now).
Each record contains the last logfile received from that site (and the
size if it was incomplete), the last logfile that was sent to that site,
and
where the LogManager will place the logfiles that
are sent to that site (be it an FTP directory, an email address,
or a directory to copy the files into directly).
NB: Each site will also
have it's own record in the SiteTable (where ThisSite = our site =
RelatingSite). This is to store logfile counters and some other stuff.
You must have this record or else Replication will not work.
Examples
If you have C5.5F or earlier, then you MUST read
the FAQ:Compiler
Errors section.
There are a number of examples in your
\Clarionx\3rdParty\Examples\Replicatedirectory.
These demonstrate the use of the 3 different Replicate classes in a
single-EXE and multi-DLL environment as well.
| SubFolder |
Application |
Based on Class |
Simple Explanation |
| demo |
demo.app |
csLog |
This typifies your single ABC application. It incorporates the
ControlCenterServer to start and stop the LogManager when it runs
(requires NetTalk). If you're using this app, then compile the
LM.app first (without running) - then compile and run this
application and the LM will run and close automatically with the
demo application. |
| demo |
demoNoNetTalk.app |
csLog |
This typifies your single ABC application, but without
the the ControlCenterServer to start and stop the LogManager when
it runs. |
| demo |
LM.app |
csLogConnectionManager |
This typifies the LogManager based on the ABC classes, using
NetTalk to handle FTP and Email transportation. Incorporates the
ControlCenterClient and WinEvent to minimize to the TaskTray
(requires WinEvent and NetTalk). |
| demo |
LMNoWE.app |
csLogConnectionManager |
Exactly the same as LM.app, but without the WinEvent
functionality. |
| demo |
LMdirect.app |
csLogManager |
This typifies the LogManager based on the ABC classes without
external transportation (limited to LANs). This app does not
contain NetTalk. |
| demo |
LMservice.app |
csLogConnectionManager |
This typifies the LogManager based on the ABC classes as a
service using SelfService. |
| demo |
SiteSetup.app |
csLog |
This is basically just a browse of the site file to be used with
the LMservice.app (so you can setup the outging details.) |
| MultiDLL |
root.app (DataDll)
Function.app (FunctionDLL)
Mainexe.app (the EXE)
LM.app (the LogManager) |
csLogManager |
This typifies your Multi-DLL ABC application, where the
LogManager uses the same data-DLL as the main exe. |
| ControlCenter |
lm.app
server.app |
csLogConnectionManager |
These 2 apps depict a typical scenario where all your
LogManagers are control centrally by one ControlCenter (the
server.app) |
| Optional |
demo.app |
csLog |
This app depict a typical scenario where Replicate is activated
depending on the level of the Secwin licence (requires Secwin). |
demo.app, multidll (root.app, function.app and mainexe.app) typify
your existing application(s). The LogManager
programs (LM.app and LMdirect.app) provide examples of the LogManager
which you will need to create to manage the log files.
Let's have a look at 3 scenarios and what we would expect to see in
each scenario (in the SiteFile).
Note: These scenarios are a continuation
from one to the next. Please complete one through three, and don't jump
directly to the method of your choice, as this will lead to incoherent
results.
Scenario 1: 2 sites
relating to each other using Direct transport (i.e. file copy) - with no
site limitations
This scenario will work straight out the box with no changes to the
examples.
We have 2 sites: D000 which is the Primary Site, and D100 which is the
primary site's mirrored site (so there is no site limit). The crucial
thing is that D000 knows (and points correctly to) where D100s incoming
directory is (and visa-versa). The incoming directory is (by default) a
sub-directory in the logpath of the other site. So if D100's logpath is:
D:\c55\3rdparty\Examples\Replicate\demo\D100\log
then it's incoming directory will be:
D:\c55\3rdparty\Examples\Replicate\demo\D100\log\Incoming
A snap shot of what the SiteFile should look like (in this case the Site
file looks the same in both places - except for the Last LogFile counters
- because there is not SiteRange limit on either site):

- The first record shows the Primary Site's details - the ParentSite,
the SiteRange, the currently used logfile (which is stored in the Last
LogFile Received Number) and the last logfile exported (which is a
number stored in the Last LogFile Sent File).
- The 3rd and 4th records are superfluous to the Primary Site - so we
won't concern ourselves with those at present.
- The record highlighted (the 2nd record where ThisSite = D000 and
RelatingSite = D100) shows the details that the Primary Site (D000)
will use to synchronize with D100 site. It shows:
- The Site Range (which would be used to
filter out the records not required for that site if there was a range
filter). In this case there is no filter as it is a mirror-site, so
this is set to blank.
- The Last LogFile Received counters, which
indicates the last logfile that was received from D100 and was
successfully imported into site D000. (more
details)
- The Last LogFile Sent counters indicate
the file that was last sent to site D100 (and the time and date it was
sent).
- The Direct Incoming Directory field
indicates the directory into which logfiles from D000 must be placed
to be successfully imported by D100. This field must match the
Incoming Directory in the About screen at D100.
That's half the job done. We should be successfully replicating from D000
to D100. The next step is to get D100 replicating to D000, which is
basically a repeat of the above, except doing it at D100 with correct
details for relating to D000 (record 3 is the crucial record to get
correct at site D100).
How to get started with the examples (Tutorial 1):
For those who own NetTalk:
- In the examples, compile the logmanager LM.app in the
clarionx\3rdparty\examples\Replicate\demo directory to run the D000
site. Do not run the LogManager at this stage. If you don't own
WinEvent, then use the LMNoWE.app.
- Compile the demo.app.
- Run the Demo.exe application - the LogManager will start
automatically with the demo application.
- In the clarionx\3rdparty\examples\Replicate\demo\D100 run the
demo.exe.
For those who
do not own NetTalk:
- In the examples, compile and run the logmanager LMDirect.app in the
clarionx\3rdparty\examples\Replicate\demo directory to run the D000
site.
- Compile and run the demoNoNetTalk.app (your LogManager will not
automatically run and close down with your application).
- In the clarionx\3rdparty\examples\Replicate\demo\D100 run the
lmdirect.exe and the demo.exe.
You will now be able to see 2 sites replicating to each other directly
with both sites running on the same machine.
Scenario 2: 2 sites
relating to each other using FTP transport - site limits
FTP can be both the simplest and most complex transport method to setup,
depending on the method you choose. If you are only going to use FTP for
transport using a single FTP server, then you have almost no setup to do
between 2 sites. The setup is all done in the template. In this example
we'll set the LogManager tab (in the Replicate Global Extension Template)
as follows:
 Note:
Note: In the above scenario, you need to
setup an FTP server locally, i.e.'localhost' (if you're using XP/Vista -
then this is quite easily done in IIS), with a User 'MyUser' and a
password 'MyPassword'. You also need to create the base directory
'Replicate'. You don't need to worry about creating any other directories
in your FTP setup - Replicate will do the rest. You can use your NetDemo
that ships with NetTalk to check that you can connect to your server and
that your base directory has been created (or Explorer to show the
directories).
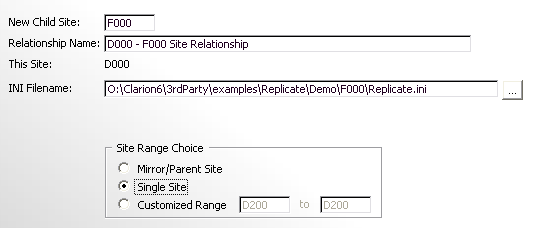
Continuing with site D000, which is the Primary Site (as discussed in
Scenario 1 above), we introduce a new site F000 which is a child of the
Primary Site with a site limit. Let's first look at what the setup will
lookup once everything is setup, and then we'll go through how to set it
up.
A snap shot of what the SiteFile will look like at the D000 site:

- The first record shows D000 Site's details - the ParentSite, the
SiteRange, the currently used logfile (which is stored in the Last
LogFile Received Number), the last logfile exported (which is a number
stored in the Last LogFile Sent File) and the FTP incoming directory.
- The 4th-7th records are superfluous to site D000 - so we won't
concern ourselves with those at present (records 6 and 7 are the only
2 fields in this case that will be visible at F000 - the others are
filtered out because of not being in the same site range).
- The record highlighted (the 3nd record where ThisSite = D000 and
RelatingSite = F000) shows the details that Site D000 will use to
synchronize with F000 site. It shows:
- The Site Range (which would be used to
filter out the records not required for that site). In this case it
will only send site-related records with the F000 stamp (and filter
out everything else).
- The Last LogFile Received counters, which
indicates the last logfile that was received from F000 and was
successfully imported into our site. ( more
details)
- The Last LogFile Sent counters indicate
the file that was last sent to site F000 (and the time and date it was
sent).
- The Direct Incoming Directory field and the Email Address fields are
clear - so that files are copied to the FTP Directory. If the Direct
Incoming Directory is not clear, then the LogManager will copy
directly and ignore the other (Email and FTP) settings for the
relating site.
Now we know what the settings should look like, lets go through a quick
tutorial in how to get there.
How to get started with the examples (Tutorial 2):
- In the examples, select the LM.app, edit the FTP Server setup in the
Replicate Global Extension template (if necessary). Fill in constants
for your server, user, password and base directory details (Note:
Replicate will create a sub-directory for each site in the base
directory in which to place logfiles for that site). Run it in your clarionx\3rdparty\Examples\Replicate\demo
directory to run the D000 site.
- To create the relating site, click the Create
Child button and a Wizard will appear enabling you to setup
the relationship between the 2 sites. Enter the following:
Click the Next button and check the Use FTP
checkbox.
Click the Next button and choose the FTP
option in the Send LogFiles to the new site via
group. Leave the Direct Only checkbox
clear.
Click the Finish Button.
- Using NetDemo, check that the LogManager has created a directory
called F000 in your Replicate directory on your FTP server, and that
there are 2 files in there: D000data.z and D000msg.z.
- Run another instance of the logmanager in the clarionx\3rdparty\Examples\Replicate\demo\F000
directory to run the F000 site. Click the Process LogFiles
button - and the site will configure itself to the parent site
automatically.
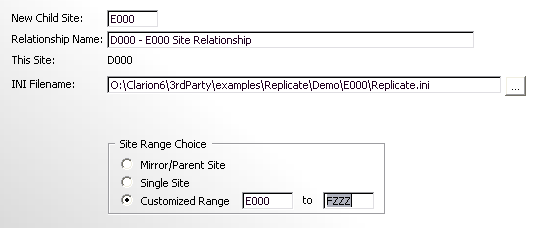
Scenario 3: 2 sites relating to each other using a combination of Email
and direct transport - a limited site with an individual backup
Continuing with our site-setup, let's introduce a forth site: E000. We'll
concern ourselves with 2 sites: D000 which is the Primary Site, and E000
which is a child of the Primary Site with a site limit that includes it's
data and the data from the FTP site in Scenario 2 (i.e. F000). We'll set
this up so that it's like a roving laptop - which is sometimes connected
to the network (i.e. so logfiles can be copied directly) and others
connects remotely (via email). The crucial thing is that D000 knows the
Email Address that E000 will look for incoming logfiles, and also that the
Incoming Directory is correct (see Scenario 1 for more details on the
Direct method).
A snap shot of what the SiteFile should look like at the E000 site (which
will filter out all the records for the D000 and D100 sites):

- The 2nd record shows E000 Site's details - the ParentSite, the
SiteRange, the currently used logfile (which is stored in the Last
LogFile Received Number), the last logfile exported (which is a number
stored in the Last LogFile Sent File), the Direct Incoming Directory
and the Email Address.
- The 3rd and 4th records are superfluous to site E000 - so we won't
concern ourselves with those at present.
- The first record where ThisSite = E000 and RelatingSite = D000 shows
the details that Site E000 will use to synchronise with D000 site. It
shows:
- The Site Range (which would be used to
filter out the records not required for that site).
- The Last LogFile Received counters, which
indicates the last logfile that was received from D000 and was
successfully imported into our site. (more
details)
- The Last LogFile Sent counters indicate
the file that was last sent to site D000 (and the time and date it was
sent).
- The Direct Incoming Directory field and
is set to point to the incoming directory of the other site. If the
directory is present (at the time of synchronisation, then it will
copy directly, otherwise it Email the logfiles to the address
specified). See the About screen (at D000) for the Incoming Directory
to make sure this is correct.
- The Email Address field is set to match
the Email Address at D000 site. See the About screen (at D000) for the
Incoming mailbox to set this field to.
OK - now we know what we should be expecting, let's go through how to set
it up.
How to get started with the examples (Tutorial 3):
- In the examples, run the logmanager (LM.app) and in the clarionx\3rdparty\Examples\Replicate\demo
directory to run the D000 site.
- Click the Change Settings item in the Program menu and click next a
couple of times until you get to the Email Settings tab. Enter the
Email settings for this site, and click next and finish.
- To create the relating site, click the Create
Child button and aWizard will appear enabling you to setup
the relationship between the 2 sites. Enter the following:
Click the Next button and enter the following settings (you will need
to enter the relevant server and user details in the fields provided):
Click the Next button and enter the following settings:
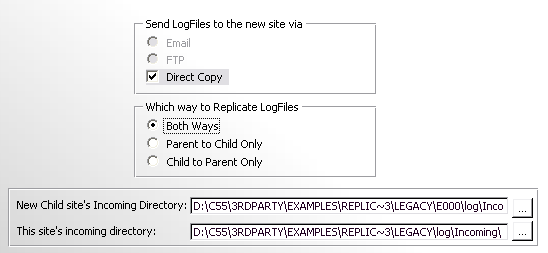
By selecting both the Direct and the Email methods, we'll let the
LogManager decide on the most optimum depending on whether direct is
possible or not.
Click the Finish Button.
- Run another instance of the logmanager in the clarionx\3rdparty\Examples\Replicate\demo\E000
directory to run the E000 site. Click the Process LogFiles button -
and the site will configure itself to the parent site automatically.
Some more explanation on the built-in functionality of the default
LogManager
- The BrowseSites window (The Replication Control Window):

- The top Browse shows a list of sites. In this case, the SiteFile
is not replicated, so only the records pertaining to this site
(G000) will be displayed here. There are 3 records - the
highlighted record shows the settings that this site will use to
determine it's settings (FTP, LogFile to write to, Site Range,
etc.), the other 2 records determine how G000 relates to those
other sites. Let's look at each column:
This(Site) - shows the records that pertain to this site. If you
are replicating your site file, then there will be other site
records in here that don't pertain to our site.
Relating(Site) - shows the relating site.
Parent(Site) - shows who the parent of that site is. In this case
this is the primary site, so all 3 sites will have this site as
the parent.
Site Range - this is the range of records to be sent from this
site to the relating site (or the range of site-related data that
this site will import). If the both the High and Low Range fields
are blank, then all site-related data is sent\received to
that\those particular sites. If the Low Range is blank, then the
Relating Site value (i.e. the site ID of that site) is used as the
low limiter.
Last LogFile Received - this group contains information showing
the last logfile received. The number is the last complete logfile
received from that site. If the Last logfile received was a
complete logfile, then the size will be 0. For example: if the
last logfile received was logfile No3, but it did not have an
EndOfFile stamp on it, then the Number will be 2 and the Size will
be the size of logfile No3 that was imported.
Last LogFile Sent - the details of the last logfile successfully
sent to a relating site.
Requests - if this site receives a logfile that is not the next
logfile, it will request the missing\incomplete logfile from the
relating logfile. This shows how many requests we've posted to
that relating site, and what was the last logfile requested.
- The bottom browse shows a history for the highlighted site of
files this site has imported from that particular site.
- The Site Specific group of controls - pertain to a single
highlighted site in the browse.
Create - creates a relating child site.
Sync - synchronize this site's data with a relating site's data
(site ranges to site-related data are applied to the sync).
Export - export a set of data to the relating site (similar to a
sync, but is only one-way).
Extra Details - this shows the method(s) of transportation to that
site. Email Address shows the address that the logfiles will be
sent from this site to the relating site (for the relating site to
import). Similarly FTP, and direct dir apply to FTP transport and
direct copy respectively. If there is more than one possible
option of sending logfiles, then the following priority is used:
1. Direct Copy, 2. Email Address, 3. FTP Directory. This means
that the transport mechanism can easily be selected on the fly
automatically.
- The General (Complete) group of controls are commands that are
not site related.
Restore - is used to restore data from this sites logfiles.
Export - used to export a complete data set from this site to a
selected logfile.
Import - used to manually import a complete data set from a
selected logfile.
Process - issues a ProcessLogFiles, which receives and imports
incoming logfiles, as well as exports and sends outgoing logfiles.
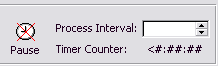
Pause - allows the user to pause the timer (and thus disallow
Process to occur automatically).
Process Interval - allows you to set the interval between
Processes.
TimerCounter - shows the amount of time which will lapse before
the next Process is automatically issued.
- If you are using the ControlCenterClient, then the string below
the bottom browse indicates the status of the connection to the
ControlCenterServer. If the client failed to connect to the
server, then the number in brackets indicates the amount of times
the client has attempted connecting to the server.
- DontFTP\Dont Email - this temporarily globally disables
FTP\Email at this site. This is useful if there is in case there
is a temporary problem with one of these transport mechanisms -
and the LogManager must avoid trying to use until these checkboxes
are unchecked.
- The Create Child site window is based on the Replicate_CreateChild
control
template, which is explained in the Templates section of this
doc.
- In the unlikely event of having to change a LogManager's settings,
you can select the Program | Change Settings window from the main
menu. This is similar to the Create Child Screens, although these
settings will pertain to our own site. You can set the SiteID, log
Path, Parent Site, as well as the Site Range Type (as discussed
above). You can also set the FTP and Email settings (if required). If
you make changes to these settings, you will need to exit and re-run
your LogManager in order for these changes to take effect. Be careful
when changing these settings as these will not be changed at relating
sites automatically. If you change any of these details, they must
also be modified at all the relating sites.
The Rules
These are the Rules. If you
obey them you'll be OK, if you break them you're on your own.
If you're new to Replicate then read the
Help - I'm
a new user, what must I read first? section of this doc first.
- Your Site fields MUST be STRING(4).
- Each table in your dictionary that is replicated MUST have a GUID
STRING(16) field. Do not touch this field - this is a field for
Replicate to use. DO NOT CHANGE THIS FIELD!!
- You MUST have a site table in your dictionary.
- At each site, your Site table MUST have a record for each site that
it relates to as well as a record for
itself. These records all have ThisSite = OurSite. Note you may have
more records replicated from other sites in your Site table - but
these are not used by ThisSite.
- You MUST run one and only one LogManager per site.
- You cannot have one table declaration for multiple files (i.e.
switch filenames on the fly).
- Do not delete (or drop) your site table at an existing site when
upgrading your application/LogManager.
- DO NOT be tempted to skim read the docs
and rush into implementing it into your application!!!
- Read the Some things NOT to
do in the Useful Tips section.
Useful Tips
(This is a really handy
section, full of useful bits of info - highly suggested reading)
- General Replicate Tips
- Things to do in/with the LogManager
- Some useful tips for your application:
Note: You must re-compile your LogManager when
making changes to your dictionary.
1. General Replicate Tips
Some things NOT to do
- DO NOT make file changes to
your files other than through your program, or another Replicate
enabled program. This means that you cannot do file maintenance via
the dictionary browser and other manual editing tools.
- DO NOT copy a clients data onto your laptop, make changes, and copy
back the changed database over existing data. You must either:
- make your laptop a client site and import the changes as you
would in the normal site import manner.
- OR -
- export the client's data and import it into your laptop, make
changes, and then import the logfile of the changes you have made
to the clients database.
- DO NOT make your Outgoing directory the same as the Incoming
Directory (SIT:DirectInDir) of another site.
- For Clarion6 and above you must check the Open
In Current Thread option for each file in the dictionary that
you want to be replicated.
- DO NOT make your log directory the same as the Outgoing Directory or
the Incoming directory.
- Do not use PUT(View) in Clarion5.5. This won't get logged (a
Clarion5.5 limitation). The Process template uses PUT(View). Also do
not use DELETE(View) as this will also not get logged (this may be
fixed by SV at some stage but at the time of writing this is still not
a possibility).
Recommended: Using a different Hard-drive for the logfiles. Your
logfiles provide an easily restorable back-up, so if your hard-drive
(where the data is stored), goes faulty, it will be a simple matter of
restoring from the backup. If this is not possible, then you can
create a dummy mirror-site. This means that your logfiles will be
copied to another location, where they can be stored until a backup is
required.
What you need
to distribute to your users:
- Your csLog enabled applications (and everything that you would
normally distribute that goes with these applications)
- Your csLogManager application.
- The zlib.dll (found in your Clarionx\3rdparty\bin directory) - which
should be installed into the same directory as the LogManager.
- Any pre-set site information contained in the INI settings file (set
in your Global Extension
template) and (depending on settings) the SiteFile. This could
include the Site, logpath, FTP settings, site range, etc.
- If you are using NetTalk as a transport engine, then you need to
distribute the NetTalk dll (check the NetTalk docs for more details).
Replicate and SQL
Replicate supports SQL with a few limitations:
- You cannot use prop:SQL to perform write operations on the database,
as these will not be visible to the Replicate methods (with the
exception of using Triggers and StoredProcedures - with the caveat
mentioned below)
- You cannot use the SQL engine to do relational integrity
maintenance, as these are also not in view of the Replicate methods
(unless you are only replicating between SQL databases of the same
database type that have the same RI rules in place). For example: when
the relationships in the dictionary are used to maintain the
relational integrity, the updates/deletes are all down through the
file driver engine (one transaction at a time). Each of these
transactions are logged, and when an import is done, the relational
integrity is maintained.
- There was a bug in the Clarion MSSQL driver (fixed in 9057), where
the GET did not pass through the CALLBACK. This means that there was
no way to determine what changed in a file record when the next PUT
was done. This means that the entire contents of the record needed to
be stored, which makes for larger logfiles - and also record level
replication as apposed to field-level replication. If you cannot
upgrade to 9057 or later, then you need to be aware of this
deficiency.
NOTE: If you are using 9057 or up, then
you need to check the 'I'm using Clarion6 9057 or higher' checkbox on
he Options tab of the Global extension template in both your
application and the LogManager.
- You cannot use triggers (unless your triggers and stored procedures
are precisely the same in both databases) - as the file activity is
not visible in the filecallback - thus these changes cannot be logged
by replicate.
Implementing Translation
There are only a few things that need to be translated in Replicate. There
are the
error and warning messages, and a few internal windows (like the
importing and exporting progress windows - although these are generally
hidden). The translation is supported by means of an INI - type file that
you can edit using a text editor like NotePad. For example:
[RepMessage]
Heading=Replicate Warning
Unknown Message.=Unknown Message.
Now|Never|Next Time=Now|Never|Next Time
[ReplicateWindow]
Importing...=Importing...
Exporting...=Exporting...
Processing...=Processing...
There are 2 sections: The RepMessage section, which contains all the
translations required for the Messages associated with Replicate; and the
ReplicateWindow section, which contains all the translations required for
the windows associated with Replicate.
There's a method called
GenerateTranslationFile,
which you can use to generate (or add to) a translation file with all the
messages and other text that requires translation. To use this translation
file, you can set the translation file in the
Global Extension Template.
Complete
replication of Site related files throughout the Site-Tree
There may be cases where you require a Site-related file to be visible
throughout all the sites.
For example: You have several pizza parlour branches using software to
track the orders of clients. You want all the other branches to be able to
add their own clients, but also to view the others branches' clients. The
clients may not always go to the same branch and you want whichever branch
to be able to view the clients details (maybe the client file has a
favourite pizza field). You still want subsetreplication for your invoices
and orders files.
In the above scenario, you simply change the Site field name to something
slightly different (e.g. SiteID). Replicate will see this as a global
table and will replicate the file changes throughout the Site tree, but
you can still impose site limitations on the way the data is viewed.
Suppressing files in the dictionary (as apposed to in each app)
Instead of filling out the list of suppressed tables in your application,
you can add a user option 'RepSuppress' in your dictionary for those files
that you wish to suppress.
- Open your dictionary, and right click on a file that you want to
suppress and click the Properties item in
the popup that appears.
- Change to the Options tab in the Edit
Table Properties window that appears.
- Enter the RepSuppress option in the User Options table as follows.
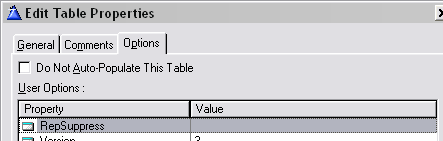
You can do this for each table that you require to suppress.
Warning: You should either use the template
list (to suppress files) or the dictionary option - not both, as this can
lead to confusion.
What to do in a
Multi-DLL setup
Case 1 (the usual case):
You don't need any of the Replicate properties or methods in any of the
applications. You LogManager will use the DataDLL.
Solution:
- Add the Replicate Global Extension into your Global DataDLL - and
setup the options as you would your LogManager for a single EXE, but
check the This is part of a Multi-DLL application,
Export Class from this DLL and Use
this DataDLL for the LogManager checkboxes.
- In your LogManager, add the Replicate Global Extension and check the
This is part of a Multi-Dll application
checkbox and go to the Class tab and select the same class that you
did in the DataDLL (in step 1).
You don't need to add the Replicate templates to any of your other
applications.
Case 2:
You need some of the Replicate properties or methods in some of your
applications. You LogManager will use the DataDLL.
Perform the steps as in Case 1, but add the Replicate Global Extension
template to those DLL (and EXE) applications where you require the use of
the Replicate properties and/or methods. In each of these instances, check
the This is part of a Multi-DLL application and select the class that you
selected in the DataDLL.
Case 3:
Your LogManager is completely separate from your Multi-DLL application
(stand-alone, or with it's own DLL set).
Solution:
- Add the Replicate Global Extension into your DataDLL and setup the
options as you would for your log enabled application. Check the
following checkboxes: This is part of a Multi-DLL
application and Export Class from this
DLL but leave the Use this DataDLL for
the LogManager checkbox unchecked.
- Setup your LogManager as laid out in the docs above for a StandAlone
LogManager.
Converting an existing application with independent sites to a
Replication setup
- The first step is to add FM3 and ship your application.
- The next step is to clean your dictionary up. You need to try and
get rid of Autonumbered keys that shouldn't be there. Let's take the
Bizrules app (shipped in Clarion6) that has your standard customers,
orders, lines, items (or products) (and rules) type database. Here we
have all 3 table types: Orders and items (are site related tables),
Items and Rules (are global autonumbered tables) and customers (a
global non-autonumbered table).
- The first important step is to make the customers table a
non-autonumbered table. This is because we want all our customers
to be at all sites - and we don't want to worry about duplicates
(i.e. the same customer with a different number at each site).
This means we have to change a number of things in our database:
- The CUS:SysID has to be made obsolete from the table (also the
Customer Number field) (don't delete it).
- We need to make an alternative primary key (lets use
Company\Firstname\Lastname - although in normal everyday life this
would not be sufficient to ensure uniqueness as there may be 2
people with the same names working at the same company). Otherwise
you could use the GUID field
- We need to add the Company\FirstName\LastName (or if you've used
the GUID field) relating fields to the Orders table. This is where
things start getting exciting as you need to write a routine to
make sure that on conversion the correct data gets populated into
the new field. We won't delete the CUS:SysID in these tables -
just superannuate it. Once we've added our new relating field(s)
we can run our routine and populate these new fields based on the
values picked up through the old CUS:SysID relationship.
This routine will look something like:
set(Orders)
loop until access:Orders.next()
CUS:SysID = ORD:SysID
access:Customers.fetch(CUS:SysIDKey)
ORD:CusGUID = CUS:GUID
access:Customers.update()
end
- Once we've cleaned up the table structures, we can move on to
changing the dictionary to a Replicate enabled dictionary. You need to
use BDE to add the GUIDs to each table and Site fields (FAQ
2.3. for more details) to those tables that require it.
- FM3 will auto populate your GUID fields - but they must be called
<PRE>:GUID in order for FM3 to recognize these fields as GUIDs
(where <PRE> is the label of the file prefix). Site fields
should have the SetIfNew option set to $$$$. It's a good idea to
distribute your application at this stage, otherwise you need to have
a separate application that runs FM3 on all the tables to convert the
data (which must be run prior to your application running). You can
easily do this with the Conversion Application template utility that
is included in FM3. This is to ensure that the SiteFields and GUIDs
are all created prior to Replicate initializing.
- OK - now that we've got our data all setup and Replicate ready,
you're ready to add Replicate to your application.
- You need to add the following line of code to the end
Replicate Init method ("After Generated Code"). For more detail on how
to do this, check out the Deriving
your own methods section.
self.PrimeSiteField('$$$$',Rep_CheckIfDone)
This will basically turn all the site field values that have been
primed with $$$$ to the value of the current site (this is only done
once).
- Alright, that's about it. Well, not quite, because here's the
killer. You probably have two complete sets of independant data.
You'll have a products table, a customers table, etc at each site. Now
when they start replicating, there are going to be a whole bunch of
duplicates that spring up. Best case scenario is that you can allocate
one of these sites as the master, whose database will supercede that
of the other, but more likely you have valuable data at both sites -
neither of which you'll want to through away. In this case, there's no
short cut, but to add a site field to each table, replicate the data
(and thus merge the data), and then create a program (with replicate
in it - or a routine in your application) that will merge/delete
duplicates which will need to manually be run by someone who
understands the data. Once the merger has taken place, the site field
must be removed from the tables that don't require it.
Optional:
- If each client has it's own SiteTree (i.e. maybe with 2 sites) then
it may be easiest to include an ini file in the install (with the
SiteID in it). Then the initial site can start up with all it's
details intact.
- The client can then create their own extra child sites using the
CreateChildSite wizard in the LogManager (which you can tailor to suit
your needs, like make certain fields read only). The best would be if
you've got an FTP server that they can access, then you can
programmatically set Replicate to use the FTP server, otherwise
they'll need to setup the local connection between the two sites (i.e.
the incoming directory).
Note on point 2 (if you're using the common
FTP server): You need to make sure that each INI file that gets shipped
has it's own unique SiteID, otherwise you may get 2 sites with the same
common SiteID.
Note on point 1 (if you're using the common
FTP server): Alternatively, you could randomly generate the SiteID and
then contact FTP Server (doing a directory search) to see if the SiteID is
available, and then assign one dynamically, before Replicate initializes
(or by running a separate install exe on startup).
Things to do in/with the LogManager
Restoring a Complete
database
When doing a complete data restore, you will need to run your LogManager
with the following switch:
/NoAutoSiteAdd. This
will ensure that when you first run the program, your own site is not
automatically added, so that when you do the restore, your to the new
record, because of a different own site's record will also be restored. If
you do not do this, a site record will be automatically added, and you
will be unable to restore the original site info GUID existing as the
record identifier.
If you're using the FullDataImport Control Template to handle the import,
then before importing, you will be prompted with the following messages:
- Would you like to import suppressed fields as well?
If you have suppressed some fields in the tables that you are logging,
you can choose to import these suppressed fields (this is provided
that the suppressed fields have been written into the log file). For
example: The LogManager tracks what log files and the size of these
log files that it has imported from and exported to its relating
sites. These tracking fields, are normally suppressed. However, when
you do a complete import, it might be necessary to restore these
pointers to continue with smooth replication (as though a complete
re-import never occurred).
- Would you like to log changes implemented?
You may want to log the file changes that are made during an import
(as though these were normal changes) which you can distribute to your
relating sites. Normally you would select No as this is simply used to
get a site's data back to where it was before the wheels fell off.
Making
more frequent (than daily) LogFiles
It is possible to make LogFiles more regularly in Replicate. The most
practicable solution to making more logfiles is to create a new logfile at
every transaction. You need to modify the LogManager program, although
your own programs (the log programs)
MUST be compiled with version
Beta 9 or later, or else the Replication will not work.
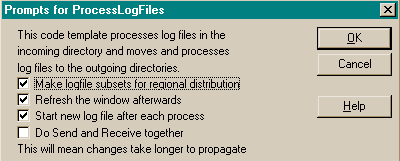
In your
ReplicationControlWindow procedure, you
need to edit the
Process Incoming and Outgoing
logfiles Code template as follows:
Note: check the
Start
new log file after each process check box.
You also need to ensure that all of the programs (log or logmanager) have
the property
ThisRep.NoCheckEOFEverytime clear (or 0). This is
clear by default, so it will be clear unless you have manually set it.
Choosing transport on the
fly
If you have a salesman with a laptop, who sometimes is in the office and
others is connected remotely (via e-mail), then it is often useful to be
able copy the files directly to his machine when he is in the office, and
email them when he is out. It's very easy to do this, you simply set up
both methods of transport in the relationship.
At the parent, make the incoming directory (to the laptop) what it should
be, and also add the email/FTP details. Do the same at the child site.
How it works
The LogManager will test to see if the directory in the DirectInDir
is there. If it is, it will copy the logfiles (and compress and/or encrypt
if required)to this directory without emailing them. If it is not, it will
email/FTP the logfiles.
Creating a new child site
It is often useful to be able to create a childsite without your users
having to set-up the connection between them and the parent. Too much can
go wrong in the setup.
There is an example of how to do this in the LM.app and the LMdirect.app(a
procedure called AutoCreateSite).
Basically, the Create-Child wizard will :
- create an INIFile containing the settings that the child-site's
LogManager will use.
- create an entry in your sitefile describing the relationship to the
child-site.
- create a MessageFile with the information on how the child should
relate to the parent and place this MessageFile in the incoming
directory (or FTPDirectory or Mailbox) of the child site.
- Create a complete data set for this new site to import and use
(Note: this is a slow way of creating a complete data set because of
exporting and importing one record at a time. It is more advisable to
create a database export (to TPS for example) and start the new site
with a complete database, rather than importing the complete database
from a log file)
All you basically need to do is ensure that the INIFile is placed in the
correct directory (for the child site) and run the LogManager at the child
site. The child's LogManager will create an entry in the SiteFile to
maintain its settings. The first ProcessLogFiles it will find the
MessageFile in it's incoming directory (or FTPDirectory or Mailbox) and
import that - i.e. create a record in the SiteFile that describes it's
relationship to the parent.
If you don't want a complete data export upon child-creation (you may have
an alternative method of setting the initial data set up) - then you can
clear the 'Perform full data export for the new child site' checkbox in
the 'Auto Create a Child Site' extension template on the AutoCreateSite
procedure.
2.5. Synchronizing
with another site
There is a control template to aid you in doing this. Go to your
BrowseSite window and add the
Replicate
- Synchronize control template to the window.
You can also use the
CRC
Check control template to do an abridged (and much quicker)
comparison between two sites.
Implementing Status of Relating LogManagers
It's useful to be able to see what's happening at relating sites'
LogManagers. The status feature will give an indication of whether the
relating sites are normal operation, whether we have had to request a
missing logfile, if the logfile that we missed, isn't actually there and
requires to be remade (this will happen automatically). You can use the
Request counters to count how many times a different logfile is requested,
and thereby develop patterns for the different logmanagers in order to
track why a logfile is going missing in
transit.
To implement:
- Add 3 fields to your sitefile (this will be done automatically in
BDE for users creating the sitefile with BDE version 2.07 and up):
StatusFlag byte
NoOfFilesRequested long
LastFileNoRequested long
- Populate these 3 variables into their respective fields in the
Replicate Global Extension template in the LogManager (the Sitefile
tab).
- In your ReplicationControlWindow window, in the embed point After
Opening the Window:
?Browse:1{propstyle:backcolor,1} = color:blue
?Browse:1{propstyle:textselected,1} = color:blue
?Browse:1{propstyle:backcolor,2} = color:yellow
?Browse:1{propstyle:textselected,2} = color:yellow
?Browse:1{propstyle:backcolor,3} = color:red
?Browse:1{propstyle:textselected,3} = color:red
where ?Browse:1 is the ID of the browse control on the site table.
- in your window formatter (of the ReplicationControlWindow window),
check the Style option on for whichever fields you want styled with
the status ( in the List box formatter). Now go to the Actions tab of
you list properties and set the Styles customization to the following:
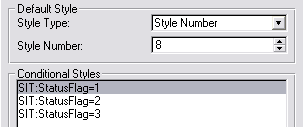
Note: The StatusFlag is set to 1
(level:notify) when a logfile is missing and is being requested from
the relating site (normally color:blue). It is set to 2
(level:warning) when the relating site cannot find the missing logfile
to send through. If a logmanager is setup to do nothing when one of
the logfiles from its own site has gone missing, then the status will
change to 3 (level:error) and the color will be set to red.
Controlling the
LogManager Externally
You must have NetTalk in order to use this feature - and you'll almost
certainly want to make your LogManager a service (which you can do easily
using
SelfService).
You can use a ControlCenterServer to control your Replicate LogManagers
via TCPIP at realtime. What you can do from the ControlCenterServer to
manage your LogManagers:
- Force LogManager(s) to process.
- Stop/Start LogManager(s) processing (start or stop the process
timer).
- Monitor the LogManager(s) activity (when it processes, if it is
running or idle or not available).
- View the processing status of a site (whether there is a problem -
i.e. whether it is requesting logfiles from a relating site or not).
- Abort the LogManager.
In order to do this, you need to make your LogManager a
ControlCenterClient and create a ControlCenterServer. Fortunately, we've
made this dead easy for you to do. This will enable you to remotely issue
a process now, stop process timer, start process timer and refresh status
command to a (or all) site(s). Undoubtedly you'll have a firewall - in
which case you will need to open a port in order for the client to
communicate with the ControlCenterServer through.
Creating the Control Center Server:
- Create a new completely blank application (using your dictionary)
based on ABC templates.
- Run the CreateReplicateControlCenterServer
Template Utility.
- Go to the Local Extensions of the ControlCenter procedure - and
highlight the Control Center Server. Go to the SiteFile tab and check
that all your SiteFile and SIT:RelatingSite field is entered
correctly.
When you run this program, you will need to initially setup the site ID,
and the IP address and port.
Implementing the Control Center Client into your
LogManager:
If you have an existing LogManager, then you need to make the following
modifications to your LogManager (Note: you must have upgraded your
LogManager to using the ProcessControlWindow Controls -
FAQ
U10):
- Add an instance of the NetTalk Local Extension template
'IncludeNettalkObject' to your Main window. Set the Base Class to
NetSimple and on the Settings tab, select the Client radio option and
check the Suppress Error Messages checkbox.
- Open the Window Formatter in the Main (Frame) window. Add a toolbar,
and click populate, Control template - and select the
ReplicateControlCenterClient. The control is a string which indicates
the status of the connection to the ControlCenter Server. Right-click
on the string control and go to the Actions - and the Options tab on
that, and:
- Set the IP address and port to match that of the
ControlCenterServer. Check out the
\ Template Section for more information on details of each
of the other settings.
- Clear the this is on the Process window
checkbox.
- Populate the Requires Controls as follows:

- Set the Next ProcessTime to RepGLO:TimeBetweenTransactions and
check the Next Process Time is relative
checkbox.
- The Close LogManager when abort is received
checkbox, if left unchecked will only abort the process
currently running (without exiting the LogManager). Otherwise the
process will be aborted, and the LogManager will close.
- The Close LogManager when Controller closes
checkbox is useful if you're making your application the
ControlCenterServer for each LogManager. You can then force the
LogManager to close when your application closes by checking this
checkbox. Otherwise the LogManager will remain running if the
ControlCenterServer closes. You can override this on a site level
by setting the:
ThisRep.SetGlobalSetting('IgnoreCloseFromControlCenter',1)
property in your ThisRep.Init after the
parent call at the site(s) that you don't want to close when the
ControlCenterServer closes (or at those sites that are not
controlled by a ControlCenterServer).
Note: When using the Control template in the LogManager, you can
send the following commands from the client:
- 1 = Request Status
- 3 = Process Now
- 4 = Pause Processing Timer
- 5 = Continue Processing Timer
- 130 = Show LM
- 131 = Hide LM
To pass the commands from your application (if your app has the
Control Client window added) - then simply do the following:
CommandGroup.Command = 4
do SendOneCommand
Aborting
in the middle of the ProcessLogFiles routine
It may be useful to provide this facility for users who require the need
for shutting down their LogManagers/PCs on a regular basis (like roving
salesmen with laptops updating information at clients). The importing
process can be quite time-consuming, and what's particularly problematic
is that if the ProcessLogFiles is aborted in mid-process, the next time a
ProcessLogFiles is issued, the LogManager will start at the top of the
logfile again. This means that logfiles can bloat if a record change
oscillates (i.e. a customer's address changes twice in the same logfile,
and the shutdown happens before importing to the end of the logfile - the
next time, the change will appear 4 times in the logfile, and then 8 times
the following time, and so on). Implementing an abort - allows them to
stop the importing process and resume from where it left off the next time
the LogManager is run.
The best way is to create an external program to control the LogManager
and post the abort to the LogManager when the user wants to close. This is
best done by using a NetSimple client/server combination - where the
server object is on the LogManager side (this can be in the frame of the
LogManager) - and the client is on the separate control application. check
out
FAQ U9
Alternatively, you can do this in your csLog based application, by adding
the 'LogManager controls from Application' extension template to your
frame - check out
FAQ - U9
Otherwise, you can handle receiving the abort with your own mechanism and
when the abort is received at the LogManager, you simply have to set an
AbortFlag:
ThisRep.SetGlobalSetting('abortnow',1)
post(event:closedown,,1)
Note: you'll probably want to exit the
LogManager when an abort is received, so you need to check the 'Close
Logmanager when abort is received' checkbox in your Process incoming and
outgoing logfiles code template (in your ReplicationControlWindow
procedure of your LogManager).
Ordering the table
export sequence
You can order the sequence that the tables are exported (in a full export
for child creation, general export or site specific export) by setting up
the tables in the Data Tables tab of the Replicate Global Extension
template in the LogManager (the order of the list has no significance in
your application - where it is used purely to indicate which tables must
be logged or not logged).
You need to check the
Make List the register list
checkbox. The SiteFile will always be precluded from this list.
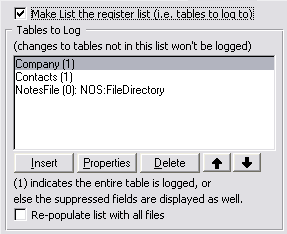
You can use the sort buttons (up and down buttons) to sort the order of
table exports. The Site file (if not suppressed on the Site File tab) will
always be exported first, followed by the file at the top of the list, and
so on. If you want to suppress a table (from being replicated), then
simply delete it from the list.
Shutting
down the LogManager from your application (ABC Only)
You must have NetTalk in order to use this functionality.
If you have a single application running on your site (typically on a
laptop) - you may like to start the LogManager with your application, and
close it down when your application closes. The technology for this piggy
backs on the
ControlCenterServer
(if you haven't read that section of the docs yet, now's a good time (
Controlling
the
LogManager Externally)) - where your application becomes a
mini-ControlCenterServer for a single LogManager. Because of this, you
cannot have both features (i.e. the ControlCenterServer controlling the
LogManager AND your application controlling the LogManager) - so depending
on your particular needs you'll need to choose between either the one or
the other (or none if you require neither).
You create your LogManager as you would for a ControlCenterClient (see
Controlling the LogManager
Externally), but instead of making a separate ControlCenterServer
application (as documented in that section), you put that functionality
into your application.
One thing you do need to do in your LogManager application:
- Go to your Main window, and open up the Control Center Client
extension template.
- Go to the Options tab and check the "Close LogManager when abort is
received" and "Close LogManager when Controller closes" checkboxes.
We're done with the LogManager bit, now lets move to your application.
- Open your application in the IDE, and add the NetTalk global
extension to your application (if this is a Multi-DLL application,
then it's a good idea to do this in the EXE app)
- Run the CreateReplicateLMController
Template Utility and pick 'A Window into my application'
- You will notice a new window is created in your Application:
LogManagerControlWindow. Go to the "Local LogManager Controller
controls" template prompts and enter:
- The name of your LogManager in the LogManager EXE field (this
will make sure that your LogManager is started when you start your
application) on the General tab. If you don't want to start your
LogManager when your application starts, then leave this blank.
- On the Options tab, set the Port number that you want to use to
what you set it in the LogManager (suggest > 2000)
- Next thing is to call this window from within your application on
startup - you can do this in your ThisWindow.Init method (right at the
end):
start(LogManagerControlWindow,25000)
Ignoring Fields and/or records or changing a
field's text(based on a condition)
There may be some cases where you would like to ignore importing a field
(or exporting a field) or record based on it's value. Here are some simple
examples on how to do this.
The method to
derive
is the
IgnoreField
method in your LogManager application (for Ignoring a field for export,
then you need to write it into your application - but this is not
recommended, unless you don't want the field value to be written into the
logfiles at all). Every time a field is imported or exported, this method
is called and the default is not to ignore the field (unless it's a GROUP
or OVER variable - then the parent call will tell Replicate to ignore it)
- so you can override this as follows (you need to place this code AFTER
the parent call):
if (pFileID &= MyFile) and pImporting and
(self.site = self.parentsite)
if pFieldNo = where(PRE:Record,PRE:FieldToIgnore)
if instring(self.site,pValue)
ReturnValue = Rtn_IgnoreField
ReturnValue = Rtn_IgnoreRecord Rtn_IgnoreField
end
end
end
or we may want to override the default behaviour for importing an OVER
field (this code must be placed BEFORE the parent call):
if (pFileID &= MyFile) and pImporting
if pFieldNo = where(PRE:Record,PRE:FieldToIgnore)
ReturnValue = 0
end
end
Runtime setable table
suppression (ABC only at this stage)
You can set the replication direction and activation of each un-suppressed
table at runtime. This must be used with extreme caution, as you can only
set the direction up once (to avoid two sites being out of sync).
Steps in implementing runtime table direction suppression:
- Open your dictionary and import the ReplicateRuntimeSuppressionTable.txd
(found in your clarionx\3rdparty\libsrc directory) into your
dictionary. Save and exit
- Open your LogManager application - go to the Replicate Global
Extension prompts (on the Data tables tab) and check the use Runtime
setable suppression checkbox.
- Using the Suppression File details button, enter the required fields
from the Suppression File.
- If your application is an ABC app Go back to your application tree
and import the ReplicateRuntimeSuppressionABC.txa
(found in your clarionx\3rdparty\libsrc directory) into your
application.
- In your frame, add a Setup item to your menubar and on the actions
tab, select call procedure and select the ReplicateOptions
procedure to call (use new thread checked).
To summarise:
- Both ways - replication will occur as normal (i.e. importing and
exporting).
- Import only - table changes will be imported to the database, but no
changes will be logged or exported at this site.
- Export only - table changes will be logged and exported from the
database, but no changes received (on import) will be applied to the
database.
- None - the table will be suppressed.
Making
file changes when receiving a specific file change from another site
Immediately after performing a successful imported file change, the
LogManager will call the
FileChange
method. You can handle conditions to handle a specific file change by
deriving the FileChange method and adding your code in there.
Note: File logging is turned off in the
LogManager (except for the SiteFile if it is replicated) - so you will
need to manually add any file changes into the logfile.
Create a TMPPointer LONG in your derived data section of the FileChange
method.
In the derived FileChange method (after the parent call):
if FileID &= MyFile
case FileCommand
of 'UpdateFull'
of 'Insert'
orof 'Update'
orof 'Delete'
!Do your code here for
if ~Errorcode()
TMPPointer = pointer(self.q)
self.q.label = 'MyFileToChange'
get(self.q,slef.q.label)
self.insert(self.primelog('Delete',self.q.file),self.q.label)
get(self.q,TMPpointer)
end !if
end !case
end !if
MySQL tweak
for remote MySQL databases (i.e. remote from the pc running the
LogManager), you might find that the MySQL odbc does a phantom disconnect
(i.e. that appears to the LogManager that the connection is no longer
open). In this case, you need to check the 'MySQL: Verify connection is
open before parsing logfile' checkbox on the Advanced tab of the Replicate
global extension template of your LogManager. This will slow the
LogManager down (when parsing logfiles) - but will ensure that the
connection between the LogManager and the database remains intact.
Making Your logManager a Service
First, there's an example that uses SelfService in the LogManager
(LMservice.app). Take a moment to open that up as a tutorial.
Compile the LMService.app. Open a command prompt, and run the compiled app
as follows:
LMd000.exe /iss !Runs the LM as a normal EXE and installs as a service.
Quite the exe by right clicking on the icon in the tasktray and exiting.
Open the controlCenter\Server.app example app - and compile, copy to the
same directory as the LMservice.app and run it there. Set the connection
settings as follows (if port 8882 does not work, you can change the port
in the LMservice.app and re-compile):

Compile and run the SiteSetup.app. This will enable you to change the
child site setup.
To setup a child site (D100) on a different PC, Copy the D100 folder to
the desired PC, and run the LMD100.exe with the command line parameter
/iss.
Note: if you are using a direct method to copy the files , then you must
make sure that the Service app is associated with a user (who has access
to that particular folder) - see SelfService docs for details. If you are
not getting logfiles across to the incoming dir of the other site, then
debug the file handling in the following manner. In the ThisRep.init
method, code the following:
self.GlobalSettings.Debug.FileHandling = 1
You can view the ouput debug in the ReplicateDebug.log file located in the
LMService directory. Search for "Copy Failed"
It's a good idea to use FTP or Email transport when using LM as a service,
because you will not encounteraccess denied errors, etc.
Using DropBox to transport the logfiles
The basic principle of using DropBox is very similar to direct copying
of the files. The easiest way to do this is to setup a drive map to the
dropbox folder (let's call it R:), and in your dropbox folder have a
sub-folder for each site (e.g. R:\B000, R:\B100, etc). The logpath is set to be in
a path below the R:\B000 - so R:\B000\log.
The incoming, archive and outgoing folders will reside in folders below
these.
At B000, in your logmanager, you'll set the B100 relationship to
direct, and enter R:\B100\log\incoming
for the SIT:DirectInDir where SIT:Site=B000 and SIT:RelatingSite=B100.
Likewise, at B000, in your logmanager, you'll set the B000 relationship
to direct, and enter R:\B000\log\incoming
for the SIT:DirectInDir where SIT:Site=B100 and SIT:RelatingSite=B000.
Some useful tips for your application:
Implement
replicate for a calculated field
- You will need to suppress
the result field (not necessarily the whole file) in both
your application and the LogManager.
- You will need to include the calculated formula into your LogManager
(as a function or link the DLL/LIB containing the function into your
LogManager).
- You will need to code the call to the formula from the FileChange
method. To do this:
- Click the Global button
- Click the Embeds button and select the embed as shown below
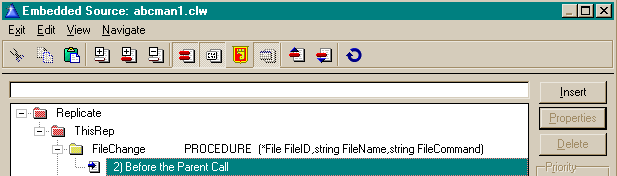
- Insert code to call your formula (or code the formula in). For
example:
A brief introduction to this code: There are 2 tables involved:
InvHist (prefix INV) and Products (Prefix PRO). Products contains the
stock item and the running total, while InvHist contains the stock
movements (so it's a child of the Products table). Everytime there's a
stock movement (e.g. stock coming in), a record gets added to the
InvHist table. When this occurs, the QuantityInStock field (in the
Products table) gets calculated.
So - in a replicate setup, we suppress PRO:QuantityInStock only (i.e.
the Products table is not suppressed, only the one field). When an
item comes into stock, an entry in InvHist table is added, and the
PRO:QuantityInStock field is changed. The PRO:QuantityInStock change
is not reflected in the logfile (because it is suppressed), only the
InvHist entry. When this change gets imported by the relating
LogManager, the LogManager picks up the InvHist table change, gets the
relating record in the Products table, and calculates the
PRO:QuantityInStock field, and saves the new value.
if FileID &= InvHist
access:Products.open
access:Products.usefile
case clip(FileCommand)
of 'Add' orof 'Insert'
if INV:Quantity <> 0
PRO:ProductNumber = INV:ProductNumber
if ~access:Products.fetch(PRO:KeyProductNumber)
PRO:QuantityInStock += INV:Quantity
access:Products.update
end
end
of 'Delete'
if INV:Quantity
PRO:ProductNumber = INV:ProductNumber
if ~access:Products.fetch(PRO:KeyProductNumber)
PRO:QuantityInStock -= INV:Quantity
access:Products.update
END
end
of 'Update' orof 'Change' orof 'UpdateFull'
if INV:Quantity <> RepHINV:Record:Quantity
PRO:ProductNumber = INV:ProductNumber
if ~access:Products.fetch(PRO:KeyProductNumber)
PRO:QuantityInStock += (INV:Quantity -
RepHINV:Record:Quantity)
access:Products.update
end
end
end
access:Products.close
end
InvHist is the table name that contains the entry that is used to
calculate the value of PRO:QuantityInStock. Products is the name of
the file that contains the calculated value (PRO:QuantityInStock).
- You will need to code a routine in the ImportCRCDataSet and the
ImportFullDataSet method to check all the Totals when a CRC check or
Sync is implemented. To do this:
- Click the Global button
- Click the Embeds button and select the embed as shown below
(not must be in the After the Parent Call embed point)
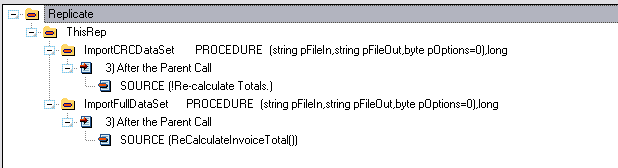
- Insert code to call your formula (or code the formula in). For
example:
Continuing on using our above table structure that we used for the
FileChange method:
set(Products)
loop until access:Products.next()
INV:ProductNumber = PRO:ProductNumber
PRO:QuantityInStock = 0 !Start from scratch -
in this case 0 is the initial quantity, otherwise you can use a
field or an alternative equate.
set(PRO:KeyProductNumber,PRO:KeyProductNumber)
loop until access:InvHist.next()
if INV:ProductNumber = PRO:ProductNumber
then
break
end
PRO:QuantityInStock += INV:Quantity
end
access:Products.update()
end
You'll probably want to put this into a procedure that you can call
from both the ImportCRCDataSet and the ImportFullDataSet methods.
- You'll need to make sure that your file containing your calculated
total is exported (for a new child) prior to the file used for
calculating the total. You can do this in your Global Extension
template.
- In the Data tables tab of the Global Extension template, check
the Make list the register list
checkbox.
- Now enter all the tables that you want replicated - you can use
the up and down buttons to ensure that the priority of export is
correct.
In our above example, you will need to make the Products appear above
the Invoices table in the list:
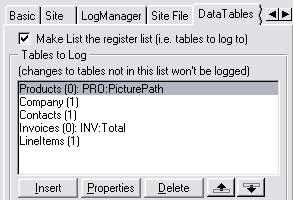
Note: If you have a calculated field in a
parent table, where the calculated field represents a total of the child
fields, then you need to make sure that the parent record is inserted
before the children. To do this, ensure that you have a
relate:ParentTable.primerecord at the top of your form.
Sending an external file
(like a graphic or doc file) with your logfiles
Sometimes it's useful to have a graphic displaying the image of a portion
of data. This is generally an external file (like a jpg or bmp file). You
can have a field in your data that points to this file in order to display
the record on a form. You can use Replicate to send the jpg automatically
to the relating sites with the data.
- Set a graphics directory where these files will reside (it's
probably best to use the data directory or a directory inside the data
directory).
- Go to your Replicate Global Extension Template - the Data
Files tab, and in the Fields pointing to
external graphic files listbox enter the field name of the
field that contains filename of the graphic file. You will need to do
this in both your Log enabled application and the LogManager as well.
- Ensure that the path in the template is set to the path that you
chose in Step 1. (Use the Radio buttons in the Directory
to store files in options group to set the directory).
If you want to use a variable path:
- Set the Directory to store files in
options group to Other and enter a variable
or a constant (in quotes) or a formula (use Clip() for strings in a
formula) to use for the path.
- Go to the Global Embeds and you will find the following embed points
which you can use to set the path for each entry in the Fields
pointing to external graphic files list:
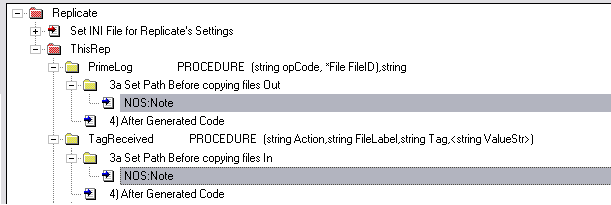
NOTE: If your files are not using the data
directory for storing the incoming graphic files, then you need to set the
path in the TagReceived method's derived embed point.
In the Replicate demo.app example there is an example of how to handle
external graphic files.
- The Notes file has a field 'NOS:GraphicFile' in it - and it has a
directory as well 'NOS:FileDirectory'.
- The path that is used for the graphics is 'Other' with a temporary
global :
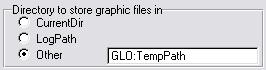
- The GLO:TempPath is set in the PrimeLog method embed point (see in
the above graphic, except with the NOS:GraphicFile field) so that the
file will be copied from the right place.
GLO:TempPath = NOS:FileDirectory
if len(clip(GLO:TempPath))
if GLO:TempPath[len(clip(GLO:TempPath))] <> '\'
GLO:TempPath = clip(GLO:TempPath) & '\'
end
end
- In the LogManager the NOS:FileDirectory must be suppressed. We don't
want to suppress it in the abclog and leglog applications, because the
path needs to be part of the backup. But the other sites will almost
certainly have a different path structure to the originating site, so
we can't replicate the path to the other sites - hence the suppression
in the LogManager.
- In the examples, the LogManager is set to place the Graphics fields
in the CurrentDir. This is because the NOS:FileDirectory will be clear
at the relating site (after replication). So the LogManager places the
graphics file into a location where the abclog and leglog applications
will be able to find it when the path is blank.
For more details on the logfile entry see the
An
external graphics file entry in the logfile section of this doc.
If you're having problems replicating external files, then work through
FAQ1.13.
Steps
to making Replicate optional
If you want to sell different levels of you program, then you'll want to
disable replicate in some versions and enable it in the more powerful
versions. E.g. the Enterprise level allows replication, whereas the
standard version is only a standalone application and database.
Here's how it's done (to make Replicate optional using Secwin):
- In your Replicate Global Extension Template (in your application(s)
- not in the LogManager), you must check the Make
Replicate Optional based on Secwin license on the Options tab
and select a License level to permit Replication.
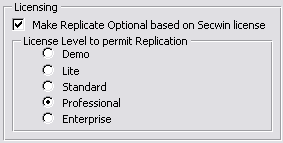
- You need to add the Replication template: Use Secwin License Level
to activate Replicate to your procedure (normally the Frame) that
contains the Secwin template: User Login Here.
Note: For sites where the license
level is less than the minimum required to activate Replicate, the
Sitefield (in Site related tables) will be primed with '$$$$'. When
the license level is upgraded to supported Replicate, then Replicate
will go through all your Site-related tables and replace '$$$$' with
the correct site value (once). The license should not be downgraded
(and the program used) and then upgraded again, as this will result in
data loss. If you don't require this feature then clear the Replace
'$$$$' with the site ID in site-related tables when the license is
upgraded checkbox and your data will not be automatically
converted.
Making Replicate optional without Secwin:
- Derive your ThisRep.Init method in your
application (not the LogManager) and enter the following in the
"Before the Parent Call" embed point (Note: this must also be done after the SetGlobalClassHandle):
if MyFunctionToReturnTrueIfReplicateIsActive() !<---- You need to
make this function.
if self.GlobalSettings.Active = 0
self.SetGlobalSetting('active',1)
end
end
- Then in the "After the Parent Call" embed point (also in the ThisRep.Init method)
if self.GlobalSettings.active = 1
self.PrimeSiteField('$$$$',Rep_CheckIfDone)
end
- Then in the "After Generated Code" embed point (also in the ThisRep.Init
method)
if clip(RepGLO:Site) = '' then
RepGLO:Site = '$$$$'
end
Stamping log
entries with a user name
You can stamp each log entry with a user name if you would like. The
easiest place to do this is in the Init method (check out the
Deriving
your
own methods (i.e. inserting your own code) if you're not sure how to
do this):
self.SetGlobalSetting('User',ds_CurrentName())
Stamping
the Procedure that created the log entry
You can stamp the Procedure name with each log entry (into the logfile) -
for debugging purposes, then you can detect which procedures are creating
each log entry. This is for ABC applications only.
In your application you will need to put the following code into your
derived PrimeString method (before the parent call) ():
self.ProcedureName = GlobalErrors.GetProcedureName()
Memos: Binary vs Non-Binary
Memos are supported in Replicate. An important note though, is to realise
that binary memos are not clipped when stored in the logfiles (because
they are binary) - so you should only use binary memos in your dictionary
where they must be binary. - otherwise they can significantly bloat the
logfiles.
Some More Technical Info
Peeking at Compressed
LogFiles
It is sometimes useful to have a look at one of your logfiles that have
been zLib compressed. There is a small utility called Shrink.exe that you
will locate in your Clarionx\3rdparty\bin directory which you can use to
uncompress/compress logfiles. Run the exe and fill in thefile names (for
the compressed and uncompressed files) and click the Extract or Compress
button (dependent on the function required).
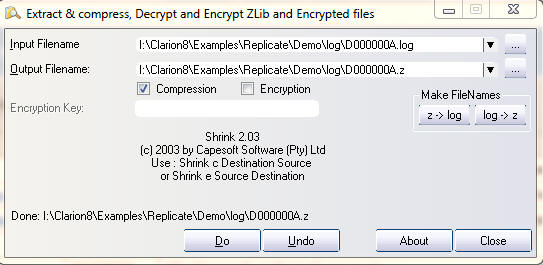
The log file name must be in the Input Filename, and the
compressed/encrypted filename must be in the Output filename. To Undo
(i.e. get a logfile from the compressed/encrypted file) click the undo
button. To create a compressed/encrypted file from the log file, click the
Do button.
Where the settings get
stored
If you imported the example LogManager (that ships with Replicate) then
you will have an About window which will display the majority of your
settings. This makes it easy to check these settings and how your
LogManager has been setup.
The LogManager (and your own application) make use of an INI file and your
Site file to store some of the settings - like what your siteis, where to
log files, where to look for incoming logfiles, etc. The INI file
containing the settings should look like this:
[Replicate]
Site=B200
LogPath=.\
ParentSite=B000
IncomingDir=.\Incoming
OutGoingDir=.\Outgoing\
SiteHi=B2ZZ
SiteLowDone=1
FTPSettingsDone=1
LastCopiedOut=3
SiteLow=
OurEmail=replicate@replicate.com
PopServer=YourServer
PopPort=110
PopUser=YourUser
PopPassword=YourPassword
SMTPServer=YourServer
SMTPPort=25
FTPInDir=replicat\B200
FTPInServer=YourPopServer
FTPInUser=You
FTPInPassword=YourPassword
Of course you may not use all the settings (for example if you only use
FTP, then the EmailSettings will not apply).
Using Replicate
with an External DLL
You may be in the situation where you require an files that are defined in
an external DLL (like a 3rdparty product) to be replicated accross sites.
This is particularly useful in Access control (like with SecWin). SecWin
will soon support this feature, and you may want to include this in
another DLL - that's what this section of the docs is for.
Note: MEMOs and BLOBs in External files are not
supported.
Some of your files' names (or their fieldnames) in your external DLL's
files may overlap with those in your EXE, since they use different
dictionaries. It is therefore highly recommended that you use a
SuperPrefix for your external DLL files. In the following example there
are 2 tables: FirstTable and SecondTable. The SuperPrefix used is _sml:
which applies to both these files. Note: You will
not
have to change these filenames to include the SuperPrefix - the
SuperPrefix is from the EXE side to recognise the tables uniquely.
1. Changes that need to be made to the DLL:
Step 1: You need to make the
tables
Replicate
compliant (i.e. with a GUID field in each table and a SiteField
added where those tables are
Site-Specific
tables).
Step 2: You need to make a function to return
the handles that Replicate requires for the files that need to be
replicated. The function needs to return a long (to indicate whether the
file handles are returned or not) and must be exported. Some of your
files' names (or their fieldnames) in your external DLL's files may
overlap with those in your EXE, since they use different dictionaries. It
is therefore highly recommended that you use a SuperPrefix for your
external DLL files.
_sml:GetFileHandles PROCEDURE (*long pFileID,string
pFileLabel,*long pRecordID,*long pGUIDKey)
CODE
case clip(lower(pFileLabel))
of '_sml:firsttable'
pFileID = address(FirstTable)
pRecordID = address(FIR:Record)
pGUIDKey = address(FIR:KeyGUID)
of '_sml:secondtable'
pFileID = address(SecondTable)
pRecordID = address(SEC:Record)
pGUIDKey = address(SEC:KeyGUID)
else
return(1)
end
return(0)
Step 3: You need to make a function to open the
files that you require to be replicated. A long returns whether the
function was successful (0 for opened, otherwise the errorcode/error level
is returned) and must be exported.
_sml:OpenFile PROCEDURE (string pFileName)
ReturnValue long
CODE
case clip(lower(pFileName))
of '_sml:firsttable'
ReturnValue = access:FirstTable.open()
if ReturnValue = 0 then access:FirstTable.usefile() .
of '_sml:secondtable'
ReturnValue = access:SecondTable.open()
if ReturnValue = 0 then access:SecondTable.usefile() .
end
return(ReturnValue)
Note: for legacy use the errorcode()
function, but return a ReturnValue rather than the errorcode() directly.
If the DLL needs to open the file, then set the ReturnValue to errorcode()
otherwise return 0 (if the file did not need to be opened).
Step 4: You need to make a function to close the
files that you require to be replicated. A long returns whether the
function was successful (0 for closed, otherwise the errorcode/error level
is returned) and must be exported.
_sml:CloseFile PROCEDURE (string pFileName)
ReturnValue long
CODE
case clip(lower(pFileName))
of '_sml:firsttable'
ReturnValue = access:FirstTable.close()
of '_sml:secondtable'
ReturnValue = access:SecondTable.close()
end
return(ReturnValue)
Step 5: Add the Activate Capesoft
RecordTypeGeneration template to your application (that ships with
Replicate). This will create a number of include files which you will need
to use in the apps using the external DLL.
2. Changes that need to be made to your apps (both the csLog based
application and the LogManager):
Step 1: Add the lib file (of the external DLL)
to the project.
Step 2: Using the Record structure include file
generated in 1. Step 5 above, add the following to your application in the
global embed '%BeforeFileDeclarations':
include('SecwinRecord.inc')
Step 2 (alternative): This is the tricky bit,
and needs to be done carefully. The best is to obtain an .inc file (from
the 3rdparty supplier) that contains these group types, but if this is not
possible, then you need to obtain the record structure. Go to your Global
Embeds - and insert a source embed into the Global Date embed. For each
table create a GROUP,TYPE that is an exact replica of the file RECORD
structure.
This Template Embed point is: %GlobalData
FirstTableRecordType group,type
ID LONG
GUID STRING(16)
Description STRING(255)
END
SecondTableRecordType group,type
ID LONG
GUID STRING(16)
Site STRING(4)
Description STRING(255)
AnArray LONG,DIM(10)
AGroup GROUP
GroupField1 STRING(20)
GroupField2 LONG
END
END
Next is to add the actual groups, which should be done in the same EMBED:
FirstTableRecordStr &group
FirstTableRecord group(FirstTableRecordType),PRE(_sml:FIR),over(FirstTableRecordStr)
end
FirstTableHist group(FirstTableRecordType),pre(FIRHist)
end
SecondTableRecordStr &group
SecondTableRecord
group(SecondTableRecordType),PRE(_sml:SEC),over(SecondTableRecordStr)
end
SecondTableHist group(SecondTableRecordType),pre(SECHist)
end
Next (if you have an array/s in your record), you need a couple of
variables (per array) to handle the array replication:
Rep_sml:SEC:AnArray string(size(_sml:SEC:AnArray)),over(_sml:SEC:AnArray)
RepH_sml:SEC:AnArray string(size(_sml:SEC:AnArray)),thread
Step 3: You need to add a module to your
GlobalMap - so go to the GlobalEmbeds - Inside the GlobalMap and add a
source embed instance there as follows:
This Template Embed point is: %GlobalMap
module('SmallDll')
GetFileHandles(*long pFileID,string pFileLabel,*long pRecordID,*long
pGUIDKey,<*long
pSiteField>),long,name('_sml:GetFileHandles'),dll(dll_mode)
smlOpenFile(string
pFileLabel),long,name('_sml:OpenFile'),dll(dll_mode)
smlCloseFile(string
pFileLabel),long,name('_sml:CloseFile'),dll(dll_mode)
end
Step 4: You need to add code into the
Replicate
| ThisRep | ClearSavedFields | After Generated Code Global embed
to clear the saved GROUPs.
Using the Template generated include file:
include('SecwinClearSaved.inc')
Handcoded example:
This Template Embed point is:
%ReplicateCodeSection,'ThisRep','ClearSavedFields',' 4) After Generated
Code'
case FileName
of '_sml:firsttable'
clear(FirstTableHist)
of '_sml:secondtable'
clear(SecondTableHist)
_sml:SEC:Site = ThisRep.Site !Initialise the sitefield
end
Step 5: You need to add code into the
Replicate
| ThisRep | CloseFile | After Generated Code Global embed to
close the files. For example:
This Template Embed point is:
%ReplicateCodeSection,'ThisRep','CloseFile',' 4) After Generated Code'
if FileLabel[1:5] = '_sml:'
returnvalue = smlCloseFile(FileLabel)
end
Step 6: You need to add code into the
Replicate
| ThisRep | OpenFile | After Generated Code Global embed to open
the files. For example:
This Template Embed point is:
%ReplicateCodeSection,'ThisRep','CloseFile',' 4) After Generated Code'
if FileLabel[1:5] = '_sml:'
returnvalue = smlOpenFile(FileLabel)
end
Step 7: You need to add code into the
Replicate
| ThisRep | Registration | After the Parent Call Global Embed to
register the files.
Using the Template generated include file:
include('SecwinRegistration.inc')
OR Handcoded Example:
This Template Embed point is:
%ReplicateCodeSection,'ThisRep','Registration',' 4) After the Parent Call'
if
GetFileHandles(Loc:FilePtr,'_sml:FirstTable',Loc:RecordPtr,Loc:GuidKeyPtr)
= 0
FirstTableRecordStr &= (Loc:RecordPtr)
Loc:File &= (Loc:FilePtr)
self.register(Loc:File,'_sml:FirstTable',FirstTableRecord,_sml:FIR:GUID,FirstTableHist,,'_sml:')
end
if
GetFileHandles(Loc:FilePtr,'_sml:SecondTable',Loc:RecordPtr,Loc:GuidKeyPtr)
= 0
SecondTableRecordStr &= (Loc:RecordPtr)
Loc:File &= (Loc:FilePtr)
self.register(Loc:File,'_sml:SecondTable',SecondTableRecord,_sml:SEC:GUID,SecondTableHist,_sml:SEC:Site,'_sml:')
self.RegisterArray('_sml:SEC:AnArray',Rep_sml:SEC:AnArray,RepH_sml:SEC:AnArray,1,'_sml:SecondTable',4)
end
Note: It is very important that the
SuperPrefix parameter in the call to the register method (parameter no 7)
is correct.
Check out the
Register
and/or the
RegisterArrays
methods for more details.
Step 8: You need to add code into the
Replicate
| ThisRep | StoreBuffer | OtherFiles Global Embed in order to
save the record into the history group.
Using the Template generated include file:
include('SecwinStoreBuffer.inc')
OR Handcoded Example:
This Template Embed point is:
%ReplicateOtherStoreBufferCodeSection,'ThisRep'
if
GetFileHandles(Loc:FilePtr,'_sml:FirstTable',Loc:RecordPtr,Loc:GUIDKeyPtr)
= 0
if address(FileID) = Loc:FilePtr
FirstTableHist = FirstTableRecord
end
end
if
GetFileHandles(Loc:FilePtr,'_sml:SecondTable',Loc:RecordPtr,Loc:GUIDKeyPtr)
= 0
if address(FileID) = Loc:FilePtr
SecondTableHist = SecondTableRecord
RepH_sml:SEC:AnArray = Rep_sml:SEC:AnArray
end
end
Step 9: You need to add code into the
Replicate
| ThisRep | RestoreBuffer | OtherFiles Global Embed in order to
save the record into the history group.
Using the Template generated include file:
include('SecwinRestoreBuffer.inc')
Note: Don't forget to complete the changes
in both your LogManager and Log applications.
4. Steps
in
creating a LogManager with your own transportation system
- Create the LogManager as laid out above (based on the
csLogConnectionManager class if you are wanting to use FTP, Email or
both as well as your own transport method).
- Add the necessary extra properties that your transport will require
to the class:
- In the clarion IDE - Click the Global
button, and then the Embed button.
- In the Embedded Source tree, find the Replicate
| ThisRep | Other
Class Properties branch and click the Insert
button.
- Select Source from the Select Embed
Type tree, and click the Select button.
- Enter the properties your transport method requires into the
source editor window.
- Click Exit and save the contents of
the window.
- Next we'll have to setup the properties in the Setup method.
- In the Embedded Source tree, find the Replicate
| ThisRep | Setup |
After the Parent Call branch and click the Insert
button.
- Select Source from the Select Embed
Type tree, and click the Select button.
- Enter the code to setup your properties for our own site. For
example:
self.FTPInDir = self.GetSetting('FTPInDir')
Self.FTPInServer = self.GetSetting('FTPInServer')
Self.FTPInUser = self.GetSetting('FTPInUser')
Self.FTPInPassword = self.GetSetting('FTPInPassword')
if (~clip(self.FTPInServer) or ~clip(self.FTPInUser) or
~clip(self.FTPInPassword)|
or ~clip(self.FTPInDir)) and ~self.SuppressWarnings
if self.RepMessage(23,button:yes+button:no,button:yes) =
button:yes
if ~clip(self.FTPInDir) then self.FTPInDir =
self.AddSetting('FTPInDir').
if ~clip(self.FTPInServer) then Self.FTPInServer =
self.AddSetting('FTPInServer') .
if ~clip(self.FTPInUser) then Self.FTPInUser =
self.AddSetting('FTPInUser').
if ~clip(self.FTPInPassword) then Self.FTPInPassword
self.AddSetting('FTPInPassword') .
end
end
- Click Exit and save the contents of
the window.
- Click the Close button and then the
OK button to return to the application
tree window.
- Next we'll do the Receiving of the files.
- Click the Procedure menu, New
item and enter ReceiveMyMethod in the
procedure name.
- Double click on the new procedure, and select the procedure
type Window from the list that appears
and click the OK button.
- Check the Declare Globally checkbox.
- Edit the code as necessary to receive your files. The files
received should be placed in the Incoming directory. This
will probably mean that you will need to have at least one
parameter for this procedure containing where to put the logfiles.
- Now we need to place the call to the ReceiveMyMethod in the correct
place.
- In your Global Embeds, find the Replicate |
ThisRep | ReceiveFiles | After the Parent Call embed
point and place the call to your procedure here (with the
necessary parameters as well). For example:
ReceiveFTP(self.FTPInDir, self.FTPInServer,
self.FTPInUser, self.FTPInPassword, self.IncomingDir)
- Next we'll do the Sending of the files.
- Click the Procedure menu, New
item and enter SendMyMethod in the
procedure name.
- Double click on the new procedure, and select the procedure
type Window from the list that appears
and click the OK button.
- Check the Declare Globally checkbox.
- Edit the code as necessary to receive your files. The files
Sent will be in a parameter passed to the SendFiles method (from
whence you will call this procedure). This will probably mean that
you will need to have at least one parameter for this procedure
containing the name of the logfiles to be sent.
- Now we need to place the call to the SendMyMethod in the correct
place.
- In your Global Embeds, find the Replicate |
ThisRep | SendFiles | Before Generated Code embed point
and place the call to your SendMyMethod procedure there. The File
that requires to be sent is in the pFileName parameter of the
SendFiles method. Here's some example code from the template
generated code for FTP transportation:
if clip(self.FTPOutDir) <> ''
if (clip(pFileName)<> '')
if clip(self.FTPOutServer) = '' then
self.FTPOutServer = self.FTPInServer
if clip(self.FTPOutUser) = '' then self.FTPOutUser =
self.FTPInUser .
if clip(self.FTPOutPassword) = '' then self.FTPOutPassword =
self.FTPInPassword .
SendMyMethod(self.FTPOutDir, self.FTPOutServer,
self.FTPOutUser, self.FTPOutPassword, pFileName)
RemoveTheFile = 1
end
end
if RemoveTheFile = 1 then remove(pFileName) .
- Next you need to set the properties of where to send the file to.
You can store these details in one of the fields in the Site file.
- In your Global Embeds, find the Replicate |
ThisRep | LoadSitesProperties | After Generated Code
embed point and place code to set the relating site's connection
properties.
if ~errorcode()
if clip(SIT:DirectInDir)<> '' and
self.CheckDirectory(SIT:DirectInDir)
pInDirectory = SIT:DirectInDir
self.FTPOutDir = ''
else
self.FTPOutDir = SIT:FTPDirectory
end
else
self.FTPOutDir = ''
end
5. The Logfile in more
detail
We initially started numbering logfiles with a hex number system - but
after a while, we realized that 65535 logfiles would be way too few for
most applications. We thus moved over to a different number system using
letters and other legal filename characters as well (from logfile G000 and
up). This means that there are:
(29 * 45 * 45 * 45) - (45 reserved files) + 65535 = 2708160
possible logfiles available to be used for logging. This means that if you
use 100 logfiles per day (or a new logfile every 15 minutes on average) -
then you should have sufficient logfiles to last you 75 years.
What gets logged when...
1. A record is Added - Data written into the logfile
will contain the following structure (for example):
<Insert> contacts
<Stamp>B000</Stamp>
<Time> 8:51:49</Time>
<CON:GUID>B000,73651,3190979,-2139329800</CON:GUID>
<CON:COMPANY>1</CON:COMPANY>
<CON:SITE>B110</CON:SITE>
<CON:TITLE>Mr</CON:TITLE>
<CON:NAME>Geoff</CON:NAME>
<CON:SURNAME>Thomson</CON:SURNAME>
</Insert>
The log is incased in the <Insert> tag, which is immediately
followed by the filename. The first information is the
Site
Stamp, then the time of the insert, followed by a decoded version of
the GUID field, which will be used to identify the record. Each field that
is not 0 (longs, shorts, numbers, etc) or clear (strings, cstrings, etc),
is logged to the logfile.ields that are clear or 0 are omitted.
2. A
record is Changed - Data written into the logfile will contain
the following structure (for example):
<Update> sitefile
<Stamp>JIFF</Stamp>
<Time> 8:50:03</Time>
<SIT:GUID>JIFF,73649,3149489,627691434</SIT:GUID>
<SIT:SITE>JIFF</SIT:SITE>
<SIT:LASTNUMBER>3</SIT:LASTNUMBER>
<SIT:LASTDATE>73651</SIT:LASTDATE>
<
SIT:InDir></SIT:InDir>
</Update>
The log is incased in the <Update> tag, which is immediately
followed by the filename. The first information is the
Site
Stamp, then the time of the update, followed by a decoded version of
the GUID field, which will be used to identify the record. Each field that
has changed, will be included into the log file. Fields that remain the
same are omitted from the logfile (other than the SiteField if
subset
replication is supported). In this instance, the SIT:LastNumber,
SIT:LastDate have changed, while the SIT:InDir has been cleared.
3. A record is Deleted - Data written into the
logfile will contain the following structure (for example):
<Delete> sitefile
<Stamp>JIFF</Stamp>
<Time> 8:50:03</Time>
<SIT:GUID>JIFF,73649,3149489,627691434</SIT:GUID>
<SIT:SITE>JIFF</SIT:SITE>
</Delete>
The log is incased in the <Delete> tag, with the filename
immediately proceeding the <Delete> tag. The first information is
the
Site Stamp, then the time
of the update, followed by a decoded version of the GUID field, which will
be used to identify the record. The only other field included is the
SiteField (where applicable - and if
subset
replication is supported). If the record is not found in the site
database, then the delete is simply ignored.
4. A
Sitefield is changed - Data written into the logfile will contain
the following structure (for example):
<UpdateFull> company
<Stamp>JIFF</Stamp>
<Time> 8:51:20</Time>
<COM:GUID>JIFF,73651,3184564,-2139329801</COM:GUID>
<COM:SITE>MOM2</COM:SITE>
<COM:COMPANY>1</COM:COMPANY>
<COM:DESCRIPTION>Russ's 1st company</COM:DESCRIPTION>
<COM:LINE1>Address 1</COM:LINE1>
<COM:LINE2>Address 2</COM:LINE2>
<COM:CITY>City1</COM:CITY>
</UpdateFull>
The logfile entry will follow the same principle as the Insert (i.e. All
the fields that are not clear or 0 are included in the log entry), except
it is encased in the <UpdateFull> tag. The UpdateFull entry is
handled like an update (when it is imported into a site) if the record
exists in the file (although the record is cleared so that any fields that
were cleared in the update are carried through), or it is handled like an
insert (if the record does not exist when imported). It is basically a
record level update (whereas normal Updates are a field-level update).
UpdateFull is used when:
- doing a full sync
- the site field is changed (for that record).
5. An external graphics file entry in the logfile
If you have a field in your record that points to an
external
graphics/doc file then your logfile entry (when the field is
changed/populated on insert) - will include the field change as well as a
special tag to tell the LogManagers that an external file is being
replicated together with that logfile:
<PRO:PICTURE>SelfService.jpg</PRO:PICTURE>
<PRO_Picture_Filename>SelfService.jpg</PRO_Picture_Filename>
The external file will now be located in the outgoing directory (until the
LogManager next does a process - in which case it will be sent together
with the logfile to the relating sites).
If you have setup external graphics file replication, but you are not
getting the additional filename tag, then work through
FAQ1.13.
6. The Site
Stamp
Each record is stamped with a Site Stamp. This is a site value immediately
following the file identifier encased in the tag <Stamp>. If the
user makes a change to the file, then the Site Stamp will be the user's
site (which we'll call ThisRep.site). the change to the file is made
because of importing a file from the parent (we'll call the site
ThisRep.parent) then the Site Stamp will be the ThisRep.parent. If the
change to the file is made because of importing a file from the child,
then 1 of 2 things could happen: if the Site Stamp (on the imported
record) is the child site, then the change is instituted and the Site
Stamp will be ThisRep.site. If the Site Stamp (on the imported record) is
ThisRep.site, then the change is discarded (and not imported). This is to
ensure that propagation does not recur infinitely if a change is made to
the same record at 2 sites simultaneously.
6. Deriving
your own methods (i.e. inserting your own code)
Deriving a method simply means to add (or replace) code to one of the
Replicate methods. This is what makes OOP (Object Orientated Programming)
so powerful. You can insert your own unique code, and still get the
benefit of future updates to the Replicate methods.
You can do this in one of 2 ways.
- The simplest is to derive the method in the application, and to aid
you, we've placed embed points on either side of the call to the
parent method, and also on either side of any template generated code
(where necessary), such as the Insert method.
To get to these embed points, open the application in the Clarion IDE.
Click on Global, then Embeds
and scroll down to the Replicatebranch of
the Embed source tree.
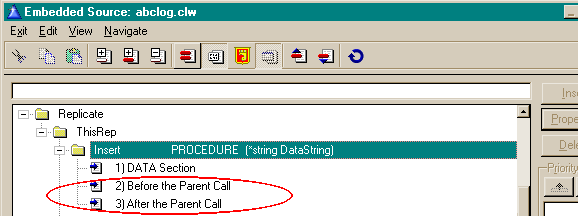
For Example: If you want to exclude records from being replicated, you
can insert the following code in the embed code before the parent
call:
if ~omitted(3)
If lower(FileLabel) = 'customers') and
(CUS:DontReplicate = 1)
else
parent.Insert(DataString,FileLabel,AddToExportFile)
end
else
Put the end in the embed after the Parent Call
end
Note: You need to derive the
PrimeLog method as well and place the following code before the parent
call. (This is in case the CUS:DontReplicate flag is changed).
if (FileID &= Customers)and
(CUS:DontReplicate = 0) and (RepHistCUS:DonTReplicate = 1) and
(opCode = 'Update')
opCode = 'UpdateFull'
end
For more information on the various methods, please peruse the
Technical Documentation (class definitions).
- Slightly more complicated is to create a new class based on the
csLog class. In this instance it's a good idea to get hold of the
Capesoft freeware template Object Writer (https://www.capesoft.com/accessories/owsp.htm).
Using this method allows you the opportunity to use your derived class
in more than one application. It also means that you only have to
change your derived class in one place (which will then be effectual
in each application that uses your derived class).
7.
Explaining some of the fundamentals of Replicate
Why Logged file changes go down and return up the site
tree:
The best way to explain the movement of file changes would be to give a
scenario. Let's suppose we have 2 sites B000, and B100, B000 being the
primary site.
- If B000 changes the address of Customer No 1 from 1 to 11 First Ave,
and B100 changes the same record (street address of Customer No 1) to
21 First Ave at the same time.
- At the next ProcessLogFiles, B100 will receive the change to 11
FirstAve, while B000 will receive the change to 21 First Ave. They
have both processed correctly, but they are not synchronized (i.e. the
data does not match). The change that B000 received from B100 will not
be stamped with it's own site ID (namely B000) - i.e. as if it made
the original change.
- After the following ProcessLogFiles, B100 will receive the change
back to 21 First Ave - but B000 ignores the change it receives from
B100 (to change to 11 FirstAve) - because it sees it's own site stamp
on the record change - and so it remains at 21 First Ave.
- After the following ProcessLogFiles, B100 does not receive any
changes and B000 ignores the change it receives from B100 (to change
to 21 FirstAve) - because it has it's own site stamp on the record
change.
- The sites are now both Synchronized with their data matching.
The Replicate Templates
Template Utilities:
Old Templates (superceded by the ProcessWindowControls template):
The Global
Extension Template
- On the Basic Tab:
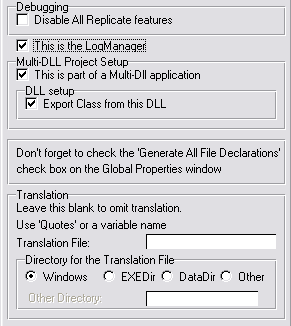
- Check the Disable All Replicate features
check box if you are having difficulties locating a bug. This
should be left unchecked, unless you have a major problem and
cannot find the source, and would like to eliminate all Replicate
code.
- If this is a Multi-DLL application then check out the What
to do in a Multi-DLL setup section for how to setup the
Multi-DLL application. Otherwise:
- Check the This is the LogManager if
this application is your LogManager.
- Leave the This is part of a Multi-DLL
application check box clear.
- If you want to use a translation file, you can set it here. You
must also specify the directory that contains the translation
file. Click here for Implementing
Translation.
- On the Class
tab (the last one).
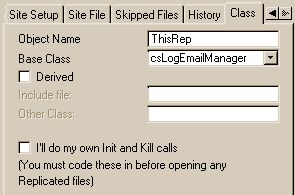
- You need to enter an Object name
(ThisRep by default)
- Select the base class that the app will use (click here
if you're not sure which class to use).
- If you have derived your own object from one of the Replicate
objects, then you can check the Derived
checkbox and enter the Include file and
the Other Class name in the fields
provided.
In Multi-DLL applications, you must make sure
that these settings are the same as the data DLL (What
to do in a Multi-DLL setup section for more details)
- The I'll do my own Init and Kill calls
check box is obsolete and is purely there for backwards
compatibility.
The rest of the settings are only available
for single-EXE programs and the data-DLL of a multi-DLL program.
- The Options tab is only available in your application (not the
LogManager):
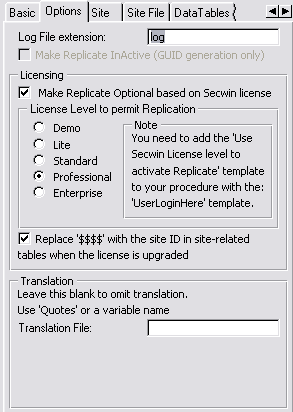
- The Log File Extension is used to
set the file extension of the log files. This will default to
'log'. You MUST NOT use .z, .ze or .loe as these will be used by
compression and encryption (if required).
- If you don't want Replicate to be active, but you do want GUIDs
to be generated, then check the Make Replicate
InActive (GUID generation only) checkbox. This option is
disabled for applications that use the Secwin license to activate
Replicate.
- See the Useful Tips Section: Useful
Tips Section: Making Replicate optional for help on the
licensing group of prompts.
- You can enter a Translation File to
translate the native Replicate windows and their prompts into a
language other than English.
- The next thing to do is
to change to the Site tab.
You need to enter a Site record identifier in the Records
field (unless you're only using one-way Replication). Replicate will
use this identifier to identify the SiteField
in each of your tables. This is defaulted to 'Site'. E.g. a client
table that is site related will have a field CLI:Site field.
The Suppress Warnings checkbox can be
checked if you don't want your users to be warned when a directory
requires to be created, or there's problems with the transportation of
the logfiles (or other minor errors). This should be checked when you
ship your application because the LogManager is designed to run in the
background (without user intervention).
The Settings File is the ini file which
stores the information for replicate (like the Site, Site range,
Parent, path where the log files are written, etc.). You can also
specify the directory where the INI file resides using the options in
the Directory for the INI file group. If
you select Windows, then the default
windows directory (probably c:\windows)
will be used. If you select EXEDir then the
directory from where the EXE is run will be used. If you select Datadir then the current directory will be used,
or Other enables you to set a directory of
your choice.
The Directory for LogFiles group is used to
specify where the LogFiles must be created and written.
- The next thing to do is to change to the LogManager tab.
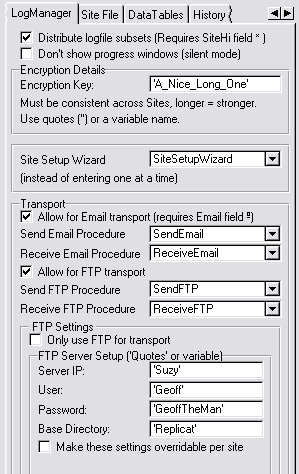
- If you would like to distribute subsets
of the logfiles, then you can check the Distribute
logfile subsets check box on the code template.
- If you would like your LogManager to operate in silent mode,
then check the Don't show progress windows.
This will not show the progress windows when importing and
exporting is taking place. This can be misleading, because nothing
appears to be happening. It would be better to use the Silent
property and turn it off (from an INI setting), depending on
whether you are testing or released.
- Enter a unique encryption key in the field provided (this will
be disabled if Encryption is not required). The longer the key,
the stronger the encryption. You must enclose your key in quotes,
or else it will be assumed to be a variable/expression.
If you are basing your LogManager on the csLogConnectionManager class,
then you will be able to select your transport method.
- If you require Email, then check the Allow
for Email transport checkbox and fill in the SendEmail
procedure and the ReceiveEmail procedure names.
- If you require FTP, then check the Allow
for FTP transport checkbox and fill in the SendFTP and
ReceiveFTP procedures.
- If you are using FTP for transport, then setup your FTP server
details in the FTP Server Setup group. If you are using other FTP
servers, then you can set these up individually at those sites
using the fields in the SiteFile to override the original template
settings. You need to check the Make these
settings overridable per site checkbox to enable you to
do this.
- Change
to the Site File tab. Note:
This tab is only valid for applications based on the csLogManager or
csLogConnectionManager class.
You will need to enter the fields and keys details of the SiteTable
in the entries provided (these will default to the above fields - if
the fields are available). The Fields that are not entered (and other
fields) will be cleared when a site is automatically added.
If you are using the csLogConnectionManager as your base class and you
will be using Email as one of your transport mechanisms, then you must enter a field into the EmailAddress
field, or else your log files will not be emailed.
If you are using the csLogConnectionManager as your base class and you
will be using FTP as one of your transport mechanisms, then you must enter a field into the FTP Directory field,
or else your log files will not be FTP'ed.
The SIT:SiteLow field is only required if
you are to have a low limit (for your subset distribution) other than
the Site field.
The SIT:DontSendFiles is useful if you want
a LogManager (at a particular site) to receive and import logfiles,
but not send them (for example backups).
If you are using FTP, but you don't require FTP at all sites, then the
sites that do not use FTP must be flagged with the NoFTP
field. This will disable the site from attempting to connect to the
FTP server, where it is not required.
If you would like to propagate the Site table (i.e. log the Site Table
changes) you can check the Don't Suppress the Site
file checkbox. The Write Suppressed
fields to the log file will allow the suppressed 'last'
fields to be written to a log file, but not imported. This is useful
when importing from a backup (i.e. re-creating a data set) so that the
replication can resume where it left off, but it can bloat the log
file substantially if the data is regularly updated.
- If
you would like to Suppress some tables (i.e. prevent certain table
changes from being logged to the logfile) you can do this on the DataTables tab.
If you would like to only suppress certain fields of a table (but log
others) then you can insert the table and clear the All
Fields checkbox, and in the list below that enter the fields
that you require to be suppressed. You can also choose (if this
program is the LogManager) to Write Suppressed
fields to the log file, which will preventing importing
suppressed fields, but they will still be written to the log file. It
is not necessary to insert a Suppressed field into your Log based
application if the suppressed field must be logged (since your
application does not handle the importing of records).
If an entire table is suppressed, then the tablename (appearing in the
Suppressed Files list) will be succeeded by a '(1)'. Alternatively,
the tablename will be succeeded by a '(0)' and the field names that
will be suppressed.
Note: If you are using a legacy
application and suppressing an entire file (which has a GUID field),
then you need to call the GetGUID
method before your add command:
PRE:GUID = ThisRep.GetGUID()
add(Filename)
If you only want to replicate a few tables - and you have many tables
in your dictionary, then you may like to invert the suppressed list.
Check the Make List the register list (i.e. tables
to log to) checkbox to do this. This will make the tables in
the list the list of tables whose changes will be logged
(other tables' changes will not be replicated).
Check the Runtime
setable table suppression in the Useful tips section if you're
wanting to use Replicate setable table suppression/direction.
If you have fields pointing to an external file (usually a graphics
file), you can enter those field names into the list box below the
Suppressed tables group. You need to enter the correct directory where
the graphics will be stored, or else select the Contained
in FieldName radio option. This needs to be done in both the
LogManager and the csLog enabled applications. It is essential that
the filenames are referred to with respect to the directory specified
in the Directory to store graphic files in.
- If you would like to keep a track of when you received log files in
a HistoryFile, you can
change to the History tab. Note:
This tab is only valid for applications based on the csLogManager or
csLogConnectionManager class.
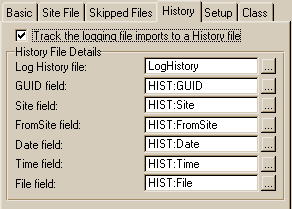
Check the Track the logging file imports to a
History file check box on and the History
File Details group will appear with the entry fields for the
various fields of the History table.
- To change some of the Advanced options, change to the Advanced tab
(in the LogManager only).

- The Log File Extension is used to set
the file extension of the log files. This will default to 'log'.
You MUST NOT use .z, .ze or .loe as these will be used by
compression and encryption (if required).
- The Don't warn when a new site's log file
arrives checkbox (if checked) will not warn the user
before automatically adding site details to the Site file when a
new site's log file is received. If this is left unchecked, then
when a new site's logfile is added, it will first warn or the new
arrival and then inquire as to whether to add the site, or discard
the incoming logfile. You should leave this checked, as the
LogManager is designed to run in the background
- Check the Use CapeSoft ZLIB compression
checkbox if you would like to compress the log files in transit.
You need to enter the Object name and
the Class in the fields provided.
Compression makes logfiles smaller and so saves on bandwidth, etc.
There should be no reason not to compress the files.
- Check the Use Capesoft Encryption
checkbox if you would like to encrypt the logfiles. You will need
to enter an Encryption Key,the Object
Name and the Class in the
details provided. Encryption occurs just before transport and
decryption occurs in the first step of importing a file. There
should be no reason not to encrypt the files.
You must use the same encryption key if
you are making more than one LogManager program.
- Replicate will check if a relating site's incoming directory is
there and will create the directory if it is not. Check the Don't create directory if non-existent for Direct
sites if you don't want the LogManager to do this. This
is useful if you have relating LogManagers that are not always
connected (like a Salesman's laptop), so that the LogManager will
not waste time attempting to create the relating site's incoming
directory.
- If logfiles have gone
missing (not in transit but) at the originating site (which can
happen due to a virus or PEBKAC (Problem Exists Between Keyboard
and Chair) error - "misplacing" the logfiles), or if you did a
restore from backup and lost your logfiles, then you can do one of
4 things:
- Make blank logfile(s) (this is the least safe option as any
changes that did possibly exist in the logfile will not be
replicated to the other sites). This is the most economical
time wise as the LogManager will simply create a blank logfile
and send it to the requesting LogManager. Note: If you have
record changes going missing, then selecting this option would
be the cause of it.
- Allow Replicate to make a complete data export for the first
logfile that it finds is missing. Subsequent missing logfiles
will be created as blanks. This is helpful to get a site
automatically up and running without losing any changes that
other sites need to have replicated to. However, this can be
extremely time consuming and bandwidth hungry - as a full data
export can run into 100s of MBytes (depending on the size of
the database). But it is the most accurate method of ensuring
that any changes that could have existed in the missing
logfile are not omitted.
- Make + CRC all sites (If you have WinEvent added to your
LogManager). This option will make blank logfiles, but issue a
CRC request to all relating sites. This requires that you have
the CRC control template added to your
ReplicationControlWindow window, as well as the WinEvent
Global Extension added to your LogManager. This option will
create a file that contains a CRC of each record of each file
and send those for comparison to the relating LogManagers (who
will compare CRCs with those at their sites). Any mismatches
will be requested from or sent to the original LogManager (who
was missing the logfile).
- The manual method - i.e. Don't do anything. This means that
you need to go and manually find/create/beg/borrow/steal the
logfile in order for Replication to continue, should a logfile
go missing.
- NO LONGER RECOMMENDED: You can archive your logfiles (in order
to clean up the logpath and decrease drive space usage of the
logfiles). Select either the After x
days radio button or the but keep the
last radio button in order to automatically archive
logfiles. The former option will keep logfiles in the logpath that
are less than x days old, while the later, keeping the
number of logfiles specified. These options require the use of the
cszLib class (or you need to include your own archiving method).
NOTE: Because disk space these days is extremely cheap, and this
feature introduces an extra layer of complexity (another thing to
go wrong), this feature is not recommended.
The
ProcessWindowControls Control Template
The template replaces the obsolete ProcessLogFiles, CRCCheck, Synchronize,
FullDataExport and FullDataImport templates and places all the
functionality into one control template. Basically this control template
is the heart of the ReplicationControlWindow in the LogManager - operating
in tandem with a browse of the SiteFile, it handles processing the
logfiles (automatically/periodically and manually), crisis management
tools (like synchronizing and CRC checking with relating sites and Restore
functionality) as well as new site creation. Let's first take a look at
the controls that this template places on your window:
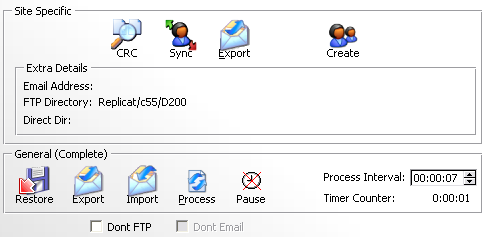
The Site specific group of controls (with the exception of the Create
button) pertain to the record highlighted in the SiteFile browse. So in
this case the record D000-D200 is selected. You may delete any of the Site
Specific controls that you don't require.
- The CRC button will do a CRC check with the site selected (in this
case D200 site) (This will only appear if you have WinEvent added to
your LogManager).
- The Sync button will perform a complete synchronization between D000
and D200 sites.
- The Export button will all a complete data set to be sent to D200.
- The Extra Details display the method (and specifically where) our
site D000 will send the logfiles to the relating site.
- The Create button will all a complete site creation.
The functions in the General (Complete) group pertain to this site - and
bare no relation to the SiteFile browse. You must not delete these, if you
don't require them, then hide these controls.
- The Restore button will enable you to do a restore from logfiles
from a specific date.
- The Export button exports a complete data set to a logfile.
- The Import button enables you to import a complete data set from a
selected log file.
- The Process button allows you to do a manual process of logfiles.
- The Pause checkbox allows you to pause automatic processing.
- The Process Interval allows you to stipulate the time between
automatic logfile processing.
- The Timer Counter shows the time before the next automatic process
logfiles.
The Dont FTP and Dont Email checkboxes allow you to disable one or both of
these functionalities should there be an issue (temporarily disconnected
ISP, etc.) that will affect FTP and/or Email globally.
OK, let's have a look at some of the template prompts that give you the
control to setup the LogManager how you want it.
On the General Tab:
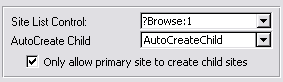
- The Site List control is the control
equate of the SiteFile browse.
- The AutoCreateChild procedure is the
procedure that must be called when creating a new child site.
- The Only allow primary site to create child
sites checkbox if checked will prevent child sites from
creating their own child sites.
- The Save Settings to INI file group
allows you to stipulate where you want the settings saved to (there is
a Don't Save option, which doesn't save changes to an INI file).
What's saved to an INI file? ProcessPeriod for one.
On the Options Tab:
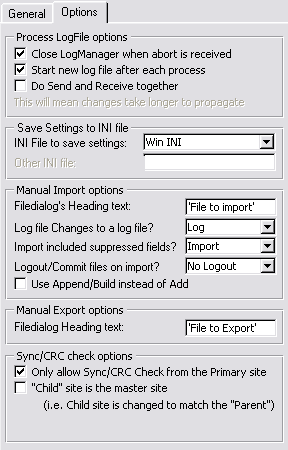
- The Close LogManager when abort is received
checkbox if clear will only abort processing of logfiles (if that's
what it is busy doing) - and not close the entire LogManager down,
when an abort is received (either from the Control Center or itself).
Otherwise the entire LogManager will close down when an abort command
is received.
- The Start new log file after each process
checkbox (if checked) forces logging to a new logfile after each
process logfiles. Otherwise the same log file will be logged to for
the whole day (and a new one is started each day). The advantage of
checking this is small logfiles are exported - whereas unchecking has
the advantage of only one logfile for each day being sent.
- The Do Send and Receive together checkbox
is useful if you want your sending and receiving to occur at once
(instead of receiving incoming logfiles, processing and then sending
logfiles). For large processes under dialup, this can be preferred to
receive, import, process, export, send.
- Let's take a look at some of the Manual Import
options:
- In the Filedialog's Heading text you
can enter a variable or text (in quotes)for the title of the
Filedialog box from where you select which file to import.
- From the Log file changes to a log file
group, you can select whether the changes that are made during the
import must or must not be logged to the log file, or whether the
user should be prompted at runtime.
- From the Import included suppressed fields
group, you can select whether you would like to with suppressed
fields (in the global
extension template) in the imported log file, whether to
import them or not, or prompt the user at runtime.
- It can be more time efficient to Use
Append/Build instead of Add - although this requires
exclusive use of the files used. Append/Build adds the records to
the file, and then builds the keys, whereas add combines both in
one function.
- In the Manual Export options group, you
can specify the Filedialog's Heading text
you can enter a variable or text (in quotes) for the title of the
Filedialog box from where you select which file to export the data set
to.
- Let's take a look at some of the Sync/CRC check
options:
- The Only allow Sync/CRC Check form the
Primary site checkbox will let you decide whether all
sites have the liberty to perform a Sync and/or CRC check
(unchecked) - or whether only the Primary site can do this
(checked). The sync performs a complete data export from both
sites - which can be extremely bandwidth hungry where databases
are large.
- The "Child" site is the master site
checkbox will enable you to determine which data must override in
the case of a discrepancy between the two datasets. If you check
this, then the child's data will override what's in the parent,
otherwise the child's data will be overridden by the parent. Note
that in both cases, if there are extant records at the "slave"
site, these will be imported into the master site.
The
Replicate ControlCenterClient Control Template
This control template implements the Client part of the ControlCenter
functionality into your LogManager. This is a control template (a string
control) - the string control displays the status of the connection with
the Server. You should populate this on the frame of your LogManager (in a
toolbar) - or else create a separate window in your LogManager on which to
populate this template. To populate this template, open the Window
formatter (for the window that you want the group on), select the
Control
Template item from the
Populate menu
and select the ReplicateControlCenterClient from the list that appears.
Place the string where desired and then right-click one of the controls
and select
Actions from the popup menu that
appears. There's nothing to set on the
Basic
tab, so on the
Options tab you will find the
following prompts:
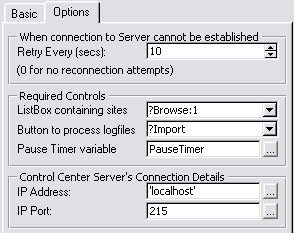
- Retry every (secs) is the time between
each connection attempt to the ControlCenterServerImport when
connection cannot be established. Set this to 0 if you don't want to
attempt to reconnect (not recommended, unless you have diallup sites).
- ListBox containing sites is the main list
containing the browse of the site file with a list of the sites to
connect to.
- The Button to Process logfiles is
self-explanatory
- The Pause Timer variable is for those
where you can pause the LogManager (i.e. so that ProcessLogFiles is
not automatically executed if the Pause is activated). If you don't
want the LogManager to be paused, then you can omit this variable. The
ControlCenterServer will be notified if the LogManager is paused.
- The IP Address and IP
Port are the details that this client must use to locate the
ControlCenterServer. These should match the dynamic IP settings in the
Server.
The
Replicate ControlCenterServer Control Template
This control template implements the server side of the ControlCenter
technology. This needs to be a separate application from your LogManager -
check out details on creating it in the
Useful
Tips:
Controlling the LogManager Externally. Once this has been done, we
can take a little more in depth look at the way you can customize the
settings to suite your needs:
In the ControlCenter (Browse) - go to the ControlCenterServer extension
template, you will find the following on the
Options
tab:
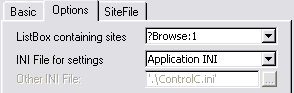
- The ListBox containing sites is
self-explanatory. You must have a browse in order to show all the
sites in the site-tree. The sites are limited by the siteID of the
site from which you're working from.
- The INI File for settings drop down
allows you to select whether you want to use the Application INI (as
setup in the applications Global properties) - or a different one
(Other) - in which case you can enter the name of the file (in quotes)
or the variable containing the name to use in the Other
INI File entry.

- The SiteFile is the table in your
dictionary that Replicate uses to keep relate to other sites. Your
browse should be based on this table (as the Primary table of the
browse).
- The SIT:RelatingSite is the field in your
SiteFile that contains the SiteID whose record details pertains to the
relationship between our site and the Relating site specified.
The
Replicate AutoCreateChild Control Template
This template enables you to easily create a child site, by using the
control template. This control template will place all the necessary
controls required to make setting the relating site's data and
relationship between the new site and the existing site simple and
effective.
The template uses a lot of the settings in the Replicate Global Extension
template to determine how the window behaves and what controls to display.
Therefore, it is not necessary to delete unnecessary controls, as these
will be control by your template settings - which you may change at a
later stage, and thus require the existance of those (presently) unwanted
controls.
First, let's take a look at the controls that are
populated with the template:
- The New Child Site is the ID of the new child site, and is used in
the relationship name.
- The INI Filename is the ini file that will be created with the
initial site setup. This should be copied to the child's INI directory
(as setup in the Replicate global Extension template) before the
child's LogManager is started for the first time.
- Site Range Choice is used if SiteRange data selection is used.
Mirror\Parent site is a full data site (i.e. no site range applied),
Single Site - the siterange is limited to that specific site (no other
data will be exported down to that site), Customized Range means that
a site range can be set manually.
- On this screen you can select the transport mechanism that the child
site will use (Direct is not optional). If you have selected FTP as
the only means of transport, then this screen is skipped, and FTP is
forced on. If you are using more than one FTP server, then you can
enter the details of the relating site's FTP server, or otherwise
leave it blank (to use the default FTP setup). If you check the Use
Email checkbox, then you need to enter all the email details into the
fields provided.
- This screen let's you setup how our site will export files to the
new child site (and visa-versa). You can select Direct
Copy as well as one of the options selected on the previous
screen if you would like to use more than one possible transport
mechanism - but normally, you would only select one.
- You can use the Which way to Replicate
LogFilesRepEGEmailWiz4.png group to determine whether you
want one-way replication (and which way you want the one-way
replication) or both-way replication.
- If you check the Direct Copy checkbox,
then you will need to enter the New Child site's
Incoming Directory (as seen from this PC), as well as This site's incoming directory as seen from the
new child site PC. This will probably mean that you will need to
prefix the directory with the PC name - or map a drive letter at that
other PC.
Secondly, lets look at some of the control template's
prompts:
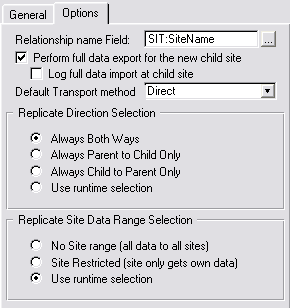
- The Relationship name Field is a
description field in the SiteFile (to describe the relationship). You
can leave this blank if you don't require it.
- The Perform full data export for the new child
site if checked will export all the data to a single logfile
to be imported by the new child. If you have another method of
initializing the data (for example you create a data snapshot and
those files are copied to the new child), then you can uncheck this -
as importing this file can be very time-consuming.
- The Log full data import at child site checkbox
is available if you checked the above checkbox. If you are sending a
complete dataset in the first logfile, then it's probably not
necessary for the new child site to log those changes into a logfile.
This just creates a whole lot of overhead, that is almost certainly
unnecessary.
- You can use the Replicate Direction Selection
group to programmatically select which way replication will occur
between the new site and the existing site. You can either force it,
or allow the user to select it at runtime - in which case the 'Which
Way to Replicate Data' control on the window will be shown at runtime.
If you don't have a DontSendFiles flag in your site file (set in the
Replicate Global Extension template) - then this option will be
hidden, and replication will always occur both ways.
- You can use the Replicate Site Data Range
Selection group to programmatically select which data should
be replicated between the new site and the existing site. If you would
like all data to be replicated always, then select the No
Site range, otherwise you can select Site
Restricted (in which case the existing site will only send
the new site's site-related data to the new site) or Use
runtime selection.
The Replicate
SetupDebugFlags Template
The SetupDebugFlags template is useful for turning on or off debug flags
at runtime. This means that you don't have to run your LogManager (or your
application) with the command line parameters in order to debug it - and
you can turn various debugging on or off while it is running. The state of
these flags is not saved for the next session (i.e. when the program
closes the flags aren't saved for the next time it runs).
The easiest way to do add this is into your LogManager (or program) is to
run the
ImportLogManagerWindows(ABC
or Legacy) template utility and check the Import SetupDebugFlags
window only (leave the others clear).
This is what the SetupDebugFlags window will look like in your
application. At runtime, you can highlight the flags that need to be set
(depending on what you want the debug output to be). Leaving the Extended
Debugging clear will just debug the basics (minimal output).
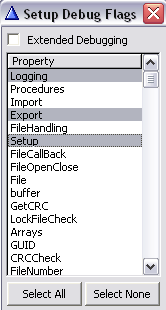
The
ReplicateSendFTPControls Control Template (and Replicate
ReceiveFTPControls Control Template)
This template is used to populate the correct code in for using the
NetTalk FTP objects. There are a couple of settings which you can set via
the template:
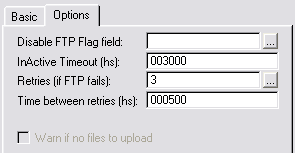
- Disable FTP Flag field - allows you to
have a global variable as an FTP disable field.
- Retries (if FTP fails) - the number of
times to retry FTPing the file if the FTP fails.
- Time between retries - the time (in hs -
i.e. hundredths of a second) between a failed FTP transfer and
retrying.
- InActive Timeout - Check out the NetTalk
docs for more details on this property (as well as other NetTalk
properties that this template uses in the generated source code).
The
Local
LogManager Controller controls Control Template
This template is used to enable you to control the LogManager from within
your application (i.e. start it with your application and close it down
when your application closes down). You can use the
CreateReplicateLMController
template utility to import this window and control template into
your application:

You will not your users to interact with this window - it will be hidden
(unless the IP and Port have not been configured properly).
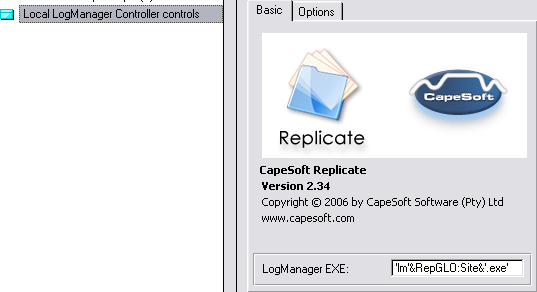
- The LogManager EXE is the name of your
LogManager that must be started by your application. If you are
running more than one site from a single machine, then you need to
have the LogManagers uniquely identifiable. We suggest using the
SiteID built into the LogManager EXE name in order to make this
possible (as shown above).
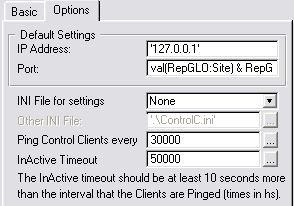
- The IP Address is the IP Address where
the server is running. This should be set to 127.0.0.1 because the
LogManager is running locally.
- The Port can either be a fixed value (if
there will only ever be 1 LogManager running on a machine at a time) -
or you can create a formula (which must be replicated in the
LogManager to make sure that your application and the LogManager are
talking on the same IP Port).
- You'd only want to store the IPAddress and Port if you'd like these
to be setable/altered. 95% of the time, you can happily stick with the
defaults. If you'd like to be able to alter and store the Port and
IPAddress, then you can select 'Other' in the INI
File for settings drop down list, and enter an INI file in
the Other INI File entry box.
- Ping Control Clients every setting is
the time (in hs - hundredths of a second) that the LogManager must be
pinged (if the connection between the 2 is idle).
- InActive Timeout setting is the time (in
hs - hundredths of a second) that your application must close the
connection if the LogManager is not responding to a ping anymore. This
means that the LogManager has locked up or GPFed or been closed.
Template Utilities:
In order to run a template utility, you need to have
an application open (either yours, a clean application or the created
LogManager). You can then select 'Template Utility' from the 'Application'
menu in the Clarion IDE and you will be presented with the following
Replicate template utilities:
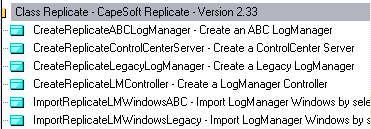
Create an ABC (or
Legacy) LogManager
The point of this Utility template is to enable you to create a default
LogManager application. Once created, you can then tweak the settings and
alter the look and feel of the LogManager application to make it your own.
(Check out the
Template Utilities
section if you're not sure how to implement a Template Utility)

- In the Transport Methods drop down list,
select either 'Direct Only' or 'Email, FTP & Direct'. If you do
not have NetTalk, or you will definitely not be using Email or FTP for
transport, then select 'Direct Only', otherwise select 'Email, FTP
& Direct'.

Create a ControlCenter
Server
The point of this Utility template is to enable you to create a default
ControlCenter Server
application. The ControlCenter Server will enable you to control
your LogManagers from one place. (Check out the
Template Utilities section if you're not sure how to implement a
Template Utility)
There are no prompts for this template utility - you need simply to create
a clean ABC application (with your dictionary), and the template utility
will create the necessary procedures in the application required for the
ControlCenter Server technology.
Create a LogManager
Controller
The point of this utility is to create a LogManager Controller that will
control the
LogManager locally. This is most useful if you would like your
LogManager to open and close when your application opens and closes
(respectively) - although it is also useful where multiple instances of
your application are running at the same site (with one LogManager) - and
you would like to be able to control the LogManager from a different PC to
the one that it is running on. (Check out the
Template
Utilities section if you're not sure how to implement a Template
Utility)

- Most likely you'd like to select 'A window into my Application' from
the What Controller to create drop down.
This will allow your application to control the LogManager window -
this is only for instances where one application runs per site.
Otherwise, a new separate application will be created in order to
control the LogManager (which may be useful where multiple
applications are running at the same site).
The Process
LogFiles code template (obsolete)
The
ProcessWindowControls Control Template replaces this template, this
is merely documented for existing users who are unable to upgrade at this
time.
This template will add the necessary code to your program to handle the
Export and import of the log files. This is a code template which you can
place in an embed point in your LogManager application.
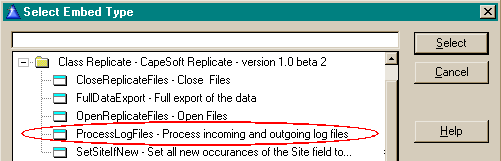
The Process LogFiles code template will feature the following prompts:
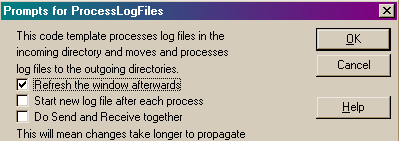
- The Refresh the window afterwards
checkbox (if checked) will simply put the necessary refresh window
commands (for a standard clarion window) after the processing occurs.
There should be no reason not to refresh the window.
- The Start new logfile after each process
will stamp the current logfile with an End of File tag at the end of
the Synchronization, enforcing a new logfile to start with the next
file change. If left unchecked, then a new logfile will be started on
the first entry of the day (hence one logfile per day).
- The Do Send and Receive together
checkbox allows the send and receive to be done together. This makes
for quick connection time (when receiving email), but will not
propagate the changes that are in the logfiles received until the next
ProcessLogFiles (so Replication takes longer).
The code generated by the template will:
- Import the log files coming in (if the LogManager class used is the
csLogConnectionManager, this includes receiving the logfiles in the
inbox).
- Move the log files to the outgoing directory.
- Loop through the site table and send (for ConnectionManagers) and/or
copy the (subset of these) log files to the incoming directory of the
related sites. If the InDir field in the Site
Table is blank, then the files are not copied (and/or
compressed) for that site. Similarly, if the EmailAddress field in the
Site Table is blank, the log files will not be emailed to the related
site. This enables us to have a mixture of Direct and Indirect
Connections to our different sites.
- It lastly updates the SiteTable
to keep track of what logfiles have been exported to each of the
related sites.
The
FullDataExport Control template (obsolete)
The
ProcessWindowControls Control Template replaces this template, this
is merely documented for existing users who are unable to upgrade at this
time.
This template will enable you to export a complete data set (or subset).
This is a control template (consisting of a button) which you can place on
a window in your LogManager application.
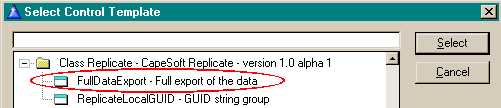
The FullDataExport control template will feature the following prompts:
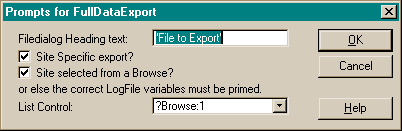
You can enter a variable in the
Filedialog Heading
Text field if you are using translation, or else use text in
quotes. If you want to export data to a specific site then check the
Site Specific export? checkbox. If you're using the
Export as a select type button (i.e. export a subset of the data for the
Site selected in the Sites Browse), then you can check the
Site
selected from a Browse checkbox and select a
Browse
Control from the drop list provided.
The
FullDataImport Control template (obsolete)
The
ProcessWindowControls Control Template replaces this template, this
is merely documented for existing users who are unable to upgrade at this
time.
This template will enable you to import a complete data set. This is a
control template (a button) which you can place on a window. To populate
this template, open the Window formatter (for the window that you want the
button on), select the
Control Template item
from the
Populate menu.
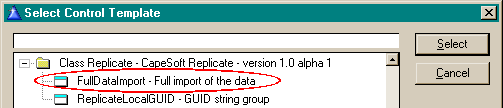
Select the FullDataImport template from the
Select
Control Template window and click the
Select
button. Place the button where desired and then right-click the button and
select
Actions from the popup menu that
appears.
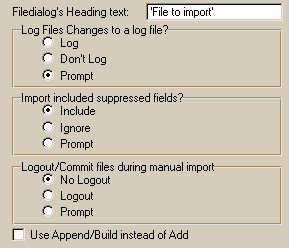
In the
Filedialog's Heading text you can enter
a variable or text (in quotes) for the title of the Filedialog box from
where you select which file to import.
From the
Log file changes to a log file group,
you can select whether the changes that are made during the import must or
must not be logged to the log file, or whether the user should be prompted
at runtime.
From the
Import included suppressed fields
group, you can select whether you would like to import fields that are
present in the log file, but that have been suppressed (in the
global
extension
template), or not, or prompt the user at runtime.
The Replicate
Synchronize Control Template (obsolete)
The
ProcessWindowControls Control Template replaces this template, this is
merely documented for existing users who are unable to upgrade at this
time.
This control template provides a button which will enable you to
synchronize the data of the current site with another specified site. This
is normally done on the Browse Sites window so that you can select a site
with which to synchronize. This means that if a file corrupts or loses
data (in some way) then you can simply issue a synchronize from the parent
site.
An example:
You have 3 sites: D000, D100 and D200, where D000 is the parent site, and
D100 and D200 have site ranges of D100-D1ZZ and D200-D2ZZ respectively. In
the D000 LogManager, you select the record ThisSite = D000, RelatingSite =
D100 and click the Synchronize button. The LogManager at D000 will create
a full data set for the site range D100-D1ZZ and send this to D100
together with a request for the complete data from D100. At the next
ProcessLogFiles (at D100), the full data set will be imported in (Note:
this is not an insert - but a full update, so all the corresponding values
will be changed to match whatever is at the D000 site). Then the
LogManager at D100 will create a complete data set and send that to D000
to be imported by the LogManager at D000 at the next ProcessLogFiles. Thus
after the synchronization, the data will be exactly the same at both sites
(in the site range D100 - D1ZZ). This will not affect the data in the
range D200-D2ZZ at the site D000 though. If the data at D100 is more
accurate than that at D000, then the synchronization should be issued from
D100 rather than D000. In this case, at the D100 Logmanager, select the
record ThisSite = D100 and RelatingSite = D000 and click the Synchronize
button.
To populate this template, open the Window formatter (for the window that
you want the button on), select the
Control Template
item from the
Populate menu.
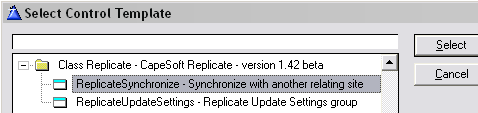
Select the Replicate - Synchronize template from the
Select
Control Template window and click the
Select
button. Place the button where desired and then right-click the button and
select
Actions from the popup menu that
appears.
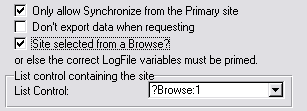
Check the
Only allow Synchronize from the Primary Site
checkbox if you would like to only allow users to issue a synchronize
request from the Primary site. This is quite critical, because the site
that issues the synchronize is assumed to have the most valid data set.
Thus the data exported from this site will overwrite the site's data to
where the synchronize is issued.
The
Don't export data when requesting checkbox
is checked to indicate that when a sync is issued, you want to just get
the data from the relating site and not send the data from this site to
that site first as well. If left unchecked, then this site (i.e. the site
that requested the sync) will first send it's data to the synced site and
then import the data sent from the requested site.
If the Site is to be selected from a Browse, then check the
Site
selected from a Browse? checkbox and pick the Browse control from
the List control drop list. Otherwise fill in the variable containing the
site to synchronize with in the entry control provided.
Note: The default is to use a Browse
control to select the Site to Sync to. The Browse control may not be
auto-populated (in the List Control) which will result in compile errors.
Some caveats using this sync method:
1. Even after a sync it is possible that the two sites are not completely
synchronized:
Site A exports all it's data record by record -- writes each to an entry
in the .log.
Site B imports this complete data logfile and overwrites it's data that
exists with what it imports from Site A.
Site B exports all it's data record by record -- writes each to an entry
in the .log.
Site A imports this complete data logfile and overwrites it's data that
exists with what it imports from Site A.
The problem with this is that if you have the following scenario:
UniqueKey (Site, AutoNum) and GUID are unique:
Record1: Site=B000, AutoNum = 1 and GUID = 576
Record2: Site=B000, AutoNum = 2 and GUID = 578
and in the import:
Site=B000, AutoNum = 1 and GUID = 578
Site=B000, AutoNum = 2 and GUID = 576
Note that the GUIDs are switched for the 2
records in the import.
The import will fail on both records, because of the unique key causing a
duplicate on import - in which case the 2 datasets will remain
inconsistent for these 2 records - make sense? In this case, the only way
to ensure that the 2 sites are in sync are to make one site the master,
and actually delete the records of the one site and import the full
dataset from the other site which has the master set. This is very tricky
in a situation where both sites are changing the data. If the situation is
where the primary site is like a data bank, then this is possible.
The Replicate
CRCCheck ControlTemplate (obsolete)
The
ProcessWindowControls Control Template replaces this template, this
is merely documented for existing users who are unable to upgrade at this
time.
Note: You must first add WinEvent to your
LogManager before you will be able to use this feature.
This Control Template allows you to do a CRC check and automatically
synchronize those records that are different between the two checked
databases. The CRCCheck control will basically generate a CRC file
consisting of a CRC for each record in each table (for the relating site)
at the site where the request for CRC synchronization is issued. This CRC
generated file will be sent to the relating LogManager, which creates a
CRCCheckQ - comparing the CRCs received from the requesting site with it's
own. The site will then request the differences from the requesting site,
and post records that are found in it's own database, but not in the
requesting site's database. The requesting site will then import the new
records received from the relating site, and post those records that
differ to the relating site, for the relating site to import. There may be
duplicate errors when importing these records, so in order to cater for
this, you need to select a master site in the LogManager (which can either
be the parent site or the child site).
You should populate this control template on your ReplicationControlWindow
window (the BrowseSites window). Some more detail on the options for this
template:
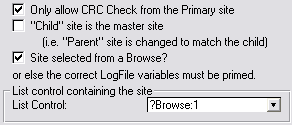
- The Only allow CRC Check from the Primary site
checkbox lets you restrict the requesting site to the Primary site.
- The "Child" site is the master site
checkbox let's you dictate which data must preside in the event of a
duplication clash. If you check this checkbox, then if there are
duplicates, the child's data will preside, and conversely if you leave
it unchecked the parent site will preside.
- The Site selected from a Browse? checkbox
is useful if this control is added to the Replication Control Manager.
- The List Control let's you select the
list that you will use to select the site to do the CRC comparison
with.
The Variable Name is the field name
containing the Site to do the CRC comparison with (if the Site is not
selected from a Browse).
License & Copyright
This template is copyright © 2002-2013 by CapeSoft
Software. None of the included files may be distributed, except the
zlib.dll, which you may distribute with your application. Your programs
which use Replicate can be distributed without any Replicate royalties.
This product is provided as-is. Use it entirely at your own risk. Use of
this product implies your acceptance of this, along with the recognition
of copyright stated above. In no way will CapeSoft Software, their
employees or affiliates be liable in any way for any damages or business
losses you may incur as a direct or indirect result of using this product.
Source Program
We have chosen to ship Replicate as source code,
rather than as a compiled DLL. This makes it much easier for you to
modify, but it also makes it much easier for you to pirate. We ask you to
please consider the effort involved in writing this product, before you
choose to hand it on to any other developers.
If you received this program illegally (i.e. if you didn't pay for it, or
you didn't buy it from CapeSoft, ClarionShop, or one of their respective
dealers) then we ask you to contact us so that we can remedy this
situation. Without the revenue generated from products such as this, it is
impossible for us to create new products.
This next bit is optional - and is included for the benefit of programmers
wishing to inspect, or alter, the Replicate object.
Replicate was written with the aid of Object Writer - a freeware template
available from
https://www.capesoft.com/accessories/owsp.htm.
You will require this template if you wish to open the included
Replicate.App file. The Replicate.App file has been written in Clarion
5.5. If you work with the Replicate.App then make sure the Object Writer
Global extension is set to point to your Clarion 5 installation.
Please
Note: Generating the Replicate.App will overwrite your existing
Replicate.clw and Replicate.inc files (in your \Clarion5\3rdParty\LibSrc
directory).
We welcome any suggestions from users regarding new features that might be
added to Replicate.
Support
| CapeSoft Support |
| Email |
 |
| Telephone |
087 828 0123
+27 87 828 0123 |
Installation
Run the supplied installation file.
What the Users are saying about
Replicate
Jim Halpin (in an email - 6 November 2003)
... Replicate ranks right up there with fm2. both templates allow me to
implement functionality that i could never deliver on my own (at least,
not without spending a decade or so). ... they help me create apps that
amaze me!
on top of the great templates at reasonable prices, the technical
assistance is first rate, as you have demonstrated in the last week.
thanks, and keep up the good work.
Steve Lord (in an email - 15 March 2004)
WOW! Nice product!
Marien van Vliet (in an email - 22 April 2004)
It is working GREAT!!!!!!!!!!!!!!!!!!!!!!!!!!!!!
It is fantastic....
Version History
Download latest version
here
Version 2.66 Gold: Released July 29, 2021
- Fix: Typo in pragma call.
Version 2.65 Gold: Released June 30, 2021
- Add: Pragma call to ThisRep call to set init priority to 4, to make
sure this object is constructed early, before it is needed.
Version 2.64
Gold: Released June 22, 2021
- Add: Support for VLDS / Declare file declarations in modules
support.
- Refactor: BestKey routine into BestKey method, used by CheckGuidKey
method.
Version 2.63 Gold: Released May 25, 2021
- Add: Clarion 11.1 to install.
Version 2.62
Gold: Released September 18, 2018
- Add: Clarion 11 to install.
Version 2.61 Gold:
Released September 15, 2017
- Template Support for NetTalk 10 class changes.
- Template Support for NetTalk 8 class changes
Version 2.60 Gold:
Released September 15, 2017
- Template Support for NetTalk 10 class changes (first iteration).
- Rebuild examples to NetTalk 8 (and up) compliance.
- Remove old C55 conditionally compiled code.
- Added check for fileerrorcode 23505 (PostgreSQL) for duplicate
constraint violation.
Version 2.59
Gold: Released February 25, 2015
- Installer is Clarion 10 aware.
- Removed unnecessary calls to %cwversion.
Version 2.58 Gold:
Released April 10, 2014
- Includes Clarion 8 compatible txas and dctx for creating a new
logmanager.
Version 2.57 Gold:
Released February 10, 2014
- Fix for Secwin protected applications (where a licence restricts the
use of the logging functionality).
- Clarion 9.1 supported install
Version 2.56 Gold:
Released June 28, 2013
- Fix for Clarion 8 MultiProj applications. Includes source files
(replicate.clw and cszlib.clw) for compile, and includes the DOS and
zlib.lib files.
- Fix for logfile generation: There was a very small possibility that
<EndOfFile> could end up as EndOfFile> in some circumstances
(as per another fix in 2.54).
Version 2.55 Gold:
Released May 2, 2013
- Fix for SelfService applications - only set the object name in the
EXE.
- New method RegisterAllCallBacks - can be used to register or
deregister all filecallbacks (for bulk operations like backup or
restore, or fileupgrading).
- _wait and _release - internal methods for critical section calls
(allows embed code to change the critical section used.
- Clarion 9 support.
Version 2.54 Gold:
Released August 9, 2011
- Fix for 16385 size logfiles (was chopping off the last char in a
16385 logfile).
Version 2.53 Gold:
Released July 13, 2011
- Support for FM3 4.92 (FM3Upgrading and FM3SettingVar threaded, so
moved to the ThisRep class - from the global unthreaded class).
- Assert (debug mode) if no GUIDKey is found on a table.
Version 2.52 Gold:
Released January 26, 2011
- Fix regression in 2.51 - %ABCGlobalsDefinedExternal was not always
defined.
Version 2.51 Gold:
Released January 11, 2011
- Support for Clarion 7.3 projection.
- Don't project cwutil.clw if exported externally.
- Support for INSERT in the ReplicateFileChange code template.
- Replicate_CreateSite control template supports a specific ini file
directory default.
- Replicate_CreateSite control template places non-standard incoming
directory in the child site ini for direct rep sites.
- Template - use %ReplicateObject instead of ThisRep for all instances
of referring to the Replicate class.
Version 2.50 Gold:
Released August 25, 2010
- Debug to logfile for service apps (LogManagers). Also logs errors in
copying.
- SelfService tpl support - automatically codes 'DebugToFile' when LM
is running as a service.
- SelfService tpl support - CheckDirectory does not perform directory
check if a UNC path is tested. Leave for the copy to fail, so that
error handling can be reported.
- Added embed points to the procedure routines in the
ControlCenterServer template.
- Documented LM support in a Service (see
here)
Version 2.49 Gold:
Released August 19, 2010
- Tpl work around for C7.2 - Was not projecting the correct dos driver
always, so use C70dos%X%%L% for both local and stand-alone compiles.
- Added name attribute to the Encrypt class procedures and methods
(resolve clash with NetTalk in C7.2 in local-mode)
- New method - Lock - handles locking of files with appropriate error
handling.
- Tpl change - ReplicateControlCenterServer control template has a tpl
switch to disable code generation.
- Work around for C7 not supporting routines declared in a local class
procedure.
Version 2.48 Gold:
Released April 27, 2010
- Tpl fix - Was not restoring TimeBetweenTransactions between
sessions.
Version 2.47 Gold:
Released January 18, 2010
Key Features: Rollback call addedin
FunctionDone method. GetGUID method changed to only include alphanumeric
chars, and $ char. Fix for Clarion7.1.
- Object change - call to self.rollback added in the functiondone
method. Derived template code to rollback changes.
- GetGuid method changed - only uses alphanumeric chars (upper and
lower case) and $. Java compatible - and strings don't have to be
binary in SQL backends.
- AddToLog - default number of tries changed from 10 to 20 (Template
change allows you to change this at the template level)
- PrimeSiteField - duplicate external method name removed from the one
method (causing error in C7.1 compiler)
- MySQL support - verify connection before writing change support. If
a connection times out, then the connection must be re-opened before
writing.
- Default time between process times - tpl can allow user to override
time (and save overriden time or not).
Version 2.46 Gold:
Released June 11, 2009
Key Features: Memory leak fix, use Site Alias
file for Replicate methods in the LogManager.
- Template option and class implementation to cater for a working
REGET in the MSSQL callback (was not working up until 9057).
- Template can use an alias file for the sitefile (in the LogManager
to prevent the browse from getting confused).
- Fix - AutoProcessLogFiles calls close for the sitefile when done
processing.
- Template Tweak - LogManager Controller template (for your
application) - allows handcoded call to start the Logmanager
- Fix - includes the cwutil.inc file if it's not already included.
Older versions of C6 included this automatically.
- Template change - remove superfluous SiteFileField prompts in the
template.
- Class change - DeRegisterByID called by the DeRegister and Kill
methods. Duplicate code, was not completely duplicated, causing a
memory leak.
- Class change - incorrect syntax when verifying if a file was extant
in the archive directory (when using the archive function, and
recalling an archived file).
Version 2.45Gold: Released November 26, 2008
- Fix template regression in 2.44
Version 2.44 Gold: Released November 26, 2008
- Tweaks for Clarion 7: includes the cwutil and various lib files
required.
Version 2.43 Gold: Released November 10, 2008
- Clarion 7 compatible install.
Version 2.42 Gold: Released October 23, 2008
- zLib Class Change - prefix variables and filenames with zLib: - make
the names unique.
- Class change - free internal queues - reduce pointers (to internal
queues and handle variables)
- Class change - omit the '/' char from GUID generation (this is the
escape key in SQL).
- Class change - Checkdirectory supports cstring or string (depending
on the field used in the dct) - was taking an any handle. Suspected
memory leak.
- Template Fix - support for Clarion7
- Template change - FTP windows use the Replicate object setting (not
another template setting).
- Template change - remove the 'Do Send and Receive together' option.
Obsolete.
Version 2.41 Gold: Released February 7, 2008
- Class Fix - GPF in criticalsection - was disposing while another
thread was in a wait. CriticalSection is changed from pointer to a
class, removing the need for new and dispose.
Version 2.40 Gold: Released January 22, 2008
- Template Fix - FTP - if timeout on a quit/connection close - then
the FTP window was not closing.
Version 2.39 Gold: Released August 31, 2007
- GetGUID method changed - only generates GUIDs with printable
characters in the field. This is a workaround for the Clarion browse
duplicates issue - but saves helps by removing the requirement for SQL
GUIDs to be binary (so they can be char fields).
- Handles MSSQL duplicate errors (i.e. errorcode 90) correctly.
- New class property - methodname, which (if set) will log into the
logfile from which method the logfile entry was made.
- Template Fix - check for RepGLO:Site is no longer case sensitive.
- Template Fix - when Replicate was adding files (from relationships
to replicatable tables) - the RepSuppress was not being checked for.
- Template Fix for FTP - remove old temp files (from mysite) when
uploading (from old failed uploads).
- Template Fix - Add FilePrefix to browse variable. Removes ambiguity.
- Template Fix - don't assert on arrays that are over a
non-dimensioned field (replicate does not support arrays - but arrays
over another field are fine).
Version 2.38 Gold: Released February 27, 2007
- Fix - memory leak (when inserting a record into logfiles, the
created string was not always disposed)
- Fix - requesting records in a CRC check was limited to 64KB of
requests. Allow request file to be built up until RC check is
finished, and then sent.
Version 2.37 Gold: Released February 5, 2007
- Fix - memory leak
- Template Change - template created loc variables are generated with
RepLoc prefix (instead of Loc).
Version 2.36 Gold: Released January 25, 2007
- Fix regression in 2.35 - trying to include a Secwin4 include file.
Version 2.35 Gold: Released January 24, 2007
- Fix - new LogManagers did not have %LogSite template variable in
history (only for those creating an LM without the TemplateUtility).
- Fix - Some Multi-DLL settings.
- Template change - if SiteFile defaults weren't set (when Replicate
was added before adding the SiteFile to the dictionary) - then
SiteFile settings will be added to the application.
- Template change - set ProcessThread variable in AfterWindowOpening
and clear in AfterWindowClosing embed points.
- Template change - disable Export Site button if CRC and Sync
controls are disabled at the child as well.
- New template to generate include file for table declarations (used
in an external DLL to generate an include to be used for Replicate
support in an external DLL).
- Fix - CRC check - was only requesting the first few hundred
different records.
- Class change - allow command line setting of Number of tries
(inserting into logfile).
Version 2.34 Gold: Released September 11, 2006
- Added a property to enable the procedurename to be logged with the
log entry in the logfile.
Version 2.33 Gold: Released August 17, 2006
- In some legacy apps, %FirstFileDone template variable was not being
declared in time.
Version 2.32 Gold: Released July 26, 2006
- Improved documentation for Calculated values.
- Implemented StampVersion into default clw (to show what version
Replicate is compiled with)
Version 2.31 Gold: Released July 25, 2006
- Fix - for CStrings - was not stamping in file when only a space
added to the end of a CString.
Version 2.30 Gold: Released July 24, 2006
Upgrading from 2.03 or before? Check out the
Upgrade note in FAQ U10
Version 2.22 beta: Released July 18, 2006
- Added a parameter to the IgnoreField method to indicate what action
the Replicate class is performing on the table.
Version 2.21 beta: Released July 11, 2006
- Regression in 2.19 - was not storing Memo history variables, so memo
values were being written into logfiles, even if no change occurred.
Version 2.20 beta: Released July 11, 2006
- Fix for CSTRINGs - was clipping them instead of using the length
(this meant that trailing spaces were chopped off).
Version 2.19 beta: Released July 4, 2006
- Improved documentation for Calculated Totals in application
- Improved examples (included a Calculated Totals, as well as the
LogManager Controlled from the application).
- New Property in the tables q - LastRecordStr and StoreMemos and
RestoreMemos methods added.
- StoreBuffer is no longer called immediately prior to the record
deletion in logfile import.
- StoreMemos,RestoreMemos and LastRecordStr are used in the duplicate
checking rather than StoreBuffer and RestoreBuffer - this means that
the original values before the import are preserved for use after the
file action (for handling totals, etc.).
Version 2.18 beta: Released June 26, 2006
- Fix - Regression in 2.15 - if deriving a method, SetFamily was not
called in OpenFile correctly to determine ABC or legacy application
(in Clarion6.0 applications).
Version 2.17 beta: Released June 22, 2006
- Fix - Regression in 2.15 for applications where the SiteFile is
suppressed (from Replication) - a GPF occured.
- If a file is not registered, and Replicate tries to open it - was
GPFing in ABC applications. Now displays a warning (if warning
messages are enabled). Using an old version could exhibit this type of
behaviour (where a file is used in the logfile, but is not registered
in the LogManager).
Version 2.16 beta: Released June 21, 2006
- Fix - for archiving feature. The Replicate enabled application
checks the archive directory for subsequent logfiles before creating
them.
- StoreBuffer
method takes 3 parameters (allowing you to perform some action
prior to the change being imported into the database).
Version 2.15 beta: Released June 20, 2006
- Common equate used for maximum number of support fields in a file
(uses MaxNoOfFields - currently set to 512).
- CRC File check fix - in some cases was including suppressed fields
in a CRC check.
- Optimized File CRC check - uses array to determine fields suppressed
(instead of looping through a queue each time)
- Fix - was trying to include c55util.inc in Clarion6.0 applications.
- Template File Q - was not allowing sortable table order. Changed to
numbered template q.
- Fix - when using the tables list as the list to replicate, was
populating the tables twice.
- Fix - If WinEvent is not added to the LogManager Controller, then
don't use the ds_HideWindow function.
- Fix - external graphics copy (where using a global variable for the
path) - the embed point was in the incorrect place (regression from an
earlier version of Replicate 1.62) - was checking for existence before
the variable was set.
Version 2.14 beta: Released June 14, 2006
- Tweak to support increased fields in version 2.13.
Version 2.13 beta: Released June 12, 2006
- Increased max number of fields in a single table that Replicate
supports from 255 to 512.
Version 2.12 beta: Released May 24, 2006
Version 2.11 beta: Released May 18, 2006
- Template fix - for LogManager that uses the Data DLL of the
application. If Compression and\or Encryption was turned off, then the
LogManager was not importing the log files.
- Template and class change - callback de-activated in the LogManager
(except for the SiteFile where it is required to be replicated) as no
file changes need to be detected (all changes to the logfiles are
written directly to the logfile when a logfile is imported). If you
have other routines in the LogManager, then you need to check the
Force All file logging in the LogManager (on the Advanced tab of the
Replicate global extension template of your LogManager). This makes
for a huge speed increase in importing and exporting logfiles.
- Class change - CRC import optimized - GUID field is uppered (when
generating into the CRC file output) - which means that when searching
for the GUID field, it is no need to upper the FileString when
searching for the end tag.
- Class change - don't CRC an alias file.
- Class change - length of string variable used in FileCRC in order to
minimize the use of Clip when comparing strings.
- Class change - in CompareCRC, if the SiteID stamp is missing from
the logfile, then use the CRClogfile name (first 4 chars).
- Template and property change - property to ignore the abort received
from the ControlCenterServer (IOW - if you want to be able to turn
this control on\off at runtime for specific sites).
Version 2.10 beta: Released April 5, 2006
- Template fix - was setting BLOB size to 0 when adding a record to a
file that was not autonumbered by the dictionary (i.e. on SQL
backends).
- Template change - removed tahoma font setting on the template
prompts (for legibility on non-ClearType machines).
Version 2.09 beta: Released January 25, 2006
- Object Fix (GetGUID) - regression introduced in 2.04 - was possible
to have duplicate GUIDs.
Version 2.08 beta: Released January 20, 2006
- Template Fix for Clarion63 (was linking in the incorrect file driver
c63dosx.lib instead of c60dosx.lib).
Version 2.07 beta: Released December 22, 2005
- FileCrypt - file encryption moved to the encrypt class.
- EncryptString, DecryptString methods deprecated.
- Template change - Tables to Log (In Data Tables tab) - checks for
duplicate entries, as well as disabling Sitefile entry and tables with
the RepSuppress UserOption added in the dictionary.
- Template change - Re-populate list with all files allows easy
complete list population (of the dictionary tables).
- Template change - the order of the Tables to Log list is the order
that the tables are exported to the logfile (when a fullexport is
executed).
- Template change - if exclusive file access for manual import is
selected, then flush after each table is imported (instead of a flush
at the end).
Version 2.06 beta: Released December 9, 2005
- Fix - also use Stream and Flush in legacy applications when
requiring exclusive access for database tables when performing a
manual logfile import.
Version 2.05 beta: Released December 5, 2005
- Fix - regression introduced in 2.04 - flush removed from insert
method could cause unsequential entries into the logfile.
- Fix - when using Email (and not FTP) - was not entering the email
address correctly into the respective field in the sitefile in the
AutoCreateChild routine.
Version 2.04 beta: Released December 2, 2005
- Optimized some of the procedures (AUTO on LocParameters in the
Filecallback methods, pass string from Import to ProcessLine so that
we can use implicit string array instead of clip for importing, extra
lower string created in ProcessLine, so that we don't have to keep
lowering the passed string)
- GetGUID method changed to support OEM collated files (OEM converts
strings to ANSI, so the GUID fields were being converted, and
incorrect entries were appearing in the logfiles). The GetGUID method
now only uses OEM neutral characters to ensure no corruptions.
- Change exclusive access to stream and flush (rather than logout and
commit) when manually importing (much quicker). OpenFile method
changed to receive a parameter as to whether shared access or
exclusive file access is required.
- LogDataSize is changed to 16382 (from 4096).
- ProcessWindowControls template fixed (where controls that aren't
required are deleted - don't reference these controls in the template
generated code)
Version 2.03 beta: Released November 21, 2005
- cszlib Fix - clears the error flag at the start of compression and
uncompression (in case of previous error occurance).
- Change - Export to new child can be suppressed (from being logged).
First import file is changed to xxxxdatf.log (was xxxxdata.log like a
normal complete export). Set in AutoCreateChild control template.
- New method - ProcessLogFiles (handles the complete process
instruction that used to be template generated code).
- Fix for dimensioned fields within a dimensioned group.
- Fix - MakeMissingLogFiles for legacy (was using ABC code in certain
cases).
- Template change - ProcessLogFiles, Export, Import, CRC Check and
Sync control templates have been merged into one template The
ProcessWindowControls Control Template and will be superannuated
in the gold release.
- Utility template structure changed - 2 new utility templates to
facilitate importing of peripheral windows (as apposed to the entire
LogManager).
- Template fix - was using ThisRep and ThisRepGlobal in some code
(instead of the template variable)
Version 2.02 beta: Released October 21, 2005
- Fix - When Replicate is inactive GPFing on a second call to a thread
(exposed by the inited property moving to the global class in 1.99).
Version 2.01 beta: Released October 20, 2005
- Feature - Supports LogManager control from a menu in your
application (new extension template LogManager Control from
Application which you can add to a procedure). This makes it easy to
abort, pause and start auto-processing from your application. Check
out the new examples in the
clarionx\3rdparty\examples\Replicate\ControlLMWithAPP.
- Fix - if not close on Abort in processing, then reset the AbortNow
property when processing is aborted.
- Fix LogManager - if Processing, then don't close down until abort is
finished.
- Feature LogManager - if required, the LogManager closes when
app/controller closes.
Version 2.00 beta: Released October 18, 2005
- Feature - Supports abort
in processing (new property in global settings class).
- Changes as a result: Don't save filename if aborted (and returned
blank filename), CopyIn takes an option parameter - deleteafter
copying, only if import is successful, otherwise (if aborted) the file
is left in in the incoming directory, to be imported next time.
ProcessLogFiles code template change - allow LogManager to be closed
after processing when abort is received in mid-process. On abort,
progress is saved where the logfile is aborted at, so that import
begins at the correct place next time.
- Fix - legacy template caused accepted embed on some buttons to be
removed.
- Feature - New debug properties that you can set at runtime (also new
control template to set these properties). Makes debugging much
simpler.
- Optimization - only enter FileCallback methods for the opCodes that
we're interested in (otherwise bail out immediately).
- Change - Allow incrementing/decrementing of flags in
SetGlobalSetting method (use '+' and '-').
- New control template - Local LogManager Controller controls (control
the LogManager externally - making process abort seamless). New
template utility to create this external application.
- ControlCenterClient template redesigned to be on the Frame (although
still backward compatible) - allows control of the processing from a
different thread.
- New Global class property - 'Processing' set and cleared before and
after processing (to indicate to other threads whether the LM is
processing.
- ControlCenterServer - abort, show and hide controls added.
- ControlCenter (Client and Server) - allow option not to save session
to an INI file (i.e. use fixed values).
- Control Templates (ControlCenter) - allow deletion of controls (if
not required) - template code gets omitted for controls that are
deleted.
- ControlCenterServer template connect button rtn fixed - was
disabling Process and GetStatus buttons as well.
Version 1.99 beta: Released October 5, 2005
- Fixed regression in 1.92 which was a workaround to cater for the
FileCallback bug in Clarion6 - which introduced problem with hanging
in Clarion6 (because of thread locking). FileCallback moved back to
the threadedclass, and the necessary properties are moved from the
threaded class to arrays (one for each thread) in the GlobalClass.
Properties affected (at this stage) are inited, inside, logoff, and
TempOpened. New property - ThisThread to store the thread of the
current class. This means that no critical section is required in the
FunctionCallback - which eliminates the hanging. C55 coding is
affected, but not operation stays as normal.
- Fixed - if replicate is disabled (for GUID generation only) - then
inside property was not being reset after the active property test in
the filecallback - causing no GUID generation.
- Template Fix - populate template files q immediately before
registering files - affects where relating files are suppressed (or
IMDD tables).
- Template Fix - %RtnParameter routine caters for functions.
- Change - yield() in CloseLogFile routine (in open method).
- Fix - if derived code in FileChange method makes changes to a table,
then upon returning, self.q's buffer is refreshed to contain the
original file changed.
- New - omit specific records from Replicate - ignorefield is included
into GUID testing, enabling a record (based on a GUID) to be ignored.
Version 1.98 beta: Released August 30, 2005
- Fixed regression in 1.96 - was causing Clarion IDE GPF when going to
global embeds - WinEvent build variable will be moved to system
variable (so that test does not cause GPF).
- Fix - returning ANYs was not a good idea as the memory was not being
freed - LogManager (in particular) - was eating more and more memory.
Created strings returned and disposed (using the _StringHandle
property) at the calling procedure. Methods affected: Insert,
PrimeString, Export, SearchAndReplace. Note: If you are calling these
methods in handcode, then you need to dispose the returned string
- Fix - ANYs cleared before returned (to free up memory).
- Change - GetGlobalSetting returns a string (rather than an ANY) - in
order to prevent memory leakage.
- Fix regression in 1.96 - no break out of loop when file is missing
and not created.
- Change - Status of Error message 30 downgraded to warning (rather
than critical) - because mechanisms in place to create missing
logfiles.
Version 1.97 beta: Released August 17, 2005
- Fixed regression in 1.96 - was asserting in Site-related tables,
even for non-Site distributed site-trees.
- Fixed error in CRC check where no records exist in a table at one
site (but are at another).
- Fixed error in Site-related data where number of records in a table
(at parent) shouldn't match number of records in a site's table.
Version 1.96 beta: Released August 16, 2005
NB: For those who've derived and handcoded the
IgnoreTables method,
you need to apply the changes to this method (using the pImporting
parameter).
What's Changed:
- Feature - runtime
setable directional suppression.
- Feature - optional automate
CRC check issued on missing logfile (requires WinEvent)
(previously was either synchronising or making a blank logfile).
- Fix - bestkey (site key) - searches for first unique key that has a
site-related component (as it's primary) before searching through
duplicate keys. Site-related tables must have at least one key
(preferably unique) with the Site field as the primary component - and
this key must be in the backend (FM3 can disable key generation in the
database, although it can exist on the app end).
- Fix - if LogManager a previous logfile is deleted/corrupted, and no
succeeding logfiles have been sent, then don't wait for request from
relating site (as none will be generated).
- You require WinEvent version 3.29 (at least) for new LogManager apps
that use WinEvent.
Details:
- Template code for CRC check with other site moved into a method.
- Class change - new OmitFileQ - stores a list of files to omit,
including direction.
- Methods changed - RegisterSuppressed
(includes a directional parameter, and allows fields to be omitted,
thereby pertaining to the whole table), IgnoreTable
(includes directional parameter), MakeMissingLogFiles
(includes a site parameter that requested the missing logfiles).
- New method - DoCRCWithSite.
Replaces superannuated template generated code.
- IgnoreTable is also called from the Export method. IgnoreTable
method cycles through the OmitFileQ to see whether the file is
disabled from importing or exporting.
- Fix - deRegister does not dispose the file q, also deregisters the
callback for the deregistered file.
- Added yields into those windows that were yield free.
Version 1.95 beta: Released August 8, 2005
What's Changed:
- Fixed - Receiving a PauseTimer/StartTimer from the
ControlCenterServer, posts an event to PauseTimer control instead of
just changing the state of the variable.
- Fixed - Clears arrays before importing - regression caused previous
values to be continued to a next entry (where those values were
clear).
Version 1.94 beta: Released July 22, 2005
What's Changed:
- Fixed - ReceiveFTPControls does not was Replicate vars in the
template (in order to support external use). Allows window to be
hidden.
- Fixed - %SendFTPSilent unknown variable error in ReceiveFTPControls
control template.
- Feature - Added progress bar to SendFTPControls template
- Workaround for %RepDefaultTransportList
error.
- Feature - template assert generated when SendFTP or ReceiveFTP
procedure parameters are incorrect.
Version 1.93 beta: Released July 13, 2005
What's Changed:
- Fixed a bug in the encryption routine.
Version 1.92 beta: Released July 12, 2005
Note: For Clarion55 users - you will see an error
message the first time you open your LogManager:
Unknown Variable: '%RepDefaultTransportList'
Please don't be concerned about this - basically in C55 a #prepare
(where this variable is declared) is only run after
the variable is assigned for template use.
What's Changed:
- Interface (to Function callback class) moved to global class (for
Clarion6). This is because the methods are always called on thread 1.
- Receive and Send FTP control templates are not dependent on the
existence of Replicate (genericized). Uses Replicate properties if
Replicate is in existence.
- Only call Quit from SendFTP or ReceiveFTP if the connection was
opened - otherwise just close the window.
- Improved CreateSite control template - Adapts Global Template
settings to display selective controls on the window and force
settings where necessary. Also expanded to allow Oneway Replicate
selection.
Details:
- If no files to transfer, then generate error message (if required).
- New method (in GlobalClass: EquateLocalClass) to assigned the
GlobalClass's pointer to the correct local class.
- FunctionDone and FunctionCalled locked - EquateLocalClass is called
immediately after the lock.
Version 1.91 beta: Released June 23, 2005
What's Changed:
- Fixes Auto-Create missing logfiles (if no archiving is used).
- CreateChild
control template supports Replicate Direction Selection and
template selected Site Data Range Selection.
Details:
- Fix MoveFiles method - When moving files out, first check if exists,
before StampEOF and attempting to copyout.
- Fix GetFromArchive method - parent call changed to return 1 (error
getting from archive). If no archiving, then error is generated.
(Template generated code returns 0 when successful before calling the
parent method)
- Fix RestoreBackup method was expecting a 1 if GetFromArchive was
successful - should have been expecting 0 for success.
- Change - MakeMissingLogFiles makes all missing logfiles, even if the
'Full Export to first missing logfile' is unchecked.
- TPL Change - support for DontSendFiles flag addition to the MSG
file.
- TPL fix - DontSendFiles was not sending CRC check message files to
relating sites.
- Change ConnectionDetails method - allows a flag to determine if the
new site's DontSendFiles flag must be set or not.
Version 1.90 beta: Released June 16, 2005
What's Changed:
- Fix for Control Center Client\Server - implements poling to ensure
the communication line is sustained between client and server.
Version 1.89 beta: Released June 15, 2005
What's Changed:
- New Feature - CRC database comparison and limited synchronisation
(addition of WinEvent and the CRC
Check control template required in your LogManager).
Details:
- Template fix - LoadFileToString returns -1 if error loading a file
to a string.
- Template fix - CRCCheck stipulates if site range is used (call to
FileCRC method).
- Class Fix - Import method sets siteID correctly if not automatic
import (i.e. data or datc import).
- Class Fix - RestoreBuffer in HandlePotentialDuplicates whether
duplicate found or not.
- New Method - GUIDFieldToString takes a GUID value and converts to a
string.
- Class Fix - FileCRC - don't apply site limit if SiteLow is set, but
SiteHi is; Clear RxCRC and FoundThere flags if not in requesting
database.
- LoadCRCStringToQ - clear FoundHere and OurCRC flags when importing
CRC request file.
- CompareCRCFile - free CRCCheckQ after comparing; open and close data
files where necessary.
Version 1.88 beta: Released June 9, 2005
- Template fix - move setting of cszLib.silent property to where it's
set in each thread (instead of once).
- cszLib (v1.14) fix - for when attempting to get a record that is
held.
- Default SendEmail and ReceiveEmail procedures (in the Global
Extension template)
- Template fix for Clarion 6.2 (an ABC class property is made private)
- Template fix for IMDD file (where IMDD is written back to the file).
Logging is disabled.
- New methods (csLog): RestoreBuffer, PrimeString ; (csLogManager):
StringToFile, FileCRC, RestoreGUID, AssignQueue, DisposeQueues,
CompareCRCFile, LoadCRCStringToQ, LoadFileToString, ImportDataSet,
ImportCRCDataSet. These methods are all in place to support complete
CRC database comparison (future feature - which requires WinEvent).
- Template fix where NoOfFilesRequested is not used (causing a compile
error).
- Template change - force FTP to make directory.
- Template change - SendFTP and ReceiveFTP source procedures have been
moved to control templates.
- Template fix - If AllowFTP is unchecked, then when auto-creating a
direct child site, the directory was not filled into the respective
field in the SiteFile.
- MoveFilesIn method change - Cater for receiving CRC files and Data
generated from CRC request files.
- Import method change - Cycle in import loop (for a specific site) if
EndOfFile on the last file imported - otherwise break out.
- ProcessLine method change - cater for CRC datafile clash (with
existing file) - duplicates should be deleted at the slave site - so
that imported records will be added correctly.
- RestoreGUID functionality moved to a method (for re-usability
purposes).
- PrimeLog method superannuated (although still supported for backward
compatibility) with the PrimeString method.
- GUIDFieldToText - allow an extratag to be added into the GUID field
tag.
- Requisition method - primary tag rectified when not Inform (where
pInform parameter not omitted).
- ReceiveRequest method - modified to cater for CRC request file.
- Open method - parameter added to force a new file creation.
Version 1.87 beta: Released April 20, 2005
- Template change - a template option to generate GUIDs only (i.e.
make Replicate inactive).
- New method - CriticalErrorInImport - allows you to programmatically
override critical errors in order to continue importing should an
error be non-critical.
Version 1.86 beta: Released April 15, 2005
- Template change - use TryUpdate instead of update (v1.85 did not
replace all instances of Updatein the template).
Version 1.85 beta: Released April 14, 2005
- Template fix - variable syntax error in ControlCenterServer.
- Template change - use TryUpdate instead of update.
Version 1.84 beta: Released April 13, 2005
- Fix - cater for CRC pos when partially importing files (last pos
included the CRC)
- Fix - abort import if critical file error occurs when applying
logfile changes (last successful write pos is saved and logfile
currently being imported is left in the incoming dir). ProcessLine
method requires a progress variable, which it updates.
- Template Change - use TryOpen for files - also reset openmode if
file open fails (bug in ABC code).
- Template Change - extra embed point in ControlCenterServer process
code to handle customized commands.
- Fix - locking in commit (if committed and logfile EOF stamped, then
new logfile was 'unlocked' and old file was left locked)
- Fix - check GlobalSettings pointer is still set before checking
active property, otherwise a GPF will incur if the kill method is
called twice.
- Fix - Set logpath to an absolute path if the path is relative (when
logfilepath is set) - this means that changing the path at runtime
won't effect a relative logfilepath setting.
- ControlCenter Client - sends Replicate version and Date and Time of
last and next process logfiles.
Version 1.82 beta: Released April 6, 2005
- If compression fails - and this is an outgoing logfile, then remove
the logfile from the outgoing\Site directory (otherwise the
uncompressed logfile is sent).
- cszLib change - if open fails, then return an error. If file
created, but not opened, then delete the file and return error.
- cszLib Change - if ErrorLogFile name property set, then log errors
to the specified error file (the silent property must be set in order
to do this).
Version 1.81 beta: Released March 31, 2005
- cszLib Improvement - retries open, close and create if initial
error.
- Fix ControlCenterServer template utility.
- Fix ControlCenterClient template reference to browse's queue.
- If NetTalk is disabled on the BrowseSites window or Replicate is
disabled globally, then don't generate code for the
ControlCenterClient.
- If an unknown Site connects - display and allow control over that
site (for new sites).
Version 1.80 beta: Released March 30, 2005
Version 1.79 beta: Released March 24, 2005
- Template Fix - Optional Replication - support for legacy
applications.
- Template Fix - compile error when using the AutoCreateChild site in
a Non-FTP application.
Version 1.78 beta: Released March 23, 2005
- Template Fix - Multi-DLL (for optional Replication) - allow setup in
template.
- Template Fix - LogManager template where LogManager uses the DataDLL
(was not initializing).
- Template Fix - LogManager was not setting RepGLO:Site for optional
Replication in a Multi-DLL setup.
- Template Fix - set Silent property (in cszLib class) when Warnings
are suppressed in the template (this will suppress warnings in the
zLib class as well).
Version 1.77 beta: Released March 18, 2005
- Feature - template to make optional Replicate activation simpler and
easier (using Secwin).
Version 1.76 beta: Released March 14, 2005
- Fix - when SetGlobalSettings is called, if the global class pointer
is not set, then set it (was causing GPF if class pointer wasn't set).
Version 1.75 beta: Released February 16, 2005
What's Changed:
- Fix - when writing to a logfile that is not open (exporting - leads
to an error 63).
Details:
- In Open method - only reset self.opened if close(file) is
successful. Retry if close fails.
- In Close method - only stamp EOF if file is open.
- New method - Insert to handle a generic insert to a logfile.
- Fix - If Commit is issued when the logfile is closed, then initial
write fails.
Version 1.74 beta: Released February 14, 2005
What's Changed:
- Removed use of CSTRINGs (causing spurious errors) where not
completely necessary.
- Fixed template error when using Status without the Status counters.
Version 1.73 beta: Released February 8, 2005
What's Changed:
- Fixed erroneous template variable.
Version 1.72 beta: Released February 2, 2005
What's Changed:
- Work-around for ASCII logfile viewer in example applications (bug in
Clarion template was causing GPF) and txas.
- New method - GetGlobalSetting:
a thread safe method for getting a global setting.
Version 1.71 beta: Released February 2, 2005
What's Changed:
- Fixed legacy GPF in Clarion6 applications.
- Install moves old examples to
clarionx\3rdparty\examples\ReplicateOldEgs to avoid confusion with the
new example structure.
Version 1.70 beta: Released January 31, 2005
What's Changed:
- Updated docs to reveal property changes and steps to change these
properties.
Version 1.69 beta: Released January 27, 2005
What's Changed:
- Fix for Multiple EOF stamps at the end of a file (regression in
1.65)
- Fix for empty logfiles stamped (regression in 1.65).
- GlobalSettings class introduced into Clarion5.5 applications.
Properties restructured (this will create some compile errors
initially as some properties have changed from the threaded class to
the Global class).
Details:
- RepGloClass changed to GlobalSettings class. Some properties that
were global in the threaded class, are moved to the GlobalSettings
class. Some global properties that will not change have a copied
property in the Threaded class. This means that you can access these
variables without locking the thread. The properties are copied in the
Init method.
- Clarion5.5 also uses the GlobalSettings class (although both classes
are unthreaded). This means that upgrading from C5.5 to C6 will
require no changes (with regard to Replicate).
- New method (SetGlobalSetting) - used to set a global property. This
makes the setting of GlobalSettings thread safe (in c6).
- CRC option removed - logfiles will always be stamped with a CRC.
NoCheckEOFEveryTime removed as well - always check when writing to the
logfile.
- CriticalSection object created (newed in Init if null).
- Fix - StampEOF was comparing to old empty logfile size, instead of
XMl header as well. This means that blank logfiles are used.
- Fix - CheckEOF was checking the wrong file in some situations.
- Fix - CheckEOF was returning an invalid data if no file was found
(rather return 0).
- Properties Affected: Moved from Threaded to Global Class (can be
changed using the SetGlobalSetting method): TranslationFile,
LogFileName, Silent, SuppressWarnings, SuppressCritical, active.
Properties with copied to the Global Class (these are only set once at
runtime): Machine, SiteFieldID, LogFilePath, Site, ParentSite,
LogExtension, SettingsFile. Properties removed from the threaded class
(obsolete): NoCheckEOFEveryTime, MakeXMLFiles, SettingEOF, StampCRC.
Version 1.68 beta: Released January 25, 2005
What's Changed:
- Full data export defaulted to 0 - creates problems for big sites
where logfiles have been skipped.
- SiteSync - clears NoOfFilesRequested and LastLogFileNoRequested
counter when a sync is issued for that site.
- Checks relating site's Outgoing Directory exists before doing an
AutoExport.
- Resets flag if there is an error closing the logfile (i.e. not open,
etc) - unless in the middle of logout and can't close the file.
Version 1.67 beta: Released January 21, 2005
What's Changed:
- You need to import the new LogManager routines (preferably create a
new LogManager, or else do a partial import of the Replicate windows).
Details:
- Template - new compile flags for FTP: Exists, Overridable,
ShowSettings; and StatusFlag existant.
- Template - correct embed point for hiding controls in SiteSettings
control template.
- New template utilities (x2) - supercedes the previous template
utilities (x6).
- New control template - AutoCreateChild site. This control template
supercedes the old coded routine.
Version 1.66 beta: Released January 14, 2005
What's Changed:
- Fix - Moved LogFileNumber and LogFileDate priming into Configure
method (was only checking in Open).
- StampEOF - if a 0 date is passed, then don't stamp EOF.
- Feature - handles file changes from sites with an old version. (Use
the FM3 oldname attribute when changing a fieldname in order to
utilize this feature).
Details:
- New method (ImportFullDataSet) to handle full data import.
- Changed TagReceived method to receive a long handle - the where ID
in the record structure of the file. Caters for oldname setting in the
template.
Version 1.65 beta: Released January 12, 2005
What's Changed:
- Status of relating logmanagers (and counter to indicate the amount
of times logfiles are requested from each relating site).
- Before moving requesting logfiles out, check to make sure that they
have an EOF stamp on. Fix to prevent an infinite loop between two
logmanagers (waiting for a complete logfile).
- Includes version 2.07 of BDE.
Details:
- Closefile method takes a debug parameter (to show from where it was
called)
- Template change - generate code for setting status stuff in
SetStatusFlag derived method.
- Fix - use a created loc variable in GetArchive - because pathname
required in decompression.
- New property - AutoMakeIfMissing. If Status flag is not used, then
just make the logfiles if they are missing when requested.
- If StatusFlag is used, then returnstatus(2) if a requested logfile
is not found.
- If a relating site's status is 2, then keep requesting them to make
a logfile until we get the logfile.
- In derived SetNextNumber, reset Status flag to 0 of relating site.
- New methods: SetStatusFlag and ReturnStatus.
- Obsolete code templates deleted: ReplicateFileRequest and
ReplicateSendRequest.
- In MoveFilesIn - set status flag if a file is missed.
- Fix - StampEOF was calling open with the RepLogFileName and not the
generic name of the file that should be opened.
- Fix - CheckEOF was using the logfile, but should have been using
it's own definition if the logfile required to check is not the
logfile.
- ReceiveRequest method handles StatusFlagChange and MakeLogFile
requests.
- GetFromArchive (parent) - should have been returning 0.
Version 1.64 beta: Released January 6, 2005
What's Changed:
- Automatic logfile reconstruction. If a logfile goes missing, this
resulted in Replicate falling over - now resurrects itself.
- Fixed - could miss a StampEOF in certain circumstances.
- Fixed - if error adding to the logfile, then try call open() - to
handle EOF stamp, etc.
- Fixed - made StampEOF generic - which means that StampEOF does not
use the logfile structure to stamp an EOF.
- Fixed occasional error when importing changes to a locked file.
Details:
- New methods - generic open (to open and stamp logfiles), stampEOF
(stamp end of file into logfiles), CheckEOF (check end of file stamp
in logfiles).
- New methods - GetLogFileHeader (returns the header for a logfile),
GetLogFileFooter (returns the footer to be stamped at the end of a
logfile) and MakeMissingLogFiles (makes any logfiles that are
missing).
- AddToLog method changed - made generic to log to any file.
- GetFromArchive changed - can no longer create blank logfiles.
- Object change - put message when logfile cannot be found for export
into a warning section.
- Object Change (GetSetting and AddSetting) - forces '\' onto dirs if
they are not present.
- Object Change (Commit) - if error when adding, then call the open
method.
- Object Change - made logfile properties (number, date and time)
- Object Change - in ReceiveRequest - was closing the logfile, but
this is not required as we are not using the logfile.
- Upgraded Clarion5.5 versions to include the Global Settings object.
Version 1.63 beta: Released December 22, 2004
What's Changed:
- Important Fix - fixed sporadic logfile skipping.
- New feature - Status setting in LogManager to determine status of
relating LogManagers.
- New Feature - auto-create a blank or complete logfile, if a logfile
is missing.
- Important Fix - sometimes site was not being processed to.
- Important Fix - allow Message files to be sent through to a relating
child site.
Details:
- Object Change - made LogFile variables into global unthreaded class
for Clarion6.
- Object Change (Insert) - removed logfilenumber increment.
- Object Change (MoveFilesIn) - Status flag change
- Object and TPL Change - Openfile debug in openfile method.
- Object Change ( MoveFilesOut) - returns 0 when no error occurred,
otherwise a status.
- Object Change (ReceiveRequest) - statusflagchange and makelogfile -
new request functions.
- Object Change (GetFromArchive) - if Creating file, then create in
the logpath and leave it there.
- New methods - SetStatusFlag and ReturnStatus.
- Template Change - set whether to export entire data to logfile, or
create a blank logfile.
- Template Change (AutoProcessFiles) - use pointer to ensure Site
record is correct.
Version 1.62 beta: Released December 10, 2004
- Template Change - checks external file exists before attempting file
copy (and logfile instructions).
Version 1.61 beta: Released December 1, 2004
- Fixed Error in MoveFilesIn method. Was only requesting files from
one site (if logfiles required from two or more sites).
Version 1.60 beta: Released November 23, 2004
- Fixed template error when inverting SuppressedFile list - GUID
generation for Replicate files.
Version 1.59 beta: Released November 19, 2004
- Fixed import error (where GUID contains commas in the Site portion).
Version 1.58 beta: Released November 12, 2004
- Fixed template bug (Destination should have been pDestination).
Version 1.57 beta: Released November 11, 2004
- Export History Variables.
Version 1.56 beta: Released November 9, 2004
- New LogManager txa's (mod look and better default settings).
- New equate set if LogManager in SilentMode.
- New method - IgnoreTable,
which is called at the start of importing. This method can be derived
to prevent a table from being imported under certain circumstances.
Version 1.55 beta: Released November 8, 2004
- Fix for Multi-Proj support - Add zlib.lib link to Multi-Proj lib
project.
- TPL fix - LogPath initialised in new site (if not stored in INI
file). Caused initial logfile to be stored in application directory
(if setting not stored in INI file).
- Improved GetSetting template generated code. First insert - all
default settings extracted from INI file. INI file settings are only
used as defaults, and ignored after SiteFile insertion.
- New method AddExtraTag - which is called in Primelog before entry
end tags are added.
- In Memory Driver tables automatically suppressed.
- Default option to do away with settable Incoming directory.
- New LogManager txa's.
- SiteSetupWizard window control template optional FTP obsolete. Also
you need to force the optional Incoming directory if you require a
non-standard incoming directory.
Version 1.54 beta: Released October 29, 2004
- Fixed to use SiteSetupWizard when logfiles are stored in a place
other than the INI Setting option.
- In a delete - the StoreBuffer is called in order to save the current
values into history during import.
- RepMessage 63 - more informative message.
- Fixed the imported LogManagers to compile correctly on startup.
- Includes BDE version 2.03.
Version 1.53 beta: Released October 19, 2004
- Moved template equate into System template variable (Clarion6.1
regression).
Version 1.52 beta: Released October 18, 2004
- Fixed missing #fix for SiteFile.
Version 1.51 beta: Released October 14, 2004
- Fixed missing template variable %LogSite (removed instances
referring to this).
Version 1.50 beta: Released October 14, 2004
- Fixed the use of the NoFTP so that the template ASSERT is correctly
called.
Version 1.49 beta: Released October 8, 2004
- This release sees a revamp in the implementation of FTP transport
which proved difficult and needed ironing out. Vastly simplified and
improved (check out the FAQs
for a couple of tips).
- NB: The arrival of the NoFTP field. If you use FTP, and don't
require FTP transport in all your sites, then you
need to check this field at the sites that are not requiring FTP
transport. (check out the FAQs
for a couple of tips).
- FTP / character is supported and endorsed, rather than the
traditional \. This is overridable if required.
- DontSendFiles field is supported at template level. You can add this
field to your SiteFile to prevent sites that must only receive
logfiles from sending them.
- The Project Define has been replaced by an equate. This means that
you need to remove the project define (it can't be done
automatically).
- New equates for conditional compiles (for the different transport
mechanisms). This makes your AutoCreateSite and SiteSetupWizard
windows more flexible.
Version 1.48 beta: Released July 20, 2004
- Multi-DLL setup in the Template improved. Also LogManager can use
the DataDLL correctly.
- cwutil.clw not projected in Clarion6.1 versions.
- ONCE attribute added to the various external files that are
included.
- Error Message(30) added filename into message.
Version 1.47 beta: Released July 12, 2004
- Use Sleep API command (instead of yield()) when there's a clash
writing to the logfile.
- StoreBuffer after a PUT (incase of multiple PUTs to the same
record).
- Correct stamping of CRC (for large logfiles where CRC stamp spans 2
logfile records)
- For Clarion6 (template) - allow Init method to initiate callback if
active is 0 - for GUID generation where replicate is not active.
- Allow ProcessLine method to be derived.
- Clarion6 - bypass Init in first construct - wait until Init is
called before Initing the threaded object in the construct.
Version 1.46 beta: Released May 25, 2004
What's Changed:
- Support for Clarion 6.1 (some template updates).
- The active property must be set before calling the init methods
(this only affects those who coded their Init
and Kill calls manually - This is very Important because no
Replication will take place if you do not set this property). This
makes it easy to make Replicate optional.
- Fixed the SiteFile open error if you were not replicating the
SiteFile.
Version 1.45 beta: Released April 30, 2004
What's Changed:
- Fix (CheckDirectory method) - Create directory for paths containing
Drive names.
Version 1.44 beta: Released April 30, 2004
What's Changed:
- New Feature - Fields pointing to external files can contain the path
to the original file (a setting in the Replicate Global Extension
Template - on the DataTables tab).
- Improved Array support - Decimal arrays functioning correctly.
- Loop AddToLog a few times and if there is an error that occurs, try
again.
Details:
- Template Fix - If OpenCloseOnce is used, then file is opened in the
Init method, and closed in the Kill method.
- Template Change - TagReceived Template generated code moved to it's
own embed point.
- Template Fix - if external fieldnames are used for the SiteFile,
then make sure that these are used when generating a ConnectionDetails
Message file when creating a new child site.
- Template Fix - Peek all fields at once (instead of individually).
- Class Change - removed the GUID label in Register method - who was
not working correctly (for non-externally named SiteFiles).
- Class Change - RegisterArray, PrimeLog and ProcessLine methods
changed (for Decimal Array handling). Also Arrays primed properly
before StoreBuffer (when Update is imported)
- Class Change - yield in AddToLog incase there is an error in adding
to the logfile - and try again.
Version 1.43 beta: Released March 19, 2004
What's Changed:
- Critical Fix - if Replicate Manager is in silent mode, then import
process was not working correctly
- Critical Fix - Replicate Manager was sometimes not detecting the
name of the GUID field (clarion oddity) - forced name of GUID field to
PRE:GUID, if external name is not present.
Details:
- Template Fix - if SilentMode switch turned on, turns the silent
property on.
- Template Change - passes the external or the actual name of the GUID
when registering the field.
- Class Update (New methods AddToLog,
OpenTempFile)
- use this method to write to the logfile, and the latter to open the
TempFile.
- Class Fix (Import method) - If illegal tag was written into the
file, then it got stuck in a loop.
- Class Fix (ProcessLine & ReceiveRequest) - if in silent mode,
then still load lnlen with the length of the bytes read.
- Class Fix (ProcessLine) - if GUID name is still old name, then
recognize this as the GUID field.
- Class Update (Commit method) - lock the logfile when writing the
entries from the tempfile into the logfile.
- Class Update (Export method) - sometimes set(GUIDKey) does not set
to the top of the file, this means that not all records are exported
to the logfile. Check method added to ensure that all records are
added in.
Version 1.42 beta: Released March 15, 2004
What's Changed:
- New Feature - synchronize 2 relating sites.
- Bug fix - don't not import other sites logfiles if we're waiting to
receive logfiles from a
Details:
- Class Change (MoveFilesIn) - cater for ASNC files (request for sync
file).
- Class Change (MoveFilesIn) - don't abort importing file for all
sites, only that which is missing a logfile. Keep importing for the
other sites.
- Class Change (ProcessLine) - carry over existing values in
suppressed fields (when performing an 'UpdateFull') - without clearing
(as was previously doing).
- Class Change (Export) - If synchronizing, then use UpdateFull rather
than Insert as the tag (this means that a complete update will be
performed as apposed to discarding the Insert if the record exists).
- Class Change (Requisition) - if ASNC file required, then use
SiteASNC as the filename. You can request all data.
- New method (AutoExport)
(also catered for in the template)
- New control template to facilitate the use of the Synchronize
feature.
Version 1.41 beta: Released March 10, 2004
What's Changed:
- Critical Class Fix - Auto-rectification of corrupt logfile counter
(bug introduced in version1.33)
Version 1.40 beta: Released March 10, 2004
What's Changed:
- Critical Class Fix - Incorrect site stamping of empty logfiles cause
a subsequent import of the same named logfile to be erroneous.
- New feature - allows suppression of files as a user option in the
dictionary (RepSuppress). This means you don't have to create a
suppress table in each of your applications.
Version 1.39 beta: Released March 4, 2004
What's Changed:
NB: If you are using FTP, then you need to
re-import the SendFTP and ReceiveFTP methods. These have better error
recovery (or else make the necessary changes shown in FAQ
U.4.
- Fix - Attempt to export LogFile not yet created, was causing
continual error in LogManager.
- Fix - Handles import of 0 bytes files (was skipping 0 bytes files -
causing data loss (this was happening on some FTP servers))
- Fix - requisition for first file was causing the file not to be
sent.
- Fix - Avoid records written after the EOF in a logfile (occurring
occasionally when a stamp occurs between a check and a write)
Details:
- Class Fix (Import method) - exits with error if file imported 0
bytes.
- Class Fix (MoveFilesOut method) - Always checks logfile existence
before sending.
- Class change (Export method) - exports in GUIDKey order (instead of
record order). Makes comparing 2 databases easy.
- Class Fix (ProcessMovedFiles method) - cut extension out when
processing request from another site.
- Template Change - allows inversion of suppressed table list (so if
only a few tables must be replicated, you can use the list to list the
tables that must be replicated)
- Template Fix - When using the One FTP Site method, don't place a '\'
at the beginning of the FTPDir, when the FTPDir is blank.
- Template Fix (GetNextNumber code generation) - added check for
LogNumber + 1 incase, someone else stamps the EOF as we're about to
write to the logfile.
- Template Fix - calls SetProcedureName instead of
SetProcedureName('') - deletes the procedure name from the queue
instead of writing a blank entry.
- Template Fix - changed name of FTP group in the Control template -
prevents compile error when disabling FTP. You need to delete and
re-add the control template to get rid of the compile error.
Version 1.38 beta: Released February 13, 2004
What's Changed:
- Fix - when importing a file that contains throwaway records, memory
was not being flushed (until complete logfile was imported).
Version 1.37 beta: Released February 13, 2004
What's Changed:
- Fixed missing char in line (causing occasional infinite loop in
import routine).
- Fixed importing of file changes where GUIDs have external names.
- New Feature - Archive logfiles.
Details:
- New methods (PutToArchive and BulkArchive) - Moves files to the
archive directory (derived method uses zLib to compress files).
- Renamed method (GetOldFile - GetFromArchive) - gets (and
decompresses) archived files.
- Template and Class Change - If LastLogFileNumber is 0, then search
the LogPath for the last file, before assigning a number to the first
logfile (protection against restarting from scratch).
- Class Change - GetLastFileNumber, GetFileNumber, HexToLong and
GetFileDate methods all moved into the csLog class (to cater for the
logfile search in the logpath).
- New method (SortFileQ) - sorts the queue from a directory command
into Replicate file order.
- Class Fix (Import method) - if one char is returned, don't kiss it
good bye.
- Class Fix (ProcessLine method) - compare GUID with actual name of
the field (not the assumed name)
- Class Change (MoveFilesOut) - adjusted to handle the new archiving
routine (i.e. looks in the archive if it's not in the logpath).
Version 1.36 beta: Released February 9, 2004
What's Changed:
- Fixed critical bug in import (introduced with method split in
version 1.33) (class change)
- Fixed Array and MEMO change detection when External names are used
for these fields (template change).
Version 1.35 beta: Released February 6, 2004
What's Changed:
- Improved handling of external files (like graphic files) - these are
exported with the data set.
- Fixed the array handling - eliminates erroneous values inserted into
blank arrays (where array types are numeric).
- Removed the template utilities to create a default logmanager
(import bug in clarion causing compile errors). You need to import the
txa manually to create the default logmanager.
Details:
- Object & Template Changed (Export method) - Can make Site
specific exports (for transport selection, etc) - and then send the
files out (in the Export code template
- Object & Template Changed (PrimeLog method) - to handle
exporting external files (pointed to in the data) as part of the data
set.
- Template Changed - only sets RepGLO:Site if not set already. This
means you can set to a temp value (if Replicate is inactive).
- Template Fix - correct LoadSitesProperties - if DontCreate Relating
site directory is unchecked, then create the dir.
- Template Fix - correct array clearing when array is not a string
type.
- Object Change (new PrimeSiteField method) - enables bulk priming of
site fields (where Non-Replicate site is upgraded to a Replicate
site).
- Class fix (RestoreBackup method) - fixed order files are restored
(after the 65535th file).
Version 1.34 beta: Released February 3, 2004
What's Changed:
- MsSQL work around - The REGET command does not pass through the
FileCallback. The entire record is passed (with an UpdateFull flag).
The best solution is to handcode a FETCH or GET command after the
REGET command, although this is not always possible.
- TPL generates XML friendly fieldnames into the log file.
Details:
- Class Change (FunctionDone) - Make Action UpdateFull if the History
GUID is <> CurrentGUID, and also if the FIleDriver is MsSQL.
- Template change - Change source generation of fields with the ':'
character to '_' - which makes this XML friendly.
- Template change - new utility templates to automatically import the
different flavours of LogManagers (making it easier to make your own
logmanager).
Version 1.33 beta: Released January 29, 2004
What's Changed:
- Support for FM2 (previously only FM3 supported)
- Fixed the RestoreBackup method (was hanging in some circumstances)
- Fixed the GlobalFTP settings (specifically where the directory -
self.site)
- Split the import method into 2 - import and Processline in
anticipation of the Online transport layer.
- New feature - allow de-registering of files.
Details:
- Template Fix - extended FM3 support to FM2
- Template Fix - compile error when using the csLogManager class
(instead of the csLogConnectionManager class).
- Template Fix - Using Global FTP Site - where the directory =
self.site (was clearing the FTP directory).
- Template Fix - export to a site (without site limitations) - was
enforcing site limitations.
- Class Change - Added parameter to the IgnoreField
method to allow value dependent checks for ignoring fields. Also added
functionality to ignore the entire record (instead of just the field).
- Class Change (new method DeRegister)
- allows deregistering of files at runtime.
- Class Change (new method ProcessLine)
- the Import method has been split into two methods.
- Class Change (import method) - don't use AppendQ. If append flag is
set, then append to all files.
- Class change (RestoreBackup method) - sort byName instead of
date/time. If date was less than required date, then it got stuck in a
continuous loop.
Version 1.32 beta: Released January 27, 2004
What's Changed:
- Template Fix: Prevents old FTP name (with Site directory name on the
end) from having an extra site directory added.
Version 1.31 beta: Released January 19, 2004
What's Changed:
- Support for ALIASes.
- Support for FM3 upgrading.
- Better implementation of optional Replication.
Details:
- Template changed - re-organised the global template, to place unused
items in the Advanced tab.
- Template changed - new list not dependent on #button - this was
causing the Template Variable list to sometimes not be populated, so
Embed points were being orphaned.
- Template changed - adds a project define, set to 1 if code must be
disabled (allows conditional omits around handcoded replicate calls).
- Template changed - template insertions labeled.
- Template and Object changed - supports FM3: when FM3 is upgrading,
then upgrade inserting are not logged, unless FM3 is auto numbering a
file.
- Template and Object changed - Clarion6 init stuff moved to the Init
method.
- Template Changed - removed all old SIT:InDir field references (now
obsolete).
- Template changed - does not omit ALIAS files from being registered.
- Object Change (Kill method) - don't Kill if it wasn't Inited.
- Object Change (GetGUID) - if no Site, then generate a random site
(this is for sites where replicate is not activated).
- Object Change - if active property is clear, then don't do the
configuration.
Version 1.30 beta: Released January 13, 2004
Important Note: If you used the IgnoreField
method, this has an extra parameter for Importing (to determine whether
you are ignoring the field exporting or importing). You may need to
include this in any if statements so that a field is not ignored if it
is required to be imported.
Important Note: If you are using Email or FTP for
transport, then you need to update your ReceiveFTP, SendFTP and
SendEmail procedures as set out in Question
3.20 of the FAQs, or run the Template Utility
(ImportReplicateEmailFTPabc or ImportReplicateEmailFTPLegacy) to import
the updated windows.
Important Note: If you hand coded a call to the
CopyOut method to export a file to a relating site, then you need to
call the method SendAllOutGoing as well - which will handle the
transportation of the file to the relating site (which the CopyOut
method no longer does).
What's Changed:
- Optional: SendFTP to include a temporary directory to upload
logfiles to and then move them to the proper one. This solves errors
while FTPing to the site (and the relating site Gets the file at the
same time).
- Restructured so that files are all processed into the specific
site's outgoing directory and then sent (in one go). Files are removed
from the directory in the Sending procedures (when the sending is
successful). If files are not sent, they will be sent the next time a
successful transport occurs. Basically the OutGoing directory has
become an outbox. Everything that is placed in there is sent to the
various sites (which have their own outboxes). Once a file has been
successfully sent, it is removed from the respective directory.
- New method of changing and setting settings using a wizard - the
SiteSetupWizard. This can be imported from the example applications or
using the Template Utility.
- You can set the SuppressWarnings in the Global Extension template,
which now also suppresses the warnings to create directories for
relating sites.
- FTP can be globally setup (if a single FTPsite is used for all
sites). This simplifies the site setup. If this option is selected,
then the default will be FTP, but can be overridden by specifying an
email address or Directory (or an alternative FTP server) if not
required.
- All settings stored in the SiteFile - except directory (logpath) and
site ID - which are stored in an INI file. This means that settings
are only stored in one place.
Details:
- Object Fix - If SuppressWarnings is set, then don't warn on request
for missing logfile.
- Object Change (new method - IgnoreField) - conditionally ignore a
field when priming the logfile (also can be used to override a GROUP,
Over field, that is ignored by default).
- Object Fix (MoveFilesOut method) - check that there is a file number
of the one we're wanting to move out (it may not have been created
yet).
- Object Change (RepMessage method) - add site to heading of messages.
- Object Fix (AddSetting method) - save and restore the current path
when selecting the replicate directory.
- Object change (ProcessLogFiles method) - use long filenames - don't
use fnsplit to work out directory names - and move External files out
as well (anything in the Outgoing dir will be copied/processed to the
relating sites outgoing directories).
- Object Fix (ProcessLogFiles method) - if problem opening the
TempFile to process to, then bail out (of processing that file).
- Object Change - SendFiles method has an optional options parameter.
- Object Change (GetOldFile) - change FileName string(255) to FileName
string(FileNameSize)
- Object CHange (IgnoreField method) - pImporting flag added to allow
for overriding of Groups and Overed fields if they are in the logfile
(must no be ignored during import).
- Object Change (HandleExtraFiles) - made obsolete
- New methods: UpdateFTPSettings, UpdateEmailSettings,
UpdateBasicSettings, handles the bulk update of specific settings.
- New methods: SendAllOutgoing - handles the sending of all files in a
relating site's outdirectory.
- New method: RemoveAllFiles - Removes files from a specified
directory
- Object Change (GetSetting method) - renamed pDontUpdate parameter to
pOptions.
- Template Change - SuppressWarnings checkbox on the global extension
sets the property (for ease)
- Template Change - Do away with ForceImport from first logfile
checkbox (obsolete).
- Template Change - Option to use SiteSetupWizard instead of the
default procedure
- Template Change - Setup a global FTP setting (instead of having to
setup each FTP site individually).
- Template Change - Test for LAN connection before sending removed -
obsolete.
- Template Change - allow you to use a tempfile for FTP uploading.
- Template Change - add the SiteFile to the UsedFiles template
variable list (in log apps) if it is not used in the application.
- Template Fix - corrected %RepGloDerivedClass typo in C6.
- Template Fix - place embed point in the PrimeLog and TagReceived
derived section so that the path can be set for each field (containing
external graphics).
- Template Change (derived AutoProcessLogFiles method) - call
SendAllOutgoing after processing all logfiles for a site - removed
call to HandleExtraFiles. Remove all files from the Outgoing directory
after processing.
- Template Change - transport priority order set: Direct, otherwise
Email, otherwise FTP.
- Template Change - GetSetting, UpdateSetting derived code changed to
handle storing all settings in the SiteFile (except directory).
Incoming dir only stored in the INIFile, other settings only stored in
the SiteFile.
- Template Change - transport calls removed from the derived Copyout
method.
- Template Change - delete obsolete options from the ProcessLogFiles
code template.
- Template Change - added 'Auto-Export' option to the FullExport
control template. This means that the logfile will be automatically
named correctly and sent to the respective site. If the site is
selected from a list box, then this can be used for the site requiring
the export.
- Template Change - new control template - for bulk updating settings
- ReplicateUpdateSettings. This is used on the SiteSetupWizard in the
example applications.
- Template Change - only call SendFTP if all FTP details (directory,
user, server, password) are present.
- Object Change (Setup method) - if Site range exists, check that
SiteLow <= Site and SiteHigh >= Site.
Version 1.29 beta: Released December 4, 2003
What's Changed:
- New feature: You can replicate external (graphics) files that are
pointed to in your data.
- New feature: You can use Replicate to manipulate data before it
writes to the file (and the logfile).
- New feature: You can include normally excluded fields (over fields,
Groups, etc.) if required.
- Fix: Don't force SiteHi if non-existent
Details:
- Template Change - only show translation file details when a
translation file is required.
- Template Change - Don't create directory if non-existent for Direct
sites option added (affects CopyOut derivation).
- Template Change - changed Skipped Files tab to DataTables - included
graphic files transport support (also writes extra stuff into the
logfile in the derived PrimeLog method and uses the TagReceived method
to handle the extra stuff).
- Template Fix - Only forces SiteHi if there is a value and the value
is less than Site (bug introduced in 1.27)
- Template and Object change - made GenerateCRC method virtual (so it
can be derived).
- Object Change (new method
IgnoreField)
- Object Change (new method ChangeFields)
- Object Change (new method HandleExtraFiles)
- Doc change - revamped An explanation of the Site File section.
Version 1.27 beta: Released November 27, 2003
What's Changed:
- New feature - CRC for logfiles (to ensure that logfiles are not
corrupted in transit) (if required).
- LogFile renamed to Rep_LogFile.
- New feature Restore from backup (see examples for implementation).
- Fixed bug when using a log path other than the current path when
first starting up (GPF and first logfile to wrong place)
- Logfiles in XML format (not strictly yet, as XML format requires
that ':' are not used in field names).
- Fixed bug where logfile was not being sent automatically in response
to a logfile request.
- Force SiteLo to be <= site and SiteHi to be >= site.
Details
- New method (GenerateCRC) - use to generate a CRC for logfiles
(template option in Global Extension template).
- Changed internal filenames to contain the subscript Rep_.
- Options changed to equates to make method calls more legible.
- All logfiles now in XML format.
- Close, Export methods call GenerateCRC when closing the logfile (and
after stamping the EOF).
- Fix (MoveFilesIn method) - delete data file from the incoming queue,
so that a normal import isn't attempted.
- Fix (Configure method) - gets the logpath before attempting the site
setting. (ensure that the first logfile is written to the correct
place - if the logpath isn't the current directory).
- Change (Import method) - displays the file currently being imported,
if small files, then get the whole file. Test CRC if present
- Change EOF stamp to End_of_File (XML friendly). Will still support
the old method.
- Fix - if the pointer is corrupt and is beyond the last tag of the
file, then it would not return a file done.
- Fix only copy out one file (MoveFilesOut).
- Change (AddSetting method) - allows to override updating the setting
(now that logpath is the first setting - you can only add it to the
file once the site has been set).
- Fix GetFileName and GetFileNumber to exclude MSG files.
- Fix - Growing MSG File (was not being removed after export)
- New method (RestoreBackup) - method to restore a site's own logfiles
from a specific date.
- New method (GetFileDate) - gets the date stamp of a log file.
- Template change - removed option to make logfiles in XML format.
- Template change - don't generate code into the AddSetting method.
This was duplicated.
- Template fix - MoveFilesOut called correctly in the AutoProcessFiles
method's generated code (for one file) - also fixed problem where
requested logfiles were not being moved out correctly (NEXT
misbehaving).
- Template Fix - if SiteHi is < Site, then reset to Site, and if
SiteLo > Site then reset to Site (UpdateSetting and GetSetting).
- Template Fix - if /NoAutoSiteAdd then must not add the site record
to the site file (UpdateSetting and GetSetting).
Version 1.25 beta: Released November 6, 2003
What's Changed:
- Support for much more logfiles (increased from 65535 to 2708160)
- Fixed GPF when receiving a Request file (caused by not closing the
file correctly).
- Critical: Fixed a compression error in the cszLib class
- Critical: Fixed a error when re-reading a logfile (when the
LastInSize is corrupt).
- One request file per Process logfiles (previously was being
overwritten, and so only one request was being issued).
- When one logfile is requested, only one is sent (previously sending
all subsequent logfiles)
- Critical: Fixed LastFileSize for XML files. This means that the
logfile is imported from the correct place (as apposed to having to
start from the beginning).
Details:
- Includes a new version of BDE - 1.55
- Includes a new version of the cszLib class - 1.11
- Object Change (Open Method) - supports up to 2708160 files (instead
of 65535)
- Object Change (Import & MoveFilesOut & LogToTemp &
StampeEOF Method) - calls GetFileNumber and GetFileName instead of
working filenames out
- Object Change (Requisition Method) - returns filename used
- Object Fix (Import Method) - starts a complete import of a logfile
when LastInFile Number is corrupt.
- Object Fix (Import Method) - when XML used, stores the size of the
file - XML formatter. This means that the LastInSize is at the correct
place in the file for the next import.
- Object Fix (MoveFilesOut Method) - Handle copying out errors
correctly.
- Object Change (ProcessMovedFiles Method) - handles whole queue
(instead of sorted - sorting not accurate with extended range of file
names).
- Object Change (ProcessMovedFiles Method) - handles OnlyOne file
correctly
- Object Change (GetFileName & GetFileNumber Methods) - allows up
to 2708160 files
- Object Fix (Requisition Method) - Creates MSGFile in the logpath
(instead of the OutGoingDir) this means that a request is not
overwritten by a superceding request (changed parameter to a string
for future commands).
- Object Fix (ReceiveRequest Method) - fixes GPF casued by not closing
the file during a receive request.
- Object & Template Change (LoadField Method) - returns the value
of the field before the change is implemented.
- Template Change - allows optional blank logfile creation (if logfile
is missing).
- Template Change (AutoProcessFiles) - OnlyOne operates correctly (if
1 file is requested, it only sends that one).
- Template Change (GetSetting & AddSetting & SetNextNumber
code) - use %LogFile instead of 'SiteFile'.
- Template Change - use LastOutFile (field of the site record) to
store the file last logfile copied out.
- Template Change - in copyout, if there is an error while compressing
files, then don't delete the file and abort exporting that file.
- Template Change - (ProcessLogFiles code template) clear the
MSGFilename property before doing the process. If it is not clear at
the end of the Process, then we know to delete the MSGFile. This means
that only one MessageFile is used per ProcessLogFiles. Warning to Handcoders: You need to include the
following code before your call to the AutoProcessLogFiles method:
clear(ThisRep.LastMSGFile) if clip(ThisRep.LastMSGFile)
<> ''
remove(ThisRep.LastMSGFile)
if ~errorcode() then clear(ThisRep.LastMSGFile) .
end
Version 1.24 beta: Released October 23, 2003
What's Changed:
- Support for tables defined in external DLLs (like Secwin)
- Directory fields in your site field are not limited to strings (may
be cstrings or another data type)
- Fixed Occasional uncompression error.
- Allows a variable in the encryption Key (previously required a
constant).
- Includes a new version of BDE - 1.54
Details
- Object Change: New properties: SuperPrefix (in the FileQ) to store
the unique SuperPrefix of a table of an external DLL, FileLabel and
FieldPosition (in the ArraysQ).
- Object Change: CheckDirectory - prototype changed to allow any
variable type to be passed to the function (containing the directory).
Also changes to current dir if Makedir fails.
- Object Change: Register and RegisterArray methods changed to cater
for the extra parameters required for External DLLs.
- Object Change - removed the lower in Lower(self.q.label), because
it's stored like that.
- Object Change - removed obsolete code to find the BestKey (in
register method).
- Object Change - Import and Export methods changed to include
SuperPrefix in the fieldnames.
- Object Change - PrimeLog method - if Array not found (using WHO),
then loop through array Queue, also caters for SuperPrefix where
necessary.
- Object Change - GUIDFieldToText - prototype changed so that length
parameter is optional.
- cszLib Object Fix (version 1.11) - was not checking uncompressed
size string correctly.
- Template Change - Changed FromSite to RelatingSite (makes more
sense).
- Template Change - Embed point added in AutoProcessLoop before
getting site's properties.
- Template Change - Use Quotes in encryption key to allow for a
variable to be used as the encryption key.
- Template Change - when opening a file, if file already open, don't
return an error.
- Template Change - embeds (in StoreBuffer method) added for storing
coded buffer.
Version 1.23 beta: Released August 8, 2003
What's Changed:
- Fix for the GPF when a site's dataset is exported (caused by the
existence of a dynamic index in the file).
- Fix for when a site's first logfile is not 1.
Details:
- Object Change - Changed compile flag from _c55_ to _VER_C55.
- Object Change (MoveFilesOut) - If a file is requested that does not
exist, then new method GetOldFile is called, which by default will
create a blank logfile to be sent to the relating site that is
requesting the logfile. In future this method will be used for
unarchiving logfiles when required.
- Object Change (Export method) - if no fields in a key/index (like a
dynamix index) then this key is not searched. This was causing a GPF
on dynamic indexes.
- Object Change (CheckDirectory method) - allows you to automatically
create directories without prompting the user.
- Object Change (GetOldFile) - new method.
- Template Fix - if SiteFile is suppressed then extra end was
included.
Version 1.22 beta: Released August 1, 2003
What's Changed:
- cszLib corrected. (Version 1.10 is shipped with Replicate). The
compression algorithm (in some occurrences) makes the string larger,
which was causing a file read error. Rectified error returning.
- If LogFilePath was not selected, then set to default (.\).
- Re-instated filename into the subject line (for email
transportation). This ensures that the largest file gets imported
(where multiple emails are received with the same logfile name
attachment).
Version 1.21 beta: Released July 18, 2003
What's Changed:
- Support for old SIT:InDir field was not correct. Updated to convert
SIT:InDir to SIT:DirectInDir correctly.
- In certain cases, zLib files were not being removed from the child's
outdir - fixed.
Details:
- Template Change - only auto-set SIT:DirectInDir (from SIT:InDir) if
blank.
- Template Change - do not require the SIT:InDir field (as the prompt
is disabled now that it is obsolete).
- Template Change - removed remove from the Sendfiles routine - into
the CopyOut routine.
- Template Change - save SIT:DirectInDir change.
- Template Change - (in CopyOut) - if DeleteAfter is set, then remove
old files from source and destination.
- Object Change (ProcessMovedFiles) - for no subset replication and
parent sites, copy the files to the sites' outgoing dir first before
issuing a CopyOut on those files.
Version 1.20 beta: Released July 15, 2003 What's
Changed:
- Mostly fixes for bugs introduced in beta 1.19. - especially the
deleteafter bug in the copyout method, and '\' checking in paths.
- Also a more robust transaction handling (in commits).
Details:
- Template Fix - ConnectionDetails (FTP and Email) code generation -
strings clipped when entered to the MessageFile.
- Template Fix - DeleteAfter in CopyOut - was not always deleting the
file after exporting.
- Template Fix - fixed generation of some methods names (incorrect
parameters).
- Object Change (Export method) - new file declaration for Export
method - has it's own logfile.
- Object fix (Open method) - LogFileName property not always set.
- Object Change (Insert method) - allows specification to new export
file.
- Object fix (Commit method) - open logic removed - handled in the
open method.
- Object Fix (ProcessMovedFiles method) - don't deleteafter in copyout
call - this prevents a file from being sent to subsequent relating
sites.
- Object Fix (CheckDirectory) - force '\' to be appended at the end of
the path
- Template Fix - ensures last character in path is '\' before
appending the filename to the end of the path.
- Object Change (CheckDirectory) - use API call instead of
CreateDirectory. Difference in C6 and C55 versions of the function.
Version 1.19 beta: Released July 11, 2003
What's Changed:
- The directory structure - only requires 1 directory (all
sub-directories will be managed by replicate within this directory) -
although the old existing directory structure option is still
supported. SIT:InDir becomes obsolete - SIT:DirectInDir will be used
for direct copying. Existing sites will
- Compatibility for non 8.3 directory names.
- Complete auto-child creation (together with starting point LogFile
and existing data export). This is shown in the examples: legcman.app
and abccman.app.
Details:
- Template Change - option to create unique outdir for each child is
removed. This is required.
- Template Change - SIT:DirectInDir is required. SIT:InDir is
obsolete.
- Template Change - Prevent GROUP ends being generated into the
LoadField derived method.
- Template Change - In ConnectionDetails - conditionally populate
range fields (only if range is required), Fixed entry of transport
details, added LastInNumber, so that logging can begin at the correct
logfile.
- Template Change - logfile is always generated into \outgoing\child
first before being transported (or copied to the child's incoming
directory). This prevents the zLib error when writing to and reading
from at the same time.
- Template Change - fixed get lastcopiedout from file (when setting
must be read from the file).
- Template Change - Removed file extension logic from CopyIn method
(must be passed with the correct destination file).
- Template Change - compress to outdir and then copy to Incoming
directory of the relating site (for direct replication).
- Class Change - MoveFileName changed to Cstring (to support fnsplit).
- Class fix - LogFileName property set in .Open method.
- Class change (Close method) - allows stamping of EOF into log file
on the close method.
- Class change - individual checking for '\' at the end of directories
removed - implemented into CheckDirectory.
- Class change - allow for xxxxdata.log file in import - which will
force a complete import of the file.
- Class fix - configured flag set in configure method (clarion 6
issue).
- Class change - bit flag in import method allows manual import to be
logged based on parameter passed.
- Class change (GetSetting) - make default incoming directory and
outgoing directories.
- Class change (RepMessage) - tidied up warning message text, force
error-level messages to be stops.
- Class fix (export method) - stamps EOF on file end after complete
data export.
- Class fix (ProcessMovedFiles) - use fnsplit to get the filename and
extension name.
- Class fix (HexToLong) - return 0 if not a hex number.
- Class fix (ReceiveRequest) - supports XML formatted files.
Version 1.18 beta: Released June 18, 2003
- Includes BDE version 1.51
- Object Change - New error level - Critical. This means that you can
suppress warnings and/or critical errors.
- Object Change - translatable window text.
- Object Change - all critical errors made translatable.
- Object Change (RepMessage method) - NoDisplay parameter added to
allow for simple translation file construction.
- Object Change (Requisition method) - allows request file to be used
as a information file.
- New method: GetTranslation - central place for obtaining the
translation of text.
- New method: GenerateTranslationFile - generates a complete
translation file so that all the required translatable text can be
translated.
- Template Change - all fields relating to FTP included.
- Template Change - allows translation to be setup in the template.
- Template Change - References to ThisRep changed to the object name
specified in the template.
- Template Change - removed duplicate embed point in SendFiles method.
- Object (& Template) Change - new methods: LoadField (for
populating the SiteFile properties) and ConnectionDetails (for
creating the Information file for adding a new site).
- Object Change - initialise RandomNo property to 0.
- Object Change - Set RepGloClass.Configured = 1 in configure method
(for C6 support).
Version 1.17 beta: Released June 5, 2003
- Includes BDE version 1.50
- Fixed examples for Clarion6 (legacy) compiling.
Version 1.0 beta 16: Released June 4, 2003
Note: Because of some necessary object changes,
some methods have been changed which affects Clarion5.5 users as well.
Please implement the changes required for your LogManager when upgrading
to beta16 in the FAQs.
- (Template and Object Change) Clarion6 compatibility - introduced new
unthreaded global object to contain global settings.
- Template Change - If Replicate is disabled, then Global Variables
aren't populated.
- Template Change - Global variables and Replicate main class changed
to threaded (if version is Clarion6)
- Template Change - if Replicate is disabled, then the DOS driver is
not added to the project (by replicate).
- Template Change - ThisRep placed in no-mans land removed from
template.
- Template Change - For an ABC Multi-DLL - ThisRep.Init and
ThisRep.Kill are placed in the DLL Init and the DLL Kill sections so
that it is only necessary to populate the DLL with the Replicate
Template.
- Template Change - Clarion 6 support: Object is activated and global
properties set in first Init call.
- Template Change - GetArray, Set Array, UpdateSettings, SendFiles and
AddSettings template generated code all moved to after the parent
call.
- Template Change - Clarion 6 support: Cannot make an over threaded,
and so peek and poke used to handle arrays (C5.5 still uses the over
variables).
- Template Change - RepGLO:Site is set in the derived Init method.
- Template Change - Use LoadSitesProperties in the AutoProcess derived
method (instead of duplicating the code), sets the Replicate class
properties with those pertaining to the relating site (found in the
site file).
- Template Change - in Clarion5.5, Setup method called.
- Template Change - SiteLow value included in the derived GetSetting
and Update Setting method. Also SiteHiDone and SiteLowDone returns 1
if not required.
- Template Change - When AddSetting is called, then the Site record is
changed in the SiteFile (for our settings).
- Template Change - for Class declarations, use PROCEDURE only
(instead of obsolete FUNCTION).
- Object Change (RegisterArray) - If the file is threaded, the Arrays
Queue stores this.
- New methods (Construct and Destruct) - for Clarion6, when a new
thread opens / closes, the Init / Kill method is called.
- New methods (SetArray and GetArray) - for Clarion6 to poke and peek
at the Array contents.
- Object Change (Configure method in the csLogManager changed to the
Setup method) - proper setup for SiteLow value (if required).
- Object Change (ConfigureEmail and ConfigureFTP changed to SetupEmail
and SetupFTP) - allows optional use of Email and FTP if compiled for
both.
- Object Change - ASCII Files used by the object declared as threaded
(in Clarion6)
- Object Change - refers to global unthreaded properties (in Clarion6)
were required.
- Object Change - LogFile determined when opened (rather than in the
configure method).
- Object Change - random number used to generate the GUID value is
stored as a property (and not a static)
- Object Change - If a LogManager method is called, first check if
SetupDone is set, otherwise do the Setup method.
- Object Change (Import Method) - for Clarion6: when importing
threaded Arrays call the SetArray method.
- Object Change (ProcessMovedFiles method) - remove old logfiles from
the export queue.
- Object fix (CheckDirectory method) - was not checking partial
directories with .. prefix correctly. Also uses clipped directory (was
not clipping previously).
- Object Change (FunctionDone method) - StoreBuffer called when a
record is added.
- Template Change - allows runtime disabling of FTP and/or Email
transportation
Version 1.0 beta 15: Released May 9, 2003
- Object Change - Defined Message/ Requestfile.
- Object Change (FunctionDone) - Set self.inside on either side of the
method code - prevents loopbacks.
- Object Change (Open, Import method) - New property
self.MakeXMLFiles. If set this will ensure that the logfiles are true
XML files. The old csLogManager class (beta 14b and earlier) does not
support this format, the new one supports both.
- Object Change (MoveFilesIn) - handle request files and send
requested logfiles.
- New Method () - Use this method to request files from a relating
site. Used by MoveFilesIn and Import methods.
- Object Change (MoveFilesIn) - removes successfully imported
logfiles, and request files.
- Object Change (Import Method) - Checks if logfile is in XML format
or not.
- Template & Object Change (CopyOut method) - allows deletion of
logfiles after copying out. This prevents excess logfiles hanging
around in the OutGoing directory.
- Object & Template Change - new object: csLogConnectionManager
(with ConfigureEmail, ConfigureFTP, Sendfiles and ReceiveFiles)
methods .
- Object Change - csLogEmailManager class removed. (ReceiveEmail,
SendEmail, SendRequestedFiles and Configure methods)
- Object Change (PrimeLog method) - don't write memos in when file
entry is deleted.
- Object Change (ProcessMovedFiles) - add '\' to directory before
checking the directory.
- Object Change (ProcessMovedFiles, StampEOF) - if XML Files are used,
then stamp the end of the logfile with the correct tag, before
sending.
- Object Change (GetFileName) - Fixed path insert into Filename.
- Object Change (CheckDirectory) - Supports part pathnames (like .\
and .., etc.). At runtime this is set (but not saved) to the correct
path.
- Template Change - Moved 'Make LogFile subsets' to global extension
template.
- Template Change - Allows logfiles to be in pure XML format.
- Template Change - 'Test for the local directory' has been moved to
the global template.
- Template Change - Support for FTP included in the template
(procedures and stored location).
- Template Change - If Replicate is disabled, then don't export the
functions (if in Multi-DLL mode)
- Template Change - improved method of determining ABC/Clarion
templates.
- Template & Object Change - new method AutoProcessFiles - the
processing routine is made into a method rather than from the code
template.
- Template & Object Change - LoadSitesProperties - gets the
connection details for a relating site.
- Template Change - removed old method of requesting files.
- Template Change - included FTP settings in the respective derived
methods.
- Template Fix - fixed returned value for OpenFiles and CloseFiles
derived method.
- Template Fix - Close SiteFile after GetNextNumber method.
- New Methods (CheckRequestFile, LoadSitesProperties, ReceiveRequest,
ReceiveRequest, Requisition).
- Template Change - ReplicateFileRequest and ReplicateSendRequest code
templates are obsolete and will generate a compile error to ensure
their removal.
- Template Change - New template utilities to add SendEmail,
ReceiveEmail, SendFTP and ReceiveFTP procedures to the LogManager.
- Includes new version of the Bulk Dictionary Editor: version 1.044.
Version 1.0 beta 14b: Released April 9, 2003
- Template Change - Call CheckDirectory instead of NewInDir
(redundant).
- Template Fix - Fixed Test for LAN directory when using the select
transport method on the fly feature.
- Object Update (CheckDirectory) - allows creation of Directories (not
just checking if the directory exists). Prompts for creation before
creating
- Object Change (Configure methods) - checks for Logging, Incoming and
Outgoing directories on startup.
- Object Change (ProcessMovedFiles) - checks and creates the Outgoing
(specific) directory for the related site before processing the
logfiles.
- New Method (SetPathTo) - used for decoding shortened path forms
(like '.', '..' , '.\' , etc). This means that you can have shortened
paths for your outgoing, incoming and logfile paths.
- Template Change - if no email address, don't try and email the
logfiles and/or request messages.
- Include SHRINK utility.
- Template Change - Flag introduced to prevent ProcessLogFiles code
template from running more than once simultaneously.
- Included Encrypt object files in the install.
Version 1.0 beta 14: Released April 8, 2003
- Object Update (GetFileName) - new parameter to specify site.
- New Feature - Optional encryption of logfiles before transporting
and decryption on reception (includes new
methods and template changes).
- Object Change (MoveFilesIn) - Files are tested before
decryption/uncompression/moving to see if they are valid for import.
Files not imported are left in the Incoming directory.
- Bug Fix (import method) - ActrionStr was too short, so EOF was not
being picked up at the end of an import.
- Object Change (Import method) - if logfile is not imported (because
of a previous one not being complete) then error is returned and
further logfiles are not attempted.
- Bug Fix (MoveFilesOut method) - LastCopiedOut counter was
incrementing too far, so another var is used in the loop, also it is
only incremented if the no error occurs while copying.
- Object Change (CopyIn method) - the name of the file is passed as a
handle instead of a string.
- Bug Fix (ProcessMovedFiles method) - checks for Len (sitefieldname)
instead of a constant.
- Template Change - LastOutFile used to store the Last logfile copied
out.
Version 1.0 beta 13: Released April 2, 2003
- Cleaned debugging up.
- Bug Fix (Import method) - Clear MEMOs before importing inserts and
UpdateFulls.
- Bug Fix (Import method) - Clear fld pointer after equating a MEMO
(so that it is not -1)
- Bug Fix (Import method) - Progress Indicator cleared at the
beginning of the import.
- Bug Fix (Import method) - TempString partially cleared as used - and
pointer moved accordingly, ensuring that at least size(Inf:Data) is
contained in the buffer (unless the file end is reached).
- New method GUIDFieldToText
- Object change (PrimeLog Method) - uses GUIDFieldToText instead of
the internal routine.
- Template fix - '\' not added to the InDir field. This is added to
the buffer in the object.
Version 1.0 beta 12: Released March 19, 2003
- New method in the csLog Class - CheckDirectory.
- New method in the csLogManager Class - TagReceived.
- Object fix (GetGUID) - Only set the GUID if it is blank. This is
essential for FM2/3 users. NOTE: This will
mean that you MUST clear the GUID field in Processes, add loops.
- Object change (Import) - string used to determine the action (rather
than flag)
- Object change (Import) - calls TagReceived if the Tag is not
recognised in the field and memo list.
- Template change (ProcessLogFiles Code TPL) - option to select
transport method on the fly (i.e. switch between direct and email). A
new variable is added to your local data (RepLoc_InDir).
- Includes the new BDE release (v1.034).
Version 1.0 beta 11a: Released March 6, 2003
- Includes the new BDE release (v1.033)
Version 1.0 beta 11: Released March 4, 2003
- Object Change (GetGUID method) - Resolved occasional duplicate GUID
generation.
- Examples - included an example showing transport using FTP.
- Template Change - included an embed to facilitate the use of a
different transport method.
- Included the new Bulk Dictionary Editor (Version 1.031).
- Template Change - Use GetGUID method when generating a GUID for a
suppressed file.
- Object Fix (Open method) - only opens required logfiles on startup
(eliminates time delays on startup of programs).
- Object Fix (Import method) - does correct compare with in
LogFilePath (resulted in extra \ occurring in the logfilepath).
- Object Fix (Import method) - If GetNextNumber returns a 0, set to 1.
Expect first file not 0th file.
- Object Change (MoveFilesOut method) - added parameter to specify the
number to start at (if files are required by a relating site).
- Object Fix (ProcessMovedFiles method) - test for upper of the
filename to be processed.
- New method (SendRequestedFiles) - used to send requested files to
another relating site when requested.
- Template Update - Allow Trapping of logfile receive error so that a
request can be posted (LogEmailManager only)
- Template Fix - generated GetNextNumber returns 1 if a GetNextNumber
on a new site is attempted, without adding the record to the sitefile.
- Two New code Templates to aid in the Requesting of logfiles and the
sending of requested logfiles.
- Object Change (Export Method) - fixed export routine, was exporting
fixed length data into the logfile.
Version 1.0 beta 10: Released February 12, 2003
- Object Change (Insert method) - track the size of the string, don't
use clip().
- Object Change (GetGUID method) - ensure that illegal (for SQL
engines) characters are non-existent (i.e. all generated numbers are
converted to bytes>127).
- Object Change (Import & PrimeLog & ProcessMovedFiles method)
- temp string change to an any so that there is no limit on the size
of the variable (loop if long field until entire field is loaded in
temp var).
- Object Change (Import method) - check for the EOF stamp if pointer
is the same as the filesize.
- Object & template change (SetMemo method) - accepts a pointer to
a undefined length strength, rather than a pointer to a string.
- Object Change (NewInDir method) - new parameter (path included or
not). Checks if self.OutGoingdir is not
clear before creating the new directory.
- Template Change - no call to SetProcedureName
- Template Change - rectified SetNextNumber number generation and site
insertion (generated in csLog based applications).
- Template Change - returns 0 if no LogNumber for this site.
- Object Change (configure method ) - calls open (if no LogNumber)
instead of SetNextNumber (which was looping and returning the correct
number in certain cases).
- Template Change - option to begin a new site's import from the
current logfile (instead of forcing an import from the first logfile).
- Template Change - Memos are clipped (if BINARY attribute is cleared)
when written to the logfile.
- Object Change (MoveFilesOut) - make sure range to copy out to is not
0.
- Object Change (Commit method) - make sure that logfile is not 0
before writing.
Version 1.0 beta 9: Released February 5, 2003
- IMPORTANT: If you are using a
EmailLogManager, you need to change your receive and send process (as
shown in the examples shipped with Replicate). This will ensure that
the LATEST logfile is written into the incoming directory, and is not
overwritten by earlier files sent with the same name.
- Object Change - Kill Method: Callback unregistered (plugs memory
leaks)
- Object & Template Change - GetNextNumber Method function
redetermined. Only used for getting (not writing) the next number.
SetNextNumber used solely for this purpose. Commit, Open and Configure
methods also affected by this change.
- Template Change - Fixed Site clearing if Site details obtained from
the SiteFile.
- Object Change - StampEOF: pathing rectified (filename comparison)
- Object Change - FunctionDone method cleaned up (excess vars
deleted). Resolved hanging (in ABC applications) and long delays in
Browses.
- Template Change - Fixed SiteLow implementation for exporting,
importing and processing calls.
Version 1.0 beta 8: Released February 3, 2003
- Object & template change - provides option for Append/Build
instead of ADD during manual importing.
- Object Change - progress window during log files processing.
- Object Change - <13,10> in tag search solved occasional import
lockup loop.
- Object Change - cstrings changed to strings in ProcessMovedFiles
method.
- Template Change - allows StampEOF in LogFile processing. This means
that each time the ProcessLogFiles transaction is called, a new log
file is started.
- Object Change - In GetNextNumber - implements CheckEOF to see if the
logfile has an EOF stamp before writing to it.
- Object & Template change - provides extra limitation for Site
Low range field (if the Site Low is a value other than the Site
value).
- Object Change - Fixed GUID null checker (possible duplicates with
the previous way of setting nulls)
- Object Change - increased size of data got from the log data files
(increase in speed).
- Template & Object Change - Compilable version for Clarion 6 - but will not work!!!!
- Object Change - Optimized import file routine for speed.
- Object Change - Callback methods exited if error. This resolves the
duplicates on insert bug (no error message and a record added).
- Object Change - If logfiles removed from the logpath, does not
recreate them.
- Object Change - Checks previous logfiles to ensure EOF stamp exists.
- Object Change - StampEOF - allows stamping of file that is not the
current LogFileNumber.
- Object Change - New method for creating the LogFile name - GetFileName.
- Object Change - Commit method changed. Updates TempLogFile to
correct logfile (if it changes).
Version 1.0 beta 7: Released December 18, 2002
- Object Change - reset LastFile pointer automatically if the pointer
is incorrect.
- Object Change - caters for LogFile inconsistencies (like swapping
between zipped and unzipped files).
- Template Change - allows get settings directly from the SiteFile.
- Template Fix - ignores arrays with the over attribute.
- Template Fix - puts code into GetSetting method when no Site global
field identifier is specified.
Version 1.0 beta 6: Released December 11, 2002
- Object Change - Registered table in original case (not lowered)
- Object Change - Carry date through from original change (when
importing)
- Object Change - Export window does not clip filenames and displays
in correct case.
- Object Fix - Correct handling of non-standard Site field names.
- Object Fix - Correctly importing of logfiles with HexToLong
conversion.
- Template Fix - Generates SendEmail code if Using mail and not
zipping files.
Version 1.0 beta 5a: Released December 9, 2002
- Install fix - install for beta 5 contained beta 4 files instead of
the beta 5 files.
Version 1.0 beta 5: Released December 3, 2002
- Object Change - New Property: NoLogging, which enables a temporary
disable of logging if necessary.
- Object Change - When importing File Changes, the original File
Change details is maintained (Time, Date, User and machine (where
applicable))
- Object Change - yield introduced into the Import and Export process.
- Object Fix - when doing a complete export, if there is an existing
file, the file is deleted before exporting.
- Object Fix - When doing a selective/specific export, the Site fields
are identified by the SiteFieldID property and not by ':Site'.
- Object Fix & Template Change - Moved the removing of logfiles to
the template.
- Template Fix - Only primes GUID for completely suppressed files
(outside the FileCallback method)
- Template Change - Provide option to send and receive together.
Version 1.0 beta 4: Released November 23, 2002
- Template Fix - Fixed file list compile (for EXEs)
- Template Change - Clarified some of the prompts
- Object Change - Moved ParentSite setting to csLog.Configure method
Version 1.0 beta 3: Released November 22, 2002
- Object Fix - Import Progress bar progresses.
- Object Change - Made a window to display the progress of an export
- Object Fix - if no SiteHi property, then import all entries (i.e.
with no Site limitation)
- Template Fix - Resolved Multi-DLL file declaration issues.
- Template Fix - Assigns External attribute to variables (in a
multi-DLL) correctly.
- Template Change - Auto-assigns a GlobalData field (that the Bulk
Dictionary Editor populates in your dictionary) to ThisRep.Site
variable for use in your program.
- Template Change (OpenReplicateFiles) - Allows you to only open the
files used.
Version 1.0 beta 2: Released November 20, 2002
- Doc Update - Correct detail in creating your own LogManager.
- Template Fix - Skipped Files set-able in Multi-DLL mode when this is
not the data DLL
- Template Fix - If OtherDir selected for the settings file, then
correctly coded path
- Object Change - added method to LogManager - FileChange which is
called when a file change occurs during an import.
- Template Change - if no siteHi field required, then not coded into
application (ProcessLogFiles template).
- New Code Template - aids in running a procedure when a file change
occurs.
- Object Change - ParentSite property moved to csLog class (for
purposes of Global Tables insert). Is now configured in the csLog
class as well.
Version 1.0 beta 1: Released November 14, 2002
- Template Change - This is the LogManager check box. Restrict
selections for csLog classed apps to what's necessary.
- Template Change - only uses the files used in this application. (You
need to check the 'Generate all file declarations' for other files)
Version 1.0 alpha 8: Released November 6, 2002
- Object Fix - Prevents infinite loop when no SiteHeader stamp in the
logfile.
- Object and Template Fix - Prevents infinite loop with nested
GetNextNumber method calls.
Version 1.0 alpha 7: Released November 5, 2002
- New Example - EmailManager in legacy.
- Object Fix - cleared before priming the ThisRep.q and the
ThisRep.Omitq (causing problems with NULL pointers in legacy)
Version 1.0 alpha 6: Released November 4, 2002
- Object Fix - getting stuck on the first log file (i.e. not importing
logfiles of number > 1)
- Template & Object Change - easy implementation of mirror
sites.
- Updated Examples - include display of necessary site setup
properties on the about windows.
- Object Update - if log files already exist (with EOF stamp) then log
to a new log file.
- Object Update - Warn if a new files arrive, with more than one
without an EOF stamp.
- NB: Object update - Started
RepMessage ID fields at 11 instead of 1.
Version 1.0 alpha 5: Released October 31, 2002
- Update the Add GUID Utility - does not add GUIDs and GUIDKeys to
files of drivers: ASCII, DOS, and BASIC. Add GUID Utility renamed to
BDE - Bulk Dictionary Editor. Changed interface to a wizard.
Implemented general dictionary maintenance and TPS to SQL conversions.
- Template Update - does not register files of driver types: ASCII,
DOS and BASIC
- Template Update - warn/not warn when new site's log file arrives.
- Template Update - for DLLs, option to only open/close files used in
the DLL.
- Template Update - ignores ALIAS files.
- Object Update - caters for DUPLICATE function (before doing an add)
- Object Update - prevents nulls from occurring in GUIDs (in the
GetGUID method)
- Template Update - put 'quotes' around default ini file name
- Docs Updated - clarified examples, added to FAQs, etc
Version 1.0 alpha 4: Released October 23, 2002
- Updated the Add GUID Utility - can add Site fields to the files and
edit the existing (unique and primary) keys.
- Updated docs - clarified installation and site tree setup.
- Updated examples - made a
simple way of implementing a site-tree structure
- Template Fix - if no email address for a site, skip the send
procedure for that site.
Version 1.0 alpha 3: Released October 21, 2002
- Updated the Add GUID Utility - can add Site fields to the files and
edit the existing (unique and primary) keys.
- Updated docs - clarified installation and site tree setup.
Version 1.0 alpha 2: Released October 15, 2002
- Updated examples (removed MessageBox)
- Updated install to install the Add GUID utility correctly.
- Updated the install to include the csZLIB class.
- Updated the Add GUID Utility.
Version 1.0 alpha 1: Released October 14, 2002