
www.capesoft.com
Updated 07 June 2011
| NetSimple Objects and Direct Port Communications | ||
|
|
||
| Version
www.capesoft.com Updated 07 June 2011 |
||
The NetSimple object allows you to establish a TCP/IP or UDP/IP connection directly to a port on another machine or to create a NetSimple server to listen on a port for incoming connections.While you will find that the NetAuto objects (NetServer and NetClient) provide you with the functionality for creating your own programs that can communicate with one another, you may want to interface with other processes that do not use NetAuto. Or you may prefer to use NetSimple because it works easier through a proxy / firewall.
For example you may want to access a Mail server, a FTP server, a Web server, or you may want your application to talk to a Java or a C application. In these cases you will need to use the NetSimple objects.
This object allows you to create either:
1. a Listening Port (a NetSimple Server)
2. a Client Connection to a listening port. (a NetSimple Client)
For instance, if you wanted to connect to a server you would use the NetSimple object as a client. More on this in the How to use NetSimple as a Client or a Server section.
We have also built other objects based on the NetSimple object for:
- Sending and receiving Email & News. (NetEmailSend, NetEmailReceive, NetNewsSend & NetNewsReceive objects).
- Connecting to a Web server. (NetWebClient object).
- Transferring files to and from an FTP server. (NetFTPClientControl & NetFTPClientData objects and the FTP Control Template).
- SNMP - (SNMP)
NetSimple gives you the option to use TCP or UDP to send / receive data.
TCP vs UDP
Most people will want to use TCP (transfer control protocol), which is the NetSimple's default. TCP is used for Email, Web, FTP and in fact most other applications.
Here's some of the differences between TCP and UDP:
Our advice for choosing between TCP or UDP:
TCP provides a one-to-one, connection-oriented, reliable communication service. TCP is responsible for the establishment of the connection, the sequencing and acknowledgment of packets sent, and some recovery of packets lost during transmission.
UDP provides a one-to-one or one-to-many, connectionless, unreliable communication service. UDP is used when the amount of data to be transferred is small (such as the data that would fit into a single packet), when the overhead of establishing a TCP connection is not desired, or when the applications or upper layer protocols provide reliable delivery.
Unlike TCP, the User Datagram Protocol (UDP) does not present data as a stream of bytes, nor does it require that you establish a connection with another program in order to exchange information. Data is exchanged in discrete units called datagrams, which are similar to IP datagrams. In fact, the only features that UDP offers over raw IP datagrams are port numbers and an optional checksum. UDP is sometimes referred to as an unreliable protocol because when a program sends a UDP datagram over the network, there is no way for it to know that it actually arrived at it’s destination. This means that the sender and receiver must typically implement their own application protocol on top of UDP. Much of the work that TCP does transparently (such as generating checksums, acknowledging the receipt of packets, retransmitting lost packets and so on) must be performed by the application itself.
With the limitations of UDP, you might wonder why it’s used at all. UDP has the advantage over TCP in two critical areas: speed and packet overhead. Because TCP is a reliable protocol, it goes through great lengths to insure that data arrives at it’s destination intact, and as a result it exchanges a fairly high number of packets over the network. UDP doesn’t have this overhead, and is considerably faster than TCP. In those situations where speed is paramount, or the number of packets sent over the network must be kept to a minimum, UDP is the solution.
Use TCP (default) unless you have to talk to some other application that only can communicate using UDP.
1) Turn on the UDP tick box in the Procedure Extensions (in the Settings Tab).
2) Most of the properties & methods are fairly similar, but check the info in these sections. (You now need to specify a UDPToPort before calling the send() method, and you can also see a UDPFromPort when you receive data.
3) It is not advisable to send more that 512 bytes in one packet. This is what Microsoft recommends, "It is generally inadvisable for a broadcast datagram to exceed the size at which fragmentation can occur, which implies that the data portion of the datagram (excluding headers) should not exceed 512 bytes.".
More information about UDP:
http://www.capesoft.com/Cached/UDP.htmTip: For the best explanation of a step-by-step guide on how to use NetSimple please see the NetSimple.Open Method in the NetSimple Method section.
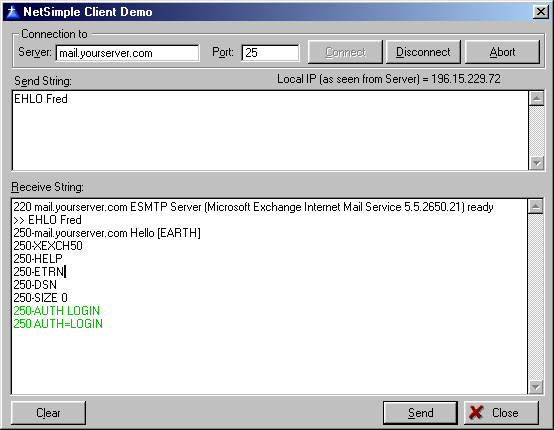
This object is demonstrated in the NetDemo example (as well as in the other NetSimple examples).
To use this object you need to do the following: (You will find this section easier to understand if you have already worked through scenario one).
1) Open or create a new application in Clarion.\2) Clarion 5 Users (only):
2a) Go to the "Project" Menu click "Properties" this will load the Project Editor.
2b) Click on "Project:Generator" in the very top of the left-hand pane, then press the "Properties" button and make sure your application's "Target OS" is set to " Windows 32-bit". If it's not, change it to 32-bit. (NetTalk only works for 32-bit applications).
2c) (Optional but recommended - turn on logging options - only needed in Clarion 5, as the NetTalk template in more recent versions does this for you):
Go to the defines Tab and add
NETTALKLOG=>1
This will turn on the NetTalk logging option (for debugging).
Then press OK a number of times to return to the Application Tree3) Add the NetTalk Global Extension by going to the "Global" Button, pressing "Extensions", then "Insert" and choose "Activate_NetTalk" from the list of extensions. Press OK a number of times to return to the Application Tree.
4) Use the NetTalk extension template to create your own object based on the NetSimple class. You could call your object anything you like (e.g. "ourClient" or "ourServer"). In the Settings tab you now need to choose whether this NetSimple object will behave like a client or like a server. Choose either Client or Server.
5) You now need to override whichever methods you need to use. See the NetSimple Methods section. You can send and receive data in the object's property which are described in the NetSimple Properties section.
Tip: For the best explanation of a step-by-step guide on how to use NetSimple please see the NetSimple.Open Method in the NetSimple Method section.To see this all in action look at the NetDemo example application.
More details to follow, but the completed code example of this Jump Start can be found in the examples that ship with NetTalk.
Tip: For the best explanation of a step-by-step guide on how to use NetSimple please see the NetSimple.Open Method in the NetSimple Method section.
![]()
Note: When you see (Notification Method) it means that the method is called (or fired) when something happens. e.g. The ConnectionClosed() method is called when the connection is closed by the remote machine. This allows you to populate these methods with code, so that your program can respond correctly when connections close, or data arrives etc.
Abort()
This aborts the client connection or server listening port, and discards any data (either incoming or outgoing) that the DLL has. This can be used in situations where you want the connection aborted immediately. The NetSimple queues data to the DLL, which sends it out as fast as possible. This method() gives you the chance to get rid of data you sent to the DLL, but which has not gone across the network yet.
(Not meaningful in UDP mode)In many cases you will rather want to use the Close() method, as it waits until all your queued up data has been sent.
Important Distinction between Abort() and Close()|
Abort(): Closes the connection immediately, and discards any unsent data (sitting in the NetTalk DLL).
Close(): Waits until any unsent data (waiting in the DLL) has been sent, and then gracefully closes the connection.Note: It's often best to check if the connection is open, before trying to abort it, otherwise Abort() will call .ErrorTrap - (particularly if you are calling .Abort() in .ErrorTrap - otherwise you'll recursively call .ErrorTrap(), which is a bad thing). So the following code is recommended:
if (self.OpenFlag or |
self.AsyncOpenBusy)
! Okay we know the connection is
! either open or busy opening
self.abort() ! immediately abort
end
Tip: This is the only method that can close a connection that is busy opening in asynchronous mode.
AbortServerConnection (ulong p_Socket, long p_SockID)
Only meaningful with NetSimple in Server mode.
This aborts the server connection rather than gracefully closing it. See also CloseServerConnection() and see Abort() for a distinction between Abort() and Close().
Important: It is better to use the CloseServerConnection() method to close a server connection. Only use AbortServerConnection() when CloseServerConnection() is not going to be fast enough for you.
Close()
Shuts down the connection or listening port that you setup when you called the Open() method.
This method performs a graceful close. i.e. Data that has been sent from the object to the NetTalk DLL will be sent, and the NetTalk DLL will send the object data already received that was waiting in the NetTalk DLL. No new data will be received and the socket will be closed properly once all data has been sent.
(Not meaningful in UDP mode)
Note: If the object's window is closed before the Close() method is called, any incoming data in the NetTalk DLL will not get to the object as the object is closed when the window closes. NetTalk does not guarantee that data waiting in the NetTalk DLL will be sent, after the object is killed and taken out of scope (e.g. the window closed). This means that when using the Email and News objects you still need to keep the windows open until the MessageSent() or the ErrorTrap() methods have been called. i.e. A command is sent and a reply is given before the next command is sent. So closing the window before the mail has finished being sent may not guarantee that the mail will be sent.
CloseServerConnection(ulong p_Socket, long p_SockID)
This method closes a connection that is connected to the listening port that you created using a NetSimple object in Server mode.
See also AbortServerConnection().
ConnectionClosed(), Virtual
(Notification Method)
Client Use:
Called when your connection was closed by the remote server.
Server Use:
Called when a client that was connecting to your server disconnects. To find out which socket and SockID where just closed look in the self.packet.Socket and self.packet.SockID properties.
(Not meaningful in UDP mode)
ErrorTrap(string errorStr, string functionName) ,Virtual
(Notification Method)
This method is called when an error occurs. Typically you will want to override this method and place in your code to handle errors when they occur.
Often you'll want to suppress messages from being displayed in this function. You can do this by setting the Suppress Error Messages checkbox in the extension template.
GetInfo (long Options=1)
Reports the number of packets in the NetTalk DLL that have been sent from the NetSimple object, but not yet sent down the network connection from the NetTalk DLL. This value is set in self.OutgoingDLLPackets
If Options = 2 it also sets the value of self.OutgoingDLLPacketsBytes, which is the number of bytes in these packets.
Init(uLong Mode=NET:SimpleClient)
Initialises the object. Automatically called from the NetTalk template.
InterpretError(), String
Converts the self.Error property to a text string (returned).
Kill()
Kills the object (opposite of Init). Automatically called from the NetTalk template.
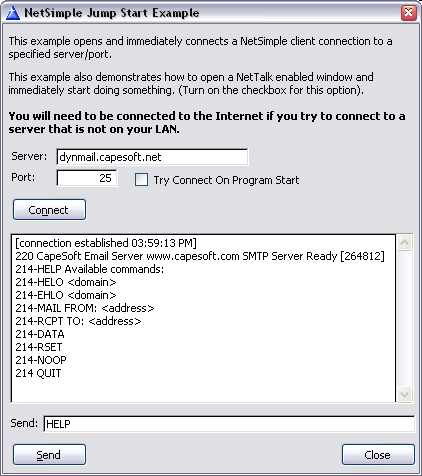
Open (string Server, uShort Port=0)
Client Use: This method establishes a connection to the Server and Port number specified in the parameters.
For complete example code please look at the examples or the NetSimple JumpStart.
By default self.AsyncOpenUse is set to on (1) in the .Init() method, so this function opens the connection asynchronously.Asynchronous Behavior
This is the default behavior of the NetSimple Objects. Asynchronous means that the function is performed behind the scenes. In other words, when you call the Open() method it returns before the connection has been opened, and the act of opening the connection is done in the background. If the connection opens correctly the .Process() method is called with a packet type of Net:SimpleAsyncOpenSuccessful or if the connection fails to open the .ErrorTrap is called with a packet type of Net:SimpleAsyncOpenFailed.Synchronous Behavior
If you set self.AsyncOpenUse = 0, the Open() method will behave synchronously. This means when the function returns you know it either worked or didn't. From this point of view it's quite nice. However if the connection fails you can end up waiting 45 to 90 seconds before WinSock decides that the connection has in fact not worked. This is undesirable as your window will appear to lock up for this length of time.
The best solution: Use the default Asynchronous Behavior.
Asynchronous Open
MyC.AsyncOpenUse = 1
MyC.AsyncOpenTimeOut = 1200 !12sec
MyC.InActiveTimeout = 9000 !90sec
MyC.Open (clip(Server), Port)
! Note that the connection is now
! open asynchronously
! once it is opened .Process()
! will be called
This approach means that your call to .Open() returns immediately and the process of trying to connect to the server is done in the background. During which your program keeps responding to users, re-drawing the screen, or doing other processing. Another advantage of asynchronous open over synchronous open is that you can specify the amount of time after which to give up. And with most sites, if you haven't connected to them in 9 seconds, you probably won't connected to them even if given more time.
To use asynchronous open you need to:
1) Set .AsyncOpenUse = 1
Example:
MyC.AsyncOpenUse = 1
2a) You may also want to change the value of the timeouts. There are two timeouts:
AsyncOpenTimeout: The length of time (in hs) after which to stop trying to establish the connection).
InActiveTimout: The length of time, (after the connection is established) to report InActivity (Idle connection) on the connection.
Example:
MyC.AsyncOpenUse = 1
MyC.AsyncOpenTimeout = 1200 ! 12 sec
MyC.InActiveTimeout = 9000 ! 90 sec
MyC.Open ('MachineName', 80)
2b) To use NetSimple in SSL (Secure Sockets Layer) you should use the following code:
MyC.AsyncOpenUse = 1
MyC.AsyncOpenTimeout = 1200 ! 12 sec
MyC.InActiveTimeout = 9000 ! 90 sec
MyC.SSL = 1
MyC.SSLCertificateOptions.CertificateFile = |
CertificateFile
MyC.SSLCertificateOptions.PrivateKeyFile = |
PrivateKeyFile
MyC.SSLCertificateOptions.DontVerifyRemoteCertificateWithCARoot=|
DontVerifyRemoteCertificateWithCARoot
MyC.SSLCertificateOptions.DontVerifyRemoteCertificateCommonName=|
DontVerifyRemoteCertificateCommonName
MyC.SSLCertificateOptions.CARootFile = |
CARootFile ! Or '' for none
MyC.Open ('MachineName', 80)
Note: Please take note of the files you need to distribute (in the Distribution section of the main NetTalk document) if you are using SSL.
(see FAQ G8 and also the NetWebSecure section of the docs.)
3) Because this is asynchronous, the call to .Open() will return before we know whether the connection has worked or failed. To find this out you'll need to put code into two places:
3a) If the connection fails, the ErrorTrap() method will be called. So in .ErrorTrap() you could put something like this:
if self.Packet.PacketType = |
NET:SimpleAsyncOpenFailed
Message ('Connection failed to'&|
' open.' & |
' NetError = ' & |
self.packet.NetError & |
' SSLError = ' & |
self.packet.SSLError & |
' WinSockError = ' & |
self.packet.WinSockError)
end
3b) If the connect establishes the .Process() method is called. You can place code into .Process() like this:
case self.Packet.PacketType
of NET:SimpleAsyncOpenSuccessful
! Our asynchronous open worked
! You might want to send data here
self.packet.binData = MyData
self.packet.binDatalen = |
len(clip(self.packet.binData))
self.send()
of NET:SimplePartialDataPacket
! Was the same as Net:SimpleDataPacket
! We received a partial packet
ReceivedData = |
self.packet.binData[1:|
self.packet.binDataLen]
! You might want to send data back
self.packet.binData = MyData
self.packet.binDatalen = |
len(clip(self.packet.binData))
self.send()
of NET:SimpleWholeDataPacket
! If you set
! self.WholePacketUseLengthField
! and you are talking to your own
! client and server,
! then you can get these
! whole packets.
! We received a whole packet
ReceivedData = |
self.WholePacketQueue.WholeBinData [1: self.WholePacketQueue.WholeBinDataLen]
! You might want to send data back
self.WholePacketSend(MyData, MyDataLen)
of NET:SimpleIdleConnection
! Connection has been
! idle for period set
! in .InactiveTimeout
self.abort()
Message ('Our Connection was idle')
end
4) If you used the .OpenFlag property to determine if a connection was open you may need to also check the .AsynOpenBusy property, which tells if a connection is busy opening asynchronously. For example:
if (self.OpenFlag or self.AsyncOpenBusy)
! Okay we know the connection is
! either open or busy opening
self.abort() ! immediately close
end
Tip: The only method that can close a connection that is busy being opened asynchronously is self.abort()
Server & UDP Use:
This method sets up a listening server Port on the specified Port parameters.
1a) If you leave the Server string set to '' (default behaviour) then the listening port will listen on all the IP addresses on that computer.
Example:
MyServer.Open ('', 80) ! Listen on all IPs
1b) If your machine has more than one IP address or you would rather bind to 127.0.0.1 (which will only be available from the local machine), then set the Server string set to the desired IP address. (Please note if the machines TCP/IP protocol (Control Panel - Networks) has not been configured to support the IP you specify, NetSimple will default to using all available IP addresses).
Example:
MyServer.Open ('127.0.0.1', 80)
or
MyServer.Open ('192.168.2.1', 80)
1c) To run your Server as a SSL use the following code:
MyS.SSL = 1
MyS.SSLCertificateOptions.CertificateFile = |
CertificateFile ! Or '' for none
MyS.SSLCertificateOptions.PrivateKeyFile = |
PrivateKeyFile ! Or '' for none
MyS.SSLCertificateOptions.DontVerifyRemoteCertificateWithCARoot=|
DontVerifyRemoteCertificateWithCARoot
! Next line Must be set to 1
! For a NetSimple Server !!
MyS.SSLCertificateOptions.DontVerifyRemoteCertificateCommonName=1
MyS.SSLCertificateOptions.CARootFile = |
CARootFile ! Or '' for none
PartiallyCloseServer()
This method closes just the Server Listening port, while leaving any server connection active.
Ping (string p_IP, long p_TTL),long
This method allows you to ping an IP address or a Host Name. This is an synchronous function. i.e. It only returns when the ping command and echo have been received.
TTL = microseconds (i.e. 1000 = 1 second)
Example:
result = ThisPing.Ping ('127.0.0.1', 3000)
case (result)
of 0
Message ('Ping sucessful')
of ERROR:AddressNotFound
Message ('Invalid address')
of ERROR:CouldNotLoadProcedures
Message ('The PING code is unsupported ' &|
'on this computer')
else
Message ('Ping Failed!')
end
Please bear in mind:
1) That when you call the ping command with a hostname like 'www.winzip.com' that a DNS call will need to be made first to convert the hostname to an IP address.
2) Ping will not work through some proxy servers.
3) If the host you are pinging is running a firewall (including Windows Firewall), they may have blocked the Ping command, so the ping may fail even if the host is alive.
Process(), Virtual
(Notification Method)
This method is called whenever a packet is received by the object. You need to override this method (using the Advanced tab of the extension template or by typing code into the source of your procedure). The data received is found in the packet property. See the NetSimple Properties section for more info.
Tip: Read up on self.packet.packetType. This method is well demonstrated in the netdemo example application.
Example Client Use:
(If you are using asynchronous open then once your connection is established .Process() will be called with self.packet.packetType = NET:SimpleAsyncOpenSuccessful)
case self.Packet.PacketType
of NET:SimpleAsyncOpenSuccessful
! Our asynchronous open worked
! You might want to send data here
self.packet.binData = MyData
self.packet.binDatalen = |
len(clip(self.packet.binData))
self.send()
of NET:SimplePartialDataPacket
! Was the same as Net:SimpleDataPacket
! We received a partial packet
ReceivedData = |
self.packet.binData[1:|
self.packet.binDataLen]
! You might want to send data back
self.packet.binData = MyData
self.packet.binDatalen = |
len(clip(self.packet.binData))
self.send()
of NET:SimpleWholeDataPacket
! If you set self.WholePacketUseLengthField
! and you are talking to your own client
! and server, then you can get these
! whole packets.
! We received a whole packet
ReceivedData = |
self.WholePacketQueue.WholeBinData[1:|
self.WholePacketQueue.WholeBinDataLen]
! You might want to send data back
self.WholePacketSend(MyData, MyDataLen)
of NET:SimpleIdleConnection
! Connection has been
! idle for period set
! in .InactiveTimeout
self.abort()
Message ('Our Connection was idle')
end
Example Server Use:
(This method is also called when a new server connects. In this case the self.packet.packetType is set to NET:SimpleNewConnection.)
case self.Packet.PacketType
of NET:SimpleNewConnection
! A new connection to our Server
! You may want to send data now
self.packet.ToIP = self.packet.FromIP
! self.packet.SockID is same as sender
! self.packet.Socket is same as sender
self.packet.binData = MyData
self.packet.binDatalen = |
len(clip(self.packet.binData))
self.send()
of NET:SimplePartialDataPacket
! Was the same as Net:SimpleDataPacket
! We received a partial packet
ReceivedData = |
self.packet.binData[1:|
self.packet.binDataLen]
! You might want to send data back
self.packet.ToIP = self.packet.FromIP
! self.packet.SockID is same as sender
! self.packet.Socket is same as sender
self.packet.binData = MyData
self.packet.binDatalen = |
len(clip(self.packet.binData))
self.send()
of NET:SimpleWholeDataPacket
! If you set self.WholePacketUseLengthField
! and you are talking to your own client
! and server, then you can get these
! whole packets.
! We received a whole packet
ReceivedData = |
self.WholePacketQueue.WholeBinData[1:|
self.WholePacketQueue.WholeBinDataLen]
! You might want to send data back
self.packet.ToIP = self.packet.FromIP
! self.packet.SockID is same as sender
! self.packet.Socket is same as sender
self.WholePacketSend(MyData, MyDataLen)
of NET:SimpleIdleConnection
! Connection has been
! idle for period set
! in .InactiveTimeout
self.abortserverconnection(|
self.packet.OnSocket, |
self.packet.SockID)
end
RefreshQServerConnections(long p_Free)
Force refreshes the Server Connections Queue.
Send(), Virtual
See also WholePacketSend()
Client Use:
This method is used to send a packet to the port that you connected to. You simply need to set the
self.packet.binData and
self.packet.binDataLen
properties, before calling self.send().
Server Use:
This method is used for sending data to one of the clients that are connected to your listening port.
You need to set the
self.packet.ToIP
self.packet.OnSocket
self.packet.SockID
self.packet.binData and
self.packet.binDataLen
properties before sending data. Look at the breakdown for Net:SimplePacketType.
UDP Use:
This method is used for sending a UDP packet from your machine to another host/port. If you have opened a listening port then the UDP packet will be sent from that port, otherwise a temporary socket/port is created, the data sent and the socket/port closed.
You need to set the
self.packet.ToIP
self.packet.UDPToPort
self.packet.binData and
self.packet.binDataLen
properties before sending data.
Important Note and Code Sample:
See the .DontErrorTrapInSendIfConnectionClosed property for how to avoid -34 errors.
Important Note:
This function is performed asynchronously. i.e. When you call this function your packet is sent to the DLL to send down the socket when the socket can next accept data, this normally happens very fast (like most Winsock applications), but this function does not guarantee that your packet has reached its destination by the time it returns. Any errors that are encountered will result in .ErrorTrap() being called. And when new data arrives .Process() will be called.
SSLGetIssuerField(string p_FieldName),String
Returns the value of the Issuer part of the Remote Certificate.
For example:
! Return Issuer Common Name
self.SSLGetIssuerField('CN')
SSLGetSubjectField(string p_FieldName),String
Returns the value of the Issuer part of the Remote Certificate.
For example:
! Return Subject Common Name
self.SSLGetSubjectField('CN')
TakeEvent()
Processes events from the NetTalk DLL. Called automatically by the NetTalk template.
WholePacketCheckForWhole()
Advanced Users:
This method checks the contents of the current record in the WholePacketQueue buffer to see if a whole packet has arrived (e.g. it looks at the length field and then determines if that number of bytes have actually been received).
This method is called automatically if you set self.WholePacketUseLengthField = 1
Demonstrated in the NetSimple Auto Packet Boundaries & Encryption example.
WholePacketFree(long p_SockID)
Advanced Users:
Frees the data used for the p_SockID in the WholePacketQueue.
Called automatically.
Demonstrated in the NetSimple Auto Packet Boundaries & Encryption example.
WholePacketSend(&String, long p_Length)
This method allows you to send data of any size. (As opposed to the Send() method, which limits you to sending 16K at a time). Note: If you have set self.WholePacketUseLengthField = 1, then a length field (4 bytes) will be sent at the front of the packet. This option is very useful when sending data to your own applications, as the WholePacket will be reassembled from all the Partial Packets at the recipients end. This option won't work if the recipient is not one of your own applications as it will not know what to do with the extra 4 bytes for the length field.
Client Use:
This method is used to send a packet to the port that you connected to. You simply need to call:
self.WholePacketSend(string, length)
Server Use:
This method is used for sending data to one of the clients that are connected to your listening port.
You need to set the 3 properties and then call WholePacketSend
self.packet.ToIP
self.packet.OnSocket
self.packet.SockID
self.WholePacketSend(string, length)Important Note:
This function is performed asynchronously. i.e. When you call this function your packet is sent to the DLL to send down the socket when the socket can next accept data, this normally happens very fast (like most Winsock applications), but this function does not guarantee that your packet has reached its destination by the time it returns. Any errors that are encountered will result in .ErrorTrap() being called. And when new data arrives .Process() will be called.
Demonstrated in the NetSimple Auto Packet Boundaries & Encryption example.
WholePacketStorePartialPacket()
Advanced Users:
This method appends the partial packets to the .WholePacketQueue.This method is automatically called if you set self.WholePacketUseLengthField = 1
Advanced Users:
You could also call it manually to add data to the WholePacketQueue
If you are using self.WholePacketUseLengthField = 0, and are calling self.WholePacketStorePartialPacket yourself, then the data you have received so far, is available via
self.WholePacketQueue.WholeBinData
[1:self.WholePacketQueue.BufferUsed]
Demonstrated in the NetSimple Auto Packet Boundaries & Encryption example.
WholePacketTruncate(long p_Bytes)
Advanced Users:
This method truncates p_Bytes off the current item in the WholePacketQueue queue buffer.
If the BufferUsed is then zero the string is disposed., unless self._WholePacketDontFreeWholeBinData is set to 1
Demonstrated in the NetSimple Auto Packet Boundaries & Encryption example.
![]()
AsyncOpenBusy long Read-only. Indicates if a connection is busy opening using asynchronous open. Read more in NetSimple.Open
AsyncOpenUse long Set this property to 1 to use Asynchronous Open. Read more in NetSimple.Open
By default this is set to 1 (on).
AsyncOpenTimeOut long This is length of time in hs (hundreths of a second) after which the asynchronous open will timeout. Defaults to 9 seconds (900hs). Example use:
self.AsyncOpenTimeout = 200 ! 2 seconds
or
self.AsyncOpenTimeout = 1000 ! 10 seconds
Read more in NetSimple.Open
Tip: Although this property is measured in hs it will only timeout to an accuracy of a second.
_Connection Group(Net:SimpleConnectionType)
This group holds the connection details. You may want to specify the self._connection.MaxServerConnections which allows you to limit how many incoming connections a server can handle. The default is 0 = unlimited.
We've marked this as an internal property (all properties and methods that are prefixed with a "_" are internal), but you may want to read some properties out of this Group.
See the breakdown for Net:SimpleConnectionType.
DontErrorTrapInSendIfConnectionClosed Long Because of the 3 levels of architecture in NetTalk, namely WinSock, the NetTalk DLL and the NetTalk objects. Under some circumstances it is possible that your object tries to send data down a connection that has actually closed, but the object is not aware of this yet. WinSock and the NetTalk DLL are aware of this, but not the object. This situation often occurs when accessing a web server. Once your page has downloaded your application tries to fetch another page, using the same connection. Unbeknown to the object the web server closes it's connection. Previously this would cause a 10038 error, currently this would cause a -34 error. The best way to code around this is now like this:
mC.DontErrorTrapInSendIfConnectionClosed = 1
mC.Send()
if mC.Error = ERROR:ClientNotConnected
! This error occurs if the connection
! closes and we try and send data on it,
! before the object knows the object has
! actually closed.
Message ('The connection has already ' & |
'closed, will try and open ' & |
'the connection again')
! You may want to rather try re-opening
! the connection ....
end
Error Long Contains the error value of the last transaction. 0 = no error. You can use the InterpretError() method for converting the error code into an error string.
See also self.SSLError and self.WinSockError
ErrorString String(256) Contains the last error string that was reported.
Will only be updated after the parent.ErrorTrap call in the ErrorTrap method.
InActiveTimeOut long This is length of time in hs (hundredths of a second) after which an idle connection will timeout. When the timeout occurs a packet of packettype NET:SimpleIdleConnection will be sent to .Process()
Tip: Although this property is measured in hs it will only timeout to an accuracy of a second.
LogDataBytes long Logs up to this many bytes to DebugView, in the .Send() method, when the application is run with the /nettalklog command line parameter. (Default = 0 = off)
OpenFlag Long
Read-only
Client Use:
When 0 the connection is not established
When 1 the connection is established
Do not change the value of this yourself.
Note: You will probably want to use this property in conjunction with the .AsyncOpenBusy property to determine if a connection is busy opening in asynchronous mode.
Server Use:
When 0 the object is not listening on the port
When 1 the object is listening on the port
Do not change the value of this yourself.
OutgoingDLLPackets long
After you call the GetInfo() method, this is the number of packets sitting in the NetTalk DLL for this socket connection that are waiting to be sent. It gives you an indication of how much data still needs to be sent. It cannot be used as a confirmation that all packets have been sent. It just means the packets have been sent to WinSock as they may still be in transit.
Packet Group(Net:SimplepacketType)
Used for sending and receiving data. This contains all the data for sending and receiving. Look at the breakdown for Net:SimplePacketType.
qServerConnections &Net:SimpleServerConnectionsQType
Server Mode Only: This queue contains the information about all the connections that are connected to the listening port. See the definition of the Net:SimpleServerConnectionsQType Queue.
(Not meaningful in UDP mode)
ServerConnectionsCount long
Server Mode Only: Indication of how many connections there are to the listening port.
(Not meaningful in UDP mode)
SSL Long
Set this to 1 to use a SSL (Secure Socket Layer) connection. Defaults to 0.
Note: Be sure to read about the SSL DLL Distribution.
Note: This implementation does not do certificate checking yet (we plan to add this later on), but it will allow you to communicate and download from secure sites.
Note: See FAQ G8 - for tips to getting SSL to work.
SSLCertificateOptions group(Net:SimpleSSLCertificateOptionsType).
Options for the SSL Certificates and Certificate Verification.
See Net:SimpleSSLCertificateOptionsType
SSLError long
Contains the SSL Error Code.
See also self.Error and self.WinSockError
SSLMethod Long
Set to one of :
NET:SSLMethodTLSv1
NET:SSLMethodSSLv3
NET:SSLMethodSSLv2
NET:SSLMethodSSLv23
! NET:SSLMethodSSLv3 = Default.
! Tries TLS v1.0, then SSL v3.0,
! then SSL v2.0
SSLDontConnectOnOpen Long
By default (0) the SSL connection will perform the SSL connection on the open.
Set this to 1 to turn it off (this gives you the option to call self._SSLConnect when you want to switch a connection from non-SSL to SSL).
SuppressErrorMsg Long
Set this to 1 to disable error messages, otherwise leave it as 0.
UseThisThread long (Advanced Optional Property). This property allows you to manually specify which thread must receive the messages that the NetTalk DLL posts to the NetSimple objects. Set this property before calling the Init() method. Defaults to 0 (no action).
WholePacketQueue &Net:SimpleWholePacketQueue
This queue allows you to read incoming whole packets. See Net:SimpleWholePacketQType
Note: If you are using self.WholePacketUseLengthField = 1 then, when Process is called with a packet type of Net:SimpleWholeDataPacket, then the current data is in the queue buffer of this queue, and is accessible via
self.WholePacketQueue.WholeBinData
[1:self.WholePacketQueue.WholeBinDataLen]Note: If you are using self.WholePacketUseLengthField = 0, and are calling self.WholePacketStorePartialPacket yourself, then the data you have received so far, is available via
self.WholePacketQueue.WholeBinData
[1:self.WholePacketQueue.BufferUsed]
WholePacketUseLengthField long
Defaults to 0, But if you set it to 1 the NetSimple object will:
a) Append a length field (4 bytes) to the top of all packets sent via the self.WholePacketSend() method
b) Will manage the incoming partial packets as they arrive and will cache them up until the full length of the whole packet arrives (as specified in the length field). Then self.Process will be called with a packet type of Net:SimpleWholeDataPacket
Note: You can only use this property if you are in control of both the client and the server parts of the connection, as the extra length field will break any protocol that is not expecting this field.
WinSockError long
Contains the WinSock Error Code.
See also self.Error and self.SSLError
SockID long Matching SockID
WholeBinData &string Data Buffer (dynamically allocated)
WholeBinDataLen long Length of packet (if using self.WholePacketUseLengthField)
BufferUsed long Length of Data in the Buffer
_BufferSize long Size of Buffer (not all of it may be used, but it is allocated)
ToIP cstring (NET:IPStringSize + 1) Client Use:
Not required.
Server Use:
Set this to the client you want to send messages to. Use the values in the FromIP when packets are sent, or you can also use the qServerConnections queue to give you all the details of all the connections to this listening port. See the NetDemo application for an example of this.
OnSocket NET:SocketType (long) Identifies the socket on which the packet was or will be sent. See also .SockID
SockID long Used with Socket to uniquely differentiate the different connections you are using. If you are receiving a packet, then these are the details of the socket that the data arrived on. When you are sending data these are the details of the socket you want to send the data out on.
FromIP cstring (NET:IPStringSize + 1) Client Use:
Not really needed. As all packets come from the server/port that you connected to.
Server Use:
Lets you know who send the packet.
BinData String(NET:MaxBinData) This is the binary data (stored in a string) that you receive and send. NET:MaxBinData = 16384 bytes (16K)
BinDataLen long Specifies the length of data in BinData.
PacketType long Client Use:
NET:SimpleAsyncOpenSuccessful (Connection established asynchronously)
NET:SimpleAsyncOpenFailed (Connection could not be established asynchronously - reported in .ErrorTrap())
NET:SimpleIdleConnection (A new client connected)
NET:SimplePartialDataPacket (Data packet received)
(was Net:SimpleDataPacket)
Server Use:
Either set to
NET:SimpleNewConnection (A new client connected)
NET:SimpleIdleConnection (A new client connected)
NET:SimplePartialDataPacket (Data packet received)
(was Net:SimpleDataPacket)
_DebugPacketNumber long Reserved.
UDPToPort Net:PortType (ushort) UDP Use:
This is the port of the machine you are sending data to.
UDPFromPort Net:PortType (ushort) UDP Use:
This is the port of the machine that sent you the data.
NetError long Internal NetTalk Error Number
WinSockError long Internal WinSock Error Number
SSLError long Internal SSL Error Number
_Reserved string Reserved
Mode long
Read-onlyThis determines whether the connection is running in Client or Server mode. Will either be:
NET:SIMPLE_CLIENT or
NET:SIMPLE_SERVER
Server cstring (NET:StdStringSize)
Read-onlyCan be a text-based hostname or the IP address.
Port NET:PortType (ushort)
Read-onlyIn Client Mode this is the port to connect to.
In Server Mode this is the port to listen on.
Socket NET:SocketType (long)
Read-onlySocket Connection Handle (Defined by Winsock).
SockID long
Read-onlyThe NetSimple Socket ID number.
NotifyThread long
Read-onlyThe thread on which this connection was opened.
NotifyEvent long
Read-onlyAn internal NetTalk Windows Message number.
MaxServerConnections long
Server Mode Only:
Sets the max number of incoming connections that will be allowed to connect to this listening port. This property needs to be set before calling the Open() method.
LocalIP cstring (NET:IPStringSize+1)
Read-onlyThe IP address of the local machine, as seen from the remote machine.
Internal.IP Net:IPType (long)
Read-onlyReserved. No not change.
UDPmode long UDP Use:
When this long is set to 1 (normally done via the template), then NetSimple object will use the UDP protocol instead of the normal TCP protocol. To change this go to the NetTalk extensions template and to the Settings tab. There you will find an option to run NetSimple in UDP mode.
Make sure you've read the TCP vs UDP section before you use UDP.
AsyncOpenTimeOut long Automatically set from self.AsyncOpenTimeout
Don't change this
SSL long Automatically set from self.SSL
Don't change this
Note: See FAQ G8 - for tips to getting SSL to work.
SSL_Method long Automatically set from self.SSLMethod
Don't change this
SSL_DontConnectOnOpen long Automatically set from self._SSLDontConnectOnOpen
Don't change this
_SSL_CertificateOptionsPointer long Automatically set to point at self.SSLCertificateOptions
Don't change this
This is a queue that stores a list of all connections that are connected to a listening server port.
RemoteIP cstring (NET:IPStringSize+1) IP address of the Remote machine
Socket NET:SocketType (long) WinSocket Socket Descriptor Handle
SockID long NetSimple Socket ID number
RemotePort NET:PortType (ushort) Remote Port that connected to this listening server. The word Port is used lightly as it is not a listening Port, but this is the port that the remote machine would list if it did a netstat.
LocalIP cstring (NET:IPStringSize + 1) The local IP address.
_Connection Group(Net:SimpleConnectionType). A connection group of type NET:SimpleConnectionType
Packet Group(Net:SimplePacketType). A packet group of type NET:SimplePacketType
OpenFlag Long Indicates if the connection is open. After calling the close() method the record will remain in the queue while the connection closes, but it it immediately marked as OpenFlag = 0
See also AsyncOpenBusy.
SockID long A unique connection identifier.
_BetweenPhaseOneAnTwo long Reserved. Internal Property. Don't change this.
_IgnorePhaseTwo long Reserved. Internal Property. Don't change this.
AsyncOpenBusy long Indicates if the connection is busy opening asynchronously. See also OpenFlag.
_Size long Reserved. Do not change this.
_Reserved1 long Reserved. Do not change this.
DontVerifyRemoteCertificateCommonName long Tells this object not to verify that the remote certificate's Common Name matches the Server name of the connection.
NetSimple Servers must set this to 1.
NetSimple Clients can choose (default = 0)
DontVerifyRemoteCertificateWithCARoot long Tells the object not to verify the remote certificate's Issuer against a list of trusted Issuers (stored in what's called a CA Root File).
CARootFile string(260) Path to the CA Root File (see DontVerifyRemoteCertificateWithCARoot)
CertificateFile string(260) Path to the Local Certificate. Typically this is a .crt or .pem file)
PrivateKeyFile string(260) Path to the Local Certificates Private Key File. Typically this is a .key or .pem file.
RemoteCertificateHaveDetails long Set once the RemoteCertificate fields are set (see below).
RemoteCertificateVersion long The Version number of the remote certificate.
RemoteCertificateSubject string(NET:SSLSubjectLen) The remote certificate subject. Use self.SSLGetSubjectField() to get values out of this string.
RemoteCertificateIssuer string(NET:SSLSubjectLen) The remote certificate issuer. Use self.SSLGetIssuerField() to get values out of this string.
RemoteCertificateNotBeforeDate long Not Before Date of the Remote Certificate. Note: No GMT to local time calculation has been made to this value. It's a GMT time.
RemoteCertificateNotBeforeTime long Not Before Time of the Remote Certificate. Note: No GMT to local time calculation has been made to this value. It's a GMT time.
RemoteCertificateNotAfterDate long Not After Date (Expiry Date) of the Remote Certificate. Note: No GMT to local time calculation has been made to this value. It's a GMT time.
RemoteCertificateNotAfterTime long Not After Time (Expiry Time) of the Remote Certificate. Note: No GMT to local time calculation has been made to this value. It's a GMT time.
RemoteCertificatePublicKey string(NET:SSLPublicKeyLen) Public Key of the remote certificate. RemoteCertificateAlgorithm long Algorithm of the remote certificate.
RemoteCertificateSerialNumber long Serial Number of the remote certificate.
Reserved string(300) Reserved. Do not change this.
NetSimpleMultiClient is a NetSimple object that has been built to handle multiple client connections.
Comparison Guide:
NetSimple NetSimpleMultiClient Allows you to create either a client or a server Only allows client mode Server supports one listening port with multiple connections No server support Only allows one client connection Supports multiple client connections Allows Client & Server SSL SSL not supported
Programming the NetSimpleMultiClient is very similar to the NetSimple object. We have included a list of properties and methods to help you familiarise yourself with this object.
Basically the biggest change is that there is now a queue of properties. For each connection there is one record in the queue. Therefore the methods act upon the data currently loaded in the queue. (e.g. If you call the close() method, the connect currently loaded in the queue is closed).
This object is demonstrated in the NetDemo example application.
How to learn to use this object?
The best way to learn how to use this object is to start by using the NetSimple object. From there you can then advance to this object.
Note: When you see (Notification Method) it means that the method is called (or fired) when something happens. e.g. The ConnectionClosed() method is called when the connection is closed by the remote machine. This allows you to populate these methods with code, so that your program can respond correctly when connections close, or data arrives etc.
Abort()
This kills the connection currently loaded in the self.q property. It dumps any data (either incoming or outgoing) that the DLL has. This should only be used if you need a button for "I've just sent the wrong data, try and close down as fast as possible". The NetSimpleMultiClient queues data to the DLL, which sends it out as fast as possible. This method gives you the chance to get rid of data you sent to the DLL, but which has not gone down the network yet.
Important: It is better to use the Close() method to close the connection. Only use Abort() when close() is not going to be fast enough for you.
Close()
Shuts down the connection currently loaded in self.q
This method perform a graceful close. i.e. Data that has been sent from the object to the DLL will be sent, and the DLL will send the object data already received that was waiting in the DLL. No new data will be received and the socket will be closed properly once all data has been sent.
Note: If the object's window is closed before the Close() method is called, any incoming data in the NetTalk DLL will not get to the object as the object is closed when the window closes. NetTalk does not guarantee that data waiting in the NetTalk DLL will be sent, after the object is closed down (e.g. the window closed).
CloseAll()
Performs a close() on each connection in self.q
ConnectionClosed(), Virtual
(Notification Method)
Client Use:
Called when your connection was closed by the server. The connection which was closed will be loaded in the self.q property.
ErrorTrap(string errorStr, string functionName) ,Virtual
(Notification Method)
This method is called when an error occurs. Typically you will want to override this method and place in your code to handle errors when they occur.
Typically you'll want to suppress messages from being displayed in this function. You can do this by ticking the Suppress Error Messages in the extension template.
GetInfo()
Reports the number of packets in the NetTalk DLL that have been sent from the NetSimple object, but not yet sent down the network connection from the NetTalk DLL. This value is set in self.OutgoingDLLPackets
If Options = 2 it also sets the value of self.OutgoingDLLPacketsBytes, which is the number of bytes in these packets.
Open (string Server, uShort Port=0)
Client Use:
This method establishes a connection to the Server and Port number specified in the parameters. When the connection is opened a new record will be added in the self.q queue. To test whether this connection is successfully opened test the self.error property.
Important Note:
By default this function is performed synchronously. i.e. When you call this function it will wait while it makes the connection. Once this function has returned the connection has either been established, or an error will have occurred.
To use asynchronous open please refer to the tips and info displayed at the NetSimple.Open() method. (Note that the .AsyncOpenBusy flag is stored in the Q queue of the NetSimpleMulticlient object)
Process(), Virtual
(Notification Method)
This method is called whenever a packet is received by the object. You need to override this method. The data received is found in the packet property. See the NetSimpleMultiClient Properties section for more info.
The connection which received the data will be loaded in the self.q queue.
See also the NetSimple.Process method.
Send(), Virtual
This method is used to send the self.q.packet down it's connection. To send data you must do the following:
1) Make sure the connection you want to send it down is loaded in self.q
2) Set self.packet.BinData
3) Set self.packet.BinDataLen
4) Call the self.send(), or the parent.send()
Important Note:
This function is performed asynchronously. i.e. When you call this function your packet is sent to the DLL to send down the socket when the socket can next accept data, this normally happens very fast (like most Winsock applications), but this function does not guarantee that your packet has reached its destination by the time it returns.
AsyncOpenUse long Set this property to 1 to use Asynchronous Open. Read more in NetSimple.Open
AsyncOpenTimeOut long This is length of time in hs (hundreths of a second) after which the asynchronous open will timeout. Defaults to 9 seconds (900hs). Example use:
self.AsyncOpenTimeout = 200 ! 2 seconds
or
self.AsyncOpenTimeout = 1000 ! 10 seconds
Read more in NetSimple.Open
Tip: Although this property is measured in hs it will only timeout to an accuracy of a second. If this really doesn't suit your program please let us know at support@capesoft.com
Error Long Contains the error value of the last transaction. 0 = no error. You can use the InterpretError() method for converting the error code into an error string.
ErrorString String(256) Contains the last error string that was reported. It only changes the next time an error occurs.
Q Queue(NET:SimpleMultiClientQType) The contents of the NET:SimpleMultiClientQType Type are described below.
_Connection Group(Net:SimpleConnectionType)
This group holds the connection details. You may want to specify the self._connection.MaxServerConnections which allows you to limit how many incoming connections a server can handle. The default is 0 = unlimited.
We've marked this as an internal property (all properties and methods that are prefixed with a "_" are internal, but you may want to read some properties out of this Group.
See the breakdown for Net:SimpleConnectionType.
Packet Group(Net:SimplepacketType)
Used for sending and receiving data. This contains all the data for sending and receiving. Look at the breakdown for Net:SimplePacketType.
OpenFlag Long
If set to 0 the connection is not established
If set to 1 the connection is established
Do not change the value of this yourself.
SockID long
A unique connection identifier. This is the same as the _Connection.SockID, but having it as a separate property in the queue makes it easier to use.
AsyncOpenBusy long
Read-only. Indicates if a connection is busy opening using asynchronous open. Read more in NetSimple.Open
UseThisThread long (Advanced Optional Property). This property allows you to manually specify which thread must receive the messages that the NetTalk DLL posts to the NetSimple objects. Set this property before calling the Open() method. Defaults to 0 (no action).
These objects are demonstrated in the NetDemo example.
We have provided a Send Email Control template as well as two objects (NetEmailSend and NetEmailReceive) which allow you to add full email functionality into your application.
To use these objects you need to do the following: (You will find this section easier to understand if you have already worked through scenario one).
1. Add the NetTalk Global Template and all the usual basics (see steps 1 to 5 of Scenario One) for each application that will use NetTalk.
2. Use the NetTalk extension template to create your own object based on the NetEmailSend or NetEmailReceive class. You could call your object anything you like (e.g. "ourEmailSend" or "ourEmailReceive").
3. You now need to override whichever methods you need to use. See the NetEmailSend Methods and Properties or the NetEmailReceive Methods and Properties section.
You will prime some of the properties (like the SMTP Server address, and the contents of your email) then you will call the SendMail() method. This puts your email in an outgoing queue. When your email is successfully sent to the SMTP Server the MessageSent() method is called. You can override this method to find out when your emails are sent. If errors occur the ErrorTrap() method is called.
You will prime some of properties (like the SMTP Server address, Login and Password) then you will call the Ask() method. This goes and gets the emails from the server. Every time an email arrives the Done() method is fired. You can also use the NetEmailReceive object to count the number of emails, as well as downloading headers before you download the whole email to determine if you want to download it.
4. To see this all in action look at the NetDemo example application.
Note: If the object's window is closed before the Close() method is called, any incoming data in the NetTalk DLL will not get to the object as the object is closed when the window closes. NetTalk does not guarantee that data waiting in the NetTalk DLL will be sent, after the object is closed down (e.g. the window closed). This means that when using the Email and News objects you still need to keep the windows open until the MessageSent() or the ErrorTrap() methods have been called. This is because of the mail protocol behaves in a synchronous fashion. i.e. a command is sent and a reply is given before the next command is sent. So closing the window before the mail has finished being sent may not guarantee that the mail will be sent.
We added a control template to speed up the process of adding email sending functionality to your applications. Using email is now even easier than ever.
There is an example of these controls in action in the NetDemo example application.
1) Open or create a new application.
2) Clarion 5 Users (only):2a) Go to the "Project" Menu click "Properties" this will load the Project Editor.
2b) Click on "Project:Generator" in the very top of the left-hand pane, then press the "Properties" button and make sure your application's "Target OS" is set to " Windows 32-bit". If it's not, change it to 32-bit. (NetTalk only works for 32-bit applications).
2c) (Optional but recommended - turn on logging options - only needed in Clarion 5, as the NetTalk template in more recent versions does this for you):
Go to the defines Tab and add
NETTALKLOG=>1
This will turn on the NetTalk logging option (for debugging).
Then press OK a number of times to return to the Application Tree3) Go to the Window formatter of the window procedure that you want the Send Email controls in.
4) Go to the "Populate" Menu and choose "Control Template...".
5) Choose "SendEmailControls" in the Select Control Template Window under "Class NetTalk" and press Select
6) Resize your window so that you can see all the controls. Return to the Application Tree.
7) Right click on the procedure with the Send Email controls and click and choose extensions.
8) In the NetTalk extensions setting you will see three tabs. Click on the "Settings" tab and you will see the options for this extension. You can choose to change these options to suit your program needs.
9) Save your work and Compile and Run your application.
You need to specify your SMTP Server. This is typically something like smtp.yourISP.com and the port is normally 25.
You can use the Send Email control template to send a list of files. Files must either be comma separated or in the format returned from the File Lookup Browse box.
When you go to the "Settings" extension Tab you can tell the Send Email Control Template which variables contain the data you want to use to send email. To start with we have just specified some variables and have displayed them on the screen with text boxes. However you may wish to point the Send Email Control Template to data in a file. You would simply change the fields in the Settings tab.
We haven't put an HTML field on the screen but you can also use the Send Email Control Template to send HTML content in your emails.
"I want to send a quick email using NetEmailSend, how do I start?"
This section exists to get you going quickly. You'll need to read the rest of the documentation to access all the other features and functionality of the NetEmailSend, but if you follow the following instructions you can add the ability to send emails from your application in 10-30 minutes.
We recommend that you have worked through at least one of the scenarios as these will get you accustomed to the way NetTalk interfaces with your application.
Code Example:
There is a copy of this JUMP START example in your example folder on your machine. See Clarion/3rdParty/Examples/NetTalk.
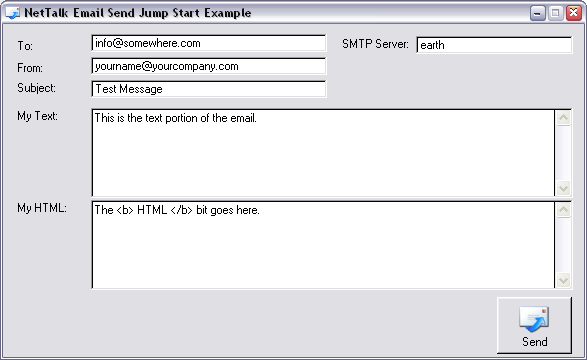
Example Screenshot
Objectives of this Jump Start for Sending Email:
Instructions:
- add an NetEmailSend instance to a window
- send an email
1) Add the "Activate_NetTalk" Global Extension to your application. Also make sure your application will be compiled in 32-bit mode. (See scenario one for help).
2) Create a window and add the following to it:
- a text field on it called MyTo of type String(252)
- a text field on it called MyFrom of type String(252)
- a text field on it called MySubject of type String(252)
- a text field on it called MyServer of type String(252)
- a text field on it called MyHelo of type String(252)
- a text field called MyText of type String(30000)
- a text field called MyHTML of type String(30000)
- and a button to this window called ?SendEmail
3) Add the NetTalk procedure extension "IncludeNetTalkObject" to the window in your application that you want to access a Web page from . Set the ObjectName to ThisEmailSend, the Base Class to NetEmailSend
4) In the button accept code embed point insert the following code:
ThisEmailSend.Server = MyServer
ThisEmailSend.Port = 25
ThisEmailSend.ToList = MyTo
ThisEmailSend.ccList = ''
ThisEmailSend.bccList = ''
ThisEmailSend.From = MyFrom
ThisEmailSend.Subject = MySubject
ThisEmailSend.Helo = MyHelo ! should be something like domain.com
ThisEmailSend.AttachmentList = '' ! Could be 'c:\test.txt'
ThisEmailSend.SSL = 0 ! Set to 1 to use SSL
ThisEmailSend.SecureEmailStartTLS = 0 ! Set to 1 to use StartTLS
if ThisEmailSend.SSL or ThisEmailSend.SecureEmailStartTLS
ThisEmailSend.SSLCertificateOptions.CertificateFile = ''
ThisEmailSend.SSLCertificateOptions.PrivateKeyFile = ''
ThisEmailSend.SSLCertificateOptions.DontVerifyRemoteCertificateWithCARoot = 0
ThisEmailSend.SSLCertificateOptions.DontVerifyRemoteCertificateCommonName = 0
ThisEmailSend.SSLCertificateOptions.CARootFile = '.\caroot.pem'
end
if ThisEmailSend.SecureEmailStartTLS
ThisEmailSend.SSLCertificateOptions.DontVerifyRemoteCertificateCommonName = 1
! Fudge this for now, as the certificate is not known
! when NetSimple does the CommonName check
end
ThisEmailSend.SetRequiredMessageSize (0,len(clip(MyText)),len(clip(MyHTML)))
!You must call this function
!before populating self.MesageText
if ThisEmailSend.Error = 0 ! Check for error
if len(clip(MyText)) > 0
ThisEmailSend.MessageText = clip (MyText)
end
if len(clip(MyHTML)) > 0
ThisEmailSend.MessageHTML = clip (MyHTML)
end
setcursor (CURSOR:WAIT)
display()
ThisEmailSend.SendMail(NET:EMailMadeFromPartsMode)
! Put email in queue and start sending it
setcursor
display()
end
5) In the ThisEmailSend.MessageSent method code embed point insert the following code:
! This is the method that is called when a message is sent
! The first thing that we do here is work out how many emails
! are sitting in the OutGoing Queue. (When you call the SendMail()
! method the message is put into the OutGoing Queue (called
! self.DataQueue)).
! The last message sent is still in self.DataQueue, so when
! records (self.DataQueue) = 1, you know there are no more
! emails in the out queue and all the emails have been sent.
if records (self.DataQueue) = 1 ! Last sent email still in queue
Message ('Email Sent Successfully', 'Email Send', ICON:ASTERISK)
end
6) In the ThisEmailSend.ErrorTrap method code embed point insert the following code:
! This is the method that is called when an error occurs while
! sending an email. If you do not suppress Errors (see the setting
! in the procedure extension), NetTalk will automatically display
! an error message for you. When you send an email using the
! SendMail() method the message is queued in the DataQueue (the
! outgoing queue). If the message is sent successfully the
! MessageSent method is called, if an error occurs the ErrorTrap
! method is called.
Message ('Message was not sent')
7) Run your application and remember to specify the server address of your SMTP (Mail) server. The correct format for email addresses (needed in the To & From fields) are: Fred Bloggs <fred@mail.com> or simply fred@mail.com
Abort ()
Aborts the connection. See NetSimple.Abort()
AfterBuildFromParts ()
This method is called if you are using the NET:EMailMadeFromPartsMode option with SendMail(0 method. It allows you to change two things:
1) If you have created your own DataQueue structure, you can set any new fields that you've added to the DataQueue in this method. (Existing fields will be overwritten by the rest of the code in .SendMail() )
2) The following properties:
self.ToList (NetEmailSend only)
self.CCList (NetEmailSend only)
self.From
self.Newsgroups - (NetNewsSend only)
AfterBuildFromWhole ()
This method is called if you are using the NET:EmailWholeMessageMode option with SendMail(0 method. It allows you to change two things:
1) If you have created your own DataQueue structure, you can set any new fields that you've added to the DataQueue in this method. (Existing fields will be overwritten by the rest of the code in .SendMail() )
2) The following properties after they have been extracted from the whole message:
self.ToList (NetEmailSend only)
self.CCList (NetEmailSend only)
self.From
self.Newsgroups - (NetNewsSend only)
CalcProgress ()
This method is used to report back the progress of the email sending operation.
The simplest way to use this is to assign the self.progressControl property to a progress control object in the window.init() method after the open (window) call, like this:
ThisEmailSend.ProgressControl = ?OurProgress
Then setup a timer and call calcProgress() in the timer and the Progress bar will be automatically controlled by the object. We suggest a timer of 50/100 sec.
Alternatively you can call the calcProgress() method and the following properties are updated:
Progress1000 - The progress as a ratio of 1 to 1000 (1000 being complete)
ProgressBytesToGo - Bytes still to send
ProgressBytesMax - Bytes total to send
ErrorTrap (string errorStr,string functionName)
(Notification Method)
This method is called when an error occurs. When ErrorTrap is called, the are three different types of error recovery that could be operational:
1) An error occurred but the next email will be tried next. The current email will not be resent. If you wish to resend it it is available in the DataQueue (as the currently loaded item). In this case:
._ErrorStatus = NET:ERROR_STATUS_SEND_ERROR
._AfterErrorAction = NET:ERROR_ACTION_AFTER_ERRORTRAP_TRY_NEXT
2) An error occurred before the message was added to self.DataQueue In this case:
._ErrorStatus = NET:ERROR_STATUS_INVALID_DATA_NOT_ADDED_TO_QUEUE
._AfterErrorAction = NET:ERROR_ACTION_DO_NOTHING_DATA_WAS_NOT_ADDED
3) A fatal error occurred, all items in the queue will be deleted and the connection will close. In this case: ._ErrorStatus = NET:ERROR_STATUS_SERVER_ERROR
._AfterErrorAction = NET:ERROR_ACTION_IN_ERRORTRAP_DELETE_ALL or NET:ERROR_ACTION_AFTER_ERRORTRAP_DELETE_ALL
Basically when ErrorTrap is called it means something went wrong, but if NetTalk thinks the error was just related to this email (like an incorrect To Address), or the SMTP server won't relay this specific message, then it will try and send the next one.
Note: When this method is called the last sent message is still in the DataQueue. We've implemented it like this so that you can store the message or try and resend it.
Note: You never need to delete the message from the DataQueue. NetTalk deletes the message after the ErrorTrap() method is called.
Note: Typically you'll want to suppress messages from being displayed in this function. You can do this by ticking the Suppress Error Messages in the extension template.
EmbedImages (*string htmlSource, long embedImages = 1, string rootFolder), string Parses the passed HTML and returns a list of all images used as a comma seperated string. Also optionally modifies the passed HTML to embed the images using the cid: syntax. This allows images to be embedded in an email with a single line of code:
EmailSender.embedList = EmailSender.EmbedImages(htmlSource, True, rootFolder)
Parameters
*string htmlSource
The HTML source to process. If the embedImages parameter is set to True (1), then the HTML source is modified to embed the images when it is sent via email.
long embedImages
If this is set to True (1), then the HTML source is modified to embed the images, by removing paths, and adding the "cid:" prefix. If this is set to False (0), then the method still returns a list of images used, but the HTML is not modified.
string rootFolder
The root folder for images with relative paths. If this is black, then the current application path is assumed to be the roots folder for any images that have relative paths.
Return Value
Return a comma seperated string that contains the name and path of all images referenced in the passed HTML. This string can be directly assigned to the .embedList property before sending to embed the images (see the example above).
Free()
Frees memory allocated by SetRequiredMessageSize(). You don't really need to bother with this unless you are very fussy or sending really big emails.
MessageSent()
(Notification Method)
This method is called for each email that was successfully sent. Override this method if you want to know when an email was sent. If an email fails the ErrorTrap() method will be called.
When this method is called the last sent message is still in the DataQueue. In other words when all the email have been sent records (self.DataQueue) = 1. The message is only deleted from the DataQueue (Outgoing queue) after the MessageSent() method has been called.
SetRequiredMessageSize
(long WholeSize, long TextSize, long HtmlSize)
Use this to allocate memory to the self.WholeMessage, self.MessageText and self.MessageHTML strings, before populating them.
If you are sending mail with the NET:EMailMadeFromPartsMode mode you don't need to specify the WholeSize parameter, just use 0.
You don't need to call free() before calling this method again, it will re-use the same memory or even free extra memory if it thinks it is necessary.
SetAttachmentContentType
(string fileName, *string contentType)Sets the attachments content type based on the name of the file when sending email. This method can be overridden to set a custom MIME content-type for specific attachments. Set the passsed contentType string to the desired value and return before the parent call (the parent call will populate the value based on the file extension). SendMail (long mode)
Used to send the email.
Important: This function will return before the email is sent and so you need to override the MessageSend() method and/or the ErrorTrap() method to determine if the email was actually sent.
mode should be either:
NET:EMailMadeFromPartsMode - this means you need to specify
self.Server
self.ToList
self.CCList
self.From
self.TextMessage
(after calling .SetRequiredMessageSize)
self.HTMLMessage
(after calling .SetRequiredMessageSize)
(for a code example see the Email JumpStart above)
NET:EmailWholeMessageMode - this means the email sent will be self.WholeMessage. By default NetTalk extracts the To, CC and From details from the message. When using this option you may also want to make use of the self.AfterBuildPartsFromWhole() method which allows you to modify the parts that are extracted from the whole.
Example Code:
MessageLen = len(clip(WholeM))
E.SetRequiredMessageSize ( |
MessageLen, 0, 0)
if E.Error = 0
E.WholeMessage = WholeM
else
Stop ('Could not allocate' & |
' enough memory to' & |
' send email')
return
end
E.Helo = 'example.com'
E.SendMail(NET:EmailWholeMessageMode)
Code in .AfterBuildPartsFromWhole
self.ToList = 'Fred Bloggs<fred@email.com>'
self.CCList = ''
self.From = 'Fred Bloggs<fred@email.com>'
AttachmentList string(NET:StdEmailAttachmentListSize)
List of comma separated files that you want to send. e.g. Please note that attachments are different from embeds. Attachments are separate files that you want to send with your email.
Example:
self.AttachmentList = 'c:\letter.doc, c:\chart.xls'
! Normal comma separated)
self.AttachmentList = '"file with spaces.txt", "anotherfile.txt" '
!Comma and quote separated)
self.AttachmentList = 'C:\|test2.zip|file with spaces, and commas.txt'
! Clarion FileDialog Format)
AuthUser string (NET:StdAUTHLoginSize)
Used for Authorised Login to SMTP servers. Many servers do not yet require this, but Authorised Login to SMTP servers is gaining popularity to prevent missuse of the servers. Simple set self.AuthUser and self.AuthPassword and NetTalk will login to the SMTP server using that login.
SMTP servers support a number of different login methods. NetTalk currently supports AUTH LOGIN which is the same login method as Outlook Express 5.x
Example:
self.AuthUser = 'Fred'
self.AuthPassword = 'FredFred' ! Case sensitive
To test whether your email server supports AUTH Login use the NetDemo application and connect to your email server and send the string EHLO Fred if the server responds back with 250 AUTH LOGIN then you know it is using AUTH Login.
AuthPassword string (NET:StdAUTHLoginSize)
See self.AuthUser.
bccList string (NET:StdEmailListSize)
BCC (Blind Carbon Copy) List. There needs to be someone in the ToList or the ccList or else the SMTP server will reject it. (semicolon or comma separated)
Example:
self.bccList = 'James Bond <007@bond.com>, Fred Smith <fred@mail.com>'
or
self.bccList = 'James Bond <007@bond.com>; Fred Smith <fred@mail.com>'
or
self.bccList = '"Bond, James" <007@bond.com>, Fred Smith <fred@mail.com>'
ccList string (NET:StdEmailListSize)
CC (Carbon Copy) List (semicolon or comma separated)
Example:
self.ccList = 'James Bond <007@bond.com>, Fred Smith <fred@mail.com>'
or
self.ccList = 'James Bond <007@bond.com>; Fred Smith <fred@mail.com>'
or
self.ccList = '"Bond, James" <007@bond.com>, Fred Smith <fred@mail.com>'
DataQueue &Net:EmailDataQType
This is a queue of all the emails that are being sent. You can check number of records in this queue before closing down your Send Mail window. (See the NetDemo.app for an example). Here's the definition for Net:EmailDataQType:Net:EmailDataQType Queue, Type ToList string(NET:StdEmailListSize) CcList string(NET:StdEmailListSize) BccList string(NET:StdEmailListSize) From string(NET:StdEmailFromSize) ReplyTo string(NET:StdEmailFromSize) Organization string(NET:StdEmailFromSize) DeliveryReceiptTo string(NET:StdEmailFromSize) DispositionNotificationTo string(NET:StdEmailFromSize) Subject string(NET:StdEmailSubjectSize) Newsgroup string(NET:StdNewsNewsgroupSize) ExtraHeader string(1024) MessageText &string MessageTextLen long MessageHtml &string MessageHtmlLen long WholeMessage &string WholeMessageLen long AttachmentList string(NET:StdEmailListSize) EmbedList string(NET:StdEmailListSize) endDeliveryReceiptTo string(NET:StdEmailFromSize)
An address which the receiving email server should send an acknowledgement of receipt to. Some email servers do not support this.
Example: self.DeliveryReceiptTo = 'fred@email.com'
DispositionNotificationTo string(NET:StdEmailFromSize)
An address which the receiving email client should send an acknowledgement of receipt to. Some email clients do not support this.
Example: self.DispositionNotificationTo = 'fred@email.com'
EmbedList string (NET:StdEmailAttachmentListSize)
List of comma separated files that you want to send as embedded files in your HTML code. See the EmbedImages method for simple and automated embedding of images.
Example:
In your HTML code you could embed a gif file using the following syntax:
<img src="cid:MyPic.gif"> ! Note the use of the cid:
You would then need to set self.EmbedList = 'c:\SomeDir\MyPic.gif'
For other file formats see self.AttachmentList
ExtraHeader string(1024)
A extra string that is appended to the Email header. This allows you to create custom or special header properties in the email header. This property needs to be specified before the SendMail() method is called.
Example:
self.ExtraHeader = 'MyCoolField: Data<13,10>' & |
'AnotherCoolField: More Data'
High Priority:
self.ExtraHeader = 'X-Priority: 1<13,10>' & |
'X-MSMail-Priority: High'
Low Priority:
self.ExtraHeader = 'X-Priority: 5<13,10>' & |
'X-MSMail-Priority: Low'
From string(NET:StdEmailFromSize)
From whom the email was sent. (Only one name and address)
Example:
self.From = 'James Bond <007@bond.com>'
or
self.From = '"Bond, James"<007@bond.com>'
Helo string(NET:StdEmailListSize)
This is the string that is passed with the HELO (or EHLO) command. Some Email Servers require a full domain name in here.
This property defaults to '' (blank), and if it's still blank when .SendMail() is called, it is set to the domain of the From address.
If the from address has no domain, it will be set to 'helo_is_blank' which seems to satisfy some servers. (If your server doesn't like this helo command, try using a valid From field, or you can hard-code the Helo property).
Alternatively you can set this property yourself, before calling .SendMail(). But we just normally leave it blank.InActiveTimeOut long This is length of time in hs (hundredths of a second) after which an idle connection will timeout. (When the timeout occurs a packet of packettype NET:SimpleIdleConnection will be sent to .Process()) The NetEmailSend object will then drop the connection and try and send any other emails.
Tip: Although this property is measured in hs it will only timeout to an accuracy of a second.
ReplyTo string(NET:StdEmailFromSize)
An alternative (optional) address to whom addresses should be sent.
Example: self.ReplyTo = 'fred@email.com'
MessageHtml &string
This is the HTML content for the message.
Important: Allocate the size of this property before using it. Use the SetRequiredMessageSize() method to set the size.
MessageText &string
This is the text content for the message.
Important: Allocate the size of this property before using it. Use the SetRequiredMessageSize() method to set the size.
OptionsAttachmentContentType string (40)
Lets you override the default Attachment Content Type of 'application/x-unknown'.
Incidentally you can use _NetWebServerWorker._GetContentType(string p_FileName) to do filename to Content Type conversions.
OptionsKeepConnectionOpen long
The default behaviour (OptionKeepConnectionOpen = 0) is to close the connection when the DataQueue (which is a queue of messages waiting to be sent - you add to this queue by calling the SendMail() method) is empty. Setting this to 1 (or true) will stop the connection from closing. The Server you are connecting may time out your connection though after a certain number of seconds. If this is set to 1 and you want to close the connection call the close() method.
Organization string(NET:StdEmailFromSize)
An optional string specifying the name of the organization from whom the message is sent.
Example: self.Organization = 'Cool Company Ltd'
Progress1000 long
See the CalcProgress() method. The progress as a ratio of 1 to 1000 (1000 being complete).
ProgressBytesToGo long
See the CalcProgress() method. Bytes still to send.
ProgressBytesMax long
See the CalcProgress() method. Bytes total to send.
ProgressControl long
See the CalcProgress() method. This is the reference to your Progress Control if you have one.
Port Net:Port_Type (ushort)
The port number of the SMTP Server. Defaults to 25.
ReconnectAfterXMsgs long
Setting this property to something like 20 will cause the connection to the SMTP server to be closed and opened automatically after every 20 messages. Setting this property to 0, means this feature is ignored.
References string (NET:StdEmailReferencesSize)
A list of references if the email is a reply. The order should be like this:
<original email message-id> <first reply message-id> <next reply and so on>
Example: self.References = '<00cd01c02dde$765a6880$0802a8c0@spiff> <00dc01c02de0$35fbea00$0802a8c0@spiff>'
SecureEmailAlways long
Set this to 1, if you want to send emails to a Secure Email Server. This will use SSL to send your emails. Use this option when your Secure SMTP Server requires the entire conversation in SSL. See the NetDemo example application for a good demo of this. When I last checked this is what GMail was using. You will also need to set the various SSLCertificateOptions.
SecureEmailStartTLS long
Set this to 1, if you want to send emails to a Secure Email Server. This will use SSL to send your emails. Use this option when your Secure SMTP Server requires the start of the conversation to be in non-secure mode and then it needs to use STARTTLS to switch to the conversation to SSL. See the NetDemo example application for a good demo of this. You will also need to set the various SSLCertificateOptions.
Server string(80)
The name of the SMTP Server. Can be either the hostname or the IP address.
Example:self.server = 'pluto'
Or: self.server = '192.169.2.15'
ServerErrorNum long
The Error Number the Email Server returns available in the ErrorTrap() method. May be blank (0).
ServerErrorDesc string(80)
The Error Description the Email Server returns available in the ErrorTrap() method. May be blank.
SSL Long
Set this to 1 to use a SSL (Secure Socket Layer) connection. Defaults to 0.
Note: Be sure to read about the SSL DLL Distribution.
Note: This implementation does not do certificate checking yet (we plan to add this later on), but it will allow you to communicate and download from secure sites.
Note: See FAQ G8 - for tips to getting SSL to work.
Tip: See the Email Send Jump Start or the NetDemo for examples of using SSL Email
SecureEmailStartTLS Long
Set this to 1 to start using a non-SSL connection and then using the SMTP command STARTTLS switch to a SSL (Secure Socket Layer) connection.
Tip: GMail does not use this setting. Just use self.SSL = 1 for Google.
Tip: See the Email Send Jump Start or the NetDemo for examples of using SSL Email
SSLCertificateOptions group(Net:SimpleSSLCertificateOptionsType).
Options for the SSL Certificates and Certificate Verification.
See Net:SimpleSSLCertificateOptionsType
Tip: See the Email Send Jump Start or the NetDemo for examples of using SSL Email
SSLError long
Contains the SSL Error Code.
See also self.Error and self.WinSockError
Tip: See the Email Send Jump Start or the NetDemo for examples of using SSL Email
SSLMethod Long
You can leave this alone (defaults to the best option), or see NetSimple.SSLMethod.
Tip: See the Email Send Jump Start or the NetDemo for examples of using SSL Email
Subject string (NET:StdEmailSubjectSize)
The email subject line.
Example: self.subject = 'My Cool Email'
ToList string (NET:StdEmailListSize)
A list of all the people you want the email sent to. (semicolon or comma separated)
Example:
self.toList = 'James Bond <007@bond.com>, Fred Smith <fred@mail.com>'
or
self.toList = 'James Bond <007@bond.com>; Fred Smith <fred@mail.com>'
or
self.toList = '"Bond, James" <007@bond.com>, Fred Smith <fred@mail.com>'
WholeMessage &string
This is the whole email to be sent. When you call
ThisEmailSend.SendMail(NET:EMailMadeFromPartsMode)
This string is allocated memory and generated for you.
Important: Allocate the size of this property before using it. Use the SetRequiredMessageSize() method to set the size.
You will only need to allocate the memory for this property if you are Sending Mail with the NET:EmailWholeMessageMode option.
XMailer string(60)
Optional property to specify the X-Mailer header field, which is normally used to specify the name of the application that sent the message.
Example: self.XMailer = 'My Cool Email Application'
Advanced properties:
_AfterErrorAction long
See ErrorTrap() method
_AfterErrorSavedAction long
See ErrorTrap() method
_ErrorStatus long
See ErrorTrap() method
OptionsMimeTextCharset string (40)
Option to set the Mime Text Charset. You could use either:
'us-ascii' or
'iso-8859-1' or
'utf-8'
The default is 'us-ascii'
(Set this options before calling the .SendMail() method)
See: www.joelonsoftware.com/articles/Unicode.html
OptionsMimeTextTransferEncoding string (40)
Option to set the Mime Text Transfer Encoding. You could use either:
'7bit' (no encoding)
'8bit' (no encoding - not recommended as some SMTP servers cannot transport this encoding)
'quoted-printable' (Outlook Express Standard)
'base64' (not normally used for text encoding. Base64 is usually used for file attachments, not Text or HTML encoding)
The default is '7bit'
(Set this options before calling the .SendMail() method)
OptionsMimeTextDontEncode long
This is an advanced feature.
Set this to 1, when your text (in MessageText) is already encoded, and you don't want NetTalk to do the encoding again. You will need to set the OptionsMimeTextTransferEncoding so that the receiving email client knows what encoding you have sent it.
(Set this options before calling the .SendMail() method)
OptionsMimeHTML....
Same as the OptionsMimeText... properties.
Except that the default for OptionsMimeHTMLTransferEncoding is 'quoted-printable'
(Set this options before calling the .SendMail() method)
"I want to receive my email using NetEmailReceive, how do I start?"
This section exists to get you going quickly. You'll need to read the rest of the documentation to access all the other features and functionality of the NetEmailReceive, but if you follow the following instructions you can add the ability to receive emails from your application in 10-30 minutes.
We recommend that you have worked through at least one of the scenarios as these will get you accustomed to the way NetTalk interfaces with your application.
Code Example:
There is a copy of this JUMP START example in your example folder on your machine. See Clarion/3rdParty/Examples/NetTalk.
Example Screenshot
Objectives of this Jump Start for Receiving Email:
Instructions:
- add an NetEmailReceive instance to a window
- receive your email
1) Add the "Activate_NetTalk" Global Extension to your application. Also make sure your application will be compiled in 32-bit mode. (See scenario one for help).
2) Create a window and add the following to it:
- a text field on it called MyTo of type String(252)
- a text field on it called MyFrom of type String(252)
- a text field on it called MySubject of type String(252)
- a text field on it called MyServer of type String(252)
- a text field on it called MyUser of type String(252)
- a text field on it called MyPassword of type String(252)
- a text field called MyText of type String(30000)
- a text field called MyHTML of type String(30000)
- and a button to this window called ?GetEmail
3) Add the NetTalk procedure extension "IncludeNetTalkObject" to the window in your application that you want to access a Web page from . Set the ObjectName to ThisEmailReceive, the Base Class to NetEmailReceive
4) In the button accept code embed point insert the following code:
ThisEmailReceive.Server = MyServer
ThisEmailReceive.Port = 110
ThisEmailReceive.User = MyUser
ThisEmailReceive.Password = MyPassword
ThisEmailReceive.OptionsDelete = 0
ThisEmailReceive.OptionsDontSaveAttachments = 1
ThisEmailReceive.OptionsDontSaveEmbeds = 1
ThisEmailReceive.SSL = 0 ! Set to 1 to use SSL
if ThisEmailReceive.SSL
ThisEmailReceive.SSLCertificateOptions.CertificateFile = ''
ThisEmailReceive.SSLCertificateOptions.PrivateKeyFile = ''
ThisEmailReceive.SSLCertificateOptions.DontVerifyRemoteCertificateWithCARoot = 0
ThisEmailReceive.SSLCertificateOptions.DontVerifyRemoteCertificateCommonName = 0
ThisEmailReceive.SSLCertificateOptions.CARootFile = '.\CaRoot.pem'
end
! Call the Ask() method
ThisEmailReceive.Ask(NET:EmailDownload)
! This method tells NetTalk to start downloading
! The email. After each email is received the self.Done()
! method is called. You can then process or store the emails
! in the Done() method.
! There are other options that you can call the Ask() method.
! You can look these up in the Methods & Properties section.
5) In the ThisEmailReceive.Done method code embed point insert the following code:
! This is the method that is called when a message is received
! If the Finished Flag is set to 1 it means all the emails have
! been received. If Finished is 0 then it just means that a
! message has been received.
if finished = 0
! Display the message
MyTo = clip (self.ToList)
MyFrom = clip (self.From)
MySubject = clip (self.subject)
if self.MessageTextLen > 0
MyText = clip (self.MessageText[1:self.MessageTextLen])
else
MyText = ''
end
if self.MessageHtmlLen > 0
MyHTML = clip (self.MessageHtml[1:self.MessageHtmlLen])
else
MyHTML = ''
end
display()
Message ('View next email')
else
Message ('Finished receiving emails.', 'Email Receive', ICON:ASTERISK)
end
6) In the ThisEmailReceive.ErrorTrap method code embed point insert the following code:
! This is the method that is called when an error occurs while
! receiving an email. If you do not suppress Errors (see the setting
! in the procedure extension), NetTalk will automatically display
! an error message for you.
Message ('An error occurred receiving the emails.')
7) Run your application and remember to specify the following:
- Server address of your POP (Mail) server.
- Your UserName
- Your Password
Some of these examples are demonstrated in the NetDemo.app example application.
ThisEmailReceive.Server = 'Server'
ThisEmailReceive.Port = 110
ThisEmailReceive.User = 'User'
ThisEmailReceive.Password = 'Password'
! Call the Ask() method
ThisEmailReceive.Ask(NET:EmailDownload)
! Options here are either NET:EmailCount
! or NET:EmailDownload
Your Done() method will need to contain something like:
if Finished Message ('Processing Completed', 'Test Email Receive', ICON:ASTERISK) else ! Store EMail - for example clear (ourMailQ) ourMailQ.WholeMessage = clip (self.WholeMessage[1:self.WholeMessageLen]) ourMailQ.TextMessage = clip (self.MessageText[1:self.MessageTextLen]) ourMailQ.HtmlMessage = clip (self.MessageHtml[1:self.MessageHtmlLen]) ourMailQ.ToList = clip (self.ToList) ourMailQ.CCList = clip (self.CCList) ourMailQ.From = clip (self.From) ourMailQ.Subject = clip (self.Subject) ourMailQ.Attachments = clip (self.AttachmentList) ourMailQ.MsgNumber = self.MsgNumber ourMailQ.MsgBytes = self.Bytes add (ourMailQ) endSuppose you want 2 email clients to access the same POP3 email mailbox. One client is a NetEmailReceive client that must download and delete (and process) all messages say from one particular person, while the other email client is Outlook Express. Well here's how to do it.
You would modify the simple example above to now use a Decide() method in the decide method you would put something like this:
case mode !----------------- of NET:EmailBasics !----------------- self.DecideAction = NET:EmailMoreInfo ! Request more info (like From Header) ! The details will be sent back to ! This method with mode set to ! Net:EmailDetails !----------------- of NET:EmailDetails !----------------- if InString ('fred@mail.com',clip(self.From),1,1) <> 0 self.DecideAction = NET:EmailDownload ! We choose to download the mail. self.OptionsDelete = true ! Choose to delete as well else self.DecideAction = NET:EmailSkip ! Skip self.OptionsDelete = false ! No delete end endYour decide() method gets initially called with mode set to Net:EmailBasics. At this point in time only the self.self.MsgNumber & self.Bytes are known. We now need to request more info, which we do by setting self.DecideAction to NET:EMailMoreInfo.
This will result in Decide() being called again with mode set to NET:EmailDetails. When this happens you can now examine all the header info (like who the email was from). You can then choose to skip the message, stop processing or download the message. You can also set self.OptionsDelete = true to delete the message. This enables you to examine who the mail is from and download and delete those you want to. You just need to make sure that Outlook Express doesn't download & delete all the messages before your NetEmailReceive client can read them. You can ensure this by telling Outlook Express to leave the messages in the POP3 server and only to delete them after one day.
Ask (long command)
Tells the object to go and do the following command (passed as command parameter):
NET:EmailCount - Just count how many emails there are and how many bytes in total. These are then returned in the Done() method.
NET:EmailDownload - Go and download the emails. But before downloading the email call the Decide() method with the size of the email. See the Decide() method for more details.
CalcProgress ()
This method is used to report back the progress of the email sending operation.
The simplest way to use this is to asign the self.progressControl property to a progress control object in the window.init() method after the open (window) call, like this:
ThisEmailReceive.ProgressControl = ?OurProgress
Then setup a timer and call calcProgress() in the timer and the Progress bar will be automatically controlled by the object. We suggest a timer of 50/100 sec.
Alternatively you can call the calcProgress() method and the following properties are updated:
Progress1000 - The progress as a ratio of 1 to 1000 (1000 being complete)
TotalBytesCount - Total bytes of all emails to receive.
TotalBytesReceived - Total bytes we have received so far
TotalBytesToGo - Remaining bytes to receive
Decide (long Mode)
(Notification/Feedback Method)
This function is called when there is an email to download, the NetEmailReceive object wants to know what you want to do. The default option is to download the email, but you can choose any one of the following options by setting self.DecideAction to
NET:EmailDownload - Download message
NET:EmailMoreInfo - Requests more info (headers and UID)
NET:EmailSkip - Skip message
NET:EmailStop - Stop processing
NET:EmailDelete - Delete this message (message will not be downloaded).
Mode is set to one of:
NET:EmailBasics - self.MsgNumber and self.Bytes are populated with the Message Number of this email as well as the size of the email. This will help you decide if you want to download the email.
NET:EmailDetails - More info has been requested previously in Decide(). You can now look at the header info as well as the Unique ID number.
DecideToDelete ()
(Notification/Feedback Method)
This method allows one to selectively choose which emails should be deleted. This method is called after each email is downloaded, and gives you the option to set self.OptionsDelete = true if you want to delete the email, after looking at the contents of it. If you want to delete all email just set self.OptionsDelete = true before starting to download the emails.
Done (long Command, long Finished)
(Notification Method)
This method is called
- after each email download
- after the total emails have been counted (if you called Ask(Net:EmailCount)
- and when all processing has been completed.
This method is not called if the ErrorTrap() method is called and the email process can not continue.
Parameter Command is set to your original command as specified in the Ask() method.
Parameter Finished is set to true when all processing is complete. (Otherwise it is false after a email download).
DoneListAll ()
(Notification Method)
Advance Method
This method is called after the full list command has been processed. For this method to be called you must issue a .Ask(Net:EmailDownload)
Basically there are 3 ways to download/delete emails using NetEmailReceive:
1) The first and simplest, is to just call Ask() and to populate code into .Done() and .ErrorTrap(). You can turn on or off .OptionsDelete if you want to delete the emails. This way will result in all emails being downloaded and the value of .OptionsDelete will determine whether all emails are deleted or not.
2) The second is a variation of (1) and only differs in that you populate code into the .Decide() method. Your code in the .Decide method can determine when you want to:
- Get more information (e.g. Header information) which will also result in .Decide being called again.
- Skip the email
- Download the email (set .OptionsDelte = 1 if you want to delete the email after downloading it).
- Delete the email (without downloading it).
3) The third method, allows you to get a list (queue) of all the emails, then you can choose which ones you want to download and/or delete. The .DoneListAll() and .DoneUIDLAll() methods use this, and the list of emails is returned in the .EmailsListQ property. This is explain more now.This method is called before any emails are downloaded. At this point in time the .EmailsListQ property has been created with the following set:
ID
Size
ToDownload
ToDelete
You can change the ToDelete or the ToDownload fields in the .EmailsListQ and this will determine the behaviour of which emails are downloaded or delete.
Note: Please note that if .OptionsDelete = 1, and email that is downloaded will be deleted, regardless of the ToDelete field. (i.e. It's best to set .OptionsDelete = 0 when using the .EmailsListQ).
Note: If you require the UID information, then rather put your code in .DoneUIDLAll() which is called after .DoneListAll() once the UID List has been received.
Note: Before the .Decide action is called. The action specified in the .EmailsListQ is primed as the default answer, so if you are wanting to use the .EmailsListQ to determine which emails should be downloaded, then you can simply return out the .Decide method, or put no code in it.
Note: There are two ways of using the .EmailsListQ:
1) You get the .EmailsListQ in either .DoneListAll() or .DoneUIDLAll() and then simply change the ToDelete or ToDownload fields in .EmailsListQ to determine what you want downloaded. (This works well if your download is all automatic - and requires no user to choose what he/she wants or doesn't want).
2) You get the .EmailsListQ (again in either .DoneListAll() or .DoneUIDLAll()) and then stop processing. You then display a list and let the user make the choices regarding what to download or delete. Then you call the .Ask again but you set the .OptionsUsePreviousEmailsListQ property to 1. This time it will use the ToDelete and ToDownload information that you have already primed. To just get the .EmailsListQ without downloading or deleting you can do one of two things:
a) You set .OptionsJustGetEmailsListQ = 1, in which case you'll just get .EmailsListQ
b) or, you can set your own flag and do the following in .Decide:
if loc:GetEmailsList = true
! This is advanced usage
! This is only used when we want
! the Emails List Queue and the
! details (TOP) info, but not to
! actually download the emails.
case mode
!-----------------
of NET:EmailBasics
!-----------------
self.DecideAction = |
NET:EmailMoreInfo
!-----------------
of NET:EmailDetails
!-----------------
! Okay you need to store the
! result of the TOP command
! here.
self.DecideAction = |
NET:EmailSkip ! Don't download
end
return ! Don't run any more code
! in this method - we've
! specified what to do
! in the EmailsListQ
end
This is all demonstrated in the NetDemo example.
DoneUIDLAll ()
(Notification Method)
Advance Method
This method is called after the full UIDL (Unique ID List) command has been processed.
It's very similar to the .DoneListAll() method. And it is all explained there.
When .DoneUIDLAll() is called the UID field in .EmailsListQ has also been set.
ErrorTrap (string errorStr, string functionName)
(Notification Method)
This method is called when an error occurs.
Typically you'll want to suppress messages from being displayed in this function. You can do this by ticking the Suppress Error Messages in the extension template.
LoadEmailsDoneBeforeQ ()
(Notification Method)
This method is called when the object wants you to load the self.EmailsDoneBeforeQ. You only need to do this if you are using self.OptionsUseDoneBeforeQ = 1.
Tip: An easy way to do this is to use CapeSoft's xFiles and to add an xFileXML object to the window (window - local extensions). Then add the following code to the LoadEmailsDoneBeforeQ() method:
ThisXMLFile.Load(self.EmailsDoneBeforeQ, 'Emails.xml')
SaveEmailsDoneBeforeQ ()
(Notification Method)
This method is called when the object wants you to save the self.EmailsDoneBeforeQ. You only need to do this if you are using self.OptionsUseDoneBeforeQ = 1.
Tip: An easy way to do this is to use CapeSoft's xFiles and to add an xFileXML object to the window (window - local extensions). Then add the following code to the LoadEmailsDoneBeforeQ() method:
ThisXMLFile.Save(self.EmailsDoneBeforeQ, 'Emails.xml')
AttachmentList string(NET:StdEmailAttachmentListSize)
A list of attachments that were sent with the email. This is where the attachments have been saved.
This is a comma separated list. We've kept it in use only because of backward support. Rather use the .AttachmentListQ property.
AttachmentListQ &NET:EmailAttachmentQType
This is a queue structure of the data found in self.AttachmentList
NET:EmailAttachmentQType Queue, Type
Name string (256)
end
AttachmentPath string(NET:StdEmailPathSize)
This is the path to store the attachments in. Defaults to current path.
e.g. 'c:\' or 'c:\Attachments\'
(It must end with a \ )
Bytes long
Returned in Decide() after Ask(Net:EmailDownload)
ccList string (NET:StdEmailListSize)
CC (Carbon Copy) List.
DecideAction long
Set this in the Decide() method.
DeliveryReceiptTo string(NET:StdEmailFromSize)
An address which the receiving email server should send an acknowledgement of receipt to. Some email servers do not support this.
DeliveryStatusOriginalRecipient string (NET:StdEmailStringSize)
If the email contained a Delivery Status this field will be populated with the relevant field. (Delivery Status reports can be used to track emails that bounce).
DeliveryStatusFinalRecipient string (NET:StdEmailStringSize)
If the email contained a Delivery Status this field will be populated with the relevant field. (Delivery Status reports can be used to track emails that bounce).
DeliveryStatusAction string (NET:StdEmailStringSize)
If the email contained a Delivery Status this field will be populated with the relevant field. (Delivery Status reports can be used to track emails that bounce).
DeliveryStatusStatus string (NET:StdEmailStringSize)
If the email contained a Delivery Status this field will be populated with the relevant field. (Delivery Status reports can be used to track emails that bounce).
DeliveryStatusRemoteMTA string (NET:StdEmailStringSize)
If the email contained a Delivery Status this field will be populated with the relevant field. (Delivery Status reports can be used to track emails that bounce).
DeliveryStatusDiagnosticCode string (NET:StdEmailStringSize)
If the email contained a Delivery Status this field will be populated with the relevant field. (Delivery Status reports can be used to track emails that bounce).
DeliveryStatusLastAttemptDate string (NET:StdEmailStringSize)
If the email contained a Delivery Status this field will be populated with the relevant field. (Delivery Status reports can be used to track emails that bounce).
DispositionNotificationTo string(NET:StdEmailFromSize)
An address which the receiving email client should send an acknowledgement of receipt to. Some email clients do not support this.
EmailsDoneBeforeQ &Net:EmailsDoneBeforeQType
This is an option queue that you can use together with the self.OptionsUseDoneBeforeQ to make the object remember which emails it has previously downloaded, so that it doesn't need to download the emails again. This works very well when self.OptionsDelete = false.
See self.SaveEmailsDoneBeforeQ() and self.LoadEmailsDoneBeforeQ() and also the Email Receive with Don't Download Again example.
EmailsListQ &Net:EmailsListQType
This is a queue of the available emails that you can download.
This is described with the .DoneListAll() method.
EmbedList string(NET:StdEmailAttachmentListSize)
List of comma separated files that were embedded in the HTML section of the email.
Example:
If this was the code in the HTML section
<img src="cid:003201c0b6a3a8c0@spiff"> ! Note the use of the cid:
Then EmbedList will be set to the following:
'003201c0b6a3a8c0@spiff'
See also self.EmbedListQ
This is a comma separated list. We've kept it in use only because of backward support. Rather use the .EmbedListQ property.
EmbedListQ &NET:EmailAttachmentQType
This is a queue structure of the data found in self.EmbedList
NET:EmailAttachmentQType Queue, Type
Name string (256)
end
From string(NET:StdEmailFromSize)
From whom the email was sent. (Only one name and address) e.g. 'James Bond <007@bond.com>'
InActiveTimeOut long This is length of time in hs (hundredths of a second) after which an idle connection will timeout. (When the timeout occurs a packet of packettype NET:SimpleIdleConnection will be sent to .Process()) The NetEmailReceive object will then drop the connection.
Tip: Although this property is measured in hs it will only timeout to an accuracy of a second.
MessageID string (NET:StdEmailMessageIDSize)
The Message ID of the message received. Example: '<00cd01c02dde$765a6880$0802a8c0@spiff>'
MessageText string
This is the text content for the message.
MessageTextLen long
The length of MessageText.
MessageHtml string
This is the HTML content for the message.
MessageHtmlLen long
The length of MessageHTML.
MsgNumber long
This message number. Returned in Decide() after Ask(Net:EmailDownload)
Progress1000 long
See the CalcProgress() method. The progress as a ratio of 1 to 1000 (1000 being complete).
ProgressControl long
See the CalcProgress() method. This is the reference to your Progress Control if you have one.
ReplyTo string(NET:StdEmailFromSize)
An alternative (optional) address to whom addresses should be sent.
OptionsDontSaveAttachments long
Options to tell the object not to save the attachments to disk. The entire email will still be downloaded from the POP server, but the attachments will be discarded.
OptionsDontSaveEmbeds long
Options to tell the object not to save the embed files to disk. The entire email will still be downloaded from the POP server, but the embedded files will be discarded.
OptionsDelete long
Options to delete the mail from the Mail box after downloading it.
OptionsDeleteAfterHours long
Must be used with self.OptionsUseDoneBeforeQ. Then it deletes messages older than self.OptionsDeleteAfterHours off the server.
OptionsIncludeTextAttachmentsInText long
Set this to 1 if you want the text attachments added to the text portion of the email. Defaults to 0 which is off.
OptionsJustGetEmailListQ long
Option to just get the .EmailsListQ without downloading or deleting any emails.
This is described with the .DoneListAll() method.
OptionsKeepOpen long
Option to keep the connection to the POP3 Server open (will not do this if the OptionsDelete option is set to 1)
OptionsNewBatchEveryXMessages long
Option to make the download split into batches every x number of messages. This is a new property, so treat with a bit of caution. 0 (the default) disables this feature.
OptionsNewBatchEveryXBytes long
Option to make the download split into batches after x number of bytes have been downloaded (will finish current email being downloaded, once x number of bytes have been downloaded). This is a new property, so treat with a bit of caution. 0 (the default) disables this feature.
OptionsOnlyGetWholeMessage long
Prevents the object from splitting up the .WholeMessage data into MessageText, MessageHTML, Subject, ToList etc. It takes away functionality, but it is faster.
OptionsOnlyProcessHeader long
Only the header is processed. Prevents the object from splitting up the .WholeMessage data into MessageText, MessageHTML etc. The To, From, Subject etc. are still processed. It takes away functionality, but it is faster.
OptionsUseDoneBeforeQ long
Option to use the Done Before Queue. This queue is a list of the last emails in the mailbox, so that when you don't delete the emails, you don't have to re-download them again. Makes the object behave like the Outlook Express's Leave a Copy of Message on Server option. See the Email Receive example which uses xFiles to load and save the self.EmailsDoneBeforeQ to an xml file.
See self.EmailsDoneBeforeQ and self.SaveEmailsDoneBeforeQ() and self.LoadEmailsDoneBeforeQ() and also the Email Receive with Don't Download Again example.
OptionsUsePreviousEmailsListQ long
Option to use the previous (ie existing) values in the .EmailsListQ to determine which emails to download or delete. This gives you the option to get the .EmailsListQ then ask the user to choose which emails should be downloaded or deleted, and then to apply those settings.
This is described with the .DoneListAll() method.
OptionsUserFilter cstring (80)
A user defined header filter (e.g. 'X-VARIABLE'). Returned in Decide if you ask for more Info or in Done after downloading email. (Use all capitals)
Organization string(NET:StdEmailFromSize)
An optional string specifying the name of the organization from whom the message is sent.
Password string (80)
The POP3 User Password.
Port Net:Port_Type (ushort)
The port number of the POP3 Server. Defaults to 110.
Server string(80)
The name of the POP3 Server. Can be either the hostname or the IP address.
ServerErrorDesc string(80)
The Error Description the Email Server returns available in the ErrorTrap() method. May be blank.
SSL Long
Set this to 1 to use a SSL (Secure Socket Layer) connection. Defaults to 0.
Note: Be sure to read about the SSL DLL Distribution.
Note: This implementation does not do certificate checking yet (we plan to add this later on), but it will allow you to communicate and download from secure sites.Note: See FAQ G8 - for tips to getting SSL to work.
Tip: See the Email Receive Jump Start or the NetDemo for examples of using SSL POP3
SSLCertificateOptions group(Net:SimpleSSLCertificateOptionsType).
Options for the SSL Certificates and Certificate Verification.
See Net:SimpleSSLCertificateOptionsType
Tip: See the Email Receive Jump Start or the NetDemo for examples of using SSL POP3
SSLError long
Contains the SSL Error Code.
See also self.Error and self.WinSockError
Tip: See the Email Receive Jump Start or the NetDemo for examples of using SSL POP3
SSLMethod Long
You can leave this alone (defaults to the best option), or see NetSimple.SSLMethod.
Tip: See the Email Receive Jump Start or the NetDemo for examples of using SSL POP3
References string (NET:StdEmailReferencesSize)
A list of references if the email is a reply. The order should be like this:
<original email message-id> <first reply message-id> <next reply and so on>
Example: '<<00cd01c02dde$765a6880$0802a8c0@spiff> < <00dc01c02de0$35fbea00$0802a8c0@spiff>'
SentDate string(NET:StdEmailSentDateSize)
The Date the email was sent in the format that it was stored in the email header.
Subject string (NET:StdEmailSubjectSize)
The email subject line.
ToList string (NET:StdEmailListSize)
A list of all the people you want the email sent to. Format is like this:
James Bond <007@bond.com>, Fred Smith <fred@mail.com>
TotalMessagesCount long
Returned in Done() after Ask(Net:EmailCount)
TotalBytesCount long
Returned in Done() after Ask(Net:EmailCount)
TotalBytesReceived long
See the CalcProgress() method. Bytes received so far.
TotalBytesToGo long
See the CalcProgress() method. Bytes still to send.
UID string(NET:StdEmailUIDSize)
Returned in Decide() after Ask(Net:EmailDownload) and when you set self.DecideAction = NET:EmailMoreInfo in Decide() the first time.
User string(80)
The POP3 User Name.
WholeMessage string
This is the whole email.
For example to extract just the email headers use InString('<13,10,13,10>', self.WholeMessage,1,1)
i.e. the headers are at the start of the whole message and end with the first blank line.
WholeMessageLen long
The length of WholeMessage.
UserFilterContent string(NET:StdEmailListSize)
The content of the user header filter field.
ContentType string (NET:StdEmailContentTypeSize)
The ContentType of the email.
ContentTransferEncoding string (NET:StdEmailContentTransferEncodingSize)
The Content-Transfer-Encoding of the email.
MimeAltBoundary string (NET:StdEmailMimeBoundarySize)
The Mime Boundary character string for the multipart/alternative part of the email.
MimeMixedBoundary string (NET:StdEmailMimeBoundarySize)
The Mime Boundary character string for the multipart/mixed part of the email.
MimeRelBoundary string (NET:StdEmailMimeBoundarySize)
The Mime Boundary character string for the multipart/related part of the email.
MimeVersion string (NET:StdEmailMimeVersionSize)
The Mime Version of the email.
_UseList long
By default this is set to 1. You can set this to 0 to stop the LIST command being issued. Instead a LIST x command will be issued for each email. This is not recommended though, as it is slower and pop3.btconnect.co.uk may fail with this approach (as it sometimes contains a list of emails that do not start at 1).
_UseUIDL byte
Used in conjunction with ._UseList (also defaults to q) and it's not recommended that you change this.
We send out our CapeSoft Newsletter using the CapeSoft Mailer. We use it to send thousands of emails in one go.
Okay, but how do you do that. Well here goes...
If you are sending more than 20 emails I would suggest sending them one at a time from a timer routine. (To do this you need to modify the timer property on the window that has your SendEmail object in it).
A lot of people simply want to do something like this:
! This is an example of how NOT to do it
loop x = 1 to records (MyRecepients)
get (MyReceipients,x)
Do MySendRoutine
end
The problem with this is that the SendEmail() method is Asynchronous, this means it returns to you before doing what you asked it to do. But now because you are in a tight loop, NetTalk is never given a chance to try and send your emails to the mail server until you've finished your loop.
What actually happens when you call SendEmail() is that NetTalk takes all the different parts of your email and puts it in the Object.DataQueue. It then starts sending these emails as soon as you give it a chance.
So what you rather need to do is the following:
[In the Event:Timer Accept Embed]
0{prop:timer} = 0 ! Pause Timer
if records (ThisSendEmail.DataQueue) < 50 ! Only send emails if there
! are 50 or less in the
! NetTalk email Queue
Do MySendRoutine
end
0{prop:timer} = 20 ! Restore Timer to 20/100 sec
This then gives NetTalk a chance to send the emails. I would suggest making your timer short (e.g. around 20/100 sec) so that if you are trying to send emails to a local mail server it runs very quickly, but if you are sending emails to a "slow" internet mail server, it will fill the NetTalk email queue to 50 and then keep looping until there are less that 50 emails in the queue.
Another good thing to do is to record in a log file, the email address of the most recently sent email. Then, if something goes wrong you know which people have already been sent the email. If you recipients list is alphabetically sorted you only need to store the last person sent to, and then you know who has had the email sent to them. To do this put something like this in your MessageSent() method:
putIni ('SentTo','Last Address', clip(ThisEmailSend.DataQueue.ToList), LogFile)
Don't close the window with the NetEmailSend object on it until all the emails have been sent, as this would close the NetEmailSend object and email sending would stop. Before closing the window it is worth checking that records (YourEmailSend.DataQueue) = 0, you can do this by putting the following code into the Event:CloseWindow embed:
if records (ThisEmailSend.DataQueue) > 0
if Message ('The email is still being sent.|' & |
'Are you sure you want to quit?', |
'NetTalk Send Email ',|
ICON:Question,|
BUTTON:Yes+BUTTON:No,BUTTON:No) = Button:No
cycle
end
end
Download a demo Mail Server to try out your application on, that way your can test sending email to thousands of people, but they never get sent, because you don't configure the mail server to send emails. We suggest CapeSoft Email Server. It comes with a 30 day demo and really isn't expensive. See the CapeSoft Email Server Web page for more details.
This document demonstrates how to easily integrate CapeSoft NetTalk (www.capesoft.com), with Tracker Software's PdfXChange (www.docu-track.com). In a sentence, it demonstrates how to take an existing application and use PdfXChange to enable your existing reports to generate PDF files; and then use NetTalk to email those PDF files as an attachment. Please note that this document does not serve as a tutorial for either of these products, but rather as a guideline to get you started on using them together, from which point you will be able to use the documentation that ships with each product to expand the functionality demonstrated below.
There is an example of this in your Clarion/3rdPart/Examples/NetTalk/SendEmail PDF Report folder. See the examples section.
- Add the "Activate_NetTalk" global extension template to your app (accept default settings)
- Add the "PDFXChangeApp" global extension template to your app (accept default settings)
- Make a new procedure called "SendMail". This should be a "standard" Clarion Window procedure, declared globally, taking the following parameters:
(string EmailAddress, string AttachedFiles, string EmailSubject)
You can rename these parameters, but for the sake of this exercise we recommend you use these.- On your new window, populate the NetTalk "SendEmailControls" control template. (Leave the default settings).
- On the procedure's extensions window, select the "NetTalk Send Email Controls" template, and insert the NetTalk "PDFXChange_Enhancement" extension template, using the following options:
Do not generate code
Self-explanatory
Hide this window This window opens with prop:hide set to true. Recommend that if you set select this option you also select the next one. Close window once mail has been sent
Self-explanatory
This procedure will be called from each report and will serve two purposes. Firstly, it serves as the window from which NetTalk will send your email, and secondly it has a UI purpose of being the transition window between the report generation and the actual email send. Once you have this documented functionality working you will want to tweak both the cosmetic (UI) and possibly code (functionality) of this window yourself.
- On the report procedure that you want to "email from", add the "PDFXChangeRpt" extension template. Complete the prompts as follows:
FileName Enter the name of the pdf file which you want PdfXChange to generate (and hence save). Can be a variable of an "actual" filename. e.g. 'MyFile.Pdf'
PDF Preview Option None
- In the "Local Objects : Abc Objects : Window Manager : TakeCloseEvent" embed point, after the parent call, embed the following code:
SendMail ('Client@Address.com', 'MyFile.pdf', 'Invoice 123')
Substituting the parameters with your own (EmailAddress, NameOfPdfFile, EmailSubjectLine). Note that the second parameter needs to be exactly the same as the "FileName" setting on the PdfXChangeRpt extension template (shown in the table above).- You will need to repeat this step for all the report procedures that you want to email from.
- Compile and run your app.
- Generate the report you have modified, as per normal.
- Print the report. It will print to the PdfXChangeDriver, then the report previewer will close.
- Depending on the settings you made on the "SendMail" procedure's "PdfXChange_Enhancement" template, the "SendMail" window will now appear. Press the "Send" button to send the email.
- For NetTalk you do not need to redistribute any files.
- For PdfXChange you will need to include "PdfXdr.exe" ( preferably as an executable called from your installer ) which will install the Printer Driver on the client machine, along with all the the PdfXChange files installed on your machine, located by default in the c:\c55\3rdParty\Pdf-XChange\Driver Files\W2K\ folder ( or similar ).
- NetTalk (www.capesoft.com) support is available from support@capesoft.com
- PdfXChange (www.docu-track.com) support is available from Support@Docu-Track.com
These objects are demonstrated in the NetDemo example.
To access NetNews we have provided 2 objects: NetNewsReceive and NetNewsSend. They are based on the NetEmailReceive and NetEmailSend objects respectively. Before reading this section, please make sure you are familiar with the email objects as the news objects are very similar, and only the differences are outlined below.
1) With News you first have to know the News Server you will be connecting to and also the NewsGroup. The Name of the NewsGroup To list all the NewsGroups at a particular server you must use the object.Ask(NET:NewsListGroups) (where object is the name of your object). Once the NewsGroup list has been downloaded the Done() method is called. (See the example in NetDemo).
2) Once you've established what NewsGroup you want to download, you need to put that into self.NewsGroup.
3) When it comes to downloading messages you can specify a range that you want to download. These are stored in the object.DownloadRangeStart and object.DownloadRangeEnd
4) To start downloading messages use object.Ask(NET:NewsDownload). After each messages is downloaded the Done(false) method is called. After the last message has been downloaded the Done(true) method is called.
1) When sending a News Message it is almost identical to sending Mail, except that you need to supply the NewsGroup that you are posting a message to.
Note: If the object's window is closed before the Close() method is called, any incoming data in the NetTalk DLL will not get to the object as the object is closed when the window closes. NetTalk does not guarantee that data waiting in the NetTalk DLL will be sent, after the object is closed down (e.g. the window closed). This means that when using the Email and News objects you still need to keep the windows open until the MessageSent() or the ErrorTrap() methods have been called. This is because of the mail protocol behaves in a synchronous fashion. i.e. a command is sent and a reply is given before the next command is sent. So closing the window before the mail has finished being sent may not guarantee that the mail will be sent.
Note: General Protocol for Public Newsgroups.
1) Spamming newsgroups is not recommended. (Spamming hacker newsgroups = seriously not recommended!)
2) Only send messages in Text format and not HTML format, unless the Newsgroup site welcome HTML format. Most don't!
3) Don't send attachments unless it is absolutely necessary.
The reason for this etiquette is to keep the messages as small as possible so that downloading Newsgroup messages goes as quickly as possible.
NewsGroup string(NET:StdNewsNewsGroupSize)
The name of the NewsGroup at the Server
DefaultDownloadFlag long(1)
The default action in the Decide method if no coding is present, to override it. It determines whether the default action is to download the messages or not.
DownloadRangeStart long
The Message ID Range that you want to download
DownloadRangeEnd long
The Message ID Range that you want to download
Lines long
The number of lines in the News Message
NewsGroup string(NET:StdNewsNewsGroupSize)
The name of the NewsGroup at the Server
qNewsGroups &Net:NewsGroupsQType
If you request a list of NewsGroups at a Server, the results are placed in here.
qNewsHeaders &Net:NewsHeadersQType
This is the list of headers passed to the Decide() method. You can filter through them and choose which messages you don't want to download. By default all the messages specified within the Range are downloaded.
XRef string (NET:StdEmailReferencesSize)
Reference
This object is demonstrated in the NetDemo example.
We've created a Web Client object so that you can download web pages and also post data back to web page forms. This object supports both the HTTP and HTTPS (Secure Web) protocol.
"I want to get a web page using NetWebClient, how do I start?"
This section exists to get you going quickly. You'll need to read the rest of the documentation to access all the other features and functionality of the NetWebClient, but if you follow the following instructions you can get Web access going in your application in 10 minutes.
We recommend that you have worked through at least one of the scenarios as these will get you accustomed to the way NetTalk interfaces with your application.
Code Example:
There is a copy of this JUMP START example in your example folder on your machine. See Clarion/3rdParty/Examples/NetTalk.
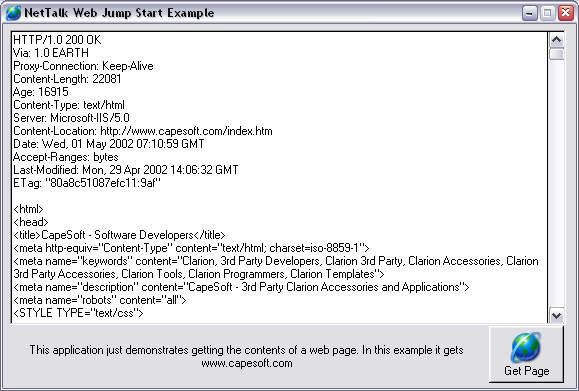
Objectives of this Jump Start for Web:
Instructions:
- add an NetWebClient instance to a window
- get a web page & display it on screen
1) Add the "Activate_NetTalk" Global Extension to your application. Also make sure your application will be compiled in 32-bit mode. (See scenario one for help).
2) Create a window with a text field on it called MyText of type String(30000). Add a button to this window. Call the button ?GetPage
3) Add the NetTalk procedure extension "IncludeNetTalkObject" to the window in your application that you want to access a Web page from . Set the ObjectName to ThisWebClient, the Base Class to NetWebClient
4) In the button accept code embed point insert the following code:
setcursor (CURSOR:Wait)
MyText = '' ! Clear the text on the screen
display()
! You start by telling the object what to download.
! You can choose to either download the whole page or just
! the web page header.
ThisWebClient.SetAllHeadersDefault() ! We recommend you call this before Fetch()
! You may want to modify some properties after this.
ThisWebClient.CanUseProxy = 1 ! Can use a proxy
ThisWebClient.HeaderOnly = 0 ! We want the whole page
ThisWebClient.AsyncOpenUse = 1 ! Use AsyncOpen 12 seconds (recommended)
ThisWebClient.AsyncOpenTimeOut = 1200 ! Up to 12 seconds to connect
ThisWebClient.InActiveTimeout = 9000 ! Set IdleTimeout 90 seconds
ThisWebClient.SSLCertificateOptions.CertificateFile = ''
ThisWebClient.SSLCertificateOptions.PrivateKeyFile = ''
ThisWebClient.SSLCertificateOptions.DontVerifyRemoteCertificateCommonName = 0
ThisWebClient.SSLCertificateOptions.DontVerifyRemoteCertificateWithCARoot = 0
ThisWebClient.SSLCertificateOptions.CARootFile = '.\CARoot.pem'
ThisWebClient.Fetch('www.capesoft.com/free.htm')
! This tells the object to fetch the www.capesoft.com free
! Product information page.
! The Fetch() method is asynchronous this means it runs in the
! background and wont have finished when the function returns.
! We only know when it's finished when the PageReceived()
! method is called.
! If an error happens then .ErrorTrap() will be called.
5) In your ThisWebClient.PageReceived method code embed point insert the following:
! This is the code that is called when the page has been downloaded.
! In this case we display it on the screen by putting it in the MyText
! variable.
if ThisWebClient.PageLen <= 0
MyText = ''
elsif ThisWebClient.PageLen < Size(MyText)
MyText = ThisWebClient.Page [1 : ThisWebClient.PageLen]
else
MyText = '<<Page size is ' & ThisWebClient.PageLen & |
' bytes. Display clipped because it was over ' & size (MyText) & ' bytes.><13,10>' & |
'<<You can use the SavePage() method to save to file to see it all.><13,10,13,10>' & |
sub (ThisWebClient.Page, 1, size(MyText)) ! only show first bit
end
display()
setcursor
6) Put in the following into the ThisWebClient.ErrorTrap method() code embed. This is the method that gets called if anything goes wrong during the download:
Message ('This WebSite could not be downloaded. Error ' & ThisWebClient.Error & |
' = ' & ThisWebClient.InterpretError())
setcursor ! Return mouse back to normal.
! If an error occurs, the NetWebClient will display a message,
! unless you suppress error messages in the procedure
! extension template,
! in which case you would need to handle your own error messages.
7) Run your application and try it out. You will need to be connected to the Internet to download the www.capesoft.com web page. But you could change that to another web address of a machine on your LAN if you are not connected to the Internet.
Posting data is very similar to fetching data, you start by telling the object what to upload (POST). You can do this by using code like the following:
ThisWebClient.SetAllHeadersDefault()
! These Header Properties need to be made before most POSTs will work
! The header properties are quite specific and will need to match those
! expected by the server. Use Fiddler to check for the header expected.
ThisWebClient.HeaderOnly = 0
ThisWebClient.Cookie = Cookie
ThisWebClient.Referer = Referer
ThisWebClient.ContentType = 'application/x-www-form-urlencoded'
ThisWebClient.AcceptEncoding = ''
ThisWebClient.Pragma_ = 'no-cache'
! Clip the Poststring when sending text data only. When sending binary data
! using a Multi-Part post you should not clip the post string, rather keep
! track of the size of the data being posted.
ThisWebClient.Post(Clip(PostURL), Clip(PostString))
if ThisWebClient.Error
Message('This WebSite could not be posted to. Error ' & ThisWebClient.Error |
& ': ' & ThisWebClient.InterpretError())
SetCursor()
endThis tells the object to post the PostString to the address specified by the PostURL variable. The Post() method is asynchronous this means it runs in the background and wont have finished when the function returns. When the POST is complete the web server will return a page, and the PageReceived() method is called. You can then display the message with code like the following:
myPage = ThisWebClient.Page[1 : ThisWebClient.PageLen]Side Note: You can also display the actual HTML version of the page in your Clarion application using FileExplorer, which allows you to drop an HTML Browser or Editor control onto your window, along with controls for Windows Media, Flash and PDF.
Before you start writing any code to do more advanced posting you need a way to view the data being sent between the server and the client. We recommend the easy to use (and free) Fiddler powertoy from Microsoft - http://www.fiddlertool.com/fiddler/.
Fiddler allows HTTP traffic to be viewed, including with secure HTTPs. This is particularly valuable for determining what the server requires from the client. For example a web browser can be used to connect to the server and post the form. Fiddler allows the HTTP packets and headers to be inspected, making it easy to determine exactly what the server requires.
Uploading a file is no different from POSTing any other data. Typically a "file upload" is simply a form being posted (just as you would fill the form fields in using a browser and press the Submit button to post the form). The way that the form is sent depends on the type of form that you are POSTing.
There are two content-types that are used for posting form data:
ContentType = 'application/x-www-form-urlencoded'
or
ContentType = 'multipart/form-data'Both post methods are covered below, so although it might look a bit intimidating, it is actually simpler than you might expect.
Tip: Use the NetTalk Proxy example application and then use a web browser to submit the form. The proxy example application will show the POST and GET strings, which is invaluable in determining what the server expects. Without doing this you will be shooting in the dark, so this is strongly recommended. If you are using an HTTPs address the data is encrypted, so you can't see the POST and GET data as plaintext, unless of course you are a bit sneaky (like we are of course <g>). See the NetTalk Tips: for extracting Post strings from HTTPS web sites section below for instructions.
Once you have done this you will be able to see the full POST and GET strings, including the expected type. From there you can build up a Post that fits the requirements.
Posting using the 'application/x-www-form-urlencoded' content type
For 'application/x-www-form-urlencoded' forms you simply need to add each field separated by an ampersand.
For example:
    HttpClient.ContentType = 'application/x-www-form-urlencoded'
    postString = 'SessionID=971720855&retry=LoginForm&FromForm=LoginForm' |
               & 'Loc__Login=Demo&Loc__Password=Demo&=&pressedButton=save_btn'
For each field in the form the name is added to the string, followed by the value. The last field has an extra &= before the &, although you should check what your browser posts to ensure that your form uses the same syntax. This syntax will typically be used to submit text (such as XML) rather than binary files, and the server often expects the data to the URL encoded. To URL encode the XML string call the NetWebClient.EncodeWebString() method:
encodedString = ThisWebClient.EncodeWebString(decodedString)Note that this method can only return up to 16K at a time, and because the returned string is larger than the passed string, it is advisable to pass the data to this method in 4K blocks. You can simply loop and encode 4K at the time, then append each block together. It is safe to Clip() the return result as spaces are encoded, and any spaces at the end of the return string are in fact empty space.
Posting using the 'multipart/form-data' content type
The second type of post (Multi-Part) supports binary data and is typical of forms with a FileType field for submitting files of any type.
When you POST a multi-part form, a number of MIME parts get created, one for each field in the form. Each MIME part is a the contents of a form field surrounded by a MIME boundary. The MIME boundary is simply a string that is used to delimit each field in the POST. Below is a routine provided for creating a MIME boundary string.
A typical Multi-Part POST looks something like the following:
    POST /index.htm HTTP/1.1
    Host: 127.0.0.1:88
    User-Agent: Mozilla/5.0 (Windows; U; Windows NT 5.1; en-US; rv:1.8.0.7)
    Gecko/20060909 Firefox/1.5.0.7
    Accept: text/xml,application/xml,text/plain;q=0.8,image/png,*/*;q=0.5
    Accept-Language: en-us,en;q=0.5
    Accept-Encoding: gzip,deflate
    Accept-Charset: ISO-8859-1,utf-8;q=0.7 ,*;q=0.7
    Keep-Alive: 300
    Connection: keep-alive
    Referer: http://127.0.0.1:88/FormControl
    Cookie: SESSIONID=971720855
    Content-Type: multipart/form-data;
    boundary=---------------------------183453108720906
    Content-Length: 3592

    -----------------------------183453108720906
    Content-Disposition: form-data; name="SessionID"

    971720855
    -----------------------------183453108720906
    Content-Disposition: form-data; name="FormData"

    <?xml version="1.0" encoding="ISO-8859-1"?>
    <queue>
    <data>
    <logging>1</logging>
    <inbox>2</inbox>
    <outbox>3</outbox>
    <sentitems>4</sentitems>
    <deleteditems>5</deleteditems>
    <drafts>6</drafts>
    <defaultaccount>1</defaultaccount>
    <vspos>108</vspos>
    <hspos>183</hspos>
    <defaultfont>Tahoma, Arial, sans-serif</defaultfont>
    </data>
    </queue>
    -----------------------------183453108720906
In the above example the form as a field called FormData that the XML is placed into and there is also a SessionID field that is the first field on the form (although in this particular case this field was hidden and not displayed to the user). The above post is made of of a number of parts:
- The POST header, which contains information to inform the server of what is being posted, where the browser is coming "from" and where it is posting "to", along with information about the type of data being posted and the size of the post string (everything below the header).
- The MIME parts, each part is separated by the boundary string ('-----------------------------183453108720906' in this case)
- The form data, which is placed between each boundary (the code for which is shown below).
In this example the "binary data" in the FormData field is actually XML, but this could be any binary data. The field names are also simply what is specified by the Form page, there are no preset field names and you will need to use those specified by the form itself.
Creating a Multi-Part post string
1) Make your own MIME boundaries
mimeBoundary     string(42)

 code
CreateMimeBoundary routine ! A mime boundary is actually any arbitrary string that is not
! contained within the parts that is encapsulates
Clear(mimeBoundary)
mimeBoundary = '---------------------------'
!--- Add the random 15 digit number for the boundary
loop i = 1 to 15
mimeBoundary = Clip(mimeBoundary) & Random(0, 9)
endTo be safe you can check that the MIME Boundary string that you have created does not occur anywhere in any of the data that you will include in the post string. The boundary string must be unique.
2) Create the Post string made out of MIME parts
 PostString = '--' & Clip(mimeBoundary) & '<13,10>' |
            & 'Content-Disposition: form-data; name="SessionID"<13,10>' |
            & '<13,10>' |
                       & Clip(sessionID) & '<13,10>' |
            & '--' & Clip(mimeBoundary) & '<13,10>' |
            & 'Content-Disposition: form-data; name="thisFormData"<13,10>' |
            & '<13,10>' |
                       & Clip(PostForm) |
            & '<13,10>--' & Clip(mimeBoundary) & '<13,10>'
In this case there are only two fields, however the format is always the same:
boundary
field
boundary
field
boundaryThere needs be the a '<13,10>' (Carriage Return, Line Feed) at the end of all data, and after each boundary, as shown above. Don't forget to add the two minus signs to the front of the boundary in the string that you are going to post (as shown above). If in doubt check the string posted by the web browser using the proxy example as detailed above.
3) Set the header fields
HttpClient.SetAllHeadersDefault()

HttpClient.HeaderOnly = 0
HttpClient.Referer = Clip(Set:serverUrl) & '/FormControl'

! The referrer is the original page that this came from
HttpClient.AsyncOpenTimeOut = 1200     ! 12 seconds
HttpClient.InActiveTimeout = 2000       ! 20 seconds

! Only needed if the server is using a cookie and expects a value here
HttpClient.Cookie = 'SESSIONID=' & Clip(sessionID)

! Add the MIME boundary
HttpClient.ContentType = 'multipart/form-data; boundary=' & Clip(mimeBoundary)
HttpClient.AcceptEncoding = 'gzip,deflate'
4) Call the Post() method to send the data
This is simply the standard Post() call:
    ! Clip the Poststring when sending text data only. When sending binary data
    ! using a Multi-Part post you should not clip the post string, rather keep
    ! track of the size of the data being posted.
       ThisWebClient.Post(Clip(PostURL), Clip(PostString))


    if ThisWebClient.Error
             Message ('This WebSite could not be posted to. Error ' & ThisWebClient.Error |
                & ': ' & ThisWebClient.InterpretError())
               SetCursor()

    end
Using Fiddler2 (this is the recommended method):
Fetch (string URL)
This tells the object that you want to download the page (or image or file), located at the reference in URL.
Some properties should be set before calling this method. The following example code shows how to call this method:
ThisWebClient.SetAllHeadersDefault()
! You may want to modify some properties after this.
! Proxy Settings
ThisWebClient.CanUseProxy = 1
! Use AsyncOpen 12sec (recommended)
ThisWebClient.AsyncOpenUse = 1
ThisWebClient.AsyncOpenTimeOut = 1200
! Set IdleTimeout 20seconds
ThisWebClient.InActiveTimeout = 2000
! Choose to download whole page
ThisWebClient.HeaderOnly = 0
! Call Fetch
ThisWebClient.Fetch(URL)
Once the page has been downloaded the .PageReceived() method is called. If an error occurs then the .ErrorTrap() method is called.
If you are wanting to send web page form data and the form uses the GET action then you can use the Fetch() method otherwise you will need to use the Post() method if the form uses POST action.
The fetch method (as well as the Post() method) first tries to access the proxy server and if that fails it tries to access the site directly. You can specify proxy settings using the ProxyServer and ProxyPort properties, or NetTalk will use Internet Explorer's proxy settings. You can also disable all the use of proxy (for webclient) by setting CanUseProxy = 0.
Note: You can use Fetch to download any type of file from the webserver. e.g. You can call
.Fetch('www.example.com/example.zip') or .Fetch('www.example.com/example.pdf') or .Fetch('https://www.clarionshop.com/secure/checkout.cfm') ! Uses SSL (HTTPS) Connection
Note: Be sure to read about the SSL DLL Distribution if you want NetWebClient to work with HTTPS sites.
Note: This implementation does not do certificate checking yet (we plan to add this later on), but it will allow you to communicate and download from secure sites.
DecodeWebString (string p_PostString) Dencodes a string from say 'Fred%20Bloggs' to 'Fred Bloggs'
See also .EncodeWebString()
EncodeWebString (string p_PostString) Encodes a string from say 'Fred Bloggs' to 'Fred%20Bloggs'
See also .DecodeWebString()
ErrorTrap(string errorStr, string functionName) ,Virtual
(Notification Method)
This method is called when an error occurs. Typically you will want to override this method and place in your code to handle errors when they occur.
Typically you'll want to suppress messages from being displayed in this function. You can do this by ticking the Suppress Error Messages in the extension template.
Free
Frees all allocated memory. This method is automatically called when the object is killed, but some programmers may want to call it independently.
GetValueFromWebString (string p_VarName, string p_PostString)
Returns the variable value in the web string.
Example:
Name=Fred&Age=25
the value of the Age variable name is 25GetVariableNameFromWebString (long p_number, string p_string)
Returns the nth variable name in the web string.
Example:
Name=Fred&Age=25
the 2nd variable name is Age
PageReceived
(Notification Method)
This method is called when a page has been downloaded. A page could also be an image or an file that you have chosen to download. This method is also called after the header has been downloaded if you chose to just download the header.
The full downloaded data (including header) is available in
self.Page [1 : self.PageLen]
if PageLen > 0
And the header is available in
self.Page [1 : self.HeaderLen]
if self.HeaderLen > 0
Post (String p_Url,String p_PostString)
This method is similar to Fetch() in that it returns a page, but it also has the ability to post data to a web site. Some web page forms use method=POST. You will need to use this method to send data to them. See the netdemo.app for examples of using the post method.
PostString can be any sized string (e.g. can be very big)
e.g.
ThisWebClient.Post (clip(PostURL), clip(PostString))
SavePage (string FileName)
This method saves the page that has been downloaded to disk. It stripes off the headers and just saves the page content.
This method will save all kinds of files that can be downloaded from a web server. e.g. web pages (htm), graphics (jpg / gif / png) and programs (zip / exe).
If successful self.error = 0
You can call this from the PageReceived method or you could put a Save button on the screen and allow the user to save pages.
SetAllHeadersDefault()
This method just resets all the Header properties that you or the object may have set during use. You can override this method if you wish to set your own defaults, (see the existing NetWebClient.SetAllHeadersDefault method in the nettalk.clw file to see which properties you need to be setting).
Alternatively and more easily you can make tweaks to the Header Properties you can just set the Header properties before making a call to the Fetch() or Post() methods.
TextOnly()
Converts the HTML page into plain text.
AsyncOpenUse long Set this property to 1 to use Asynchronous Open. This is the recommended way to use the Web Client Object
AsyncOpenTimeOut long This is length of time in hs (hundreths of a second) after which the asynchronous open will timeout. Defaults to 9 seconds (900hs). Example use:
self.AsyncOpenTimeout = 200 ! 2 seconds
or
self.AsyncOpenTimeout = 1000 ! 10 seconds
Tip: Although this property is measured in hs it will only timeout to an accuracy of a second. If this really doesn't suit your program please let us know at support@capesoft.com
Authorization String(256)
See the section below called Web Authorization. Busy long
Indicates a page is in the process of being downloaded.
CanUseProxy long
Indicates that this object may use the Proxy Server.
If you set to 1 it will try and use the proxy server settings that are specified in Internet Explorer. Alternatively you can override these by setting the .ProxyServer (string) and .ProxyPort property. But it's normally best to allow it to read the settings from Internet Explorer
CustomHeader String(4096)
This string allows folk to add their own custom headers to the Get or Post requests. (Done internally in the ._CreateRequestHeader() method).
Note - this string must not have trailing <13,10>.
e.g.
self.CustomHeader = 'F1=MyData' & |
'<13,10>F2=MyData'
Error Long Contains the error value of the last transaction. 0 = no error. You can use the InterpretError() method for converting the error code into an error string.
ErrorString String(256) Contains the last error string that was reported.
Will only be updated after the parent.ErrorTrap call in the ErrorTrap() method.
Host String(256) The host portion of the URL.
HeaderLen long
This is the length of the Header. The header is stored in Page, unless the TextOnly() method has been called, in which case HeaderLen = 0 and there is no header in Page
HeaderOnly Long
Specifies that the Fetch() method should only return the header component of the response from the server.
InActiveTimeOut long This is length of time in hs (hundredths of a second) after which an idle connection will timeout. When the timeout occurs a packet of packettype NET:SimpleIdleConnection will be sent to .Process()
Tip: Although this property is measured in hs it will only timeout to an accuracy of a second.
Page &String
This is where the page that is returned from the server will be stored. It is a dynamically allocated string. The length of the the page is stored in PageLen
PageLen long
See Page
ProxyAuthorization String(256)
See the section below called Web Authorization. ProxyPort ushort
See ProxyServer
ProxyServer string(256)
Allows you to specify a Proxy Server, or it will use Internet Explorers' proxy settings.
ServerResponse long
In .PageReceived this property (ServerResponse) is set to the response number that the server returned.
If .OptionsDontRedirect = 1, then NetWebClient won't auto redirect on 3xx ServerResponses that have a Location: field in the header.
e.g. Try the following URL jump.capesoft.net which will redirect to www.capesoft.com
(If you run the NetDemo app - see the difference when you press Fetch or Header in the Web Client example with the jump.capesoft.net URL)
How these numbers work:
1xx - information message
2xx - success
3xx - redirection
4xx client error
5xx server erro
Common ServerResponses:
200 OK
301 Moved Permanently - Redirection (NetWebClient automatically does this for you)
302 Moved Temporarily - Redirection (NetWebClient automatically does this for you)
404 Not found
500 Server Error
SSL Long
Automatically set by the NetWebClient class if you fetch a https:// address. Do not set.
Note: See FAQ G8 - for tips to getting SSL to work.
Tip: See the Web Client Jump Start or the NetDemo for examples of using HTTPS
SSLCertificateOptions group(Net:SimpleSSLCertificateOptionsType).
Options for the SSL Certificates and Certificate Verification.
See Net:SimpleSSLCertificateOptionsType
Tip: See the Web Client Jump Start or the NetDemo for examples of using HTTPS
SSLError long
Contains the SSL Error Code.
See also self.Error and self.WinSockError
Tip: See the Web Client Jump Start or the NetDemo for examples of using HTTPS
SSLMethod Long
You can leave this alone (defaults to the best option), or see NetSimple.SSLMethod.
Tip: See the Web Client Jump Start or the NetDemo for examples of using HTTPS
Advanced Properties
Accept_ String(256) User configurable. Defaults to
'image/gif, image/x-xbitmap, image/jpeg, image/pjpeg, */*'
in .SetAllHeadersDefault
AcceptEncoding String(256) User configurable. Defaults to
''
in .SetAllHeadersDefault, can also be set to things like 'gzip, deflate' if you will handle you own decompression
AcceptLanguage String(256) User configurable. Defaults to
'en'
in .SetAllHeadersDefault, but you could say set this to 'en-za' for South African English.
CacheControl String(256) User configurable. (Also see self.Pragma_)
Use
self.Pragma_ = 'No-Cache'
self.CacheControl = 'No-Cache'
if you want to force no caching via Proxy Servers.
This is demonstrated in the NetDemo and Web Poll example.
ContentLength Long Deprecated. Set automatically in POST method.
ConnectionKeepAlive Long User configurable. Try and keep connection alive. Defaults to 1
ContentType String(256) User configurable.
Cookie String(256) User configurable.
IfModifiedSince String(256) User configurable.
IfNoneMatch String(256) User configurable.
OptionDontRedirect long
This option (if set to 1) will prevent the object from automatically redirecting URLs that return with a 3xx ServerResponse and that have a Location: field in the header.
e.g. Try the following URL jump.capesoft.net which will redirect to www.capesoft.com
(If you run the NetDemo app - see the difference when you press Fetch or Header in the Web Client example with the jump.capesoft.net URL)
OptionFinishOnEndHTMLTag long
This option (if set to 1) will cause .PageReceived to be called if the page we are receiving has no content-length, and the last 7 characters are </html>. You should not need this on, but the versions prior to 3.07behaved like this by default. This has now been turned off and moved to a configurable setting (which is off by default).
Pragma_ String(256) User configurable. (Also see self.CacheControl)
Use
self.Pragma_ = 'No-Cache'
self.CacheControl = 'No-Cache'
if you want to force no caching via Proxy Servers.
This is demonstrated in the Netdemo and Web Poll example.
ProxyConnectionKeepAlive Long User configurable.
Referer String(256) User configurable.
UserAgent String(256) User configurable. Defaults to
'Mozilla/4.0 (compatible; MSIE 5.0; Windows 98; DigExt)'
in .SetAllHeadersDefault.
![]()
The NetWebClient object allows you to use Web Authentication in your application. Here is an example of using Basic Authentication.
Authentication is needed when you receive header information like this:
HTTP/1.0 401 Unauthorized
Via: 1.0 EARTH
Content-type: text/html
Pragma: no-cache
WWW-Authenticate: Basic realm="Page name"
Proxy Authentication is needed when you receive header information like this:
HTTP/1.0 407 Proxy Authentication Required
Via: 1.0 EARTH
Content-type: text/html
Pragma: no-cache
WWW-Authenticate: Basic realm="Page name"
The bold parts indicate the parts of importance. The first line contains the return code and a short description. This indicates to us that the server needs to know who we are. The "WWW-Authenticate" part supplies us with more information as to which page (realm) needs this identification.
The word "Basic" in the string indicates the method of encoding the server wishes us to use when we send the authorization. Basic just means Base64 encoding.
! 401 Unauthorized: we need a password ! **********
! This means that before the server can send the file to you,
! it needs to know who you are. Normal plan of action
! involves asking the user for his username and password,
! encoding it in the form "username:password" (without
! the quotes) in Base 64 form. NetTalk supplies a function to
! do this for you - look further down for details.
! Here we generate the authorization string that is sent
! to the server. It consists of the username, immediately
! followed by a colon, which is in turn followed by the
! password. We pass this string to the encoding function,
! and send the Base64 result to the server.
AuthStr = clip(OurUsername) & ':' & clip(OurPassword)
! Compute the length of the string to be encoded
AuthStrLen = len (clip(AuthStr))
self.Authorization = 'Basic ' & NetBase64Encode (clip(AuthStr), AuthStrLen)
self.Fetch (OurURL)For Proxy Authentication you can use the following:
! 401 Unauthorized: we need a password ! **********
AuthStr = clip(OurUsername) & ':' & clip(OurPassword)
! Compute the length of the string to be encoded
AuthStrLen = len (clip(AuthStr))
self.ProxyAuthorization = 'Basic ' & NetBase64Encode (clip(AuthStr), AuthStrLen)
self.Fetch (OurURL)
If you are using the WebClient object and are getting 10038 errors the following section may be useful:
10038 errors can be produced when the web server closes the connection immediately after the web page data has been sent. As soon as the web page is received the NetTalk DLL notifies the web object that the page has been received. Soon after this the NetTlk DLL becomes aware that the connection is closed and notifies the WebClient Objet. Because thee notifications are messages posted from the DLL to the object layer the object is unaware that the connection has closed until it receives the message. Unfortunately by the time the object receives the message it has called it's virtual PageReceived() method. If you application tries to fetch another page in this PageReceived method it will by default try to use the current connection (which has actually closed - although the object is unaware of this). Hence an error occurs - 10038 which means a "Socket operation on non-socket."
To get around this problem simply insert a self.abort() after receiving a page in the PageReceived() method.
These object will enable you to easily build your own FTP (File Transfer Protocol) clients that access an FTP Server. This means you can add FTP file transfer and other related functionality to your applications.
For data transfer to take place between a user and an FTP Server, two connections need to be established:
one to transmit FTP commands and replies between the user and the server,
and another - to transfer data.
To support this, the NetFTPClient was built from two objects based on the NetSimple: NetFTPClientControl and NetFTPClientData.
The NetFTPClientControl object is a Simple Client, as it initiates a connection with the FTP Server in order to carry out your FTP requests. The other connection, necessary for transfer of data, requires a "listening" port - this part of the job is handled by the NetFTPClientData object, which is a Simple Server.
You will be able to make use of most of the functionality provided by the NetFTPClient with the help of the methods and properties of the NetFTPClientControl. The NetFTPClientData object deals specifically with how the data transfer and processing of the data received is handled.
Before you call any of the methods provided by the NetFTPClient that involve accessing an FTP Server, you need to set some properties:
ThisNetFTPClientControl.ServerHost = MyFTPServer
ThisThisNetFTPClientControl.User = MyUser
ThisThisNetFTPClientControl.Password = MyPassword
ThisThisNetFTPClientControl.OpenNewControlConnection = 1
If you are accessing an anonymous FTP Server, you do not have to set the user details (NetFTPClientControl.User and NetFTPClientControl.Password), the defaults will enable you to login as an anonymous user. However, if anonymous access is not permitted at the server, make sure that you use valid user name and password.
By setting the NetFTPClientControl.OpenNewControlConnection flag to 1, you show the necessity for a new control connection to be established. You need to set this flag when you approach an FTP Server for the first time. Therefore, if you call a number of NetFTPClient methods without changing the NetFTPClientControl.ServerHost property, you only need to set NetFTPClientControl.OpenNewControlConnection once, right in the beginning.
It is also possible to login as a different user without disconnecting from your current FTP Server. To do this, change the user details and set NetFTPClientControl.LoggedIn to 0 before calling the next method.
Please note that these objects are demonstrated in the NetDemo example application.
Passive mode FTP is a where the FTP client does not make a Listening Server Port, this instead is created by the FTP Server. This can help in allowing FTP to work through proxy server and firewalls. By default the NetFTP objects run in active mode.
To use the NetFTP objects in a PASSIVE mode, please go the procedure extension template of the NetFTPClientData object and in the Settings Tab select the Use Passive Mode FTP.
Using FTP is now even easier than ever now that we've added a set of extension and control templates to speed up the process of adding FTP upload and download functionality to your applications. You'll want to use this method if:
1. You have a file to upload to the FTP server using a single procedure call.
2. You have a file to download from an FTP server using a single procedure call.
3. You have a list (queue) of files you want to upload and/or download in one go.
4. You want to use wildcards for the filenames.
There is an example of these controls in action in the FTPDemo example application.
Note: The call to either FTP_UploadFile, FTP_DownloadFile or FTP_Files_Procedure is Synchronous. This means that they won't return until they've done the job. This also means the current thread that calls any of the procedures will be blocked until FTPing completes.1) Open or create a new application.
2) Clarion 5 Users (only):2a) Go to the "Project" Menu click "Properties" this will load the Project Editor.
2b) Click on "Project:Generator" in the very top of the left-hand pane, then press the "Properties" button and make sure your application's "Target OS" is set to " Windows 32-bit". If it's not, change it to 32-bit. (NetTalk only works for 32-bit applications).
2c) (Optional but recommended - turn on logging options - only needed in Clarion 5, as the NetTalk template in more recent versions does this for you):
Go to the defines Tab and add
NETTALKLOG=>1
This will turn on the NetTalk logging option (for debugging).
Then press OK a number of times to return to the Application Tree3) From the 'Application' menu select 'Template Utility' and run the 'Import NetTalk FTP Files Procedures' utility template which will add 3 procedures to your application: FTP_UploadFile, FTP_DownloadFile and FTP_Files_Procedure.
4) Using the 3 imported procedures:
4.1) Uploading: You can upload a file(s) by simply calling the FTP_UploadFile with the following parameters:
(string pFTPDir,string pFTPServer,string pFTPUser,string pFTPPassword,string pLocalPath,byte pOptions=0)
pFTPDir: is the directory in the FTP server where the file(s) must be placed.
pFTPServer: is the IP address, or dns name, of the FTP Server.
pFTPUser: is the user with which you need to log on to the FTP server.
pFTPPassword: is the password with which you need to log on to the FTP server.
pLocalPath: is the path and file name (file name includes wild cards) of the file(s) to upload.
pOptions: a bit loaded flag, you can use the following equates:
NetFTP:UseTempFile (uploads to a temporary file first and then renames to the correct file once the uploading is complete)
NetFTP:HideWindow (hides the window while the upload is in progress)4.2) Downloading: You can download a file(s) by simply calling the FTP_DownloadFile with the following parameters:
(string pFTPDir,string pFTPServer,string pFTPUser,string pFTPPassword,string pLocalPath,byte pOptions=0)
pFTPDir: is the directory in the FTP server where the file(s) must be placed.
pFTPServer: is the IP address, or dns name, of the FTP Server.
pFTPUser: is the user with which you need to log on to the FTP server.
pFTPPassword: is the password with which you need to log on to the FTP server.
pLocalPath: is the path and file name (file name includes wild cards) of the file(s) to upload.
pOptions: a bit loaded flag, you can use the following equates:
NetFTP:DeleteAfter (deletes the file off the FTP server once the download is complete)
NetFTP:HideWindow (hides the window while the upload is in progress)4.3) Multiple files (uploading and downloading from a queue): You can create a queue of files (including wildcards) to upload and/or download to your FTP server. The queue structure is located in your NetALL.inc file (in your clarionx\libsrc directory) and is as follows:
NetFTPQueueType queue,type
Action long !upload = 0 , download = 1
dir string(512) !Local path where the file resides Only used if not blank and not the same as the last
LocalFile string(512) !Can include wildcards (* and ?) - for sending
RemoteFile string(512) !Can include wildcards (* and ?) - for receiving
LocalFileSize long
LocalFileDate long
RemoteFileSize long
RemoteFileDate long
DeleteAfter long !Used for downloading - if set, then the file(s) is deleted after a successful download
UseTempFile long !Used for uploading - if set, then the file(s) is uploaded to a temporary file and then renamed to the correct one after a successful upload.
endBefore calling the FTP_Files_Procedure, you can add as many files to this queue as you would like to upload during this session.
Net:FTPGroupType group
Server cstring (NET:StdStringSize)
Port long
Active long !0 = passive, 1=active
User cstring (NET:StdStringSize)
Password cstring (NET:StdStringSize)
FTPDir string(512) !leave blank if not required.
HideWindow long !Set if you want to hide the window.
ErrorOccurred long !If an error occurs in the FTP_Files, then it sets this flag
IgnoreTempFiles long !0 = delete *.*tmp files found in the FTP directory before uploading, 1 = ignore these files.
endYou need to declare a local instance of the above queue and group and then pass these to the FTP_Files_Procedure.
Example declaration:
LocNET:FTPq queue(NetFTPQueueType),pre(LocNET:FTPq)
end
LocNET:FTPg group(Net:FTPGroupType),pre(LocNET:FTPg)
endPassing these to your FTP_Files_Procedure:
do AddFilesToNetQ !This is your routine that adds files to the queue to FTP
LocNET:FTPg.Server = 'localhost'
LocNET:FTPg.User = MyUser
LocNET:FTPg.Password = MyPassword
LocNET:FTPg.Active = 0
LocNET:FTPg.FTPDir = 'Test'
LocNET:FTPg.IgnoreTempFiles = 1
FTP_Files_Procedure(LocNET:FTPq,LocNET:FTPg) !Queue as first parameter, then the group
!This is a synchronous call so we can immediately check the error.
If LocNET:FTPg.Error
do FTPErrorRoutine !This is your error handling routine
else
free(LocNET:FTPq)
endIn your FTP_Files_Procedure, you will notice 3 extension templates: 2 of 'NetTalk or NetSimple Object' and a 'NetTalk: FTP File Controls' template. If you go to the prompts of your FTP File Controls template you will notice the following options on the Options tab:
- Disable FTP Flag field: If you want to, you can create a global flag that you can set from anywhere in your program to disable FTP (assuming all you FTPing is done through this window). Enter the name of the global variable in here.
- Retries (if FT
- InActive Timeout (hs): You can set when this FTP client times out (when it can't communicate with the server anymore). The time is in hs - hundredths of a second
- P fails): Set the amount of times to retry if an error occurs in the FTP transfer.
- Time between retries (hs): Set the time after the error occurs when the next retry begins.
- Warn if no files to upload (if window is not hidden): In some cases you may want to inform the user if they are trying to upload a file that doesn't exist. The HideWindow option passed to this procedure must be clear in order to display this warning message (passed in the group in step 4.3. above).
"I want to get a file using FTP, how do I start?"
Note: In many cases, the FTP Control templates will get you exactly the FTP functionality that you want.
This section exists to get you going quickly. You'll need to read the rest of the documentation to access all the other features and functionality of FTP, but if you follow the following instructions you can get FTP going in your application in 10 minutes.
We recommend that you have worked through at least one of the scenarios as these will get you accustomed to the way NetTalk interfaces with your application.
Code Example:
There is a copy of this JUMP START example in your example folder on your machine. See Clarion/3rdParty/Examples/NetTalk.
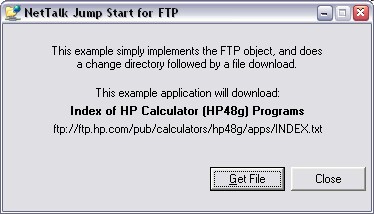
Example Screenshot
Objectives of this Quick Start for FTP:
Instructions:
- add FTP to a window
- change directory
- get a file
- close the connection
1) Add the "Activate_NetTalk" Global Extension to your application. Also make sure your application will be compiled in 32-bit mode. (See scenario one for help).
2) Add a window to your application. This will be the window you want the FTP to be activated from. Put a button on the window.
3) Add the NetTalk procedure extension "IncludeNetTalkObject" to the window in your application that you want to access FTP from. Set the ObjectName to ThisFTPData, the Base Class to NetFTPClientData. (FTP uses two objects, one for data transfer and one for command control. This is one is the data one).
Set the NetFTPClientData Object in the Settings Tab to ThisFTPControl (this is the object you will define in step 4).
4) Add another IncludeNetTalkobject extension to the window and set the ObjectName to ThisFTPControl, the Base Class to NetFTPClientControl.
In the Settings Tab set NetFTPClientControl Object to ThisFTPData (this is the name you specified in step 3).
Important: Please check now that you typed in the correct names in both objects Settings Tab. Mistakes here can cause your application to either not compile or to GPF.
5) Insert the following into the embed code where you need it (for this example you could put this in the embed point of the accept event of a button):
setcursor (CURSOR:WAIT)
! This is the code to get a remote file from the FTP server.
! The first 5 lines you just need to do once, to set up the
! properties so the object knows who to connect to.
! This FTP object will automatically log in to the FTP
! server, the first time you call one of the action methods
! like the ChangeDir() or GetRemoteFile() method.
ThisFTPControl.ServerHost = 'ftp.hp.com'
ThisFTPControl.User = 'anonymous'
ThisFTPControl.Password = 'anonymous@hotmail.com'
ThisFTPControl.OpenNewControlConnection = 1
ThisFTPControl.BinaryTransfer = 1
ThisFTPControl.ChangeDir ('/pub/calculators/hp48g/apps/') ! Change Directory
6) Insert the following into the ThisFTPControl. Done() method code embed:
setcursor
case lower(clip(self._Command))
of 'aborting'
of 'appendtofile'
of 'changedir'
! This is the code to get a remote file.
! We do this after the change directory has worked
setcursor (CURSOR:WAIT)
ThisFTPControl.GetRemoteFile('INDEX.txt','.\Download.txt') ! (source, destination)
! Download file
! You could change this method call to call one of the other transactions
! like PutFile(source, destination)
! e.g. PutFile('.\myfile.txt', 'myfile.txt') etc.
of 'changedirup'
of 'deletefile'
of 'getcurrentdir'
of 'getdirlisting'
of 'getremotefile'
! Notify user that the file downloaded fine
Message ('File downloaded successfully to ' & longpath() & '\Download.txt',|
'NetTalk FTP QuickStart',ICON:ASTERISK)
run ('notepad.exe Download.txt')
! You can put more code in here to start the next
! transaction if you are building a larger
! application.
self.quit() ! Tell FTP server we are quitting now
! You don't have to quit at all if you don't wont to
! You could leave the connection open and do more transactions
! In fact you don't even have to quit if you have finished all
! transactions.
of 'makedir'
of 'noop'
of 'putfile'
of 'removedir'
of 'rename'
of 'quit'
! This is where you can put code in once the QUIT command has taken place
end
7) Insert the following into the ThisFTPControl.ErrorTrap() method code embed:
setcursor
! Handle specific errors here.
case lower(clip(self._Command))
of 'aborting'
of 'appendtofile'
of 'changedir'
Message ('Change Directory command failed. ' & self.Error & ' ' & errorStr)
of 'changedirup'
of 'deletefile'
of 'getcurrentdir'
of 'getdirlisting'
of 'getremotefile'
Message ('Get Remote File command failed. ' & self.Error & ' ' & errorStr)
of 'makedir'
of 'noop'
of 'putfile'
of 'removedir'
of 'rename'
of 'quit'
end
8) Run your application. (NB. You'll need to be connected to the Internet to download the example file - but you can also change the properties of the FTP server and File, if you just want to run the app on your LAN).
Important: The design of this FTP object does not require for you to call some-sort of login method. You simply call the functionality you want (e.g. GetDirListing()) and the login sequence will happen automatically if the connection has not already been established. For more details see the FTP objects section.
AppendToFile (string LocalFileName,
string RemoteFileName)(Asynchronous Method)
Similar to Put, but does an append.
Transfers the local file specified by LocalFileName from the local host to the FTP Server, and stores it in RemoteFileName. If a file with the same path and name as RemoteFileName already exists, the transferred data is appended to the end of the existing file. If no such file exists, a new file is created.
Will either call .Done() or ErrorTrap() or success or failure. You can also look at the self.Busy property before calling this method to see if the FTP object is currently busy with another command.
CalcProgress Call this method in your Timer Event. It will keep the progress information updated.
It's recommended that you place a call to .CalcProgress in your Timer Event, with a timer of say 25hs.
See the example in the NetDemo application.
CalcProgressOptimized This is the method that calculates the progress of the FTP transfers. It is called from CalcProgress. You can put code in here after the parent call if you want to update screen properties like bytes transferred. See the NetDemo application.
ChangeDir (string DirectoryName) (Asynchronous Method)
Changes the remote current working directory to DirectoryName.
Will either call .Done() or ErrorTrap() or success or failure. You can also look at the self.Busy property before calling this method to see if the FTP object is currently busy with another command.
ChangeDirUp (Asynchronous Method)
Changes the remote current working directory to one level higher in the directory tree.
Will either call .Done() or ErrorTrap() or success or failure. You can also look at the self.Busy property before calling this method to see if the FTP object is currently busy with another command.
DeleteFile (string RemoteFileName) (Asynchronous Method)
Deletes the remote file specified by RemoteFileName.
Will either call .Done() or ErrorTrap() or success or failure. You can also look at the self.Busy property before calling this method to see if the FTP object is currently busy with another command.
Done (Notification Method)
This method is called once a NetFTPClientControl method involving FTP Server access has completed its execution successfully.
After you make a call to a NetFTPClientControl method involving FTP Server access, you should wait for either Done() or ErrorTrap() to be called, before proceeding onto another FTP request. Inside Done() you can determine the corresponding command that reached success with _Command property.
e.g.
case lower(clip(self._Command))
of 'aborting'
! Put your code in here
of 'appendtofile'
! Put your code in here
of 'changedir'
! Put your code in here
of 'changedirup'
! Put your code in here
of 'deletefile'
! Put your code in here
of 'getcurrentdir'
! Put your code in here
of 'getdirlisting'
! Put your code in here
of 'getremotefile'
! Put your code in here
of 'makedir'
! Put your code in here
of 'noop'
! Put your code in here
of 'putfile'
! Put your code in here
of 'removedir'
! Put your code in here
of 'rename'
! Put your code in here
of 'quit'
! Put your code in here
end
If an error occurs while trying to complete the task the ErrorTrap() method gets called and if an FTP error occurred, its value will be placed in FTPError.
ErrorTrap (string errorStr,string functionName) (Notification Method)
Note: All the errors that occur in either NetFTPClientControl object or the NetFTPClientData object will be sent to this method. If an FTP-specific error occurs, NetFTPClient.Error will be set to "General FTP error". In such a case, look at the value of FTPError to find out more about the error that has occurred.
See NetSimple.ErrorTrap.
Typically you'll want to suppress messages from being displayed in this function. You can do this by ticking the Suppress Error Messages in the extension template.
GetCurrentDirName (Asynchronous Method)
This method retrieves the name of the remote current working directory and stores it in CurrentDirectory.
Will either call .Done() or ErrorTrap() or success or failure. You can also look at the self.Busy property before calling this method to see if the FTP object is currently busy with another command.
GetDirListing (string DirectoryName) (Asynchronous Method)
Retrieves a list of contents of the remote directory specified by DirectoryName and stores them in self.DirListingQ. To get contents of the current working directory, pass an empty string as the parameter.
By setting FullListing property to 0, you will receive a list of file or directory names only. When FullListing is non-zero, full information on the files will be retrieved.
Note: DirectoryName can also contain a remote file name.
In this case, current information on the file will be returned.
Note: Many FTP Servers are case sensitive
Examples:
GetDirListing ('mydirectory') ! dir
GetDirListing ('myfile.exe') ! file
GetDirListing ('m*') ! file or dir
GetDirListing ('m*.exe') ! file
Will either call .Done() or ErrorTrap() or success or failure. You can also look at the self.Busy property before calling this method to see if the FTP object is currently busy with another command.
In some instances the server might return the directory listing in an unknown format, in which case the ErrorTrap method will be called with the error "Unknown format of directory listing". See FAQ X11 for the solution to this problem.
GetRemoteFile (string RemoteFileName,
string LocalFileName)(Asynchronous Method)
Transfers the remote file specified by RemoteFileName from the FTP Server to the local host, and stores it in LocalFileName. If a file with the same path and name as LocalFileName already exists, it will be overwritten by the received file. A new file is created, otherwise.
Note: If you are using Passive Mode and want the progress bar & progress properties to work then you need to do a directory listing first, so that the passive mode code find know the size of the file you are getting.
Will either call .Done() or ErrorTrap() or success or failure. You can also look at the self.Busy property before calling this method to see if the FTP object is currently busy with another command.
MakeDir (string DirectoryName) (Asynchronous Method)
Pass the name of the new remote directory to be created as a parameter.
Will either call .Done() or ErrorTrap() or success or failure. You can also look at the self.Busy property before calling this method to see if the FTP object is currently busy with another command.
NoOp (Asynchronous Method)
This method calls the FTP NOOP command. NOOP is a non-operational command designed to nothing. It is useful for preventing a FTP connection from closing. For instance you can put it in the EVENT:Timer accept embed like this:
0{prop:timer} = 0
! Every 60 seconds send a NOOP
if KeepConnectionAlive and |
MyFTPClientControl.OpenFlag
! Keep the connection open by sending NOOP
if MyFTPClientContol.Busy = 0
MyFTPClientControl.NoOp()
end
end
0{prop:timer} = 6000 ! Call this every 60 seconds
Note: The NoOp() method will call .ErrorTrap if the FTP object is currently busy with another command. So it's recommended that you check if the self.Busy property is set before calling NoOp().
Will either call .Done() or ErrorTrap() or success or failure. You can also look at the self.Busy property before calling this method to see if the FTP object is currently busy with another command.
ProcessIdleConnection (Notification Method)
This method is called whenever the control connection has been idle for a period longer than self.InActiveTimeout. The parent.ProcessIdleConnection will abort the current connection and call .ErrorTrap. So if you want a different behaviour then put a return before the parent call in your derived method, or set self.InActiveTimeout = 0 after the parent.init() method call.
Rename (string RemoteFileName,
string RemoteNewFileName)(Asynchronous Method)
Renames the remote file specified by RemoteFileName to RemoteNewFileName. This method can also be used to rename a directory.
Will either call .Done() or ErrorTrap() or success or failure. You can also look at the self.Busy property before calling this method to see if the FTP object is currently busy with another command.
PutFile (string LocalFileName,
string RemoteFileName)(Asynchronous Method)
Transfers the local file specified by LocalFileName from the local host to the FTP Server, and stores it in RemoteFileName. If a file with the same path and name as RemoteFileName already exists, it will be overwritten by the file being transferred. A new file is created, otherwise.
Will either call .Done() or ErrorTrap() or success or failure. You can also look at the self.Busy property before calling this method to see if the FTP object is currently busy with another command.
Stop (Asynchronous Method)
Stops the execution on an FTP command currently in process. Example: Stopping a file download or upload.
Will either call .Done() or ErrorTrap() or success or failure. You can also look at the self.Busy property before calling this method to see if the FTP object is currently busy with another command.
Note1: Depending where and when you call this function, you could get two calls to Done() in response.
Note 2: We suggest waiting a couple of seconds after calling this function to let the FTP server settle down, as it may post back some warning messages, which would be confusing if you say requested a file, straight after doing a Stop, as the FTP servers warning would appear to come back as a response to the File Get.
RemoveDir (string DirectoryName) (Asynchronous Method)
Removes the remote directory specified by DirectoryName.
Will either call .Done() or ErrorTrap() or success or failure. You can also look at the self.Busy property before calling this method to see if the FTP object is currently busy with another command.
Quit (Asynchronous Method)
This method will allow for all the data transfer in process to complete and then disconnect you from the FTP Server.
Will either call .Done() or ErrorTrap() or success or failure. You can also look at the self.Busy property before calling this method to see if the FTP object is currently busy with another command.
_FigureOutDirFormat Advanced Programming:
You can put code in the virtual method of your objects ._FigureOutDirFormat() method to handle special cases of directory formats returned by FTP servers (for instance the format returned by some mainframes).
The purpose of this function is to look at the code in the current packet and determine a format structure number. This number is store in self._DirListingFormat. Example code may be
<after parent call>
<algorithm to check for your expected format>
self._DirListingFormat = 255 ! Programmer configured format
self._DirFormatSet = true
At the moment the following format numbers exist:
1 - DOS format e.g. [03-21-02 03:07PM 10 test_file.txt]
2 - Unix format (sixth column is date) e.g. [drwxr--r-- 1 user group 0 May 10 14:22 Desktop]
3 - Unix format (fifth column is date) e.g. []
4 - Short Directory Listing Format
200 to 255 - available for Programmers to use. If you set the self._DirListingFormat to one of these options the method self._FillDirListingQ_FormatCustom() method will be called for you to populate the self.ControlConnection.DirListingQ queue.
In some instances the server might return the directory listing in an unknown format, in which case the ErrorTrap method will be called with the error "Unknown format of directory listing". See FAQ X11 for the solution to this problem. If _DirListingFormat is set to and including 200 to 255 then the self._FillDirListingQ_FormatCustom() method is called instead of the appropriate method (e.g. NetFTPClientData._FillDirListingQ_Format01)
Authorization String(256) If specified it will be included in the header section. See the Web Authorisation section for more details.
BytesLeftToReceive Long The number of bytes left to receive from the FTP Server. Keeps track of file transfer and is updated as packets are received from the server.
Note: If you are using Passive Mode and GetRemoteFile and want the progress bar & progress properties to work then you need to do a directory listing first, so that the passive mode code find know the size of the file you are getting.
Note: You need to call the CalcProgress() method in a timer event to keep this information updated. See the example in the NetDemo application.
BytesLeftToSend Long The number of bytes left to send to the FTP Server. Keeps track of file transfer and is updated as packets are sent to the server.
Note: If you are using Passive Mode and GetRemoteFile and want the progress bar & progress properties to work then you need to do a directory listing first, so that the passive mode code find know the size of the file you are getting.
Note: You need to call the CalcProgress() method in a timer event to keep this information updated. See the example in the NetDemo application.
BinaryTransfer Long By default, binary data transfer takes place when files are transferred between your host and the FTP Server (BinaryTransfer = 1). Set BinaryTransfer to 0 before calling a method involving file transfer to transfer data as ASCII characters.
Busy Long self.Busy = 1 when the FTP object is busy with a command, otherwise self.Busy = 0
ControlPort UShort This is for the connection to the FTP Server. It's the port on the FTP Server that you want to connect to. Defaults to port 21 which is the default FTP port. You can set it to something else in the Init method, or by changing the Port in the derived Open method (before the parent call).
_Command String(256) This property is used to store the name of the method that is currently being executed. If no method is currently executing, _Command will contain the method that was called last.
Possible options for _Command are:
'getremotefile'
'putfile'
'appendtofile'
'rename'
'getdirlisting'
'changedir'
'changedirup'
'makedir'
'removedir'
'deletefile'
'getcurrentdir'
See Done().
CurrentDirectory String(256) See GetCurrentDirectory().
DataPort UShort This is the local port used for the data connection to the FTP Server.
The data connection is opened when a NetFTPClientControl method involving data transfer is called. After the data transfer is completed, the data connection is closed and can only be reopened on the same port after a time out period. For this reason, DataPort is changed constantly to ensure smooth transfer of data.
Set to a random number between the self.lowerbounddataport and the self.upperbounddataportin the Init() method. You can override this after the init() method call should you wish to.
DirListingQ Queue
Name String(FILE:MAXFILENAME)
Shortname String(13)
Date Long
Time Long
Size Long
Attrib Byte
NoOfLinks Long
Owner String(50)
GroupOwnership String(50)
AccessPermissions String(50)
EndSee GetDirListing().
If GetDirListing method is called with FullListing set to 0, only DirListingQ.Name will contain data. If a full listing is retrieved, all the identified pieces of data received will be stored in DirListingQ. Which queue fields will get filled with data depends on the directory listing format used by the FTP Server. Two such formats are supported: MS-DOS format and UNIX format.
ShortName is not used and is always blank.
ExpectedFileSize Long This is the expected size of the file being transferred. If no file transfer is in process, it will contain the size of the file that was transferred last.
Note: If you are using Passive Mode and GetRemoteFile and want the progress bar & progress properties to work then you need to do a directory listing first, so that the passive mode code find know the size of the file you are getting.
Note: You need to call the CalcProgress() method in a timer event to keep this information updated. See the example in the NetDemo application.
FTPError Long FTP specific errors are stored in this property. NetFTPClientControl and NetFTPClientData both use this property to tell which error has occurred.
FullListing Long See GetDirListing().
Set to 1 by default.
LogDataBytes long Logs up to this many bytes to DebugView, in the .Send() method, when the application is run with the /nettalklog command line parameter.
(Default = 0 = off)
LoggedIn Long If you are currently connected and logged in at an FTP Server and you wish to login under a different user name without changing the server, set User and Password to your new user details and set LoggedIn to 0. On your next method call, you will be logged in as the new user without being disconnected from the server first.
LowerBoundDataPort UShort The value of DataPort gets incremented to avoid problems with establishing a data connection. When DataPort reaches the UpperBoundDataPort, it is set back to the LowerBoundDataPort.
Set to 1792 by default. If you experience problems with the default values given to LowerBoundDataPort and UpperBoundDataPort, you can change them to other suitable values.
OnlyUseSizesInDirList Long A very small number of FTP Servers reports the file size of a download incorrectly. Setting self.OnlyUseSizesInDirList to 1 will ignore this and use the filesize of the file from the last directory listing. Default = 0
OpenNewControlConnection Long If you are not currently connected to the FTP Server specified by ServerHost, set this property to 1 before calling any of the NetFTPClientControl methods that require FTP Server access. Once a connection has been established by one of the methods, it will remain open until you explicitly close that connection or a network error occurs.
Password String(256) Set to "anonymous@mail.com" by default and does not require changes for accessing anonymous FTP Servers. If the User property is set to anything either than "anonymous", you have to make sure that this property is set to a valid password for the current user name.
ProgressControl Long NetFTPClient provides an easy way for you to add a progress bar to your application that will show the progress of the file transfer taking place. Once you have added a progress bar control to your window, add the following line of code at the end of ThisWindow.Init():
ThisNetFTPClientControl.ProgressControl = ?MyProgress
Note: If you are using Passive Mode and GetRemoteFile and want the progress bar & progress properties to work then you need to do a directory listing first, so that the passive mode code find know the size of the file you are getting.
Note: You need to call the CalcProgress() method in a timer event to keep this information updated. See the example in the NetDemo application.
ProgressAllowLoading Long
Set ProgressAllowLoading = 1 if you want the progress bar to move while a PUT file operation is loading the file and sending it to the NetTalk DLL. This will move the progress bar from 100% to 0% first as the file is sent to the NetTalk DLL. Then the progress will behave normally as the file is sent over the network to the FTP server. This is useful if you are sending large files, and they take a while to load into memory.
ProgressUpdateInterval Long Defaults to 15 (hundredth of a second i.e. Just less than 7 updates in a second). This value optimizes and controls the CalcProgressOptimized method, restricting the number of times that the screen controls are updated. To disable the optimization set this to 0, otherwise values of 10 (10 updates per second), or 25 (4 updates per second) are also acceptable. Values higher that 25 may cause progress indication to change in too high a step.
ProgressUpdateNow long If 1 it forces CalcProgress() to call CalcProgressOptimized next time CalcProgress() is called. It will be reset to 0 after CalcProgressOptimized has been called.
UpperBoundDataPort UShort See also LowerBoundDataPort
Set to 4400 by default.
User String(256) User is set to "anonymous" by default. If the FTP Server that you wish to access does not permit anonymous login, set this property to a valid user name.
ServerHost String(256) Set ServerHost to the name of the FTP Server that you wish to access.
_LineBreak String(4) Contains the string that marks the end of a line in the data that we receive from the FTP server. This defaults to '<13,10>' and you can adjust this any time after the init() method is called.
![]()
A NetSNMP object allows you to use SNMP (Simple Network Management Protocol) in your application.
SNMP is a Management Protocol for sending and receiving information across a network. There's no limit as to what it can be used for, but typically it's for talking to hardware devices like routers or power-supplies etc.
Some basics first:
SNMP Management Station - This is the 'client' part of SNMP, it requests information from the Agent.
SNMP Agent - This is the 'server' part of SNMP. It sends back information as responses to the Management Station.
Traps - These are exceptions from the normal client / server model. This allows an Agent to post a warning message to a Management Station. For example your UPS may post a warning message to your machines telling them that they must shutdown as the batteries are almost flat.
MIB (Management Information Base) : This is just a fancy name for the list of data that is stored on the Agent.There are three operations that a Management Station can initiate, namely:
GetValue() : get a value of a variable from the Agent
GetNextValue() : get the value of the "next" variable on the Agent
SetValue() : set a value on the Agent
These operations involve sending an SNMP packet to the Agent requesting that the operation is performed. The Agent will send back a response with the result in it.
Apart from sending back responses, an Agent can also initiate a trap (message) to the Management Station:
SendTrap() : send a trap to a management station.There are several things that are useful to know before starting to use SNMP:
1) SNMP runs over UDP (different from TCP).
2) The variables that the management station gets and sets on the agent are stored in a special kind of database on the agent, namely a Management Information Base (MIB). This is implemented as the self.qIBEntries queue on the Agent. The variables in this queue actually all belong to a tree, with the first couple of nodes looking like this:
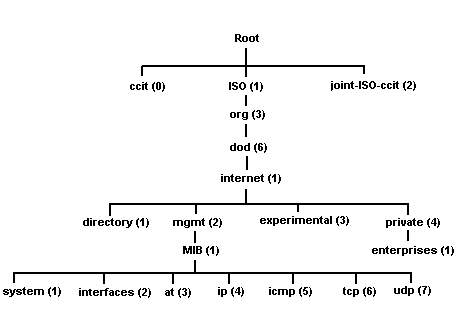
For example: interfaces would be .1.3.6.1.2.1.2 (starting at the root, each dot indicates that you go down a level in the tree and each integer is the number of a node you pass through)
Each node can be represented in two ways: either by the name given at the node (for example interfaces) or by a series of integers separated by dots indicating it position in the tree. The latter (.1.3.6.1.2.1.2) is called an object identifier and is usually written without the leading dot (i.e. interfaces is 1.3.6.1.2.1.2). Notice that all elements in a subtree of the above tree will have the beginning of their names exactly matching the name of the root of the subtree.
The tree can be represented as a list of (variable) names by ordering the object identifiers from top to bottom and from left to right. So the above tree will give rise to the following list:
0
1
1.3
1.3.6
1.3.6.1
1.3.6.1.1
1.3.6.1.2
1.3.6.1.2.1
1.3.6.1.2.2
...
1.3.6.1.2.7
1.3.6.1.3
1.3.6.1.4
1.3.6.1.4.1
2This is how the variables in the agent's MIBEntries queue should be organized. From this it is clear what is meant by the next variable after a given variable.
So how do we add more nodes (variables, object identifiers) to this tree (list)? This is done by loading MIB files into the tree. They are basically text files containing descriptions of new nodes (usually they are referred to as objects in this context) and where in the tree they belong. If we take the root to be level zero, then the above tree up to and including level 6 is actually an MIB file called RFC1155-SMI.mib whereas the remaining subtree below mgmt is RFC1213-MIB.mib.
3) Every agent/management station belongs to one or more SNMP communities, which is basically just a group of network elements. Each agent stores a list of these community names, the MIB variables that members of each community are allowed to access in the first place (called their MIB View) and the access rights the members have to these MIB variables (Read-Only or Read-Write). One entry in this list is called a Community Profile and the list is implemented as the CommunityProfiles queue.
4) As mentioned above, for every agent the MIB View of a community is a subset of the agent's MIB that members of that community are allowed to access. In fact, it is a collection of subtrees of the MIB that they are allowed to access. This information is stored in the MIBViews queue: for each subtree in a community's view, the root of the subtree is stored alongside the community name in this queue.
5) Note that in the case that you are running Windows XP, you can run a Windows XP SNMP service on your computer. When this SNMP service is running, it behaves as an SNMP agent and maintains a MIB with all variables relevant to your computer. To run this service, take the following steps:
1) Go to Control Panel, then to Administrative Tools and then run the Computer Management program.
2) Click on Services and Applications, and then on Services.
3) If SNMP is already installed on you computer, you can should be able to scroll down the list until you find SNMP Service. There will be an option to start the service - click this to start the SNMP agent on your computer.
If there is no SNMP Service entry, SNMP has not yet been installed on your computer. To install it, follow the steps below. Note that you need to be an Administrator to perform the below actions.
1) Go to Control Panel, then to Add or Remove Programs and click on the Add or Remove Windows Components button.
2) Click on Management and Monitoring Tools without selecting or deselecting the checkbox, and click details.
3) Select the Simple Network Management Protocol checkbox and click OK.
4) Click Next, and follow the rest of the steps.
When the installation is complete, SNMP will automatically start running on your computer.
NB. You can not run more than one SNMP application on the same ports at the same time on a single computer. By default SNMP applications use ports 161 and 162. So for example to run the netdemo.app SNMP example you would need to either change the ports that the demo runs on or stop your Windows XP SNMP Service.
![]()
This section exists to get you going quickly. You'll need to read the rest of the documentation to access all the other features and functionality of SNMP, but if you follow the following instructions you can get SNMP going in your application in 10 minutes.
Code Example:
There is a copy of this JUMP START example in your example folder on your machine. See Clarion/3rdParty/Examples/NetTalk.
Objectives of this Quick Start for SNMP:
- Add SNMP to a window
- Get the entire MIB of some machine/network element running SNMP
Instructions:
1) Add the "Activate_NetTalk" Global Extension to your application. Also make sure your application will be compiled in 32-bit mode.
2) Add a window to your application. This will be the window you want the SNMP to be activated from. Add the following to your window:
- An entry, populated from a string(80)called IPAddress (in the Local Data)
- Another entry, populated from a string(255)called Community (in the Local Data)
- A listbox, populated as follows:
- Populate it from a queue called ResultQueue
- This queue should have three fields, Name string(255), Description string (1024) and Value string(255)
- Add these three fields to the listbox as columns
- Add a string to the window called Status with a use variable of ?Status
- Add a long to the local data called timercount
- Add a timer to the window, set to go off every 100 hundredths of a second
- Add a button "Get Info" use ?GetInfo
3) Add the NetTalk procedure extension "IncludeNetTalkObject" to the window in your application that you want to access SNMP from. Set the ObjectName to MyNetSNMP, the Base Class to NetSNMP.
4) Insert the following into the Accepted embed code of the ?GetInfo button:
!Clear the current list of retrieved MIB variables and start collecting the new MIB
free(ResultQueue)
?Status{prop:text} = 'Retrieving the MIB Summary Info ...'
MySNMP.requestID = 1
MySNMP.packet.ToIP = IPAddress
MySNMP.community = community
!Set the starting position to 0.0 - this comes before any variable name that you will ever find in an MIB
free(MySNMP.qVarBindList)
MySNMP.qVarBindList.name = '1.3.6.1.2.1.1' ! Start here
add(MySNMP.qVarBindList)
timercount = 1
MySNMP.GetNextValue()5) Insert the following code into the MyNetSNMP.ErrorTrap() embed:
! An error occurred before we could send out the request
! SupressErrorMessages is on, so display the error in the
! status string and switch the timer off
timercount = 0
?Status{prop:text} = 'Error - ' &clip(errorStr)
6) Insert the following code into the timer event embed:
! First check whether the timer is 'switched on',
! i.e. whether a getnext packet has been sent out
if timercount > 0
! If so, increment the timer
timercount += 1
! if we have waited for more than a second, we probably wont receive a reply at all
if timercount = 3
timercount = 0
?Status{prop:text} = 'Timed out - no SNMP response received'
end
end
7) Insert the following code into the ThisWindow.init() embed after the MySNMP.Init has been called:
MySNMP.open()
! The read community for whatever SNMP agent we are querying will probably be the following:
community = 'public'
IPAddress = 'localhost'
! ----------------------------------------------------------------------------------
! Load the Description Map with some descriptions.
! This means when you get data from an agent you can see Descriptions for the Data
! Not just the dot notation numbers.
! In your application you'll want to add your own here
MySNMP.DescriptionMapAdd ('1.3.6.1.2.1.1.1.0', 'A textual description - should include full name and version of the system''s hardware type, software operating-system, and networking software.')
MySNMP.DescriptionMapAdd ('1.3.6.1.2.1.1.2.0', 'The vendor''s authoritative identification of the network management subsystem contained in the entity. This value is allocated within the SMI enterprises subtree (1.3.6.1.4.1) and provides an easy and unambiguous means for determining ''what kind of box'' is being managed. For example, if vendor ''Flintstones, Inc.'' was assigned the subtree 1.3.6.1.4.1.4242, it could assign the identifier 1.3.6.1.4.1.4242.1.1 to its ''Fred Router''')
MySNMP.DescriptionMapAdd ('1.3.6.1.2.1.1.3.0', 'The time (in hundredths of a second) since the network management portion of the system was last re-initialized.')
MySNMP.DescriptionMapAdd ('1.3.6.1.2.1.1.4.0', 'A textual description of the contact person for this managed node, together with his contact information.')
MySNMP.DescriptionMapAdd ('1.3.6.1.2.1.1.5.0', 'An administratively-assigned name for this managed node. By convention, this is the node''s fully-qualified domain name.')
MySNMP.DescriptionMapAdd ('1.3.6.1.2.1.1.6.0', 'The physical location of this node (e.g. ''telephone closet, 3rd floor'').')
MySNMP.DescriptionMapAdd ('1.3.6.1.2.1.1.7.0', 'A value which indicates the set of services that this entity primarily offers.')
! ----------------------------------------------------------------------------------
display()
! Load the community profiles list with some values
MySNMP.qCommunityProfiles.CommunityName = 'public'
MySNMP.qCommunityProfiles.Permission = NetSNMP:ReadOnly
add(MySNMP.qCommunityProfiles)
MySNMP.qCommunityProfiles.CommunityName = 'private'
MySNMP.qCommunityProfiles.Permission = NetSNMP:ReadWrite
add(MySNMP.qCommunityProfiles)
! Load the MIB with some arbitrarily chosen values, in case you decide to query yourself
! This is for if there is no SNMP agent running on the network
MySNMP.qMIBENtries.name = '1.3.6.1.2.1.1.1.0'
MySNMP.qMIBENtries.valuetype = NetSNMP:String
MySNMP.qMIBENtries.access = NetSNMP:ReadOnly
MySNMP.qMIBENtries.status = NetSNMP:Mandatory
MySNMP.qMIBENtries.description = 'A textual description - should Include full name and version of the system''s hardware type, software operating-system, and networking software.'
MySNMP.qMIBENtries.value = '(Example Data) Hardware: x86 Family 6 Model 6 Stepping 5 AT/AT COMPATIBLE - Software: Windows 2000 Version 5.0 (Build 2195 Uniprocessor Free)'
add(MySNMP.qMIBENtries)
MySNMP.qMIBENtries.name = '1.3.6.1.2.1.1.3.0'
MySNMP.qMIBENtries.valuetype = NetSNMP:TimeTicks
MySNMP.qMIBENtries.access = NetSNMP:ReadOnly
MySNMP.qMIBENtries.status = NetSNMP:Mandatory
MySNMP.qMIBENtries.description = 'The time (in hundredths of a second) since the network management portion of the system was last re-initialized.'
MySNMP.qMIBENtries.value = 0
add(MySNMP.qMIBENtries)
MySNMP.qMIBENtries.name = '1.3.6.1.2.1.1.4.0'
MySNMP.qMIBENtries.valuetype = NetSNMP:String
MySNMP.qMIBENtries.access = NetSNMP:ReadWrite
MySNMP.qMIBENtries.status = NetSNMP:Mandatory
MySNMP.qMIBENtries.description = 'A textual description of the contact person for this managed node, together with his contact information.'
MySNMP.qMIBENtries.value = '(Example Data) Agent Smith, Software Engineer, CapeSoft, South Africa. email: agentsmith@capesoft.com'
add(MySNMP.qMIBENtries)
MySNMP.qMIBENtries.name = '1.3.6.1.2.1.1.5.0'
MySNMP.qMIBENtries.valuetype = NetSNMP:String
MySNMP.qMIBENtries.access = NetSNMP:ReadWrite
MySNMP.qMIBENtries.status = NetSNMP:Mandatory
MySNMP.qMIBENtries.description = 'The physical location of this node (e.g., telephone closet, 3rd floor).'
MySNMP.qMIBENtries.value = 'Top floor CapeSoft Office.'
add(MySNMP.qMIBENtries)
! Load the qMIBViews queue with some arbitrary values
MySNMP.qMIBViews.CommunityName = 'public'
MySNMP.qMIBViews.subtree = '1.3.6.1.2.1'
add(MySNMP.qMIBViews)
MySNMP.qMIBViews.CommunityName = 'private'
MySNMP.qMIBViews.subtree = '1.3.6.1.2.1.1.5'
add(MySNMP.qMIBViews)
MySNMP.qMIBViews.CommunityName = 'private'
MySNMP.qMIBViews.subtree = '1.3.6.1.2.1.1.4'
add(MySNMP.qMIBViews)
8) Insert the following into the MyNetSNMP.ProcessResponse() method code embed:
!Since we have received an SNMP reply, we can switch off the timer
timercount = 0
!First check that the received packet has the same request ID as the one we sent out
if self.requestID <> 1
?Status{prop:text} = 'Unexpected SNMP packet was received - discarded'
display()
return
end
if self.errorstatus = NetSNMP:NoError
! If no error occurred, we have received the next variable and it's value
! So put the received value in the resultqueue and request the
! variable following this one in the MIB
get(self.qVarBindList, 1)
if errorcode()
?Status{prop:text} = 'Error accessing the received data'
display()
return
end
ResultQueue.Name = self.qVarBindList.Name
ResultQueue.Value = self.qVarBindList.Value
ResultQueue.Description = self.qVarBindList.DescriptionIn
add(ResultQueue)
display()
if ResultQueue.Name < '1.3.6.1.2.1.1.7'
self.packet.ToIP = IPAddress
self.packet.fromIP = IPAddress
self.packet.UDPToPort = 161
timercount = 1
self.GetNextValue()
else
?Status{prop:text} = 'Done'
display()
return
end
elsif self.ErrorStatus = NetSNMP:NoSuchName
! If we get a nosuchname error, it means we have reached the end of the MIB
?Status{prop:text} = 'Done'
display()
elsif self.ErrorStatus = NetSNMP:GenErr
! Some general error might have occurred on the agent
?Status{prop:text} = 'A general error occurred on the agent'
display()
else
! Any other error message has no meaning in this (getnext) context
?Status{prop:text} = 'An unknown error occurred on the agent'
display()
end9) Run your application. (NB. There will need to be some machine or other network element on your network that is running SNMP. The best would be to use a computer on the network that has Windows XP installed and is running the SNMP service as is explained in the The NetSNMP Object section, point number 5. You need to enter this machine's IP Address and the relevant read-community (this is usually 'public') before pressing the button).
![]()
NetSNMP:DescriptionMapType Queue, Type
Name String (256) The object identifier of the MIB entry (name of the MIB variable).
Description String (1024) A text string describing the MIB variable. Usually this tells you more about the variable, it's function, etc.
NetSNMP:MibQueueType Queue, Type
Name String (256) The object identifier of the MIB entry (name of the MIB variable).
ValueType long The type of value that the MIB entry holds. See the NetSNMP ValueType Equates section.
Access string(20) Access Permission to the MIB variable. This restricts the actions that any network element may perform on the variable. This can be one of:
- NetSNMP:ReadOnly
- NetSNMP:ReadWrite
- 'NetSNMP:WriteOnly
- NetSNMP:NotAccessible
Status string(20) This is the implementation status of this object. It can be one of:
- NetSNMP:Mandatory
- NeSNMP:Optional
- NetSNMP:Depricated
- NetSNMP:Obsolete
Description String (1024) A text string describing the MIB variable. Usually this tells you more about the variable, it's function, etc.
Value String (256) The actual value of the variable. The value may be a long, ulong or string, depending on the ValueType.
BSsize long In the case that the ValueType is a bitstring, this holds the length of the bitstring in bytes.
BSbits long In the case that the ValueType is a bitstring, this holds the number of unused bits in the last byte of the bitstring.
NetSNMP:ComProfileQueueType Queue, Type
CommunityName String (128) The name of the community.
Permission long The access permission any member of the above community has to it's MIB view on the agent (the collection of subtrees of the MIB that it is allowed to access). This can be one of NetSNMP:ReadOnly or NetSNMP:ReadWrite.
NetSNMP:MIBViewsQueueType Queue, Type
CommunityName String (128) The name of the community. This name may appear more than once - once for every subtree of the MIB that members of this community are allowed to access.
SubTree String (256) The object identifier of the root of the subtree in this MIB view. As an example, if 'Public' was the name of a community that was allowed access to subtrees with roots 1.3.6.1.2.1.1 and 1.3.6.1.2.1.2 then there would be two entries for 'Public' in this queue, namely ('Public', '1.3.6.1.2.1.1') and ('Public', '1.3.6.1.2.1.2').
NetSNMP:VarBindListType Queue, Type
Name String (256) The object identifier (name) of the MIB variable.
ValueType long The type of value that this Variable Bindings List entry holds. See the NetSNMP ValueType Equates section.
Value String (256) The actual value of the variable. This may be a long, ulong or string, depending on the ValueType.
BSsize Long In the case that the ValueType is a bitstring, this holds the length of the bitstring in bytes.
BSbits Long In the case that the ValueType is a bitstring, this holds the number of unused bits in the last byte of the bitstring.
Description String (1024) A text string describing the MIB variable. Usually this tells you more about the variable, it's function, etc.
NetSNMP:BitString A string of bits (zeroes and ones). In this implementation this is stored in a usual string with each individual bit in the bitstring being represented by the corresponding bit in the string. For example, if our bitstring is 11101001101 and our usual clarion string that holds this is bstring then we would set
bstring[1] = chr(11101001b) and
bstring[2] = chr(101b).Since there might be some trailing zeroes at the end of a bitstring that are relevant, it is important that the length in bytes that the bitstring takes up as well as the number of unused bits in the last byte are recorded.
NetSNMP:Counter This is a value used to represent a count. It is stored in a long and can have a value from 0 to 2e32 - 1.
NetSNMP:Gauge This is a non-negative integer (stored in a long) having a value that may range between 0 and 2e32 - 1. Usually however, there are maximum and/or minimum values for this range and whenever the value goes above or below these limits the maximum/minimum value is maintained.
NetSNMP:Integer This is just the usual integer (stored in a long) with a value ranging from -2e31 to
2e31- 1.
NetSNMP:IPAddress This is just a usual IP address stored in a usual Clarion string e.g. myIpAddress = '196.2.141.67'
NetSNMP:NetworkAddress This is the same thing as NetSNMP:IPAddress, although it was initially intended to store any type of network address.
NetSNMP:Null The value of the involved variable is null.
NetSNMP:ObjectIdentifier Indicates that the value of the variable is an object identifier, i.e. a name of a variable in the MIB. This is stored in a usual Clarion string. Currently this implementation only supports object identifiers that are written in dot notation with integers only, i.e. 1.3.6.1.2.1.2 is an acceptable object identifier but interfaces is not, although they refer to the same object.
NetSNMP:Opaque Used to specify octets (bytes) of binary information. Stored in a usual Clarion string.
NetSNMP:String (also called an OCTETSTRING in SNMP) This is the same as the usual string in clarion.
NetSNMP:TimeTicks This is a non-negative integer ranging from 0 to 2e32 - 1 stored in a long. It is used to specify the time between two events in one-hundredths of a second.
![]()
NetSNMP Methods
CheckAuthenticity (), byte This checks the authenticity of the received SNMP message. If you want to implement any authentication scheme other than trivial authentication (all messages are considered authentic), your code should be placed in this procedure. Otherwise none is necessary. The idea is to check whether the network element that sent the packet does in fact belong to the Community whose name was included in the packet. When this procedure is called the SNMPVersion and Community properties will already have been extracted and given their values and the packet will only contain the remaining part of the SNMP message that was received. The packet will contain the IP address of whoever sent the packet (self.packet.ToIP). The value returned is 1 if authentication was successful (default), and 0 otherwise.
This procedure is called automatically when an SNMP packet is received and the Process() procedure will receive the result and react accordingly.
Close (), proc, Virtual Closes any ports that are opened for listening for SNMP responses and traps.
DescriptionMapAdd (string p_Name, string p_Description), proc, Virtual Adds items to the .qDescriptionMap queue.
GetValue (), proc, Virtual This procedure attempts to get the values of the variables specified in the VarBindList from the agent whose IP address is specified in the packet.
Before calling this procedure, the SNMPVersion, RequestID and Community properties should be set. The VarBindList should contain the Names of all the variables that you want to get, but their values do not matter. The usual NetSimple properties required to send a packet should also be set.
The result is received in the ProcessResponse() procedure. It may however be the case that no reply is received if a "serious" error occurs on the agent's side (for example, it doesn't support SNMP or the included community string is invalid).
GetNextValue (), proc, Virtual This is similar to GetValue(), and the properties that have to be set are exactly the same. This procedure is generally used for retrieving tables from the MIB of the agent. The result is still received in ProcessResponse(). The variable names and values in the VarBindList are those of the first variables in the agent's MIB in the sender's MIB View following the ones that were originally entered into the VarBindList when the request was sent (see the The NetSNMP Object section to see what "after" means).
It may however be the case that no reply is received if a "serious" error occurs on the agent's side (for example, it doesn't support SNMP or the given community string is invalid).
Open (ushort port = 161, ushort trapPort = 162), proc, Virtual Port is the port that the object will listen on for Response packets, and TrapPort is the port it will listen on for Trap packets. It is recommended that the default ports are used as they are the ones specified in the SNMP specification. Opens ports Port and TrapPort for listening for SNMP packets.
ProcessResponse (), proc, Virtual This is where the result of a GetValue(), SetValue() or GetNextValue() operation becomes available. If you intend doing anything with the received information you must place your code to do that in here. The RequestID will contain the value of the RequestID that was set when the original GetValue(), SetValue() or GetNextValue() operation was performed. If no error occurred, the ErrorStatus and ErrorIndex properties will be zero, otherwise they will contain the received values indicating the nature of the error.
If no error occurred, the VarBindList will contain the following values:
1) For a response to a get operation, the VarBindList will contain the Names and Values of the requested variables
2) For a response to a set operation, the VarBindList will look exactly the same as it did when the request to set the variables was sent off, except that ErrorStatus and ErrorIndex may contain values other than zero.
3) For a response to a getnext operation, the VarbindList will look as is explained in the GetNext() procedure section.
ProcessTrap (), proc, Virtual Whenever a Trap packet is received by this object, this is where the received information becomes available. If you intend doing anything with the received information you must place your code to do that in here. The Enterprise, AgentAddr, GenericTrap, SpecificTrap and TimeStamp properties will all contain the values received. The VarBindList will possibly be empty or will contain information that the agent considered to be useful, depending on the kind of trap that was generated (as indicated by GenericTrap).
SendTrap (), proc, Virtual This procedure is used by an agent to send a Trap packet to the management station (whose IP address is specified in the packet) to inform it that an important event has occurred. Before calling this procedure, the SNMPVersion and Community properties should be set. The Enterprise, AgentAddr, GenericTrap, SpecificTrap and TimeStamp properties should also be set. The VarBindList is meant to contain information that may be interesting to the receiving entity.
The trap will be received by the management station in the ProcessTrap() procedure.
SetValue (), proc, Virtual This procedure attempts to set the values of the variables specified in the VarBindList on the agent whose IP address is specified in the packet. Before calling this procedure, the SNMPVersion, RequestID and Community properties should be set. The VarBindList should contain the Names of all the variables that you want to set, and the corresponding Values that you want to set them to. The ValueType fields in the VarBindList should match the ValueType fields of the variables in the agent's MIB (see NetSNMP ValueType Equates). The usual NetSimple properties required to send a packet should also be set.
A response is sent from the agent to indicate the level of success and is received in the ProcessResponse() procedure. It may however be the case that no reply is received if a "serious" error occurs on the agent's side (for example, it doesn't support SNMP or the given community string is invalid).
AgentAddr String(128) This should be set before SendTrap() is called, and is given a value when a trap packet is received in ProcessTrap(). It is the network address of the network element that generated the trap.
Community String(128) This should be set to the name of an appropriate SNMP community to which this object (network element) belongs before a GetValue(), SetValue(), or GetNextValue() operation is performed. If the object belongs to more than one community, the community name that will give it the required access rights to perform the desired operation should be included.
qCommunityProfiles Queue (NetSNMP:ComProfilesQueueType) This is a list of community profiles on the agent. Each community name is specified in this queue together with an MIBView name (which is a collection of subtrees that a member of this community may access) and an access permission (which indicates whether a member of this community has read or write access to variables in the MIBView). For more details see NetSNMP:ComProfilesQueueType and the MIBViews property.
Enterprise String(128) This should be set before SendTrap() is called, and is given a value when a trap packet is received in ProcessTrap(). This is an object identifier under whose registration authority this trap is defined (for enterprise specific traps).
ErrorIndex long This is given a value when a response to a GetValue(), GetNextValue() or SetValue() is received from an agent. If ErrorStatus is zero, this will be too. If an error that occurred on the agent and was caused as a result of a specific entry in the VarBindList, ErrorIndex will contain the position of that variable in the list. Otherwise ErrorIndex will be zero.
ErrorStatus long This is given a value when a response to a GetValue(), GetNextValue() or SetValue() is received from an agent, and the best place where this value can be obtained is in the ProcessResponse() procedure. If this has a value other than 0 (NetSNMP:NoError) then the requested operation was not performed on the agent. It's value will be one of the following:
- NetSNMP:NoError - If no error occurred on the agent during the operation.
- NetSNMP:tooBig - The response that would have been sent back from the agent if the operation had been performed would have exceeded the agent's maximum packet size.
- NetSNMP:NoSuchName - One of the variables that this object wanted to access on the agent had a name that was not in this Object's MIBView on the agent (this may mean that either this object was not allowed the required access to this variable or that no variable with such name exists).
- NetSNMP:BadValue - This object tried to set a variable on the agent with a value that was an incorrect ValueType.
- NetSNMP:ReadOnlyErr - This object tried to set a variable in the agent's MIB that had read-only access.
- NetSNMP:GenErr - An error occurred on the agent that was none of the above.
In the case of NoSuchName, ReadOnlyErr and BadValue, ErrorIndex will be set to the position in the VarBindList of the variable that caused the error.
GenericTrap long This should be set before SendTrap() is called, and is given a value when a trap packet is received in ProcessTrap(). This will be one of:
- NetSNMP:coldStart - Indicates that the sending agent is going to reinitialize itself such that the agent's configuration will change
- NetSNMP:warmStart - Indicates that the sending agent is going to reinitialize itself but that the agent's configuration will not change
- NetSNMP:linkDown - The agent has recognized a failure in one of its communication links. The first entry of the VarBindList will contain the name and value of IfIndex for the affected interface (this is a variable in the rfc1213-MIB).
- NetSNMP:LinkUp - Indicates that one of the agent's communication links have come up. The first entry of the VarBindList will again contain the name and value of IfIndex for the affected interface (this is a variable in the rfc1213-MIB).
- NetSNMP:AuthFailure - Indicates that the agent failed to authenticate an SNMP message that it received from this object.
- NetSNMP:egpNeighbourLoss - Signifies that the agent who sent the trap has had one of its EGP neighbors to which it was a peer marked down.
- NetSNMP:enterpriseSpecific - Indicates that the trap was enterprise specific (depends on the implementation). SpecificTrap will contain more information about the trap.
qMIBEntries Queue (NetSNMP:MIBQueueType) This queue is intended to contain all of the variables in this particular agent's MIB. The variables should be ordered in this queue as was explained earlier in the The NetSNMP Object section. When an agent receives a request to get or set an MIB variable, this is where the variable and it's value is obtained or changed. See NetSNMP:MIBQueueType for a complete description of the queue fields.
qMIBViews Queue (NetSNMP:MIBViewsQueueType) This is a list of SNMP communities and the subtrees of the agent's MIB that members of the community may access. If a view contains more than one subtree, the Name of the view appears once next to each subtree in this queue (i.e. for each subtree there is a separate entry in this queue). For More details see NetSNMP:MIBViewsQueueType and CommunityProfiles.
RequestID long This should be assigned a number before a GetValue(), SetValue or GetNextValue() operation is performed on an agent. When a request to perform this operation is sent to the agent, the response the agent sends back contains this exact same RequestID to identify which request the response is to.
SendAuthFailureTrap byte If this is set to true, an authentication failure trap will be sent when authentication on a received SNMP message fails. Otherwise no trap will be sent. This field is meant for use on an SNMP agent.
SNMPVersion long The version of SNMP that is being used. Although there are three SNMP versions, this implementation currently only supports SNMP version one and hence this should be set to zero (not one).
SpecificTrap long This should be set before SendTrap() is called, and is given a value when a trap packet is received in ProcessTrap(). If GenericTrap has a value of NetSNMP:enterpriseSpecific, this will contain a value indicating what kind of trap this is (this depends on the implementation).
TimeStamp long This should be set before SendTrap() is called, and is given a value when a trap packet is received in ProcessTrap(). It is the time that had elapsed in one hundredths of a second between the last initialization of the network management system of the element that generated the trap and the generation of the trap.
ToPort long The port to which all SNMP packets to an agent except traps will be sent. This is set to port 161 as default as this is the port number specified in the SNMP specification.
TrapToPort long The port to which all SNMP Trap packets to an agent will be sent. This is set to port 162 as default as this is the port number specified in the SNMP specification.
qVarBindList Queue (NetSNMP:VarBindListType) This is the variable bindings list of this object. Essentially it is a list of MIB variable names and their corresponding values. It needs to be filled in before doing a GetValue(), GetNextValue(), SetValue() or SendTrap() operation and will be filled with information from a received SNMP packet which can then be accessed in the ProcessResponse() and ProcessTrap() procedures. See NetSNMP:VarBindListType for a complete description of the fields.