
 beta
beta
www.capesoft.com
Updated 07 June 2011
| NetTalk WebServer - Building Secure Web Sites using NetTalk WebServer | ||
|
|
||
| Version
beta www.capesoft.com Updated 07 June 2011 |
||
In order to be an Authority you need to make a CA certificate. This certificate is going to form the “top of the tree” for all the other certificates you produce.
You only need to do this once, regardless of how many certificates you create later.
This process is not complicated if you follow the directions carefully, but as with most security related things, mistakes can lead to weird behavior.
And voila, your certificate is created in the YourCAroot folder. This certificate is in 2 parts.
Part 1
A file has been created in the \clarion6\3rdparty\bin\MakeCertificates\YourCARoot\private\ folder and is called YourCA.Key
If you open this file using a text editor you'll see it looks something like this
-----BEGIN RSA PRIVATE KEY-----
Proc-Type: 4,ENCRYPTED
DEK-Info: DES-EDE3-CBC,6AAD7D6884ADEFD0
I3RXbET0QhlBxNfCh8jvR3PMAnsK7EVcbirJKJCcZ4V4iNIzofFC4/9TQ+GBuUzw
<lots of encrypted stuff here>
-----END RSA PRIVATE KEY-----
As you can see this is a Private Key. Private Keys are important in the security chain and you need to keep them Private.
Part 2
Another file has been created in the \clarion6\3rdparty\bin\MakeCertificates\YourCARoot\cacert\ folder and is called YourCA.Crt Opening this file in a text editor reveals something like this
-----BEGIN CERTIFICATE-----
MIIEoTCCA4mgAwIBAgIJANGGW6IMdDACMA0GCSqGSIb3DQEBBQUAMIGRMQswCQYD
<lots of encrypted stuff here>
-----END CERTIFICATE-----
Tip: Resist the urge to rename these files here – you’ll be able to rename them later before you ship your app. But if you rename them here you’ll break the rest of the batch files.
Note that before you can do this step, you must have completed the steps laid out in the section above Making Yourself into a Certificate Authority.
When a browser accesses a secure site, the user will enter some URL to get there. For example to get to the CapeSoft web site they enter www.capesoft.com.
If that site is a secure site, then one of the checks is that the name they entered matches the name in the certificate. So if they entered www.kapesoft.com but ended up at a secure site that had a certificate issued for www.capesoft.com then they’ll see a warning.
Now, if the program you are making will appear on the internet, then entering this field is easy. Just enter the URL of the site as the user will enter it, and move on to step number 10.
If you are making an Intranet site though, which might be running on an internal server, then things get harder. You could enter the name of the machine. For example, say the name of the _server machine_ is Hobbes. Then users on that intranet will access the site as https://hobbes . So you can enter Hobbes in the certificate at this point.
But what if you don’t know what the machine will be called? One option is to find out when you deploy, and generate a certificate for that specific machine, with that specific machine name.
In theory you could set an entry in the HOSTS file on the remote LAN, but frankly that’s probably going to cause more harm than good. Worst case, the user will see a warning each time they use the site, which they can get past by clicking on “yes”.
For an intranet, there’s no perfect solution here. Anyway, go ahead and enter something for the Common Name.
Tip: If you use a * as the first part of the common name, for example *.capesoft.com then you will be able to host multiple, secure, sites on the same server. These sites would then be differentiated by the first name - for example;
admin.capesoft.com
www.capesoft.com
blogs.capesoft.com
and so on.
Files Created
If you now look in the YourCARoot folder you should see 3 files more have been created. In the \clarion6\3rdparty\bin\MakeCertificates\YourCARoot\certs\ folder there are 2 new files Demo.crt and SignedDemo.crt.
If you look in Demo.Crt using a text editor you'll see something like this;
-----BEGIN CERTIFICATE-----
MIIEoTCCA4mgAwIBAgIJANGGW6IMdDACMA0GCSqGSIb3DQEBBQUAMIGRMQswCQYD
-----END CERTIFICATE-----
In the SignedDemo.Crt file is an information section starting with something like this
Certificate:
Data:
Version: 3 (0x2)
Serial Number: 1 (0x1)
Signature Algorithm: sha1WithRSAEncryption
Issuer: C=ZA, ST=Western Cape, L=Cape Town, O=CapeSoft Software,
and a certificate section with the now familiar
-----BEGIN CERTIFICATE-----
MIIEoTCCA4mgAwIBAgIJANGGW6IMdDACMA0GCSqGSIb3DQEBBQUAMIGRMQswCQYD
-----END CERTIFICATE-----
In the \clarion6\3rdparty\bin\MakeCertificates\YourCARoot\private\ folder there is also a new file Demo.Key. Inside this key file is something like this;
-----BEGIN RSA PRIVATE KEY-----
MIIEpAIBAAKCAQEAvob64lPrLT3caekb9UCtCPpinP3AvPhNzqjlAR59/XDwNO1d
-----END RSA PRIVATE KEY-----
As before this is the private part of the key, and it must be looked after.
Renaming
Now is a good time to rename these certificates. We’ll copy them from here to the application directory in a moment, but before we do so we’ll rename them.
Note: We DON’T want to rename the CA certificate. Leave that alone.
In the \clarion6\3rdparty\bin\MakeCertificates\YourCARoot\certs folder rename Demo.Crt to Product.Crt, where Product is some name related to your application. For the examples I’ve renamed mine to Settings.Crt (we won’t need the SignedDemo.crt one, so you can leave that alone for now.)
In the \clarion6\3rdparty\bin\MakeCertificates\YourCARoot\private folder rename Demo.Key to Product.Key, where Product is the same name you used for the Crt file. For the example I’ve renamed mine to Settings.Key
Tip: In your NetTalk 5 web server program you will need to enter the name of your certificate. The name you enter there needs to match the name you called the file here. In the examples this is set to 'certificates\settings' - certificates being the Folder part where the certificate is stored, and Settings being the name part. Notice the name part does not have an extension as it's actually referring to both the CRT and the KEY file.
Tip: If you install the YourCA.Crt file into Internet Explorer (or any other browser) as a "Trusted Root Certification Authority" then IE will stop complaining that the certificate is issued by an untrusted source. Obviously this approach is not possible if you are creating a site for the world at large, but it is possible when creating intranet applications.
When accessing a site from your browser you usually use the form
http://127.0.0.1:88
where 127.0.0.1 is the name of the server, and 88 is the port it is running on.
To access Secure servers you must use the HTTPS protocol. For the example, running on port 881, this is
https://127.0.0.1:881
When your app runs in the client’s browser 3 checks are done on the certificate, and three warnings may appear.
Internet Explorer
In IE the warning window looks something like this:
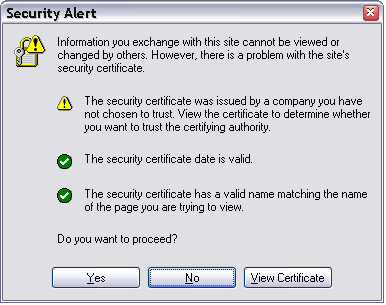
Simply clicking YES will allow the site to continue. However the next time IE is run the same error will appear.
In order to make this warning go away you need to register the Certificate on this computer.
Tip: Had we used a Signed Certificate, which was called DemoSigned in the steps earlier, then the next bit will not work. If the Certificate is signed the we have to install the CA Certificate, which I’ll describe a bit later.
If you want to permanently accept this certificate, then click on the View Certificate button.
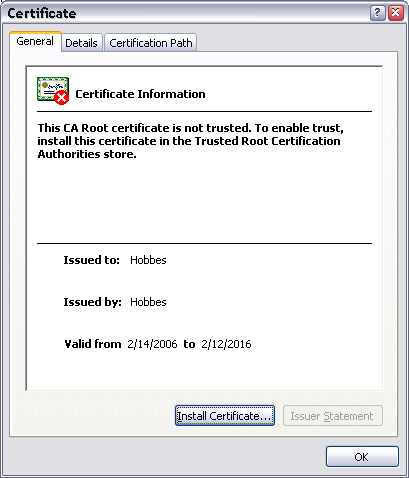
Click on Install Certificate.
You’ll get the Certificate Import Wizard.
You can accept all the default options and click on the Finish button.
Since this is an unsigned certificate You’ll get a security warning. Click Ok.
Close the windows back to the original Security Alert, and click on Yes.
Firefox
In Firefox the error looks something like this:
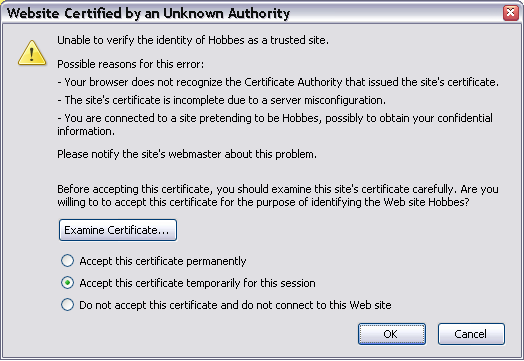
If you click on Accept This Certificate Permanently then you won’t see this error again for this certificate. For FireFox it is not necessary to install the CA Certificate.
When we created the certificate we spoke about the Common Name for that certificate. You had to set the common name to something, preferably the machine name, or IP address of the machine.
In the examples I’ve set the name of the machine to Hobbes, which happens to be the name of my machine. It’s extremely unlikely your machine is called Hobbes. So if you run the SSL example on your computer you’ll also see another error when you open the site in your browser.
In Internet Explorer the Error looks like this:
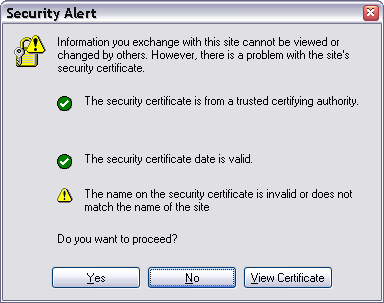
In Firefox like this:

There’s no real way to suppress these errors simply because that’s the whole point of the certificate in the first place. If you are accessing a secure site you must do so in the way which the certificate has specified.
In IE clicking on Yes, and in Firefox clicking on OK bypasses the error and you move on.
The only real solution is to generate a certificate that matches the name of the machine. If you are deploying commercial apps this means probably generating a different certificate for each site.
If you are creating a public web site, then clearly having all these warnings pop up is unacceptable. In that case you need to have your certificate signed by a Trusted Certificate Authority. This process usually takes a day or two as the CA is supposed to verify that you are who you claim to be. The process can however take several weeks, so make sure you get the certificate in good time.
There are several authorities you can use; www.verisign.com the biggest, but not surprisingly also the most expensive. www.thwate.com is the next biggest, is owned by Verisign, and is quite a bit cheaper. c. Another popular one is www.godaddy.com which is cheaper still. For Clarion-centric apps, Lindersoft have partnered with Comodo.
All three follow a similar process.
If you think this sounds like a lot of money for very little work, well, you’d be right. However these CA’s have their CA certificates already inside IE and Firefox and others, so that’s what makes them valuable.
To help you create a CSR we’ve made a batch file called CreateCertificateSigningRequest which you’ll find in your \clarion\3rdparty\bin\MakeCertificates folder.
a. Press any key to start the process
b. Country Code : Enter your 2 letter country code.
c. State or Province: Enter your state or province name here.
d. Locality: Usually a city name.
e. Organization name: This is the name that will appear on the Certificate.
f. Organizational Unit Name: If you’re that big then you can enter something here.
g. Common Name: this is the URL that people will use to access your web site. For example www.capesoft.com
h. Email address: Putting a real email in here allows people to verify your certificate if they want to. You want to make the certificate as trustworthy as possible, so putting in a real email is a good thing.
i. Challenge password: when the CA contact you, possibly by phone, they will use this password to make sure you are the person who submitted the request. Use something simple, and make a note of what it is because you’ll need to provide it later on.
j. Optional Company name: Put in a company name if you like.
k. Press any key to end the process.
This has created a file called ForRealCSR.CRT in the certs folder. Go ahead and open it in Notepad. It’ll look something like this;
-----BEGIN CERTIFICATE REQUEST-----
MIIC8jCCAdoCAQAwgYExCzAJBgNVBAYTAlpBMRUwEwYDVQQIEwxXZXN0ZXJuIENh
cGUxEjAQBgNVBAcTCUNhcGUgdG93bjERMA8GA1UEChMIQ2FwZXNvZnQxEDAOBgNV
BAsTB3Rlc3RpbmcxDzANBgNVBAMTBmhvYmJlczERMA8GCSqGSIb3DQEJARYCYWEw
ggEiMA0GCSqGSIb3DQEBAQUAA4IBDwAwggEKAoIBAQDQRS99ub9W6foSfKYYhl9S
7f36OADRoannYysfCVv04fEkhLtgmmZg5M1dlDS3MD4vf4whhpFdZ26R/Ty2mtJI lM+t/13YC03vLZ2UWRsuinI9/BQY8OMAQkr+qGh74Sg2UkJI2usd0H2Ly3d8L1x9
HbRNOvxc83ZatXjWMEZjeps6EoVcW7VYuFARQYZ+iToZYO8oRcOCl7rmvyjJJL3P
Y5lTg1rND+hKo/QL2eVUfZIdha+Z9aX21kLu9UwzNqwWV9JMoMoLlEOn/GT2zRxI
oY8/2wAg5yXbVcrCw2fSEgctAYEFw6RFGAQc0icVdGaezrTnvdSAts3enk7Roewx
AgMBAAGgKzATBgkqhkiG9w0BCQIxBhMEY2FwZTAUBgkqhkiG9w0BCQcxBxMFaGVs
bG8wDQYJKoZIhvcNAQEFBQADggEBALUo3jKd7l1TBVcBEADWvgSj+pcvWjlCLfkk
y33EzAvaFYJpRRzY6bKqFws7mEmahM9eynmIwnYWYx4budTIJvNsNOPe8+Vo8VVP
6aE5n+z/Jbp8NslmzvrOdIquEV7W6FGV/zhI2myN7WP4HSd1dM4MvR3tn8hj2uPq
pm7ABBWdddVUMh3k3q4qBd9G5gkSPfnoleApN+8DV2y9MANPHloQq4d8/i7sMD2o
/k41da+DrAuX6R4+m5Y5XYmjhYLIS499Ykyd+eLgk7xPqzZ5LiSRnBcu+gHRZxTa
1YfDaRRBMSJ8rpW+sR1IQnT3eUBUNRepe2+HCnnFpbGzU+WMTes=
-----END CERTIFICATE REQUEST-----
Whichever service you use, this is the bit they’ll want from you.
Thwate has a simple web site that allows you to test this in action.
Tip: The private key you need, that matches this certificate, is called ForReal.key and it’s in the private folder.
Tip: The CRT file, and the ForReal.key file are the two files that need to be transferred to your application\web\certificates folder. Give then a suitable name, and set that name in the Web Server options.
The example referred to in this section is called MixedSSL (8) and can be found in the \clarion\3rdparty\examples\nettalk\web server folder.
Tip: Please take note of the files you need to copy into this application folder (in the Distribution section of the main NetTalk document).
Some sites contain some mix of secure and normal web pages. The first thing this means is that your Web server is listening on 2 ports. One for unencrypted traffic, and one for encrypted traffic. Since the Web Server object cannot listen on 2 ports simultaneously, this is accomplished by adding a second web server object to the WebServer procedure.
Tip: Start with a WebApp that is already serving Normal (insecure) web pages. To add the server on the second port:
Secure Dynamic Pages
If you have procedures in your application that should only be served via the Secure port then go to those procedures (NetWebPage, NetWebBrowse and NetWebForm) and tick on the option Only Serve if Secure SSL. (You’ll find this option on the Security tab).
Secure Static Pages
If you want static pages in your system that can only be accessed via the secure server, then place them in a subdirectory of Web called Secure. This sub-directory should be below your Web directory. i.e. \web\secure
In example 8, there is a page in the secure directory called welcome.htm
The example referred to in this section is called AlwaysSSL (9) and can be found in the \clarion\3rdparty\examples\nettalk\web server folder.
Tip: Please take note of the files you need to copy into this application folder (in the Distribution section of the main NetTalk document).
One thing you might like to do is make your whole site secure, but still listen on port 80 for incoming connections.
For example, let’s say you had a site called www.buyme.com. You want to make this site 100% secure. Which means all your pages will be served by the server running on port 443. But if a user goes to http://www.buyme.com he’ll be coming in on Port 80. So you need to listen on port 80 as well, redirecting incoming traffic to https://www.buyme.com
To do this, make sure there are 2 objects in your WebServer procedure, as detailed in the section above called Creating a Server that has both secure, and normal web pages.
Go to the Not-Secure server. The one running on Port 80. Go to the Settings Tab, and on that go to the Advanced Tab. Then tick on the option Always Redirect To Secure Site
Quite apart from any SSL considerations, it’s possible to limit access to the server based on the IP that the server is listening on.
By default the server listens on all the IP addresses that are valid for the server. It will listen on 127.0.0.1 (which means the browser is on the same machine), and it will listen on any network cards, or other network interfaces, installed in the machine.
If you are adding a web interface to a program, and you only want that interface to be accessed from that machine, then you can BIND the server to address 127.0.0.1. None of the other network cards will work.
Another situation where this is handy is if the machine has 1 network card for the LAN, and another for the Internet. (Or maybe even a dial-up modem for the internet). By binding the server to the LAN card you prevent people outside the LAN from accessing the web server. Of course you should be preventing unwanted outside traffic anyway via a Firewall, but this provides an additional level of security.
You can bind a server to a specific IP address by going to
If you are making a web interface to a Service (a program that you run on a machine in Service mode) then strongly consider limiting the web interface to 127.0.0.1 . This means only browsers running on this same machine will be able to interact with your service.
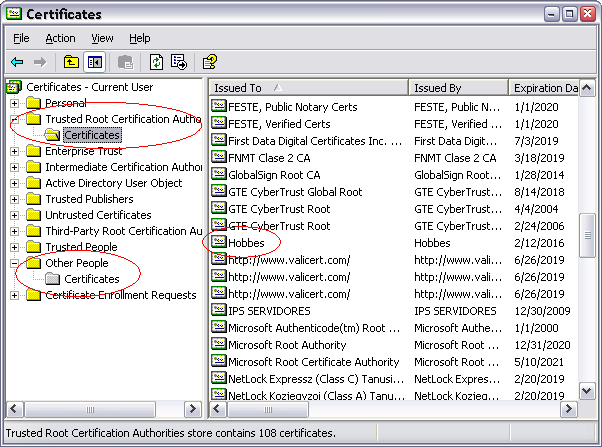
For your testing you may find it useful to remove a certificate that has been installed on your machine. To do this:
1. Click on the Windows Start button, and select RUN.
2. Type certmgr.msc and press enter.
3. Look through the installed certificates and remove the ones that belong to you (that you want to remove).
The most likely places that your certificate will end up is in the Trusted Root Certification Authorities \ Certificates folder and the Other People \ Certificates folder. You can remove a certificate by right-clicking on it, and selecting Delete.
If you have an existing secure web site (i.e. one using a certificate) running on IIS 6 then you can extract it using the following steps;
Part 1
Part 2
Copy the OpenSSL.exe, Msvcr71.dll, Ssleay32.dll, Libssl32.dll and Libeay32.dll files into the same temp folder. (You'll find these files in the \clarion3\3rdparty\bin folder)
Part 3
Open a command prompt window, go to the temp folder
type
openssl pkcs12 -in whatever.pfx -info -out whatever.pem -nodes
openssl pkcs12 -in whatever.pfx -clcerts -nokeys -out whatever.crt
openssl pkcs12 -in whatever.pfx -nocerts -out whatever.key
Part 4
Deploying a secure web server is really no different from deploying a normal web server. However some additional files are probably necessary.
As of the time of writing the files are;
Msvcr71.dll,
Ssleay32.dll, Libssl32.dll and
Libeay32.dll - These files can all be found in your
\clarion6\3rdparty\bin folder.
In addition you will need to include the Certificates folder in your web folder.
Some certificates available for purchase require the use of an intermediate certificate in order for the site to work without error in all browsers. Usually your certificate supplier will note this, and will supply you with an intermediate certificate in a .CRT file.
All you need to do to use the intermediate certificates is to merge them into your .CRT file using a simple text editor. The intermediate certificates can be before, or after, your certificate in the file.
Note: Version 5.07 or later is required for intermediate certificates to work.