 |
 |
||
 |
|||
Version   www.capesoft.com Updated Friday 29 June 2007 |
 |
||
| |
|
|
|
| Contents: User Guide | ||||||||||||||||||||||
|
||||||||||||||||||||||
Access Control:
Licencing and Registration Control:
Additional Features:
What do we need to change in order to upgrade from Secwin3 to Secwin4?

| TIP : At this point a lot of developers get easily confused. You need to register your own program on your own computer. Any registration type error messages you get do not apply to Secwin itself, but rather illustrate that the Secwin features in your application are in fact working. |
The manual registration application is shipped
as one of the Secwin examples, and can be modified to suit your needs. It can
be found in the \clarion\3rdparty\examples\secwin\register directory.
In it's simplest form Register application allows you to capture
PRODUCT details ( the License name and Seed code used in step 1b ),
The CUSTOMER details ( Company Name ) and the
REGISTRATION details ( Serial Number, Expiry Date, number of copies,
Counter, Level, Optional Modules ) which you set.
You can either generate an activation code immediately - or print out a simple
report containing all the details and a code.
| TIP : For a full description of the Register example see the Secwin Examples Reference manual. |
| TIP : To the right of all alpha-numeric fields on the window is a Check number. This number will be visible to the client while typing the details in. If his number does not match the supplied number then a spelling mistake has occurred. |
| TIP : Read the sections in the User Guide which cover the Licensing and Registration features and options to learn more about what is, and isn't possible using the Registration features. |
| Tip : This method of creating files is not very secure if you aren't using the licensing features. If you aren't using licensing then read about Creating the Security File soon. For now though continue the QuickStart. |
| TIP : We get lots of questions about passwords. For most of the answers see the section in the Secwin User Guide entitled Logins and Passwords. |
If you're not wanting Access Control, but just wanting to use the Licensing and Registration part of Secwin, then take a look at the Bypassing Access Control section.
| Lost a password? The password itself is not available to either the programmer, or any other user in the system. Because Secwin has been designed to span across applications, and networks, it would constitute a major security flaw for one user to be able to find out the password for another user. This means effectively, that if a password is forgotten, there is no way to retrieve it. If the password can't be remembered, then the user will have to be deleted and re-added. ( Tip : You can use User Groups to handle folk who are continually forgetting passwords. See the section in the User Guide entitled User Groups.) |
| TIP : If you have a Multiple-Exe product, then you can consider each Application to be it's own area. However it is possible for all the EXEs to have the same Area definition, and hence have the same access rights apply to all the EXEs. This is done by setting the Unique Application Name (on the Secwin Global Extension) and the Unique Area Name (on the Secwin User Login Here Extension) to be the same across all the Applications. |
Definitions:
When a user logs in they can be classified into one of 3 possible Levels.
Supervisor: This level has all the power.
No Access: This Level has no power (in fact they
will be denied access).
Operator: This level is in between, i.e. a user
has potentially limited power.
The difference between a Supervisor, and an Operator is obviously a significant one. Simply put, a Supervisor is allowed to change the security access rights of other Users. An Operator can not change either their own, or anyone else's, Access rights.
| TIP : For programmatic access to the Users list see the ds_InsertUserEx , ds_ChangeUser, ds_DeleteUser and ds_UsersEx functions in the Secwin Technical Reference. |
| Lost a password? The password itself is not available to either the programmer, or any other user in the system. Because Secwin has been designed to span across applications, and networks, it would constitute a major security flaw for one user to be able to find out the password for another user. This means effectively, that if a password is forgotten, there is no way to retrieve it. If the password can't be remembered, then the user will have to be deleted and re-added. ( Tip : You can use User Groups to handle folk who are continually forgetting passwords. See the section in the User Guide entitled User Groups.) |
Note: an Operator can now be part of more than one User Group.
| Tip : When you create a new user or user group, you can set it to have an existing user or user group's access rights (when it's created). You can diverge the two groups (i.e. if you wanted more options for the one than the other). |
| Tip : If a user is always forgetting their password, and you get tired of resetting their access rights every time you have to delete, and re-add them, then make a user group for that person. The access rights will be stored with the Group, not the User, so it's easier to delete, and re-add the user. |
There're a couple of reasons why you may like to bypass the Access control part of Secwin (a bit like disabling Access Control - but technically it's working around it). The primary reason for doing this, is for demo purposes - i.e. you want your program to run without forcing the user to login. Alternatively, you may not require Access control for your program period, you might like to just use the Licencing and Registration features.
There're 2 ways of Bypassing Access Control this:
1. Check the Make Login Optional to End User (on the User_Login template - Login Options tab). You won't need to ship a
dssw4.tps file (although you can if you want to use Access Control later). This means that access control is bypassed.
This is typically for people you don't require Access Control or would like to
make access control optional.
2. Check the Allow default login values (on the User_Login template - Login Options tab) use a default Login code and password and ship a
dssw4.tps file that contains the default user (if you want access control at a later stage, but not in the demo application).
This is typically for people who require access control (either now or at a
later stage), but not in the demo application.
Note: When shipping a dssw4.tps file, you need to make sure that dssw4.tps file does not overwrite the one that already exists there (for people downloading a program
update who have already set up all their user settings).
When you add an operator and set his default access to 'All Access', this will only be for the application that he is added to. For other applications, his default access is set to 'No Access'. This is because it would pose a major security flaw if you could create a user in a secwin enabled application and get all access rites to a completely unrelated application. In order to allow cross-pollination of operators in a Multi-DLL environment (IOW across multiple apps which are essentially the same application) - you need to set the app name the same for each application (you need to do this in the Secwin Global Extension template).
![]()
This code should be written into your application that generates registration
codes. There is a default registry code generation app that ships with SecWin
as an example (3rdparty\examples\secwin\register\register.app), which you can
modify to suit your needs.
![]()
| Tip : Many users upgrade their computers every 2 years or so. Network administrators change network drives more often then that. Each time the hard disk is changed the user will have to get a new activation code from you. If you're expecting a large number of installations then DO NOT use this feature. Use only in very select situations. |
When the user runs your program on his machine for the first time you can set your application up that he can automatically get a temporary license for running your program. You can switch on this feature by going to the User Login Here template, on the Licensing tab, and turning on the Issue temporary licence when first run? switch. The length of the demo is set in the next option called Valid for (days). You can set the automatic license level in the Level drop down list.
This feature also cause much grief to Secwin developers because they find it difficult
to test. Secwin will only issue ONE demo license for your program on any one machine.
If the user registers the program then they will not get a 30 day temporary
activation at any
time after that. Also if they install your program, and get their temporary license,
they will never get another for your program.
Automatic temporary licenses are issued with all modules enabled (see
Using Optional Modules for more details on
modules).
| Tip 1 : Deleting the Security File (dssw4.Tps) is not sufficient to overcome this feature, so please don't complain when you can't make it work on your development machine a second time. |
| Tip 2 : If during the 30 day period, the PC date goes backwards, then the license will automatically, immediately, expire. |
If the user sets the date back to the last date of the license, runs you program and then resets the date, then it is possible to bypass the Secwin date checking. Probably the best solution in this case would be to put a timer on the frame that checks the date is before the expiry date every few seconds, and shuts the program down as soon as the date goes past the expiry date. The function to call is ds_CurrentExpiryDate
If the user is really desperate, and resets the date in order to keep your program running (and keeps the PC date reset), then you could build a system that checks an internet date (you could use NetTalk to do this) and if the difference is > 1 day, then force the PC date to that date, and redo the license check. They would need to be connected to the internet at the time of the check though, so it might only take a short time for them to figure out the check is in place. What you could do is do the check once on startup - if there is no internet connection, then retrying every 30 seconds or so until one is established and you can then check the date. Of course, the user could always disconnect from the internet while they run your program - but eventually it gets so inconvenient for the user, that they eventually purchase an extended license.
For table restrictions, you need to:

In your
program you can specify, using the Screen Security extension template, that a
procedure Decrements the counter. When the counter reaches 0 then any procedure
trying to decrement the counter will result in a License fail.
This could be used when your program is being evaluated, for example when you
want to allow the user a fixed number of program runs before they have to purchase.
Alternatively it's possible to sell your program based on the number of times
it is used. For example data applications can be sold by the number of reports
that can be generated. You user can buy 10 reports, when they run out you simply
issue another activation code, and they get 10 more.
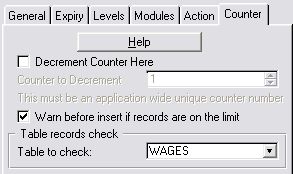
To set a procedure to decrement a counter, go to the User Screen Security
extension for that procedure, click on the License Check and Restrictions
button, go to the Counter tab, and select the option Decrement Counter
here. You need to specify which counter Secwin must decrement by a label
(which must match the label of the counter in the registration window as well as
that in the registration program issuing the activation code). This means that
there is technically no limit to the number of counters your application can
make use of.
It is also possible to deduct multiple "credits" from the counter field at one time. Use the ds_DecrementCounterEx function to do this.
For Secwin3 upgrade users:
If you made use of the counter in Secwin3, then the counter to resume using
is the 'Default Counter'. If you need additional counters, then you can either
make use of the Table Restrictions limit functionality, or else you can use
other labels and add additional procedural counters to your registration window.
The Serial Number field is a string field which you are able to use for Serial Number purposes. It is not required for licensing purposes - but is provided for your convenience. You can use the Company name to make the license unique.
In order for Licencing to work correctly, each instance of your program must be set to create and/or use the Licence file in the same place as all the other instances. This is set on the Files tab of the Secwin Global Extension template of your application. If your application is opening more times simultaneously than you have issued licenses for, then it almost certainly means that each instance running is using a different path for the license files. For more details on locating the Security file, peruse the Locating The Security File section of this document.
![]()
| Tip : If you used the QuickStart settings to get going then you program is creating it's own security files. This is not a problem if you are using Licensing, but if you aren't using licensing the strongly consider changing to one of the options below. |
| Tip : Secwin ships with an example called Cresec which creates the security file (\clarion\3rdparty\examples\secwin\cresec.) For your convenience this is also shipped as a pre-compiled Exe into your \clarion\3rdparty\bin directory. |
By default the Security file will be placed in the Windows directory.
This makes it harder for people to simply copy your program from one machine
to another. However in network situations this approach doesn't work because
typically the users need to share the same security file. If the the file is
shared they can use the program, with their login, from any machine. Security
administration is also much easier if the file is shared.
There are ways to set the location of the security files.
Secwin now supports storing the file using a variety of different drivers. These
include support for Oracle, Microsoft SQL, PervasiveSQL, and ODBC drivers, which
means you can use a variety of different databases such as Interbase or MySql.
You can select from the list of supported drivers on the
Global Extension, on the Files tab. Some drivers may have different options.
These are discussed in detail below. If you would like a new driver added to
the list then contact Support@CapeSoft.com
.
To save downloading time Secwin does not come bundled with support for the various
drivers. It only includes support for the Topspeed driver. You need to download
additional a Secwin Driver Pack for your driver, from the
www.capesoft.com
website - from the Downloads Page, Secwin Driver Pack section.
| Tip : The ODBC driver comes with special support for MySql and Ingress. On the Global Extension Files tab, first select ODBC file driver, and then MySql (or Ingress) Database type. For all other ODBC connections, use the Other option. |
Via ODBC, Secwin explicitly supports: MySQL, Ingress, Interbase and PostgreSQL. You may have success with other databases, if so - please let us know so that we can add these to the confirmed list.
If you are using a file driver other than the Topspeed or Btrieve drivers then
you will need to enter the owner string in the Owner field. This is the Owner
attribute as it would normally appear in your dictionary. The owner format for
the different drivers is as follows:
User/pwd@sn where User is the username, pwd is the
password, and sn is the Service Name or SID of your Oracle Database.
Host,db,user,pwd where Host is the IP or
Host name of the Database server, db is the Microsoft SQL database name,
user is the username, and pwd is the password.
Host|db,user where Host is the IP or Host name of the Database server, db is the database name, and user is the username. Please note the pipe "|" character used between Host and db.
Dsn,user,pwd where Dsn is the Data Source Name, user is the username, and pwd is the password.
Peruse the IPDriver Compatibility section of this
document to include IPDriver support for Secwin.
| Tip : See the various examples for these drivers in your clarion\3rdparty\examples\secwin directory. Read more about these Secwin Examples. |
If you are using the Topspeed or Btrieve driver, then you can leave the Owner
field blank, and the default one will be used. However you can enter your
own Owner field here if you want to.
| Tip : If you set an owner here for Topspeed or Btrieve then the security file you create will not be compatible with other applications that use a different owner. Therefore if you set the Owner field yourself then you must set the position of the file to be in the Application, or Data directories. (See Locating the Security File.) |
Of course if you set the owner, then you're able to import the security files
into your dictionary, and manipulate the files directly in the code. We obviously
can't stop you doing this, but we advise against it. By altering the files directly
you run the risk of bypassing the validity checking that Secwin would normally
do. For example Secwin doesn't allow you to delete Super
Users, although in your own code this would be a trivial thing to do.
![]()
On all of the Built-In Secwin windows is a little padlock logo. This logo can
be replaced by your own logo, or removed completely, using the
ds_SetLogo
function.
As from version 3.1 all of the Secwin windows can be replaced with your own
Windows. This allows you more creative control over how the windows look, and
it's also an important part of making the program compatible with Web Builder
and ClarioNet.
| Tip : Secwin ships with 2 example apps that demonstrate what you need to do. The quickest way to get going is simply to import the procedures from one of these apps and to tweak them from there. The examples can be found in the \clarion\3rdparty\examples\secwin\splash directory and are called splash.app (for legacy template applications) and splashabc.app (for ABC based applications). |
To add your own login screen to your program follow these steps;
1. Create 2 global variables of type
String, and length 12. You
can call them anything you like, I've called mine Glo:Login and Glo:Password.
These must be created in the Global Data section, not a global embed.
2. Create a new Window Procedure ( I called mine
SplashLogin ).
3. Design your ideal Login window. Make sure your new window contains Entry
fields for Glo:Login and Loc:Password. (Also typically you'd
want the Password attribute for the password field to be turned on).
4. In the accepted event of the OKButton, equate the GLO:Password
variable to the Loc:Password (So that if the user cancels then the password
is not returned).
5. Create 2 buttons for the window. One called Ok, and the other called Cancel.
Set the Cancel AND the Ok button to the normal Close current window action.
6. Go to your Main procedure where the operator login is. Go to the
User Login extension template. Make sure that the option Allow default
logins is clicked on and then set the Default User Login to be Glo:Login
(or whatever you called your variable) and the Default Password to be
Glo:Password. Also click on the option Use Own Login Screen,
and fill in the name of the new procedure in the Login Procedure space.
Note: You need to check the "Don't show screen if login fails"
checkbox on the User Login Here extension template - otherwise the default
Secwin login window will appear when the login fails.
To add your own Change Password window to your program follow these steps;
1. Create a new Window Procedure ( I called mine MyChangePassword ).
2. Design your ideal Change Password window. It must contain 3 fields, Old Password,
New Password and Verify Password, as well as anything else you think you should
be there.
3. On the Actions, Embeds, for the Ok button, on Event Accepted, use the Secwin
Change Password code template. Prime it with the 3 fields mentioned above.
To add your own Change Login window to your program follow these steps;
1. Create a new Window Procedure ( I called mine MyChangeLogin ).
2. Design your ideal Change Login window. It must contain 2 fields, Login and
Password, as well as anything else you think you should be there.
3. On the Actions, Embeds, for the Ok button, on Event Accepted, use the Secwin
Change Login code template. Prime it with the 2 fields mentioned above.
4. Note that it is not recommended to have a Cancel button on this window.
Open your application in the Clarion IDE and use the "Create RegisterProduct window" (ABC or Legacy) to import a default SecwinRegisterProduct window (in Multi-DLL apps, it's probably best to do this in the DataDLL):
You will see a SecwinRegisterProduct procedure is now added to your application.
Open the window formatter for the SecwinRegisterProduct procedure, you can now hide controls that are used by features that are not used. If you don't use an entire tab, you can modify the accepted code in the Back and Next buttons to skip that particular tab. Don't delete controls in case you require those features at a later stage.
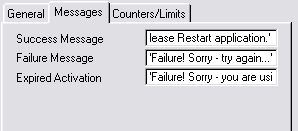
Right-click on one of the controls, and you will be able to set the text of Registration success and failure (on the Messages tab):
On the Counters/Limits tab you can enter any limits/counters that are used in the activation code.
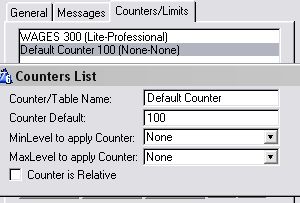
These must match those in the application issuing activation codes (although these are case insensitive). If you are using table limits, then these will be automatically added to the list from the Global Extension template, and will only be displayed here. You will need to add the procedure counters manually though. Peruse the Using Counters section of this doc for more details.
This window contains several elements which make it too difficult to describe
from scratch here. However you can add your own SetAccess window to your application
by following these steps;
a) If this is a legacy template based program, then import
MySetAccess
from the Splash.app example. OR
b) If this is an ABC template based program then import
MySetAccess from
the SplashABC.app example.
c) On the Secwin Global Extension, on the
Advanced tab, set the
SetAccess Function Override to be MySetAccess.
You are now free to examine the
MySetAccess procedure, and to tweak the
visual look & behaviour as you like.
Included in Secwin is the ability to create a Global SetAccess window. You can create one window to SetAccess rights throughout the entire application for each user. Here are the steps in order to do this:
The SetAccess window that is added to your application has two list boxes: one for users and one for the AccessPoints.
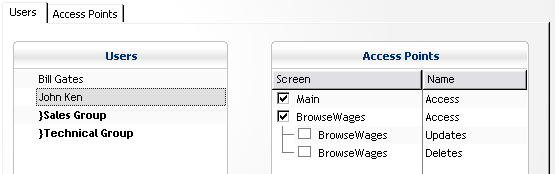
Selecting a User in the Users list, will show the AccessPoints that this user has access to in the AccessPoints list (the ones that are checked, he has access to and the ones that aren't he does not have access to). You can edit a user's access rights by Double-Clicking the relevant AccessPoint's checkbox in the Access Points list.
To view the users that have access to a specific Access Point, use the Access Points tab:
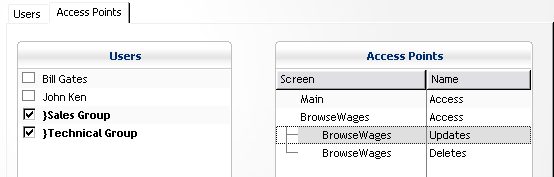
Selecting an Access Point from the AccessPoints list will show which users have access to that point highlighted. You can edit a user's access rights by Double-Clicking the relevant User's checkbox in the Users list.
You can add users and user groups using the respective buttons on the window.
Note: only supervisors have access to this window.
You will almost certainly want to create a Global SetAccess window if you're using AccessControl, which includes the User Browse and forms. If not, then you can delete the Global SetAccess window after running the template utility.
![]()
![]()
| Tip : If you are moving your application from a version of Secwin prior to 3.0 then please read the next section on converting your application. We've simplified MultiDll support a lot, but it means you need to remove most of the old implementation from your applications. |
For and example of a MultiDLL application using Secwin, and the ABC templates,
see the \clarion\3rdparty\examples\secwin\MultiABC directory.
There are 2 kinds of Application in a Multi-DLL project. The first kind is the
Root, or Data application. This typically contains all your file structures.
The second kind is any of the other APP files, other DLLs and EXEs that make
use of this Data DLL.
In both kinds of Applications you add Secwin exactly as normal except that you
need to set some settings on the MultiDLL Tab, on the Global Extension as well.
If this is the Root Application then
1. go to the Global Extension, to the Multi-DLL tab.
2. Click on This is part of a Multi-DLL Application.
3. Click on Export Secwin data.
If this is Not the Root Application then
1. go to the Global Extension, to the Multi-DLL tab.
2. Click on This is part of a Multi-DLL Application.
3. Click off Export Secwin data.
In the global extension on each application:
One of the goals when creating Secwin 3.0 was to keep it as compatible as possible
with Secwin 2.x. There are very few issues to worry about when converting,
but known issues are described here.
The Secwin DLL names HAVE CHANGED! See the
Distribution section, in the Other Information
section for specifics.
Multi-DLL support has been simplified a lot, but this means that there will
be a few things for you to remove from your existing apps.
1. In your Root DLL remove the
QAdd, QGet and QDelete functions.
2. In your Root DLL go to the Global Data button and remove
AppNameDesc
and AppNum.
Support is being added for a number of different file drivers. The old Use Btrieve
switch has fallen away, and been replaced by a drop-down. This can be found
on the Global Extension, on the File
Tab.
Secwin ships with quite a few examples, so sometimes it's difficult to find
the example you're looking for. Here is a list of all the examples, and what
they're trying to show you. Al the examples are found in the \Clarion\3rdparty\Examples\Secwin
directory.
Demonstrates using all the features together in an ABC based program.
Source code for the Cresec utilities which demonstrate creating security files.
If you are using a driver other than the TopSpeed driver, then you'll need to
change the options on this utility to set the driver, and owner, to be the same
as your program.
Demonstrates the use of the ODBC driver for Secwin with Interbase. We have called
this one Westwind. You will have
to set up a datasource name called Westwind_dsn. The customizable
procedure in the global embed will need to be edited to suit your database setup.
Demonstrates a program with only the Licensing features activated.
Demonstrates using the MsSQL driver. This example is only
installed when you install the MsSql Driver pack for Secwin. This example uses
the Northwind example database that ships with MsSQL. You will have to make
a small adjustment in the Global Embed to set the machine name for your database.
Demonstrates a Multi-Dll program based on the ABC templates
Demonstrates a Multi-Dll program based on the Legacy templates
Demonstrates a Multi-Exe project which shares a Secwin Login.
Demonstrates using the ODBC driver with a MySql database.
This example is only installed when you install the ODBC Driver pack for Secwin.
We decided to stick to the theme initiated by MsSQL and name our example database
Southwind. You will have to set up a datasource name called Southwind_dsn,
and fill in your datasource name, username, and password in the global embed.
This app demonstrates using the Oracle Database with Secwin. It is only installed
with the Oracle driver pack for Secwin. As you may or may not have guessed,
we called this one Eastwind. Once again, you will have to make a small adjustment
to the connection string in the global embed.
This example demonstrates Secwin with a PervasiveSQL backend. It will only be
installed if you have installed the PervasiveSQL driver pack for Secwin. The
name of the example is Galewind. Open the app and go to the ConnectToDatabase
procedure to set your connection parameters.
This is an example of a Activation Code database. It allows you to create customers,
products and registrations, and link them all together. This program can
be used as a start to developing your own Activation Code database.
This program contains an example of Creating
your own screens. It includes a Login, Change Login, Change Password
and Product Registration screen.
Note : They are probably not what you think.
Read the next bit carefully to understand them.
The need for Super Users arises where you, as the developer, need to maintain
a permanent ability to access the program at your client's site. While this
may seem like a defacto requirement of all programs, it is often not ideal.
While it may be common for developers to have 'back doors' into their own programs,
these back doors provide a substantial security risk (Anyone seen the movie
War Games recently ?)
Of course on some sites you do need to make sure that your login rights are
preserved, because your users are likely to do things like lock themselves out,
or forget their own passwords. Secwin offers a SuperUser feature for coping
with these situations.
Firstly - what a Super User is NOT. It is not a Back Door which will always
let you in.
Essentially a Super User is simply a user who cannot be Deleted. The user still
needs to be added in the Normal Way. The Super User code is normally set to
be a Supervisor, although he can also be set to be an Operator, or even set
to No Access. The Super User can be seen by the customer, but cannot be deleted
by the customer.
The User Login template has been modified
to support this feature. There is a special tab containing the Login Code for
the Super User. Remember the User must be created in the normal way, setting
the code here will not automatically add the user.
As with most features, this feature is optional and should not be used on sites
requiring a high level of security.
Secwin allows you to translate any of the windows into any language.
First one or two bits of terminology.
A language file (note the small letters) is a text file containing a
list of translations, from the original English into whatever language you like.
The exact format of the file will be discussed later.
LanguageFile (note the big letters, and the lack of a space) is a SecWin.INI
file parameter, containing a DOS file name (including drive and path) of a valid
language file. This file normally uses the .IRF extension.
LanguagePath is a SecWin.Ini parameter that is used with the
ds_SetLanguage function to change languages on the fly. It contains a valid
drive and path.
Secwin allows you to choose your language using two methods, the first is via
the use of an INI file, and the second is via a function (ds_SetLanguage) at
runtime.
When your Secwin enable App is started Secwin looks for two parameters namely
LanguageFile and LanguagePath. Secwin looks first in the Application directory,
in the Secwin.Ini file, in the [Secwin] section. If either, or both are not
there then it looks in the Windows directory, in the Win.Ini file, in the [Secwin]
section. If LanguageFile is still not present then it defaults to a file called
Secwin.Irf, in the Windows directory. If LanguagePath hasn't been found then
it defaults to the Windows directory. If LanguagePath is set to 'Here' (no quotes)
then it will be set to the application directory.
LanguageFile is a full path- and filename to a valid Secwin language file. The
exact format of a valid Secwin language file is discussed a little later on.
Secwin uses LanguageFile as the default language file containing the required
language phrases. If this file does not exist, then Secwin uses the normal English
phrases on the screen.
During the running of your application you can set, or change, the language
file being used by calling the ds_SetLanguage function. This function takes
one parameter, the name of a language file. This parameter is added to the LanguagePath
parameter (discussed above), and then used as the current language file.
Inside the Secwin.Ini file...
[Secwin]
LanguageFile=c:\Windows\Spanish.Irf
LanguagePath=c:\Lang
Using the above Secwin will default to using the Spanish.Irf language file in
the Windows directory, on the C Drive.
At runtime the application could call the ds_SetLanguage function, like this...
ds_SetLanguage('Russian.Irf')
Which would change Secwin to use the Russian.Irf file, in the Lang subdirectory
on the C Drive.
The last point to discuss is the structure of the Language file itself.
The format of a Secwin language file is very simple. It is made even simpler
by the fact that a sample language file (English.Irf) ships with Secwin, and
thus simply copying this sample file and translating the English terms is all
you really need to do. Note that Secwin (by default) doesn't use the English.Irf
file, it is only included as an example.
Inside the file there are a number of Sections, each one enclosed in a set of
square brackets, like this... [engds_OperatorBrowse].
Inside each section are a number of field equates that identify each visible
text field on the screen. On the right of the equals sign is the actual text
that would be displayed. For example the following.
[engds_operatorbrowse]
BrowseWindow=Browse Users
?ListMsg=Browsing Records
?ListFormat1=First Name
?ListFormat2=Surname
?ListFormat3=Login Code
?ListFormat4=Level
?ListFormat5=Work Group
By replacing the text to the right of the equals sign, you can get the ds_OperatorBrowse
screen to display anything you like.
At the top of the file is a section called [Intl], and this has a single entry
called sLanguage. eg
[Intl]
sLanguage=eng
This is used to find the correct section later on. You'll have noticed above
that the function name (e.g. ds_OperatorBrowse) is prefixed with this. This
is a requirement of the way the support works. If you change the value in the
Intl section, then you must change the prefix in all the other sections as well.
At the bottom of the file is a section called [enuMessages]. This section contains
the messages that appear when SecWin needs to communicate with the user. You
will need to translate these messages as well.
Using a different date picture:
To set the different date picture, then you need to enter the following in to the language file:
[engMessages]
datepic=@d6
| Note : PIN numbers are only necessary if the Licencing and Registration features have not been enabled. If you are using the Licencing and Registration features then you should set the PIN number to 0 and not worry about it |
One of the only current methods of compromising SecWin Access Control (where
licencing and registration aren't used) is through the replacement of the
dssw4
security file by an empty dssw4 file. PIN numbers prevent this from being effective
by requiring that a dssw4 file be "stamped" with a PIN number before
the Application will accept the dssw4 file as valid.
The PIN number system introduces two new functions, and their associated templates.
ds_SetPin is used to stamp a PIN number into a DSSW
file.
If you choose to make use of the PIN number system, then you will need some
way of stamping the dssw4 file with the pin number. This can be done in a number
of ways, some of which are laid out below!
1. Use another EXE program, over which 100% physical control can be maintained.
It should not be accessible to un-authorised users, and should be treated as
a physical key. The PIN number itself is hard-coded into the program, and can
be run by anyone with access to it. An example of such a program ships with
SecWin and is called HARDPIN. This can be found in the \Clarion\3rdparty\Examples\Secwin\HardPin
directory. The advantage of this method is that a person doesn't need to remember
the pin number - they simply need to run the program.
2. Use the enclosed SETPIN program which ships with SecWin. (This program can
be found in the \Clarion\3rdParty\Examples\Secwin\SetPin directory.)
This program requires that the PIN number be entered by the user. The user will
then need to know the correct PIN number in order to properly stamp the dssw4
file.
Secwin is compatible with the Makeover accessory, also from CapeSoft. If you
have added the Makeover extension to your app, and also the Secwin extension,
then Secwin will detect this, and add the necessary call to
ds_SecwinMakeover
for you.
The style applied to the Secwin screens will therefore make them consistent
in look to all the other screens in your application.
Secwin now supports full compatability with both the standard Web Builder templates
included with Clarion, as well as the ClarionNet
add on. For the sake of simplicity in this section I'll refer to WB compatability.
This includes both the Web Builder and ClarioNet products.
The only thing you need to do to make your program WB compatible is to create
your own versions of the Secwin screens. (You may have already done this anyway
for design reasons.) For information on creating your own Secwin windows see
the section called
Making your own Secwin Windows.
![]()
Installing
1) Make sure you install the Secwin/IP Driver support file. You will be able
to download this from the Secwin download page at www.capesoft.com
2) Copy the IP_SWTPS6.DLL from your \clarion\3rdparty\bin directory to your
\ClarionDataServer directory. If you haven't already done so also copy
the Clarion Runtime DLL's to the \ClarionDataServer directory - including
C60RunX.DLL, C60DosX.DLL and C60TpsX.DLL.
3) Run the RmAdmin program, and register the IP_SWTPS6.DLL. (This is as you
would do for your application's IP driver DLL - which is laid out in the documentation
provided by SoftVelocity that comes with the IPDriver install)
[
TIP : when deploying your application,
ie deploying the ClarionDataServer, then you will need to do steps (2) and
(3) as part of your deployment ]
Changes required to your application
The SV IPDriver Client Global Extension is active in your app then Secwin
will use the IP Driver connection.
Check that the the File driver (set in the Activate Capesoft's SecWin template)
- Files tab, is set to IPDriver.
Using a sub-directory within the ClarionDataServer
The IPDriver supports multiple database driver DLLs, which means that you can have a number of Secwin IPDriver DLLs running on the same server, each with it's own set of security files that it is maintaining. This is what you need to do in order to use a subdirectory within the ClarionDataServer:
1. Create the subdirectory within the ClarionDataServer directory (let's
call it MyDatabase)
2. Copy the IP_SWTPS6.DLL to this directory (i.e
c:\ClarionDataServer\MyDatabase)
3. In your application, go to the Files tab of the Secwin Global Extension
template, and in the Security File - Position group, select the 'Data
Directory' option and enter 'MyDatabase\' (including the quotes). You could
use a variable here as well (without quotes) if you wanted to load the
directory at runtime. The important thing to remember is that the path entered
is with respect to the ClarionDataServer directory (normally
c:\ClarionDataServer\)
4. If you are not allowing your program to create security files, then you
need to copy the dssw4.tps file to the
c:\ClarionDataServer\MyDatabase
directory.
Limitations
1) Only support for the TPS driver (ie dssw4.TPS) is currently available. Support
for other drivers will be made available on a demand basis.
2) The IP_SWTPS6.DLL must reside in the same directory/sub-directory that the
dssw4.tps file resides.
This section describes some of the advanced functions available to you the programmer,
and where you might use them.
![]() ds_BuildKeys
ds_BuildKeys
This function can be used to rebuild the keys stored inside the security file.
The primary reason for using this function is when you want to change the Locale
settings for your program. In Clarion if the Locale settings change then keys
need to be rebuilt.
![]() ds_Crypt
ds_Crypt
This is a simple function for doing simply text encryption. Pass the string
to the function to encrypt it, and pass the encrypted string to the function
to decrypt it.
![]() ds_InsertUserEx,
ds_ChangeUser, ds_DeleteUser
ds_InsertUserEx,
ds_ChangeUser, ds_DeleteUser
These functions allow you to add to and edit the list of users.
![]() ds_UsersEx
and ds_UsersUserGroups
ds_UsersEx
and ds_UsersUserGroups
This function returns a Queue containing all the users currently in the file.
The Queue contains their First name, Surname, Login Code, and User Group setting.
![]() ds_SetPath
ds_SetPath
The most common way to set the location of the Security file (dssw4) is to use
the Secwin.Ini file. However you can also set the path in code using this function.
![]()
None
This is a Global Extension template which needs to be added to the Global area
in order for the Secwin features to work.
1. Open your App in the usual fashion
2. Choose Global Properties from the Edit menu ( You can also click
on the Global button to get here )
3. Click on Extensions
4. Click on
Insert
5. Choose Activate Secwin Features
| Application Tab | Unique Application Name | Enter a unique name for this Application. |
| Disable All Secwin Features | If this option is on then all Secwin features in this application will be disabled. This is very useful if you suspect Secwin is causing a problem. By switching it off, you can confirm is Secwin is the source of your problem. | |
| Licensing Tab | License Name | This is the name of the license for this application. when generating activation codes this corresponds to the Application Name. |
| License Seed Code | This is the number that makes the activation codes for your application different to other Secwin users. Chose any random number here. Use this number when generating Activation Codes. | |
| Disable concurrent copy checks. | Secwin will issue a licence file for each concurrent copy of the program that is allowed to run (as issued in the licence). If you check this, then you will effectively disable concurrent copy checking (i.e. allow infinite amount of copies of the program to run on that licence). | |
| Disable all "valid date" checks. | Prevents the app from comparing the date of the dssw4 file to the computer's date to check if the date is being reset to a previous date. | |
| Multi-DLL Tab | This is Part of a Multi-DLL Application | If this APP is part of a Multi-DLL application then click this on. |
| Secwin Data Defined in another DLL | Click this on if this is NOT the data DLL. | |
| Don't Generate AppNameDesc | If you are using Multi-Proj then the Global data from the Data DLL will automatically be included here. If so click this on. Otherwise Secwin will need to generate the data here, in which case click this off. | |
| Export Secwin data defined in this DLL | If this is the Data DLL then tick this option on. | |
| Files Tab | Select Driver | Allows you to select the file driver that will be used to store the security files. By default the Topspeed driver is used. Will only show installed driver packs. See Security-File Driver for more information. |
| Database Type | Only shown when ODBC driver is selected, this takes care of those niggly differences between sql databases. | |
| File Owner | If you use the Topspeed or Btrieve drivers then this option is optional. With the other drivers this option is required. Each driver will display the format for it's owner string. Eg: The MSSQL owner label is host,db,user,pwd i.e. IP or Hostname of MS SQL Server, databasename, username, password. See more info at Security-File driver. Use this to set the Owner property for your security files. | |
| Allow program to create security files | Allows your program to automatically create the dssw4 security file. Only recommended for sites using licensing, or which have a low level of security. See also Creating the Security File. | |
| Security File Position | Set the default position for the security file. See also Locating the Security File. | |
| Default Language File | If you want to use a language file other than English, then put the name in here. See Also Translating Secwin windows. | |
| Language File Path | Set the default position of the Language File. | |
| Advanced Tab | Font | Set the Font which you want the Secwin screens to use. |
| Application Pin | See Application Pin Numbers in the User Guide. | |
| SetAccess Function Override | Use thisif you've created your own SetAccess function. See Making your own Secwin Windows. | |
| I'm using 9046 | Check this if you are using Clarion 6.2 9046. This will force the inclusion of the secequ60.clw file (not required in 9047 and up, but required in Clarion 6.1 and down). |
If you add this extension to a screen then the screen will be displayed, but
only in the background. this template is used in conjunction with the
RunLogoScreen Extension
This is an Extension template which can be added to a screen to make it a background
screen. This background screen is ideal for displaying the application's current
user, current license etc. This effect only works on MDI applications, and the
screen must be an MDI child window screen. The best way to run this procedure
is by using the supplied RunLogoScreen extension
in your Main procedure.
Tip : If you have the MDI attribute clicked
off by mistake then the window will float on top of all your other windows instead
of going to the back.
Tip : Setting the border of the screen to
None, and the Caption to blank and ensuring that the System attribute is off,
improve the screen's look. You can also use the Center attribute on the Position
tab when designing the screen to have the screen automatically center itself.
1. Open your App in the usual fashion
2. Click on the Window procedure that you want to make a "background"
window
3. Click on Extensions
4. Click on Add
5. Choose
MakeLogoScreen
| Do not Call ds_GetCurrent | Click on this if you do not want the Logo Screen to automatically load the current license details. |
| Level Names | If you want to change the names of the different levels then enter them here. |
This template calls your logo window, which makes the logo window visible.
This template starts a thread with your MDI logo window.
1. Open your App in the usual fashion
2. Click on your Main function
3. Click on
Extensions
4. Click on Add
5. Choose RunLogoScreen Extension
| Logo Procedure | This is the name of the Logo Procedure to use. The Logo procedure should use the MakeLogo Extension. |
The user must enter a valid user code and password here before the screen will
open. If you are not using AccessControl, you will still need...
Use this extension wherever you want password protection. In the usual case,
where the user logs in before running the Application, use this template extension
on your 'main' function.
You can include any number of these extensions throughout your program. Each
time one is encountered the user will be required to enter a valid user code
and password in order to continue. In each section you can reset which users
are operators, and which are supervisors.
When the function, in which you use this extension, is completed then the user
is automatically logged out. The user then returns to the level, and accesses,
they had before entering the function.
You can tell the program to activate licensing support at this time, and "get"
a valid license.
You can include a "Super User" at this point. This user, although
deletable, will re-appear in the browse users list every time a user logs in.
1. Open the App in the normal fashion
2. Click on the procedure where you wish the login screen to appear
3. Click on the
Properties button.
4. Click on Extensions
5. Click on
Add
6. Choose User Login Here from the list of available extensions
| Login Options Tab | Unique Area Name | This is the name for this login area. A program can have multiple login areas (each one with a unique name). If you have only one login area (as is probably the case) then you can just use the word Main. |
| Allow Case Insensitive Password | If this is ticked then passwords will be case insensitive. If this is off, then passwords will be case sensitive. | |
| Make Login Optional to End User | If this option is ticked, and there are NO users defined then the login screen will not be displayed. If this option is not ticked, and no users exist, then the user will be prompted to add the first user. | |
| Allow only 3 tries | If this is ticked, and the login fails 3 times, then the program will close. | |
| Allow Automatic Login from other EXEs | If this option is ticked on then you'll be able to automatically log into this program from other Secwin enabled programs, using the ds_Run template, or function. | |
| Allow Default Login values | If this is on, then you can set default login and password values. This allows you to 'auto-login' as well as supporting your own Login window. | |
| Default Login Code | Set this to a fixed value in 'quotes' - or a variable name. | |
| Default Password | Set this to a fixed value in 'quotes' - or a variable name. | |
| Don't show screen if default fails | If the default login fails, and this is ticked on, then the Secwin Login window will not be displayed. Otherwise the Secwin Login window will be displayed with the primed values. | |
| Force Password change every 30 days | If this is on the user will be asked to change their password every 30 days. | |
| Force Long password | If this is on then the user will be forced to have a password containing at least 6 alpha characters and 3 numeric characters. | |
| Use Own Login Screen | If this is on then you can use your own Login screen instead of using the Secwin one. | |
| Login Procedure | If the previous option is on then enter the Procedure name here. | |
| First User Procedure | If the Make Login Optional item is off, and Use Own Login Screen is on, then you should also create your own FirstUser procedure. Enter the name of this procedure here. If you leave this blank then everything still works, but it won't be ClarioNet compatible, and the sequence of events during the first login will appear a bit wierd. | |
| Display Login After Window Displays | If this is on, then your Frame will display before the login window. Normally the login window displays before the Frame window. | |
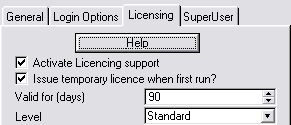
| Licensing Tab | Activate Licensing Support | Click this on to activate the licensing for this login. Typically you'll click this on for a single login in your application, usually the one on the frame. (Remember you app could have multiple login screens.) |
| Default to demo license | If you ship a security file with No license, and this option is on, then the user will automatically get a demo level license the first time the program is run. Note they will ONLY get 1 demo license. Deleting the dssw4 file will NOT result in another license. | |
| Valid for (days) | Active if the Default to Demo License is on. Default is 30 days. Set the length of time (in days) that you want the demo to last for. | |
| Level | Allows you to set what Level will be set when the Demo License is made. In the past this had to be Level Demo, now you can choose | |
| Allow Multiple Security Files | By default Secwin monitors the dssw4 file. If the user has 2 dssw4 files, or restores a backup, then Secwin will complain with a "Security File Corrupted" message. Click this option on override this check. | |
| Disable Network Licensing | If this option is ticked on then the Concurrent Network Copies feature will not be enforced. | |
| Unique License Code | Enter a 4 character (no spaces) code here. This, along with a 4 digit number, will be used to name the .LIC files used for network copies. | |
| Super User Tab | Enable Super User | Tick this option on to enable Super Users. |
| Super User Login Code | Enter the Super User's Login code here. Note Super Users are probably not what you think they are See the section in the User Guide for more information. |
At runtime a supervisor can press a hotkey ( Ctrl F8 by default ), on this screen,
and get a list of operators, along with the list of restrictions. By using the
mouse he can toggle access rights to individual operators. Only users designated
as Operators for this area of the App who are not in groups, and user group
names, will be displayed on the list.
Include this extension in a function if you wish to restrict operators, on an
individual basis, from all, or part of, the function. This will automatically
check each operator as he enters the function to check if access to the screen
is permitted, and also to check if access to controls on the screen are allowed.
You can specify up to 30 other controls, apart from the actual access to the
screen, that the operator can be restricted from. The controls that are not
accessible can be either disabled, hidden or set to read-only.
1. Open the App in the normal fashion.
2. Point to the function you wish to protect.
3. Click on the
Properties button.
4. Click on Extensions
5. Click on
Add
6. Choose User Screen Security from the list of available extensions
| General Tab | This Procedure Doesn't have a window | This is used when you are adding licensing support to a procedure which doesn't have a window - like a report. |
| Control Restrictions Button | Contains all the restrictions for the Access Control features. See below for more information. | |
| License Check and Restrictions Button | Contains all the restrictions for the Licensing features. See below for more information. | |
| Disable Screen Security Here | Click on this option to disable all the Secwin Screen Security in this procedure. In other words this is like deleting the extension, except that all your current settings are kept. This is useful if you suspect that this extension is causing a problem in your window. | |
| Control Restrictions Button | Unique Bit Position | You are allowed up to 30 groups of controls per window. Each group (a group may be just 1 control) needs a unique, unchanging number, from 1 to 30. Enter that number here. |
| Name | Enter the name of the group here. This name will be used on the Set Access window. | |
| Use Equate | Enter the equate label for the first control in the group here. (Most groups will probably have just this primary control). You can select the control from the drop down list box. | |
| Column | If the control set in the previous setting is a list box, then you can protect just a single column of the list box if you like. (If you leave this as 0 then the whole list box will be protected.). Enter a column number in here if you want to protect just a single column. | |
| Action | This determines what happens if the user does not have access to the control. For buttons and menu items Disable is recommended, for entry controls you probably want to Hide the controls. Occasionally (mostly with text-boxes) it's useful to set the control to Read-Only. This allows the user to cut & paste the entry, but not change it. This is useful for address fields and things like that. | |
| Attach other Controls | I mentioned above that you can apply the settings to a group of controls. By clicking on this button you can add more controls to the group | |
| License Restrictions Button | Disable all License checking here | Click this on if you want to bypass all the license checks here. Typically you'd do this if the extension has been added for the Access security above, but you want to prevent license checks. |
| Disable Valid License File Check here | ||
| Disable Valid Date Check here | ||
| Expiry Tab NEW | Warn of Impending Expiry | Click this on if you want Secwin to automatically warn the user when their program is nearing an expiry date. |
| Warning Period | This sets the length of the warning period in days. For example, if set to 14, then the program will start warning the customer 14 days before it expires. | |
| Action : Display Message | This allows you to specify the text of the message that will be displayed. | |
| Action : Call Procedure | This allows you to specify a procedure that mst be called. You can then create your own window procedure to display whatever you like. | |
| Levels Tab | Level Required for this screen. | If you set this to say Standard, and the user only has level Demo, or Lite, then this will cause the License to fail. |
| NEW | Control Restrictions | This allows you to restrict access to individual controls based on the Level. You can add as many controls as you like, and you can set the option to either hide, or disable, the control if the license fails. |
| Modules Tab | Optional modules required for this screen. | If you set any of the options on here, then the user will require the same module to be set, or the license will fail. For example if this procedure belongs to your General Ledger module (module 1) then you would click on optional module 1 here. If the user doesn't have the General Ledger then the license will fail. |
| NEW | Control Restrictions | This allows you to restrict access to individual controls based on the Optional Modules that are activated. You can add as many controls as you like, and you can set the option to either hide, or disable, the control if the license fails. |
| Action Tab | Action to take if License fails | If the user doesn't have the correct level, or the correct optional modules, or the license has expired, or the license is invalid, or the user has run out of network copies, then the license will fail. Exactly what happens when the license fails is up to you. |
| Show Warning and return to caller : This is the most common action. The user will see an error message and the procedure will close. | ||
| Return to caller without showing warning : Use this if you're going to show your own warning. | ||
| Disable all controls except.... : This option allows the window to continue opening, but all of the controls will be disabled (except for the ones you specify). This is useful on a frame so that the user can still run certain items (like Help | About) but not get into the bulk of the program. | ||
| Call Procedure : If you have your own Product Registration window, then you might want to call it directly (especially if the license on the Frame failed). | ||
| Counter Tab | Decrement Counter Here | If you click this option on then the counter will be decremented when this procedure runs. If the counter is already at 0 then the license will fail. Use this feature when you want to limit your program by number of runs, or number of reports etc. |
Allows you to use the CWG variable in your browse filtering.
This allows you to filter records from the browse based on the current user's
workgroup. You can set the User's workgroup on the User Details Form, which
is called from the Browse Users Screen. This template will create a variable
called CWG (a long) which stores the current users workgroup. You can then use
this variable in your browse filtering.
1. Open the App in the normal fashion.
2. Point to the browse function you wish to filter.
3. Click on the Properties button.
4. Click on Extensions.
5. Click on Add.
6. Choose User Workgroup Filtering from the list of available extensions.
7. Click on the OK button.
8. Add your desired filter in the normal fashion.
Note : No actual filtering is done by this
template. You are free to implement filtering in the normal fashion. This template
simply defines, binds, and primes the CWG variable for your use.
This allows you to create a Register product window inside your application
(as apposed to using the deprecated RegisterProduct window inside the Secwin
DLL).
Use the Template Utility provided to create a SecwinRegisterProduct window in your application.
See the Creating your own Product Registration window section for more details.
Allows the user to call the ds_CurrentName,
ds_CurrentLogin
or ds_CurrentLevel function and place the result
on the status bar.
By using this template is is easy to see, on the status bar, the currently logged
in user. You can use any one of the user name, user login code or user level.
You can also prefix your own text or variable before the result of the function
call.
1. Go to the Properties screen of your Main Menu procedure
2. Choose
Embeds
3. Choose After Opening Window
4. Choose the Call_Current code template
| Position in Status Bar | Enter the position in the status bar here. |
| Text | Enter any text here you want to appear before the variable part. For example if you're displaying the user's name then enter 'User Name' here. Use quotes for literal text, or a variable (without any !) |
| Call | Select the variable you want to display. Use Name for the user's name, Login for their Login code, or Level for their level |
![]()
Allows the developer to display the current value left in the counter.
Allows the developer to display the current value left in the counter. This
is useful if you have a counter based license. the result is stored in a field,
and you can display the field on a Window or a report. It makes use of the
ds_CurrentCounter
function.
1. Add the Code template to an embed in your program. You can call this function
from just about any local (not global) embed point.
| Put the result in | Enter a field which will contain the result. The field should be a Long. |
![]()
Allows the developer to display the current value currently in the Expiry Date
in the License
This is useful if you want to display to the user the date on which the license
will expire. It uses the ds_CurrentExpiryDate
function.
1. Add the Code template to an embed in your program. You can call this function
from just about any local (not global) embed point.
| Put the result in | Enter a Long field to contain the date. |
Used to Brand Windows and Reports with the name of the user who is the current
owner of this copy of the program. You can also use the
Call Get License Details template to get all the license details.
This code template is designed to be attached to a report, or window. It creates
a variable called ds_RegisteredCompany. It puts the name of the current License
owner into the variable for you. You can then put the string onto your window,
or report, and format it any way you like. It uses the function
ds_CurrentLicence.
1. Go to the Procedure you want to display the License name in
2. Click on
Embeds for the procedure
3. Choose an embed that is near the beginning of the procedure. The exact spot
will vary depending on your template, but any embed that happens before the
report starts printing is fine.
4. Click on the Insert button
5. Choose the
Call_CurrentLicence code template.
6. Close the windows in the normal fashion.
Then go to your Report or Window structure and populate the new Local Data variable
called ds_RegisteredCompany
Allows the user to see the list of all the users currently logged into the system.
Note that the network licensing features must be activated in order for this
to work.
This code template is designed to be attached to a menu item or button. It calls
the ds_CurrentlyLoggedIn function.
1. Add a control somewhere in your program. Usually this control would take
the form of a menu item in your main menu, but it could also be a button, or
a toolbar button.
2. Click on Actions for the control.
3. Choose
Embeds
4. Choose Control Event Handling , after generated code, Accepted.
5. Choose the
Call_CurrentlyLoggedIn code template.
6. Close the windows in the normal fashion.
Allows the user to call the Change Login Screen.
This code template is designed to be attached to a menu item or button. It calls
the ds_ChangeLoginEx function. If you're going
to use the built-in Secwin window then typically this would be called from a
menu item. If you are going to make your own Change Login window then you would
add this to the Ok button on your Change Login window.
1. Add a control somewhere in your program. Usually this control would take
the form of a menu item in your main menu, but it could also be a button, or
a toolbar button.
2. Click on Actions for the control.
3. Choose
Embeds
4. Choose Control Event Handling , after generated code, Accepted.
5. Choose the
Call_ChangeLogin code template.
6. Close the windows in the normal fashion.
| 1. This is CALLING the Secwin Change Login window | Click this option if you want the menu item to call Secwin's built-in Change Login window. OR |
| 2. This is calling Your Own Change Login window. | Click this if you want the menu item to call your own Change Login window. OR |
| 3. This IS the Ok button on your Change Login window. | Use this if this is the OK button attached to Your Change Login window. |
| Login | Enter a field name here which contains the Login code that the user just entered. (Only used if Option 3 above is chosen) |
| Password | Enter a field name here which contains the Password code that the user just entered. (Only used if Option 3 above is chosen) |
| Your Procedure | If you chose Option 2 above, then enter the name of your Change Login procedure here. |
| Parameters | If you chose option 2 above, then you can optionally enter your parameters to your procedure here. This is included for your convenience if you decide to make a procedure that accepts parameters. |
Allows the user to call the Change Password Screen.
This code template is designed to be attached to a menu item or button. It calls
the ds_ChangePasswordEx function. If you're
going to use the built-in Secwin window then typically this would be called
from a menu item. If you are going to make your own Change Password window then
you would add this to the Ok button on your Change Password window.
1. Add a control somewhere in your program. Usually this control would take
the form of a menu item in your main menu, but it could also be a button, or
a toolbar button.
2. Click on Actions for the control.
3. Choose
Embeds
4. Choose Control Event Handling , after generated code, Accepted.
5. Choose the
Call_ChangePassword code template.
6. Close the windows in the normal fashion.
| This is your own Change Password Window | If you've added this template to your own Change Password window, to the Ok button, then click this option on here. |
| Old Password | Enter a field name here which contains the Old Password that the user just entered. |
| New Password | Enter a field name here which contains the New Password that the user just entered. |
| Verify Password | Enter a field name here which contains the second copy of the new password that the user just entered. |
| Suppress Warnings | If this option is on then Secwin will not display any warnings if the request failed. This is usually done when you want to display your own warnings. See the ds_ChangePasswordEx docs for information on the possible error codes. |
![]()
Allows you to load all the current existing license details.
This is typically used when you are creating your own Product Registration screen.
It allows you to prime all your variables with the current values. It calls
several of the functions including ds_CurrentLicence,
ds_CurrentSerialNumber,
ds_CurrentCopies,
ds_CurrentCounter,
ds_CurrentAppLevel,
ds_CurrentExpiryDate and
ds_CurrentOptional
1. Add this to the Init method (in ABC templates) or to the After Opening Window
embed point if you are using the Legacy templates.
| Company | Enter the company field here. This should be a String(40). |
| Serial Number | Enter the serial number field here. This should be a String(20). |
| Copies | Enter the copies field here. This should be a Long. |
| Counter | Enter the counter field here. This should be a Long. |
| Level | Enter the level field here. This should be a Byte. |
| Expiry Date | Enter the expiry date field here. This should be a Long. |
| Optional Modules | Enter the optional modules field here. This should be an Array of bytes. The array should have at least 30 items. If you select the name from the lookup, then Clarion will automatically populate the field with a subscript. e.g. Modules[1]. You should remove the subscript part. e.g. Modules. |
Allows the user to call the Lock Screen Screen.
This code template is designed to be attached to a menu item or button. It calls
the ds_LockScreen function
1. Add a control somewhere in your program. Usually this control would take
the form of a menu item in your main menu, but it could also be a button, or
a toolbar button.
2. Click on Actions for the control.
3. Choose
Embeds
4. Choose Control Event Handling , after generated code, Accepted.
5. Choose the
Call_LockScreen code template.
6. Close the windows in the normal fashion.
Allows the user to call the Operator Browse Screen.
This code template is designed to be attached to a menu item or button. It calls
the ds_OperatorBrowse function with the appropriate
parameters.
1. Add a control somewhere in your program. Usually this control would take
the form of a menu item in your main menu, but it could also be a button, or
a toolbar button. This control should be visible from all the security areas
within your App, so you may need to add more than one control.
2. Click on
Actions for the control.
3. Choose Embeds
4. Choose Control Event Handling , after generated code, Accepted.
5. Choose the
Call_OperatorBrowse code template.
6. Close the windows in the normal fashion.
Allows the user to call the Register Product Screen.
This code template is designed to be attached to a menu item or button. It calls
the ds_RegisterProductEx function with the
appropriate parameters.
1. Add a control somewhere in your program. Usually this control would take
the form of a menu item in your main menu, but it could also be a button, or
a toolbar button.
2. Click on Actions for the control.
3. Choose Embeds
4. Choose Control Event Handling , after generated code, Accepted.
5. Choose the Call_RegisterProduct code template.
| General Tab | This is your own Register screen | Click this option on if you're using this embed on the Ok button of your own Product Registration screen. Click this option off if you are calling the default Product Registration window. The rest of the options you see will depend on this option. |
| Levels Tab | Allow the following Levels | Allows you to control what Levels appear on the default Secwin window. Select the Levels you want Secwin to offer. |
| Optional Modules Tab | Allow the following optional modules | Allows you to control which Optional Modules appear on the default Secwin Window. Select the modules you want Secwin to offer. |
| Fields Tab | Company | This is set if this is your own Register Product screen. Set the field to match the Company field that the user just typed in. |
| Serial Number | This is set if this is your own Register Product screen. Set the field to match the Serial Number field that the user just typed in, or that you've set in your code. | |
| Copies | This is set if this is your own Register Product screen. Set the field to match the Copies field that the user just typed in, or that you've set in your code. | |
| Counter | This is set if this is your own Register Product screen. Set the field to match the Counter field that the user just typed in, or that you've set in your code. | |
| Level | This is set if this is your own Register Product screen. Set the field to match the Level field that the user just typed in, or that you've set in your code. | |
| Optional Modules | This is set if this is your own Register Product screen. Set the field to match the Optional Modules field that the user just typed in, or that you've set in your code. | |
| Activation Code | This is set if this is your own Register Product screen. Set the field to match the Serial Number field that the user just typed in. | |
| Advanced | Counter is Relative | The counter setting will be added to the existing counter value. |
| Activation code used once. | Prevents the same activation code being entered multiple times. Use when issuing relative counters to prevent multiple entry. |
Allows the user to run another Secwin program, using the currently logged in
user. The program being run must have the Allow Automatic Logins from other
EXE's option clicked on.
This code template is designed to allow you to run other programs, from within
the current program, at the same time automatically logging in to the new program
using the existing user's details. This template uses the ds_Run
function.
1. Add a control somewhere in your program. Usually this control would take
the form of a menu item in your main menu, but it could also be a button, or
a toolbar button.
2. Click on Actions for the control.
3. Choose Embeds
4. Choose Control Event Handling , after generated code, Accepted.
5. Choose the Call_RunAnotherExe code template.
| Program Name | Enter the program name to run here. This name can include the path if necessary. |
| Parameters | Enter any command line parameters, which will be sent to the new program, here. |
6. Set the name of the program to run as well as any other parameters that the
program may need.![]()
International language support.
Allows you to change the language file which will be used when displaying any
of the default Secwin windows. Makes use of the ds_SetLanguage
function.
1. Add a control somewhere in your program. Usually this control would take
the form of a menu item in your main menu, but it could also be a button, or
a toolbar button.
2. Click on Actions for the control.
3. Choose Embeds
4. Choose Control Event Handling , after generated code, Accepted.
5. Choose the Call_SetLanguage code template.
| Language File Name | Enter the name of the language file here. Use 'Quotes' if this is a fixed name, or enter a variable if you want the name of the file to be stored in a variable. |
None
This function is not designed to be added to your main application - rather
it is used on the developer machine to stamp dssw4 files with PIN numbers.
This code template stamps the dssw4 file with an Application PIN number. Pin
numbers enhance application security be ensuring that only correctly "stamped"
dssw4 files will be considered valid for the application. A full description
of the PIN number concept, and when you would use this function, can be found
in the User Guide in the section entitled Application PIN numbers. It uses the
ds_SetPin function.
1. Remember this function would not be used inside the Application you are intending
to protect. Rather you need to create a separate utility. 2 examples of such
utilities are shipped with Secwin. They can be found in the \clarion\3rdparty\examplrs\secwin\setpin
directory and the \clarion5\3rdparty\examples\secwin\hardpin
directory.
2. Add a control somewhere in your utility. This control could be a menu item
in your main menu, or a button, or a toolbar button.
3. Click on Actions for the control.
4. Choose
Embeds
5. Choose Control Event Handling , after generated code, Accepted.
6. Choose the
Call_SetPin code template.
| Application Name | Enter the name of the application here. You can use a variable, or 'quotes' for a fixed value. |
| Application PIN number | Enter the application Pin number in here. |
None
This function is not designed to be added to your main application - rather
it is used on the developer machine to generate Activation Codes. This template
makes use of the ds_GetActivationCode function.
Used in registration programs, like the included Register example application.
You feed the template the variables it needs and it returns a valid activation
code. You can find the Register example in the \clarion\3rdparty\secwin\register
directory
1. Add the code template to a button.
| Parameter Name | Type | Description |
| ApplicationNumber | Long | This is the Application number returned by ds_LoginText. |
| FunctionName | String | This is the name of the function to which the user is requesting access. This parameter is not case sensitive. |
| Override | Long | This is an attribute that contains any overrides that the program may use to override the users access levels. This is not currently used and should be set to 0. |
This function enables the application to get the access rights for a specific
user for a specific part of the program ( usually a screen.) The function is
called using the ApplicationNumber as well as the FunctionName. The function
returns a long ( although currently only the low 8 bits are supported ), in
which each bit signifies that access has been granted or denied to a particular
section. If the bit is set the access has been granted, if it is not set then
access has been denied.
These accesses only apply to users designated as 'Operators' on the Operator
Browse screen. You cannot limit the access of an user designated as a 'Supervisor'.
A Long which can be bitwise tested to determine the access rights that
the user has been granted. These access rights are set by calling ds_SetAccess
ViewVideo Procedure
window WINDOW('Caption'),AT(-1,2,185,92),SYSTEM,RESIZE,MDI
BUTTON('Delete'),AT(68,28,,),USE(?DeleteButton)
BUTTON('Change'),AT(127,35,,),USE(?ChangeButton)
BUTTON('Cancel'),AT(74,53,,),USE(?CancelButton)
BUTTON('Ok'),AT(17,25,,),USE(?OkButton)
BUTTON('Print'),AT(19,51,,),USE(?PrintButton)
END
ThisAllowed long
CODE
ThisAllowed = ds_allowed (Application Number,'ViewVideo',0)
if ~band(ThisAllowed,1) then return.
OPEN(window)
WindowOpened=True
if ~band(ThisAllowed,2) then hide(?OkButton).
if ~band(ThisAllowed,4) then hide(?ChangeButton).
if ~band(ThisAllowed,8) then hide(?DeleteButton).
if ~band(ThisAllowed,16) then hide(?PrintButton).
alert(DS_SECURITYKEY)
ACCEPT
| Parameter Name | Type | Description |
| Locale | String | Optional. A string suitable for passing to the Clarion LOCALE statement. |
Use this function to rebuild the keys in the Security file. Actually the main
reason for this function is to allow you to change the LOCALE settings for the
file. When you change your LOCALE settings then you need to rebuild the keys
in order for the new Locale to take effect.
Nothing
NewLogin String(12)
NewPassword String(12)
Code
ds_BuildKeys ()
ds_BuildKeys ('My.Env')
![]()
| Parameter Name | Type | Description |
| ApplicationNumber | Long | This is the Application number returned by ds_LoginText. |
| Login | String | Optional. A default value for the Login. |
| Password | String | Optional. A default value for the Password. |
| Options | Long | Optional. Explained below |
This allows another user to Login without quitting the application. The login
screen will behave using the same options as was last passed to ds_LoginText.
This function behaves the same as the ds_LoginText function and uses the Login
and Password parameters in the same way.
If Options is set to 1 then the default Secwin screen will not be displayed.
This is used when you have your own ChangeLogin screen.
Note that you can create your own ChangeLogin window to collect the Login and
Password from the user, and pass them on to this function. In this way you can
bypass the built-in Secwin window.
A Byte containing 0 if the operation was successful, or 1 if the login
was unsuccessful.
NewLogin String(12)
NewPassword String(12)
Code
ds_ChangeLoginEx (AppNum,NewLogin,NewPassword)
ds_LoginText, Code
: Change Login, Making your own Secwin
windows
Allows the user who is currently logged in to change his or her password. The
user will be required to enter his existing password, and then his new password
twice. There is only one password per user, regardless of the number of applications
or security areas.
To build your own password window, use the
ds_ChangePasswordEx
function.
Nothing
NewPassword String(20)
OldPassword String(20)
Code
ds_ChangePassword(OldPassword,NewPassword)
ds_ChangePasswordEx,
Code
: Calling Change Password, Making
your own Secwin windows
| Parameter Name | Type | Description |
| ApplicationNumber | Long | This is the Application number returned by ds_LoginText. |
| OldPassword | String(12) | The users old password |
| NewPassword | String(12) | Contains the new password |
| VerifyPassword | String(12) | Contains a copy of the new password. |
| Options | Long | Described below |
Allows a programmer to use his own
ChangePassword screen, and call this function to update the password stored
in the database. Note that only the person currently logged in can change their
password. In other words the OldPassword field must match the password that
the person currently logged in.
If Option is set to 1 then the Secwin warning messages will be suppressed.
A Byte containing 0 if the operation was successful, or one of the
following error codes;
1 Incorrect Old Password
2 New password cannot be the same as old password
3 New Password and Verify Password don't match.
4 Password cannot be blank
6 Password must contain 6 Alpha and 3 Numeric Characters
This last requirement is enforced if the Force Long Password option on
the Login extension is set.
OldPassword STRING(12)
NewPassword STRING(12)
VerifyPassword STRING(12)
window WINDOW('Change Password'),AT(,,209,75),SYSTEM,GRAY,AUTO
PROMPT('Old Password:'),AT(34,6),USE(?OldPassword:Prompt)
ENTRY(@s12),AT(103,6,60,10),USE(OldPassword)
PROMPT('New Password:'),AT(34,22),USE(?NewPassword:Prompt)
ENTRY(@s12),AT(103,22,60,10),USE(NewPassword),PASSWORD
PROMPT('Verify Password:'),AT(34,38),USE(?VerifyPassword:Prompt)
ENTRY(@s12),AT(103,38,60,10),USE(VerifyPassword),PASSWORD
BUTTON('&Ok'),AT(56,55,45,14),USE(?Ok)
BUTTON('&Cancel'),AT(109,55,45,14),USE(?Cancel)
END
Code
open(window)
accept
if field() = ?Ok and Event() = Event:Accepted
if ds_ChangePassword(AppNum,OldPassword,NewPassword,VerifyPassword,0)
= 0
post(event:closewindow)
end
end
end
close(window)
ds_ChangePassword,
Code
: Calling Change Password, Making
your own Secwin windows
| Parameter Name | Type | Description |
| AppNum | Long | The application number of the current application as returned by the ds_LoginText function. |
| FirstName | String | Obvious (for Users). If the UserGroup parameter is set to -1 then this contains the UserGroup Name. |
| LastName | String | Obvious (for Users). If the UserGroup parameter is set to -1 then this contains a space followed by the UserGroup Name. |
| LoginCode | String | The code the user will use when he logs in. His initial password will also be set to this value. |
| WorkGroup | Long | The users Workgroup number. this is the same as the Workgroup field on the usual operator form. |
| Level | Long | One of DS_SUPERVISOR, DS_OPERATOR or DS_NOACCESS |
| UserGroup | Long | User Group Number. If this is set to -1 then this is a UserGroup (not a User) being added. |
Lets you change a user (or user group) in source code.
0 if successful.
1 if the operator doesn't exist.
2 if some file-access-error prevented the delete. Use ERRORCODE() to get the
actual error.
code
execute ds_ChangeUser(App,FirstName,LastName,
LoginCode,WorkGroup, Level,0)
message('Operator Not Found')
message('Error Writing Record: ' & Error())
end
ds_InsertUserEx, ds_DeleteUser
| Parameter Name | Type | Description |
| SecurityAreaName | String | This is the name of the area being protected. Each name must be unique, even across applications, so by convention, this name is normally made up of the application name and the area name, separated by a pipe ( | ) symbol. The maximum length of this parameter is 43 characters, and it is not case sensitive. This is the same as the SecurityAreaName parameter from the ds_LoginText function. |
Counts the number of users that have access to this Area. If you create your
own login screen, then you will probably want to create your own FirstUser screen
as well. This procedure lets you determine if the FirstUser fuinction needs
to be called.
long containing the number of users with Supervisor or Operator access.
code
if ds_CountUsers(Clip(AppNameDesc) & ' | Main') = 0
myFirstUser(Clip(AppNameDesc) & ' | Main')
end
This function creates the security file. Typically it's called from inside a
separate utility, but it can be called from inside your program.
Care should be taken if you add this to your application as it can mean a serious
breech of the security is possible. For example a user might overcome
the security simply by deleting the security file and running the program again.
This is less of a problem if the Licensing features are enabled as the program
will have to be re-activated before it will run.
| Tip : If you are using a file driver other than Topspeed to store your security file, then you must call ds_SetOwner before calling ds_Cresec. |
The function won't empty, or overwrite, any security file which might exist
already.
Nothing
code
ds_SetOwner ('bobbybrown', 'washere')
ds_CreSec( )
Creating the Security File,
Activate
Security Extension, ds_SetOwner
| Parameter Name | Type | Description |
| TextString | String | This is the string to encrypt or decrypt. |
Allows you to perform simple encryption on a string. To decrypt the string you
pass the encrypted string to ds_Crypt. This doesn't provide a very high level
of encryption as no key is used, but it does prevent unsophisticated users from
finding sensitive text on the disk.
A String containing the encrypted or decrypted string.
Test String(12)
Code
test = ds_Crypt('hello') ! now test contains the encrypted string
test = ds_Crypt(test) ! now test contains the decrypted string
Exports the Secwin tables to a portable format. Useful when you need to move the tables from one storage system to another (for example TPS to MSSQL). The encrypted file is called dssw4.BIN and it will be created in the "Current directory". Use the ds_ImportFiles function to import the file.
| Parameter Name | Type | Description |
| pSelectDir | byte | If this is 0 or omitted, then the select file dialog box is not displayed and the exported table is merely created in the current directory. If 1 is passed, then a select file dialog box is displayed that allows you to select the file to export the data to. |
Tip : It is recommended that this function is only called After the call to ds_LoginText.
Tip : Use SETPATH to set the current directory, however it is recommended that you restore the current directory to the previous value after the export.
Nothing
Code
ds_ExportTables()
Exports the Secwin tables to a portable format. Useful when you need to move the tables from one storage system to another (for example TPS to MSSQL). The encrypted file is called dssw4.BIN and it will be created in the "Current directory". Use the ds_ImportFiles function to import the file.
| Parameter Name | Type | Description |
| pSelectDir | byte | If this is 0 or omitted, then the select file dialog box is not displayed and the imported table is used in the current directory. If 1 is passed, then a select file dialog box is displayed that allows you to select the file to import the data from. |
Tip : It is recommended that this function is only called After the call to ds_LoginText.
Tip : Use SETPATH to set the current directory, however it is recommended that you restore the current directory to the previous value after the export.
Tip : Data from the import is added to the existing Secwin data. Duplicate records are automatically discarded. However this function is designed primarily to move complete Secwin data, and is not designed to merge Secwin data. While merges of multiple data files may be successful, no guarantee is offered in this regard.
Nothing
Code
ds_ImportTables()
This is a Registration related function. It allows the programmer to get the
current Application Level ( e.g. Demo, Lite, Standard etc) set in the current
license. Don't confuse this function with ds_CurrentLevel which is an Access
Control related function, and returns the Users current level.
A long containing the current Application Level. Valid values are 1 to 5. 1
is the lowest level (Demo) while 5 is the highest (Enterprise).
Result Long
Code
Result = ds_CurrentAppLevel()
Code : Get License Details,
Using
Levels
Allows the programmer to get the number of Copies set in the current license.
A long containing the current number of copies.
Result Long
Code
Result = ds_CurrentCopies()
Code : Get License Details,
Using
Network Copies
Allows the programmer to get the Counter set in the current license. This Counter
is set when the activation code is generated, and used.
A long containing the current Counter value.
Result Long
Code
Result = ds_CurrentCounter()
Code : Get License Details,
Using
Counters
Allows the programmer to get the current Expiry Date set in the current license.
This Date is set when the activation code is generated, and used.
A long containing the current date in a Clarion standard date format.
Result Long
Code
Result = ds_CurrentExpiryDate()
Code : Get License Details,
Using
Expiry Dates
| Parameter Name | Type | Description |
| ApplicationNumber | Long | This is the Application number returned by ds_LoginText. |
Allows the programmer to get the date on which the password, for the logged
in user, was last change. Useful for implementing your own "Force Password
Change" feature when the built-in version is not flexible enough.
A long containing the date of the last password change in a Clarion standard
date format.
Result Long
Code
Result = ds_CurrentLastPasswordChange(AppNum)
If Today()-Result > 7
ds_ChangePassword(AppNum)
End
| Parameter Name | Type | Description |
| ApplicationNumber | Long | This is the Application number returned by ds_LoginText. |
Allows the programmer to get the Level of the user who is currently logged on.
This can be useful for displaying the login of the current user on the status
bar etc.
A long containing the level of the user currently logged on. The returned value
will be either DS_SUPERVISOR or DS_OPERATOR.
CurrentLevel Long
Code
CurrentLevel
= ds_CurrentLevel(AppNum)
ds_CurrentLogin, ds_CurrentName,
ds_CurrentOperatorNumber,
Code
: Calling Current
Allows the programmer to get the name that this program has been licensed to
as set in the current license. This value can be used in the product as a "Branding"
technique. For example this value could appear on reports, on the MDI screen
etc.
A string containing the company, or person, name of the registered user. This
string can be a maximum of 40 characters long.
result string(40)
code
result = ds_CurrentLicence()
Code : Get License Details,
Branding
on Reports, Branding Using Logo screens
| Parameter Name | Type | Description |
| ApplicationNumber | Long | This is the Application number returned by ds_LoginText. |
Allows the programmer to get the Operator Number of the user who is currently
logged on. This matches the number returned in the ds_UsersEx function.
You can use this number (which is unique for each operator) to link your own
user file to the Secwin user file.
A long containing the operator number of the user currently logged on.
CurrentOperator Long
Code
CurrentLevel = ds_CurrentOperatorNumber(AppNum)
ds_UsersEx, ds_CurrentLevel,
ds_CurrentLogin, ds_CurrentName,
Code : Calling Current
Allows the programmer to get the optional modules that this program has been
licensed to as set in the current license.
A long, where each bit represents an optional module. You can test for a specific
optional module by BANDing the result with one of the DS_OM1 to DS_OM30 equates.
result long
Optionalmodule1 byte
OptionalModule2 byte
code
result = ds_CurrentOptional()
if band(result,DS_OM1) then OptionalModule1 =1.
if band(result,DS_OM2) then OptionalModule2 =1.
Code : Get License Details,
Using
Optional Modules
| Parameter Name | Type | Description |
| ApplicationNumber | Long | This is the Application number returned by ds_LoginText. |
Allows the programmer to get the Login Code of the user who is currently logged
on. This can be useful for displaying the login of the current user on the status
bar etc.
A string containing the login code of the user currently logged on. The maximum
length of the string is 12 characters.
CurrentLogin string(12)
Code
CurrentLogin = ds_CurrentLogin (AppNum)
ds_CurrentLevel, ds_CurrentName,
ds_CurrentOperatorNumber,
Code
: Calling Current
Allows the programmer to get the Serial number as set in the current license.
A String (20) containing the Serial Number.
SerialNumber String(20)
code
SerialNumber = ds_CurrentSerialNumber()
| Parameter Name | Type | Description |
| Options | Long | Valid options are DS_DONTSHOWSCREEN. |
This function requires the registration features to be active. Allows the user
to see who else is logged on to the system. This is useful when you wish to
ask people to quit the program because of insufficient licenses, or if you need
to update the program on the server.
If the DS_DONTSHOWSCREEN option is used then the function will not open a screen
showing the list of users.
Irrespective of the parameter, a comma delimited list of User Names is passed
back from the function.
A comma delimited string containing the list of User Names currently on the
system.
List string(255)
Code
ds_CurrentlyLoggedIn()
list = ds_CurrentlyLoggedIn (DS_DONTSHOWSCREEN)
Code : Calling Currently Logged In,
Using Network Copies,
ds_CurrentlyLoggedInEx
| Parameter Name | Type | Description |
| LoggedInQueue |
ds_LoggedInQueue | This is a queue defined in your application using the ds_LoggedInQueue queue structure. the queue you pass must have this structure. An example of such a queue is... |
LoggedInQueue
QUEUE,PRE(_dsqex)
Name
STRING(255)
Reserved
STRING(255)
END
This function requires the registration features to be active. It fills the
supplied Queue with the names of all the other users who are logged onto the
system. This is useful when you wish to ask people to quit the program
because of insufficient licenses, or if you need to update the program on the
server.
In addition to the Queue being populated, a comma delimited list of User Names
is passed back from the function.
This function is not designed to replace
ds_CurrentlyLoggedIn,
but rather to provide a method for getting the list of names in a Queue format.
This is particularly useful if large numbers of users will be connected, and
the string is not large enough for the whole list.
A comma delimited string containing the list of User Names currently on the system.
Note: The first item in the queue/string is the current user. This will mean that the user is duplicated in the queue of users. Don't forget to free the queue before calling the function, as the function will simply add to the queue.
UserQueue
QUEUE,PRE(_dsqex)
Name
STRING(255)
Reserved
STRING(255)
END
s
STRING(255)
code
s = ds_CurrentlyLoggedInEx (UserQueue)
Code : Calling Currently Logged In,
Using Network Copies,
ds_CurrentlyLoggedIn
| Parameter Name | Type | Description |
| ApplicationNumber | Long | This is the Application number returned by ds_LoginText. |
Allows the programmer to get the Name of the user who is currently logged on.
This can be useful for displaying the name of the current user on the status
bar etc.
A string containing the name of the user currently logged on. The maximum length
of the string is 40 characters.
currentname string(40)
code
currentname = ds_CurrentName(AppNum)
ds_CurrentLevel,
ds_CurrentOperatorNumber,
ds_CurrentLogin, Code
: Calling Current
| Parameter Name | Type | Description |
| ApplicationNumber | Long | This is the Application number returned by ds_LoginText. |
Allows the programmer to get the name of the User Group that the user currently
logged in, belongs to. The users User Group is set on the operator Browse screen.
Only operators can belong to a user group (i.e. Supervisors do not belong to
a group).
A string (maximum length 20 characters) containing the name of the user group.
If the user does not belong to a group the this string is contains the word
'None'. If the user belongs to a group, but the group name no longer exists,
then the word 'Unknown' is returned.
Result string(20)
Code
Result = ds_CurrentUserGroup (Appnum)
Obsolete. Use ds_CurrentWorkGroupEx instead. ds_CurrentWorkGroup returns
a Short not a Long.![]()
| Parameter Name | Type | Description |
| ApplicationNumber | Long | This is the Application number returned by ds_LoginText. |
Allows the programmer to get the Workgroup of the user who is currently logged
on. The users' Workgroup is set on the users form by a Supervisor. Workgroups
are a way of grouping users for browse filter purposes.
A long. The number returned is the number entered in on the User form.
CWG long
code
CWG = ds_CurrentWorkGroup (AppNum)
Work Groups, ds_GetWorkGroupEx
Removes 1 from the value stored in the License. This is used when selling your
program by number of runs, or number of reports, or something like that.
1 if successful. 0 if failed. The function will fail if the counter is already
set to 0.
Result Long
Code
result = ds_DecrementCounter()
If result = 0 then return.
Using Counters
ds_DecrementCounterEx
Removes Count from the value stored in the License. This is used when
selling your program by number of runs, or number of reports, or something
like that. Using this function instead of
ds_DecrementCounter allows you to remove a variable number from the available
counter in a single hit.
1 if successful. 0 if failed. The function will fail if the counter is already
set to a number less than count. If the function fails then nothing
is removed from the counter.
Result Long
Code
result = ds_DecrementCounterEx(100)
If result = 0 then return.
Using Counters
ds_DecrementCounter
| Parameter Name | Type | Description |
| ApplicationNumber | Long | This is the Application number returned by ds_LoginText. |
| Login | String | The login code of the operator being deleted. |
Allows the programmer to delete a user in Source code. Users that are used in
other applications which share this file cannot be deleted. (Rather set their
Level to NoAccess using the ds_ChangeUser function). If the user is the last
Supervisor for an application, and other Operators exist, then he can't be deleted.
0 if successful.
1 if the operator doesn't exist.
2 if he's the last Supervisor.
3 if the user is used in another application
4 if some file-access-error prevented the delete. Use ERRORCODE() to get the
actual error.
code
execute ds_DeleteUser(App,LoginCode)
message('Operator Not Found')
message('Can''t delete last supervisor')
message('Operator used by another program')
message('Unable to delete operator: ' & error())
end
ds_InsertUserEx, ds_ChangeUser
| Parameter Name | Type | Description |
| ApplicationNumber | Long | This is the Application number returned by ds_LoginText. |
| CalledBy | String | This is a unique string for this procedure. Usually the procedure name. |
| OperatorNumber | Long | This is the number for the current Operator as returned by ds_CurrentOperatorNumber or in the users Queue returned by ds_UsersEx. |
This function returns the access rights for a particular user, for a particular
procedure in the application. If the CalledBy parameter is set to LEVEL then
it returns the user's Level. This function is provided primarily so you
can build your own SetAccess window.
A Long, containing the access rights for that user, for that particular screen.
This is basically the number that has been set using the ds_SetAccessEx function.
If the CalledBy parameter is set to LEVEL then it returns one of DS_NOACCESS,
DS_OPERATOR or DS_SUPERVISOR.
See the included Splash example for an example of a SetAccess window.
Opens a screen that lets you generate an activation code. You wouldn't normally
include this function in an application. The Register.App example calls this
function so that you can generate unique activation codes based on your clients
name etc. The example can be found in the \Clarion\3rdParty\Examples\Secwin\Register
directory.
Nothing
code
ds_GenerateActivationCode()
ds_GetActivationCode,
Some
Activation Code Secrets
![]()
| Parameter Name | Type | Description |
| Product | String | The name of your product as specified in the Secwin Global Extension. |
| Company | String | The name of the company which has bought the software. |
| SerialNumber | String | The serial number you have issued the company mentioned above. |
| Copies | Long | The number of concurrent network copies they are allowed to run. |
| Level | Long | The level they have purchased. 1 = Demo, 2 = Lite etc. ( Valid 1- 5 ) |
| Optional | Long | A bit mask of the optional modules they have purchased. 1 is module 1, 2 is module 2, 4 is module 3, 8 is module 4 etc. So to activate modules 2 and 4 this would be set to 10 ( 2+8 ). |
| ExpiryDate | Long | The date when the user's license will expire. This is a standard clarion date. |
| Counter | Long | The counter field. |
| SeedCode | Long | The seed code of the application as specified on the Secwin Global Extension. |
Takes all the required parameters and returns an activation code. This function
is provided so that you can design your own activation code generation procedures.
For an example of using this function see the Register.App demo application
This example is in the \clarion\3rdparty\examples\secwin\register directory.
This function is not typically called in the programs that you distribute.
A String of length 20 containing the Activation code.
AC String(20)
Code
AC = ds_GetActivationCode ('App','Comp','001',5,3,0,today()+30,0,1234)
ds_GenerateActivationCode,
Some
Activation Code Secrets
| Parameter Name | Type | Description |
| Drive | String | Optional. Contains the Root directory of the drive to check. If omitted then the Current Path will be used. |
Used to get the Serial Number of the Hard Drive. This can then be used as the
program's serial number. By comparing the two numbers you can detect when the
data has been moved from one hard drive to another.
Ulong containing the Serial Number
Code
If ds_GetDriveSerialNumber() <> ds_CurrentSerialNumber()
message('I'm an unhappy program.')
return
End
![]()
![]() Obsolete.
Use ds_GetWorkGroupEx instead. ds_GetWorkGroup returns a Short not a Long.
Obsolete.
Use ds_GetWorkGroupEx instead. ds_GetWorkGroup returns a Short not a Long.
![]()
| Parameter Name | Type | Description |
| ApplicationNumber | Long | This is the Application number returned by ds_LoginText. |
| OperatorNumber | Long | This is the number for the current Operator as returned by ds_CurrentOperatorNumber or in the users Queue returned by ds_UsersEx. |
Allows the programmer to get the Workgroup of another user. The users' Workgroup
is set on the users form by a Supervisor. Workgroups are a way of grouping users
for browse filter purposes.
A long. The number returned is the number entered in on the User form.
CWG short
code
CWG = ds_GetWorkGroup (AppNum,1)
Work Groups, ds_CurrentWorkGroup
![]()
| Parameter Name | Type | Description |
| SecurityAreaName | String | This is the name of the area being protected. Each name must be unique, even across applications, so by convention, this name is normally made up of the application name and the area name, separated by a pipe ( | ) symbol. The maximum length of this parameter is 43 characters, and it is not case sensitive. This is the same as the SecurityAreaName parameter from the ds_LoginText function. |
| FirstName | String | Firstname of the user being added. Ignored if Number <> 0. |
| LastName | String | Lastname of the user being added. Ignored if Number <> 0 |
| LoginCode | String | The code the user will use when he logs in. His initial password will also be set to this value. Ignored if Number <> 0. |
| Number | Long | The User Number of an existing User to be granted First User rights to this area. If 0 then a new user (using the above parameters) will be created. |
If the login to your program is not optional, then an issue arises if no user
has access to the program. At this point Secwin insists that either an existing
user (who currently has No Access) is granted access to the system, or a new
user is created. In either case the user will be granted Supervisor status.
0 = Success. Otherwise Failure.
Code
If choice(?list1) <> 0
get(q,choice(?list1))
ds_InsertFirstUser(AppName,FirstName,LastName,LoginCode,q.Number)
Else
ds_InsertFirstUser(AppName,FirstName,LastName,LoginCode,0)
End
This function is obsolete. It's exactly the same
as calling ds_InsertUserEx with the UserGroup
parameter set to 0. It is included here for backward compatability reasons.
![]()
| Parameter Name | Type | Description |
| AppNum | Long | The application number of the current application as returned by the ds_LoginText function. |
| FirstName | String | Obvious (for Users). If the UserGroup parameter is set to -1 then this contains the UserGroup Name. |
| LastName | String | Obvious (for Users). If the UserGroup parameter is set to -1 then this contains a space followed by the UserGroup Name. |
| LoginCode | String | The code the user will use when he logs in. His initial password will also be set to this value. |
| InitialAccess | Long | 1 = All Access otherwise No Access. |
| WorkGroup | Long | The users Workgroup number. this is the same as the Workgroup field on the usual operator form. |
| Level | Long | One of DS_SUPERVISOR, DS_OPERATOR or DS_NOACCESS |
| UserGroup | Long | User Group Number. If this is set to -1 then this is a UserGroup (not a User) being added. |
Lets you add a user (or user group) to the system in source code. As in the
screen version the user's initial password is set the same as his login code.
If the user exists, or if one of the parameters is blank, then the function
will fail.
If you are adding a User Group then the WorkGroup field is ignored, and the
FirstName field contains the User Group Name (eg Sales). The LastName parameter
should contain a space and the FirstName value. The Login code should be blank.
0 = successful.
1 = Either No FirstName, no LastName, no LoginCode, or InitialAccess not set
to 0 or 1.
2 = An error adding the operator to the File (use Error() and ErrorCode() for
details)
Code
ds_InsertUserEx (AppNum, 'Bill', 'Gates', 'BG',1,0,DS_OPERATOR,0)
ds_InsertUserEx (AppNum, 'Sales', ' Sales','',1,0,DS_OPERATOR,-1)
ds_UsersEx, ds_ChangeUser,
ds_DeleteUser
| Parameter Name | Type | Description |
| RqdLevel | Long | The license level required at this point. Valid values are 1 to 5. Invalid values are automatically set to 3. |
| RqdModules | Long | The optional modules required at this point. Valid values are 0 or a combination of the DS_OM1 through DS_OM30 equates. |
| Options | Long | Various options that modify the behaviour of the function. |
Checks the users current license and returns a value to tell you if it passed
or failed the check. Equates have been defined for the different optional modules,
namely DS_OM1 thru DS_OM30. You can modify the behaviour by using the options
parameter with one or more of the following values.
DS_NOWARN : By default Secwin displays a warning to the user when one of these
checks fails. By including this option no warning is displayed.
DS_NODATECHECK : This ignores the checks for errors 3 and 4.
DS_NONETWORKCHECK : This ignores the check which could return error 5.
DS_MULTIDATA : This ignores the check that could return error 7.
0 if successful.
1 if the current license level is not sufficient.
2 if the current license has expired
3 if the current PC date is less than the date of a previous use of the license.
4 if the current Pc date is more than 2 years later than the previous use of
the license.
5 if too many network users are logged in.
6 if the current licence's optional modules are not sufficient.
7 if the date and time of the
dssw4 file goes backwards. (suppress this check
with DS_MULTIDATA)
Result long
Code
Result = ds_LicenceOk(1,0,0)
Result = ds_LicenceOk(3,DS_OM1,DS_NOWARN)
Result = ds_LicenceOk(5,DS_OM1 + DS_OM8,DS_NOWARN + DS_NODATECHECK)
| Parameter Name | Type | Description |
| ApplicationNumber | Long | This is the Application number returned by ds_LoginText. |
Allows the user who is currently logged in to lock the application while being
away from the terminal temporarily. The screen is blacked out and the user must
enter their password before the application will continue. Note that the machine
is not locked as the Windows task manager is still active. The application can
also be terminated using the task manager.
Nothing
Code
ds_LockScreen (AppNum)
Ancillary User Functions,
Code
: Calling Lock Screen
| Parameter Name | Type | Description |
| SecurityAreaName | String | This is the name of the area being protected. Each name must be unique, even across applications, so by convention, this name is normally made up of the application name and the area name, separated by a pipe ( | ) symbol. The maximum length of this parameter is 43 characters, and it is not case sensitive. |
| Options | Long | This parameter governs the behaviour of the Login function. Multiple options can be added together. Possible values are listed below. |
| Login | String | This is the default Login code. In order for this to be used by this function, the DS_AUTOLOGON option flag must be set. Can be blank. |
| Password | String | This is the default Password. In order for this to be used by this function, the DS_AUTOLOGON option flag must be set. |
DS_DEFAULT (0) : Default behaviour. A login is definitely required, and the
password is case sensitive. Automatic logins are not allowed, and unlimited
login tries are accepted.
DS_OPTIONALON : This indicates that this login is optional, and is governed
by your user at runtime. If any user has been given access to this area, then
a login is required. If no user has been assigned access then no login screen
is presented. When inside an optional area all users have supervisor status
i.e. no Screen Security is in place. A user can change the optional status of
the area by entering the area, then opening the Browse Users screen. They can
then assign a supervisor to the area, and from then on the area is not optional,
until all users have been assigned 'No Access' again.
DS_CASESENSITIVITYOFF : If this flag is present then the User password is not
case sensitive.
DS_THREETRIES : Limits the number of login attempts to 3 before the program
automatically aborts the login attempt.
DS_USECURRENTLOGON : Allows this application to accept automatic login attempts,
using the ds_Run function.
DS_AUTOLOGON : Allows this application to accept automatic login attempts, using
the Login and Password parameters.
DS_DONTSHOWSCREEN : If this flag is set, and the DS_AUTOLOGON flag is set, and
the attempted automatic login fails, then the function will immediately return
0, without opening the login screen. If this flag is not set, and an automatic
login attempt fails, then the normal login screen will be opened.
Allows a user to login to the program, or program area. A window will be opened
allowing the user to enter a user code and a password. If there are no users
defined for this application then one of the following two actions will occur.
1. If security is not optional then you will be asked to either assign an existing
user to this area as a Supervisor, or to add a new user as a Supervisor. If
you add a new user then the initial password is the login code.
2. If security is optional then no window will be opened and the user will automatically
be given the Supervisor level.
If the DS_USECURRENTLOGON flag is set then the function will attempt to log
the user in using the same login code and password of the calling program. The
calling program uses the ds_Run function (or template) to run this program.
If the DS_AUTOLOGON flag is set then the function will attempt to log the user
in using the Login and Password parameters.
If either of these attempts fail, then the normal login screen will be displayed.
If the DS_DONTSHOWSCREEN option flag is set then the function won't open the
screen, but will return 0.
The Application Number (long).
This number is used by other functions so it must be stored, a global, non-threaded
long is the perfect storage vessel. If the number returned is 0 then the login
was unsuccessful and appropriate action should be taken.
If you have multiple login areas within one application then store the application
number (AppNum) in a queue, adding the new AppNum to the top of the queue when
successfully logging in, and removing it when logging out. This ensures that
AppNum always points to the current user area.
Calling ds_LoginText automatically logs out the existing user for this instance
of the area, if one exists. In other words calling ds_LoginText (SecurityAreaName,
x) causes an implicit ds_Logout (ApplicationNumber) - i.e. a logout of the same
area - to be called before ds_LoginText. If no user is logged in then ds_Logout
ignores the request.
AppNum long
Code
AppNum = ds_LoginText ('Video.Exe', DS_OPTIONALON +DS_CASESENSITIVITYOFF,'','')
if AppNum = 0
! login was unsuccessful
return
End
AppNumQueue Queue
AppNum long
code
AppNum = ds_LoginText ('Video.Exe', DS_DEFAULT,'','')
if AppNum = 0
! login was unsuccessful
return
End
Add(AppNumQueue,1)
!< Function code goes here >
ds_Logout (AppNum)
delete (AppNumQueue)
get (AppNumQueue,1)
return
ds_Logout, Extension
: User Login Here, Login and Password Access
Control, Making your own Secwin windows
| Parameter Name | Type | Description |
| ApplicationNumber | Long | This is the Application number returned by ds_LoginText. |
Allows a user to logout of an application, or application area. The user will
have to re-enter his login code and password before he can reenter the part
of the application protected by the password.
It is not necessary to Logout if the program is being terminated.
0 if successful. 1 if unsuccessful.
If the function returns 1, then the user was not logged in to the application.
AppNum long
Result long
code
AppNum = ds_LoginText ('Video.Exe', ds_DEFAULT,'','')
if AppNum = 1
! login was unsuccessful
return
End
< function code goes here >
result = ds_LogOut (AppNum)
return
| Parameter Name | Type | Description |
| ApplicationNumber | Long | This is the Application number returned by ds_LoginText. |
Allows you to Browse the users for this Application or Security area. Only Supervisors
have access to this screen. A Supervisor must use this function to add, edit
or remove other Supervisors or Operators.
Nothing
AppNum long
code
ds_OperatorBrowse (AppNum)
Operator Browse and Form, User Groups, Work Groups
| Parameter Name | Type | Description |
| Product | String | The name of the product. |
| Seed | Long | The developer's seed code. |
| Options | Long | Various options, described below. |
| Company | String | The name of the company the product is licensed to. |
| SerialNumber | String | The serial number of the product. |
| Copies | Long | The number of copies that the user may simultaneously run on a network. |
| Level | Long | The level that the user is licensed to. |
| Modules | Long | The optional modules that the user has access to. |
| Activation Code | String | The activation code as returned by ds_GenerateActivationCode. |
| Counter | Long | The number that the Counter must be set to. |
This function is used to change the users current license levels.
NOTE: This function relies on the existance of a licence already. It
merely changes the existing licence. If you are handcoding the call, then you
need to first call ds_UseLicence in order to
create an initial licence.
The product parameter is set with the name of the product. This is usually hard
coded into an application, and cannot be changed on this screen.
The seed code is used so that other developers cannot generate activation codes
for your applications. This is normally hard coded into the application, and
isn't seen by the end user.
The options parameter allows you to change the way the screen behaves.
If it contains any of the DS_LVL equates (DS_LVL1 to DS_LVL5) then that level
will not be displayed on the screen. So you can hide the Professional and Enterprise
options by including DS_LVL4 + DS_LVL5 in the options parameter.
If it contains any of the DS_OM equates (DS_OM1 to DS_OM15) then those optional
modules will not appear. So to hide optional modules 13 thru 15 you would include
DS_OM13 + DS_OM14 + DS_OM15 in the options parameter.If this parameter includes
DS_OM16 then all optional modules from 16 to 30 are hidden.
If it contains the DS_DONTSHOWSCREEN parameter then the screen will not be opened.
In this case you MUST pass all the correct values, including the activation
code, to the function. This is available so that you can draw your own RegisterProduct
screen. You should then check the value returned to make sure the call was successful.
If it contains DS_RELATIVECOUNTER then any value in the Counter field will be
ADDED to the user's current Counter value. Use this in situations where you
are basically trying simply to increment the number stored in the counter at
the client.
If it contains DS_ONETIME then the activation code can only be entered once.
If it is entered a second time it will fail. This prevents a user from entering
a code, using up the Counter, and re-entering the same code (within the 7 day
window).
Using the company, serial number, copies, level, modules and activation code
parameters you can prime each of the values on the screen. If you omit any of
these parameters then they will default to their current value.
0 if successful, 1 if Invalid Activation code.
code
ds_RegisterProduct('Wonderprog',12345678,0)
ds_RegisterProduct('Wonderprog',12345678,DS_LVL4+LVL5)
ds_RegisterProduct('Wonderprog',12345678,DS_LVL4+LVL5+DS_OM15)
Code : Calling Register Product,
Overview
of Licensing, Making your own Secwin
Windows
| Parameter Name | Type | Description |
| ApplicationNumber | Long | This is the Application number returned by ds_LoginText. |
Allows you to launch another Secwin enabled EXE, performing an automatic login
using the currently logged in user.
In other words, App A can use this function to run App B, at the same time passing
App B the login code and password of the current user. App B will automatically
log the person in.
In order for this to occur App B MUST have the login option DS_AUTOLOGON bit
set. On the Login User Here template this option is referred to as "Allow
automatic login's from other EXEs".
A string which needs to be included as a parameter in the Clarion "Run"
statement.
code
run ('ProgName ProgParam ' & ds_Run (AppNum))
Code : Run Another Exe,
Secwin
Examples
| Parameter Name | Type | Description |
| MakeoverObject | Makeover | A reference to a Makeover objected created in the Exe. This would typically be ThisMakeover |
This procedure allows the Secwin screens to support CapeSoft's
Makeover
accessory. The Makeover object is created by the Exe, and then this function
is used to pass a pointer to the object, to the Secwin DLL. Note that
Makeover is not required in order for Secwin to work properly.
Nothing.
code
ds_SecWinMakeover(ThisMakeover)
CapeSoft Makeover Compatability
| Parameter Name | Type | Description |
| MessageName | String | This is one of the Standard Secwin Message Names. |
This function gets, translates, and displays one of the common Secwin error
messages.
Valid message names are
| MessageName | Default Message |
| activationfailed | Incorrect Activation Code. Please consult your application supplier. |
| activationsuccessful | Activation Successful !! Please quit the application for new settings to take effect. |
| accessrestricted | Your access to this part of the program has been restricted. |
| cantdeletelast | You cannot delete the last supervisor before deleting all the other users, or setting their access to ''No Access''. |
| cantdeletesuperuser | This is a super user created by the developer and cannot be deleted. |
| featurenotavaliable | This feature is not available in your Level of the program. Consult your application supplier for more information |
| productexpired | Your product has expired. Consult your application supplier. |
| toomanyusers | Too many people are already running the system. People already logged in include ... |
| notlicenced | You are not licensed to use this module. |
| filecorrupted | Your Security file has become corrupted. Consult your application supplier for a new activation code. |
| badoldpassword | Incorrect Old Password |
| cantbesame | New password cannot be the same as old password |
| passwordsmustmatch | New passwords must match. Please try again. |
| cantbeblank | Password cannot be blank |
| cantbesimple | Password must contain 6 Alpha and 3 Numeric characters |
| invalidpassword | Invalid Password |
| invalidlogin | Invalid Login |
| licensenotloaded | Call to ds_LicenceOk, but License Not Loaded by ds_UseLicence |
Nothing.
code
ds_SecWinMessage('AccessRestricted')
| Parameter Name | Type | Description |
| ApplicationNumber | Long | This is the Application number returned by ds_LoginText. |
| ScreenName | String | This is the name of the screen or function. This name must be unique within an application. |
| Options | String | This string contains all the access options for this function. Each item in the string is separated by a pipe (|) character. There may be up to 8 items in the string. Each item must be 6, or fewer, characters long. These items then appear on the Set Access screen in different columns. |
This screen is normally called from within a specific function in order to change
the access levels for the different operators, for that screen. Only Supervisors
have access to this function. The access levels are retrieved using the ds_Allowed
function. ds_SetAccess is normally invoked by pressing a hotkey. This hotkey
is normally stored in the DS_SECURITYKEY equate. By default this key is Ctrl-F8.
The function can however be called in almost any manner, for example by using
a button on the window.
The Options parameter string contains all of the access options for the calling
function, as you want them to be displayed on the ds_SetAccess browse box.
Nothing
ViewVideo procedure
code
< normal opening window code etc goes here >
alert(DS_SECURITYKEY)
accept
if keycode() = DS_SECURITYKEY
ds_SetAccess (AppNum,'ViewVideo','Access|Delete|Print')
End
< rest of accept handling goes here >
End
| Parameter Name | Type | Description |
| ApplicationNumber | Long | This is the Application number returned by ds_LoginText. |
| CalledBy | String | This is a unique string for this procedure. Usually the procedure name. |
| OperatorNumber | Long | This is the number for the current Operator as returned by ds_CurrentOperatorNumber or in the users Queue returned by ds_UsersEx. |
| Rights | Long | These is the rights for this operator, for this window. Each bit represents a different right. This is matched to the number |
This function sets the access rights for a particular user, for a particular
procedure in the application. This function is provided primarily so you
can build your own SetAccess window.
Nothing
See the included Splash example for an example of a SetAccess window.
| Parameter Name | Type | Description |
| Face | String | The name of the font to use. |
| Size | Long | The size of the font to use. |
| Color | Long | The color of the font to use. Valid colors, such as Color:Black, are in the Equates.Clw file. |
| Style | Long | The style of the font to use. Valid styles, such as Font:Regular, are in the Equates.Clw file. |
| Charset | Long | The Charset to use. |
This function allows you to set the font that Secwin will use on it's screens.
If you call the function with no parameters then the standard Windows Font Dialog
box will be called so that the user can select the font.
Note that only versions of Clarion 5.5 and later support CharSets. In the previous
versions of Clarion, the Charset will be ignored.
Nothing
code
ds_SetDefaultFont('Arial',10,Color:Black,Font:Regular)
| Parameter Name | Type | Description |
| LanguageFileName | String | This is the name of the language file to use. If this name is invalid, or the file cannot be found, then Secwin will default to English. |
Allows you to adjust the text which appears on the Secwin screens. This is used
to translate the native English of the Secwin screens into other languages.
Note that this can be called from before or after the user logs in. If this
is called before the user logs in then the settings for the language file in
the various ini files will be ignored.
Nothing
User Guide : Internationalization support
AppNum long
code
ds_SetLanguage ('Spanish.Irf')
Code : Calling Set Language,
Translating
Secwin Windows
| Parameter Name | Type | Description |
| LogoFileName | String | This is the name of the logo file to use. |
| CallbackFunctionAddress | Long | This parameter is reserved for future use. You should set this to 0. If this is set to -1 then the Secwin about screen will not appear if a user clicks on the Logo. |
Allows you to change the logo that appears on all of the Secwin screens.
Nothing
code
ds_SetLogo('c:\logo.ico',0) ! use logo in root directory
ds_SetLogo('logo.ico',0) ! use logo in current directory
| Parameter Name | Type | Description |
| Owner1 | String | This is the Owner attribute of the Security files. (dssw4) |
| Owner2 | String | This is the Owner attribute of the License files. (.LIC) |
This function allows you to set the Owner attributes for the Security, and License
Files. This function is required to support the alternative file drivers. when
you use the Topspeed driver (the default setting) then the owner variables are
set internally, and this function has no effect. If you are using one of the
other drivers, then set the owner using this function.
Nothing
code
ds_SetOwner ('bobbybrown','washere')
ds_CreSec, Activate
Secwin Extension
| Parameter Name | Type | Description |
| Path | String | A specific path where the dssw4 file can be found. |
| LanguageFile | String | A specific name for the language file to use. |
| LanguagePath. | String | A specific path for the language file. |
Allows you to programmatically set the location of the Secwin support files,
including the dssw4 file and the language file or language path. They specifically
override the PATH, LANGUAGEFILE and LANGUAGEPATH settings as they appear in
the Secwin.Ini file.
If any of the above parameters are omitted then the usual methods (ie INI file
& defaults) are used to determine the position of those files.
For more information on the Language files and paths read the section in the
User Guide on Translating Secwin Windows
.
Note : This function can only be called once, and must be called Before
any other Secwin functions. Therefore it is recommended that you add this function,
if required, to your Global Program Setup embed point.
| Tip : Use the word HERE to indicate the current directory, and the word EXEDIR to indicate the Application(Exe) Directory |
Nothing
code
ds_SetPath('c:\')
ds_SetPath('HERE')
ds_SetPath('HERE','Dutch.Irf','EXEDIR')
| Parameter Name | Type | Description |
| SecurityAreaName | String | This is the name of the security area, as used by the ds_UsePin function. |
| PinNumber | Long | This is the Pin number to stamp into the file. |
Used to stamp the dssw4 file with a valid pin number. You would not normally
do this from inside an application. The SetPin and HardPin examples use this
function. The examples can be found in the \clarion\3rdparty\examples\secwin\setpin
and \clarion\3rdparty\examples\secwin\hardpin directories.
Nothing
code
ds_SetPin('Bobs App',12345678)
ds_UsePin, Pin Numbers,
Extension
: Activate Secwin Features
| Parameter Name | Type | Description |
| LoginCode | String | This is the Login Code of the user to make a Super User |
Use this function to set a user as a Super User. Note that this does NOT add
a user, if the user doesn't exist then the function does nothing.
Nothing
code
ds_SetSuperUser ('demo')
ds_UsersEx, ds_InsertUserEx, ds_ChangeUser,
ds_DeleteUser, Extension
: User Login Here, Super Users
| Parameter Name | Type | Description |
| ProductName | String | This is the name of the product. This name is used when generating activation codes. |
| ApplicationNumber | Long | This is the Application number returned by ds_LoginText. If you are not using a login then set this number to 0. |
| LicenseName | String | This is a unique, 4 character, string containing the unique license name for this product. You may use alphanumeric characters only. It is case insensitive. |
| Options | Long | A long number containing a number of different bit settings.
This variable can contain either (or both) of the following options; DS_NODEMO DS_NONETWORKCHECK The 3rd byte in the long (ie options/65536) contains the length of the demo license. The default is 30 days. |
In order to enable the copy protection, and remote activation, features which
Secwin can add to your application, you use Licenses. Somewhere near the beginning
of your application (usually just after calling the ds_LoginText function) you
make a call to ds_UseLicence. A license is then sought, and held for the duration
of the program. The license is automatically released when the program terminates
(in whatever manner) or if the computer is switched off.
If no licenses exist then one will automatically be created. This created license
will have a level of 'Demo' (level 1) and an automatic expiry period of 30 days.
Your user can then change this license to their requirements when you supply
hem with the necessary activation code. If you do not want the 30 day demo period
then include the DS_NODEMO switch in the options parameter.
Although you can call this function at any time it is best to do it just after
the call to ds_LoginText as you will then be able to supply the ApplicationNumber
parameter. This allows Secwin to put the name of the current user inside the
license file so that others can see which users are currently using the program.
You can override the default behavior of checking network licenses (i.e. the
user will have an effective "site license") by using the DS_NONETWORKCHECK
switch in the options parameter.
Note that no checking of the license occurs at this point. To check the license,
especially the Expiry dates or application level, use the ds_LicenceOk function.
Nothing
AppNumQueue Queue
AppNum Long
End
Code
AppNum = ds_LoginText('Video.Exe',DS_DEFAULT,'','')
if AppNum = 0
! login was unsuccessful
Return
End
Add(AppNumQueue,1)
ds_UseLicecnce('Amazing Wonderful Program',AppNum,'AWP',DS_NODEMO)
| Parameter Name | Type | Description |
| SecurityAreaName | String | This is the name of the application. This is the same name as you'd use with the ds_LoginText function. |
| AppPinNumber | Long | This is the unique pin number for this application. Only dssw4 files containing this pin number will be valid. |
This function allows you to "stamp" a dssw4 file as being valid. Without
a pin number the user can simply delete the dssw4 file, and re-create an empty
one using CRESEC25. This use of Pin numbers requires however that the dssw4
file be stamped with the correct pin number before it will be considered valid.
Nothing
code
ds_UsePin (AppNameDesc,12345678)
ds_LoginText( AppNameDesc, ds_Default,'','')
ds_SetPin, Pin Numbers,
Extension
: Activate Secwin Features
This function is included in the
docs for backward-compatability reasons. It should be considered as obsolete.
The ds_UsersEx function should be used.
| Parameter Name | Type | Description |
| UserQueue | ds_UserQueueType | This is a queue defined in your application using the ds_UserQueueType queue structure. the queue you pass must have this structure. An example of such a queue is |
Structure
ds_UserQueue Queue,pre(_dsq)
Name string(20)
Surname string(20)
Login string(12)
UserGroup Long
end
This function fills in a queue all the users currently in the database. In other
words by using this function you can get the logins and names of all existing
users.
Nothing. The queue you passed now contains all the user details.
ds_UserQueue Queue,pre(_dsq)
Name string(20)
Surname string(20)
Login string(12)
UserGroup Long
end
code
ds_Users (ds_UserQueue)
ds_InsertUserEx, ds_ChangeUser,
ds_DeleteUser,
ds_CurrentOperatorNumber
| Parameter Name | Type | Description |
| AppNum | Long | This is the Application number returned by ds_LoginText. |
| UserQueueEx |
ds_UserQueueEx | This is a queue defined in your application using the ds_UserQueueEx queue structure. the queue you pass must have this structure. An example of such a queue is... |
Note: In Secwin4 this function has changed somewhat, because a user can now belong to multiple user groups. In order to get a list of the user groups that a user belongs to, you need to use this function in conjunction with the ds_UsersUserGroups function. The UserGroup item in the queue will contain the first user group that the user belongs to (making sure that your existing code will not break when upgrading to Secwin 4) - but the user may belong to more than one group, in which case it will be necessary to call the additional function as well.
ds_UserQueueEx
QUEUE,PRE(_dsqex)
Name
STRING(40)
Surname
STRING(40)
Login
STRING(128)
UserGroup
LONG
Number
LONG
LastPasswordChangeDate LONG
Reserved1
LONG
Reserved2
STRING(12)
Reserved3
STRING(20)
end
This function fills into a queue, all the users currently in the database. In
other words by using this function you can get the logins and other details
of all existing users.
Nothing. The queue you passed now contains all the user details.
ds_UserQueueEx
QUEUE,PRE(_dsqex)
Name
STRING(40)
Surname
STRING(40)
Login
STRING(128)
UserGroup
LONG
Number
LONG
LastPasswordChangeDate LONG
Reserved1
LONG
Reserved2
STRING(12)
Reserved3
STRING(20)
end
code
ds_Users (Appnum,ds_UserQueueEx)
ds_InsertUserEx, ds_ChangeUser, ds_DeleteUser, ds_CurrentOperatorNumber, ds_UsersUserGroups
![]()
| Parameter Name | Type | Description |
| pUser | Long | This is the Application number returned by ds_LoginText. |
| pUGQueue |
ds_UsersUserGroupsQ | This is a queue defined in your application using the ds_UsersUserGroupsQ queue structure. the queue you pass must have this structure. |
| pListActiveOnly | long | If set, then pUGQueue will be populated with a list of the UserGroups that the user belongs to. Otherwise, all the UserGroups will be added to the queue, with the Active flag set for those UserGroups that the User belongs to. |
ds_UserSUserGroups
QUEUE(ds_UsersUserGroupsQ) .
This function fills into a queue, all the user groups that a user belongs to.
You can either use it to populate an exhaustive list of UserGroups and
highlight the user group using the active flag (like with a style or Icon in
a list) or only return a list of the user groups that the user belongs to.
Nothing. The queue you passed now contains all the usergroup details.
ds_UsersUserGroupsQ
QUEUE(ds_UsersUserGroupsQType) .
code
ds_UsersUserGroups(MyUser,ds_UsersUserGroupsQ)
| Other Information | |||||
| Installation | Distribution | Copyright & License | Limitation of Liability | Technical Support | Release History |
Run the Supplied Installation file.
![]()
You are free to distribute the Secwin DLLs with any of your Applications without
extra charge.
You are free to distribute the CRESEC.EXE or any of the Example programs should
you want to.
The DLLs your program require will depend on your version of Clarion and the
Secwin File Driver you are using. Note that programs compiled in Local Mode
do not use DLLs and therefore there is nothing extra for you to distribute.
Clarion 6
32 Bit Topspeed Driver S6TPSX.DLL Btrieve Driver S6BTRX.DLL SQL Anywhere Driver S6SQAX.DLL MsSQL Driver S6MSSX.DLL ODBC Driver S6ODBCX.DLL
Clarion 5.5
32 Bit Topspeed Driver S55TPSX.DLL Btrieve Driver S55BTRX.DLL SQL Anywhere Driver S55SQAX.DLL MsSQL Driver S55MSSX.DLL ODBC Driver S55ODBCX.DLL
32 Bit Topspeed Driver S5TPSX.DLL Btrieve Driver S5BTRX.DLL SQL Anywhere Driver S5SQAX.DLL Oracle Driver S5ORAX.DLL MsSQL Driver S5MSSX.DLL ODBC Driver S5ODBCX.DLL
I'm getting Runtime and/or Compile Errors
1.1. I want to remove the license for a client on one
machine. How do I do this?
1.2. How I define the activation code's expiry date?
1.3. Can more than one person run my Secwin app with one demo
licence?
1.4. I want to ship a dssw4.tps file (with access control
setup) - but using that file gives me a license error when installing it at the
client side.
1.5. I have issued 5 licences, but more than 5 users can run
the application simultaneously.
2.1. When I send the app to my clients the users have to
be re-entered for the security to work.
2.2. The secwin functions restrict up to 13 characters long.
Can I extend this?
2.3. Will
Secwin allow me to refuse access to a report?
3.1. Can
I see who is logged into the program on all the clients?
3.2. I don't want to use the Access Control
features of Secwin, only the Licence and Registration.
3.3. I don't want the login screen appearing
in my demo application.
3.4. How do I reset a user's password?
3.5. I need to prevent the last SecWin User from switching
from supervisor to operator. How this can be done?
3.6. How do I force the user to change his password the first
time he logs on?
3.7. How can I set the default access to all
access when adding an operator to all my EXEs (in a Multi-DLL) application?
3.8. How can I override AccessRights for
insert/change/deletion specific functionality?
4.1. My Text for Cut and Paste has an incorrect CRC check in the Activation code. What must I do?
5.1. I downloaded the Oracle (or ODBC or MSSQL or.....)
build for Secwin, but I can still only set the Secwin driver to TPS.
5.2. What settings must I do in my various apps in a Multi-DLL
application?
6.1. How can I rename the dssw4.tps file?
6.2. My app was running fine in Windows XP - but in Vista, it
does not find the security file?
6.3. I'm using Secwin with MSSQL and I cannot get my
application to create the security tables.
6.5. What do we need to change in order to upgrade from Secwin3 to Secwin4?
1.1. Question: I want to remove the license for a client on one machine. How do I do this?
Answer: Call ds_RegisterProductEx with an already expired date.
1.2. Question: How I define the activation code's expiry date?
Answer: You can tweak your registration application. In the Update Registrations procedure:
todate = fromdate+6
Replace this with another suitable expiration date, e.g. to make it the activation code last as long as the registration:
todate = REG:ExpiryDate
1.3. Question: Can more than one person run my Secwin app with one demo licence?
Answer: By default the demo licence will be a 30day, demo, 1 user licence (if you've enabled that in the Secwin Templates). This means that you can make any number of shortcuts to the application, but one person at a time will be able to access the application. However you can send them a (demo) code which allows multiple users at the same time. This code can be entered on any workstation.
1.4. Question: I want to ship a dssw4.tps file (with access control setup) - but using that file gives me a license error when installing it at the client side.
Answer: Basically what you're wanting to do is create a dssw4.tps file without licensing included in the file. Normally you'd want to do this to create a SuperUser and ship the SuperUser in the dssw4.tps file. This is a bit tricky - but here's basically how you do it:
a) Go to your app and turn OFF licensing. You can do this on the Secwin
Global Extension Template.
b) Compile (don't run yet.)
c) Delete the dssw4.tps that your program will use. (so that a new one will be
created.)
d) Now run the program.
e) Doing as little in the program as possible, go to the Browse users screen,
and add the Super User. (if the system forces you to do this before the Login,
then add the user but DON'T login - just cancel when you get there.)
f) Now save the dssw4 file in a safe place, so you have a copy for the future.
This "virgin" dssw4 file is the one you ship.
g) Back to the app, turn licensing back on. Compile. Ship (make sure you include
the dssw4.tps file that you created earlier in your install). In your install,
make sure that you don't overwrite the dssw4.tps file that may already existing
at the client site as they will lose their security settings.
1.5. Question: I have issued 5 licences, but more than 5 users can run the application simultaneously.
Answer: Your application is not setup to use the same licence file location. For more details, peruse The mechanics of the Licencing section of this document.
2.1. Question: When I send the app to my clients the users have to be re-entered for the security to work.
Answer: Maybe you're _shipping_ the dssw4 file. And the
"install" of the update is overwriting the existing dssw4 file?
If this is the case then set the file in the installer to be "preserve
existing".
Alternatively, you've changed the setting for where the dssw4.tps file is stored? This is a setting on the Activate Security Global extension template.
2.2. Question: The secwin functions restrict up to 13 characters long. Can I extend this?
Answer: Unfortunately not. This is set in the file declarations - which is up for review in 2006.
2.3. Question: Will Secwin allow me to refuse access to a report?
3.1. Question: Can I see who is logged into the program on all the clients?
Answer: You can use the ds_CurrentlyLoggedInEx() function to return a queue of the users currently logged in.
3.4. Question: How do I reset a user's password?
Answer: You cannot reset Secwin user passwords. The programmer can't, the SuperUser can't. The reason is that this would create a security hole in the access control. If someone can reset the password, then effectively, that user/supervisor/superuser/programmer has control over that person's login. Security by nature is inconvenient. The reason for this is that it's very unusual to have a Supervisor in control of all modules, so giving a Supervisor in the accounts dept rights to reset an operator's password, will effectively give them rights to any department that that user will have.
What you can do, is create a UserGroup and assign your users to a user group (even if it's one per person). You set the rights the user has to the user group, then you can delete and re-add the user without affecting any access control setup that you have done (if it all pertains to the user group). In a multi-EXE scenario he will need to be re-added to the user group in each module by the supervisor in that module.
3.5. Question: I need to prevent the last SecWin User from switching from supervisor to operator. How this can be done?
Answer:
ds_UsersEx (Appnum,ds_UserQueueEx)
if records(ds_UserQueueEx) < 2
disable(?UserLevelGroup)
end
3.6. Question: How do I force the user to change his password the first time he logs on?
Answer:
3.8. Question: How can I override AccessRights for insert/change/deletion specific functionality?
Answer: There are probably 3 catagories of users: 1 - those who have
complete rights (i.e. able to change and insert), 2. those who have insert
rights (not able to change), 3. those that are not able to insert or change.
Catagory 3: Place the restriction on the calling window (IOW they will not be
able to access the form to insert/change).
Catagory 2: Place the restriction on the form (either make all controls readonly,
or disable the OK button). These users that you are wanting to restrict - the
restriction will be overridden when inserting to allow insertion.
Catagory 1: Remove all restrictions for these users.
Probably the best way to do this, is the following mod in the 'After Get Allowed' embed point:
If self.Request = InsertRecord
ThisAllowed = DS_ACCESSALL
end
This will override the restriction for catagory 2 users to allow them to
insert the record.
4.1. Question: My Text for Cut and Paste has an incorrect CRC check in the Activation code. What must I do?
Answer: There's a small change you need to make to your Registration App:
Open the UpdateRegistrations window in the source editor and paste the following line of code in the CopyIn routine:
do calccrc
immediately before the following code line:
TextField = 'Company : ' & clip(REG:Company) & ' (' & crc1 & ')<13,10>' & |
5.1. Question: I downloaded the Oracle (or ODBC or MSSQL or.....) build for Secwin, but I can still only set the Secwin driver to TPS.
Answer: You need to download the full install for both Secwin and the FileDriver that you are requiring support for, as well as the patch for the version of Clarion that you are using for both (or indeed as many drivers) that you are wanting Secwin to support. If you are using Clarion 6.3 9050 and require support for Oracle and ODBC drivers, then you will need to download the following files:
http://www.capesoft.com/ftp/public/secwininstall.saf (The main Secwin
install)
http://www.capesoft.com/ftp/public/secwinoracleinstall.saf (The main Secwin
for Oracle install)
http://www.capesoft.com/ftp/public/secwinodbc.saf (The main Secwin for ODBC
install)
as well as:
http://www.capesoft.com/ftp/public/secwin_9050install.saf (the Secwin patch
for 9050)
http://www.capesoft.com/ftp/public/secwinoracle_9050install.saf (the Secwin
for Oracle patch for 9050)
http://www.capesoft.com/ftp/public/secwinodbc_9050install.saf (the Secwin
for ODBC patch for 9050)
5.2. Question: What settings must I do in my various apps in a Multi-DLL application?
Answer:
6.1. Question: How can I rename the dssw4.tps file?
Answer: We have not made this programmer/user configurable and do not plan to do so in the future.
6.2. Question: My app was running fine in Windows XP - but in Vista, it does not find the security file?
Answer: It's almost certainly got to do with the location of your
dssw4 file. See the Secwin Global Extension, Files tab.
Under XP it's ok to place the dssw4 file in the windows directory. In Vista this
isn't going to work. Recommended practice is setting the dssw4 file to be the
same location as the rest of the data.
6.3. Question: I'm using Secwin with MSSQL and I cannot get my application to create the security tables.
Answer: Are you using a trusted connection? Don't supply a user name and password in the connect string.
6.5. Question: What do we need to change in order to upgrade from Secwin3 to Secwin4?
Answer:
Click here for Secwin Compiler Error messages
If you have 2 applications using the same security file (or multiple instances of the dssw4.tps file on the same machine - even if they are used by different applications), you will need to check the Allow Multiple Security Files option in both applications.
You have a queue that is prototyped incorrectly. The ds_UsersEx function is expecting a queue of the following structure:
ds_UserQueueEx Queue,pre(_dsuqex),type
Name string(40)
Surname string(40)
Login string(128)
UserGroup Long
Number LONG
LastPasswordChangeDate LONG
Reserved1 LONG
Reserved2 STRING(12)
Reserved3 STRING(20)
end
Probably the best would be to define your queue as follows:
MyUserQ
queue(ds_UserQueueEx)
end
First search you drive for an old secequ15.clw file. Remove all copies that are not in your clarion6\3rdparty\libsrc directory and recompile.
If you are still getting this error, then check the I'm using 9046 (include the secequ60.clw file) checkbox in the global extension template. (This should only be necessary for Clarion 6.2 users on patch 9046).
|
CapeSoft Support
|
|||
| support@capesoft.com | |||
| Telephone | +27 21 715 4000 | ||
| Fax | +27 21 715 2535 | ||
| Post | PO Box 511, Plumstead, 7801, Cape Town, South Africa | ||
![]()
Note: Please do not make product releases using Secwin4 during the alpha phase. Continue using Secwin3 for your released applications. The alpha release phase will end when 4.00 is released.
Version 3.99b (29 June 2007)
Version 3.99a (28 June 2007)

Version 3.99 (26 June 2007)
New Features:
Fixes:
Version 3.47 (19 June 2007)
Version 3.46 (6 June 2007)
Version 3.45 (11 May 2007)
* Include latest Makeover classes into Secwin.
Version 3.44 (18 April 2007)
* Include latest Makeover classes into Secwin.
Version 3.43 (14 March 2006)
* Include latest Makeover classes into Secwin.
Version 3.42 (13 December 2006)
Version 3.41 (29 August 2006)
Version 3.40 (27 July 2006)
Version 3.39 (29 June 2006)
Version 3.38 (15 June 2006)
Version 3.37 (10 May 2006)
Version 3.36 (27 April 2006)
Version 3.35 (27 April 2006)
Version 3.34 (21 April 2006)
Version 3.33 (21 April 2006)
Version 3.32 (18 April 2006)
Version 3.31 (24 Feb 2006)
Version 3.30 (1June 2005)
Version 3.27 (26 October 2004)
Version 3.26 (22 January 2004)
Version 3.25 (12 January 2004)
Version 3.22 (14 July 2003)
Version 3.21