
www.capesoft.com
Updated 07 June 2011
| NetTalk WebServer - The Basics | ||
|
|
||
| Version
www.capesoft.com Updated 07 June 2011 |
||
1. GET a page from a server.
2. POST information to a server, accepting whatever page the web browser sends in reply.
3.
Display the page.
1. Respond to a GET by loading that file off the disk and sending it to the browser.
2. Respond to a POST by doing “something” and loading a file off the disk and sending it to the browser.
1. Respond to a GET by loading that file off the disk, parsing it, and sending it to the browser.
2. Respond to a POST by doing “something”, load a file off the disk, parse it, and send it to the browser.
3. Respond to a GET or a POST by generating a page dynamically, and returning it to the browser.
The sequence shown above is so basic it’s almost the first thing you learned when you were programming. It’s so basic that you’ve forgotten it even exists. That’s simply how things are.
If you like, take a moment now to consider what you’d need to do if the following restriction was added to your programming language:Drawn, it looks like this.
Notice that in a web server program, you never go back. In the description and picture above you never go back to the browse. You always go forward to the next browse.
In a purely stateless world, the date lookup would clear the locator. The Form edit would clear the locator and the date filter. Not surprisingly programs written in a purely-stateless world are extremely limited (at least for what we’re trying to do.)
The solution to this issue always falls into one of the following 3 approaches;
1. Store variables in the browser, as cookies. This works as long as the data being stored is very limited, and as long as the user has cookies turned on.
2. Pass all the necessary variables from one page to the next on the “command line” ie as part of the page address. While workable, and infinitely scalable (from a number-of-servers point of view) there are limits to the length of the command line.
3. Create a “session” on the server. Store all the variables inside this session. All you need to know is what Session belongs to the client (which is passed in a cookie), from this you can set appropriate default values onto pages being delivered. This is the primary approach taken by NetTalk.
Probably the closest equivalent is writing a program where there are only global variables, and procedure parameters, but no local variables.
Unfortunately with web programs there is one more wrinkle. There may be more than 1 user accessing the same program at the same time. Each user needs his own variable space. For this reason we use a Queue, and hence we talk about the SessionQueue.
[Aside: Later on we’ll see that this may not be a Queue at all, but that’s not important right now. Think of this big variable storage area as a Queue.]
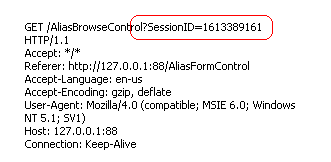
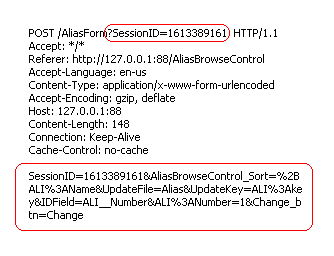
When the request takes the form of a POST can appear in the URL, or they can appear below the header. In the log they look like this:
p_web.SetCookie('Loc__Login','NetTalk')
would be accessible using
p_web.GetValue('Loc:Login')
Every time the user does something (clicks a link, clicks a button, etc) a request is sent to the server. Each request processed by the server is done on its own thread. In other words;
a. A request arrives at the server'
b. A new thread is started to handle the request'
c. The thread immediately performs any actions, and sends a page back to the browser'
d. The thread ends.
Thus unlike a windows program, the lifespan of each thread is very short.
In Clarion 5.5 and earlier these threads effectively run concurrently. Because there is no ACCEPT loop each thread will run from start to finish before any other incoming requests can be processed.
In Clarion 6 true multi-threading capabilities exist, so the Web Server is capable of managing multiple requests simultaneously. (This is one of the reasons we recommend using Clarion 6.0 or higher for your Web Server development. The other reason is Services.)
In Windows a program usually runs only after a user has logged in. However if you are creating a Server program then typically you want it to run before a user logs in. (For many servers, no user logs in at all unless there are other tasks to perform.)
Services can be made in Clarion 5.5 and earlier, but they are not reliable and cannot be multi-threaded. Which means they’re pretty useless in the real world. In Clarion 6 you can turn any program into a service, either by using the Windows 32 API, or (if you’re lazy like me) by using a template. Not surprisingly we recommend SelfService (http://www.capesoft.com/accessories/selfservicesp.htm) for making services.
One of the first decisions you’ll need to make is if the site is going to use Frames or not. This is a key starting point, because this will determine the way you build the site.
It is of course possible to make a site that works using both Frames or No-Frames, but that is extra work, so start with one approach, and add the other approach necessary if you want to.
Frames allow you to divide the visible window (in the browser) into different “panes”. Each pane can then be updated individually, and one pane can change another.
The primary disadvantage with frames is two-fold.
a. Search Engines struggle with them, and
b. The address bar in the browser stops working when you have frames.
If your site is designed to be used as a program, with a login and then the ability to do stuff then Frames are good. If your site is going to be a public site, and you want Google to search it then don’t use frames.
Sites without frames however are also a bit more flexible when it comes to layout, and give the programmer somewhat greater freedom when it comes to doing stuff. Personally I've moved away from using frames to building apps that do not use frames.
In the web world there are 2 kinds of servers. Secure servers, and non-secure servers. If you are transferring information between the server and the client that you want to protect (Credit Card numbers spring to mind) then you want your server to be secured using SSL.
This is a topic that is very simple on one hand, but also can get bogged down in details very quickly. NetTalk allows you to build Secure servers, non-secure servers, and servers which do a combination of both. This is discussed in detail in the document Building Secure Web Sites.
A very quick overview of a typical NetTalk app is useful here. Each of these parts is discussed in more detail in a moment.
Each web server app has a WebServer procedure and a WebHandler procedure. These handle the incoming responses.
The app may contain static htm pages stored on the disk.
The app may contain one or more NetWebPage procedures, which generate a complete HTM page on demand. You cannot embed one Page inside another Page.
The app may contain one or more "Control" procedures. These are things like browses and forms. They can be embedded on a page, or they can be called directly as a page.
The app may contain one or more "Source" procedures. These can be embedded on a page, but not called directly as a page.
Each WebServer you create will listen on a specific port. The default port for web servers is 80, but only one server can be listening on a single port at a time. If you are making a general purpose site, one aimed at the whole internet community then of course you will need to run on port 80. If you are making a non-internet server (for example, you’re just making a way to access your program across the network) then you can use your own port number. Port numbers above 1000 are generally considered to be “open”.
The default port for Secure servers is 443. However any port can be secure.
An app may contain multiple web servers. Each Web server listens on a single port, but as a whole the app is listening on multiple ports.
The WebServer procedure is the procedure that listens to the open port. In the examples it’s always called WebServer, but the name is not fixed – you can call it anything you like. Obviously if you have more than one then they need unique names.
The WebServer procedure consists of a Window procedure, to which is added one or more NetTalk Objects. These objects are set to the NetWebServer base class. Some settings for the server will appear on the settings tab. The details of each setting is discussed in the reference document.
The WebServer procedure listens for incoming requests. For each request the WebHandler procedure is called, on a new thread. The name of the WebHandler procedure for this web server is set on the Settings tab.
In NetTalk 5 the multi-site Host application was introduced. This allows a single server to share port 80 between multiple apps. For more information see the document here.
The WebHandler procedure will become a good place to embed some code later on, but for now there’s no hand-code necessary here. There are also no template settings of any note in this procedure.
Each web app will contain at least 1 WebServer procedure, and at least 1 WebHandler procedure.
Many WebServer procedures can share the same WebHandler procedure.
Many NetWebServer objects can share the same WebHandler procedure, even if some of the NetWebServer objects are secure, and others are not.
|
Legacy Templates Web Hander procedure, Extensions, NetTalk or NetSimple Object Extension, Class Tab, Smart Generate option.
|
A NetWebPage is the basic structure that starts each web page. On this page you can place your own HTML code, menus, Browses, Forms and so on.
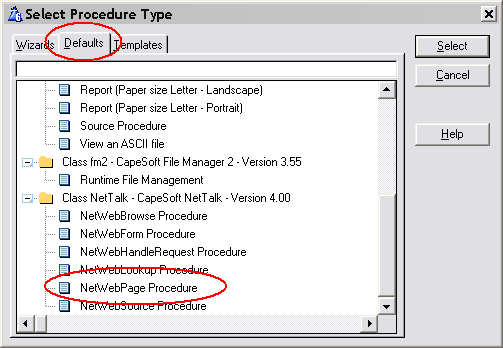
To Create a new page use the NetWebPage Procedure Default.
Each page has a number of settings which are described in the Reference document.
To a Web Page procedure you can attach one or more extensions. These extensions include:
NetWebFrame - Frame Extension
NetWebBoder - Border Extension
NetWebMenu - Menu Extension
Each of these extensions will be discussed in more detail in a moment.
Using HTML you can describe the content of the page, including other NetWeb controls (such as Browses and Forms.) You can also embed custom HTML source, from other procedures in your app (procedures based on the NetWebSource procedure template.)
It should be noted that you cannot embed another page on this page.
An example of a simple NetWebPage can be found in example 1.
In this example the IndexPage procedure contains the following HTML;
<!-- Net:PageHeaderTag -->
<!-- Net:MailboxesBrowseControl -->
<!-- Net:PageFooterTag -->
Essentially this page is made up of 3 parts. Each part is constructed by a separate procedure in the app. Using the NetTalk tag system procedures can be embedding on the page.
A NetTalk Tag is basically a wrapper around some variable, or procedure, that you want to include at this point in the page. It takes the form
<!--Net:Something -->
In this case that Something are procedures, so the HTML generated by those procedures are included on the page.
If the Something is not a procedure, then it might be a session variable. For example you might have a session variable and you can include that on the page. You’ll see a lot of this happening as you progress through the examples.
Static pages (usually .htm pages on disk) that contain tags have to be parsed by the server. If you use a static page on the disk these tags can still be used. However in that case the first line of the page must be
<!-- NetWebServer -->
It's important to note that you can put any tag you like into your web page, as long as you handle it in the ProcessTag method in the WebHandler procedure. However there are some built-in Tags which you can use without having to add code to the WebHandler procedure.
<!-- Net:FunctionName
-->
This tag will call the specified function in that point in the code.
This can be a function based on any of the NetWeb procedures. (Note:
Not all the procedures make sense at every point though.
<!--
Net:s:SessionVariable -->
This will embed the current contents of the session variable on the
web page. If the variable should be formatted (for example a DATE
field) then make sure the Picture parameter of the session variable
is set using either
p_web.SetSessionValue('name','value','pic') or
p_web.SetSessionPicture('name','pic')
<!-- Net:v:Variable
-->
This will display the current contents of a Parameter at this point
in the web page. In other words the same as (2) above, but uses the
Value queue, not the Session queue.
A good example of embedding browses and forms in static pages is the appropriately name Pages (47) example. In ClarionLive Webinar 19 Wolfgang Orth also delivered an impressive demonstration on integrating NetTalk into a static site. You can find a recording of that webinar here.
The Frameset extension allows you to create the frames that your app will run in.
Before making use of the FrameSet extension you need to decide if your site will be using Frames or not. See the section above entitled Frames for more information on making this decision.
A good example of the use of Frames is Example number 4 – “Frame with Menu”.
Frames, as an HTML concept, are both simple, and complex. There is no easy way to give you the power in Clarion, without also giving you some complexity, so this is by far the least intuitive of the extension templates. Taking a moment to understand frames is a good idea if you want to use them.
A FrameSet is an HTML term that denotes the breaking up of the window into multiple pieces. Each of these pieces in turn can contain either another Frameset, or a Frame. Thus it is a somewhat recursive process which can make it confusing.
To make matters worse, the manner of breaking up the window is also flexible. You can break the window into multiple rows, or multiple columns, or multiple rows and multiple columns.
Let’s use the Example 4 Frameset procedure as an example. Here’s the result as seen in the browser:
In this case the window is split initially into 2 rows. The top row becomes the Header of the eventual site. The bottom row is split into 2 columns. The left column is where we’ll put the Menu for the site. The right side of the bottom row is where the rest of the site will appear.
It’s important to note that each part of the above window is ultimately a Frame. And each Frame has a name (which you set.) By using this name (also known as the “target”) you can determine what pages appear in which frame.
The Framset page itself does not contain any HTML of its own. It just provides the “container” into which other pages, based on NetWebPage, will appear.
One way of making pages look better is by placing a border around them. NetTalk has an extension template that simplifies this for you.
All the examples use this extension in the PageHeaderTag and PageFoorterTag procedures.
The border extension includes different style possibilities, as well as allowing you to specify the HTML contents to appear inside the border.
You can use the Web Border extension on NetWebPage procedures, as well as NetWebSource procedures.
Borders are cosmetic in nature – not functional.
Menus are an important part of any app, and the Web is no different. However unlike Windows there are no standards as to how menus are implemented, or how they behave. NetTalk Web Server includes in-the-box support for 5 menu styles. You can of course implement any menu system you like if you have a sufficient knowledge of JavaScript and HTML.
The first supported menu is the Chrome menu. This is a horizontal menu bar, with drop-down menu items.
The second menu style is the Accordion style. This is a vertical menu and works well in both Framed, and unframed pages. The key thing to note about the accordion style is that only one section can be open at a time. As a section is opened, the other sections are closed automatically.
The third menu style is called the Double-Drop menu. Similar to the Chrome style this menu is horizontal in nature. However the Double-Drop menu supports menus within menus, and also uses the ThemeRoller styles.
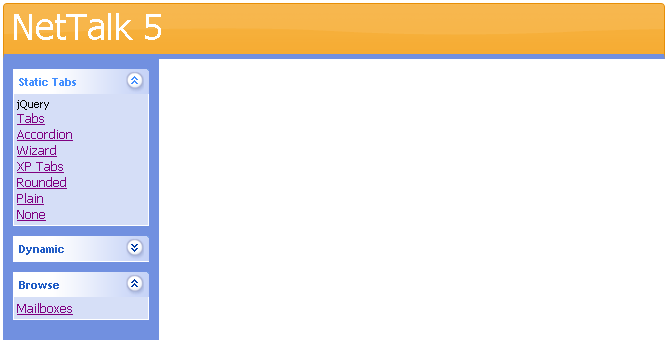
The fourth menu is the XP-Panel menu, which in NetTalk 4 was called the XP-TaskPanel menu. It is similar to an Accordion menu, except that multiple sections may be open at the same time. It is styled to be similar to a Taskpanel in Windows XP.
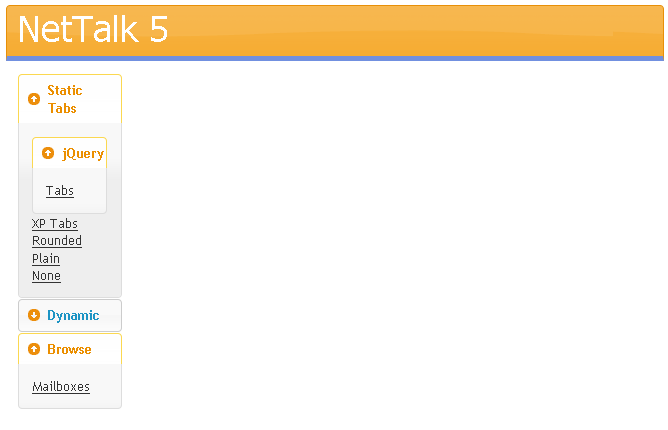
the TaskPanel menu is similar to the XP-PAnel. However like the Double-Drop menu, it supports both menus-inside-menus and Themeroller styles.
A procedure template called NetWebSource exists. This allows you to create HTML “snippets” that can be included in other pages. These could contain anything you like, however “Browses” and “Forms are better handled using those specific templates.
A good example of using the Source procedure in the Examples are the PageHeader, and Page Footer tags. Since the header of each page is common to all pages, this can be defined in one place (in the NetWebSource procedure) and then “embedded” onto multiple pages.
Sometimes it’s possible that you want to use a Browse, Form procedure as a page in it’s own right. NetTalk makes this possible through the concept of a generic page. If you use a control procedure (i.e. a Form, Browse) in a place where you would usually use a Page, then NetTalk will wrap the control up as a page and serve it.
It’s likely that you may have either a common header, or common footer, (or both) for these pages. In the first 3 examples you can see this in action via the PageHeaderTag and PageFooterTag procedures. These 2 source code procedures include HTML that you want included at the top, and bottom, of every generic page.
The name of the two tags are set in the WebServer procedure, under the Settings. The generic header tag is
'<!-- Net:PageHeaderTag -->'
and the generic footer tag is
'<!-- Net:PageFooterTag -->'
Notice the standard wrapping for a NetTalk tag
<!-- Net:Something -->
The use of a procedure name in a tag means that that procedure will get called and the HTML from that procedure will get generated into the page at that point.
The generic header and footer do not apply to NetWebPage pages. In example 3 the procedure IndexPage contains the following HTML – explicitly including the header and footer if we want them.
<!-- Net:PageHeaderTag -->
<!-- Net:PageFooterTag -->
A form is a good example of the difference between a Web app, and a Windows app.
In a windows App the form procedure starts, and remains running until the user closes the window. The act of loading the record, displaying the form, validating the input, and saving to disk all takes place in one place. Importantly one single procedure drives all this functionality.
In a Web app the form behavior is split over several separate threads. When the user clicks on a link that opens the form, a thread starts which loads the record, and constructs the Html. This Html (this “page”) is passed to the browser and the thread closes.
When the Save button on a form is pressed then a second thread starts. This thread will validate the record, and save it to disk.
In a NetTalk app it is convenient though to keep all the code related to a single form in one procedure. This makes things more organized and easier to keep track of. However this one procedure performs a few different functions. Each function should be considered as distinct from the others. Local variables in the form procedure are NOT preserved between calls. The library ends up calling the Form procedure many times. A parameter to the procedure determines which part of the process the Form procedure must now perform.
So far I’ve described the form as a Page. And that is not strictly accurate. The form is more like a Control. It can exist on a page all by itself, but it’s more likely to be just one part of a more complex page. A web form procedure in your app is thus Not a page, but just a control to be included on other pages.
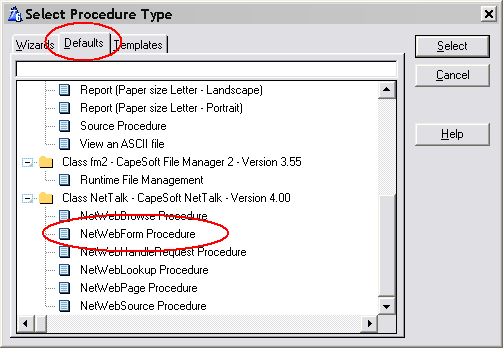
In the App a form is created using the NetWebForm procedure template default.
The specific options for the form are covered in the Reference document.
Advanced
Forms can be dynamic. In other words when the user Selects, or Accepts any of the fields, then one or more items on the form can be updated. This is done asynchronously (in the background) and allows you to make your forms highly interactive.
Some of the interactivity is already built in for you. For example if you have a lookup field, and you've entered the code and description fields of the remote table on the Lookup Settings tab, then your lookup field is already dynamic. Try typing in the code rather than looking it up. Notice the way the description changes? That's the sort of thing I'm talking about here.
Example 21, UpdateInvoices procedure, has a good example of this when selecting a customer.Aside: Try typing in the description into the entry field and see what happens.
Adding your own interactivity to a form is a 2 step process.
First identify what needs to be changed, and when it needs to be changed. Each row of the form consists of 3 parts, the Prompt, the Value, and the Comment. Each part can be updated, and any number of parts on the screen can be updated on any event. You can also update Prompts, Values and Comments for other fields when this field changes.
The second part is embedding the correct code (in the right place) to calculate the item you want to display.
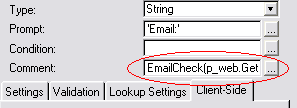
For example, let's say you want to update a Comment Field when a Value is entered. To keep it simple let's assume you're going to validate an Email field to make sure it contains both a @ and a .
So, step 1, identify (and set) the fields that need to be updated. This is done on the Client-Side tab. For the email field set Refresh: Comment on.
Then step 2. In some cases you won't need to do a step 2 because the templates are already doing it for you.
In other cases the code you've entered into the comment field may be sufficient. Like here
(In this case you've made your own function, called EmailCheck, which is doing the validation for you and returning an appropriate comment. Notice the SessionValue is always used - the whole comment field looks like this
EmailCheck(p_web.GetSessionValue('Cus:Email'))But in some cases you'll need to embed code in the routine that generates this comment (or prompt, or value).
Remember each prompt, value, or comment field can be updated, and for each of these cells a routine has been generated called either prompt::field, value::field or comment::field where field is the name of the field. For example, in this case the entry field is cus:email, and we're looking to set the comment, so use the embeditor to find the comment::cus:email routine. In this routine is an embed point, and here you can set loc:comment to be what it needs to be. For example;
If Instring ('@',p_web.GetSessionValue('cus:email'),1,1) > 0 and |
Instring('.',p_web.GetSessionValue('cus:email'),1,1) > 0
loc:Comment = 'Email ok'
Else
loc:Comment = 'Email not ok'
EndIn the prompt embed point you would set loc:prompt and in the value embed point you would set the Sessionvalue of the field, using p_web.SetSessionValue('fieldname',value).
Debugging Tips
It can be quite hard to debug this asynchronous updating when it's not working. Since there are different parts involved it's hard to know where to look, and which part of the process isn't working. Here's one process you can use to help identify the source of the problem.
1) Do a Regenerate All. If the code you are adding hasn't been correctly generated into the WebHandler (by the template) then that's the easiest possible problem to fix.
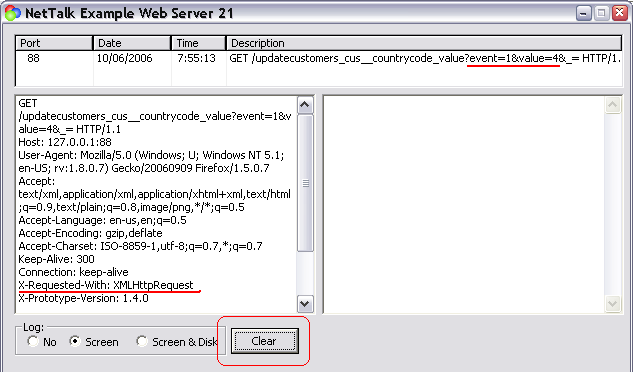
2) First thing to determine is if the event on the browser is triggering an event to the server as expected. You can do this by watching the Web Server window. Click on the Clear button to clear the log, then change a value. You should see and item appear in the GET part of the log. Like this:
Note that the request included the Event (Event:Accepted = 1) and also the new value for the field that changed. You can also see the request was asynchronous because of the XMLHttpRequest item in the header.
3) So the request is being generated, but the response is not making it to the browser. Or perhaps it is, it's just not the response you're expecting. The most likely place for an error is in the embed code you may have added. (Don't worry, it's normal to make errors when writing code. This isn't about blame, it's about correctly identifying the source of the problem so it can be fixed.) What I usually do in this case is comment out my embed code entirely, and replace it with a simple bit of code, that doesn't have a bug, and which makes a visible impact in the browser. For me that's
loc:comment = Random(1,1000)
If this works then I examine the embed code a bit at a time to see which part isn't working as expected.
Tip: Remember that this little routine is being called asynchronously and none of the rest of the Form has necessarily run. So if you need to access other data tables, then you will need to open and close them appropriately. Also you should always use Session variables rather than file variables for the actual form fields. That's why in the example code above I used p_web.GetSessionValue('cus:email') and not just cus:email.4) But what if the simple use of Random suggested above doesn't work? Well then the most likely reason is you missed out step 1. But what if it still doesn't work? Well then the next step is to examine the packet that is being sent to the browser. You can do this by adding
NETSHOWSEND=>1
to your project, in your app, as a Project Define. Then use the free DebugView program (available from SysInternals) to monitor the outgoing packets.
The browse is the root of many applications. It allows you to display data on the screen in a tabular format. In many way the browses provided by NetTalk WebServer are similar to the browses you are already familiar with in Clarion.
A browse can have many different settings. These are covered in more depth in the Reference document.
Browses can be page-loaded, or file-loaded. They can be sorted by clicking on the header. They can have locators.
In most cases a browse is simply a tabular list of data, something that will be instantly recognizable to any Clarion developer.
However tabular data can be displayed in many creative ways, some of which don't look like a browse at all. The following are two browses, one on the left, and a child on the right.
One big difference between a Web app and a Windows app is the concept of global variables. In a Windows app one user is using the program. Multiple copies of the program may be running, but each copy belongs to only one user. So you can set global variables which implicitly belong to just that user.
A web app can be serving multiple users (at the same time) from one single exe. So you can't assign a global variable to a single user. All users can see all the globals all the time. (At least that's how your program would behave if you used globals.)
In NetTalk you use Session Variables to assign values to a user. we discussed Sessions earlier. Each user has a single, unique, session number which they keep for the duration that they are in the browser. If you need to store a variable you do it by writing the value into the Session Queue. And you can fetch it from the Queue when you need it. For example;
After the user logs in we want to store their name. So we go to the place where their login is validated (ValidateUpdate Routine) and we add some code;
p_web.SetSessionValue('LoginName',clip(loc:login))
Later on we can get this value, and put it in a local variable by doing
loc:login = p_web.GetSessionValue('LoginName')
if you wanted to embed this session variable inside an HTML page then you can put, inside your HTML,
<!-- Net:s:LoginName -->
The default deployment folder structure looks something like this;
HTML files are placed in the web folder. The WebServer is limited (by default) to supplying files in, and below, this folder. Default is appPath\web where appPath is the location of the Exe.
You can set the web folder on the NetTalk settings on the WebServer Window.
Below this folder are a number of folders. You can override these as well, but by default they are:
Scripts (contain .js files)
Styles (contain .css files)
Log (contain Log files if logging-to-disk is turned on)
If these folders do not exist they will be created for you.
In addition it is recommended that images are placed in an “images” directory. However this is not a requirement, just a suggestion.
You need to deploy your program (exe, dlls, tps files whatever) as normal.
NetTalk web server does not require any additional programs on the machine. (i.e. no IIS or Apache etc.)
You need to deploy your web folder onto the server machine as well.
For more information on program deployment see the Deployment doc.
There are various way to approaching printing in a WebServer application.
Firstly it should be remembered that the printing is a function of the browser. Which means that any page your application delivers is intrinsically a report. The user can click on the browser print option at any time. By careful design, and attention to the information you are presenting, you can make many "reports" obsolete.
There are times though where a specifically formatted document is necessary. In these cases HTML doesn't necessarily offer the degree of control that you need. The best option in this situation is to create a PDF file, and have the browser display this.
Since Clarion 6 Enterprise Edition contains a Report-To-PDF extension, this seems like a good place to start. You can take existing report procedures in your application, and with minor additions make it generate a PDF file, and also allow the NetTalk WebServer to send the PDF file to the browser. PDF makes an excellent format for this sort of thing because most browsers already know how to display a PDF (via the Adobe plugin) and you have 100% control over how the page will be displayed, and importantly 100% control over how it will look when printed.
If you don't have Clarion 6 EE, then there are other 3rd party tools that can be purchased that do a similar thing. NetTalk 4 includes examples of using the Clarion 6 EE functionality, as well as examples from other vendors.
There are 2 examples included with NetTalk which demonstrate the technique used to use existing report procedures in your web site. In each example there are 2 reports, one simple one, and one more complex one that makes use of an "Options" window, and the ABC Pause button.
Example 13 (PDF Report - requires C6EE) requires, as
the name suggests, Clarion 6 Enterprise Edition (or alternatively the
Clarion 6 Professional Edition, with the optional PDF Report Generator).
Example 14 (PDF Report - requires PDF-Tools) is the same example, but uses
the
PDF-Tools product from Tracker Software Products to convert the reports
to PDF. PDF-Tools is available for Clarion 5.5 and Clarion 6 so this example
works in both of those.
Steps to use an existing report procedure in a Web application
If your Report is set to start in Paused mode, then the Start button will automatically be pressed by the NetTalk template, when the report is running in Web mode.
Date formats are a little tricky to handle. In Clarion you're probably used to selecting date formats all over the place, using one of the built-in date pictures (like @D1 or @D2 etc.). However at the browser these values are meaningless, so a suitable method for selecting dates must be available.
With NetTalk 5, the date-selector popup is the one offered by jQuery. This supports all Clarion date pictures up to (and including) @D16. Note that D17 and D18 are not supported.
In order to allow you to select the format globally, rather than just on a form-by-form basis, there is a setting on the WebServer procedure, Extensions, NetTalkWebServer, Settings called Date Picture. This should be entered without quotes.
On Browses you can set the picture of a specific column to anything you like. If you would like to set it to say D6 then you would enter '@D6' . If you would like to set it to the global default then use p_web.RequestData.Webserver.DatePicture .
If you have, or are making, a Multi-DLL system (ie one comprised of many APP files) then you may want to use procedures in one other other DLL's in your NetWeb application. For example, if you have a report, or graph, in an external DLL, it would be ideal if this procedure could be used in the Web interface as well.
First a quick note about normal Clarion Source procedures. These can be used already in the normal way. Remember your web app is a Clarion program, and Clarion already has templates in place to allow you to use External procedures in an application. So using normal source procedures is no problem.
The problem occurs when you are exporting procedures with NetWeb extensions. For example a NetWebReport, or NetwebBrowse and so on. If you wish to use these procedures in the main NetWeb app then you need to tell the WebHandler to include these procedures. To do this:
Now all the NetWeb procedure in that remote APP file will be included correctly in the Web Handler procedure.
In the remote app you will need to add the Activate
NetTalk Global extension, Activate Net Web Server Global extension as normal
(although you don't need to fill in anything on the Multi-DLL tab).
Your procedures in the remote APP will need to be EXPORTED in the normal
Clarion way.
In the WEBHANDLER app you will need to link in the remote procedures in the
normal Clarion way.
So to summarize:
Possible Errors:
By embedding a couple of tags on your web page, it is possible to generate fully functional browses and forms which appear inside your static pages.
Basic support needed on the page
The first line of the page must be
<!-- NetWebServer -->
Inside the <head> of your page you must put
<!-- Net:c:Head -->
Just before the </body> tag of your static
page add
<!-- Net:c:BodyEnd -->
The NetTalk styles, and scripts, should be in folders called Styles and Scripts respectively, and these folders should be inside the same folder as your HTML pages. In other words, the pages will reference styles/netweb.css.
Embedding a Browse on the Page
You can embed a browse on the page simply by using
a NetTalk tag. For example
<!-- Net:BrowseCustomers -->
will embed the BrowseCustomers procedure at that point on the page.
Embedding a Form on a page
If you have embedded a browse on a page, then
chances are you will also want to embed the form on a page.
In this case simply
a) Insert the tag into the page as normal. For example
<!-- Net:UpdateCustomers -->
and
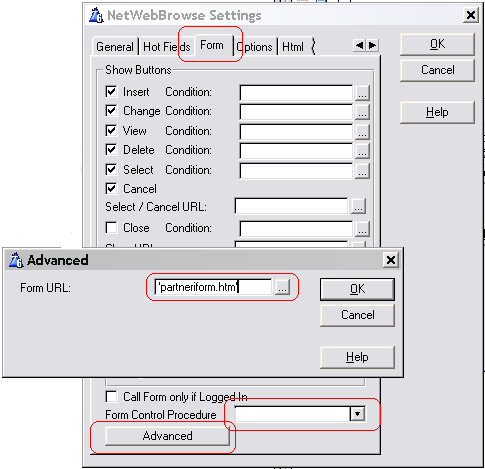
b) Tell the browse procedure, in your app, to call your static page on
an update, rather than go directly to the form. You can do this by going
to the NetWebBrowse settings, to the Form tab, clear the Form Control
Procedure field, click on the Advanced button, and enter the name of
your static form page.
Embedding the Popup, and Message on a page
The validation on the form can generate an automatic Message (which appears on the window) and/or an automatic Popup (which appears as the form is refreshed). If you create a static page as a container for the form, then you'll want to embed these onto that static page as well.
Use <!--Net:Message--> to embed the message. I recommend putting this just before the tag which includes the form.
Use <!-- Net:Popup--> To include the popup. I recommend placing this at the bottom of the page, after all the visible components of the page have been done
Most browsers allow the data passed from the server to be compressed using the GZIP format. Using this technique it is possible to improve performance, by reducing the bandwidth requirements for a site.
Graphics
If you are using PNG, GIF or JPG files for your graphics, then the graphics are already compressed. No additional compression is necessary, or recommended.
Static Page Pre-Compression
The most efficient way to compress am unchanging text file, such as a static HTM file, a JS file, or a CSS, file is to store a compressed copy of the file on the disk, in the same folder as the original file. Because the file is already compressed there is no additional CPU load on the server, and the minimum bandwidth is required to get the file to the browser.
NetTalk supports this pre-compression by looking first for filename.gz before looking for filename. So if you have a file, called say whatever.css, then you can use the Gzip utility to compress this to whatever.css.gz. and store this on the server along with whatever.css. However you want to leave the whatever.Css file there as well for the benefit of those browsers that don't support compressed files.
You can disable the automatic serving of pre-compressed files on the Settings/Advanced tab of the NetTalk Extension in the WebServer procedure.
NetTalk 5 introduces the ability to serve PHP pages. It does this by having the ability to call the Pgp-cgi.Exe program, feeding it the necessary information it needs, and trapping the output. The primary purpose is to allow easier integration to existing web sites.
Note: In order to support PHP from your web server, you will require OddJob.
Example: A good example of using PHP in an app is example 58 (cunningly called PHP).
In order for your application to support PHP pages, you need to do the following three steps;
a) Add the OddJob global extension to your application. If you are building a multi-dll application then add this to the Data Dll.
b) Copy the PHP folder from the Example 58 folders. This contains the Exe and DLL's and other support files that PHP requires. This folder should be a sub folder of your application folder.
c) Make sure when you deploy, that the path name to the application does not include any bracket characters. The example is in a folder called "php (58)" and this WILL NOT WORK. You must rename the folder to say "PhpExample" in order for it to work.
There is a property, called
phpFolder which contains the path to the Php folder. If you wish to relocate
the Php folder for some reason, then set the property in the WebHandler
procedure, ProcessLink method, to the actual location. For example;
self.site.phpFolder = 'c:\php'
Note that one of the files in the Php folder is the Php.Ini file which contains details that the Php exe uses. Since this file can change from time to time (and can be changed internally by the web server) it is not recommended to have the Php folder in the c:\program Files path. Under Windows Vista, and later versions of windows, writing to this folder is forbidden.
By default your web server is installed in a directory (the AppPath) and below this hang the Web folder, Log folder, Web\Uploads folder and so on. However in some situations you may prefer to rename some of these folders.
Log Folder
Default is AppPath\Log
This can be problematic under Vista if you have installed your program into
the \Program Files folder. If you've done this then the LogPath breaks
Vista's rules. Setting the LogPath to the AppData folder is probably
preferable in these circumstances.
To set the logpath, in the WebServer procedure, in the
NetTalk object before Init Section embed point, add some
code such as the following;
ThisWebServer.LogPath = 'c:\logs'
Web Folder, and Web Uploads folder
Defaults are AppPath\Web and AppPath\web\uploads respectively. However the same Vista problem that affects the Log path applies here as well. If your program accepts uploads, then writing them into the Program Files folder can be a problem.
You have 2 choices when moving the Uploads folder. Either move the Web folder completely (by adjusting the WebFolderPath AND UploadsPath properties) or just move the Uploads folder.
Remember that static files can only be served if they are under the web folder, so the real question is whether you want your uploaded files to be available for download. If yes, then you need to move the whole web folder, if no, then you can afford to just move the Uploads folder.
Because both the WebFolder, and Uploads folder are site specific, you need to alter their properties in the _SitesQueue property of the WebServer. For example;
Get(ThisWebServer._SitesQueue,1)
ThisWebServer._SitesQueue.Defaults.WebFolderPath = 'c:\web'
ThisWebServer._SitesQueue.Defaults.UploadsPath = 'c:\web\uploads'
Put(ThisWebServer._SitesQueue)
The best place to do this is in the Init method of the web server procedure.
Not surprisingly there are many different ways to accomplish any given task. The NetWebServer examples are designed to cover as many of these possibilities as we can. This section describes each example in a bullet form, covering the features you can see in operation.
![]()
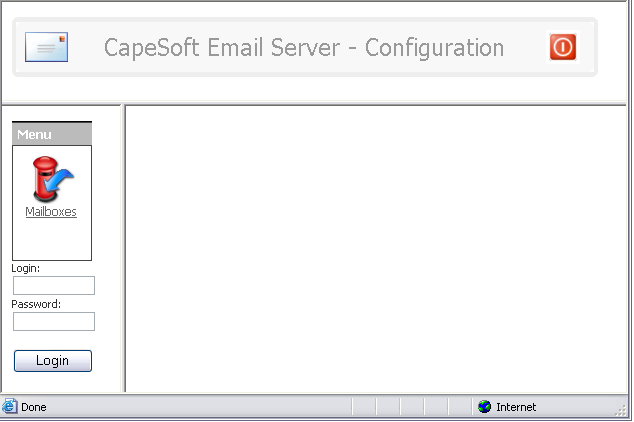
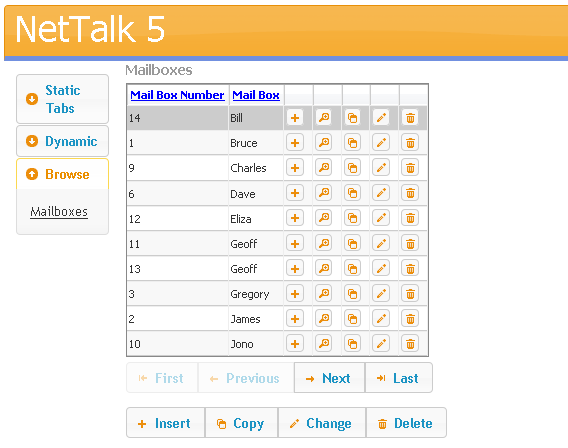
This is the simplest example. It provides a server that displays the contents of a single table, and allows you to Add, Change and Delete entries.
Table is File Loaded.
Table has a fixed sort order.
Table uses “Radio” style row selection.
Form has a forced-lookup date-entry field.
Form has “plain” style interface.
![]()
Adds a Windows style menu to the top of the page, to navigate through the site. The example consists of 2 related files.
Tables are File Loaded.
Tables demonstrate client-side sorting. (click on headers).
Tables have “Highlight” style row selection.
Form allows date lookup or date entering.
Alias Browse has a relational lookup on the Mailbox file.
Forms have ‘rounded’ style interface.
Basic form validation added.
Alias Form has example of a “drop down” entry field.
![]()
Shows the addition of Login and Password information, which the user must use to access parts of the site. (Use login of Demo, password Demo when running the application).
Tables are Page-Loaded with Server side Sorting.
Forms have ‘tab’ style interface.
Greenbar effect on browse.
Locator above browse.
Shows browse set to “include blank rows”.
Alias Form has example of a “lookup”.
![]()
Adds a simple Frame to the index page. Includes an Outlook style menu in the left frame.
Forms have ‘Outlook’ style interface.
Browse is page loaded.
Greenbar effect on browse.
Locator below browse.
Shows hand-coded procedure which displays login message. Linked into LoginForm procedure as “layout tab / Source Before”. The message is set, in LoginForm, if a login fails.
![]()
Shows a single page that has both a browse, and a Form on the same page.
If you click on an item in the browse, then that record is loaded in the form.
Clicking on Save in the Form refreshes the Browse.
[ this example is not working perfectly yet ]
![]()
Demonstrates a server running exclusively on a secure SSL port.
![]()
Similar to Example 4, but shows the login screen appearing before the frame appears.
Useful for programs where absolutely the first thing the user must do is log in.
Frame borders are suppressed.
Range Locator. (try pressing ‘j’ in locator field.)
Includes a picture in the browse and on the form.
Example of using a cookie to preserve the login & password information in the browser so it is remembered for the next time the user logs in.
![]()
Demonstrates a server running on 2 ports, one serving normal pages, and another serving SSL pages.
![]()
Demonstrates a server running on 2 ports, a secure port and a non-secure port. All incoming requests on the non-secure port are redirected to requests on the secure port.
![]()
Requires Insight Graphing
Shows putting a graph on a window.
Shows the use of a Memory form, linked to a SendEmail function.
The user can fill in the details for an email, but the Server program sends the email (rather than relying on the client's email setup.)
![]()
Requires Secwin
Integrates Secwin functionality into a NetTalk WebServer application, including the ability to limit users from certain controls, depending on the individual, at runtime.
![]()
Requires Clarion 6.x Enterprise Edition
Demonstrates the use of the template that takes an existing Report procedure and makes it available as a PDF file to the browser
![]()
Requires PDF-Tools SDK
Demonstrates the use of the template that takes an existing Report procedure and makes it available as a PDF file to the browser
![]()
Select a Mailbox on one browse, then the Alias browse is always
filtered based on that selection.
This example also shows setting a dynamic header on the Alias Browse.
![]()
Shows using the web server in a multi-DLL example. Normal Multi-DLL rules apply, but NetTalk specific settings are listed below.
1. AllFiles.App. This is the Data DLL. (Generate all
file declarations is on.)
a) This app has the Activate NetTalk global extension added.
2. Customers.App. This app contains one or more NetWeb
procedures.
a) Global NetTalk Extension, and Global NetTalk Web Server
extension are added as normal.
b) ALL NetWeb procedures MUST be marked as EXPORT.
3. WebServer.App. This app contains the WebServer and
WebHandler procedure, as well as one or more other NetWeb procedures.
a) Global NetTalk Extension, and Global NetTalk Web Server
extension are added as normal.
b) On Activate NetTalk Web Server, Global Extension,
Multi-DLL tab, all apps (excluding this one) with netweb procedures are
listed.
c) ALL NetWeb procedures in ALL other DLL's must be added
here as EXTERNAL procedures.
Make sure to get the prototypes
right;
Browse, Page, Source :
(NetWebServerWorker p_web)
Form: (NetWebServerWorker
p_web,long p_action=0),long,proc
d) All files used by NetWeb procedures must be generated in
this app. (Typically just turn on Generate All File Declarations).
4. MainExe.App. This is the Exe program
a) Activate NetTalk Global Extension is added.
b) WebServer procedure is called as desired.
![]()
This example demonstrates the use of a Browse as a form entry field. It's the classic Invoice-LineItems relationship, where LineItems can be added, or edited when the Invoice Form is open.
![]()
Similar to Example 21, this example uses a Invoice / LineItem dictionary. In this case however there is a new field, InvoiceNumber added to the Invoice table, and the LineItems are related to the Invoice Number and not the Invoice ID.
Because the Inv:Id field is used in the unique key it cannot be changed on the UpdateInvoice web form. However this allows the Inv:Number to be changed on the form. As the LineItems are related to the Invoice number (and not the ID) they need to change whenever the invoice number changes.
Outwardly this example is no different to example 21 - there's nothing the programmer needs to do to make the relational updating work. The relational stuff is done for you by the template, and classes.
![]()
In this example the Browse is on one table (Customers) but the Form is on a different table (MoreCustomers). [ note - as at build 4.21 this example is not working yet ]
![]()
This example shows how to override the destination of the "Save" button to chain to a second form. Notice the URL on Save setting for the FirstForm procedure.
![]()
An often requested ability is to have 2 browses, on the same page, where the "child" browse updates as a row in the "parent" browse is selected. This example demonstrates this behavior.
Notice the Children tab on the Browse Invoices procedure. This is where you set the set the BrowseLineItems procedure to be a child of the BrowseInvoices procedure. Children can be to the right, or below, the parent. Children Browses can have children of their own (demonstrated in example 31).
Notice also the ability to have conditional filters on the LineItems browse. In this case the filter is set to a specific range if the parent is the BrowseInvoices procedure. This feature allows browses to be re-used in different places, with different filters.
This example also shows the ability to override the browse colors on the extension to the Web Server procedure.
![]()
This example shows how the user can upload a file to the server. In this case the expected file is a picture which will be associated with the mailbox.
The first thing to note here is on the form. The current picture name is displayed as a Display field. The "Upload" field is NOT pre-primed with the existing name. (If it was the file would be re-uploaded on every Change.) If the upload-file field is blank when the form is Saved then the existing value is NOT overwritten.
In addition, this example, shows how the graphic can be displayed both in the browse, and as a "Hot Field" to the right of the browse. This is done by using the NetWebSource procedure "HotImage". Notice the way HotImage is set as a Child procedure of the MailBoxes browse.
Lastly this example has Logging enabled. Activate the logging by clicking on the "Screen & Disk" option on the main Web Server window when the program is running. Right-click on the Screen-&-Disk radio option in the Window formatter to see the various logging options that need to be set.
![]()
Similar to example 7, this one uses the XP Task Panel style menu on the left hand side instead of the Outlook style menu. The menu in question is in the MenuOnLeft procedure. Note that toggling between the menu styles here is as simple as changing the option on the drop-down.
![]()
This example shows the ability to place buttons on Forms, and Browses. Currently Buttons to send Emails, and link to other screens are included. Special notice should be taken of the "Link with ID" button on the browse.
![]()
An example to show serving an XML page rather than a HTML page. Notice the MailBoxesXML procedure, where the page type is set to XML. This would be used primarily in cases where other programs (not browsers) need to access your data (and XML is the preferred markup).
![]()
Shows the ability to add hyperlinks to browses and forms.
![]()
A largish demo (currently running at http://oak.capesoft.com) this example incorporates many features into a single app. Notable highlights include the use of the XP Task-Panel menu, Child browses, Dynamic Forms and so on.
![]()
Shows how a custom error page can be embedded into the Web Server procedure.
Tip: Resist the urge to place the name of the missing file in the error message. This can lead to a security problem known as cross-site-scripting.
![]()
This example shows the use of a Drop box (on a form) to dynamically filter a browse (also on the form). See the FilterAlias NetWebForm procedure.
![]()
This example shows dynamic fields being captured on the form, which then change the values in other fields on the form.
The Calculator tab includes a "Calculate" button, although this doesn't actually do anything. It does give the user something to "press" though.
The Area tab shows fields being hidden, and unhidden in real-time as the "shape" of the area is chosen.
The Button tab shows the use of individual buttons to build up the equation. The result is calculated on the fly. The embed code here shows calling a generic routine to do the work. Notice that the Equation and Result fields are set as "Dynamic" because they are not set as Reset Fields for any of the buttons. An alternative to the last 2 lines of the hand-coded routine would be to set the Equation and Result to be Reset Fields of each button. While there's nothing exciting about a server-side calculator, this technique can be used to prevent key-logging when entering passwords etc.
Notice the use of the Layout tab (on the template settings) to prevent the form from "dancing" as fields are hidden and unhidden.
![]()
An example of capturing time as a form field. The field is set as a String with a time picture (typically @T1 or @T4). However the code interpreting the field is very forgiving. The user can enter almost any number into a time field and it will be intelligently captured. All the following are legal:
1 ( resolves to 1:00)
200 (resolves to 2:00)
3am (resolves to 3:00)
4pm (resolves to 16:00)
5:16pm (resolves to 17:16)
and so on.
![]()
Demonstrates the HTML editing control.
![]()
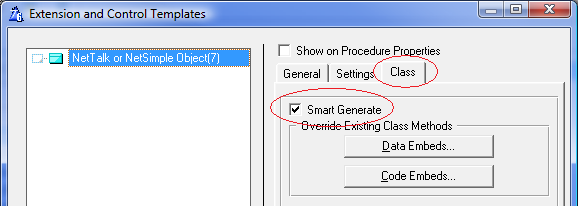
A basic web server built using Legacy templates, not ABC templates.
In order for all the Web Server features to work correctly using the Legacy templates., you need to make sure that the Smart Generate feature in the Web Handler procedure is turned on.
Web Hander procedure, Extensions, NetTalk or NetSimple Object Extension, Class Tab, Smart Generate option.
![]()
Similar to example 37, but with the addition of a report procedure.
![]()
Similar to example 37, but with the addition of a report procedure.
![]()
This example is designed to demonstrate 2 different alternate techniques for serving "static" content from the web server.
Serving static files from blobs
Firstly it contains the ability to serve files from a BLOB inside a TPS file. In this example the files in web\images, web\scripts, and web\styles have been added to a simple TPS file (called BlobFile). Each record in the table contains the name of the file, and the contents of the file (in the Blob.)
In the WebHandler procedure, _Sendfile method, some embed code has been added that checks the Blob file before checking the disk. If the file is found in Blobfile then it is sent from there, rather than from the disk.
This approach allows you to dispense with shipping the web folder, and sub-folders. The server will still create these folders, but they will be empty.
Serving static files from outside the "web" directory
By design, static files can only be served if they are below the web folder on the disk. This is a security mechanism, and should not lightly be over-ridden. However if you need to serve files from elsewhere on the disk you can. In this example 3 static PDF files can be served from the application folder, above the web folder.
To do this a generic procedure ServeDocument has been
added to the App. This procedure checks for the parameter called Name, and
uses this parameter to find the file to serve. From the browse this
procedure is called with an URL similar to this;
ServeDocument?name=file1.pdf
If you choose to override the built-in security and offer this approach to accessing static files, then you will need to add your own handcode to suitable limit what files will be served by this procedure. Failure to add code will result in any file on the server being servable.
AddBlob utility app
In order to make maintenance of the TPS file easier a small, windows, utility called AddBlob is also in this example folder. You will need WinEvent in order to compile it. If you don't have WinEvent then you can just run the EXE in the folder.
This example can be called from the command line, using a parameter -r. If you do this then the files inside the blob will automatically be refreshed with the current version of the original file.
In other words, let's say you added
c:\temp\whatever.txt to your blob
file. And you've set the FileName (the "ServeAs" name) to be whatever.txt.
If you call AddBlob -r then the
c:\temp\whatever.txt file, inside your blobfile, will be refreshed.
![]()
A simple example, which uses
Insight Graphing with the Clarion ("Legacy") templates. Similar to
Example 10, but for Legacy not ABC.
![]()
A very simple example of a SOAP server. An example SOAP client (as a Windows program), called client.app, is also here.
Scenario
In this example the client app (a windows program) passes a request-for-information to the server as an XML packet. The request asks for either Teacher or Student information. If asking for the teacher information then a password is also supplied.
On the client side the server receives the request, and creates one of three results. Either the Teacher, or Student information which was requested, or an Error.
SOAP Server
The app has, apart from the Web Server procedures, only one function. This function is called GetInfo. GetInfo is based on the NetWebPage procedure template, and the Page Type is set as XML. the handling of the incoming XML packet, and the formation of the outgoing XML packet are done in embed code, using xFiles.
The possible incoming, and outgoing structures are defined as groups. Using an xFiles object the incoming request is placed into the Request group. Then depending on the request one of the response groups is populated. the xFiles object turns the group into an XML string (Xml.XmlData), and this string is the "Page" sent to the client by the NetTalk web server.
SOAP Client
In this example the client uses xFiles to construct the XML packet with the SOAP wrapping, and then does a simple POST to the server. Note the URL of the post contains the name of the function (getInfo) - this is how the server knows which function to run.
Data
In the example data files you'll find teacher with an ID of 1 (password jake) and another with an ID of 2 (password brian). Threre are also 3 students, with numbers 1,2 and 3 respectivly.
Tip: For more SOAP Client examples, see the examples that
ship with xFiles.
![]()
An example of Access Levels.
In this example log in as
Login: Super / Password: Super
to have full access to the browses and forms, login as
Login: Operator / Password: Operator
to have limited access to some of the forms, and login as
Login: Guest / Password: Guest
to have read-only access to the system
![]()
This example will only work in IE, and only if the IE security levels are set to allow ActiveX scripts for the "zone" that the server is in.
It demonstrates using an ActiveX control, specifically the built-in WScript.NetWork control.
In the login form, a call to the JavaScript function SendUser() is made. This function is in a file called wscript.js, which is in the scripts folder. This function uses the WScript.Network control to get the UserName and ComputerName of the client computer, and send it to the server as a session value. If you examine the log after requesting the login page in your browser, you should see the additional calls to set the Session values.
Note: The use of ActiveX controls is clearly limited to very specific situations. Typically this approach is only useful in an environment where the browser itself is specified (IE) and the security settings on the browser can be set for your site.
Zones: If you want this control to work, the user must place your site into a "Zone" in their browser that has a Low priority set. the attached picture for IE 7 may help;
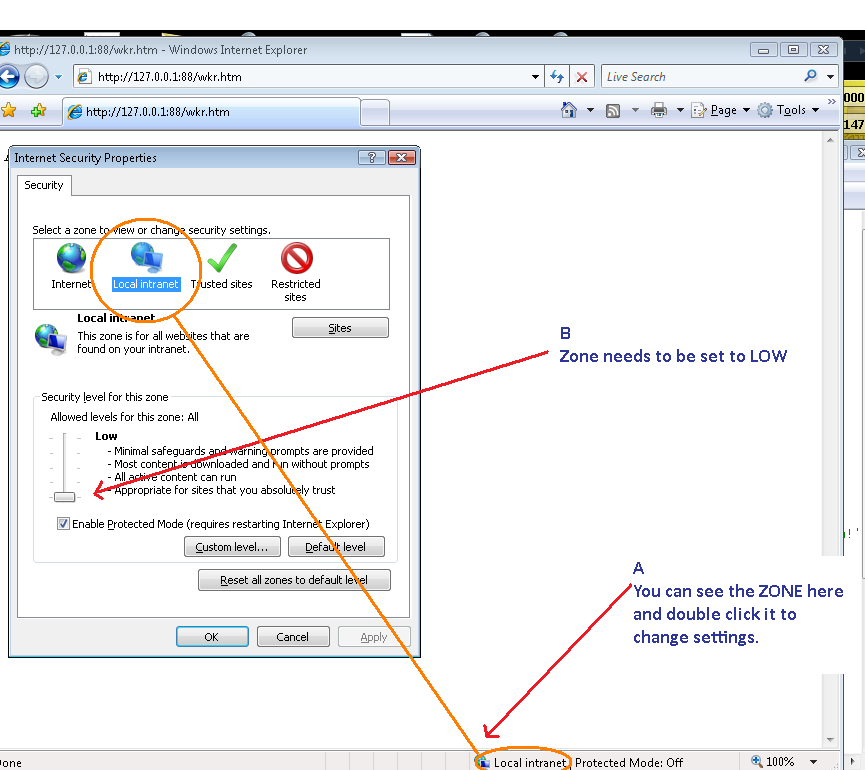
At this point the user will probably get a popup warning whenever the script is invoked. To turn off this warning, click on the Custom Level button (as seen in the picture above), and set the ActiveX settings from "prompt" to "enable".
My thanks to Bram Klootwijk who assisted with the creation
of this example and did the research to make it work.
![]()
This example shows the use of Timers as they are applied to web pages.
From the index page, click on the link "Page with Progress". This will show a very simple text progress percentage. This case uses a NetWebSource with a timer in the ProgressSoFar procedure.
The MailBoxForControl procedure includes a Display Form
Field that is updated on a timer. This uses the TimeClock NetWebSource
procedure.
![]()
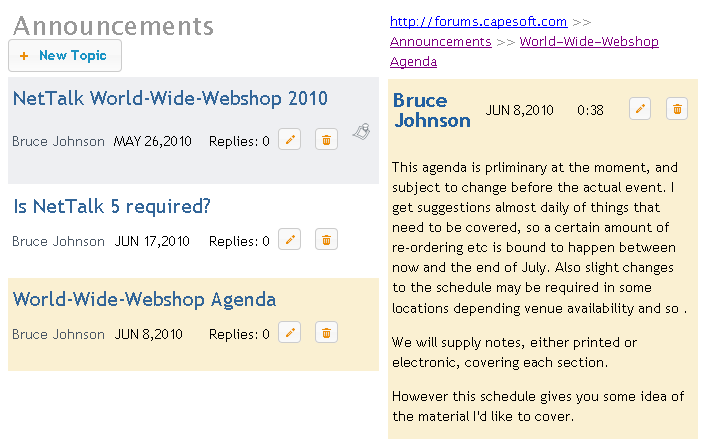
This example shows how to embed a browse in a static htm page, and also how to embed a form in a static htm page.
The default page for the site is set as 'index.htm' which is a static htm page in the web folder, rather than the normal case where the page is a procedure in the application. This index.htm page contains an embedded session variable, as well as an embedded browse procedure. It also has an embedded NetWebSource procedure, the footer.
The browse calls a static page, form.htm, instead of the form procedure. Form.htm is also in the web folder. This page has both the form, and the header embedded on it.
![]()
This example shows the EIP on a browse, where the EIP is working on a secondary table. As the user tags the records in the browse, the state of the tags is saved into a table. (In the example a TPS table has been used, but if you have the In-Memory driver, then this would make a very good driver for this table.) While nothing is actually done with the tagged records, obviously you can use the Tagged table later on in your code to "do something" with the tagged records.
In normal (primary file) EIP the changes are saved automatically as they are made. When the changes are made on a secondary table (in this case a table containing the tags themselves) hand-code must be added to fetch, modify and save the appropriate secondary record.
In addition this example contains some embed code in the WebServer procedure that shows custom behavior when a session is automatically deleted.
![]()
The goal of this example is show the variety of ways that locators can be configured for a browse.
Typically these settings are set at design time, but the programmer, however as this example demonstrates it's also possible to set the settings at runtime - thus allowing the user to select the locator they prefer.
![]()
Most browses are single line affairs. However this example uses multi-line techniques, and challenges the very essence of what we consider a browse to be.
![]()
This example demonstrates the use of dictionary Validation, and local Form Field validation.
In this example all the fields on the MailBoxes browse are set to Validate Immediately creating a highly responsive form which insists on the correct data being entered. Visual clues including highlighted entry fields, popup messages, and comments are all included automatically.
The NickName field shows how hand-coded validation can also be applied to the field. In this case the field has Validate Immediately setting on. In addition some source code has been added to the Server Code button on the Client-Side tab. The code contains both some validation (an arbitrary nickname length of 4 characters is enforced) and some "clean up" code which "corrects" the nickname to a suitable case.
Note that in the case where the validation is hand-coded the Loc:Invalid, and Loc:Alert variables are set appropriately.
![]()
This example demonstrates exporting to Excel from inside a web server.
NOTE: This example requires Office Inside in order to compile, as it uses OfficeInside to create the Excel file. Also Excel must be installed on the same machine as the server.
![]()
This example demonstrates adding SelfService to a Web server application.
NOTE: This example requires SelfService in order to compile.
![]()
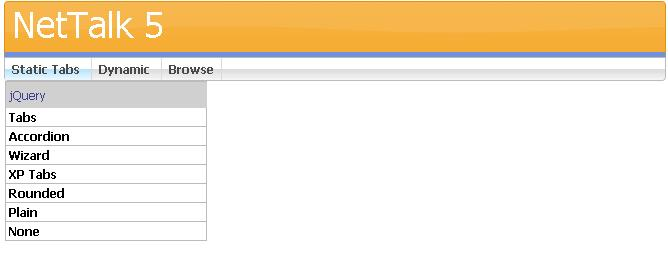
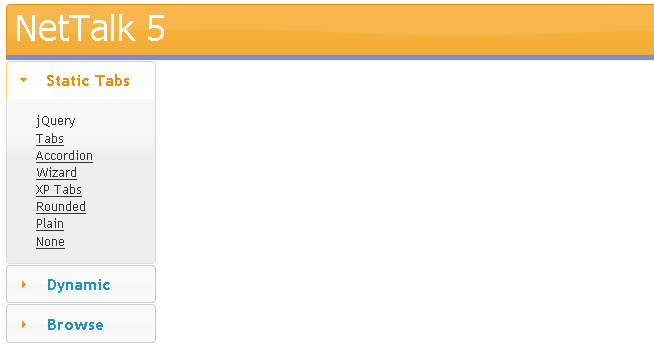
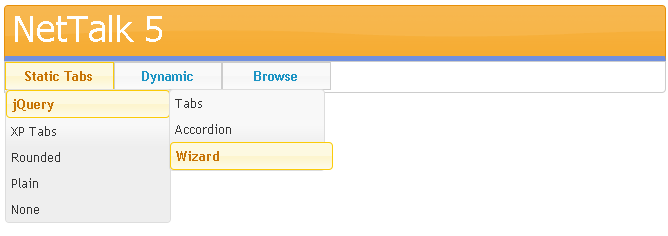
This example demonstrates various menus that are available. Use this app to experiment with different menu options and settings.
![]()
This example demonstrates the various form types (also known as Tab Types) that are available.
![]()
This example demonstrates the use of Php pages combined with NetTalk pages. Not that this example (and PHP support in general requires OddJob). For more about PHP see the notes above.
![]()
This app is more than an example, it is the source for the Host exe, the program that allows multiple web sites to share the same IP address and Port number. Compiling, and using this app is described in a different document here.
![]()
This example demonstrates the use of the web server with
existing (or new) CPCS
Report procedures.
CPCS